RSS
 

Posts Tagged ‘Photos’

Leaked photos of the a9 II and details about Sony’s event a mere block from PhotoPlus

28 Sep

Earlier this month, we caught our first glimpse of what might be Sony’s next flagship full-frame camera, the ‘a9 II.’ Now, a new photo has been leaked showing the mystery camera out in the wild yet again.

The leaked photo, seen below and shared by Sony Alpha Rumors, features what could be an a9 II attached to a taped-up battery grip and a Sony FE 400mm F2.8 GM OSS lens. The button placement and overall look is identical to the header image, which was leaked earlier this month.

As noted when the first image emerged, one noticeable change is the lack of the Focus Mode dial lock release button found on the a9. Aside from that, the externals of the camera appear largely unchanged from its predecessor.

As for internals, we don’t know much. Sony Alpha Rumors is reporting the camera will feature a 36-megapixel sensor, but that rumor has yet to be confirmed.

PhotoPlus 2019 is being held at the Jacob K. Javits Convention Center roughly a block away from the Creative Space NYC location where Sony is hosting its event.

If it’s indeed real, we’ll no doubt find out soon enough. Sony has shared the details for an event at ’Creative Space NYC,’ that will take place just around the corner from the convention center where PhotoPlus 2019 is going on. The ‘Creators’ Playground,’ as Sony is calling it, will be open from October 24 through the 26.

Articles: Digital Photography Review (dpreview.com)

 
Comments Off on Leaked photos of the a9 II and details about Sony’s event a mere block from PhotoPlus

Posted in Uncategorized


How Using Props in Portraits Can Make Your Photos More Interesting

26 Sep

The post How Using Props in Portraits Can Make Your Photos More Interesting appeared first on Digital Photography School. It was authored by Kevin Landwer-Johan.

There are many ways using props can make portraits more interesting. Often photographing a person can be challenging. This can be so for both the photographer and the person being photographed. Using props can not only add interest to the portrait, but it can also help your subject relax more.

What are props and how can you use them effectively?

Image: © Kevin Landwer-Johan

© Kevin Landwer-Johan

A prop is any element you add to a photograph which adds interest or meaning to your subject or the concept you’re creating. What you can use is up to your imagination. They can be anything from an ancient tree stump to a melting ice cream cone.

Image: © Kevin Landwer-Johan

© Kevin Landwer-Johan

Props can add humor to photographs. Using a prop well with a nervous subject can help them relax. You can use props effectively to help contextualize your subject. Without a prop, a portrait may not convey much or any concept. With the addition of a prop, a portrait can take on a whole new meaning.

A prop is often used to add visual information about the person;

  • their occupation
  • hobbies
  • character
  • or location

Using props to help illustrate a story

When you’re illustrating a story using a portrait, adding a prop can add depth and meaning. A prop incorporated into a photo will tell more of a person’s story than a caption, or even a whole paragraph.

Image: © Kevin Landwer-Johan

© Kevin Landwer-Johan

Making a series of travel portraits with a visiting friend I asked her to bring along her backpack. She was going to the station to purchase a ticket for a later date and would not have brought her luggage. Having it with her for the photographs helped to create more of a visual story.

Image: © Kevin Landwer-Johan

© Kevin Landwer-Johan

The location and the train tell part of the story. Having her backpack in the pictures lets you know she was traveling, not just there to meet a friend. The more relevant visual information you can include, the more interesting your portraits become. Well-used props help stimulate the viewer’s imagination.

Image: © Kevin Landwer-Johan

© Kevin Landwer-Johan

Isolated studio portraits using props

Isolating your subject on a plain background is a popular method of taking a portrait. A subject on their own can produce great character portraits. But for many people, it can be somewhat intimidating.

Image: © Kevin Landwer-Johan

© Kevin Landwer-Johan

Using a prop can help them relax and enjoy the experience more. Having something in their hands to concentrate on distracts them from your camera. Feeling less intimidated by it, they are more likely to give you vibrant expressions.

I took a series of photographs for a small drama school. Using props helped the students feel more at ease. They were confident performers, but many of them were not so comfortable in front of the camera. Including props allowed their tutor, who was assisting me, to encourage them into character.

Image: © Kevin Landwer-Johan

© Kevin Landwer-Johan

A single prop keeps a studio portrait simple and adds meaning that would not be evident without it. Creating concepts for stock photography in this manner it’s possible to facilitate a whole series of photos.

Including props will add depth and interest to a series of photos of the same person. It can be challenging to take more than one or two different portraits of a person on an isolated background. Using props will give you more diverse options for what you can achieve.

Image: © Kevin Landwer-Johan

© Kevin Landwer-Johan

Bring your own props or use what’s available

Often asking a person to bring along their own props can help create a meaningful portrait. Using items that they relate to and tell something about themselves will add genuine feeling to the portraits.

I asked this friend if I could photograph her and also what she’d like to use as a prop. Immediately she replied, “ice cream.” She loves ice cream so it was appropriate and meant she’d enjoy the photo session. The weather was so hot that even with the air conditioning blasting the ice cream melted quickly. We went with the flow and used the prop for additional makeup as well. It was a fun session.

Image: © Kevin Landwer-Johan

© Kevin Landwer-Johan

Any well-established portrait studio has a diverse selection of props. Your subject doesn’t have to own a prop. If they can choose from a selection you have, they might find something that lights up their imagination.

Even simple things that are common can work as props. Having someone read a book or make a phone call can help them focus on what they are doing and not on your camera.

Image: © Kevin Landwer-Johan

© Kevin Landwer-Johan

Finding props on location helps to incorporate your subject in the place. Having them pick up some produce at the market, or interact with some part of the environment can make for a more illustrative portrait.

Conclusion

Working with props definitely adds diversity to photographing people. Use the props to support your subject. Having the prop and subject in the same frame is not enough. Encourage them to interact with the props in different ways. The way your subject relates to the prop is important. This will influence the feel of the photo.

Image: © Kevin Landwer-Johan

© Kevin Landwer-Johan

Work to develop a healthy relationship between your subject and their props. This is part of your job as a photographer. Doing this, you’ll create more entertaining portraits.

Have you tried using props for a portrait session? Let me know in the comments below the props you have found helpful during the session. Also, what type of props help make the most interesting portraits?


using-props-in-portraits

The post How Using Props in Portraits Can Make Your Photos More Interesting appeared first on Digital Photography School. It was authored by Kevin Landwer-Johan.


Digital Photography School

 
Comments Off on How Using Props in Portraits Can Make Your Photos More Interesting

Posted in Photography


How to Embrace MINIMALISM for IMPROVED Landscape Photos [video]

21 Sep

The post How to Embrace MINIMALISM for IMPROVED Landscape Photos appeared first on Digital Photography School. It was authored by Caz Nowaczyk.

In this video from Mark Denney, he looks at how embracing Minimalism can improve your Landscape Photography.

?

Mark uses some of his photos to illustrate some of the following points:

5 tips for achieving minimalist landscape photography

1. Include an obvious subject

Use an obvious subject without filling the frame with it. It draws the viewer’s eye in.

2. Expansive Composition

Use a lot of negative space around your subject to make your subject stand out further.

3. Minimizing color

Color can be distracting (if there are many colors) in a minimalist composition. Many minimalist photos are black and white, quite monotone or only make use of a few colors so that the composition is not busy.

4. Use of light and shadows

Consider using dappled light, striped light, or spots of light so that light is the main subject in the scene. This can work well for minimalist photography.

5. Keep it simple

Think differently and outside the box, but keep it simple. Look for a distraction-free palette to work with. Often it is more about what you don’t have in the frame rather than what you do.

So shake up your focus with your landscape photography, and give Minimalism a try. If you are interested in learning more about Landscape Photography, check out our Landscape and Nature Course!


You may also be interested in:

  • Tips for Achieving Minimalism in Photography
  • Minimalism: Using Negative Space In Your Photographs
  • Tips for Using Negative Space in Photography to Create Stunning Images
  • How to Photograph a Minimalist Landscape
  • The Minimalist Landscape Photographer: What do you really need?
  • 5 Guidelines of Minimalist Photography to Help Improve Your Work
  • Tips for Minimalist Photography in an Urban Environment

The post How to Embrace MINIMALISM for IMPROVED Landscape Photos appeared first on Digital Photography School. It was authored by Caz Nowaczyk.


Digital Photography School

 
Comments Off on How to Embrace MINIMALISM for IMPROVED Landscape Photos [video]

Posted in Photography


How to Use Color in Your Photography to Give Your Photos the Wow Factor

17 Sep

The post How to Use Color in Your Photography to Give Your Photos the Wow Factor appeared first on Digital Photography School. It was authored by Jeremy Flint.

Photography is a wonderful art form that is enjoyed by people all around the world. It is a popular medium of expression, a fine art, a way of documenting our journeys and memories, and even a way to change views. Originally, when photography started it was all black and white, and historic photographers learned their craft in this way. Whilst this can be a great way to bring out textures and shapes, the introduction of color is a great way to attract attention and add impact to your images. Here are 5 tips to show you how to use color in your photography to give your photos the wow factor:

1. Find a colorful scene

Colour

St Nectain’s Glen waterfall, Cornwall, England

The first thing to do is to find a colorful scene. The way the countryside unfolds in the summer, for example, can be a wonderful way to show color in a landscape. Purple hues of lavender or golden wheat fields are all examples of where color can be captured to help your images stand out.

You could focus on one dominant color in a scene such as green. Alternatively, seek out a variety of tones like a cool blue sky mixed with a red field which can give your photos some impact and evoke different emotions. Blue can provide feelings of cold, whilst red can give warmth, energy, and excitement.

You can also use complementary colors in captivating ways. They refer to colors on opposite sides of the color wheel. For example, red and green or blue and orange. Other colors that work particularly well together include yellow, red and orange; and pink, purple and blue.

2. Look for details with color

Colour

Poppy field, England

Another way to use color in your photography is to look for details with color. You can photograph individual flowers in bloom such as bluebells or plant crops. As a part of a broader scene, you can photograph flowers like vibrant red poppies swaying in a field.

Think about the different colors and details you could photograph near you and experiment with a variety of color palettes to see what works well. Try and find details to photograph with single colors and combinations of colors to see which you prefer. Red is a strong color that attracts the viewer’s eye whilst yellow and orange can also command attention.

3. Change your white balance setting

how-to-use-color-in-your-photography

Stonehenge, England

One great advantage of the white balance setting is that your camera has the ability to change the color of your images simply by adjusting the white balance.

There are several different types of white balance which can be varied according to different lighting scenarios – auto white balance is the default setting for most cameras. Shade, cloudy and daylight can be selected for warmer and brighter colors, whilst tungsten and auto present cooler colors.

As the name suggests, a ‘shade’ white balance setting can work well in lighting conditions with shade and shadows, whilst ‘cloudy’ is a good choice when it is overcast. There is also an option to manually adjust your white balance to alter the color temperature to your taste.

4. Use a polariser to boost color and contrast

how-to-use-color-in-your-photography

Oxford, England

One of the greatest accessories you can have in your photography kit is a polarizing filter. A polarizer is usually placed at the front of your camera lens and is a versatile piece of equipment that can be brilliant to help darken skies, minimize reflections and manage glare from water sources such as lakes or the sea.

Polarizing filters are also a fantastic way to improve your images by instantly enhancing the color and contrast in your images. They don’t take up much space in your kit bag and are useful for making your images more distinct. Polarizing filters particularly work well in landscape photography by bringing out colors and reducing haze.

5. Boost colors in post-production

how-to-use-color-in-your-photography

Oxford, England

You can also add color to images in post-production. One way to boost the color of your photographs is to increase the saturation in post-production. You will find a saturation slider in most editing tools. Both photoshop and lightroom offer an adjustment slider where the color can be increased by moving it to the right. There is also the option to increase the saturation of individual colors to make certain parts of your images more vibrant.

Conclusion

Using color can be a great way to enhance your images. You can find colorful scenes, vibrant details, adjust your white balance, add a polariser or adjust the saturation in post-processing to give your photos more impact.

Try these techniques and share your images with us below. Also, if you have any other tips, feel free to share those too!


how-to-use-color-in-your-photography

The post How to Use Color in Your Photography to Give Your Photos the Wow Factor appeared first on Digital Photography School. It was authored by Jeremy Flint.


Digital Photography School

 
Comments Off on How to Use Color in Your Photography to Give Your Photos the Wow Factor

Posted in Photography


Video: Taking photos across California to recreate Apple’s macOS wallpapers

17 Sep

YouTuber Andrew Levitt teamed up with friends Jacob Phillips and Taylor Gray to recreate the stock wallpapers Apple includes with its Mac computers by traveling around and snapping them one photo at a time. The project required a trip into the blistering hot Death Valley National Park, as well as Sierra National Forest, Yosemite National Park, Mavericks and more.

The group of guys showed their endeavors in a newly published video detailing the project. Levitt notes that their final images aren’t quite the same as Apple’s due to different seasons, among other things, but that they’re representative of the experience and getting to see each destination in person. The five resulting images have been made available to download as wallpapers here.

Articles: Digital Photography Review (dpreview.com)

 
Comments Off on Video: Taking photos across California to recreate Apple’s macOS wallpapers

Posted in Uncategorized


Google Photos adds Instagram Stories-style Memories feature, now offers canvas prints

13 Sep

Google Photos is expanding its feature set and has launched Memories, a slideshow feature that works in a similar way as Instagram stories. Memories is designed to highlight special events, such as birthdays, trips and holidays, and let you remember those special moments without having to sift through stacks of duplicate images.

Photos and videos from previous years will be pinned to the top of your gallery for you to browse. Google uses machine learning to curate your Memories and pick the best shots out of many similar ones. Certain people or time periods can be blocked in case you´d rather not be reminded of them, and you can also deactivate the feature completely.

Memories can also be shared with people who appear in them and others. Google says that in the coming months it will make this process even easier. Shared photos will be added to an ongoing, private conversation which should make it easier to keep count of the images you have shared with each other.

In addition, you can now search for text that appears in photographs or screenshots via the standard search function. This could be useful for those who store recipes or other text documents in image format in Google Photos.

U.S. users can now also order both standard photo prints and canvas prints directly from the app. Individual photo prints can be ordered directly through Google Photos and are available to pick up from your local CVS Pharmacy or Walmart that same day at over 11,000 locations. Canvas prints are available in 8x8in, 12x14in, and 16x20in formats and prices start at $ 19.99. The app suggests the best photos to print and the canvas prints will be delivered straight to your home.

Articles: Digital Photography Review (dpreview.com)

 
Comments Off on Google Photos adds Instagram Stories-style Memories feature, now offers canvas prints

Posted in Uncategorized


The Polaroid Lab turns your digital smartphone photos into analog instant prints

10 Sep

Polaroid Originals has introduced the Polaroid Lab, a new instant printer that will turn your digital smartphone photos into instant prints.

The Polaroid Lab appears to be a rebranded version of Impossible Project’s Instant Lab released back in 2013, but offers a few new features and brings a retro-inspired design.

Like the Instant Lab, the Polaroid Lab uses your smartphone’s screen as a projector of sorts to capture the image on an instant photo. The process requires you to download the Polaroid Originals app on your Android or iOS smartphone. Once downloaded, images can be selected and edited before prepping them for their analog conversion.

Three lenses and multiple mirrors inside the Polaroid Lab take the image on the screen and focus them on any Polaroid i-Type film. When the red button on the base of the Polaroid Lab is pressed, the image is transferred to the instant film and ejected from the device.

The Polaroid Lab features an internal battery that’s rechargeable via Micro USB. Polaroid Originals says it supports iOS devices running iOS 11 or newer going back to the iPhone 6S and Android devices running Android 7 or newer for the current devices from major manufacturers.

The Polaroid Lab will retail for $ 129.99 / EUR €129,99 / GBP £119 when it ships. Polaroid Originals says the Polaroid Lab is ‘coming soon’ but fails to provide specifics beyond that. For more information, visit the Polaroid Originals’ website and sign up to receive more information on the Polaroid Lab as it’s released.

Articles: Digital Photography Review (dpreview.com)

 
Comments Off on The Polaroid Lab turns your digital smartphone photos into analog instant prints

Posted in Uncategorized


Leaked photos, specs allegedly reveal Leica’s upcoming SL2 mirrorless camera

09 Sep

Nokishita has shared images and specifications for a new Leica camera it claims is the SL2.

According to the report, the new camera (codenamed Vader) will feature a 47-megapixel CMOS sensor and feature 4K video recording with a new ‘Cine Mode.’ The report also notes the camera will have both Wi-Fi and Bluetooth connectivity and be compatible with Leica’s mobile app, FOTOS.

Based on the images, the front of the camera remains largely unchanged from the original Leica SL (Typ 601) with the exception of the viewfinder bump and edges around the grip, both of which have been rounded off compared to the sharper design of the original SL. The rear of the camera stays the same up top, but swaps the unlabeled buttons on both sides of the camera for a row of three buttons on the left-hand side of the rear display: a play, function and menu button.

There’s no additional information on pricing, but Nokishita points at a September release with a note that the camera could be pushed back to later in the year pending other factors.

Articles: Digital Photography Review (dpreview.com)

 
Comments Off on Leaked photos, specs allegedly reveal Leica’s upcoming SL2 mirrorless camera

Posted in Uncategorized


Emojivision uses computational photography to turn your photos into emojis

04 Sep

A free new camera app for iOS called Emojivision allows you to capture images composed entirely of emoji. The app was created by Gabriel O’Flaherty-Chan, according to TechCrunch, which reports that Emojivision uses computational photography to break an image down into its core color palette, then rebuilds it using similarly colored emoji in near-real-time.

The app can be used to take any image, as with the native camera app, and also to apply the emoji filters to existing images located in the phone’s camera roll. The app is free, but enthusiastic users can pay $ 2.79 USD to get additional emoji packs. For developers, the Emojivision project is located with technical details on GitHub.

Articles: Digital Photography Review (dpreview.com)

 
Comments Off on Emojivision uses computational photography to turn your photos into emojis

Posted in Uncategorized


5 Basic Post-Processing Tips to Instantly Improve Your Photos

02 Sep

The post 5 Basic Post-Processing Tips to Instantly Improve Your Photos appeared first on Digital Photography School. It was authored by Nisha Ramroop.

Are you a beginner looking to improve your post-processing skills?

That’s what this article is all about. In it, you’ll discover five post-processing tips that will immediately take your photos to the next level. Best of all, these tips aren’t even difficult to follow, and they require nothing more than the most basic image-editing program.

Let’s dive right in.

post-processing tips boats on water edited

1. Straighten your horizon for professional-looking photos

When the horizon isn’t straight, even the untrained eye picks up that something is off. They might not know exactly what’s wrong, but they’ll be aware that the scene seems out of order.

Which is why you absolutely must make sure your horizon is straight.

Fortunately, it’s very easy to correct the horizon; you can do it in any post-processing program.

Here are the instructions for straightening the horizon in Photoshop:

Step 1: Select the Crop tool

Step 2: Click the Straighten option at the top

Step 3: Click one side of your horizon and drag across the horizon line before you release

Your horizon will instantly straighten!

straightening boats in photoshop

2. Adjust the white balance for natural-looking images

White balance is a setting used to balance the color of the light you shoot, in order to get it close to a neutral white.

You see, when the color of your subject is distorted by the existing lighting conditions, you need to use the white balance setting to save the day.

Now, one way to set the white balance correctly is to get it right in-camera. However, some photographers prefer to shoot in RAW with an auto white balance setting, and then adjust the white balance afterward.

If that’s your preference, then you’ll need to choose your white balance in a post-processing program. It’s generally easy to select a white balance option that adjusts for the lighting of your shot. You’re also free to experiment with different white balance options so you can choose the one that most reflects your creative vision.

For instance, the scene below has a Fluorescent white balance applied to it using Adobe Camera Raw.

adobe camera raw white balance

And here’s the same scene but with a Shade white balance applied:

white balance adobe camera raw post-processing

3. Boost your contrast to create images that pop

Do your images look a little flat?

One of the simplest ways to make your photos pop is to adjust the contrast. A contrast adjustment further separates the darkest and brightest areas of your image. In other words, it makes the dark tones darker and the light tones lighter.

beach scene

Increased contrast, therefore, makes tones stand out and gives your photos a more three-dimensional feel. Compare the image above to the image below; I added contrast to the second image, which gives it a subtle pop.

beach scene with increased contrast

Pretty much every image editor has a contrast slider. And boosting the contrast is often as simple as pushing the slider to the right.

So just remember:

If you’re struggling to make your photos more lively, try increasing the contrast. It’s a simple post-processing tip, but one that really works!

4. Boost the saturation or vibrance sliders for better colors

The saturation and vibrance adjustment sliders usually sit next to each other and can be confusing. Both of these add an extra color punch to your image, but they do so in different ways.

You see, saturation adjusts the intensity of all the colors in your image at once. If you push the saturation slider, you’re going to see color saturation increase across the board. Therefore, it’s an adjustment you want to use sparingly.

Vibrance, by comparison, is a “smarter” saturation tool, one that adjusts only the duller colors in your image. Increasing the vibrance will boost the less-saturated colors, but won’t affect colors that are already saturated.

Look at these two photos:

lighthouse with increased colors

I boosted the saturation of the photo on the left, and I boosted the vibrance of the photo on the right.

Note that when you lower the saturation of your colors, your image takes on a more muted effect, like this:

reduced saturation lighthouse

In general, boosting the vibrance or the saturation will instantly improve your images.

5. Sharpen your photos for the best display on the web

Your images are most likely going to be displayed on the internet.

However, when you export your photos from most image-editing programs, you’re going to end up with blurry photos. Unless you sharpen for the web, that is.

There are a few ways to sharpen in Photoshop. Here is one you can try:

Step 1: Resize your image to the size you want it displayed. (If you sharpen your high resolution/original image and then resize it, the image will appear to lose its sharpness. Sharpening an image at your display resolution works better.)

resizing images post-processing tips

Step 2: Duplicate your layer.

Step 3: Desaturate your new layer (from Menu, Image > Adjustments > Desaturate).

sharpening your images

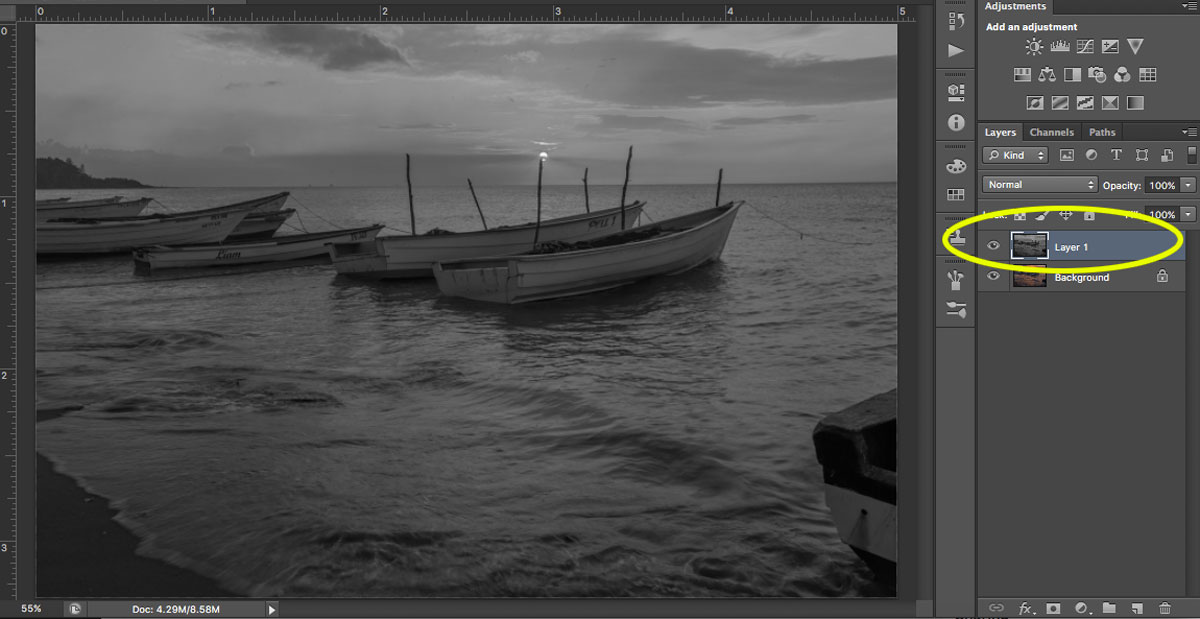
Step 4: Change your blend mode to Overlay. (Alternatively, you can use the Soft Light blend mode for a more subtle effect.)

Step 5: Now apply a High-Pass filter (from Menu, Filter > Other > High Pass) and choose a radius around 2.0 for an image of 730 pixels (on the long side). The Overlay option you chose above allows you to see how the radius affects the image so you can play around with it.

Note: The bigger your image, the larger your radius will be.

If the sharpness doesn’t look good on the entire image, you can use a layer mask and paint black over the areas where you want to hide the effect.

Step 6: Save for the web (from Menu, File > Save for Web). Check the Convert to sRGB box if unchecked.

Conclusion

If you’ve just begun your photography journey or if you’re looking to improve your basic editing skills, then these post-processing tips are a great place to start.

In fact, basic editing is often all you need to dramatically improve your photos.

So follow these tips, and watch as your images improve!

The post 5 Basic Post-Processing Tips to Instantly Improve Your Photos appeared first on Digital Photography School. It was authored by Nisha Ramroop.


Digital Photography School

 
Comments Off on 5 Basic Post-Processing Tips to Instantly Improve Your Photos

Posted in Photography