RSS
 

Posts Tagged ‘Photography’

How to Find Inspiration for Your Photography

08 Jun

Inspiration and influence are important to every creative person. Being motivated to pick up your camera and make fabulous photographs is an essential part of your on-going development. But how to find inspiration for your photography?

It’s easy to get stuck in a rut. Always taking the same subjects, using the same lighting. Sticking with a composition style because you are comfortable with it. This will make you creatively stagnant. But how do you avoid that? Especially if you have enjoyed this method for some time.

wetlands landscape photo - How to Find Inspiration for Your Photography

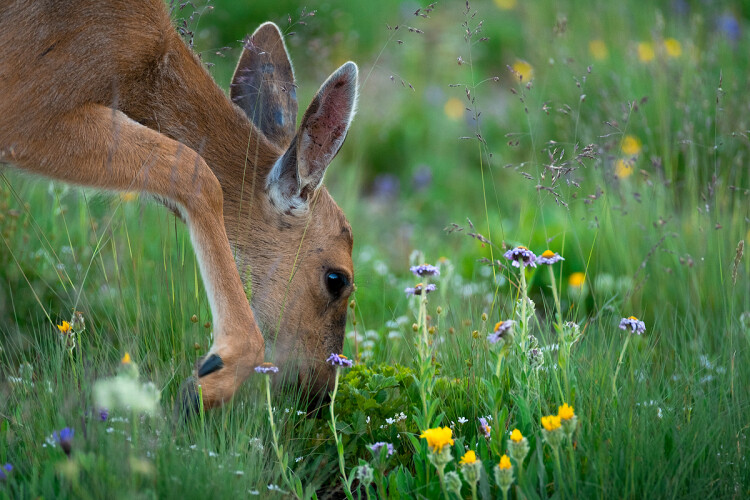
I don’t often take landscape photos. Now that we are living in a rural environment, landscape photography is my new challenge.

Find motivation in other photographers’ work

Stat motivated by looking at the pictures by photographers whose work you admire. I’m not talking about drawing an emotional charge from the photo of your girlfriend’s lunch she’s posted on Instagram. Find some successful photographers who have good collections of images that you love.

food photography - How to Find Inspiration for Your Photography

If you like to photograph your food, push yourself to get more than snapshots.

Bookmark their website. Buy a real physical book of their work. Follow the photographer on Instagram. Research to find documentaries about the way they work and think. Find out what motivates and inspires them.

If you are not sure where to start, look at your own photos, especially ones you want to improve upon. What style are the images? What are your subjects? Are the images predominantly color or black and white? Search for photographers who like what you do and follow them.

How to Find Inspiration for Your Photography - desert image with one tree

I will continue to photograph the landscape around where I live. To find more ideas and inspiration I will be researching accomplished landscape photographers.

Check the source

To find the best, look at where their work is published. Or check out photographer’s collectives, such as Magnum. Or research which photographers have won major photography competitions, like Pulitzer or the Sony Photography Awards.

These days there are few magazines specializing in picture stories. National Geographic is always good for inspiration in general. Look up some of the historic magazines like Life, Picture Post, and Look. These magazines featured top photographers. The best fashion magazines may be a good place to look to trigger your creativity.

water buffalo - How to Find Inspiration for Your Photography

The internet is also a massive source, but be careful. Anyone can publish their photos online (we all do) and call themselves an expert. Sources of photographs which are not self-published generally are more credible. I think you are more likely to find more experienced, successful photographers will have a body of work you can admire. But do look at Instagram and photo sharing sites like 500px. Seek inspiration from the best you can find in the genres you love the most.

Go to photography exhibitions

Exhibitions of photographs can also be immensely inspirational. Seeing actual photographic prints, framed and hung is such a pleasure. If you have galleries close to where you live, watch for dates they will have photography exhibitions.

When you travel, seek out the galleries showing the work of photographers.

Landscape photo of Thai mountains - How to Find Inspiration for Your Photography

Books

I love photography books. I was bought up visiting libraries. Once I became interested in photography I worked my way through all the relevant books in my local libraries. Unfortunately, there were not that many. The ones which interested me most were the ones showcasing the photos of individual photographers. Books showing their photos and giving a little background on them, rather than the how-to books.

Now I have a collection of books on photography. Most of them are on individual photographers or are collections of photographs. Two of them are catalogs of Magnum exhibitions I have seen. I pick one up from time to time and am always uplifted, encouraged, and inspired to do better.

Tricycle taxi rider in a market in Chiang Mai - How to Find Inspiration for Your Photography

I have been more drawn to street lifestyle photography and influenced by many magazine photo essays.

Pick your faves

Find yourself a selection of photographers whose work you admire and look at them often. Maybe they are more historic and no longer producing pictures. Keep looking back at your favorites and study why you like them so much.

More contemporary photographers will be updating pictures on their websites and Instagram feeds. My Instagram feed photos are from people who have taken a workshop with us and photographers who inspire me.

Natural light outdoor studio portrait of a Karen man - How to Find Inspiration for Your Photography

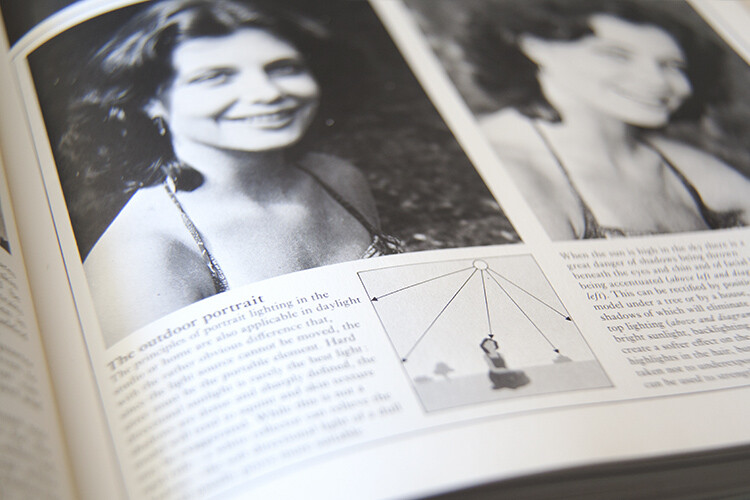
I have been greatly inspired by the work of Irving Penn. Especially his use of a natural light outdoor studio.

I love the work of Irving Penn and have some of his books. You can find his images on Instagram, even though he passed away in 2009. I never get tired of looking at the way he exposed and composed his images. I’ve never been into fashion photography, but Penn did so much more than what he is most known for and it is the style of his work that has inspired me.

Documentaries on photographers can also provide insight. Seeing how they work and hearing them speak about it can be very motivational.

Photo montage of the Iron Bridge in Chiang Mai at night made in a similar style to Daivd Hocknet joiner photos.

The historic Iron Bridge in Chiang Mai. Photographed from three different positions and compiled into a photo montage.

Shortly after buying my first camera I watched a documentary about David Hockney. He was making one of his photo-montages he called “joiners”. I loved the process and results. Because of this one short video I was inspired and have been creating my own photo collages for over 30 years.

Many photographers are also teaching online. Find one who’s photography and teaching style you like. They will help keep you inspired and educate you at the same time.

Young Thai couple pose for a photo montage in Chiang Mai, Thailand. - How to Find Inspiration for Your Photography

This photo montage was made for an exhibition I had at the Le Meridien Hotel in Chiang Mai, Thailand.

Look at the work of other photographers who inspire you. Your style and your passion will be positively affected.

Remember, Picasso suggested, “Good artists copy. Great artists steal.” Copy what you like. Steal their ideas, and make them your own.

?

The post How to Find Inspiration for Your Photography appeared first on Digital Photography School.


Digital Photography School

 
Comments Off on How to Find Inspiration for Your Photography

Posted in Photography


Why Old Photography Books and Magazines are Still Valuable

07 Jun

Cleaning out my bookshelf the other day, I rediscovered a bunch of old photography books I bought from a second-hand store some time ago. Leafing through the pages and taking in that unmistakable “old book smell”, it got me thinking about the value of reading older books as opposed to shiny new publications and PDFs on a laptop.

Aged coffee table books, magazines, essays, how-to encyclopedias, and guides – there is just something about old books that capture the heart. And they continue to be relevant today, sometimes in new and surprising ways. Here are some ways old photography books and magazines are still valuable.

folded book pages - Why Old Photography Books and Magazines are Still Valuable

Why read photography books?

With the abundance of on-screen resources available nowadays, it’s easy to dismiss hard copies of books and magazines, even brand-new publications, as a step behind the cutting edge. But books, especially older ones, offer something that the modern iPad screen lacks. They offer an experience.

The physicality of the printed text lends the feeling of a place. And the presence of a physical book discourages multitasking, focusing the mind solely on reading and absorbing information. The smell and texture of old paper, tinted with age. The turning of the page – it all contributes to a sense of knowledge, history, and sometimes nostalgia too.

It’s the same for old magazines, with each glossy print serving as a time-capsule for photographic history.

pile of photography books - Why Old Photography Books and Magazines are Still Valuable

Trends and culture

Studies have shown that reading physical books has a positive effect on the brain. It expands memory and imagination and inspires you, the reader, to develop new concepts and ideas. But older books have the additional charm of age, they are a photograph of their time.

But it’s amazing how little the groundwork of photography has changed. Although trends come and go, the foundations of photography have remained the same. Open up an old photography guide and you’ll see practical information that looks remarkably similar to many present-day photography guides.

Everything old is new again

Just like in fashion, trends in art are often recycled and re-invented. Recently, the “soft focus look” came back into vogue, gracing the covers of magazines and fashion shoots. Street photography has had a major resurgence on Instagram and the use of old film cameras over digital technology has also garnered popularity recently.

Old photography books are full of inspiration for trends like these, with guides on how to put them into practice and an abundance of imagery to study. You may even want to re-spark a trend on your own, plus, you might discover a few out-dated tips and tricks that will put you ahead of the trend.

close up of words on a page - Why Old Photography Books and Magazines are Still Valuable

A sweet deal

Unlike hot-off-the-press publications that haven’t filtered through to the second-hand market, old photography books are often incredibly economical. You could purchase three older books for the price of one new one. Maybe even more! Recently I bought a whole stack of beautiful, full-color photography magazines for 10 cents a pop. I couldn’t believe my luck.

Try looking for old books and magazines at book fairs, online, used bookstores, charity stores, and garage sales. You never know what you might find, a special kind of excitement reserved for photographers and book lovers alike!

an open book with photos inside - Why Old Photography Books and Magazines are Still Valuable

Back to basics

While we all know that editing and photography often go hand-in-hand, books that predate Photoshop and digital technology can introduce you to a world of photography with an often overlooked method of execution – getting it right in-camera.

With the ability to take thousands of photos in a single day, modern photographers can get in the habit of taking numerous photographs and hoping for the best. Older photography books and magazines that rely on film or limited memory space depict a slower, more deliberate methodology which can be a refreshing way of shooting.

inside a photo book - Why Old Photography Books and Magazines are Still Valuable

Conclusion

Photography has a long history recorded by countless publications. While brand new books and magazines may have the advantage of cutting-edge photography, older generations of print material hold a nostalgic charm and an alternative perspective to current photographic trends.

And they are cheaper too! So next time you visit a charity store or a book fair, why not pick up a few older photographic book or magazines? You’ll be surprised how useful and inspiring they really are! Share some of your book finds in the comments below.

Why Old Photography Books and Magazines are Still Valuable

The post Why Old Photography Books and Magazines are Still Valuable appeared first on Digital Photography School.


Digital Photography School

 
Comments Off on Why Old Photography Books and Magazines are Still Valuable

Posted in Photography


Underwater macro photography in Anilao, the Philippines

02 Jun
1/160, F20, ISO100, diopter 12.5 This Emperor shrimp is about 1.5 cm long, shut using a 12.5 diopter.

A few months ago, a friend invited me to try underwater photography and join a macrophotography workshop in Anilao, the Philippines. I’ve been shooting above the water for more than five decades but had no experience shooting underwater. I decided to take up the challenge, renewed my diving license, acquired the necessary photography gear and took a few dives with an underwater photography guide in the Red sea, Eilat, preparing myself for the workshop.

The workshop was conducted in Anilao, Batangas province of the Philippines, with full diving service, dive masters, boat riding, etc. provided, as well as an excellent camera room to take care of the photo gear. Anilao is considered an ideal place for macro photography. The diversity is incredible – rich reefs, a wide variety of fish, unexpected critters and nudibranchs are all over. The beachfront resorts are nestled against the jungle and provide exotic scenery while riding to and from dive sites.

1/160, F9, ISO100. Face to face with a yellow Cubicus boxfish.

The workshop schedule is quite intense: Breakfast at 0630, Review of the previous day photos between 0700 and 0830, two morning dives between 0900 to noon. Lunch break at 1200; a theoretical learning session (light, macro photography, use of strobes and more) at 1400 to 1500, two afternoon and evening dives between 1530 and 1900, dinner, photo editing and submitting some images for the next morning review, and falling asleep.

I use all full-frame cameras when shooting above the water: the Nikon D850, D5 and Sony a9 mirrorless. For my underwater excursion, I have decided to use the Sony a9 for two reasons: It is smaller and therefore the housing is smaller, and one can review the photos without removing the eye from the viewfinder. The latter is of paramount importance, especially when shooting miniature critters from a distance of less than five centimeters. If you have to move the camera to review a photo on the back screen, the subject gets out of your sight and finding it and focusing again is time consuming.

I exclusively used the Sony FE 90mm F2.8G macro lens, sometimes with a 12.5 diopter wet lens attached in front of the lens port for shooting critters that are smaller (and some are much smaller!) than a centimeter. Each photo provided here includes the main exposure parameters in the caption, and the use of the diopter is noted as well.

The Nauticam housing I used holds two powerful strobes. Below the surface, most of the sunlight is absorbed by the first few meters of water. At depths of 5 meters and more, all critters look almost colorless and it is the light of the strobes that brings back the colors. Even the light of the most powerful strobe is absorbed by the water and therefore underwater the distance from the camera to the (main) subject is usually less than 1.5 meters. Macro photography distance is less than 50 centimeters and super macro (magnification ratio above 1 – the recorded image size on the sensor is larger than the actual size of the subject) distances can be as close as 2 centimeters.

For our diving sessions we were usually three photographers to a boat, accompanied by a local dive master who knows the waters very well and finds the critters for us. We were also accompanied by two boat drivers to handle the boat and help with the diving and photo gear and getting in and out of the water.

1/160, F14, ISO100, 12.5 diopter. Glossodoris Cincta Nudibranch

The diversity of the creatures in this area is reach and unique. Colorful and beautiful Nudibranches populate the waters, ranging in size from 4mm to 600mm. Most we encountered were between 10 to 60mm in size. They can be identified by the pair of rhinophores, on which it makes sense to focus.

But it’s not all serene beauty underneath the water. Survival is a continuous daily battle, and every critter has developed a unique method of protection against predators. There are many such methods, but below are a few in particular that we saw in use:

  • Using a deadly poison and flashing bright colors warning potential predators
  • Camouflage
  • Hiding in small hard to reach holes
1/200, F13, ISO1000. This wire coral shrimp on top of the coral is about 1.5 cm long uses camouflage to protect itself.
1/160, F14, ISO100. Blue-ringed Octopus, one of the world’s most venomous marine animals. If provoked, it will change color quickly as a warning.
1/200, F14, ISO100. 12.5 Diopter. The Pink Hairy Squat Lobster, about 1.5 cm long, hiding under the projections on the sides of sponges.

The underwater world is rich with life. It is so beautiful and exciting and I am sure going to put more time and effort into exploring this new (at least for me) amazing world.

$ (document).ready(function() { SampleGalleryV2({“containerId”:”embeddedSampleGallery_0608256818″,”galleryId”:”0608256818″,”isEmbeddedWidget”:true,”selectedImageIndex”:0,”isMobile”:false}) });


About the Author: Ze’ev Kirshenboim, an Electronic Engineer by trade, is a seasoned amateur photographer of 52 years and makes his living as the president of ACS Motion Control Ltd which he founded 33 years ago. He likes shooting sport, wildlife and people, and lately has combined his photography hobby with scuba diving, the results of which are depicted in this article.

Articles: Digital Photography Review (dpreview.com)

 
Comments Off on Underwater macro photography in Anilao, the Philippines

Posted in Uncategorized


Weekly Photography Challenge – Open Wide

02 Jun

It’s time to open wide – your aperture that is – for this week’s photography challenge.

It’s that simple. Grab a lens with a big aperture like a 50mm f/1.8 or a zoom that has f/2.8, and choose the widest setting you’ve got available. Choose your subject and focus carefully to put emphasis and attention precisely where you want it.

If you need some tips for composing your narrow depth of field image, here are some ideas:

  • Benefits of Using a Large Aperture and Tips for Shooting Wide Open
  • Fast Glass: Tips for Working With Wide Aperture Lenses
  • How to Make Fake Shallow Depth of Field Using Photoshop
  • How to Use a Neutral Density Filter to Control Depth of Field
  • Seeing in Depth of Field: A Simple Understanding of Aperture
  • Why a 50mm Lens is your new Best Friend
  • 3 Elements of Getting Shallow Depth of Field Images

Bokeh from a 50mm f/1.8 lens.

Shallow depth of field brings focus to the glasses here. Make your subject stand out.

Weekly Photography Challenge – Open Wide

Simply upload your shot into the comment field (look for the little camera icon in the Disqus comments section) and they’ll get embedded for us all to see or if you’d prefer, upload them to your favorite photo-sharing site and leave the link to them. Show me your best images in this week’s challenge. Sometimes it takes a while for an image to appear so be patient and try not to post the same image twice.

Share in the dPS Facebook Group

You can also share your images in the dPS Facebook group as the challenge is posted there each week as well.

The post Weekly Photography Challenge – Open Wide appeared first on Digital Photography School.


Digital Photography School

 
Comments Off on Weekly Photography Challenge – Open Wide

Posted in Photography


Working with Different Shutter Speeds for Landscape Photography

01 Jun

There are three fundamental settings in landscape photography: the ISO, Aperture and Shutter Speed (known as the Exposure Triangle). While all of these are equally important to understand in order to create technically correct images, there’s one that’s extra important when it comes to an image’s visual impact. Adjusting the shutter speed makes a big difference and is often what can make your image stand out from the crowd.

Choosing the ideal shutter speed is not an easy process though. There rarely is a single correct shutter speed but there certainly are scenarios that benefit from a specific one. In this article, we’ll look at a few different scenes and how the shutter speed affects each of them.

Working with Fast Shutter Speeds

The easiest shutter speed to work with is a fast one. Working with fast shutter speeds doesn’t require a tripod and you can easily photograph subjects that quickly pass by. This is also the most common choice for most beginning photographers as it doesn’t require much effort (and most auto functions choose a relatively fast shutter speed).

Below you have a typical example of when you need to use a fast shutter speed. In order to freeze the motion of the deer, I had to increase the shutter speed to 1/320th of a second. Had the deer been moving at a higher tempo I would have to increase the shutter speed even more to avoid any motion blur.

deer in a field - Working with Different Shutter Speeds for Landscape Photography

Photographing animals is not the only time where you should use a fast shutter speed though. In the image below, I used a shutter speed of 1/1600th.

Why did I use such a quick shutter speed for that scene? By the looks of it, the water is quite still, there are no moving subjects and there’s still enough light to use a slightly slower shutter speed, right? Yes, however, this shot was taken from a boat and even though the waters were relatively still, I needed a very quick shutter speed in order to freeze the scene without any blur from camera movement.

iceberg and water - Working with Different Shutter Speeds for Landscape Photography

Use the ideal settings not perfect ones

Had I been standing on land, I could have easily used a slower shutter speed and achieved a similar look. In fact, the overall quality could have been even better as I could have used a lower ISO and an ideal aperture. However, the purpose of photography isn’t to always have the perfect settings; it’s having the ideal settings that allows you to get the shot within the given conditions. The most important is to actually capture the image.

For too long I was too focused on always having the perfect settings. The truth is that this often leads to missing the shot as you focus too much on the technical aspect rather than working with the conditions you’re given.

For example, using a slower shutter speed when standing on a boat (such as in the image above) would have led to the icebergs being blurry due to the motion. What would you prefer? A blurry picture which is “technically” perfect, or a sharp picture that doesn’t have the technically perfect settings?

Before we move on to slower shutter speeds, let’s look at a few more scenarios where a fast shutter speed is recommended:

  • When photographing handheld.
  • Photographing quickly moving subjects.
  • When aiming to freeze motion.
  • When photographing from a vehicle.

Working with Slow Shutter Speeds

In landscape photography, the difference between slow shutter speeds is much bigger than between fast shutter speeds. While you won’t see a huge difference between 1/320th of a second and 1/640th of a second (in most cases) you may see a big difference between 10 seconds and 60 seconds. Because of this, I’ll split this section in two parts: less than 30 seconds, and more than 30 seconds (Bulb Mode).

dark image with moving water - Working with Different Shutter Speeds for Landscape Photography

The definition of a long exposure is somewhat vague but in my Ultimate Guide to Long Exposure Photography eBook, I describe is at the shutter speed where you no longer can capture a sharp handheld image. Typically, this is in the range of 1/50th of a second, depending on your camera and focal length (a longer focal length requires a quicker shutter speed to capture a sharp handheld image than a wide-angle).

Shutter speeds up to 30 seconds

While the difference between a 1 second and 30-second shutter speed is big, it’s more natural to put these together in one section to keep this easier to follow. Still, I’ll try to break it up a little to give you an idea of which shutter speeds you should experiment with in different situations. Again, there’s no correct choice and it often comes down to your preference and the tools you’ve got to work with.

When photographing beaches and seascapes where waves are crashing onto the shore or forming around rocks, I often work with a shutter speed of 0.5-1 second. I find that this creates a nice blur in the water while still keeping enough texture. A slower shutter speed such as 8 seconds blurs the water but not enough to give it the “silky” effect you often see with long exposure photography (we’ll come back to that in a bit).

waves crashing on a rocky shore - Working with Different Shutter Speeds for Landscape Photography

This also applies when photographing waterfalls and rivers. I tend to use a semi-slow shutter speed rather than an ultra-slow shutter speed when working with these scenes, as I prefer to keep some textures in the water.

As you lengthen the shutter speed you’ll see that moving elements become more and more blurry. In the image below, I used a shutter speed of 20 seconds to blur the water and give some motion to the sky. If you look at the clouds, you can see that they have been moving and it’s starting to have the “dragged sky” effect.

seascape scene - Working with Different Shutter Speeds for Landscape Photography

Keep in mind that the speed of the clouds determine how slow the shutter speed needs to be in order to pick up this motion. When clouds are moving quickly you can pick up their motion even with a shutter speed of 5-10 seconds, but to really get the “dragged sky” effect you often need to use a shutter speed (or exposure time) longer than 30 seconds.

Shutter speeds longer than 30 seconds (Bulb Mode)

In order to achieve a shutter speed longer than 30 seconds you most likely need to activate Bulb Mode.

When I first got into long exposure photography and purchased my first 10-Stop ND filters, I immediately got hooked on these ultra-slow shutter speeds. I’ll admit that I don’t do as much of it anymore (as it rarely fits with the vision I have for most locations) but it’s certainly a lot of fun to play with.

The main reason to use a shutter speed longer than 30 seconds for landscape photography is to achieve the “dragged sky” effect and to completely blur out moving elements such as water. It can also be a good way to remove people from your images (if they walk around during your 2-3 minute exposure they most likely “disappear”).

sunset on a coastal scene - Working with Different Shutter Speeds for Landscape Photography

For the image above I used a shutter speed of 180 seconds. As you can see, this has completely blurred the water and the sky is dragged across the frame.

Conclusion

Working with longer exposures can be a lot of fun but it’s not something that’s always beneficial. For example, when photographing a scene that doesn’t have any moving elements (and no clouds), there’s no need to use an ultra slow shutter speed, as it will most likely look exactly the same with a slower one.

So knowing how to select the best or most appropriate shutter speed takes practice, and comes down to what you want to achieve in your image.


For more information about this and other aspects of this type of photography, check out my Ultimate Guide to Long Exposure Photography eBook,

The post Working with Different Shutter Speeds for Landscape Photography appeared first on Digital Photography School.


Digital Photography School

 
Comments Off on Working with Different Shutter Speeds for Landscape Photography

Posted in Photography


5 Landscape Photography Mistakes That Keep Your Images From Standing Out

30 May

Shooting landscapes is one of the most popular genres of photography. Photographs of landscapes typically capture the presence of nature and can inspire you. Outside towns and cities, you are surrounded by beautiful scenery. However, taking a good photo of those epic views is not as easy as you think. Are you making these landscape photography mistakes?

Here are some tips to help you uncover why your landscape photos are not working for you and how you can turn unsatisfying pictures into your best ever images.

5 Landscape Photography Mistakes That Keep Your Images From Standing Out - HDR of Brecon Beacons

1. Including too much detail in the frame

Have you ever been on an amazing trip, gazed at a glorious landscape and captured the incredible scenery on camera only to find out your picture doesn’t stand out? There are several reasons why this is happening.

Including too much in the frame is one of the reasons why your photograph is not appealing to you. Perhaps the trees you have included are overwhelming the scene and making the view too broad. If so, eliminate these objects from the frame. Crop inwards slightly and simplify the field of view.

5 Landscape Photography Mistakes That Keep Your Images From Standing Out - field of tall grasses

2. Wonky horizons

One common mistake some photographers regularly make is to capture a scene with uneven horizon levels. You can become so engrossed in enjoying a breathtaking view that you can overlook this aspect.

Make sure you pay attention to ensuring the horizon line is straight when photographing your next landscape image. Don’t leave it until you get home to find out that your pictures are unbalanced or crooked.

Lauca - 5 Landscape Photography Mistakes That Keep Your Images From Standing Out

3. Taking the picture without thinking

Another mistake people make when photographing landscapes is to start snapping away without giving any thought as to what they are capturing. It is easy to get carried away with an incredible view in front of you. But if you take the time to consider why your photographs are not working for you, your results will improve.

poppy field and mountains - 5 Landscape Photography Mistakes That Keep Your Images From Standing Out

Take a view of the location with just your eyes, think what you would like to capture, and then take your photo. This approach of “seeing the scene” first can help you to take better pictures rather than just picking up your camera and taking a shot without thinking about what you are photographing.

green field with a rainbow - 5 Landscape Photography Mistakes That Keep Your Images From Standing Out

4. Shooting flat, uninteresting scenes

Imagine your dream landscape scene is right in front of you. You’re standing at the top of a magical mountain, alongside a beautiful flowing river, or above some rolling hills in the countryside, for example, and you start photographing the beautiful view.

When you check your images you discover they look dull and uninteresting. So you ask yourself why they are not standing out?

A major factor that can make or break an image of that stunning panorama is light. Without directional sunlight in your shots, the images can look flat and lifeless with few textures and tones. Below is an image where the sun catching the hills adds warmth to the image to make it more interesting.

golden hills - 5 Landscape Photography Mistakes That Keep Your Images From Standing Out

On your next landscape photography trip, I recommend paying attention to the light and trying to take pictures of more illuminated scenes. I suggest taking a photograph in no light and comparing it with one captured in some light.

Look at the differences and see how the images vary. Ask yourself how do they contrast? Is one better than the other? What makes it stand out?

5. Including distracting elements

Once you have found a visually compelling location and have some nice light, give some thought to the composition. Consider what subject matter looks interesting and only include that.

You will not be making the most of a scene if you include unsightly aspects of the surroundings such as telegraph poles or overhead electricity cables. If you have no choice but to capture these elements in your composition, you can always remove them in post-processing.

Below is an example where I have eliminated distracting elements after taking the picture, in the post-production phase.

foggy scene before - 5 Landscape Photography Mistakes That Keep Your Images From Standing Out

Before

foggy landscape scene after -5 Landscape Photography Mistakes That Keep Your Images From Standing Out

After editing.

Editing the photo to remove the unsightly wires enhances the image and helps to focus attention on the church, trees, and the mist.

Conclusion

With this article, I have identified five key landscape photography mistakes as to why your images might not standing out, and to help you take better pictures at your next photography outing. Now it’s time for you to put these tips to the test, so get out there and capture your greatest ever landscapes.

Do you have any tips you would like to share?

The post 5 Landscape Photography Mistakes That Keep Your Images From Standing Out appeared first on Digital Photography School.


Digital Photography School

 
Comments Off on 5 Landscape Photography Mistakes That Keep Your Images From Standing Out

Posted in Photography


Wildlife photography in Yellowstone with Jake Davis and the Panasonic Lumix G9

29 May

April in Yellowstone National Park is a unique time. The park, which covers 3500 sq mi / 5600 sq km in the western US, is still quiet before the busy tourist season, and the weather fluctuates wildly from day to day. Wildlife photographer Jake Davis showed us around Yellowstone during this unusual period, capturing the local residents in all kinds of conditions with the weather-sealed Panasonic Lumix G9.


This is sponsored content, created with the support of Amazon and Panasonic. What does this mean?

Articles: Digital Photography Review (dpreview.com)

 
Comments Off on Wildlife photography in Yellowstone with Jake Davis and the Panasonic Lumix G9

Posted in Uncategorized


7 Great Reasons to do Early Morning Photography

27 May

An age-old question is whether you’re an early bird or a night owl. Well even if you fall into the latter category there are compelling reasons why you should get up earlier than the crack of dawn! Those reasons are of course photographic! Early morning photography can result in stunning images. Is there any other reason for getting up at 5 am?

Whether you’re in your local area or somewhere on a trip, there is always a morning photography opportunity that will benefit from you waking up early. Those can be sunrises, or perhaps the chance to see local life at the market. So let’s see why you should be up at the crack of dawn.

temples of Bagan Myanmar at dawn - 7 Great Reasons to do Early Morning Photography

This is an iconic photo of the temples in Bagan in Myanmar. It is only possible to see the mist like this at dawn.

1 – The morning atmosphere

Why wake up early in the morning when you can get just the same light in the evening? There will still be a blue hour, a golden hour, and you can sleep in!

While it’s true there will be similar light at dusk, the atmosphere in the morning is very different. Waking up in the morning gives you the chance to photograph the morning mist, this can add a lot to your photo. This morning mist can really transform a scene, moving it on from good to great.

2 – Golden light

Venice at dawn - 7 Great Reasons to do Early Morning Photography

The golden light shines on these buildings in Venice, this is only possible to see and photograph in the morning.

There are of course two golden hours per day, if you’re an early bird you’ll have enjoyed the morning one before. Of course, a lot of people will want to photograph the sunrise sky directly. Turn around though and you’ll get all those warm colors flooding over the landscape in front of you.

This opens up a new variety of photos that you could take. Perhaps instead of photographing a landscape at sunset, you could get all those golden colors on it from sunrise.

3 – You’ll have the place to yourself

tai chi at sunrise - 7 Great Reasons to do Early Morning Photography

Getting up early in the morning means you get the place more or less to yourself. These tai chi practitioners add an element of storytelling to the scene.

As discussed in a previous article, there are benefits to photographing alone. When you wake up early in the morning this is much more likely to be the case. Now photographing a popular landmark without having to deal with hordes of other people in front of you will be easier.

The early bird catches the worm as they say, and the early morning photographer has the uncrowded streets to themselves.

4 – Morning photography is more unique

dawn view of a valley - 7 Great Reasons to do Early Morning Photography

Waking early in the morning for this scene was absolutely worth it.

The most dedicated of photographers will, of course, wake up for their morning photography. That means there will be photographs showcasing the best of the early conditions.

The chance that your photograph hasn’t been taken a million times before will be much higher, it will only have been taken thousands of times before. Okay, so to get a truly unique photo may require the use of some more creative photography techniques, but you increase your odds by getting up early.

5 – The angle for specific photos only works at sunrise

sunrise in Penang - 7 Great Reasons to do Early Morning Photography

The dove jetty on Penang island in Malaysia is a great example of a photo that works better at sunrise.

Whether you’re photographing at sunrise or for the golden light, certain photos need the angle of sun which is only found early in the morning. You can figure out what angle the sun will have at various times of the year by using suncalc or an app like PhotoPills.

As with all photography, plan ahead of time. Often planning months ahead of time is what it takes to get great photos. Getting the right light for your morning photography takes effort, but it’s almost always worth it.

6 – In hot countries the morning temperature is nice

Thaipusam festival - 7 Great Reasons to do Early Morning Photography

This photo was taken during the Thaipusam festival, which started well before sunrise.

You may not live in a hot country, but if you do you’ll know that the best time of the day is morning. It’s hard work walking around much past ten o’clock. Carrying around a camera bag, and putting in the legwork you need for your photos is far easier when the temperature is kinder.

Add in some humidity as well, and you may quickly give up on doing any photography in favor of that air-conditioned coffee shop. This heat will also affect your clarity of thought, especially when you get dehydrated, and you need to think clearly to get the best photos.

7 – You’ll catch more local life first thing

park in China with people exercising and moving around - 7 Great Reasons to do Early Morning Photography

The parks in China are alive with people first thing in the morning. If you arrive much after 9am you’ll have missed everything.

You may not see crowded streets first thing, but you will see more local life. That may take the form of a local market, or fishermen getting ready for work. There is a lot of activity that goes on at the crack of dawn, all waiting for you to capture with your camera.

It’s an amazing time to be a street photographer, but there will also be opportunities for landscape photographers. What can really bring a scene to life better than a farmer tending his field first thing in the morning?

Time to wake up early for your morning photography!

Inle lake Myanmar - 7 Great Reasons to do Early Morning Photography

The morning mist on Inle Lake, Myanmar, allowed for this photo with a minimal feel.

So whether this article is preaching to the converted, or you’re already a born-again early bird – there are good reasons to get up at dawn.

Have you photographed early in the morning before, what was your experience? Did you enjoy it, and get some great photos? We’d love to see your photography from early morning expeditions in the comments section. So go to bed early, wake up fresh as a daisy, and get some amazing morning photographs!

early morning in Venice - 7 Great Reasons to do Early Morning Photography

You get to see more of the local life in Venice if you get up before everyone else!

The post 7 Great Reasons to do Early Morning Photography appeared first on Digital Photography School.


Digital Photography School

 
Comments Off on 7 Great Reasons to do Early Morning Photography

Posted in Photography


Weekly Photography Challenge: Sunsets – With Prizes from ViewBug

26 May

Who doesn’t love a good sunset? It’s colorful and makes you feel all warm and fuzzy inside, right?

Think you can take a great sunset photo? It’s not as easy as just pointing your camera at the sun. In this week’s photography challenge it’s time to get out and shoot some sunsets and share your images with us.

Need some tips? Try these dPS articles:

  • 5 Reasons Why Your Sunrise or Sunset Photos Don’t Look So Stunning
  • How to Take Better Sunset Photos
  • How to Plan and Take Killer Sunset Photos on Your Next Vacation
  • How to Shoot Stunning Photos at Sunrise and Sunset
  • Tips for Location Scouting to Get the Perfect Sunset Photograph
  • Tips for Doing More Spectacular Sunset Photography

Weekly Photography Challenge – Sunsets

Simply upload your shot into the comment field (look for the little camera icon in the Disqus comments section) and they’ll get embedded for us all to see or if you’d prefer, upload them to your favorite photo-sharing site and leave the link to them. Show me your best images in this week’s challenge. Sometimes it takes a while for an image to appear so be patient and try not to post the same image twice.

Share in the dPS Facebook Group

You can also share your images in the dPS Facebook group as the challenge is posted there each week as well.

Win Prizes from ViewBug

We’re excited to introduce a sponsor and prizes for this week’s challenge. ViewBug is the World’s biggest photo contest community with over 70 contests always open for submissions. Win prizes, exposure, and the bragging rights. It’s FREE to join! This week, ViewBug will be awarding three winners prizes!

One Challenge winner will receive 1 year of ViewBug PRO ($ 139 value) plus a free photography logo bundle ($ 59 value). Two Runners Up will receive a 1 year of ViewBug Premium ($ 59 value) plus a free photography logo bundle ($ 59 value).

To Enter

Participate in the challenge as you normally would (as described above) by posting your photo. To be considered for a prize you just need to complete the entry form below (or via this link) and submit your photo.

The Contest is open continuously from 05:00 am Australian Eastern Standard Time (“AEST”) on May 26, 2018 (03:00 pm United States Eastern Daylight Time (“EDT”) on May 25, 2018), through June 2nd 2018, 04:59am AEST (June 1st, 2018, 02:59pm EDT) (the “Contest Promotion Period”).

Full Terms and Conditions Digital Photography School Weekly Challenge Sunset – ViewBug T&C

Winners are announced on the Weekly Challenge Winners page on 9th of June.

Loading…

The post Weekly Photography Challenge: Sunsets – With Prizes from ViewBug appeared first on Digital Photography School.


Digital Photography School

 
Comments Off on Weekly Photography Challenge: Sunsets – With Prizes from ViewBug

Posted in Photography


Real Estate Photography Tips For Beginners

25 May

Some amateurs think that photographing real estate is as easy as walking into a room and taking a photo. Unfortunately, that’s not how it works. It’s a skill you must practice so you can master it. That is if you want to succeed in this competitive field.  In real estate photography, one of the questions asked by amateurs is the Continue Reading

The post Real Estate Photography Tips For Beginners appeared first on Photodoto.


Photodoto

 
Comments Off on Real Estate Photography Tips For Beginners

Posted in Photography