RSS
 

Posts Tagged ‘Photography’

Wellcome international photography competition seeks health and medicine images

16 Aug
Main image: Anne-Katrin Purkiss, Wellcome Image Award winner 2009.

Wellcome, a charitable foundation based in the UK, has launched a new international photography competition seeking images related to health, medicine, and science. Called the Wellcome Photography Prize 2019, the competition is open to submissions until December 17, 2018, with winners announced on July 3, 2019.

The photography competition seeks “pictures that show the importance of health in society and the impact health issues have on people and communities worldwide,” according to the contest Web page. A total of four categories are presented:

  • Social perspectives – explore how health and illness affect the way we live
  • Hidden worlds – reveal details hidden to the naked eye
  • Medicine in focus – show health and healthcare up close and personal
  • Outbreaks (2019 theme) – capture the impact of disease as it spreads.

Photographers and other “image makers” may submit an unlimited number of images, but the same image cannot be submitted under multiple categories. In addition to photography, the competition is open to other techniques, including medical imaging from devices like MRIs, microscopy, data visualization, 3D printing, mixed media, and more.

Each category winner will receive a £1,250 prize; the overall competition winner gets £15,000. All prizes are presented in London on July 3, 2019, at an awards ceremony. As well, all shortlisted entries and winners will be showcased at Lethaby Gallery at the University of the Arts London.

The Wellcome Photography Prize 2019 terms and conditions are available here. Entries can be submitted on Wellcome’s website.

Via: The Guardian

Articles: Digital Photography Review (dpreview.com)

 
Comments Off on Wellcome international photography competition seeks health and medicine images

Posted in Uncategorized


5 Photography Mistakes You Need to Avoid When Shooting Seascapes

15 Aug

Here are some practical steps to take and 5 photography mistakes you want to avoid in order to help you capture better seascape images.

Capturing seascapes is a very popular past-time and one of the most enjoyable and fascinating types of landscape photography. People love to capture the ocean and for good reason.

Seas around the world are more accessible than ever to the majority of us. People take regular holidays to visit the abundance of natural beaches and the ocean provides a fantastic place of escape and freedom from bustling towns and cities.

beach and palm tree - 5 Photography Mistakes You Need to Avoid When Shooting Seascapes

The ocean is a breathtakingly beautiful place and offers peace, tranquility, and an ideal opportunity to capture some memorable images. While the coastline offers photographers spectacular seas and atmospheric skies, recording these scenes can be challenging.

Mistake #1 – Cloudless skies

A common mistake that is often presented in seascape imagery is a vast expanse of empty sky without any texture or formation from clouds to lift the image.

Seascape rocky shore sunset - Here are some practical steps to take and mistakes you want to avoid to help you capture better seascape images.

To avoid this pitfall, head to the coast on partially cloudy days. Photographing ocean vistas to include the different patterns and shapes of clouds above the sea will help your images to become more inspiring.

If you find yourself taking pictures by the sea during first and last light, you will discover the colors in the sky can look even more dramatic than at other times of the day. This can beautify your image with vibrant sunset skies igniting the sky.

Alternatively, capturing big white clouds to complement a blue sky or dark, moody and overcast skies can add drama and emotion to your images.

Seascape with clouds - 5 Photography Mistakes You Need to Avoid When Shooting Seascapes

Mistake #2 – Not checking the tide schedule

If you are unprepared during a visit to photograph the ocean by not checking the tide schedule, you may get caught out by incoming tides and even freak waves during adverse weather.

The sea and waves can be unpredictable and powerful. I have ended up with wet shoes countless times while trying to capture the moving waves. Be mindful of the risks the ocean presents to you and the harmful impact the saltwater can have on your camera and equipment.

Always protect your camera (a plastic bag can keep it safe from the salty sea air) and be sure to clean your camera when you return home.

Seascape long exposure - 5 Photography Mistakes You Need to Avoid When Shooting Seascapes

If you would like to capture the swell of the ocean at high tide or an exposed bay of rocks during low tide, be sure to check the tide times and visit at the right hour.

You will find that planning to be at the coast when the tide is at a certain point will help you shoot better compositions and seascape photos.

Mistake #3 – Not considering your composition

Capturing beautiful images of the coast is not as straightforward as you might think, especially if you don’t think about your composition carefully. A few things worth considering are leading lines and the rule of thirds.

Seascape blue sunset - 5 Photography Mistakes You Need to Avoid When Shooting Seascapes

Leading lines are a great way to lead the viewer’s eye into the frame toward the main focal point in the photo. They can help to create depth in an image and provide more purpose.

When photographing the sea, you will find that placing the horizon in the middle of the image will generally be less effective than positioning the water level above or below the center of the frame.

Seascape simplified - 5 Photography Mistakes You Need to Avoid When Shooting Seascapes

You may be asking if should you include more sea or more sky in your composition? Well, that depends on the nature of the scene in front of you and what is the most interesting and important aspect of the story.

If the sky is compelling and vibrant, your image will be stronger by including more sky. But if the sky is uninviting and lacks drama while the ocean is swirling beautifully, compose the image to include more of the sea.

Whatever you decide to shoot, be imaginative and creative with your composition and capture some great images.

Mistake #4 – No focal point

Seascape blue water and a fish - 5 Photography Mistakes You Need to Avoid When Shooting Seascapes

One of the great benefits of being by the coast is the variety of subjects to shoot. However, it is surprising to see the number of times beginner photographers take images of the sea without including a strong focal point in their images.

You could focus your camera on any number of interesting material at the sea such as piers, fishing boats, lighthouses, cliffs, rocks or fish.

Mistake #5 – Not including any foreground interest in the shot

While the sea can make an exciting subject, a mistake newbie photographers tend to make when capturing the ocean is to photograph the sea and sky with nothing in the foreground.

This can occasionally work well in the right light and setting.

Seascape foreground rocks - 5 Photography Mistakes You Need to Avoid When Shooting Seascapes

But capturing an extra element such as cliff ledges, flowers, shells, or footprints in the sand will add context and another dimension to your image to help it stand out.

Conclusion

The best seascape images rarely happen by chance. Instead, they are the result of careful planning, diligence, and practice. Keep exposing, avoid these photography mistakes and use the tips and with plenty of practice, you will soon be capturing breathtakingly beautiful images!

How about you, what do you enjoy about seascape photography? Please share your tips and images below, as well as any questions you might have.

The post 5 Photography Mistakes You Need to Avoid When Shooting Seascapes appeared first on Digital Photography School.


Digital Photography School

 
Comments Off on 5 Photography Mistakes You Need to Avoid When Shooting Seascapes

Posted in Photography


5 Rules in Macro Photography and When to Break Them

13 Aug

In any genre of photography, you’re going to be faced with so-called rules, guidelines, or commandments. Macro photography is no exception.

Consider advice such as, “shoot with a narrow aperture,” or “use a uniform background.” You’ve probably heard those time and time again. In fact, I’ve taught most of them, myself!

flower abstract macro photography tulip

While these rules are often useful to beginners, as you become a more advanced photographer, you’ll find times when you need to break all photographic rules. But how do you know when to follow rules, and when to break them?

In this article, I discuss five rules in macro photography, and when they can be discarded. I use examples from my own work so that you are able to see what both following and breaking the rule looks like.

Ultimately, you’ll learn how to break rules in your own macro photography, which will allow you to really take your work to the next level.

flower macro photography gerbera abstract

Rule 1: Use the Rule of Thirds

This is probably the number one most talked about rule in photography, including macro photography. After all, it has the word “rule” in its name!

The rule of thirds is simple: Divide your viewfinder, screen, or LCD into both vertical and horizontal thirds. This creates a grid. The main elements of your composition—horizon lines, leading lines, faces, eyes—should lie somewhere along these lines.

It’s even better if they fall on one of the “power points” of the grid, the place where the lines intersect.

flower macro photography tulip

The place where the stem meets the petals of this tulip lies on a power point.

How does this apply to macro photography?

Often, you’ll be advised to place flower stems along the Rule of Thirds grid. You’ll be told to place flower centers along the power points of the image. The same goes for insects and leaves.

The points of focus should fall on the power points of the composition, you’ll be told.

flower macro photography dahlia close up

The center of this dahlia is positioned at one of the power points on the Rule of Thirds grid.

This is often great advice. The Rule of Thirds has been used for centuries and generally results in very pleasing compositions. But sometimes it’s best to break out of this mold and get something a bit edgier, a bit more unique.

When should you break the rule?

Let me tell you about two scenarios when I like to break the Rule of Thirds.

The first instance you should break the rule is when you have a symmetrical subject. Symmetry can be very powerful, and it’s usually best emphasized by putting the point of symmetry (the place around which the image is symmetrical) in the dead center of the image.

flower macro photography dahlia symmetry

The second time you might choose to break the Rule of Thirds is when you want to have a more spacious, off-balance image.

I like to place my main subject at the very top or bottom of the image and leave tons of negative space in the center and at the top. This can produce a minimalist feeling, one that I really love.

flower macro photography grape hyacinth - negative space

Rule 2: Keep it Simple

Another common macro photography rule is to keep your compositions simple.

You should have one point of focus, no distracting elements, a clean and straightforward image. Indeed, this is often wise. Random chaos takes away from the main subject and causes the viewer to become confused.

flower macro photography tulip simple one subject

However, more controlled chaos might be just the thing you need to create a unique image.

I like to use controlled chaos when I’m faced with a complex scene. Many overlapping flowers, for instance, are great subjects for a more chaotic image.

The key is to make sure that there is a main subject that stands out and remains as a point of focus. At the same time, it’s okay to let the background or foreground get a bit messy, as long as it complements the main subject.

flower macro photography chaos in composition

The flower on the left creates order in an otherwise messy composition.

For instance, you might have a background with colors that match the main subject. Alternatively, your background might include some flashy lights or brightly colored bokeh.

Just make sure that you keep the eye focused. It’s a fine line between having a complex but controlled image and making a big mess.

Rule 3: Have a Single Point of Focus

Macro photographers are often told to compose with a single point of focus in mind. That means something that the eye can focus on. This rule is especially relevant because I suggested that you use it in the tip above!

flower macro photography peony single subject

Notice how the eye is drawn straight to the center of this peony.

However, while there is a time and a place for this rule, there are also times when it should be broken.

For instance, when faced with a noticeable pattern among leaves or flowers or ferns, it is sometimes better to think less in terms of a point of focus, and more in terms of the image as a whole. Try to emphasize the pattern, and let the eye follow it through the image.

flower macro photography focus

There may not be one point of focus, but the image will remain pleasing.

Rule 4: Have a Uniform Background

Uniform backgrounds are especially emphasized in macro photography. Macro photographers will often shoot on a completely black or pure white background for this very reason.

The rule makes sense – the more uniform the background, the less distracting it is. I use it often myself.

flower macro photography tulip pink and green

However, this is a rule that I also often break. Why?

To be frank, uniform backgrounds can be boring. More colorful uniform backgrounds are better. I find a uniform gold or orange to be the most pleasing, but sometimes even that isn’t enough.

flower macro photography grape hyacinth background colors

To take your macro photography to the next level, try looking for complementary backgrounds. In other words, backgrounds that offer a bit of substance while enhancing the main subject.

One trick is to place a second subject just behind the first. Choose an aperture that keeps the second subject slightly out of focus, but yet still recognizable.

flower macro photography tulip light and airy image

Another trick is to shoot towards the sun, so that you get creative flare effects and beautiful highlights.

flower macro photography red poppy

But be careful: you don’t want to go from uniform to messy. The key word is “complementary.”

Rule 5: Make Sure the Whole Subject is Sharp

I’ve saved the most interesting rule for last. It’s a fairly simple one. Just make sure that your subject is completely sharp.

If you’re shooting a butterfly, make sure that it is sharp from edge to edge. When you’re shooting a flower, make sure that it’s sharp from the tip of the front petal to the edge of the back petal.

If you can’t get the entire subject sharp, the rule advises that you should get as much in focus as possible. This is done by narrowing the aperture. It’s common for macro photographers to shoot in the f/8 and beyond range.

Me? I rarely venture past f/7.1. In this sense, I’m a bit of a rebel.

Of course, I recognize that there is a time and a place for images that are sharp throughout the frame. But that is one particular aesthetic, and there are other looks that you can achieve by widening the aperture and shooting in the f/2.8 to f/7.1 range.

flower macro photography bleeding heart

This is how macro photographers produce that “dreamy” feeling in their images.

Use a wide aperture. You work at higher magnifications and manually focus on a recognizable part of your subject; a leaf or the edge of a petal.

flower macro photography aster

Then you shoot and come away with an image that is barely sharp, but for some people is very pleasing.

Conclusion

Macro photography rules (or photographic rules in general) can be very useful, especially for beginners. However, as the saying goes, rules are made to be broken.

By breaking the rules discussed above—that is, by breaking the Rule of Thirds, by creating more complex, chaotic compositions, and by focusing only on a small part of the subject—you’ll come away with more unique images.

flower macro abstract photography grape hyacinth

Know any other macro photography rules that you like to break? Please share them in the comment area below.

The post 5 Rules in Macro Photography and When to Break Them appeared first on Digital Photography School.


Digital Photography School

 
Comments Off on 5 Rules in Macro Photography and When to Break Them

Posted in Photography


The First 10 Things You Need to Buy After Your Camera for Travel Photography

13 Aug

You’ve just splashed out a vast sum of money on a shiny new camera to do amazing travel photography, but what’s next? There are so many different lenses, accessories, and even filters to choose from. Most people would not be able to afford to buy everything they need in one go. So what should you buy first?

Fear not, here is a simple guide on what to purchase, and in what order, after you have bought a new camera.

photo on the back of a DSLR camera - The First 10 Things You Need to Buy After Your Camera for Travel Photography

1. Lens

It may seem pretty obvious but you won’t be able to do much without a lens for your camera, so naturally, this should be the first purchase.

But the lens you choose will impact on the quality of your photos. For travel photography, you will be able to get away with only using one lens most of the time so try to buy the best lens that you can afford. Look for something that has a good focal length range and is fairly fast.

Something like a 24-70mm lens will often mean you can get 95% of the shots that you would take.

24-70mm and 70-200mm lenses - The First 10 Things You Need to Buy After Your Camera for Travel Photography

Left: 24-70mm f/2.8. Right: 70-200mm f/2.8 lens.

2. Memory Cards

The next vital purchase is at least one memory card to be able to store your photos.

Again this is something that is worth spending a little more money on in order to buy a higher capacity memory card. If you are going to be shooting in RAW format (which you should be doing) then your file sizes will be large. This means memory cards can fill up pretty quickly. Something like a 32gb or 64gb memory card should usually last a few days, depending on what you’re shooting.

Whether you buy more will come down to your budget. Using one card will mean that you have to clear your memory cards each day or every few days. So if you can afford a couple more, it will be worth the investment.

CF memory cards in a case - The First 10 Things You Need to Buy After Your Camera for Travel Photography

3. UV Filter

A UV filter might seem like an unnecessary expense, but the real benefit of buying one is to protect your lens’s glass.

They are pretty cheap to buy compared to having to repair a lens so consider getting one straight away. I fit every one of my lenses with a UV filter the day that it comes out of the box.

Canon L-series lens with a UV filter fitted on the front. The First 10 Things You Need to Buy After Your Camera for Travel Photography

Canon L-series lens with a UV filter fitted on the front

4. Tripod

Most travel photographers would put a tripod at the top of the list of their accessories. This is with good reason. If you want to capture the best possible photos at the best possible time of the day a tripod is a must.

During low light conditions, you simply will not be able to hold a camera steady enough to take a sharp photo. The only way will be to raise your ISO which will in turn mean noise in your final shot.

But it’s also worth investing in a good tripod rather than something that is cheap and flimsy. I always find it astonishing when I see people with expensive cameras using poor quality tripods. Not only are poor quality tripods subject to vibrations which cause camera shake and blurred photos, but they are putting their expensive camera at risk of falling over.

So, always look to buy a good quality tripod that can support the weight of your DSLR.

camera on a tripod overlooking a landscape scene - The First 10 Things You Need to Buy After Your Camera for Travel Photography

5. Camera Bag

Over time most photographers will end up with a collection of different bags for different scenarios. For example, a long hike will require a bigger bag, whereas day to day, you will need something more compact.

But most people can certainly get by with one bag to start off with so look for something that you can use day to day. I would always recommend buying a day backpack as a first camera bag as opposed to a top-loader or sling bag.

Look for one that is carry-on approved as you should always take you camera equipment on board rather than checking it in when you’re flying. It’s also worth buying one that you can strap your tripod to and has space for a laptop.

There are so many choices out there so do your research and even test them out at your local camera store before buying one. It’s an important purchase that will not only keep your camera equipment safe, but also mean carrying things in comfort.

camera bag full of gear - The First 10 Things You Need to Buy After Your Camera for Travel Photography

6. Graduated Neutral Density Filters

Once you’ve purchased the above items it’s time to start building up an inventory of the more specialized things you might need.

Graduated Neutral Density filters are incredibly useful anytime you are photographing at sunrise or sunset. They help to even out the light across your image when you are faced with one area being too bright (the sky) and another area being dark (the foreground).

They will generally come as a glass rectangle that fits onto the front of a lens with an adaptor. There are also screw-in versions (like traditional polarizing or UV filters) but frankly, they are a poor substitute in my opinion.

There are a whole range of brands and options and buying a complete set can work out to be pretty expensive. But you will find them incredibly useful and use them for years.

Canon camera with filter on the lens - The First 10 Things You Need to Buy After Your Camera for Travel Photography

7. Polarizing Filter

The next thing that you should look to purchase is a polarizing filter. Primarily used for suppressing glare or reflections these little screw-in filters can be really useful when photographing water, metallic objects, or even glass (like shop windows).

They also have the added benefit of darkening blues and greens which makes them very useful for landscape and travel photography. Like most photographic items you are better off purchasing a better quality version rather than cheap alternatives that can have a detrimental effect on the sharpness of the image.

beach scene tropical location - The First 10 Things You Need to Buy After Your Camera for Travel Photography

Use a polarizing filter to darken the sky to a rich blue like in this image.

8. Neutral Density Filters

Whereas Graduated ND filters are used for darkening part of the image, these filters can darken the whole scene. They are essentially a square or rectangular piece of glass that come in different darkness levels (representing the same effect as stopping down you aperture).

You might be wandering when you will ever need to darken the scene? Well, for example, if you are photographing water during the day you could use a Neutral Density filter to help you capture a smooth moving water effect. Or cloud movements in the sky.

Again a full set of these filters can be expensive so build up your collection slowly over time.

waterfall and a river flowing - The First 10 Things You Need to Buy After Your Camera for Travel Photography

9. Spare Batteries

While most people can get by with one battery, it’s always worth having a spare. The last thing you would want is to run out of power mid-way through a shoot.

Keep in mind that long exposure photography will drain your battery more quickly than photographing during the day. So if you are going to be doing a lot of this kind of photography or if you’re heading to a remote place with no electricity, this item may move up on your priority list.

I tend to travel with around six batteries in total and charge the ones I have used each night.

camera batteries - The First 10 Things You Need to Buy After Your Camera for Travel Photography

10. GorillaPod

It could be argued that a cable release should be on this list, but as you can use your camera’s timer instead, I feel a GorillaPod will be a better purchase.

The great thing about these small bendy tripods is that they will often draw less attention than a regular one. So in places where tripods are not allowed, you might get away with a GorillaPod. The other great thing about them is that you can set them up on tables, which makes them great for food photography on the go.

Just make sure that the GorillaPod you select can support the weight of your camera and not collapse.

gorillapod - The First 10 Things You Need to Buy After Your Camera for Travel Photography

Conclusion

There you have the 10 items that you should buy in order after you’ve purchased your camera. There will always be exceptions and you might need to tweak this order for your needs. Building your camera and accessories collection up is expensive, so the key is to plan out your purchases in order and take your time.

What do you think? Have I missed anything? Anything you would swap with the 10 on the list? Share your answers below.

The post The First 10 Things You Need to Buy After Your Camera for Travel Photography appeared first on Digital Photography School.


Digital Photography School

 
Comments Off on The First 10 Things You Need to Buy After Your Camera for Travel Photography

Posted in Photography


Wedding Photography Tip – 3 Ways to Tame a Bridezilla

13 Aug

One of the most terrifying things in wedding photography is a bridezilla. You’ve likely read the stories of photographer’s careers being ruined by an impossible to please bride. Of course, this is a worst case scenario and fears become heightened by the bridezillas you see on TV.

“I think of photography like therapy.” – Harry Gruyaert

But it’s normal for photographers to encounter some level of bridezilla behavior. The question is how to deal with it.

I’ve learned from photographers like Joe McNally, Zack Arias, and Jasmine Star that it’s our job as photographers to make great photos – no matter what.

So if you’re faced with a bridezilla (or any overwhelming person) at any point in your career you simply need to know how to handle them. Here are 3 ways you can do that.

bride in a pond - Wedding Photography Tip - 3 Ways to Tame a Bridezilla

This was one of the most laid back and down to earth brides I’ve photographed. Hard-working, yet easy going and ready to have fun every step of the way. Unlike some brides, she learned to handle the stress of a wedding very well.

1. Understand

“You don’t make a photograph just with a camera. You bring to the act of photography all the pictures you have seen, the books you have read, the music you have heard, the people you have loved.” – Ansel Adams

Even the most difficult situations become easier to deal with when you understand what’s going on.

The truth is, most bridezillas never actually wanted to become bridezillas. So why do some brides act like that? Major changes in your life come with stress. Marriage comes with one of the highest levels of stress. In addition to the stress, there is also decision fatigue, personal baggage, and pre-wedding depression.

Maybe the question should be why there aren’t more bridezillas!

portrait of a couple on a truck - Wedding Photography Tip - 3 Ways to Tame a Bridezilla

This photo was taken at golden hour. The unique shape of the sun flare was caused by moisture on the camera lens. There was a mist in the air that led to the surprising effect.

They don’t start out as Bridezillas. Not long ago she was living a normal life as somebody’s girlfriend. Then in the blink of an eye, her entire life changed as she became engaged.

When you put a person in a dramatic situation, you find out how much they can take before they crumble under the pressure. Planning a wedding provides more than enough stress and drama to make a person blow up.

Everybody reaches a threshold of how much stress they can handle. And for a variety of personal reasons some brides reach that threshold on or before their wedding day.

Bridezillas are people like you and me who have discovered what it takes to make them break.

couple seen under a tunnel - Wedding Photography Tip - 3 Ways to Tame a Bridezilla

This photo was taken from in the water. The couple was sitting on an abandoned train bridge. I thought the tunnel would make a good frame for the photo, so into the water I went.

2. Anticipate

“When there are other limitations, I don’t let myself be a limitation.” – Fer Juaristi

There is more than enough time leading up to the wedding day to anticipate who might become a bridezilla.

You can almost guarantee that if a bride comes from a happy family and she handles stress well then she isn’t going to become a bridezilla. But if her life is filled with stress and chaos and she doesn’t handle it well, there is going to be trouble on her wedding day!

couple on the back of a truck - Wedding Photography Tip - 3 Ways to Tame a Bridezilla

Engagement sessions are a perfect chance to get to know the bride and groom. Take time to see how they are handling the stress and find out if there are ways you can help.

When I meet with a couple who is interested in having me as their wedding photographer, I ask questions that let me know what sort of temperament the couple has.

Ask about their vision for the wedding. Then ask what would ruin the wedding for them. I had great fun with a couple who insisted that even if a tornado came along and they had to move the wedding to a basement shelter, they still wouldn’t care because their family is what means everything to them. The dress, flowers, and the decor were all secondary.

Ask other questions like, “What simply must be perfect?” or “What is your biggest fear for the day?” and “What would totally ruin your wedding day?”

Ask how quickly her emotions change to the negative and what cheers her up most in life.

couple on a bridge with a river flowing - Wedding Photography Tip - 3 Ways to Tame a Bridezilla

This photo was created using a slow shutter speed (about 2 seconds).

If a bride tells me that the most important thing to her is that she has a perfect Pinterest wedding, I know there could be trouble.

There are enough problems with the dress, flowers, and decor to drive anybody crazy. If the bride is anxious and disagreeable, to begin with, planing her perfect Pinterest wedding will drive her nuts. She’s a perfect candidate to become a bridezilla.

bride in funky socks - Wedding Photography Tip - 3 Ways to Tame a Bridezilla

When the bride is wearing fun socks and cowboy boots, you know she’s not overly stressed about the details.

Being a wedding photographer means knowing how to work with people. So if you can’t handle the stress of working with a bridezilla, you should politely decline weddings when you think there is a good chance she’ll become one. Let her know you don’t think you’re the best photographer to help her have a perfect wedding.

3. Encourage

“It is more important to click with people than to click the shutter.” – Alfred Eisenstaedt

If you understand the things that lead to bridezilla behavior, and you’re happy with the challenge of working with one then good for you! You could actually help her get through her wedding day without baring her teeth and lower her stress level.

The truth is, most bridezillas don’t enjoy being bridezillas. You can’t help the ones who enjoy it. But you can help the ones who are afraid of becoming a bridezilla.

bride spinning on the dance floor - Wedding Photography Tip - 3 Ways to Tame a Bridezilla

Weddings can be an exhausting journey, not just for the photographer who works all day, but for the family who has worked for months or years to get to this day.

If she’s open to having help, you can assist her in setting goals, seeing the big picture and embracing what is truly important about her wedding day.

Find out what’s bugging her the most and share stories about other couples who have dealt successfully with these things. That way you’re not just pushing your opinion on her, but sharing stories of real people who found a way not to crumble under pressure. You can even publish these stories on your wedding photography blog.

Help her see her goal and what is truly important to her. Help her pivot around obstacles, and there will be less of a chance of her crumbling under the pressure of her wedding day.

No matter what you do, be the one who helps, not somebody who makes it worse.

wedding couple kissing - Wedding Photography Tip - 3 Ways to Tame a Bridezilla

When a wedding is done right, the bride and groom are still excited and energized at the end of the day.

Happily Ever After

“If a photographer cares about the people before the lens and is compassionate, much is given. It is the photographer, not the camera, that is the instrument.” – Eve Arnold

No photographer wants to photograph a bridezilla. No bride wants to be a bridezilla.

You can surpass a bride’s expectations of you as a photographer by understanding her situation and being the most flexible, helpful, encouraging person on her wedding day.

All it takes is one good friend to be a calming presence amidst stress and anxiety to help a bride not turn into a bridezilla. This person could be you.

The post Wedding Photography Tip – 3 Ways to Tame a Bridezilla appeared first on Digital Photography School.


Digital Photography School

 
Comments Off on Wedding Photography Tip – 3 Ways to Tame a Bridezilla

Posted in Photography


Video: 5 DIY photography storage ‘hacks’

11 Aug

Storing camera gear seems to be a never-ending battle. Whether you want to admit to having too little space or too much gear, it almost always holds true that there are better ways to keep your gear organized.

Ted Forbes of The Art of Photography has created a short video on DIY storage hacks for cameras and lenses. The video’s title suggests Forbes mentions six different methods in 90 seconds, but based on the numbers he provides, there are actually only five suggestions, considering hack number four seems to be skipped.

Numbers aside, Forbes uses wine racks, a lazy susan, and even pantry spice organizers as methods for camera gear organization. You could argue some of the hacks are common sense (shelves are a pretty obvious choice, I would think), but the video is still worth a quick watch.

Articles: Digital Photography Review (dpreview.com)

 
Comments Off on Video: 5 DIY photography storage ‘hacks’

Posted in Uncategorized


Weekly Photography Challenge – Long Exposures

11 Aug

This week, for your dPS photography challenge, you will need to get out your tripod and remote trigger because you’ll be doing some long exposure photography.

Shooting star trails is the ultimate long exposure photography.

There are many ways to incorporate a long exposure into your images. Here are a few ideas:

  • How to Create Dynamic Photos of Car Light Trails
  • 7 Tips for Shooting and Processing Star Trails
  • How to Create a Dynamic Zoom Burst Photograph
  • Intentional Blur- How to Create it and Why it’s Awesome
  • Tips for Light Painting and Some Common Pitfalls to Avoid
  • Beginner’s Guide to Light Painting
  • 8 Reasons to Love Long Exposure Photography
  • How to Avoid Blurry Long Exposure Images with Proper Tripod Setup

Car light trails – this image is a combination of several frames shot to capture more lights.

Light painting is another idea for long exposures.

Try an intention motion blur, in this case, the lens was zoomed during a long exposure.

Weekly Photography Challenge – Long Exposures

Simply upload your shot into the comment field (look for the little camera icon in the Disqus comments section) and they’ll get embedded for us all to see or if you’d prefer, upload them to your favorite photo-sharing site and leave the link to them. Show me your best images in this week’s challenge. Sometimes it takes a while for an image to appear so be patient and try not to post the same image twice.

Share in the dPS Facebook Group

You can also share your images in the dPS Facebook group as the challenge is posted there each week as well.

Long exposures on moving subjects like this carousel can turn out great.

The post Weekly Photography Challenge – Long Exposures appeared first on Digital Photography School.


Digital Photography School

 
Comments Off on Weekly Photography Challenge – Long Exposures

Posted in Photography


Using HDR Photography to Your Advantage

10 Aug

sunset on the water - Using HDR Photography to Your Advantage

Over the years, HDR Photography has become synonymous with over-saturated, over-processed, and unrealistic images. Some hear the term HDR and never give it a second thought because of their perception of what it is. Add to that, all the camera dynamic range improvements and many say that HDR has lost its place for good.

So how exactly can HDR photography still be beneficial to you? How can you use it to your advantage?

Using HDR Photography to Your Advantage

The oversaturated look that has become synonymous with HDR photography. 

What exactly is HDR Photography?

HDR or high dynamic range refers to the difference between extremes – the brightest and darkest areas of your image. In reality, your eyes can adjust for shadows and highlights in the same scene, but a camera cannot (again this has come a long way over the years).

Using HDR Photography to Your Advantage

A more realistic looking HDR image.

Have you ever witnessed a scene that took your breath away, but were unable to capture it as is because you had to choose what your camera captured?

Exposing for the highlights left some of your image too dark or exposing for the shadows left your highlights too light. Or maybe you tried for somewhere in between and ended up with both dark shadows and light highlights?

Well when you want to capture the dynamic range of an area, you sometimes need to take more than one photo. To do that, you need to use bracketing, which is taking multiple images of the same scene at different exposures.

Most cameras now come with auto bracketing modes (AEB) , but you always have the choice to manually adjust your exposures between shots.

house in the trees - Using HDR Photography to Your Advantage

HDR Photography usually involves several bracketed images with a minimum of three images to capture the dynamic range. One image is exposed for the darker areas in your scene, another for the mid-tones and the third for the highlights. When you merge these images, you create an HDR image which reveals more detail than a single shot.

Fun Fact: Did you know that HDR photography has existed since the days of film?

How does this work to your advantage?

If you are not interested in creating mind-bending images with HDR, what’s the point? Well, the main benefit is capturing/revealing any lost details and doing so in a realistic way.

Think of it as extending the tonal range of what your camera reproduces to mimic what your eyes see, as opposed to the graphic style that HDR has become synonymous with.

building ruins - Using HDR Photography to Your Advantage

Subtle HDR also helps reveal textures in an image.

Steps for a Realistic HDR Photo

Truthfully the steps for making a realistic HDR are not drastically different from one that looks overly processed. The key is to know when to stop processing.

1. Selecting a scene

So what kind of shots are right for HDR photography?

Typically these include scenes that have a lot of contrast, for example, landscape and architectural photography. HDR is not recommended for scenes with a moving subject, or for shooting portraits (as it has a reputation for aging faces).

It is fun to experiment with bending the rules though and seeing the results.

old saloon hotel - Using HDR Photography to Your Advantage

2. Capturing your images

To eliminate or minimize movement between your shots, a tripod is an essential tool. This also ensures that each image in your sequence has the same composition.

An HDR image is usually composed of between three to seven bracketed images. Three exposures are sufficient for a more photo-realistic HDR, at two stops (EV) apart. If done manually, this means that your first shot will be metered for the mid-tones of the image (0EV), followed by dialing down your exposure to -2 for your second shot, and lastly where your meter is at +2 for your third shot.

dark image -2 Using HDR Photography to Your Advantage

Bracketed image underexposed (exposure -2).

Using HDR Photography to Your Advantage

Overexposed (exposure +2).

Bracketed image mid-tones (exposure metered at 0).

Use the HDR or Auto Bracketing (AEB) feature of your camera to accomplish this automatically.

Note: If you are shooting into the sun, you may need to do five exposures at one or two stops apart.

3. Processing your images

Processing HDR photography is essentially combining your images and adjusting your tonal mapping for detail. When it comes to processing, you have a choice of software: Photoshop, Photomatix, Lightroom and Aurora HDR to name a few.

Processed bracketed images – reveals more details (warmth boosted).

Again, processing is the place where you can push your HDR too far or end up with a nice photorealistic image.

Usually, HDR software comes with presets that give you a range of looks. If you want your image to be more on the realistic side, you need to take control of the settings. Some of the settings you want to control include; reducing noise, fixing chromatic aberrations and dialing back your tonal adjustments.

Conclusion

The main benefit of HDR photography is recovering detail in your images. Landscape and architectural photographers often use HDR realistically to portray high contrast scenes.

HDR photography is often associated with overcooked images, but when it’s not overdone it can balance out a scene and makes it more appealing to your viewer. Your objective is to post-process just enough to maintain a natural look.

The post Using HDR Photography to Your Advantage appeared first on Digital Photography School.


Digital Photography School

 
Comments Off on Using HDR Photography to Your Advantage

Posted in Photography


Tips for Processing Night Photography with ON1 Photo RAW 2018.5

07 Aug

For many students, as they start learning photography they want to know how to take photos at night. It is a mystery to them and they often think it is so complicated that they will never be able to do it. That is until they try it and discover just how easy it is. The next step is editing those images and ON1 Photo RAW 2018.5 has a lot of tools and adjustments that are perfect for processing night photography.

HDR architecture image - Tips for Processing Night Photography with ON1 Photo RAW 2018

An image created using the HDR option in On1 Photo RAW 2018.

Night photography options

First, we should take a look at the different types of night photography that you can do. There is the easiest option of setting your camera up on a tripod and photographing lights somewhere.

The city at night is very popular if you live in an urban area. Perhaps capturing town lights can also be good. You just need something that is making light. HDR has had a lot of bad press, but it really is good for some images, and night shots of cities are perfect for it. ON1 Photo RAW’s HDR processing is one of the best I’ve seen.

When the sun has gone down and there is a lot of traffic you can photograph light trails. Taking longer exposures with your camera on a tripod will make all those lights look like streaks. If you want to make it look like there were a lot, then you can stack the images together, so all the streaks will show in one final image.

One type of night shot that is hugely popular right now, especially in Australia, is astrophotography. Photographing the Milky Way. It is the season for it here and with the low population, you are spoilt for choice where to do them. If you have ever tried doing any astrophotography then you will also be aware that your images have to be processed or they can look at washed out. ON1 Photo RAW 2018.5 has you covered there as well.

Tips for Processing Night Photography with ON1 Photo RAW 2018 - astrophotography milky way image

An astrophotography image processed with ON1 Photo RAW 2018.5

Photographing the City

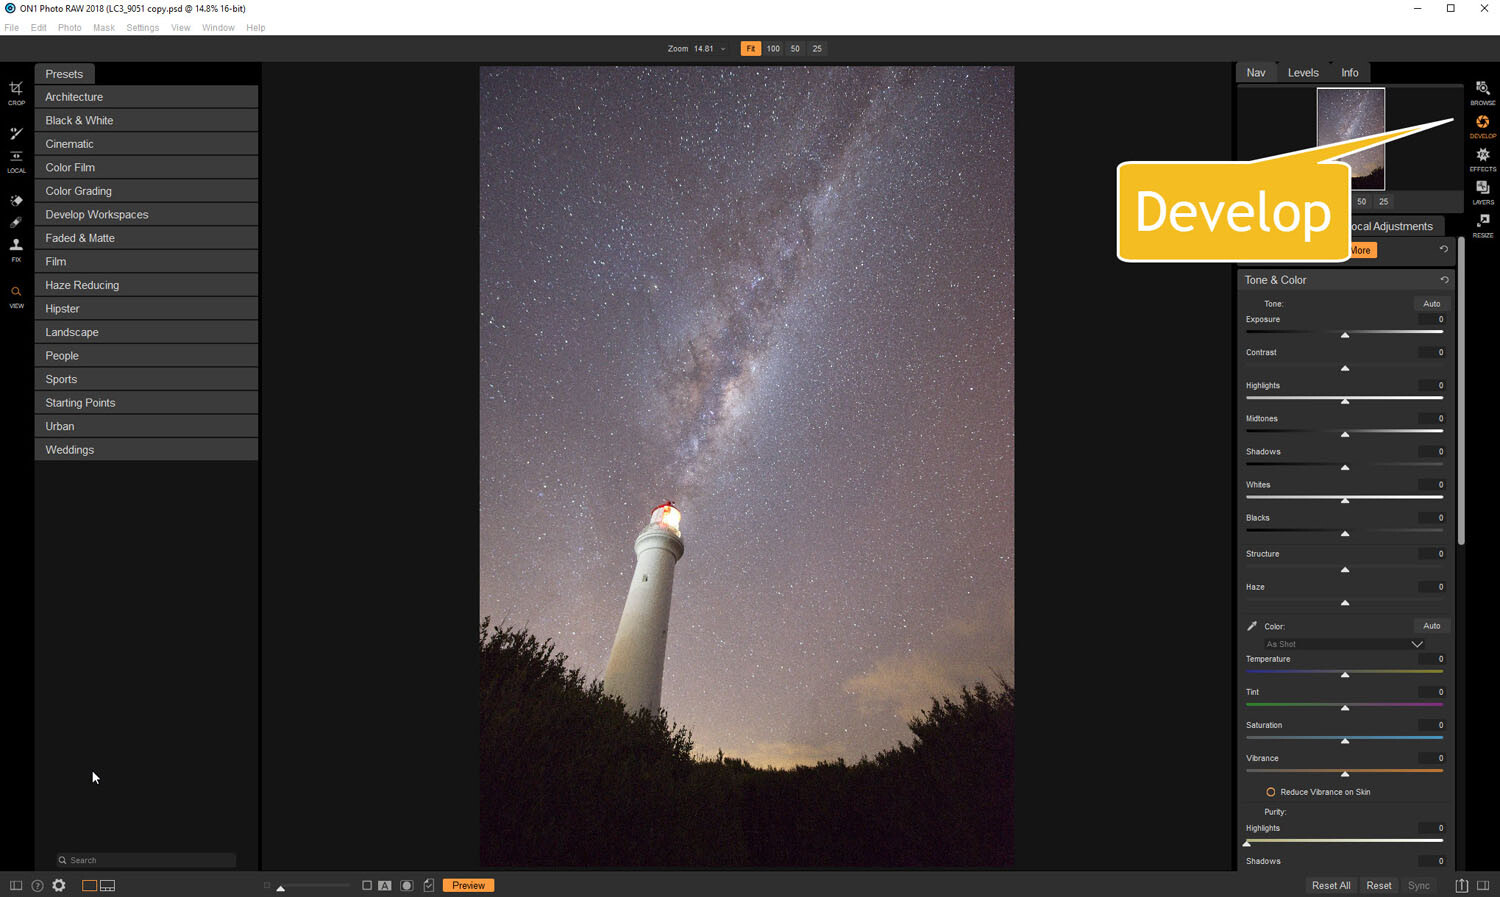
Night time in the city can be so magical and to be taking photos of it even more so. Processing your images taken at night is much the same as processing any of your images.

Open your image in ON1 Photo RAW and take it into the Develop module. Make the adjustments as you would for other images. Move the sliders around to see what you can get. Take them too far and then bring them back.

sliders in ON1 Photo RAW - Tips for Processing Night Photography with ON1 Photo RAW 2018

When learning it is good to take the sliders too far, see what happens.

If you want to make adjustments to particular areas, then look at local adjustments which is the best place to do that.

However, what if you want to do something to your image to really make it pop?

HDR photography, or High Dynamic Range, can be perfect for this. It is a process that has copped a lot of criticism over the years. People say it is too much, that the images can be ugly. But that really only happens when you don’t use it for the right images, or overdo it.

There are some scenes and images that are perfect for HDR and night photography is one of those times.

HDR Night Photography

When you are to decide which images would work best for HDR, look for ones that have a lot of dark areas, and a lot of bright parts as well. Usually, your camera will struggle with getting an even image of a high contrast scene. It will either make the image too bright or too dark. Night images have those problems. Once you get the lights exposed right, all the shadows become too dark or black.

The best way to do HDR is to take a series of images or bracketed shots. If your camera will allow you to bracket then it will sort out the exposures you need. The most common number of shots is 3 or 5. For this article, five images were taken.

Next, select all of your bracketed images inside the ON1 Photo RAW browse module. You can do that by clicking the first then pressing the shift key followed by clicking on the last image. If you have put the images into a subfolder you can then just use Ctrl/Cmd+A.

Tips for Processing Night Photography with ON1 Photo RAW 2018 - bracketed set of images

Work out which images you want to use.

Once they are selected you should be able to see the HDR button over on the right-hand side of your screen, underneath all the different modes.

select images and HDR button - Tips for Processing Night Photography with ON1 Photo RAW 2018

Select all your images.

ON1 Photo RAW will then merge all your images together. The first time you do it, a window will pop up asking you what look you would like. The options include Natural, Natural Auto, Surreal and Surreal Auto. You can make the changes once the image has been merged to HDR. There are lots of choices with ON1.

Let’s take a look around the HDR working window

Tips for Processing Night Photography with ON1 Photo RAW 2018 - HDR looks

Selecting your HDR look in ON1 Photo RAW.

There are several places where you can set the amount of de-ghosting (remove spots where something moved between brackets) you want the program to do. You can change the HDR look you wanted if you think you made a mistake. You can select which image you think should be the main one.

Go through and change the image to suit the look you are after. I know I say this a lot, but the best way to learn is to play around with the settings.

HDR options - Tips for Processing Night Photography with ON1 Photo RAW 2018

All the different things you can do to your image.

Like most images, you need to experiment to see what you like. Remember that ON1 is non-destructive so you won’t ruin anything. Try everything, it is the best way to learn. Take it all too far and then bring it back.

Lastly, choose where you want your image to go when you are done. You can have it open in Develop, Effects or go back to Browse. The last choice is Cancel. If you want to save it then click Save.

Tips for Processing Night Photography with ON1 Photo RAW 2018

Taking the image further.

Once the image is opened in the Develop module, you can then make more adjustments to as you would normally.

Develop module - Tips for Processing Night Photography with ON1 Photo RAW 2018

Where to go next.

ON1 Photo RAW is one of the best programs for doing HDR. You can make so many changes to it as it is happening and after it is done. Nothing is final.

final HDR - Tips for Processing Night Photography with ON1 Photo RAW 2018

The final HDR image.

Astrophotography

For anyone who has ever done astrophotography, you know that the images always need to be processed.

Here is an image that was taken a couple of years ago. This is the raw file and you can see that it needs a lot of work.

night image Milky Way and lighthouse - Tips for Processing Night Photography with ON1 Photo RAW 2018

Raw image from astrophotography shoot.

Open the image up in ON1 Photo RAW and go to the Develop module. Everything you need to make the best astrophotography images is all right there.

develop - Tips for Processing Night Photography with ON1 Photo RAW 2018

Open in the Develop module.

Noise reduction

The first thing you want to do is to work on the noise in the image. All astrophotography images have a great deal of noise. You have to increase your ISO quite high in order to get the Milky Way in your image. Usually, it is going to be somewhere between ISO 3200 up to 6400.

The image for this article was taken at f/2.8, for 30 seconds at ISO 6400. It was taken at 14mm using a 14-24mm lens.

In the Develop module go to Details. This is where you can help reduce the noise in your image. Click on the image to zoom in so you can see the noise better.

noise and details section of develop - Tips for Processing Night Photography with ON1 Photo RAW 2018

The first thing to do is to fix the noise in the image.

Under Noise Reduction, you will see a Luminance slider. Move that along until the noise almost disappears. Be careful not to go too far or you might lose all the stars (noise is just white specs so the stars can easily be misinterpreted as noise if you go too far).

This slider smooths out the image and you can lose a lot of detail if you go too far. Bring up the Detail slider to help maintain it. It is about experimenting and seeing what you like as well.

You can also bring up the Sharpening amount as well but be careful. Over sharpened images can look terrible. Go easy with this slider.

noise adjustments - Tips for Processing Night Photography with ON1 Photo RAW 2018

You can see how much was changed.

Tone & Color

It is time to go back to Tone & Color and make more adjustments.

tone and color - Tips for Processing Night Photography with ON1 Photo RAW 2018

Take the image back to Tone & Color to make basic changes.

The main things you want to add back into your image are the blacks and lots of contrast. The added contrast will help the stars stand out more from the dark sky. The blacks will allow the darker parts of the sky to appear as you saw them when you shot the image.

The highlights can be brought down to stop the lighthouse from blowing out too much. If you take the shadows down it helps make the darker parts of the sky richer as well. However, be aware that it can also make other parts of the image go black, like the foliage at the bottom of this image.

The whites were brought up a fraction, as this helped to lighten up the Milky Way and make it jump out more.

slider adjustments - Tips for Processing Night Photography with ON1 Photo RAW 2018

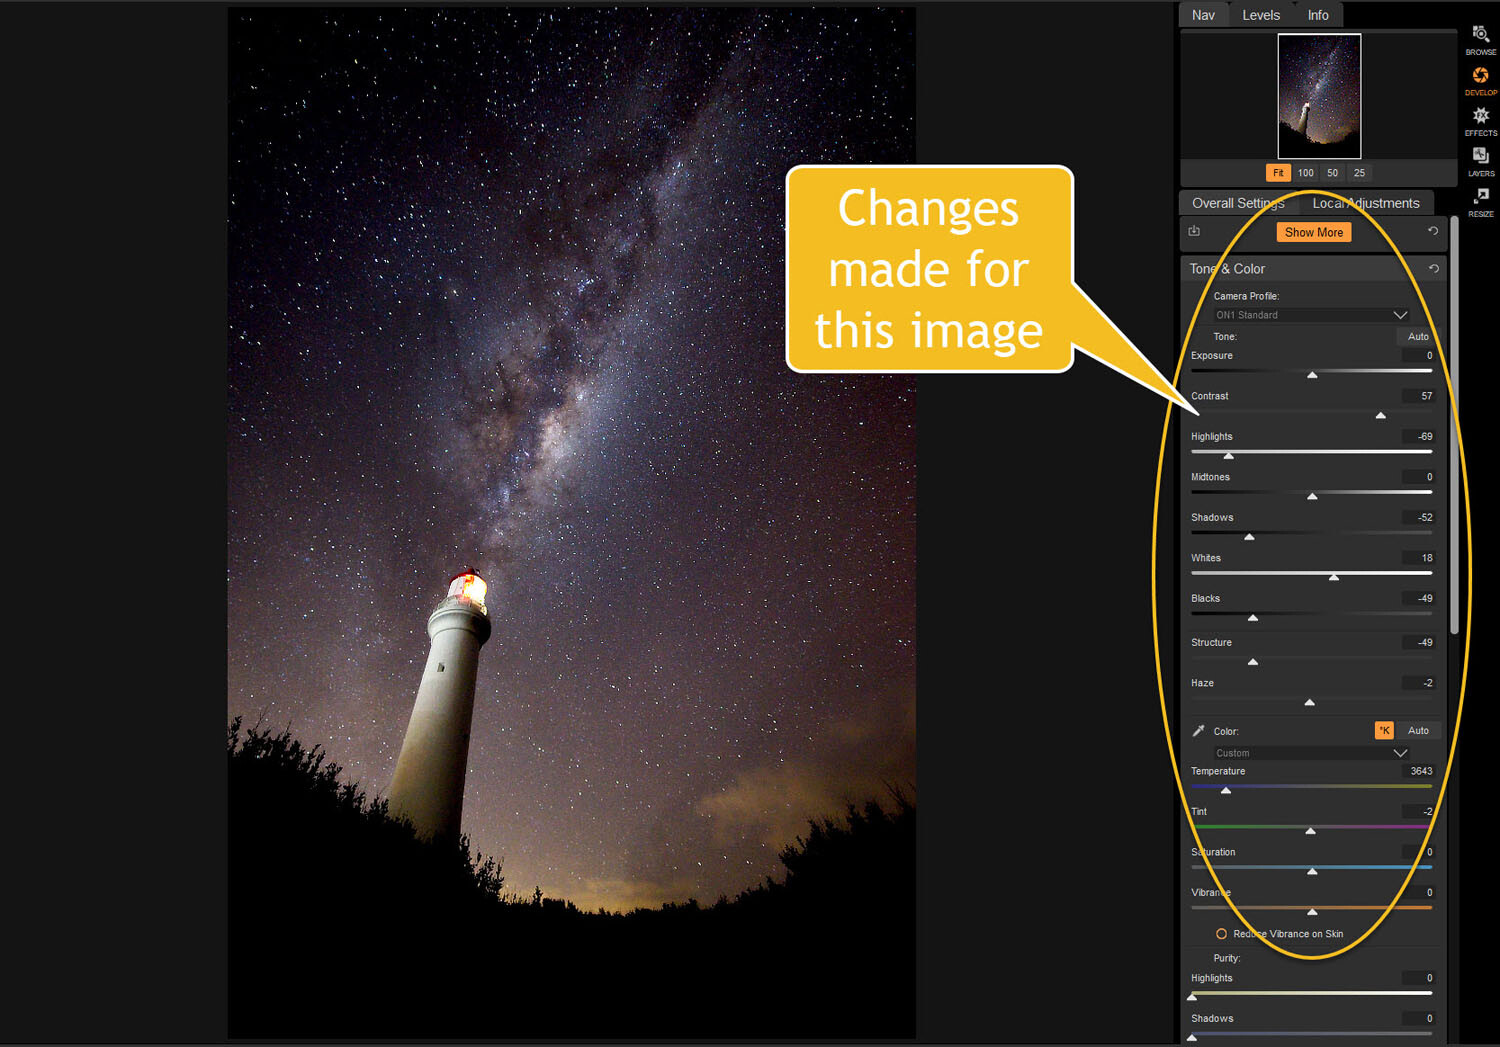
Some of the changes that were made in Tone and Color.

Color Adjustments

Most of the changes are made to the image now, but if you look closely there is quite a bit of blue in it. It shouldn’t be there and to remove it you need to go to Show More and then Color Adjustments.

color cast - Tips for Processing Night Photography with ON1 Photo RAW 2018

Taking out the blue cast color in the stars.

A new window for this will open up down below the other adjustment windows.

As it is the blue you want to change, click on that color square. Once it is selected you can move the saturation slider until the blue in the image disappears or is to your liking.

reducing blue saturation - Tips for Processing Night Photography with ON1 Photo RAW 2018

Changing the saturation of the blue.

You can try adding presets to your image as well, though most people with astrophotography just do the basics and leave it there.

You will need to play around with your photos to see what you can do and what is to your tastes. These are just suggestions as to what other photographers do. Experiment, take the sliders too far and then bring them back.

This is the final image.

final image of lighthouse - Tips for Processing Night Photography with ON1 Photo RAW 2018

The final image of the Milky Way over the top of the lighthouse.

Light Trails

In cities, or anywhere there is a lot of traffic, you will see photographers trying to capture the trails of the lights as the cars go past. For most places, the best time to capture this is during peak hour when a lot of vehicles are moving. However, it also needs to be dark.

Unfortunately, there are times of the year where it is impossible to get both at the same time. For instance, in Australia during the summer daylight saving means it doesn’t get dark until after 8 pm. Getting good light trails is reduced because there isn’t enough traffic at that hour.

However, there is a way to make it look like there was more traffic, that is to stack your images. You can also do this for star trails too.

Stacking light trails

Work out which image will be the first one. Take it the Develop module in ON1 Photo RAW and do what you want to process it normally first.

But do not straighten it or do any lens correction on the image. If you do then the other images won’t align up properly, you can do all that after.

original image for light trails - Tips for Processing Night Photography with ON1 Photo RAW 2018

The first image used for the light trails.

Once you have your image ready, go to the Layers module.

layers - Tips for Processing Night Photography with ON1 Photo RAW 2018

Take the image to the Layers mode.

Next, add all the other photos that will make up the final image. The best way to do this is to put all the images into a subfolder. Select the images you want to use, then right-click and go to Add Subfolder.

add subfolder - Tips for Processing Night Photography with ON1 Photo RAW 2018

Putting your images into a subfolder.

A window will pop up once you click Add Subfolder. You can name it as you want, or ON1 will name the folder the same as the filename for the first image. Make sure the box is ticked for Move Selected Items into Subfolder.

add subfolder - Tips for Processing Night Photography with ON1 Photo RAW 2018

Creating the subfolder.

Now you are ready to add all those images as layers to the original photo.

Get your image to the Layers module which is where you will add the images for your light trails. Go up to File in the main menu at the top. Select Add Layer(s) from File.

add images from file - Tips for Processing Night Photography with ON1 Photo RAW 2018

Now it is time to add the layers.

A window will pop up where you can go to the subfolder that you put the images into. Select all the images, Ctrl/Cmd+A, then press Open.

select images - Tips for Processing Night Photography with ON1 Photo RAW 2018

Selecting all the images you want to use.

ON1 Photo RAW will ask you if you want to open them all, say yes. Depending on how many images you are trying to do it can take some time for this to happen. The images used for this demonstration are quite large and took a few minutes.

images added as layers - Tips for Processing Night Photography with ON1 Photo RAW 2018

All the images are added.

Next, you need to blend each layer. You want the lights to shine through from each but not everything else. For each layer, go up to the blending pull-down and select Lighten.

blending options - Tips for Processing Night Photography with ON1 Photo RAW 2018

Blending all the layers with Lighten.

You can now save the image and then you can do more processing if you wish. If the image needs straightening, lens corrections, etc., you can do it in the Develop module.

light trails image - Tips for Processing Night Photography with ON1 Photo RAW 2018

The final image.

Star Trails

If you enjoy doing star trails then you will be able to use this same method for processing and stacking those images using ON1 Photo RAW. Just add them all as layers and use the Blending option Lighten.

Conclusion

There are many things you can do with your night photos in ON1 Photo RAW 2018.5. With things developing constantly you will be able to do more and more with time. The HDR feature is one of the best I’ve seen and I’m sure most of you will enjoy that.

With all software, experimenting is the key. Take what you learn and see what else you can do with it.

Disclaimer: ON1 is a dPS paid partner.

The post Tips for Processing Night Photography with ON1 Photo RAW 2018.5 appeared first on Digital Photography School.


Digital Photography School

 
Comments Off on Tips for Processing Night Photography with ON1 Photo RAW 2018.5

Posted in Photography


Don’t Show Me Your Tricks, Show Me Your Photography Skills

07 Aug

Did you know that the automated features and tricks built into cameras and computer software can actually stunt your photographic growth and photography skills? It’s true. Unless you are seeking to learn how to achieve specific results from the canned effects used by others, you might be shortchanging yourself.

Think back to what made you take up photography in the first place. Remember seeing the amazing shots in magazines, online, or taken by a friend and then dreaming that you too might produce amazing pictures?

Well, you can and you should. Learn the camera’s basic controls and how to shape your pictures with software tools, and don’t just rely on packaged effects.

Tricks Bode Orig - Don’t Show Me Your Tricks, Show Me Your Photography Skills

Photography skills override tricks

If you enjoy fishing but purchase fresh fish from the market on your way home, are you really fishing? You might bring home a tasty meal but can you really take credit for the catch? You dove into photography to capture great shots and produce gorgeous pictures. don’t shortchange yourself with tricks and shortcuts.

Tricks Bode Blue - Photography Skills

An occasional foray into visual effects can be interesting, but a steady diet gets boring and appears cliché.

Are you relying on auto settings, presets, and effects to make your shots look special? Do you run your photos through software that pushes your shots through prefab cookie-cutter interpretations?

Perhaps it’s time to put your time into understanding the basics of the photographic process. There’s an artist inside you yearning to learn. Put that artist to work in reality. Let your pride be in your work, not someone else’s.

Stop being predictable.

Those pre-digested interpretations offered by many post-processing software packages are way too easy to spot. The effects should be used sparingly and only when the scene really lends itself to the effect. Presets look good once in a while (I use them myself occasionally). But I want people to see my photography skills, not someone else’s tricks.

Be the individual, not the trend.

Stop doing what everybody else does and start expressing yourself. I grew up in the hippie era and to some degree, I bought into the trend. I wanted to be taken seriously as an individual; a non-conformist who didn’t just follow the masses and do what everybody else did.

But eventually, I realized that all my non-conformists friends dressed alike, talked alike, acted alike, and (frankly) smelled alike. All while proclaiming their individuality.

They conformed to the accepted non-conformity trends. That herd-mentality behavior didn’t make sense back then and it doesn’t make sense now. If you want to express yourself, do just that – express yourself. Just take the time to learn the basics of shaping images. It’s a whole lot easier than you think and it’s amazingly rewarding.

Tricks Bridge Orig - Photography Skills

Tricks Bridge Neon - Photography Skills

Nobody I know actually lives in a fantasyland with color as over-amped as this. Indiscriminately using a colorful effect on the wrong image can reduce the image to a clown show.

You are a logical person with a good head on your shoulders. You know you can do serious work if you take the time to learn the process. There is more to photography than learning the camera controls. You must understand the why issues of photography, not just the how of the camera buttons.

Your images deserve special attention… yours!

Use your imagination.

Determine today to see life through your own lens and interpret what you see with your eyes and your imagination. Shape your images with a clear understanding of how to command the medium of photography. Don’t see life through the lens of popular automation and trick treatments, learn to control the light and color that your camera captures.

Classy Nassau - Photography Skills

This is a pricey waterfront condo in Nassau. When you take the time to match the scene with an appropriate treatment, the results make sense to the viewer.

Capture images and shape them into what your mind sees. Don’t try to force your shots into someone else’s prefab, over-used interpretations. If this really is an age of personal expression, take control of your creative life by learning how to control the light in your photographs, both during the capture process and in post-production.

Eventually, you will come to a point where you want to test the waters of photo-creativity, learn the basics of image shaping, and let your images show your talent and photography skills instead of displaying someone else’s. It all starts with taking the time to learn the basics and believing in yourself.

Just the right amount.

One of the most beneficial parts of understanding how to shape your own pictures is knowing how much adjustment is enough and how much is too much. Like a four-year-old little girl playing with her mother’s makeup, your first attempts won’t be works of art, but that’s the way EVERY great photographer starts; over-producing their pictures.

The single most important ingredient in success is practice. Practice makes better, none of us ever get to perfect.

FoldedSail SBS - Photography Skills

Here’s the first rule of editing. When alterations start looking surrealistic, you’ve probably taken the processing too far. We enjoy special effects in the movies but we live in the real world. Small adjustments to colors and tones sometimes produce big differences. Make your initial moves and then back away from the picture for a few minutes and then take another look at the project again.

Imaging Basics

Nudging the mid-tones lighter and increasing the overall contrast can improve the appearance of almost every photo. It’s a good place to start.

Because of the linear manner in which digital cameras capture images, the simple process of capturing a scene with pixels produces images that are darker in the three-quarter tones than they need to be. These images usually benefit from shifting the mid-tones lighter simply by making some minor adjustments in the Basic panel in Camera Raw or Lightroom.

Learn to fine-tune your images to bring out the true colors and detail. The process is simple but the results can be profound. Target specific regions of light to reveal to the viewer what your mind saw when your camera captured the image. Our brains compensate for unbalanced lighting in a scene while the camera simply records existing light levels.

Basic Adjustments - Photography Skills

Small adjustments can make a major difference in the appearance of digital image captures.

Your camera doesn’t know where important detail is located in an image, although your brain located the detail and mentally enhanced the scene. You must learn how to deal with the scene’s lighting and reveal that detail manually. Most of those ho-hum images just need a little TLC to come to life.

San Juan House CR - Photography Skills

Two panels in Camera Raw provided all the controls and tools I needed to target and enhance specific areas of this image.

The white surfaces of the house above needed a boost to brighten them up without losing the surface detail. The detail in the deep shadow tones of the trees and stair steps needed to be lightened without losing the defining deep shadows.

The Basic panel provided the tools and the Tone Curve panel provided the narrow target for both the highlight and shadow adjustment without affecting the mid-tones.

Conclusion

Be the artist who understands their medium and is in command of their art. Let others see your style and maybe they’ll try to emulate you. Stop playing follow the leader and become the leader. There are only a handful of basic skills you need to develop to break the mold and really control your pictures.

Enough of the grunge, the excessive saturation, the surrealism, and the pre-packaged garbage. Start showing the world your skills and leave the tricks to the those who need them.

The post Don’t Show Me Your Tricks, Show Me Your Photography Skills appeared first on Digital Photography School.


Digital Photography School

 
Comments Off on Don’t Show Me Your Tricks, Show Me Your Photography Skills

Posted in Photography