In this second installment of my ‘Photography Bucket List’ series we’re going to cover arguably one of the most beautiful places on earth; the Cinque Terre region on Italy’s west coast. I had the opportunity to visit this region on my first trip to Italy back in late 2011 and ever since then I’ve been waiting for the opportunity to get back.
A Quick Note On Traveling to Far Away Places
Chances are that if you’re reading this, you don’t live in or around Italy. A lot of people I talk to just accept that they will never get to travel to a place like this because it’s either too far away or too expensive to get there. Well I think that’s a load of crap. These places are a lot easier to get to than most people think, and a lot cheaper to stay in too. Life is what you make of it. If you want to go to Italy, make it a goal. Start saving up right now. Think of ways to raise money for it. Do research to find cheap plane tickets, cheap hotels or hostels. I can tell you right now that it will be worth every penny. Traveling, whether to Italy or any other part of the world, is an investment in who you are as a person.
“The world is a book and those who do not travel read only one page.”
Augustine of Hippo
“You are the same today that you’ll be five years from now except for two things: the people you meet and the books you read.”
Mac McMillan
About the Cinque Terre
The Cinque Terre is a rugged portion of coast on the Italian Riviera. It is in the Liguria region of Italy, to the west of the city of La Spezia. “The Five Lands” is composed of five villages: Monterosso al Mare, Vernazza, Corniglia, Manarola, and Riomaggiore. The coastline, the five villages, and the surrounding hillsides are all part of the Cinque Terre National Park and is a UNESCO World Heritage Site.
Over the centuries, people have carefully built terraces on the rugged, steep landscape right up to the cliffs that overlook the sea. Part of its charm is the lack of visible corporate development. Paths, trains and boats connect the villages, and cars cannot reach them from the outside. (source: Wikipedia)
My Experience

Riomaggiore at Dawn | © James Brandon
During my stay in the Cinque Terre, I opted for a quaint little hotel in the town of Riomaggiore. I did extensive research on each of the five regions and settled on Riomaggiore for several reasons. The first reason was the scenery and the rugged landscape of this southernmost town in the Cinque Terre. The shoreline here is dramatic to say the least with it’s rocks shooting straight up out of the water and the homes built up along the cliffside. The boats in the harbor belong to the villagers who go out fishing every day and sell their catches to the local restaurants and families. The second reason was just how small and uncrowded Riomaggiore looked. Now don’t get me wrong, all of the towns are small and quaint, but Riomaggiore looked more so than the others. And I was right! My goodness this town had so much character and charm. The locals were so nice and welcoming. The little coffee shop had the best cappuccinos of my life. The restaurant across the street had incredible pizza and local beer and wine.
The terrain of Riomaggiore is not for the faint of heart. If you’re looking for a town to just relax at and take it easy, this one is not for you. Getting around by foot anywhere in Riomaggiore is not easy. The streets are incredibly steep and getting anywhere requires hiking. In fact, after a few days my calves and feet were so tired that it was even hard to walk downhill! But I didn’t care, the beauty of this town made it all worth it.
Where To Stay, Where To Eat
My wife and I stayed in Riomaggiore at the Locanda dalla Compagnia. You won’t see this hotel in the picture above as it’s around the corner and up the hill about 100 yards or so, right next to the church. The staff was incredibly nice and accommodating. We got in to Riomaggiore past dark on our first night and weren’t able to call ahead like we were supposed to. Therefore, the hotel lobby was closed and locked. We were freaking out. This was our first stop in Italy. We had just been on a plane for about 11 hours. Spent an entire day in the crazy city of Milan and then a 3 hour (if I remember correctly) train ride to Riomaggiore on two different trains. So when we finally got to our hotel at the end of a very long day, only to find it closed and locked, in a foreign country with all of our luggage, we were a little frustrated! Luckily for us, there were two young men drinking coffee in the lobby who let us in. They were from Israel and it was their last night in town. They unlocked the door to the lobby and let us use the phone to call the hotel owner who had left a note for us to call when we got in. The lady arrived about 15 minutes later and led us to our room. Phew! The view from our hotel was incredible. Although in town and away from the coast, we had a view of the main street in Riomaggiore looking down over the church. The room was a decent size with a small kitchen area and a big enough bathroom and I think we paid around 80 euros a night for it.

Boats floating in Riomaggiore’s harbor | © James Brandon
As far as food goes, just pick a place! I can’t for the life of me remember the names of all the places we ate at and tried. In fact, I think just finding a place and trying it out is half the fun in a place like this. In the main part of town (around the corner in the picture above) there’s a small little place that serves great espresso and breakfast in the morning. It’s right across from another restaurant that has a covered patio eating area outside. I couldn’t even find this place on Google! The fact is, it doesn’t matter where you go. We only ate at one bad restaurant during our entire trip to Italy and it was so bad that we laugh about it to this day (it was in Bellagio on Lake Como). It was just part of the experience.
Things To Do
Oh there’s plenty to do! Traveling between the towns in the Cinque Terre is easy and there are several ways to do it. The easiest is by train. For just a few euros you can travel to any town you’d like and be there in just a few minutes. You can also travel by boat or hike along a trail that connects to each town. I would love to have hiked the entire trail but we ended up just doing the stretch from Riomaggiore over to Manarola; a hike along the edge of the cliffs overlooking the Mediterranean called the Via Dell’Amore (Pathway of Love). The towns in the Cinque Terre were extrememly isolated from eachother and the outside world until the past century. After WWII the trail between Riomaggiore and Manarola was established as a meeting point for girls and boys from the two villages and so the name came to be. The trail is breathtaking to say the least and I highly recommend taking the time to do it.
You can also take a dip in the mediterranean at any of the beaches, lay out and get a tan, shop at any of the local stores and galleries, or just spend the day exploring without any plans (my favorite).

A home in Riomaggiore | © James Brandon
Other Parts of the Cinque Terre
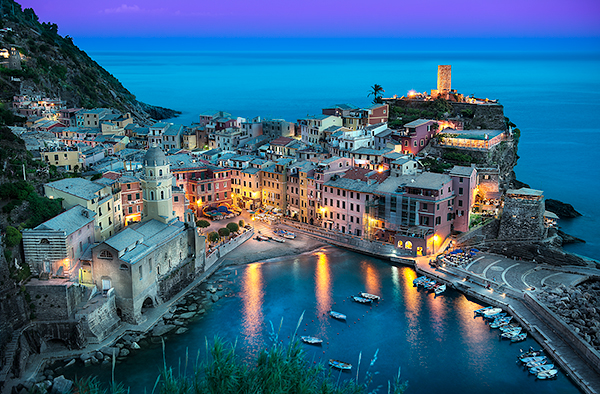
The Beautiful Vernazza | © Elia Locardi. Click image to see bigger!
Riomaggiore is just one of five towns in the Cinque Terre. Each town has it’s own charm, it’s own look and feel. While Riomaggiore is my personal favorite, Vernazza comes in a close second. Vernazza is probably the most well know of the five towns and probably the most photographed as well. It was also nearly destroyed back in 2011 by a flood and is just now getting back to normal. Most people I talk to who have been to the Cinque Terre stayed in Vernazza. It’s also Rick Steve’s favorite of the five towns.
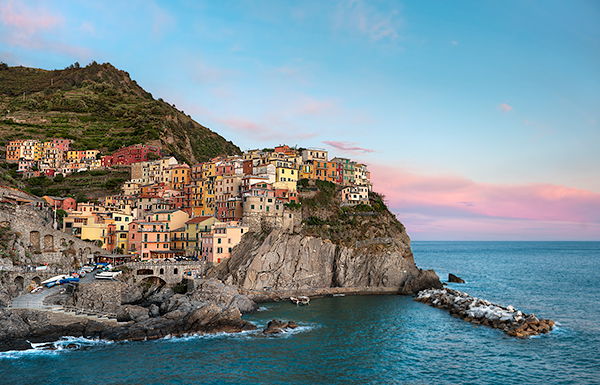
Dreams In Color | © Elia Locardi. Click image to see bigger!
The next on my list would be Manarola (seen above). This town is also very rugged, like Riomaggiore with a much larger coastline. It also may be the oldest of the towns in the Cinque Terre, with the cornerstone of the church, San Lorenzo, dating from 1338.

A sculpture carved out of the cliffs at a castle in Monterosso | © James Brandon
Right behind Manarola on my list is Monterrosso. This town is probably the best town to stay in if you just want to relax and walk around. It’s very flat, has a great beach that stretches along the coastline and the town itself is quite huge. Probably the biggest of the five. We spent one evening here and had a great time. The reason it’s so low on my list is just that it’s not as dramatic, photographically speaking, as some of the others. You could easily spend a week here and get several portfolio quality shots, but it’s hard to rate these towns when they are all so amazing!
Last on my list would be Corniglia. Again, Corniglia is an amazing town and incredibly beautiful! The only reason it’s last is because it’s the only town in the Cinque Terre that isn’t on the coast. Instead, it’s nestled up in the cliffs surrounded by vineyards and terraces.
Conclusion
I hope everyone reading this will get a chance to visit this place in their lifetime. I (along with so many other photographers) have fallen in love with this place and can’t wait to go back some day soon. The scenery is jaw dropping, the people are nice and welcoming, the food is spectacular, the water warm enough to swim in, the weather perfect for hiking between towns and all the rest of Italy is just a quick train ride away. Folks…this place has it all!
Huge thanks to Elia Locardi for providing a couple of images for this article. His website Blame The Monkey is a great resource for any photographer and I highly recommend checking it out.
If you’ve been to the Cinque Terre region or are planning on going, be sure to chime in below! You can also find me on Twitter if you have any questions. Cheers!
Post originally from: Digital Photography Tips.
Check out our more Photography Tips at Photography Tips for Beginners, Portrait Photography Tips and Wedding Photography Tips.
Photography Bucket List – Cinque Terre, Italy

Digital Photography School


 FINDING A GOOD SUBJECT

You must be logged in to post a comment.