RSS
 

Posts Tagged ‘Photography’

Newborn Photography Black and White Conversion in Lightroom

25 Oct

Introduction

The Following is an excerpt from the SLR Lounge Lightroom Preset System v5 and accompanying workshop.  The Lightroom Preset System is designed to take you from Ordinary to Extraordinary photos in just a few seconds and clicks. In this tutorial we’re going to be creating a nice soft black and white portrait for a newborn baby captured from the Newborn Photography Workshop where we teach photographers how to take beautiful newborn with any camera using simply natural window light and a reflector.

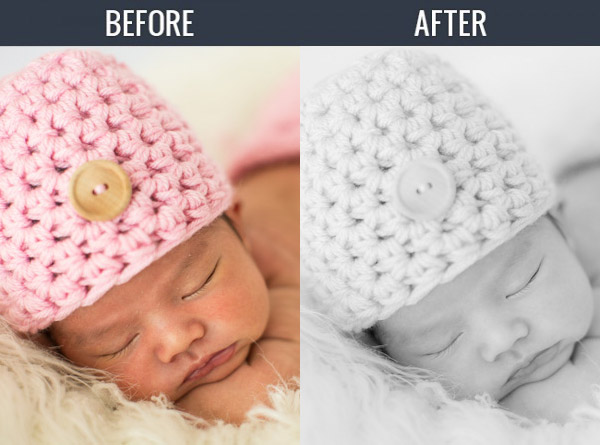
The complete written tutorial is below, and you can also watched the video tutorial at the end of this article. Here’s a sneak peak at what our image will look like before and after our edit.

newbeforeafter


Black and White Conversion for Newborns

The first thing we did to this image was adjust our Color Tempurature to taste, and in this case we used the Eye Dropper Tool (W) taking a reading from the fur that the newborn is sleeping on.

After our Color Temperature adjustment we used our “01-10 Base – Soft: 12b Super Soft – B&W” preset to edit our photo. This preset does all of our work for us and after this preset is applied our photo edit is pretty much finished. So let’s go over exactly what this preset did.

First, the Highlights and Whites have been taken down to -60 and -40. This is to smooth out highlights by bringing them closer to the mid-tones and shadows. This adjustment has the effect of softening highlights over skin tones giving us much more evenly lit skin.

Next, Clarity is being dropped to -20 in order to reduce mid-tone contrast. The reduction of mid-tone contrast again helps us achieve a softer and more flattering look. However, I would caution not to take the Clarity slider down too far as it can create an overly-soft looking image completely lacking in contrast and mid-tone detail.

In this black and white conversion the Reds, Oranges, and Yellows in the HSL are being raised, which again is primarily for skin tones. This brightens up the skin tones, further enhancing the soft flattering look.

We have our standard amount of Sharpening for portraits applied to this image which you can see below.

Also worth noting, the preset we selected dialed in a Noise Reduction Luminance setting of +30. Noise reduction was added to the preset in order to quickly reduce a little bit of the pore detail in the skin giving it a slightly smoother overall look. At an amount of +30, we will see a nice smoothing effect over skin, while retaining the majority of our fine detail in the hair, eyes and so forth.

Below is a snapshot of all of our final settings to achieve this look.

developsettings

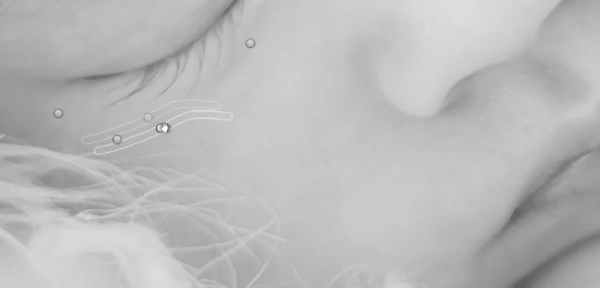
To clean up the skin a little we can use the Lightroom 5 Spot Removal Tool to remove some of the more obvious bits of dry skin and hair. Adobe has modified the Spot Removal Tool in Lightroom 5 to operate more like a brush making the tool much more powerful than in previous editions of Lightroom.

Just remember to keep your Spot Removal Tool size small and just large enough for the area you are working so that it doesn’t look unnatural.

Screen-Shot-2013-07-30-at-9.59.27-PM-650x313

Black and White Conversion for Newborns

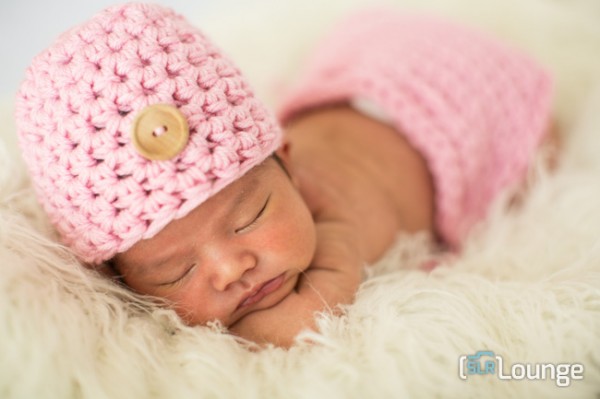
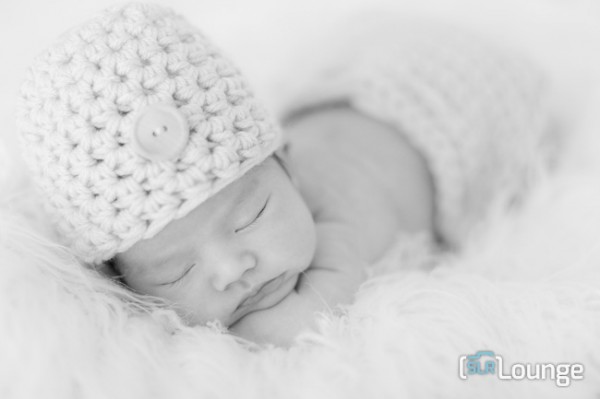
Here’s  a look at the final before and after of our newborn black and white portrait.

Before

lightroom-5-tutorial-soft-black-and-white-newborn-0001

After

lightroom-5-tutorial-soft-black-and-white-newborn-0002

Watch the Video Tutorial

If you would like to see exactly how all of the settings and adjustments were applied, please watch the video below from the SLR Lounge YouTube Channel.

Conclusion and Learn More

We hope you all enjoyed this tutorial. If you are interested in learning more or purchasing the SLR Lounge Lightroom Preset System v5 or the newly released Lightroom Workshop Collection v5, please click any of the links in this article. If you are interested in Newborn Photography Workshop please also check out our Newborn Workshop Collection and Lightroom Presets now available via digital download.

Post originally from: Digital Photography Tips.

Check out our more Photography Tips at Photography Tips for Beginners, Portrait Photography Tips and Wedding Photography Tips.

Newborn Photography Black and White Conversion in Lightroom

The post Newborn Photography Black and White Conversion in Lightroom by Post Production Pye appeared first on Digital Photography School.


Digital Photography School

 
Comments Off on Newborn Photography Black and White Conversion in Lightroom

Posted in Photography


10 Best Photography Books Bursting With Inspiration for Every Photographer

24 Oct

Every passion in life begins with an inspiration. This is especially true in the arts, where inspiration is such a huge part of the artist mindset. One great piece of art can change someone’s world and set them on the right path. Many photographers today—from nature photographers to portrait photographers—have started out this way. Beautiful photographs incited in them a Continue Reading

The post 10 Best Photography Books Bursting With Inspiration for Every Photographer appeared first on Photodoto.


Photodoto

 
Comments Off on 10 Best Photography Books Bursting With Inspiration for Every Photographer

Posted in Photography


Making Your Stock Photography Sell Like Crazy

24 Oct

Photographers get into stock photography in order to sell their pictures and make a respectable amount of extra money. Unfortunately, this is easier said than done since so many things can get in the way. For many photographers, their experimentations with stock photography simply amount to a waste of time and effort, which is unproductive. However, setting up and editing Continue Reading

The post Making Your Stock Photography Sell Like Crazy appeared first on Photodoto.


Photodoto

 
Comments Off on Making Your Stock Photography Sell Like Crazy

Posted in Photography


Polarizing and Neutral Density Filters: Essentials for Landscape Photography

24 Oct

In landscape photography, just as in portraits, fashion, products, or any other subject matter, accurate color capture is crucial. What makes it so much more difficult with landscapes, however, is the wider disparity in dynamic range, not only between foreground and background elements, but primarily between the upper and lower halves of the frame– between the earth and the sky. If you are into shooting landscapes, overcoming this hurdle will require you to have one of two filters (if not both) in your arsenal, even if you don’t use filters in any of your other photography.

Polarizing Filter

Polarizing filters– sometimes called the secret weapon of professional landscape photographers– create richer, more vivid colors. The filter pulls double duty by (1) cutting down on reflections from bright surfaces like water and rocks, and (2) adding rich blues to skies by darkening them and increasing the color and tonal saturation throughout the frame. Polarizing filters are most effective when shooting at a 90-degree angle to the sun. It will therefore be least effective when the sun is either in front of or behind you. Polarizing filters will also enhance clouds, but you have you to be careful with your lens choice. Just like you can overdo it in post production, it’s quite possible to overdo it in-camera if you use a polarizing filter on a super-wide-angle lens. The result will be uneven shades of blue in an over-saturated sky.

Without a polarizing filter

Without a polarizing filter

With a polarizing filter

With a polarizing filter

Neutral Density Filter

Neutral density gradient filters help balance the exposure between the ground and sky to capture a range of exposure that the camera cannot possibly handle on its own. If you expose for the ground, you’ll get a gray or white washed-out sky. Exposing for those awesome blues and soft, billowy clouds, on the other hand, will make the ground so dark you’ll lose much of the detail you set out to capture in the first place.

A wide view of a hand-held graduated neutral density filter illustrates how valuable it is to capturing accurate colors in landscape photography.

A wide view of a hand-held graduated neutral density filter illustrates how valuable it is in capturing accurate colors in landscape photography.

The filter itself is dark at the top, completely clear at the bottom, and essentially shades of gray in between. Available in two varieties, the circular version attaches to the front of the lens like any other traditional filter. The other type is a square or rectangular filter that you hand-hold in front of your lens. Both work the same way, darkening the sky to avoid blowouts, while leaving the ground untouched and unfiltered. It’s a seamless transition that ensures proper exposure throughout the frame– making sure you get vibrant, saturated, and (most importantly) accurate colors in all of your landscape shots.

Neutral Density Photo Credit: Flickr Creative Commons User Kain Kalju.

Post originally from: Digital Photography Tips.

Check out our more Photography Tips at Photography Tips for Beginners, Portrait Photography Tips and Wedding Photography Tips.

Polarizing and Neutral Density Filters: Essentials for Landscape Photography

The post Polarizing and Neutral Density Filters: Essentials for Landscape Photography by Jeff Guyer appeared first on Digital Photography School.


Digital Photography School

 
Comments Off on Polarizing and Neutral Density Filters: Essentials for Landscape Photography

Posted in Photography


Reflectors: Your Secret Weapon for Amazing Portrait Photography

23 Oct

By: Oded Wagenstein

There is no doubt that using natural light in portrait photography can get you the best results.

However sometimes, as you all probably know, natural light does not do what he’s told. So here comes into action what I like to call my secret weapon in outdoor Portrait Photography.

It is cheap, easy to carry and especially does not frightens my subjects, who themselves can be a little intimidating at times.

Reflector

 
It is just that! It reflects light. There are hundreds of different types of reflectors, which differ in sizes and colors (i.e. white, silver, gold, etc.). A reflector is usually a reflective fabric, stretched over a bendy ring, allowing it to fold, and easy to carry.

With so many types of reflectors on the market, I cannot review them all. This mini-guide will focus on the main reflector I use for my work.

12 ” in size, and costs less than a movie theatre ticket.

I sometimes use other larger reflectors (mainly in cinematography productions), but this 12? reflector suits my needs in travel photography; mainly because it is small enough, allowing me to hold it with one hand and the camera with the other.

To Fill up Shadows:

We all love taking pictures at sunrise and sunset. But when dealing with the harsh mid-day light, a reflector is almost a must.

Fstop of 2.8, shutter speed@ 1/100 and ISO 200

Fstop of 2.8, shutter speed@ 1/100 and ISO 200

In the above picture, taken in the western Indian Rabari tribe, for the National Geographic Traveler magazine (Israeli edition), our model was sitting in a dark mud house. He was sick; therefore it was not an option to move him outside.  On the left wall of the house, there was a small window (as can beautifully seen illuminating in the background), My trusty camera assistant Hardik Pandaya, held a silver colored reflector below the subject ‘s face in order to fill any shaded areas such as under the eyes.

reflectors portraits 2

The above picture was taken on the border of Afghanistan and Tajikistan. Please note that although the woman is standing in the shade and the background is bright, the woman is not a black silhouette and the background is not burned out.  I measured the light from the background (using spot metering). In such a situation, without using a reflector, the character will turn out completely black (silhouette) but with a reflector held on my left hand, I was able to light up her face.

Fstop of 8, shutter speed@ 1/250 and ISO 100

Fstop of 8, shutter speed@ 1/250 and ISO 100

reflectors portraits 4

Below is 80 years old Getho. A fisherman from the small community of Sea Gypsy living in, Thailand. This image is a little bit complex in terms of lighting, because there are three sources of lighting here. Just like in the studio, my main light source (key light) was the house door (right side of the frame). The light was coming from a 45 degree angle, creating this dramatic volume on Getho’s face (you can read more about “sculpturing” with 45 degrees light in this post here).

In my left hand I held the small Silver color reflector, filling the shadows (fill light) on his face? and behind him was an open window for additional  light on his beautiful white hair (back light).

Fstop of 4, shutter speed@ 1/100 and ISO 320

Fstop of 4, shutter speed@ 1/100 and ISO 320

refectors portraits 6

Sometimes a reflector is the only option to shoot under strong sunlight, as you can see in this picture.

reflectors portraits 7

Choose the Right Color

Most reflectors come in multiple colors. In this picture, taken in Western India for the National Geographic Traveler magazine (Israeli Edition), I wanted to preserve the golden- brown color which was dominate in this scene. So I asked Hardik to hold the reflector on its golden side giving the woman’s face a golden glow.

Fstop of 4.5, shutter speed@ 1/80 and ISO 100

Fstop of 4.5, shutter speed@ 1/80 and ISO 100

reflectors portraits 9

Choosing the right distance

It is important to keep in mind that the closer the light source is to the photographed subject, the stronger and less soften it will appear. Thus, a small reflector is easier to carry and hold; however it will be not as soft as a large reflector.

A “catch light” is an interesting spark in the eyes of the subject, “pulling” the audience to look straight at them. There are lots of methods to create a catch light in the subject’s eyes. For example using a flash or a flashlight. However, as we are discussing on the usage of natural light, a reflector can become a great tool for creating a catch light. Just place the reflector under the person’s face.

You can see some catch light examples here:

Fstop of 3.5, shutter speed@ 1/640 and ISO 250

Fstop of 3.5, shutter speed@ 1/640 and ISO 250

reflectors portraits 11

Fstop of 2.8, shutter speed@ 1/200 and ISO 100

Fstop of 2.8, shutter speed@ 1/200 and ISO 100

One of the most useful techniques, in order learn how to work with natural light in my opinion, is by observing the images of other photographers. Try to guess the direction of the light and the position and color of the reflector in the images below:

Fstop of 2.8, shutter speed@ 1/320 and ISO 3200

Fstop of 2.8, shutter speed@ 1/320 and ISO 3200

Fstop of 4.5, shutter speed@ 1/160 and ISO 100

Fstop of 4.5, shutter speed@ 1/160 and ISO 100

Fstop of 3.5, shutter speed@ 1/320 and ISO 1000

Fstop of 3.5, shutter speed@ 1/320 and ISO 1000

Fstop of 2.8, shutter speed@ 1/15 and ISO 200

Fstop of 2.8, shutter speed@ 1/15 and ISO 200

Fstop of 3.5, shutter speed@ 1/320 and ISO 160

Fstop of 3.5, shutter speed@ 1/320 and ISO 160

Fstop of 2.5, shutter speed@ 1/1000 and ISO 250

Fstop of 2.5, shutter speed@ 1/1000 and ISO 250

The diagrams were created by http://www.lightingdiagrams.com

Oded Wagenstein is a Travel photographer and writer. He is a regular contributor to the National Geographic Traveler magazine (Israeli Edition) and he is known for his intimate portraits from around the world. You can join his Portrait & Travel Photography Facebook page and continue to discuss on travel and people photography and get more amazing tips! –

Post originally from: Digital Photography Tips.

Check out our more Photography Tips at Photography Tips for Beginners, Portrait Photography Tips and Wedding Photography Tips.

Reflectors: Your Secret Weapon for Amazing Portrait Photography

The post Reflectors: Your Secret Weapon for Amazing Portrait Photography by Guest Contributor appeared first on Digital Photography School.


Digital Photography School

 
Comments Off on Reflectors: Your Secret Weapon for Amazing Portrait Photography

Posted in Photography


Marco Bohr investigates ‘hipster photography’

20 Oct

hipster4.jpg

What is ‘hipster photography’? Photographer Marco Bohr has written a blog post in which he attempts to define ‘a new genre of photography which is apparently produced, promoted and disseminated by trend conscious people who are in contemporary visual culture referred to as hipsters’. In his post, Bohr argues there is a distinction between a photograph of hipsters and a photograph by hipsters. He aims to deconstruct these images, and see beyond the thick black-framed glasses, quirky haircuts, and geeky watches. Click through for more details. 

News: Digital Photography Review (dpreview.com)

 
Comments Off on Marco Bohr investigates ‘hipster photography’

Posted in Uncategorized


7 Tips for Kayak Paddling Photography

19 Oct

I would like to remind you this old post, How Did you Shoot It? with some updates and revisions. It was written two years ago as part of ProBlogger’s group writing project – “How to …” I hope that these tips are still useful. They represent quite well my own approach to paddling photography.


After posting the above picture, “Paddling in Clouds”, I’ve got several questions: How did you do it? And, I had troubles to provide a reasonable answer since the shot was technically really trivial.

Finally, I figured out that it is more about seeing pictures than about shooting and wrote these more general comments.

1. Look and See

Learn to see pictures. You do not need a camera to practice it. I am often “shooting” without camera, especially, when driving: that would be a good picture, this old barn would look great at sunrise, that dust devil at a horizon can be seen only through polarized glasses.

I believe that looking at photographs in magazines, books and calendars also help to develop your seeing capability. I am checking all new photography books arriving to my university library and browsing most of photography magazines in a local bookstore.

There are several good books on the art of seeing. Freeman Patterson comes to my mind first. Recently, I spent a lot of time with Photographer Eye by Michael Freeman.

2. Have a Camera

A photographer is shooting pictures, not a camera, but you should have your camera ready. “Ready” means not only accessible. You should be familiar with your camera settings and operations. Learn what camera settings are working for your paddling photography. It may be difficult to figure out camera features when sitting in a tippy kayak and waves are splashing.

Compact waterproof digital cameras like Pentax Optio “W” or Olympus Stylus “SW” revolutionized my kayak photography. I can shoot pictures I was not able to execute before, e.g., with a partially submerged camera. I am ready to sacrifice some camera features or to some extend a picture quality for convenience and accessibility of these tiny camera for paddling environment.

3. Be Aware of Light

The best light for outdoor photography is when the sun is low, i.e., around sunrise and sunset. I know that I can expect interesting light at the end of my afternoon paddling workout. If the sunset is not very exciting I can shoot water reflections or a tree silhouette.

Ironically, on paddling trips, we are often passing the best scenery in the middle of day, when the light is harsh and unpleasant. I am still shooting some snapshots for documentary purposes. My primary motivation to start paddling fast kayaks was to get in time to my shooting spots. All that racing craziness came later …

4. Point (compose) and Shoot

Do not be afraid to shoot without viewfinder. Well, you don’t have one in Pentax Optio. And, the LCD display is often difficult to read in a bright sun. It shouldn’t stop you from shooting. Use some creative angles as far as you can extend your arm. Remember, you can put this camera under water next to you kayak. The lack of a viewfinder is perhaps the main reason preventing some photographers from buying this camera, but I think that this a reasonable compromise in the camera of this size.

I didn’t have a clear view of the camera display when shooting my “Paddling in Clouds” picture. I was just trying to keep a paddle diagonally in my frame.

foggy sunrise over Suwannee River, Florida

5. Shoot Multiple Frames

Shooting pictures with a digital camera is cheap. You do not need to worry about film cost. You can always erase the picture and shoot again unless you are after some action shots. So, do not be afraid to experiment and shoot even if you do not see the image in your LCD monitor. Shoot some extra frames. It is helpful to have an adequate memory card.

I shot about 30 frames trying to catch a sky reflection in water and in my paddle. However, I would show not more than 3 or 4 from those 30 frames.

6. Practice

The more you shoot the better you should get. I have shot similar pictures before including reflections and a paddle.

Review your pictures on the camera LCD if possible. Check the histogram. Analyze your shots after paddling on a computer screen. You have all information about camera setting included in each digital image file. Try to figure out what worked and what not. Learn from mistakes.

7. Have Fun

I don’t consider myself a professional photographer. When paddling I am shooting what I like just for fun. Documenting my paddling trips and races is still fun. I feel free to experiment.

The great Alfred Stieglitz was an amateur photographer too. Anyway, the photography is not a profession…

Sometimes I sell a picture to a magazine or donate to a book cover. A year ago, I started to sell my pictures through microstock agencies. I am just taking more often my DSLR camera and a tripod for paddling.

Related posts:kayaking Colorado - Douglas Lake

  • Use Your Paddle to Stabilize Camera
  • No Viewfinder? 10 Tips on Shooting Pictures without Viewfinder
  • Pentax Optio WP/WPi – 10 Tips on Paddling and Shooting
  • Can Pentax Optio waterproof cameras be used in the water?
  • Pentax Optio W10 as a Helmet Cam – Inline Skating along the Poudre
  • Shooting movies with Pentax Optio WP and W10 and Sisson Nucleus 100 kayak


paddling with a camera

 
Comments Off on 7 Tips for Kayak Paddling Photography

Posted in Photography


Shadows: Weekly Photography Challenge

19 Oct

Earlier today we published our post – 25 Images with Shadows – which we hope gave you a little inspiration.

Shadow images
Now it is your turn.

We’d love you to to grab your camera and over the next week look for some shadow images because that’s the theme for this weeks challenge. Take a shadow photo and then share it with us as outlined below.

Once you’ve taken your ‘Shadow’ shots we’d love to see them in comments below. Simply upload your shot into the comment field (look for the little camera icon in the Disqus comments section as pictured below) and they’ll get embedded for us all to see or if you’d prefer upload them to your favourite photo sharing site and leave the link to them.

If you tag your photos on Flickr, Instagram, Twitter or other sites with Tagging tag them as #DPSPINK to help others find them. Linking back to this page might also help others know what you’re doing so that they can share in the fun.

Also – don’t forget to check out some of the great shots posted in last weeks Pink challenge – there were some great shots submitted.

Post originally from: Digital Photography Tips.

Check out our more Photography Tips at Photography Tips for Beginners, Portrait Photography Tips and Wedding Photography Tips.

Shadows: Weekly Photography Challenge

The post Shadows: Weekly Photography Challenge by Darren Rowse appeared first on Digital Photography School.


Digital Photography School

 
Comments Off on Shadows: Weekly Photography Challenge

Posted in Photography


Your Real Estate Agent Would Like Some Free Photography, Please

18 Oct

Please pardon the detour today. I need to rant. I'd like to share with you the ballsiest request for free picture use that I have ever gotten…

Read more »
Strobist

 
Comments Off on Your Real Estate Agent Would Like Some Free Photography, Please

Posted in Photography


10 Tips to Make Your Photography Business Flourish

17 Oct

As with all other types of businesses, your photography business won’t become successful overnight, no matter how much you want it to. There’s so much to consider when starting it up: marketing costs, an online presence, physical store space, overhead and, of course, consummate skill in shooting and editing your pictures. There is only so much of the marketplace available Continue Reading

The post 10 Tips to Make Your Photography Business Flourish appeared first on Photodoto.


Photodoto

 
Comments Off on 10 Tips to Make Your Photography Business Flourish

Posted in Photography