RSS
 

Posts Tagged ‘Photography’

The Sensitive Side of Newborn Photography

09 Nov

By Annie Tao

Sensitive Side of Newborn Photography

There are many ways you can photograph newborns, but one thing is for certain: it takes a certain amount of finesse to photograph these tiny little creatures that is beyond an ability to operate a camera and knowledge of photography.
?If you’ve had a baby, then you probably know what I am talking about. Newborns are especially fragile with soft bones and unfused plates in their skull, so moving them around should be done carefully. In fact, I will ask the parents to handle the baby during my Newborn shoots, if I want the baby to be in a different place or position.

Newborns are also only recently outside the protection of their mother’s womb, so they are more susceptible to disease, cold and stress than other people you will probably photograph.

Here are 6 tips to the sensitive side of Newborn Photography.

1. Avoid wearing fragrances

Sensitive Side of Newborn Photography 4

That includes perfumed soaps, lotions, perfumes/colognes, after shave, and hair styling products. Babies have sensitive noses. The last thing you’d want is to have your precious subject sneezing. If she (or he) is uncomfortable, then she will be restless and fussy.

2. Wash hands before you begin

Sensitive Side of Newborn Photography 2

The first thing you should do when you enter the newborn’s environment is to wash your hands really well. Even if you don’t plan to touch the baby, you will most likely touch things that the baby has contact with, like the crib.

3. Reduce the chance of bringing germs into the newborn’s environment

Reschedule if you are ill.

There is nothing more stressful than needing to care for a sick newborn. Their bodies are too young for medicine, so do the baby’s family (and the baby) a favor by rescheduling if you are sick – especially if you have a fever.

4. Turn up the heat

Sensitive Side of Newborn Photography 3

Babies are happy and sleepy when they are warm, so turn up the heat, but do this safely. If you use a space heater, be careful not to place it too close to the baby or whatever the baby is on or in.

For instance, if the heater is pointed lower than the baby itself, it can still endanger the baby by heating up the basket she is in.

5. Use your client’s props, if you can

Sensitive Side of Newborn Photography 1

Blankets, hats, stuffed animals, shoes, baskets…they are all so cute to use during your Newborn session.

If you use your client’s props, then the items in the photos will be more meaningful to them (ie, Aunt Mary crocheted the hat, the basket is from the parents’ wedding, the stuffed animal is the same one the dad had as a child).

The photos will also be more unique than using the same props over and over.

6. Don’t force a pose

You or the parents of the baby may want to get a shot of the baby in a certain position or posed on a particular object. Please assert caution when attempting such feats.

Newborns are great to photograph because they can be positioned for a photograph, but they are human beings, not dolls. Take precaution and remember that babies are delicate. If they appear uncomfortable or unhappy, call it quits and find an alternative shot.

Sensitive Side of Newborn Photography 5

Newborns should be comfortable and safe at all times. So do what you can as their photographer to keep them that way during their photography session.

Annie Tao is a Professional Lifestyle Photographer in the San Francisco Bay Area who is best known for capturing genuine smiles, emotions and stories of her subjects.  You can visit annietaophotography.com for more tips or inspiration and stay connected with her at facebook.com/annietaophotography.

Post originally from: Digital Photography Tips.

Check out our more Photography Tips at Photography Tips for Beginners, Portrait Photography Tips and Wedding Photography Tips.

The Sensitive Side of Newborn Photography

The post The Sensitive Side of Newborn Photography by Guest Contributor appeared first on Digital Photography School.


Digital Photography School

 
Comments Off on The Sensitive Side of Newborn Photography

Posted in Photography


Bugs Eye View: Weekly Photography Challenge

02 Nov

This week your photographic challenge is to take and share a photo (or photos) with the theme of ‘bugs eye view’.

Hit The Deck

We’re looking to see lots of shots shared taken from a low down perspective (i.e. where a bug lives).

So get down low and go go go!

sometimes the road gets rugged and it's hard to travel on...

Further Reading on the Topic

  • 7 Tips for Great Low Angle Shots
  • Get Down Low for a Unique Perspective
  • 20 Examples of Low Angle Photography

Once you’ve taken your ‘Bugs Eye View’ shots we’d love to see them in comments below. Simply upload your shot into the comment field (look for the little camera icon in the Disqus comments section as pictured below) and they’ll get embedded for us all to see or if you’d prefer upload them to your favourite photo sharing site and leave the link to them.

If you tag your photos on Flickr, Instagram, Twitter or other sites with Tagging tag them as #DPSBUGSVIEW to help others find them. Linking back to this page might also help others know what you’re doing so that they can share in the fun.

Also – don’t forget to check out some of the great shots posted in last weeks Pets challenge – there were some fantastic shots submitted.

Post originally from: Digital Photography Tips.

Check out our more Photography Tips at Photography Tips for Beginners, Portrait Photography Tips and Wedding Photography Tips.

Bugs Eye View: Weekly Photography Challenge

The post Bugs Eye View: Weekly Photography Challenge by Darren Rowse appeared first on Digital Photography School.


Digital Photography School

 
Comments Off on Bugs Eye View: Weekly Photography Challenge

Posted in Photography


The Winners of the NYIP Photography Courses Are…

31 Oct

NewImageA BIG thank you to everyone who entered our recent competition to win one of five photography courses from our friends at NYIP.

The response was terrific with over 400 entries. In fact, it was so great that the team at NYIP decided to offer a special $ 100 discount off any of the courses (details below).

But first – here are the 5 winners of the competition:

  • Ashley Smith wins the Complete Course in Professional Photography
  • Rebecca Cozart wins the Marketing for Photographers Course
  • Jayca (comment #354) wins the Photoshop for Photographers Course
  • Donna (comment #327) wins the Fundamentals of Photography Course
  • Dion V. (comment #253) wins the Complete Course in Video Making and Storytelling

A Message from NYIP (and a $ 100 discount)

Wow! Here at NYIP we were thrilled with the quality and the quantity of the responses we received for this contest. As always, the DPS community came out in full force looking for quality photography education. Unfortunately, not everyone can win. But for those of you who did not win, we’d like to extend a special discount on the NYIP course of your choice. ??The discount code ‘AD1′ can be used when you enroll online or by phone to save $ 100 off either payment plan on any of NYIP’s courses. Simply get started by visiting www.nyip.edu. *Offer ends November 30, 2013.

Thanks again for all the wonderful submissions,

The NYIP Team”

Winners will be emailed with details of how to collect their prize by the team at NYIP.

Thanks again to everyone for entering and to NYIP for sponsoring this competition.

Post originally from: Digital Photography Tips.

Check out our more Photography Tips at Photography Tips for Beginners, Portrait Photography Tips and Wedding Photography Tips.

The Winners of the NYIP Photography Courses Are…

The post The Winners of the NYIP Photography Courses Are… by Darren Rowse appeared first on Digital Photography School.


Digital Photography School

 
Comments Off on The Winners of the NYIP Photography Courses Are…

Posted in Photography


Use it or lose it: Learning photography keeps your brain fit

30 Oct

elderlyphotog1.jpg

Crossword puzzles, sudoku, and listening to classical music won’t keep your mind as sharp as you once thought. New research found people who only participated in passive activities such as playing games got little memory benefit. However, learning photography showed significant gains in memory. Read more

News: Digital Photography Review (dpreview.com)

 
Comments Off on Use it or lose it: Learning photography keeps your brain fit

Posted in Uncategorized


The Ultimate Guide to Halloween Photography

29 Oct

Halloween. You know it for its pumpkins, ghosts, spooks, the color orange, annoying trick-or-treaters, costumes, masks and, of course, a plethora of candy to make your tummy hurt like crazy. You know it less for Halloween photography, but it turns out that this celebration is a wonderful opportunity for specialized photography. The absolute, best aspect of Halloween is the sheer Continue Reading

The post The Ultimate Guide to Halloween Photography appeared first on Photodoto.


Photodoto

 
Comments Off on The Ultimate Guide to Halloween Photography

Posted in Photography


Moon Photography: 6 Tips for Better Moon Photos

29 Oct

The moon is something so familiar to us, and yet so strange that it’s mesmerizing. It’s at once commonplace and extraordinary. As photographers, we are drawn to it in an attempt to convey the intrigue we feel when we look at it.

But moon photography can be tricky.

Moon Photography: Just the Moon, by Anne McKinnell

A bright full moon creates one of the most high contrast situations there is, posing a difficult challenge for photographers. Often photos of the moon appear like a spotlight in the sky that looks more like the sun than the moon.

Moon Photography Tips

To get the best possible pictures of our one-and-only moon, it’s important to know a few things about it first.

1. Learn the Phases of the Moon

The moon itself emits no light, it’s simply a huge rock being lit up by the sun. As it orbits the earth, and as the earth orbits the sun, how much we see of that reflection changes from a bright, full moon to no apparent moon at all.

Moon Photography: By Tomruen [Public domain], via Wikimedia Commons

By Tomruen [Public domain], via Wikimedia Commons

Because of our counter-clockwise trajectory around the sun, the shadow it casts on the moon is always moving to the left; after a new moon (no moon), the illuminated side starts to creep in from the right edge, expanding towards the left side each night. As the moon’s apparent size gets bigger, we call it “waxing”.

Once the moon is full, the shadow starts to reappear – again on the right side – and grow leftwards, shrinking the visible moon until it is dark again. This is called “waning”. Therefore, any time you want to know what the moon will look like tomorrow, look at it tonight; if it is lit on its right side, it is waxing towards fullness. But if it’s lit on the left, it is waning, and will soon be gone.

The twilight sky also holds clues to the lunar phases. If the moon is visible before sundown, it is waxing, but if you can see it before sunup, it’s waning. Alternatively, you can always look up a calendar online, or download a moon phase app that will do the calculations for you.

2. Use the Right Equipment

To maximize the success of your moon photography, there are a few bits of a gear that will come in handy.

Moon Photography: Moonrise over the Oak Bay Marina, in Victoria, British Columbia, by Anne McKinnell

  • A zoom lens.
    If you’ve ever taken a shot of the moon and been disappointed by the tiny white blob that results, you’re probably using too short of a focal length. A standard wide-angle lens makes everything appear smaller, particularly things that are far in the distance. To get a close-up shot, use a focal length of at least 200mm or more. Longer lenses will result in greater magnification and detail.
  • A tripod.
    To support the weight of this large lens, and to allow the slow shutter speeds that may be necessary to get a good exposure, mount your camera securely on a sturdy tripod.
  • A shutter release.
    These come in both wireless and wired options and will allow you to fire the shutter without having to depress the shutter button and risk camera shake. If you don’t have one, use your camera’s self-timer to achieve the same benefit.

3. Get a Good Exposure

The moon is very intricate and detailed, with craters, channels, and mountains dotting its surface. If the moon in your photo turns out bright white, it is overexposed. This happens frequently because the blackness of the surrounding sky throws the light meter off.

To fix this, turn down your exposure compensation (+/-), or use your camera’s spot metering mode to expose for the moon alone. Check your camera’s manual for information about how to do this on your specific model.

Moon Photography: Long Nights Moon by Anne McKinnell

For best moon photography results, bracket your shots. Some cameras will have an automatic bracketing feature, but if yours doesn’t, you can simply do it manually. First, take one shot at the automatically-determined settings. Then, using exposure compensation, take the same shot at -0.5EV, and one at +0.5EV. Do the same at -1EV and +1EV, and continue to +/-1.5EV and beyond if necessary. Later, you can choose the best exposure when you view them on your computer.

4. Find the Best Times and Places to Shoot

Unless the city is a part of your scene, you probably don’t want a lot of urban light pollution spilling into the sky when you’re trying to photograph a pristine moonlit night. You’ll get the cleanest shots outside of dense civilization. Explore backcountry roads, or take a hike into the nearby mountains to find truly dark night skies.

That said, a common problem photographers run into with moon photography is the harsh difference between a brilliantly lit moon and a pitch-dark sky. To avoid this, consider shooting during the “blue hours”, when the sky glows faintly after the sun goes down, or before it comes up. There is less contrast at this time, though the moon is still bright.

A moon phase app can help you determine when there will be a full moon during twilight.

5. Create an Interesting Composition

Supermoon at Bryce Canyon National Park, Utah, by Anne McKinnell
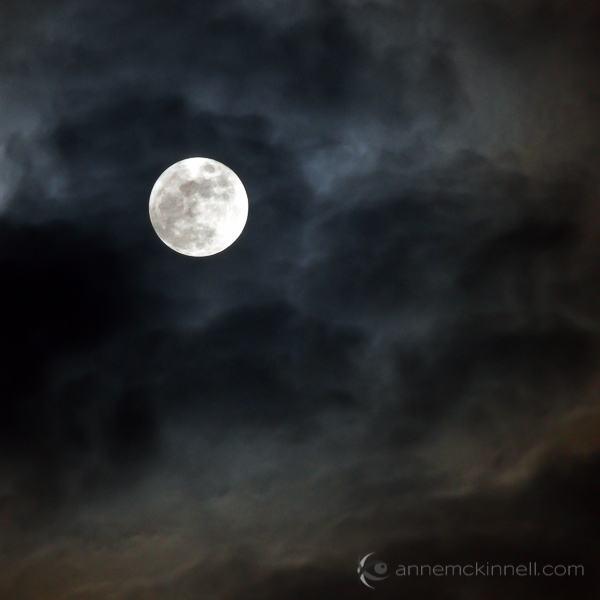
As compelling as a beautifully sharp, detailed image of a lonesome moon is, once you’ve seen one, you’ve seen them all. Getting that perfect close-up is excellent practice, but try to get creative by placing the moon within a more complex composition.

For instance, you could try framing it behind trees and buildings, or reflecting it off the surface of a still lake. Placing other objects in the foreground gives the moon context and scale that it lacks on its own. Think of the moon as a single element which should be incorporated along with other compositional elements and techniques to make a great final photograph.

6. Combine Multiple Exposures

Incorporating other objects can complicate things though, and you may find that the perfect exposure for the moon doesn’t match that of the rest of the scene. Sometimes natural light doesn’t cooperate, and the camera doesn’t see things the way our eyes do. This is where digital photography comes in really handy, allowing you to play with your images to create the scene the way you saw it, even if the camera saw it a little differently.

To do this, take several shots at different exposures by bracketing, as mentioned above. When you open the files on your computer, choose two: the one with the best exposure on the moon (‘Image 1′), and the one with the best exposure on the rest of the scene (‘Image 2′). Using an image editing program, select the moon from Image 1 and copy it, then paste it into Image 2, covering the moon in that picture. Use the eraser tool with a heavily feathered edge to remove any imperfections and blend the edges together. This method may take some trial and error to get it just right, so try it several times with several different shots to get the hang of it.

Moonrise over the ocen in Sidney, British Columbia, by Anne McKinnell

When performing this technique, try not to stretch or enlarge the size of the moon. The goal of image editing is to faithfully recreate a scene that the camera simply can’t capture all at once, so beware of any visual exaggerations that make the composition look unnatural or inauthentic.

Share Your Moon Photography Tips and Moon Photos

Got any more moon photography tips to add? We’d love to see them in comments below. Also feel free to share any photos you’ve taken of the moon.

Post originally from: Digital Photography Tips.

Check out our more Photography Tips at Photography Tips for Beginners, Portrait Photography Tips and Wedding Photography Tips.

Moon Photography: 6 Tips for Better Moon Photos

The post Moon Photography: 6 Tips for Better Moon Photos by Anne McKinnell appeared first on Digital Photography School.


Digital Photography School

 
Comments Off on Moon Photography: 6 Tips for Better Moon Photos

Posted in Photography


creativeLIVE’s entire photography catalog on sale until 31st October

29 Oct

FlashSale_950x360.jpg

Photography education resource creativeLIVE has announced a sale on all of its online photography workshops from now until the end of this month, plus a free three-day ‘Autumn Photo Critique’ evaluating submissions in three categories: wedding and family, commercial and fine art and portraiture. Click through for more details of the promotion.

News: Digital Photography Review (dpreview.com)

 
Comments Off on creativeLIVE’s entire photography catalog on sale until 31st October

Posted in Uncategorized


Choosing the Right Color Reflector for Your Photography

27 Oct

Of all the portrait lighting tools at our disposal, none are quite as versatile as the the five-in-one reflector. The concept itself is extremely basic. In the hands of a photographer comfortable with common lighting principles, the reflector helps us bounce light into or onto those areas that aren’t getting enough light, regardless of whether we are using natural, ambient, or studio/strobe lighting.  A reflector placed directly opposite a main light can act as a hair light, creating separation between the subject and background. Placed in front of a back-lit subject, we can negate the silhouette effect, using available, natural light to balance the exposure between our subject and background. Held at a ninety-degree angle to a subject’s chest, we can toss some light up on the subject’s face and neck, eliminating troublesome shadows caused by foreheads and chins when using overhead or mid-day lighting.

The possibilities really are nearly endless, and– just as importantly– affordable. While there are many options available, at about $ 40.00, The Westcott 40″ 5-in-1 Reflector meets (and often exceeds) my needs, in terms of price, size, durability, and versatility. But dropping $ 40 on a reflector and adding it to your bag of tricks is only half the battle. Like the name says, you’ve got five-in-one. While technically not all five are actually reflectors, knowing which of the five to use and under what circumstances is essential to successful photographs.

gold-reflector-guyer-photography

5-in-1 Reflector surfaces are attached to or removed from the outer ring with zippers.

Silver

The silver panel is one of the most useful, and is best for beginners first getting their bearings with reflectors. Since the silver reflects the most amount of light of the five, it is a great choice for low-light situations or those scenarios where you need a strong fill light. Since it  doesn’t change the color of white-balanced flash or studio lights, it is perfect for both indoor and outdoor portraits. Another reason it works so well for beginners is that most first-timers make the mistake of not placing the reflector close enough to their subject. The silver reflector’s ability to shine more light than the gold, for instance, allows it to be placed further away from the subject than we typically want, without sacrificing results. One word of caution, though– the fact that the silver is the strongest of the five is an advantage, but it can also be too strong in already bright light unless it’s feathered. Take some time to experiment with proper and effective placement.

Gold

The gold reflector is great for outdoor portraits because it matches the warm color tones of sunlight. The gold reflector is actually at its best when it is reflecting sunlight, casting a warm glow on the subject. It’s easy to turn normal skin tones overly yellow, however, if you aren’t careful. This is also why the gold reflector is also not recommended for studio or flash work. It not only changes the color of the white light that hits it, but can cast uneven color tones on the subject.

White

Under most circumstances, this one is my favorite. The white panel may not reflect quite as much light as the silver or gold, but when used properly it can still bounce just enough light onto the subject to overcome shadows and add subtle dimension opposite larger light sources. Since it is soft, clean light, it works well both in the studio and outside when there is ample light. While effective, the white reflector won’t do you much good at all in low-light situations.  It is also important to remember, though, that for the white reflector to do its job, you’re doing to have to get it very close to your subject. Wedding photographers love the white reflector because it doesn’t change the color of the light– or the dress.

reflector-examples-guyer-photography

In the outdoor portrait on the left, a white reflector adds just enough light to open up the shadows, while a silver reflector casts some dramatic light across the boxer on the right.

Black

This one is pretty much the “anti-reflector.” Black, as we know, absorbs light, which helps to cut down on the reflections from shiny, reflective surfaces– one of the reasons it is used so often in jewelry photography. When placed properly, the black panel also creates shadows when light falls too evenly across the subject. The benefit of this “negative fill” is that it allows you to create shadows rather than overcome them.

split-light-guyer-photography

Using the black “reflector” in a small space helped me achieve split lighting, which I usually create with a silver reflector in a larger area.

Translucent

When all of the other reflection panels have been removed, the translucent is left. While technically not a reflector, this panel works great as a shoot-through diffuser for flash or location lighting, or as a diffusion panel between the sun and your subject. Since larger light sources provide softer light, using the translucent panel as a large diffuser gives you a very large, easily portable light source. While a large enough translucent reflector can also be used as an impromptu background for a head shot, the translucent panel will almost always be between your subject and the light source.

translucent-guyer-photography

Using the translucent panel above the subject’s head, we spread the light and softened it.

Conclusion

The 5-in-1 Reflector can one of the most versatile lighting tools in your entire workflow. Taking full advantage of its capabilities, though, won’t be possible until you know what color reflector to use for which lighting scenario. Remember, though, that photography rules were made to be broken once you’ve learned them, so be sure to experiment with color and placement.

Post originally from: Digital Photography Tips.

Check out our more Photography Tips at Photography Tips for Beginners, Portrait Photography Tips and Wedding Photography Tips.

Choosing the Right Color Reflector for Your Photography

The post Choosing the Right Color Reflector for Your Photography by Jeff Guyer appeared first on Digital Photography School.


Digital Photography School

 
Comments Off on Choosing the Right Color Reflector for Your Photography

Posted in Photography


Pets: Weekly Photography Challenge

26 Oct

NewImageThis week we launched the brand new Pet Photography eBook (at the special price of just $ 7) at our sister site SnapnGuides so we thought we’d do a weekly challenge on the theme of pets!

While I know not all of our readers have a pet to photograph – feel free to get a little creative and interpret the theme in a more abstract way… maybe you have something else in your life that you treat like a special pet perhaps?

So grab your camera… convince your pet to pose (or capture him or her in action) and get practicing your pet photography!

Once you’ve taken your ‘Pets’ shots we’d love to see them in comments below. Simply upload your shot into the comment field (look for the little camera icon in the Disqus comments section as pictured below) and they’ll get embedded for us all to see or if you’d prefer upload them to your favourite photo sharing site and leave the link to them.

If you tag your photos on Flickr, Instagram, Twitter or other sites with Tagging tag them as #DPSPETS to help others find them. Linking back to this page might also help others know what you’re doing so that they can share in the fun.

Also – don’t forget to check out some of the great shots posted in last weeks Shadows challenge – there were some great shots submitted.

Post originally from: Digital Photography Tips.

Check out our more Photography Tips at Photography Tips for Beginners, Portrait Photography Tips and Wedding Photography Tips.

Pets: Weekly Photography Challenge

The post Pets: Weekly Photography Challenge by Darren Rowse appeared first on Digital Photography School.


Digital Photography School

 
Comments Off on Pets: Weekly Photography Challenge

Posted in Photography


Photography Courses: Which Ones Rock and Which Ones Don’t

25 Oct

As a photographer, you work hard for your money, so you don’t want to shell out cash for photography courses that are sub-par or a rip-off. We totally understand where you’re coming from because photographers frequently work as freelancers, which means that every penny you spend counts. So we’ve assembled some of the better photography courses for you…just in case Continue Reading

The post Photography Courses: Which Ones Rock and Which Ones Don’t appeared first on Photodoto.


Photodoto

 
Comments Off on Photography Courses: Which Ones Rock and Which Ones Don’t

Posted in Photography