RSS
 

Posts Tagged ‘Photography’

How to Use a Light Tent for Small Product Photography

15 Mar

Many crafters, cooks, and artists want to take high quality photographs of their own creations, whether to feature them in a blog post, offer them for sale online, or just share them with friends. The trick to getting these kinds of product shots easily and reliably is to use a light tent. This article will cover the fundamentals of shooting with a light tent to help you capture bright, high quality product photographs every time.

McEnaney-light-tent-roses-new-vase

What is a Light Tent?

A light tent or light box is a contraption with translucent sides that diffuses light coming from multiple sources. This allows for even, nearly shadow-less lighting against a simple, solid background.

light tent, photography, DIY, product photography

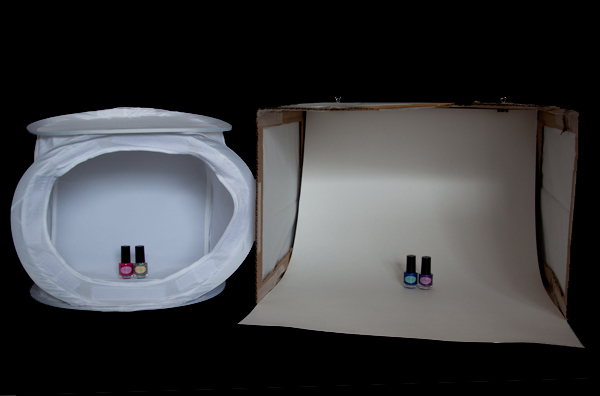
You can purchase a light tent as part of a kit or you can build your own DIY light tent. If you choose to purchase a light tent kit, it will usually come with one or more light tents, two light bulbs, two light stands, a tripod, and fabric backdrops in various colors. If you build your own light tent, you will also need to purchase two posable light sources, light bulbs, and poster board or fabric for the backdrops. Unsure of which to choose? In a future article I will offer a head-to-head comparison of a popular light tent kit and a DIY tent.

Shooting with a Light Tent

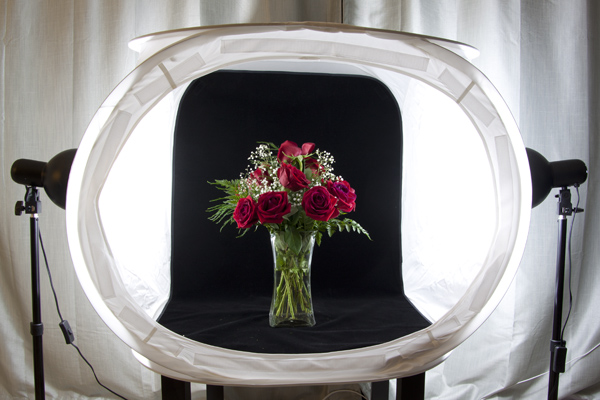
The standard set-up for light tent photography is to place the tent on some kind of table or end table, with the light sources directly opposite each other on each side and the tripod centered in front. Placing the tent up on a table makes it easier to see and maneuver, as well as easier to use your tripod for shooting.

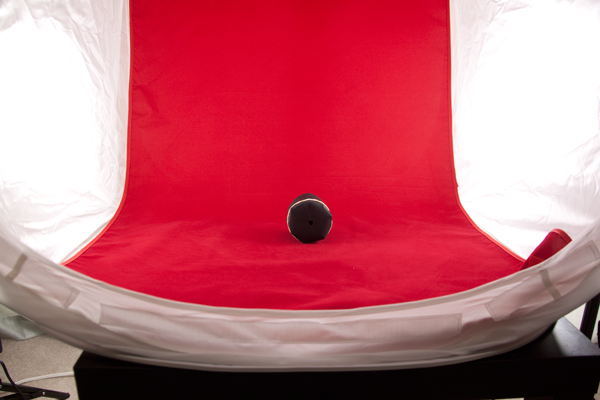
The backdrop is attached at the top inside the tent and should fall freely down into a gentle curve at the back and then across the bottom of the tent. You want to be sure that you backdrop is clean and free of debris and wrinkles. If using a fabric backdrop, be sure to iron it for a completely smooth look. (If you roll your backdrops up on a cardboard tube after shooting, you should be able to keep them wrinkle-free for next time.) Consider keeping a lint roller or small blower handy for dealing with the inevitable dust and debris.

light tent, photography, how to, product photography

Now you are ready to start photographing! Place your subject carefully inside the tent, and start with it in the exact center. Moving your subject forward or backwards relative to the light can change the lighting and shadows. Experiment to get the look you want. You can also experiment with pointing the lights slightly at an angle, rather than straight on at the tent. Be sure to leave space between your subject and the walls, so that you can zoom in or position your camera to see only the backdrop and not any edges.

Consider the ambient lighting and adjust as needed. I have found very little difference between shooting midday in diffused indoor light and shooting at night with only the lights themselves for light. You do want to avoid direct sunlight shining in or at your tent, as it will be difficult to balance such a powerful light source.

light tent photography, how to, bokeh heart

Camera Set-up

Set your camera securely on the tripod and use either the 2-second timer or a remote shutter release to ensure that you tripod remains steady. (If you are using a lens with image stabilization, vibration reduction, or vibration control, turn the switch to off.) The tripod will allow you to use longer shutter speeds with crisp results.

Begin by shooting in aperture priority mode with an ISO of 100 (or the lowest value for your camera). Choose your aperture based on the look that you want to achieve in the image (a wide aperture like f/1.8 for a narrow depth of field and a lot of blur or a narrow aperture like f/22 for a wide depth of field and crisp focus across the entire subject). Food photographs often utilize wide apertures and selective blur to make food look more appealing, while product shots of crafts and handmade goods look best with a narrow aperture to keep the entire item into focus. IF you want to avoid blur in the foreground (the bit directly in front of your object) – set your focus using the part of your subject that is closest to the camera.

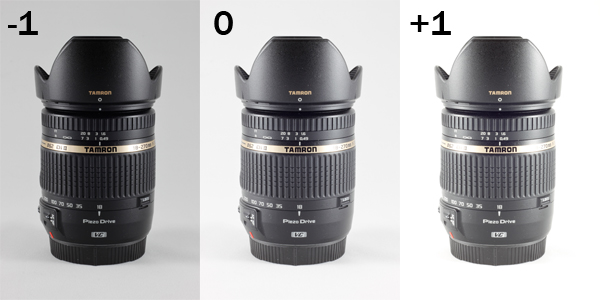
Consider also using exposure compensation to shoot a series of three shots, bracketed at -1, 0, and +1 exposure, so you can see which gives you the best results. (For white backgrounds, you may get better results around +1; while for black backgrounds, you will get better results around -1. If a full stop is too dark or too light, try a half or a third of a stop.)

light tent photography, exposure compensation, camera lens, Tamron, Tamron 18-270mm, light tent, product photography

Post-Processing Considerations

It can be difficult to get the background of your shots perfectly white or perfectly black while also keeping your subject properly exposed. In those situations, you may want to do some additional post-processing to ensure that your whites stay white and your blacks stay black. The following description relies on tools available in Adobe Photoshop, but you should be able to do many of these same procedures using other software products.

If you are shooting in RAW, adjust the white balance of your image first so that your whites look white and not yellow. Most light bulbs will list the color temperature of the light they produce, which you can use as a guide for setting the white balance. You can also set the white balance manually by shooting a white card and calibrating from that image (or if you know your background is pure white or black use the color picker in the RAW processor to neutalize any tint).

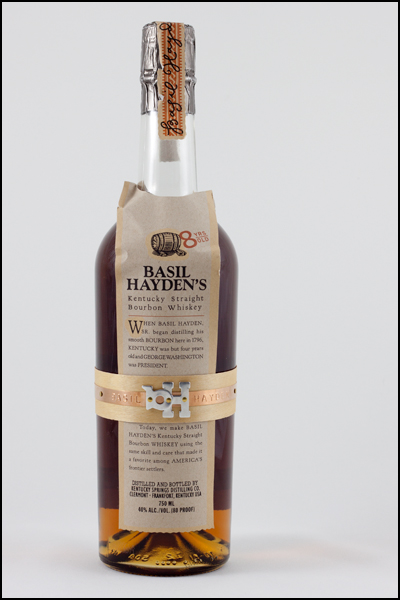
Use your histogram as a guide when processing. While standard photography advice recommends against having your histogram touch the edges of the scale (clipping), this is what you want to achieve in product shots. Clipping your background (whether on the left for black, or on the right for white) will create an entirely homogenous look to your background and focus all attention on your subject.

scarf, photography, Photoshop, post-processing, highlight clipping,

In Photoshop you can use the Levels tool to adjust either end of the histogram. Holding down the Alt (Option for Mac) key while adjusting the sliders allows you to see which areas of the photograph are being clipped, as shown in the image above. Move the slider in towards the center until the background is uniformly clipped but the subject is not. If your subject is too affected by this action, then you may need to scale back your adjustment.

If you are having trouble achieving a uniformly white background on your product shots, consider adding a thin border to your final image. While a not-quite-white background, on a shot displayed against a pure white background on a web page runs the risk of looking dingy. However, a slightly grey background with a black border can make the background shade appear intentional.

photography, bourbon, product photography, light tent, how to

Cheers! Do you use a light tent in your photography? Have a helpful tip for shooting with one? Share your thoughts and photographs in the comments below.

McEnaney-roses-closeup

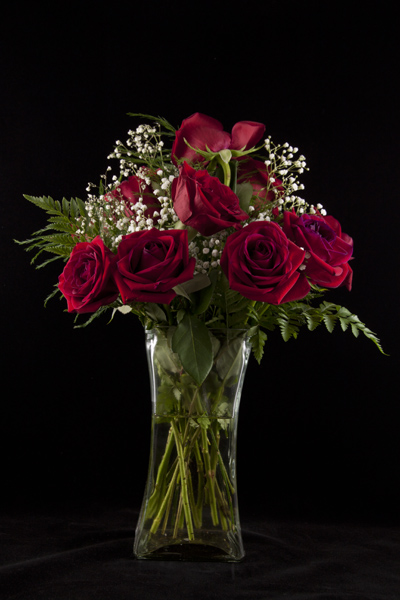
Here’s a final image from the vase of flowers in the first image at the top of the article.

For more on product photography check these out:

  • DIY Seamless White Background for Product Shots
  • Tabletop Photography Walkthrough or How to Create an Eye-Catching Product Shot
  • How To Photograph Your Product to Enhance Your Online Sales in 4 Easy Steps
  • How to Create Simple Seamless Background Product Shots

The post How to Use a Light Tent for Small Product Photography by Katie McEnaney appeared first on Digital Photography School.


Digital Photography School

 
Comments Off on How to Use a Light Tent for Small Product Photography

Posted in Photography


Weekly Photography Challenge – Up in the Air

15 Mar

Earlier I shared some images of Identified Flying Objects. People or things that have become airborne is our theme this week for the weekly photography challenge as well.

Weekly Photography Challenge – Up in the Air

Surely you can find something in your area that gets some height, that you can go photograph. Be it:

  • airplanes (real jumbo jets, remote control, or paper ones)
  • balloons (hot air or helium)
  • people (skydivers, skateboarders, parasailers, etc.)
  • dogs, cats, or horses jumping
  • birds, bats or insects flying

Get out and photograph something in the air. How you go about it is up to you. Photograph from the ground looking up? Get up there with them (be safe). Or climb a mountain or get on a rooftop and look down. Get creative with it.

Here are a few ideas:

By Difusa

By carterse

By JD Hancock

By Ford in Europe

By Zach Stern

For some articles that might help with this challenge, see these:

  • An Introduction to Bird photography
  • 10 Bird Photography Tips for Beginners
  • 8 Tips For Photographing Birds
  • Mastering Panning – Photographing Moving Subjects

Share your Up in the Air images!

Simply upload your shot into the comment field (look for the little camera icon in the Disqus comments section as pictured below) and they’ll get embedded for us all to see or if you’d prefer upload them to your favourite photo sharing site and leave the link to them.

The post Weekly Photography Challenge – Up in the Air by Darlene Hildebrandt appeared first on Digital Photography School.


Digital Photography School

 
Comments Off on Weekly Photography Challenge – Up in the Air

Posted in Photography


50(ish) Examples Of Breathtaking Fisheye Photography

14 Mar

Fisheye photos are tricky to do well. Sure, the super wide angle and curved distortion makes a lot of these pictures look cool. You don’t even need to know much about photography to impress your friends and get a boatload of “likes” on Facebook. But if you want to capture a unique perspective, you’ll need to do your homework. Then, you’ll have Continue Reading

The post 50(ish) Examples Of Breathtaking Fisheye Photography appeared first on Photodoto.


Photodoto

 
Comments Off on 50(ish) Examples Of Breathtaking Fisheye Photography

Posted in Photography


Is the Death of HDR Photography Coming?

13 Mar

‘Condensation’ By Gavin Hardcastle – Location, Gastown, Vancouver, BC

Adapt or die. It’s the way of the world, and with the ever changing rhythms of the digital age, you’ve got to be light on your feet in order to survive. I’m no oracle, but I direct these words of warning to all software companies that have a vested interest in HDR (High Dynamic Range) processing for photography.

If you’ve seen any of my work, you’ll know that I rely on HDR photography techniques to handle the huge dynamic range in the scenes that I shoot. The thing is, ever since I started shooting with the Sony A7R, I’ve been using HDR less and less.

Better Sensors = Better Dynamic Range

The new wave of digital sensors is upon us and the Bayer sensor in the Sony A7R is by no means the best out there. If you’ve got deep pockets, you’ll get the best dynamic range out of digital camera backs from Phase One, MamiyaLeaf and Hasselblad, but it’s only a matter of time until the prosumer market catches up, like it always does.

Below, you’ll see some recent examples of high dynamic range images (not tone mapped) that I made from just one exposure with my Sony A7R. With my old Canon 5D MkII, I would have had no choice but to bracket 3 different exposures and then blend them in my HDR app of choice. These days, I only need to do that in extreme cases , such as sun star shots where there can be major lens flare. These images were processed mostly in Adobe Camera Raw with some additional colour correction on Photoshop.

‘Cold & Steamy’ By Gavin Hardcastle – Location, Gastown, Vancouver, BC

‘Stumpcicle’ By Gavin Hardcastle – Ladysmith, BC

‘Stocking Freeze’ By Gavin Hardcastle – Ladysmith, BC

‘Steam Powered’ By Gavin Hardcastle – Gastown, Vancouver, BC

With the images above I basically exposed for the highlights and pulled the shadow detail back up in Adobe Camera Raw to create even dynamic range. Had I tried this with something like the 5D MkII, the noise and lack of image clarity would have made this unusable. Now I’m not comparing older camera sensors to newer ones, that’s pointless, my purpose here is to highlight how awesomely powerful the new wave of image sensors can be when it comes to dynamic range and how that’s going to affect the HDR software companies.

Imagine the freedom of knowing that you’ve nailed that epic sunset shot with just one exposure. It gives you more time to move around and try different compositions. With no need to bracket you’ll save time during a shoot, allowing you more creativity. You’ll also save on hard disk space and processing time which will speed up your workflow.

If you’re new to HDR and are not familiar with terms like ‘bracketing’, head over to my HDR Tutorial to learn how it’s done or these dPS articles:

  • Five Minutes to Realistic HDR using Lightroom and a 32-Bit Plugin
  • Tips for Great HDR Sunsets
  • The 10 Steps Every HDR Photographer Goes Through

What’s next for HDR Software Companies?

I don’t have a crystal ball, but my advice to companies like SNS-HDR, Oloneo and Photomatix is to gear their software more towards creating RAW file presets that give HDR results from a single exposure. As sensors get better and capture more dynamic range, it’s going to become the norm for us to capture all of the dynamic range we need in just one RAW file. The magic will come from being able to process those RAW files in a beautiful way with just one click of the mouse. After all, those RAW files don’t come out of the memory card looking their best. You need to do a little tweaking to pull out those details and crank up the eye candy. That’s where I see a gap for the software companies.

‘BBQ Corner’ By Gavin Hardcastle – Fototripper

I’ve come to love my HDR apps and accepted them as an integral part of my workflow, but what it all boils down to is that HDR processing is simply a means of overcoming the technical limitations of a digital camera sensor. When those limitations are no longer an issue, what’s the need for HDR processing?

I have great respect for the software companies that make these awesome HDR apps and I’ve happily paid for their software because they deliver great results. I’d hate for them to fall on hard times because they didn’t heed this message, so I invite them to post their comments on where they see HDR in the next few years.

The new wave of camera sensors are coming, will they be ready? Are you ready? Share your thoughts in the comments below.

The post Is the Death of HDR Photography Coming? by Gavin Hardcastle appeared first on Digital Photography School.


Digital Photography School

 
Comments Off on Is the Death of HDR Photography Coming?

Posted in Photography


Using a Photography Project to Spark your Creativity

11 Mar

Get out there and create!

Hazmat Alan

Do a photography project for yourself

As photographers, it’s natural we all reach that point where we become a bit bored with our work, especially if you work on the same type of photography everyday. After thousands of landscapes and flower photos, you can start feeling that desire to do something different. Starting a personal photography project can help ignite that creative fire again.

Don’t sit around and wish you had creative projects to work on. Get out there and create exactly what you want! Working on personal projects allows you to think outside the box. It allows you to play by your own rules, where there are no rules! It’s just you and your own vision. There is great power in that.

Josh Burst

A project can help overcome a creative slump

Behindthescenes

A couple of years ago I was in a creative slump. I had been wanting to do a cohesive photo series but I didn’t know what the subject was going to be. I’ve heard the phrase time and time again, “Go with what you know.” So I got thinking about what inspires me. I knew it had to be a narrative driven project. I knew it was going to be something stylish and probably a bit dark. Then one day, as I was about to wake up, it came to me like a dream. It really did! A sci-fi horror series it was.

Even though I grew up in the 80′s, I found myself watching campy sci-fi shows from the 60′s and 70′s. I loved Lost in Space, Land of the Giants, The Twilight Zone and Star Trek. I was drawn to the unusual locations, the great costumes and bright colors of these shows. I also grew up watching a lot of horror films from the 70′s and 80′s. The abstract lighting and gorgeous sets of Dario Argento and the zombie takeovers from George Romero struck a chord with me. In my photo series, “Invasion” I would combine these two loved genres together.

Think outside the box and be resourceful

Before After

I wanted clones, mad scientists, abductions, robots, aliens, and bombshells in space suits. I hunted up costumes, searched for locations, gathered friends and then I started creating. I shot at friends’ houses that fit the 50′s and 60′s time period. I also found models and friends who were more than happy to be in a cool sci-fi photo. Since shooting in outer space was out of the question, I shot in my living room. Basically, I worked with what I had.

Dare to dream big

Deven faceToday it’s easier than ever to dream up anything you want for free or almost free. You can find great costumes and props in flea markets, at your local resale shop or even in a dumpster! Put ads out on craigslist for models or makeup artists. Use your friend’s house as a set. Take your camera out of auto mode and play around with settings. Maybe use a flashlight or the television as a light source instead. The possibilities are as unlimited as your imagination. Once you have a goal in mind, with a little bit of sweat and photoshop you’ll be amazed at what you can dream up!

This Sci-fi inspired photo series has been the most rewarding project I’ve ever worked on. It’s been an incredible learning experience. I also believe “Invasion” is my strongest and most original photography that I have ever done. I contribute that to the fact that I went with what I knew, and channeled what I was interested in and passionate about. I challenge you to do the same and most important have fun doing it!

Marva2

Here are some other ideas on starting a photography project:

  • Photography projects that make you feel alive
  • Jumpstart Your Photography: Start a 365 Project
  • Lost your Photo Mojo? Ten Tips to Bring Back the Magic

Have some other tips or ideas, please share in the comments! If you’ve done a project, or started one recently – tell us about it!


The post Using a Photography Project to Spark your Creativity by Patrick McPheron appeared first on Digital Photography School.


Digital Photography School

 
Comments Off on Using a Photography Project to Spark your Creativity

Posted in Photography


Weekly Photography Challenge – Fast Cars

08 Mar

Now that I have your attention you might be able to guess what this week’s photograph challenge is right?

Weekly photography challenge – fast cars!

You may be thinking, “I don’t live near a race track”, so I’m way ahead of you. Just to clarify this challenge a little, the goal is to make the cars look like they are going fast. They don’t actually have to be doing so!

How to add motion

So how do you add motion to your car images? One way is panning. Another is to shoot from inside a moving car – just please make sure you are NOT the driver! Safety first. Here’s some tips if you need a hand:

  • Showing Speed: Using Panning When Shooting Action
  • 13 Places to Practice Taking Beautiful Motion Blur Shots
  • Mastering Panning – Photographing Moving Subjects
  • 3 Tips for Creating Dramatic Images using Motion

By Takashi Hososhima

By Brian Gaid

By Jim Sher

Share your fast car images!

Simply upload your shot into the comment field (look for the little camera icon in the Disqus comments section as pictured below) and they’ll get embedded for us all to see or if you’d prefer upload them to your favourite photo sharing site and leave the link to them.

The post Weekly Photography Challenge – Fast Cars by Darlene Hildebrandt appeared first on Digital Photography School.


Digital Photography School

 
Comments Off on Weekly Photography Challenge – Fast Cars

Posted in Photography


Fisheye Photography: 9 Shots That Work Amazingly Well

07 Mar

Photographs from a fisheye lens look different, which can be a good or not-so-good thing. This uber-wide angle lens let’s you get super close to your subject, yet still see the background. It’s an unusual perspective you can’t get with any other lens. But there are challenges, too. The edges are distorted, which makes some shots look weird, but below, Continue Reading

The post Fisheye Photography: 9 Shots That Work Amazingly Well appeared first on Photodoto.


Photodoto

 
Comments Off on Fisheye Photography: 9 Shots That Work Amazingly Well

Posted in Photography


The Photography Show 2014 – tidbits from the show floor

07 Mar

news.jpg

This week saw the successful launch of a new photography trade show in the UK. Called simply ‘The Photography Show’ and run by Future Publishing, the event ran from 1st to 4th March at the NEC in Birmingham. We spent a day there, talking to exhibitors and getting hands-on with the latest products. Click through for a selection of things we saw.  

News: Digital Photography Review (dpreview.com)

 
Comments Off on The Photography Show 2014 – tidbits from the show floor

Posted in Uncategorized


5 Most Common Mistakes in Wildlife Photography – and How to Avoid Them

05 Mar

Animals, especially wild ones, make such beautiful subjects that we cannot resist turning our cameras on them to capture images of these majestic creatures in their natural state.

Unlike a landscape, creatures are constantly in motion, and unlike most people, they can be pretty uncooperative when it comes to getting their picture taken. This can make for a lot of botched pictures. Here are a few tips on how to avoid some of the common pitfalls of wildlife photography.

1. A Tiny Subject

Three Brown Pelicans by Anne McKinnell

It’s tough to approach a wild animal – they are easily spooked. Because of this, many wildlife photos have more wilderness than wildlife, with the animal becoming a tiny speck in its environment. This can be effective in some situations, but for the most part you want the animal to be large enough in the frame to see the detail in its eyes. This is where a good telephoto lens can really help you out. Using a long focal length (over 200mm) will allow you to keep your distance while still filling the frame.

2. Blurry Image

Blur comes in many forms. Your entire image could be blurry due to camera shake; a problem which is magnified by the longer focal lengths needed for wildlife photography.

In landscape photography, using a tripod is a good technique to prevent camera shake, but a tripod is not as practical when photographing wildlife. Wildlife photography requires a more active shooting style – you’ll be moving around constantly – so unless you are using a lens that is too big to hold comfortably, forget the tripod. Also, because the animals are always in motion, you’ll need a fast shutter speed anyway. That leads me to the first method to combat camera shake blur: using a very fast shutter speed.

In landscape photography, you normally use a shutter speed that is at least 1/focal length of your lens. But usually that isn’t going to be fast enough when photographing wildlife because the animals are always in motion (even when they appear to be standing still). To avoid disappointment, you’ll need to use a much faster shutter speed to freeze both your own motion and the motion of the animal.

Here is my rule of thumb when photographing wildlife: if the animal appears to be still, use a shutter speed of 1/500th of a second. If the animal is moving, you’ll have to adjust the shutter speed based on how fast they are moving. I suggest a minimum of 1/1,000th of a second, or faster if the animal is moving faster.

Sleeping Steller Sea Lion by Anne McKinnell

Using a lens with image stabilization will also help prevent camera shake blur. A lens with a wide maximum aperture, say f/2.8 or even f/4, will let more light in, allowing you to use a faster shutter speed. Likewise, a camera with low noise at high ISOs will let you turn up the sensitivity. All of these options will enable you to make faster exposures with better results.

Another type of blur is focus blur. This results from your camera being unable to focus, probably because your subject is moving and the AF motor gets confused. Some cameras and lenses have superior auto focus systems to others, but regardless of what you have, you can get the most out of it by setting it to continuous focus mode, usually called AF-C (Nikon) or AI Servo (Canon). This setting will track the subject’s movement in the frame and focus on it more quickly and accurately.

3. The Missed Moment

We’ve all been there. You see the perfect shot, frame it, and hit the shutter. But by the time the camera focuses and the exposure is made, the animal has moved and all you end up with is the second after the perfect shot.

There are two ways to avoid this heartbreak:

Anticipation

This is a skill that can only come with practice and a keen eye. If you can learn to see when the perfect moment is about to happen, rather than when it is happenning, you can hit the shutter right before the peak moment and cause the camera to snap at just the right time.

Orca by Anne McKinnell

Continuous Shooting

When animals are in motion, you’ll get the best chance at a good result by using continuous shooting mode (also called “drive mode” or “burst mode”). With this, you can take several images per second and choose the most successful.

Higher-end DSLRs and mirrorless cameras will have a much faster maximum shooting speed, but no matter which camera you have, there are a few things that will help get the highest continuous shooting rate.

One is a fast memory card – both SD (standard digital) and CF (compact flash) cards have a certain speed that they operate at, and a faster card will make sure that your camera doesn’t get bogged down trying to save the images.

The other is a fully-charged battery – as the juice drains, the camera can become sluggish, so it’s a good idea to keep an extra battery or two in your camera bag. For ultimate performance, you can buy a battery grip that fits on your camera. This holds two batteries at the same time for maximum speed.

4. Where Is Everyone???

Sometimes wild animals can be hard to find, and they’re not always where you want them to be. Before you can photograph them, you have to learn a few things about how to find them.

Know your animals

What types of animals live around you? Before you go out shooting, find out who they are, what they eat, when they sleep, and where they like to relax in between. If you’re photographing birds, research which ones are to be found in your area at which times of year. It’s also important to know how animals might react if, and when, they feel threatened – will they fight, or flee?

American Green Tree Frog by Anne McKinnell

Know the season

Some animals will be much more active at different times of year – particularly during autumn, as they rummage up enough food for winter, and in the spring when some animals come out of hibernation.

Camp out

I don’t mean overnight (unless you’re into that), but it’s often a very effective practice to find a popular area – probably somewhere with a source of water, food, shade or shelter – where animals like to congregate. Set your camera up on a tripod nearby, and disguise yourself among some trees or brush (some photographers go so far as to buy ,or build, a blind to hide their presence).

Be patient

Animals work on their own schedule, so don’t try to fit a shooting session in between other appointments. Great photos take time, and you must allow nature to unfold at its own pace. Many animals are easily frightened, so being quiet, still, and inconspicuous will help put them at ease.

5. Animal Attack!

We don’t call it “wildlife” for nothing – the biggest mistake you can make is accidentally getting mauled. Animals are not adjusted to polite society, and can be pretty rough customers if you catch them at the wrong time, or in the wrong way. They spend most of their waking lives foraging for food, and a spat over a meal can turn ugly, fast. Never get in the way of lunch, unless you want to take its place.

Don’t approach a wild animal directly, and if they see you, avoid looking them in the eye. This is usually a sign of aggression. If you need to get closer, keep low and move in a broad zig-zag pattern to avoid frightening the animal.

Baby Aligator by Anne McKinnell

Be aware of when mating season (or “running season”) is for the type of animal you’ll be photographing. Male mammals are full of testosterone at this time of year, and can be aggressive, violent, and very dangerous. Avoid photographing at these times. Similarly, find out when animals are likely to be giving birth and raising their young. We all know how risky it can be to get in between a mama bear and her cubs.

Whenever you’re dealing with wildlife, always remember that any creature can be dangerous when provoked, and it’s very important to treat animals and their habitat with the utmost care and respect.

For more tips on wildlife photography try these articles:

  • Manipulating Natural Light in Wildlife Photography
  • How Low Can you Go? An Illustration of Camera Angle for Wildlife Photography
  • Making Sharper Wildlife Photographs – [Part 1 of 2]
  • Making Sharper Wildlife Photographs – [Part 2 of 2]

The post 5 Most Common Mistakes in Wildlife Photography – and How to Avoid Them by Anne McKinnell appeared first on Digital Photography School.


Digital Photography School

 
Comments Off on 5 Most Common Mistakes in Wildlife Photography – and How to Avoid Them

Posted in Photography


10 Ways to Improve Your Travel Photography Portraits

05 Mar

Last year I travelled all across South East Asia – a trip which not only expanded my personal horizon, but also helped to immensely improve my photography. At the beginning of my trip, my biggest struggle was taking good portraits. The problem wasn’t the lack of opportunities; I encountered incredible and the utmost photogenic scenes around almost every corner. Instead, it was that I just felt too shy or not confident enough to get close to my subject.

I had lots of excuses which might sound familiar to you: “I don’t want to disturb the moment”, “I don’t want to intrude on people’s privacy” or “It’s just a game of luck and chance anyhow”. It was frustrating and I knew that, despite all of the excuses, this was something I really had to work on. By lots or trial and error, and the help of some amazing photographers I met on the way, I gained some important insights on how to bring my people photography to a whole new level. I want to share these and hopefully help you overcome that awkward feeling and false reservation you have when photographing people.

Travel Photography Portraits 01

10 Ways to Improve Your Travel Photography Portraits

#1 Be ready

This is very basic and obvious, but so important. People photography is about brief moments, a glimpse which is normally not replicable. You are not doing landscape photography which leaves you with all the time you need. So have your lens cap off, have your camera switched on, be prepared to adjust settings and BE READY.

Travel Photography Portraits 06

Being ready to capture that one, special moment

#2 Get close

If you are unhappy with your portraits or if they looks boring, it is probably because you are too far away. I know it feels awkward to get really close to someone you don’t know, especially in a foreign country. It seems so much easier to break out your big lens, zoom in and just click away, hoping that your subject won’t notice you. Unfortunately this won’t work.

If you want to have crisp, sharp and extraordinary images which tell a story and leave your audience in astonishment, you have to overcome your shyness and get close. This will help to add more details on your subject’s face, increase sharpness and focus on only one or two elements. The viewer will automatically understand more about your image. Moreover, getting close will put you in control of things: the lighting, the background, the composition and the depth of field. These factors are so vital for a good portrait and so much easier to adjust when you are close to your subject.

Travel Photography Portraits escapology 11

Get close to your subject to control your image

#3 Practice approaching people

Travel Photography Portraits escapology 01

Learning to approach people with the right attitude – the secret of good portraits

You might think “That sounds great, but how do I get close to people?” This leads us to the biggest challenge in people photography, which has nothing to do with photography itself: dealing with people. Are you comfortable walking up to strangers, making small talk, then asking, “Can I take your picture?”

If not, the good news is, it’s something you can practice just like everything else in photography. It is all about your attitude and how you approach people. Get in contact, have a positive attitude, talk, and most importantly smile. Don’t be afraid of intruding on people’s privacy. Particularly in South East Asia the concept of privacy is totally different from ours in the West. Approaching strangers and asking very personal questions is considered perfectly normal. Open yourself and people naturally respond in the same manner. In short, don’t be shy, adapt to the local culture, get to know people, make friends and you will take better pictures.

#4 Learn the basics of the local language

How do you approach people if you don’t speak their language? I will let you in on a secret. It’s actually even easier to approach people if you DON’T speak the same language. It’s a great place to start since it is then not so much about WHAT you speak, but HOW you speak and the energy you give off. Learning a few words and phrases in the local language will go a long way to helping you approach people, and it doesn’t take much effort to learn. From my personal experience the six most important phrases you should learn beforehand are:

  • Hello, how are you?
  • My name is …?
  • I am from …?
  • What is your name?
  • Thank you!
  • Beautiful!

The last one will put a big smile on people’s faces after you have taken that nice portrait and show it to them. Get a small phrasebook. You can look up phrases when you need them or practice on longer bus rides. Ask your receptionist, taxi driver or local travel agent how to pronounce words. Don’t be afraid to make mistakes. It’s fun and will not only help to approach people, but also make your whole travel experience so much more worthwhile.

Travel Photography Portraits escapology 12

Knowing a few phrases in the local language can go a long way

#5 Smile – smile a lot!

Even if you don’t know any words or phrases, make sure to smile. A smile can go such a long way. If you are grumpy and angry because you are not getting your shots right, it will put people off and no one will want to go near you, and definitely won’t want to get their picture taken by you. When you come home from a photo walk, your mouth and cheeks should hurt from all the smiling.

Travel Photography Portraits 05

A smile can go a long way

#6 Take your time

Once you have made contact and established a good vibe, it is time to take your picture. Take advantage of all the “work” you have put in and take your time. It would be a shame to just hectically click away once or twice now. Be calm, think about the light, about what you want to emphasize (the eyes, the hands or the person itself) and about the background.

Since you are close to your subject now, you can control all of these things. Take a deep breath and try a couple of shots, maybe switch angles and try different things. By doing this, you will notice that your subject will also become more relaxed and get used to the camera. There is no need to rush. A rushed photo is usually never a good one.

Travel Photography Portraits 04

Waiting for the right moment is usually worth it

#7 Get moving

Reality can be quiet boring. There might be things in your scene that are boring or disturbing. We already talked about taking your time. Make use of it and arrange the scene to your needs, change angles, get moving. Don’t be lazy. You can eliminate things or include things just by moving around a little bit. Don’t just rely on the zoom.

Travel Photography Portraits 07

Move to create the image you had in mind

#8 Get a 50mm lens

What helped me to counter my laziness and actually get moving was the purchase of a 50mm prime lens. If you don’t have one in your bag yet, buy one. It is the one piece of equipment that boosted my creativity and the quality of my images almost instantly. You will not only learn to move more but also open your eye for new perspectives.

Travel Photography Portraits escapology 03

A 50mm lens to boost your creativity – give it a try

#9 Start with kids and people that are doing something

If you feel shy but are still willing to practice approaching people and getting close, start off with photographing kids and people that are doing something. Kids are easy to photograph. They usually love getting their picture taken, posing and never get bored doing so. I found it very rewarding in Asia but would suggest taking a more cautious approach in Western societies. Please always ask the parents first.

Shoot in busy areas or settings. People that are doing nothing will surely be looking at you. People that are doing something, can’t be bothered to look at you. When they are busy with their task, they will not care about you taking pictures. Look for traditional workshops or handicraft businesses. They usually make for great picture taking opportunities.

Travel Photography Portraits escapology 15

Occupied with traditional crafts – great picture opportunities

#10 Get out of the touristy areas

The touristic hubs are usually far from the country’s reality. At the same, time getting off the beaten track is usually not so difficult. Sometimes it just takes 15 minutes to find yourself in a small, local village. This is where you want to be as a photographer. You will meet real people who aren’t out to sell things. You will have more chances to interact, to practice your newly acquired language skills and take more authentic photographs. At the same time it will make for a much better travel experience than sticking to the “Lonely Planet Path”.

Travel Photography Portraits escapology 09

Hosted by monks in a monastery in Myanmar. No tour, no guide

All of this takes a little getting used to and practicing along the way. But it’s worth it. Please don’t just jam your camera in people’s faces when traveling abroad. It’s not nice and the pictures won’t be either. Take your time to interact with people, open up, get close and don’t forget to smile. This will make for great experiences, unforgettable memories and even better pictures.

Please share some of your favourite people photos with us in the comments and if you have another tips for photographing people, we’d love to hear them.

For more articles on travel and people photography check out these:

  • 6 Tips for Photographing People When Travelling
  • 5 Reasons Why Having People in Your Photos is a Good Thing
  • The Rewards of Photographing People When You Travel

The post 10 Ways to Improve Your Travel Photography Portraits by Philipp Dukatz appeared first on Digital Photography School.


Digital Photography School

 
Comments Off on 10 Ways to Improve Your Travel Photography Portraits

Posted in Photography