RSS
 

Posts Tagged ‘Photography’

The travel photography of HDR guru Trey Ratcliff

09 Aug

Photographer Trey Ratcliff is known for imagery that couples saturated colors with dramatic flair and cinematic subjects. Shooting HDR for nearly a decade now, his work has been featured on major networks and is even displayed at the Smithsonian Institute. Read our Q&A and take a look at more of his colorful work. Read more

Articles: Digital Photography Review (dpreview.com)

 
Comments Off on The travel photography of HDR guru Trey Ratcliff

Posted in Uncategorized


Weekly Photography Challenge – Feet

08 Aug

Feet are an important part of our human body. They take us where we want to go. They hold us upright. They can be all different sizes and styles, decorated or plain, even covered in fur (think pets). But they are often overlooked in photographs or even cropped off.

Shandi-lee Cox

By Shandi-lee Cox

Weekly Photography Challenge – Feet

This week we challenge you to go out and photograph only feet and crop off the body! They could be your own feet (foot selfie?), a friend’s, your cat’s, or a total stranger’s feet. It’s about looking at things differently and seeing something you may otherwise miss or pass over.

Juan Antonio F. Segal

By Juan Antonio F. Segal

Khánh Hmoong

By Khánh Hmoong

Mauren Veras

By Mauren Veras

Michelle Tribe

By Michelle Tribe

Raúl González

By Raúl González

Tobias Lindman

By Tobias Lindman

Share your images below:

Simply upload your shot into the comment field (look for the little camera icon in the Disqus comments section) and they’ll get embedded for us all to see or if you’d prefer upload them to your favourite photo sharing site and leave the link to them. Show me your best images in this week’s challenge. Sometimes it takes a while for an image to appear so be patient and try not to post the same image twice.

googletag.cmd.push(function() {
tablet_slots.push( googletag.defineSlot( “/1005424/_dPSv4_tab-all-article-bottom_(300×250)”, [300, 250], “pb-ad-78623” ).addService( googletag.pubads() ) ); } );

googletag.cmd.push(function() {
mobile_slots.push( googletag.defineSlot( “/1005424/_dPSv4_mob-all-article-bottom_(300×250)”, [300, 250], “pb-ad-78158” ).addService( googletag.pubads() ) ); } );

The post Weekly Photography Challenge – Feet by Darlene Hildebrandt appeared first on Digital Photography School.


Digital Photography School

 
Comments Off on Weekly Photography Challenge – Feet

Posted in Photography


5 Simple Tips for Mastering Outdoor Photography

08 Aug

While it is relatively easy to go outside and just “point and shoot,” there are better ways to take pictures in the great outdoors. Snapping photos in the outdoors rather than indoors brings a whole new list of considerations to deal with. From the weight of your pack to the eventual downpour, there are certain preparations you can take before Continue Reading

The post 5 Simple Tips for Mastering Outdoor Photography appeared first on Photodoto.


Photodoto

 
Comments Off on 5 Simple Tips for Mastering Outdoor Photography

Posted in Photography


DJI Phantom 3 Standard photography drone unveiled

06 Aug

DJI has announced a new camera drone called the Phantom 3 Standard. The DJI Phantom 3 Standard is a quadcopter with an integrated camera able to record video at up to ‘2.7K’ at 30 fps and take 12 megapixel still images in JPEG and DNG formats. The quadcopter is designed for consumer-level use. Read more

Articles: Digital Photography Review (dpreview.com)

 
Comments Off on DJI Phantom 3 Standard photography drone unveiled

Posted in Uncategorized


5 Tips for Golden Hour Photography

06 Aug

It’s pretty much an accepted fact that the earlier and later parts of the day are best for photography, but if you want the absolute richest, warmest, most beautiful light, the hours directly following sunrise and leading up to sunset – known as the golden hours – are prime time for natural light.

This is when the subtle golden light from the low-hanging sun bathes the world in a warm glow, and shadows become long and dramatic, but not harsh.

Mono Lake, California, by Anne McKinnell

Those hours can be short-lived, though as once the sun starts to rise or set, it isn’t long before it climbs too high, or disappears altogether. To help you get every second out of each golden hour, consider these tips when you go out shooting.

1. Be There

The first step to making the most of the golden hours is knowing exactly what time that magic light is going to happen. Because the golden light is caused by our view of the sun, the timing will change with the seasons. Exactly what time the sun passes over the horizon depends the time of year and your location.

Sedona, Arizona, by Anne McKinnell

The time of sunrise and set is easy to find in your newspaper or online and that is a good place to start to calculate when the golden light will happen. But golden hour may not be anywhere near as long as an hour depending, on the season and your location. For example, near the equator, the sun rises quickly and you may only get golden minutes. On the other hand, in far northern locations the sun may not rise very high in the sky at all and you might get golden light all day.

You also need to watch how the clouds are forming throughout the day, since clouds on the horizon will cut your golden hour short.

2. Prepare Early

The golden hour (or minutes) can pass very quickly, so if you’re not already out shooting when the golden light starts, it’s likely to be over by the time you find your subject, choose a composition, set up your camera, and take the shot. If you know in advance what time you need to be there, you can plan ahead. Go out a couple of hours beforehand so you’ll have time to get to your location, get set up, and be ready to take the photo by the time the horizon starts to glow.

Depoe Bay, Oregon, by Anne McKinnell

By doing this, of course, you have to think into the future a bit. Rather than compose your image based on where the sun is, you must arrange your frame according to where the sun will be. To do this, think about the path the sun takes through the sky. It rises in the east, so you know where you can expect to see it first, and because it sets in the west you know which direction it’s moving. You can even find out the exact position where the sun will set on the horizon using various website and apps. Plan your shots with this information in mind. A compass will come in handy. Compose your photograph where the sun is going to be, then just relax and wait for the moment to present itself.

3. Balance the Exposure

The contrast between light and shadow isn’t as extreme during the golden hours as it is in the middle of the day, but there can still be a huge tonal range between highlights and lowlights (shadows). Especially if you’re trying to capture the sky itself in the picture, its brightness will almost certainly overpower the scene below it.

There are many ways to balance a difference in brightness between two parts of your composition. Bracketing your shots is a good start – use your camera’s exposure compensation feature (+/- button) to take several pictures of a scene with different levels of brightness. There might be a perfect exposure setting that captures both light and shadow areas.

Organ Pipe National Monument, Arizona, by Anne McKinnell

If you shoot in your camera’s uncompressed RAW format you’ll be able to individually adjust your photo’s highlights and lowlights in post-processing, reducing the contrast while preserving as much detail as possible. This way, if one area of your photo is too dark and another is too bright, you can tone down the whiter shades while bringing up the darker shades to create a well-balanced image. This level of control isn’t possible with compressed JPG files, which don’t save the subtle information in those areas.

If the sky is consistently too bright in your photos, consider using a graduated filter that is tinted at one end, but fades out and is transparent on the other. This will reduce the exposure on only half of the image. By putting the tinted half at the top it will darken the appearance of the sky.

Another option is to take your bracketed shots and combine them in post-processing to make a high dynamic range (HDR) image (Merge to HDR in LR or another method).

4. Use Fill-Flash

Rather than take light away from the brighter areas, your other option is to add light to the darker parts instead. You can do this with a continuous light source like a lamp. Moving the light closer to the subject will make it brighter, and pulling the light away will dim it.

Superstition Mountains by Anne McKinnell

Of course, if you’re outside you probably don’t have a lamp on hand. What you probably do have, though, is your on-camera (or off-camera) flash. Flash doesn’t always have to act as the main light source in a picture – it can enhance an existing light source (such as the sun) by simply adding light into the shadow areas of a photograph.

Flashes also don’t have to be used at full power. Nearly every camera will have a Flash Compensation option. This gives you the ability to turn the brightness of your flash up or down. A dimmer flash will still add light to your scene, but it won’t be strong enough to overtake the primary light source and create new shadows of its own. Using it in this way is known as fill-flash. When your subject is backlit, such as by a fiery sunset, use this method to prevent silhouetting. Bracket your shots using different flash settings to achieve the right balance of brightness between the foreground and background.

5. Set the Colour Temperature

Combining two light sources can cause other complications though – particularly with the white balance. Every light source has a different hue, or colour temperature. Incandescent bulbs have a yellow/orange (warm) cast, while fluorescents are sort of blue/green (cool). Our eyes adjust to those slight shifts on their own, but a camera has to measure the balance of the light so it can alter its colours, and ensure that a white object looks white and not yellow/orange or blue/green. Modern cameras can do this automatically, or you can manually select what kind of light to balance the camera to (daylight, indoor light, candlelight, etc.).

Devils Tower, Wyoming, by Anne McKinnell

The golden hours have a lot of warm coloured light, so if left on auto white balance, the camera will adjust its colours to be a little more blue to compensate. However, if you add in the light of a flash, which is cool in tone, one of two things will happen: the camera will keep the same white balance setting as before, and the flash’s light will appear even more blue, or the camera will re-adjust itself to the white balance of the flash, causing it to look normal but the rest of the picture to appear more orange.

When using two different light sources, it’s important to notice the colour temperature of each. Then, decide which of them you want to appear neutral, and which one should retain its natural colour. Rather than keeping your camera on auto white balance, set it to the type of light you want neutralized. If you shoot in RAW format, this can also be changed in post-processing.

Arch at Whitney Pocket, Nevada, by Anne McKinnell

Remember, golden hour is not sunset or sunrise, but shortly before and after those times when your subject still has direct light falling on it. The magical golden light will transform your photos from ordinary to extraordinary. It’s all about the light!

googletag.cmd.push(function() {
tablet_slots.push( googletag.defineSlot( “/1005424/_dPSv4_tab-all-article-bottom_(300×250)”, [300, 250], “pb-ad-78623” ).addService( googletag.pubads() ) ); } );

googletag.cmd.push(function() {
mobile_slots.push( googletag.defineSlot( “/1005424/_dPSv4_mob-all-article-bottom_(300×250)”, [300, 250], “pb-ad-78158” ).addService( googletag.pubads() ) ); } );

The post 5 Tips for Golden Hour Photography by Anne McKinnell appeared first on Digital Photography School.


Digital Photography School

 
Comments Off on 5 Tips for Golden Hour Photography

Posted in Photography


Put the Fun Back into Your Photography with a Cow Safari

05 Aug

Whether you are a pro photographer or a dedicated amateur, sometimes when you are photographing a lot you can get so caught up in achieving the perfect image, that you lose the sense of fun that got you interested in the first place.

Actively putting the fun back in can not only help you to enjoy your regular photography work more, and assist in getting your photo mojo back, but can inspire new ideas you otherwise might not have come up with. My favourite way to do this is a Cow Safari. It’s kind of like an African safari, but with cows.

Fun-photography-safari-01
Why cows? Well, for a start they tend not to eat you as much as lions and it’s much cheaper than a trip to Africa. Cows are not the most athletic of creatures, they tend to just stand around a lot and are not well camouflaged, so are pretty easy to capture in a photo. They generally hang out in very picturesque areas, perfect for a day out photographing.

Cows generally hang out in very photogenic areas.

Cows make a great safari subject and are generally vegetarian so your risk of getting eaten by one is fairly low. Can’t say the same for lions.

However, if you don’t live close enough to a cow hang out, you can make up your own safari. For example; if you’re in the city, maybe a pigeon safari, or seagulls if are near the beach. Perhaps a people walking their dogs safari, or even a flower safari – it doesn’t really matter, just so long as you can find your subject in various different places that you can travel around to easily over a few hours, a day, or even a road trip weekend.

My first safari was some years ago by the seaside with my father, the subject was seagulls. We set up a small wager, winner gets bragging rights. There has been no definitive winner, because the safari still continues years later. Even when we’re in different parts of the country, there is an occasional exchange of seagull photographs. It’s been inspirational, I’ll be bogged down in the photographic process and my phone will light up with something like this:

It's all about fun with these safaris.

A photograph sent to me by my father while on a seagull safari. I don’t think that seagull is very well, in fact I don’t think it is actually a seagull, I suspect foul play! Photo credit: Chris Hawkins

The main point of the safari is to step away from your usual photography routine and just enjoy taking photographs for the sheer sake of doing so. No planned images, no trying to achieve anything or get that perfect shot, just fun photographic play time with the idea of loosening and lightening up a bit as a photographer, and not taking yourself or your images too seriously.

Once you take the trying hard part out of the picture, you can get back to experimenting, and maybe surprise yourself, just like you did when you first fell in love with photography. Of course you may not end up with anything worth saving, and that’s not the point of the exercise. But, then again, you never know what you might come across in your travels.

You never know what you might find on your safari.

Had I not been out on a cow safari, I may have missed the opportunity to capture this cow doing a remarkably good impersonation of a horse.

Your safari is a great time to experiment with things you might not normally try when you’re too busy trying to get that perfect shot. Try the lens you haven’t really played with yet, test out some of the features on your camera you haven’t gotten around to trying. If you are a pro who is dedicated to manual setting, maybe just try out some of the Scene Modes, or vice versa, play with manual settings if it’s something you have not really tried. Maybe even pick up one of those cheap disposable film cameras, or test out some different mobile phone apps.

A safari is a great time to experiment with your gear.

Use the photographic time-out to slow down and experiment with things like mobile phone photography apps. 

How to Conduct Your Safari

Step 1: Grab a fun friend or two

They don’t necessarily need to be photographers, although I’m willing to bet they’ll end up taking a shot or two on their phones. Encourage them to bring a camera, or bring one for them. They could also come in handy as a model.

Take some friends, photographers or non photographers, it doesn't matter, it's about fun!

Safari fun is best shared.

Step 2: Bring some supplies

Depending on where you conduct your safari, you may not be close to a convenient cafe or food place, so why not take your own. Pack a few sandwiches or a whole picnic.

Supplies are a good idea, less time hunting for food places, more time to photograph.

Maybe pack a healthy picnic for your safari. It’s all healthy as long as there’s some fruit right?

Step 3: Get out there and have fun

Jump in the car, on your bikes, the train, or get your walking shoes on and head out. You can map your trip beforehand, or perhaps toss a coin for which direction to go, as you step out the front door. Just so long as you travel around a bit, and have a few different spots to stop and take some photographs.

Taking time out to have photographic fun with friends or family  is worth it, and not just for your own photography.

It’s thumbs up for the cow safari. My little friend here really got into the spirit of the day. He even took some great photographs and video on his portable gaming device. By the end of our safari he wanted to know how much he had to save up to buy a camera. Safari success!

Safari Tips:

  • Experiment: Use the safari to experiment with different lenses, settings, or cameras.
  • Go Mobile: Don’t disregard the phone camera, even if you are not a fan of phone photography.
  • Do variations: Try all versions of the above at each place you stop. See how each setting/lens/app deals with the same situation.
  • Don’t trespass on properties, as much as you might be tempted to slip under a fence to get that perfect cow shot, these animals can be dangerous, as can farmers who don’t appreciate trespassing.
  • Don’t hassle the cows. If they are close to the fence, keep a distance and approach very slowly. If they start to get up and move, back off. No shooting off a flash in their moo-ey faces.  The same applies to other subjects. Just be kind and respectful.
  • Set up a challenge with your co- safarians (I think I just made that word up), such as best, funniest, or worst pic of the day. Just don’t get too serious about it!
  • Keep it going in the processing stage: The fun doesn’t have to stop when you get home from your safari, take the same approach to editing. Use some of your images from the day to experiment in your editing program with different effects and techniques that you wouldn’t normally try.
  • Take it global: You could do your safari with online friends, just set up a date or an event on Facebook. In this day and age of instant online access, you can safari with friends from around the world.
Get out there and start having some photographic fun!

The final shot on our cow safari, taken through the car window on the way home.

Above all, have fun, relax, enjoy, laugh, play. This is about taking a photographic break of sorts and getting outside your normal photography practice. You never know, you may end up with that coveted perfect shot in the process. Or, maybe not. It doesn’t matter, as long as you were having fun with your camera. Although I am sure you will end up with at least one shot that makes you smile, and I would love to see that shot or any others you take on your safaris.

Please do share in the comments below, any safari shots inspired by this article or from a previous safari, or any tips or safari ideas you might like to share with fellow safarians (yup, it’s a word now). They don’t have to be great shots! It’s about sharing the experience and having fun with your photography.

googletag.cmd.push(function() {
tablet_slots.push( googletag.defineSlot( “/1005424/_dPSv4_tab-all-article-bottom_(300×250)”, [300, 250], “pb-ad-78623” ).addService( googletag.pubads() ) ); } );

googletag.cmd.push(function() {
mobile_slots.push( googletag.defineSlot( “/1005424/_dPSv4_mob-all-article-bottom_(300×250)”, [300, 250], “pb-ad-78158” ).addService( googletag.pubads() ) ); } );

The post Put the Fun Back into Your Photography with a Cow Safari by Lea Hawkins appeared first on Digital Photography School.


Digital Photography School

 
Comments Off on Put the Fun Back into Your Photography with a Cow Safari

Posted in Photography


Enter Summer Landscape Photo Contest, Win Premium Photography Resources!

04 Aug

Summer is a perfect time for travelling and improving your photography skills. Therefore, we decided to run a summer landscape photography contest on Photodoto. Use this great opportunity to challenge your creativity and grow as a photographer. You can win some exciting prizes too! Read on for details. Sponsors and Prizes There are going to be 5 winners in this Continue Reading

The post Enter Summer Landscape Photo Contest, Win Premium Photography Resources! appeared first on Photodoto.


Photodoto

 
Comments Off on Enter Summer Landscape Photo Contest, Win Premium Photography Resources!

Posted in Photography


Fujifilm announces X-T1 IR for infrared photography

03 Aug

Fujifilm has introduced the X-T1 IR, a version of its flagship mirrorless camera designed specifically for infrared photography. The camera captures light from UV, visible, and infrared portions of the spectrum, from approximately 380-1000nm. Everything else is identical to the standard X-T1. Read more

Articles: Digital Photography Review (dpreview.com)

 
Comments Off on Fujifilm announces X-T1 IR for infrared photography

Posted in Uncategorized


Weekly Photography Challenge – Antique Cars

01 Aug

Old cars – look around you, they’re everywhere.

PoL Úbeda Hervàs

By PoL Úbeda Hervàs

Weekly Photography Challenge – Old Cars

Admit it – photographers love old things. The more battered, torn, peeling, weathered, falling down, beat up, rusted, broken and just in generally poor condition an item is – the more we love to photograph it. Right?! Tell me I’m not alone on that?

So your challenge this week is to go find an old car. It could be ancient and broken down like described above, or overhauled, in pristine condition, and well cared for by a car enthusiast. It’s your choice – or do both.

Thebig429

By thebig429

Craig ONeal

By Craig ONeal

Shoot the entire car (or vehicle) or do some detail shots of important parts. Your call again.

Robert Payne

By Robert Payne

Domiriel

By Domiriel

RSdBarros

By RSdBarros

RSdBarros

By RSdBarros

Darlene Hildebrandt

By Darlene Hildebrandt

Keith Midson

By Keith Midson

Where to find them?

If you can’t seem to find any old cars in your area here are a few places to look. Please remember not to trespass on private land and get permission before entering anyone’s property.

  • Junk yards (ask first)
  • Farmers’ fields (ask if you need to go on the property)
  • Vintage car clubs or car rallies. These are great as you’ll find dozens or hundreds of cars there on display for you to photograph.
  • Historic parks or museums – outdoor ones are especially good. If indoors ask about their photography policy before shooting and you may also need permission if you want to use a tripod.
  • Cuba – you don’t have to travel there (unless you want to) I just thought I’d mention it as the country is FULL of them, and I thought you might enjoy seeing some of my images from that amazing country.
Cuba-Jan14-3043-Edit-2400px

Added some texture overlays using Macphun’s b/w Tonality plugin.

_X2A8150-Google

I loved the detail on the steering wheel on this car.

Cuba-Jan2015-0422-online

You can even hire a driver and a car there for about $ 30/hour. Or just hail any taxi!

Cuba-Jan2015-1514-online

Cuba-Jan2015-1891-98-edit-online

Light painted using the light from a cell phone!

You may find it handy to have a tripod and polarizing filter (to cut reflections) and shoot later in the day if possible to get nice even light on the car. You might want to check out this dPS article as well: The 5 Biggest Mistakes Newbie Car Photographers Make.

Share your images below:

Simply upload your shot into the comment field (look for the little camera icon in the Disqus comments section) and they’ll get embedded for us all to see or if you’d prefer upload them to your favourite photo sharing site and leave the link to them. Show me your best images in this week’s challenge. Sometimes it takes a while for an image to appear so be patient and try not to post the same image twice.

googletag.cmd.push(function() {
tablet_slots.push( googletag.defineSlot( “/1005424/_dPSv4_tab-all-article-bottom_(300×250)”, [300, 250], “pb-ad-78623” ).addService( googletag.pubads() ) ); } );

googletag.cmd.push(function() {
mobile_slots.push( googletag.defineSlot( “/1005424/_dPSv4_mob-all-article-bottom_(300×250)”, [300, 250], “pb-ad-78158” ).addService( googletag.pubads() ) ); } );

The post Weekly Photography Challenge – Antique Cars by Darlene Hildebrandt appeared first on Digital Photography School.


Digital Photography School

 
Comments Off on Weekly Photography Challenge – Antique Cars

Posted in Photography


How to do Milky Way Photography – A Comprehensive Tutorial

31 Jul

How to Photograph the Milky Way

You’re spinning through our solar system on a gorgeous blue marble which offers jaw dropping views of an astronomical phenomenon we call The Milky Way. Wait for our marble to line up just right, and you’ll have a perfect opportunity to create awe inspiring images that harness that galactic chandelier hovering over your head.

My students are often delighted to learn that capturing spectacular images of The Milky Way is easy, once you know a few essential tips. Planning when and where to do Milky Way photography is just as important as the techniques and equipment you’ll be using.

If you want to get truly majestic shots of The Milky Way you’ve really got to consider your location and timing. I’ll tackle that first, before we move on to the shooting technique.

1 – Where and when to see the galactic core

How to Shoot the Milky Way

The full galactic core is only visible during certain months, at certain locations. You can see the rest of The Milky Way throughout the year, but for truly eye-popping results it’s the galactic core that you’ll be hunting for, so let’s discuss the best times of year to see it in all its glory.

Northern Hemisphere

The Big 'C' of the Galactic Core

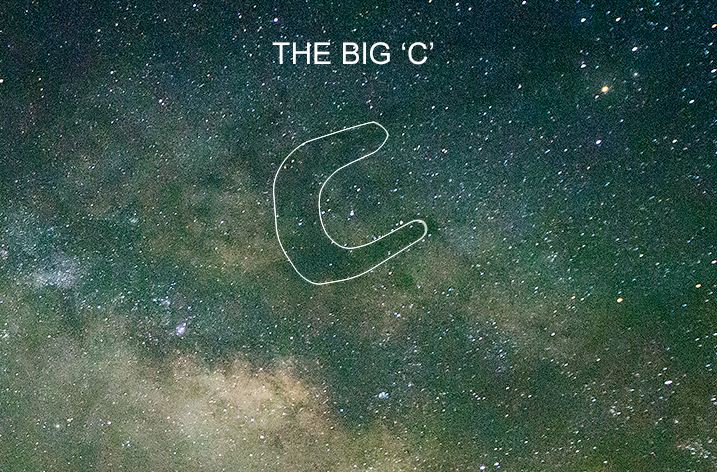
Parts of The Milky Way are visible all year round but the galactic core is present only from late April to late July and can be seen in the southeastern to southwestern sky. That’s when you’ll get to see what I call The BIG C. As the summer progresses, you’ll see the core move west so that by the end of summer it appears to rise in the southwestern sky.

You have no chance of seeing the galactic core in winter.

Southern Hemisphere

Photographers who live in the southern hemisphere are lucky because they get to see the core from February right through to October, with peak visibility being in June and July. I’m rather jealous.

Don’t forget lunar phase

For super clear Milky Way photography you’ll need minimal light pollution, which means you’ll want to avoid a bright moon. However, I’ve actually captured good shots of The Milky Way even with a first quarter moon in the sky (so don’t feel like it’s not worth shooting when the moon is present) but obviously a full moon is to be avoided.

Milky Way Photography Tutorial

The other thing to consider is the position of the moon in relation to The Milky Way. For example , a first quarter moon isn’t such a problem if it’s way off in the west while your Milky Way appears in the southeast. But, if the moon lines up dead centre in the Milky Way, it could be too bright, right where you don’t want it.

How do you know where The Milky Way is going to be?

There are a multitude of phone and desktop apps that can help you to plan your Milky Way shoot but my favourite is the free app called Stellarium. There’s a phone and desktop version, I prefer the latter to plan my shoots.

Milky Way Photography Tutorial - Stellarium

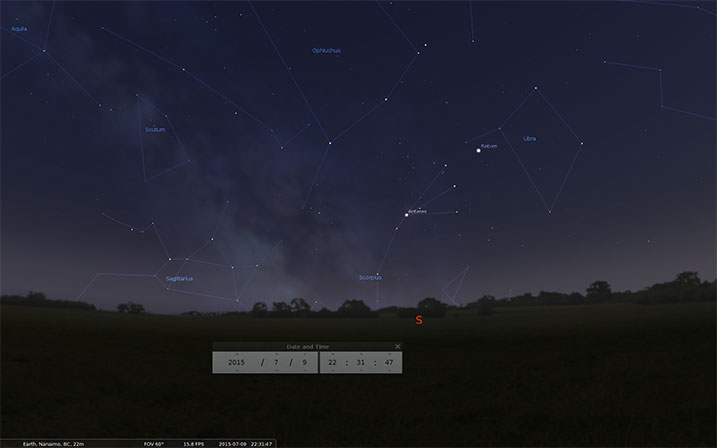
You can enter a location and time to see when and where things are going to line up. You’re mainly looking to see where the galactic core is present during a darker lunar phase. Stellarium will show you a picture of The Milky Way, and its position, at the times you specify. You can also see where and how bright the moon will be.

Check out some of the other popular apps like; The Photographers Ephemeris and Starwalk.

2 – Find a dark location

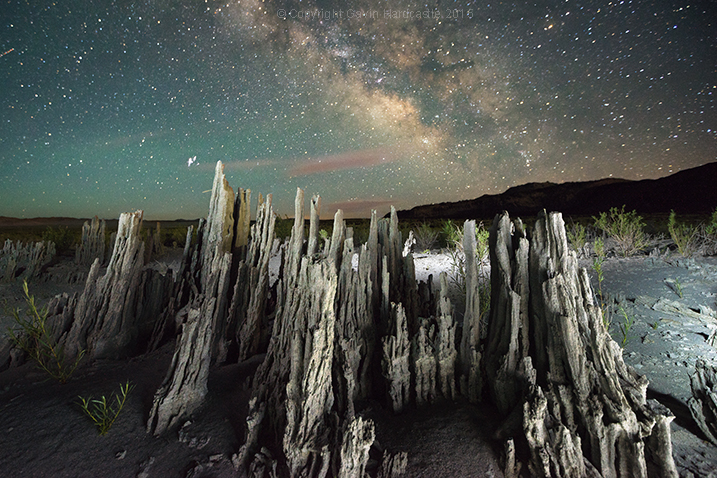
Purists will say that you MUST be in a dark sky area and of course that will give you a much clearer shot, but don’t let a little bit of distant light pollution stop you from shooting The Milky Way. If you can see it, you can shoot it. The image I shot below in Death Valley shows light pollution from two large cities and I honestly think it adds to the contrast in the image. That glow on the horizon adds a great separation of earth and sky.

Milky Way Photography Tutorial - Death Valley

If you want to discover the best dark sky locations, the International Dark Sky Places site is a great resource.

3 – Wait for clear weather

Most landscape shooters love clouds and hate blue skies. Once you get into shooting nightscapes, you’ll quickly reverse that thinking.

Astrophotography Tutorial - Gavin Hardcastle

In this shot of Mono Lake the small clouds actually added a little interest to the shot, without obscuring too much of the galactic core.

A blanket of cloud is bad news if you want to get clear shots of The Milky Way, but don’t be put off by the presence of light cloud cover. Sometimes a few clouds can add drama and framing to a Milky Way shot so it’s still worth shooting if the clouds aren’t completely blanketing the entire sky.

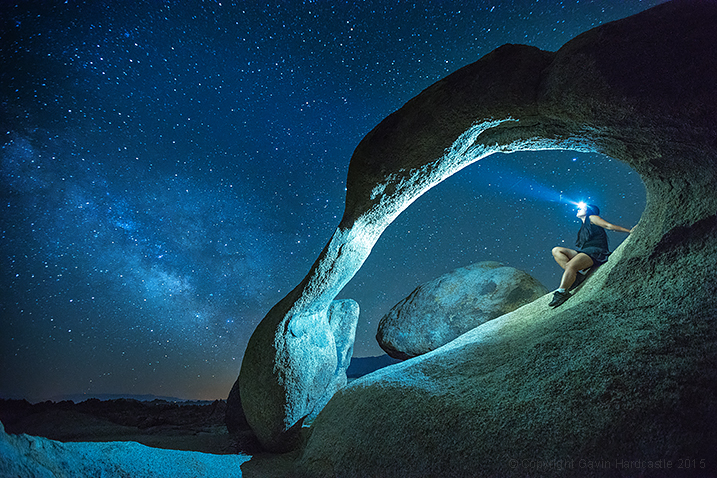
4 – The Milky Way is only half the shot

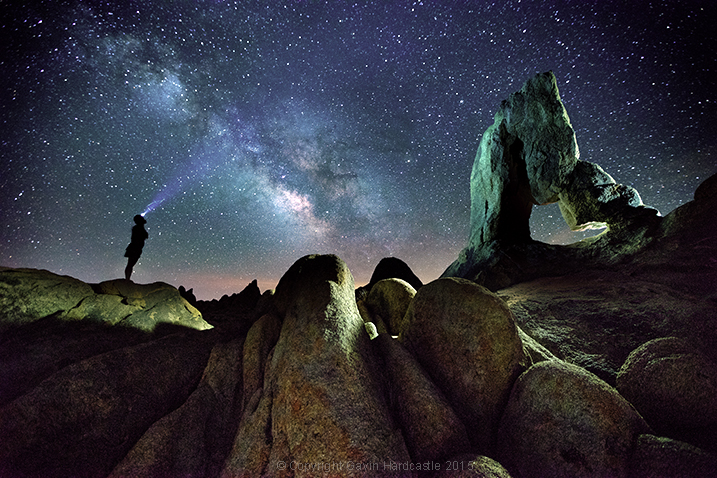
For me, the most awe inspiring Milky Way images are those that show the galactic core in relation to earthly locations and objects. Something as mundane as a person on a camp chair can look really dramatic when framed by the phenomenon of The Milky Way.

Photographing the Milky Way - Tutorial with Gavin Hardcastle

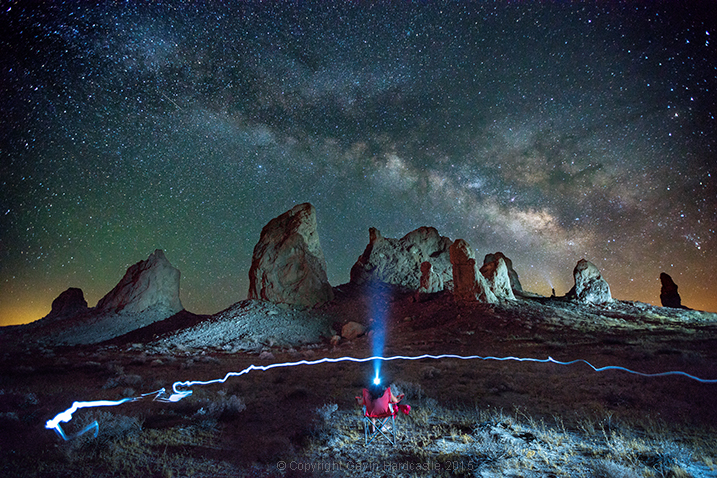
Think hard about what you’d like to put in the foreground of your Milky Way shot. If you get perfect conditions and execute perfect technique you’ll still get a boring shot if you don’t put something else in your frame to ground the viewer. Pick an interesting foreground feature and maybe try a little light painting to make your Milky Way shots truly awesome.

That could be anything from an interesting rock formation like a sea stack or arch, right through to a derelict shed, or an interesting tree. Think about locations that feature a point of interest and then consider how that place lines up with The Milky Way.

5 – Using the right gear

Lens choice

While there’s something to be said for using the gear you’ve already got, night photography is something of a challenge because of the absence of light. You’ll need a fast lens that ideally has a maximum aperture of f/2.8, or even brighter like an f/1.4.

Super wide angle lenses are ideal for shooting nightscapes because they don’t usually produce much bokeh. By that, I mean that even when set to maximum apertures of f/1.4 you’ll still be able to get a great deal of your image in focus – if you focus correctly. The last thing you want is a sharply focused Milky Way with a foreground that is completely blurred in soft, creamy bokeh, so leave the lovely Sigma 85mm f/1.4 at home.

The other great thing about super wide lenses is that you can fit a lot of The Milky Way into your frame, and there’s less magnification which allows for longer shutter speeds before the stars in your shot begin to trail.

It’s not the end of the world if you’ve got a standard, all-purpose, kit lens that isn’t very fast. You’ll still get some decent Milky Way shots because you’ll be using long exposures and high ISO settings to maximize your camera’s sensitivity to light.

Astrophotography Lens Choices

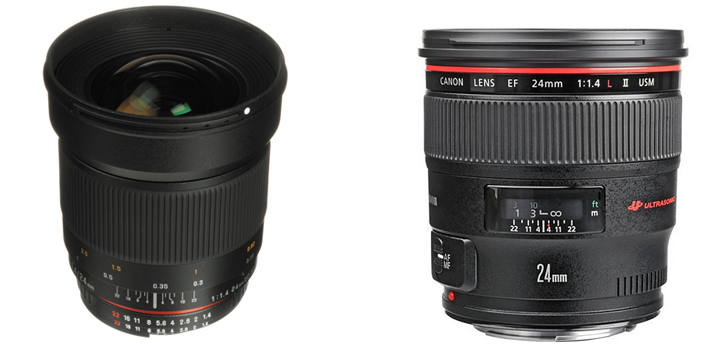
On the left we have the Rokinon/Samyang 24mm f/1.4 ($ 549) which costs a third of the price of the Canon 24 mm f/1.4 ($ 1549).

If you really get into shooting nightscapes you’ll be glad to learn that some of the most popular wide angle lenses for nigh photography are actually quite affordable.

Rokinon (AKA Samyang/Bower) offer two lenses that have something of a cult following among night shooters with their 14mm f/2.8 and their 24mm f/1.4 lenses. The build quality is atrocious but as long as you treat them with kid gloves (carefully), they usually perform well.

These are popular because they offer sharpness, speed, a wide field of view, and much less coma than other more costly lenses. Coma is the amount of elliptical aberration around stars in the corners of the frame. Some more expensive lenses, like the Canon 16-35mm f/2.8, have really bad coma on stars in the corner of the frame, which isn’t the end of the world, but it’s not ideal.

6 – Camera choice

With night photography you’ll be forced to use high ISO settings during your long exposures so it’s vital to have a camera that can operate at ISO 3200 and above, but more importantly still produce good image quality. No matter what camera you use, the image quality will take a major hit when you start to crank up the ISO numbers, that’s unavoidable.

Camera sensors have come a long way in the last couple of years so even if your camera isn’t top of the range you might be pleasantly surprised at the image quality of your high ISO images.

The Sony A7S for Astrophotography

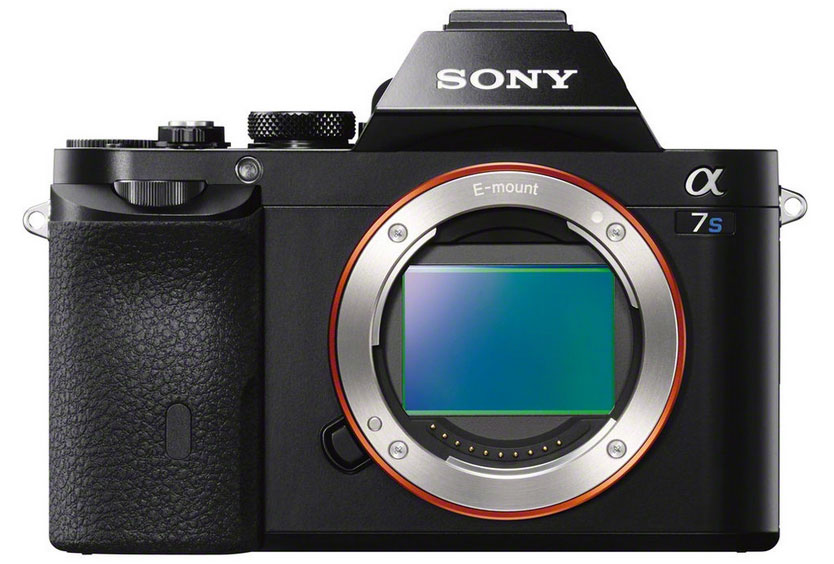
The Sony A7S has become something of a legend among astrophotographers but it isn’t cheap.

Some of the best performers of the last couple of years have been the Sony A7R, Nikon D810 and the absolutely brilliant Sony A7S, which is known for its amazing low light capability. These are all full frame cameras, and will deliver the best image quality as they typically offer better noise performance. But if you’re rocking a MFT (mirrorless four thirds) or APS-C sensor, don’t let that stop you from going out and getting some Milky Way action.

Don’t feel that you absolutely MUST have the most expensive gear. Work with what you’ve got, then upgrade when you become addicted, and can’t resist the temptation to splurge.

The one thing you’re going to really need your camera to have is a good Live View screen or an EVF (electronic viewfinder). You will use this to focus and compose your shots.

7 – You need a tripod

It’s dark, you’re going to be doing long exposures, and that means you have to use a tripod. Read my article on the reasons why a good tripod is essential for any kind of outdoor photography. For night photography a tripod is obligatory.

Shooting technique

Ok, you’ve planned everything right, The Milky Way is looming large above you, and you’ve framed up a lovely composition of it with some fascinating foreground object. It’s time to set up your camera for Milky Way shooting. Here’s where I start:

NOTE: For now you’ll want to turn off your in-camera noise reduction, as this will just slow down your test shots.

Shooting in Manual Mode
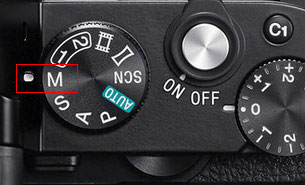
8 – Shoot in M (Milky Way Mode) and Shoot RAW

You want full control over every aspect of your shot so set your camera to Manual mode. This allows you to control the ISO, the shutter speed, the aperture and white balance. Always shoot in RAW.

9 – Use Live View or the EVF (if you have one)

This is where we’ll set our focus. Make sure you switch auto-focus OFF as we’ll be focusing manually. Before we do this you need to crank your ISO up to something like 5000 to make your sensor really sensitive to light.

10 – Set your focus on a star

Set your aperture to the widest, fastest setting it can achieve (smallest number such as f/2.8). This wide aperture will expose your sensor to the maximum amount of light.

Using your camera’s Live View or EVF, point it at the brightest star you can see until a small dot of light appears in the centre of your view. Zoom in (magnify the view NOT zoom the lens) so that you see that tiny little dot as large as possible. Now turn the focus wheel on your lens until the star becomes a sharp, tiny pin-point of light. Try turning the focus wheel passed that point until the star blurs again and you’ll have gone too far, so just back it up until you’re able to get the star as sharp and small as possible. Don’t rush this, take your time and get it right.

If your camera has a feature called Focus Peaking or Focus Assist, that can sometimes help you to determine perfect focus on a star. If you’re into calculating hyperfocal distance, you could do that too, but I prefer this method.

Whatever you do, don’t blindly set your focus to infinity by cranking your focus wheel until it reads Infinity (?), you’ll just end up with blurred images.

11 – Compose your shot

Now that you’ve focused your lens on the brightest star, it’s time to compose your shot. Use your headlamp to illuminate the scene so that you can see what you’re looking at in your Live View. If your camera has a digital level for perfect horizon lines use that – if not, you might want to invest in a bubble level for your hot shoe attachment.

Set your shutter speed to about 10 seconds (at ISO 5000 if you have it), and take a test shot. At this point all you’re doing are some rough test shots to get your composition sorted, so there’s no point in shooting a full 30 second exposure and waiting around while you take a whole bunch of test shots.

Once you’ve finished taking test shots and made your final tripod adjustments for the perfect composition, it’s time to dial in your camera settings.

13 – White Balance

When shooting The Milky Way I prefer to shoot with my White Balance set to Incandescent (aka Tungsten) which I believe is Sony’s version of Tungsten. I like the blue hue and it also displays a lot of contrast in my camera’s EVF so that I can clearly see The Milky Way. When I process my images later I often reset the White Balance back to Auto (AWB) mode for a more realistic neutral color temperature.

White Balance Settings for Milky Way Photography

This RAW file was shot with Incandescent White Balance. You can see how it looks in Adobe Camera RAW when set to Auto.

I advise you to experiment with different WB settings to get the colour temperature you like best. Shooting with the Incandescent/Tungsten prest will almost always produce good, neutral results, which you can change later in Lightroom or Adobe Camera RAW.

14 – Set your ISO

You used ISO 5000 for the test shots so that you could compose your shot quickly. But, for your actual Milky Way shot you want to use the lowest ISO setting you can get away with so dial it down to ISO 2000 and see if that gives you good results. You can always increase it to ISO 3200 after a few more test shots. I personally rarely go above ISO 3200 as my RAW files tend to degrade significantly at that point.

15 – Shutter speed versus ISO

From this point on you’re going to be juggling your shutter speed and ISO setting to get the most light sensitivity, while still having a shutter speed fast enough to avoid getting star trails. Star trails are great if you’re going for the that effect (read my star trails photography tutorial here) but even a very small star trail just results in a Milky Way shot that lacks clarity. That may just be okay for web images, but for prints you’ll want more sharpness.

Try to limit your shutter speed to a maximum of 15 seconds so that you can keep the stars in your image sharp and trail free.

Shutter Speeds for Milky Way Photography

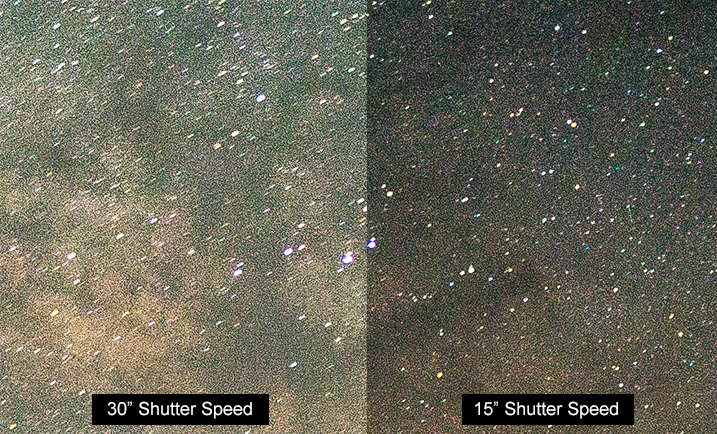
As you can see, the 30 second exposure on the left has a motion trail on each star. The 15 second exposure on the right has sharper stars, although it is darker.

With a shutter speed of 15 seconds, take a look at your camera’s light meter reading. If it’s telling you that the image is overexposed you might be able to dial your ISO number down a bit, or shorten your shutter speed to 10 seconds.

Sometimes I like to overexpose the image and ignore my light meter reading entirely. When shooting the Milky Way I’m guided more by what I see in my test shots than what my light meter is telling me to do. With my Sony cameras I use Multi metering mode, for what it’s worth.

After your shot is complete and you’re reviewing it, be sure to zoom in and check the details.

16 – Try a 30 second exposure

Milky Way Photography Tutorial - Alabama Hills, Gavin Hardcastle

I know I just said to keep your shutter speed to a maximum of 15 seonds but I always like to take an additional shot with a 30 second exposure to capture a much brighter Milky Way. I do this if I’m planning on publishing a web-only (low resolution) image because the slight star trail caused by the longer exposure won’t be very evident in a low-res web image. The stars will still look sharp enough but will have a much brighter appearance than a 15 second exposure. For prints, I’ll almost always use the 15 second exposure version for the extra sharpness.

In-camera Noise Reduction

Some cameras do a great job of processing and reducing noise reduction. But, this will double the amount of time it takes to complete your shot, so it’s always a good idea to switch this function off, at least temporarily. If you like the results of your in-camera noise reduction you can always switch this function back on once you’ve finished all of your test shots.

I personally prefer to do my own noise reduction in Adobe Camera Raw and Photoshop which gives me more control and allows me to shoot faster while on location.

Now it’s your turn

Okay, so now you know how to get gorgeous clear photos of The Milky Way. I hope you get some great results and have as much fun as I do when shooting this awe inspiring sight. If you’d like to learn how I process my Milky Way shots please post a request in the comments and if there’s enough interest I’d be delighted to share my techniques.

googletag.cmd.push(function() {
tablet_slots.push( googletag.defineSlot( “/1005424/_dPSv4_tab-all-article-bottom_(300×250)”, [300, 250], “pb-ad-78623” ).addService( googletag.pubads() ) ); } );

googletag.cmd.push(function() {
mobile_slots.push( googletag.defineSlot( “/1005424/_dPSv4_mob-all-article-bottom_(300×250)”, [300, 250], “pb-ad-78158” ).addService( googletag.pubads() ) ); } );

The post How to do Milky Way Photography – A Comprehensive Tutorial by Gavin Hardcastle appeared first on Digital Photography School.


Digital Photography School

 
Comments Off on How to do Milky Way Photography – A Comprehensive Tutorial

Posted in Photography