RSS
 

Posts Tagged ‘Photography’

Weekly Photography Challenge – The Light of Dawn

02 Apr

This set of images of dawn shared earlier are great examples of using the magic light of dawn to take stunning images.

Susanne Nilsson

By Susanne Nilsson

Weekly Photography Challenge – the light of dawn

Your challenge this week is to get up early , get out of your comfy bed, and photograph with the first light of the day, dawn. Sunrise photography can be tricky as you’re usually heading out in the dark. So you may need to plan ahead and scout some locations and shots the night or day before.

Get there early so you can capture the first light – it’s magical. Landscapes are the obvious choice for this challenge, but there are so many other subjects you can work with – so think outside the box a little. What about some macro photography? A blade of grass with morning dew, for example. Go urban and hit the city streets to see how the light plays off the buildings and early risers heading to work. There are a ton of possibilities.

Pierre Metivier

By Pierre Metivier

Andreas

By Andreas

Joe

By Joe

Share your images below:

Simply upload your shot into the comment field (look for the little camera icon in the Disqus comments section) and they’ll get embedded for us all to see or if you’d prefer upload them to your favourite photo sharing site and leave the link to them. Show me your best images in this week’s challenge. Sometimes it takes a while for an image to appear so be patient and try not to post the same image twice.

Jeff Wallace

By Jeff Wallace

57Andrew

By 57Andrew

googletag.cmd.push(function() {
tablet_slots.push( googletag.defineSlot( “/1005424/_dPSv4_tab-all-article-bottom_(300×250)”, [300, 250], “pb-ad-78623” ).addService( googletag.pubads() ) ); } );

googletag.cmd.push(function() {
mobile_slots.push( googletag.defineSlot( “/1005424/_dPSv4_mob-all-article-bottom_(300×250)”, [300, 250], “pb-ad-78158” ).addService( googletag.pubads() ) ); } );

The post Weekly Photography Challenge – The Light of Dawn by Darlene Hildebrandt appeared first on Digital Photography School.


Digital Photography School

 
Comments Off on Weekly Photography Challenge – The Light of Dawn

Posted in Photography


7 Fun Strategies to Maximize Your Enjoyment of Photography

30 Mar

Get 25% OFF James’ ebooks: Essentials of Street Photography & Street Photography Conversations eBook Bundle now for a limited time only at Snapndeals.

Williamsburg, Brooklyn.

If you are reading this, I assume that you enjoy photography enough already. You’re here, after all. However, you can always enjoy it more – so I wanted to create this list of somewhat uncommon practices, that have kept me going over the years, and kept me passionate about photography.

1. Start a three day a week, neighborhood project

365 day photo projects are a fantastic way to gain some consistency in your life with photography, which is a key to enjoying it to the fullest. However, I want to take the pressure off a little bit with the everyday. You don’t have to come up with a good photograph every single day, although if you are able to do so, more power to you. Set aside a handful of sessions during the week, as if you were going to the gym. Think about is as if it were the gym. At first it might take some getting used to, but eventually it will become second nature.

While you strive for some consistency in how often you photograph, seek out similarity in what, and where you photograph as well. Go back to the same areas over and over again, and you will find that you will start to notice new things. This commitment and consistency will help you achieve a level of imagery that is tough to reach otherwise. Photograph within your daily life, at the places that you are the most intimate with. Use photography as a way to escape and relax, without actually having to go anywhere.

2. Get lost and strike up a conversation

St . Marks Place

While photographing the areas that you are familiar with is very important, go even further. You do not need to have a set destination in mind, just pick a direction and go. Explore different routes each time. I consider photography to be an extension of walking. If there were no cameras, I’d probably still walk, and get lost sometimes. Having the camera to document what you see is just a bonus.

Don’t slink around, and make sure to say hello to people along the way. Tell them what you’re doing, and offer to take a photo of them. It’s fun, and most people will like the idea that you’re out getting lost and photographing. The camera is a great excuse to meet, connect with, and to photograph new people.

3. Don’t worry about people wondering what you’re doing

New York City

Have you ever stopped to photograph a reflection in a puddle, and then looked up to have someone staring at you quizzically, wondering what you could possibly be doing by photographing a puddle.

Forget that person. Some of the best, most beautiful, most interesting, and unique photographs are of things that can seem very mundane when you capture them. Embrace this, because it’s really fun, and keep yourself from worrying about what other people think when you are out there. Otherwise it can make you feel bad about taking images that are actually different from the norm and interesting.

Similarly, you should not worry about what people will think when they see your prints. You cannot be a good photographer without some people disliking some of your work. Do what interests you, without worry about other people’s perceptions, and you will be a better and happier photographer.

The image to the right is one that I personally enjoy. It is probably not the type of image that will stand out as much as the rest in Instagram, but there are a lot of interesting details, textures, and tones here. It’s unique. This is one that I have learned to expect not everyone to love – but some will, and I do.

4. Go to gallery shows, and get lost in the photography section of bookstores

Viewing the work of other artists will keep you inspired, and will renew your passion for photography. It will also give you a better idea of what you are capable of creating, particularly during times of frustration.

In addition to this, start a photography book collection. There are a lot of expensive photography books available, but there are just as many important ones that are affordable. Save a little money each month to build your collection, and it will help inspire you.

5. Light, light, light

Lower East Side Snowstorm

I am not referring to the light you look at, but the amount of equipment that you go out with. One, light lens is all you need. Get rid of the fear of missing out, or that you brought the wrong lens. Pick one, leave the huge bag at home, and have some fun. Use a camera phone sometimes. You will be able to go a lot farther with less gear, have a lot more spring in your step, which will lead to much better images and enjoyment.

6. Simplify your editing

Ugh… editing!

Editing can be exciting, but only when you do it the right way. I know a lot of people who have so much fun shooting, then they upload thousands of photos over months, and they get bogged down in the thought of editing. It causes them to procrastinate, and ruins the fun they had when shooting.

This is why I am a strong believer in having an efficient and organized Lightroom catalogue, but it is SO easy to do. Come back, upload a day of photos to Lightroom, and just give five-stars to your top five photos from the day. I go a little further than this, and give three, four, and five stars, but you don’t have to do that.

Even if you are the best photographer in the world, traveling in the most exotic place, you probably will not get more than five portfolio worthy pieces in a single day. So forget the middling stuff – you can come back later to search for diamonds in the rough. Just spend your time figuring out your favorite five.

Suddenly, your archive will be slimmed down so much, and this will make it much more fun to edit. Instead of looking at a mountain of thousands of images from a year, with just a small amount of work up front, you will have the top 100 images from a year, ready to go. Then grab a glass of wine (or your favorite beverage), and start making them look pretty.

7. Print!
Flower, East Village.

What’s the fun in photography if you don’t print? Take a day, get on the floor, and print out as many images as possible. If you don’t print yourself, use a service and go crazy. Force yourself to have some dedicated time to do this, or it can become so easy to procrastinate and forget about it. Printing is tough to do well in 30 minute increments, so that’s why I suggest taking half a day and having fun with it.

Then give the photos to friends! Don’t hoard them. You made them for people to enjoy, right? So give out 5x7s and 8x10s to people close to you. This is one of the hidden beauties of photography, creating something you love, and giving it to someone who will appreciate it.

Please make sure to comment below if you have some additional tips that you use, as I’m sure we would all like to hear about them.

Get 25% OFF James’ ebooks: Essentials of Street Photography & Street Photography Conversations eBook Bundle now for a limited time only at Snapndeals.

googletag.cmd.push(function() {
tablet_slots.push( googletag.defineSlot( “/1005424/_dPSv4_tab-all-article-bottom_(300×250)”, [300, 250], “pb-ad-78623” ).addService( googletag.pubads() ) ); } );

googletag.cmd.push(function() {
mobile_slots.push( googletag.defineSlot( “/1005424/_dPSv4_mob-all-article-bottom_(300×250)”, [300, 250], “pb-ad-78158” ).addService( googletag.pubads() ) ); } );

The post 7 Fun Strategies to Maximize Your Enjoyment of Photography by James Maher appeared first on Digital Photography School.


Digital Photography School

 
Comments Off on 7 Fun Strategies to Maximize Your Enjoyment of Photography

Posted in Photography


Lightroom Quick Post-Processing Tips for Landscape Photography

30 Mar

Processing a good landscape image is a lot like getting a good haircut…it should look good, but people shouldn’t really be able to tell you’ve had anything done. Now while that may be a slightly funny (hopefully) analogy, it really is a good way to approach the editing of your landscape photos. Ideally, the image should be developed to its full potential in accordance to your vision, while stopping well short of over-processing. The key to pulling off a strong landscape image can sometimes be understanding when to stop.

Before and After Split

In this article, we will go from a straight out of the camera RAW file to a fully processed photograph using Adobe Lightroom CC. We will look at each step, and I will explain why each edit was made. By the end, you will see just how easy it is for you to take full control of your landscape photography with a few simple edits.

Shoot in RAW

Here we have the RAW file as it looked after importing into Lightroom.

RAW Screenshot

As always, the better the ingredients you have to begin with, the better the finished product will be. This means to always strive to make for best exposure, crop, and composition you can, before any processing is applied. Shooting in RAW format helps you immensely when working with landscapes. The greater dynamic range (exposure latitude) will allow you to bring up shadows, and manage highlights, much better than with smaller JPEG files. I know, I know – you’ve heard all of this before – but it doesn’t hurt to hear it again! RAW truly is the best friend of the landscape photographer.

Crop first

The image above is virtually level, but not perfectly so. The first thing we will do is open the crop panel and tweak the alignment before we begin any development. Having a grid overlay will really help you to get the lines of the image just right (with the crop tool activated, press the O key to cycle through all the grids available until you find the one you want). If you wanted to crop the image further, this would be done here as well.

Crop

Add Graduated Filters to adjust sky and foreground

Now that the image has been straightened, it’s time for the real fun to begin. The first thing to do is take control of the sky so that it isn’t quite so bright. To do this, we will use the Graduated filter tool. It’s located just above the Basic Panel in the develop module, in the same row as the crop tool.

GND Indicator

The filter simulates the effect of a graduated neutral density filter. It is an indispensable tool for adjusting landscape photos. Using the Graduated filter, you can decrease the exposure, add a little contrast, and then increase the clarity just to make the clouds more pronounced, which adds a little drama in the sky. In this example I also took town the highlights, and dehazed ever so slightly. The dehaze feature is a relatively new addition to the Lightroom tool box, is available in Lightroom 6 and Lightroom CC, and really helps when clearing skies.

GND Sky

Next, you want to process the foreground but not disturb the edits you’ve just made to the sky. To do this, click new to make a new Graduated filter.

New GND Indicator

To better understand where your edits will be applied with the ND filter, simply hover the pointer over the indicator dot for a second. Everything in red indicates where the filter is working (you can also just press the o key and it will show the mask overlay – it may also show in another color on your screen, press Shift+o to cycle through all the various colors).

GND Red

Using the Graduated filter, I increased the clarity of the foreground grass, as well as illuminated the shadows. This will help to draw the viewer’s eye into the image. I’m careful not to overdo the exposure here. The main subjects of the image are the horses, and the mountains in the background, so I want to keep those emphasized. Speaking of horses…

Do local edits using a Radial Filter

I wanted to really make the horses standout within the photo so let’s make use of another powerful tool in the Lightroom arsenal – the Radial filter. It works virtually the same way as the Graduated filter, except that it is applied in the form of a circle (fully adjustable). It can be set to apply edits either inside or outside of the circular outline.

Circular GND Indicator

With the Radial filter, I raised the shadows around the horses and increased clarify slightly. I also threw in a little extra sharpening there as well. When using the Radial filter, it’s important to remember that the border between what is, and what is not edited, is very controllable. Make use of the feathering slider in order to control the density of your adjustments as they radiate outward or inwards of the circle. Effective feathering will make make your adjustments with the Radial filter seamlessly blend in with the rest of the image. Here you can see exactly where the edits will be applied.

Circular GND Red

Makes global adjustments

So far, the image has been processed using only the Graduated and Radial filter tools for local adjustments (specific areas). Now we will make some final global (whole image) adjustments in the Basic Panel.

I brought up the overall contrast and shadows, and added in a little bit more clarity. Doing this made the highlights a little too harsh so I reduced the exposure by -10. This photograph was made in the waning golden hours of sunset, so I increased the total temperature (white balance) from 4400 to 5200, so that the tone better matched what I was feeling at the time of the exposure.

Global Adjustment

Add an edge vignette

As a final touch, I add in a small amount of vignetting.

Vignette

Vignetting is great because it serves to draw the viewer’s attention into the image. In the case of this photo it works well, but that is not always the case. Just as with any other effect used in post-processing, discretion is the name of the game. When using a vignette, make sure it fits the overall mood of the image. Experiment with the feathering slider (and others) until you achieve the desired effect. As a general guideline, very subtle vignetting usually works best.

See, that wasn’t difficult at all! We have went from a completely unprocessed RAW file to a fully developed image using relatively few edits in Adobe Lightroom.

Before and After

Processing a landscape image doesn’t have to be a massive undertaking. Everything you do to a landscape photograph should compliment the scene and add harmony. You have some incredible processing tools available today which can help you to achieve your creative vision. Be careful that you don’t go too far, though. Every photograph is as unique as a fingerprint, and should be approached individually. Use the techniques in this article as a guide to your processing, and have fun helping your photos reach their full potential.

Finished

If you have any additional landscape post-processing tips that work for you, please share in the comments below.

googletag.cmd.push(function() {
tablet_slots.push( googletag.defineSlot( “/1005424/_dPSv4_tab-all-article-bottom_(300×250)”, [300, 250], “pb-ad-78623” ).addService( googletag.pubads() ) ); } );

googletag.cmd.push(function() {
mobile_slots.push( googletag.defineSlot( “/1005424/_dPSv4_mob-all-article-bottom_(300×250)”, [300, 250], “pb-ad-78158” ).addService( googletag.pubads() ) ); } );

The post Lightroom Quick Post-Processing Tips for Landscape Photography by Adam Welch appeared first on Digital Photography School.


Digital Photography School

 
Comments Off on Lightroom Quick Post-Processing Tips for Landscape Photography

Posted in Photography


5 Uncomfortable Truths About Photography

28 Mar

There is a lot of hype about photography, it’s a booming hobby practiced by huge numbers of people around the world. With the prevalence of high quality images from our phones, and widely available, inexpensive dedicated cameras, it’s no wonder the art is so popular. But it isn’t all roses, and there are some uncomfortable things it’s best just to understand from the beginning.

Here are five truths about photography:

AK-NoatakPreserve-KellyRiver-1083-320

1. More gear won’t make you a better photographer

Don’t get me wrong, I love camera gear. New bodies, lenses, and accessories are fun and exciting, but they won’t magically make you better at photography. To be a better photographer you need to learn how to find images. The gear can help you capture them, but the finding part is up to you.

Whenever I’m thinking of buying a new piece of gear, I ask myself, “Is my current gear holding me back?” Sometimes the answer is yes. It could be that the lens I’ve been using for night photography is too slow to get the detail I need, or the limitations of my current body are preventing me from blowing up the final shot to the size and detail required by a client. In such cases, I almost always have a specific image that I want to make, but can’t, due to my equipment.

More often though, the answer to whether my gear is holding me back is no. The actual reason I want a new piece of gear is that it is shiny. I may lust over new camera stuff, but if that gear won’t improve my photography in a very tangible way, I don’t buy it.

Some images require certain equipment. Without a big telephoto, this shot of the full moon over the Andes would have been impossible.

Some images require certain equipment. Without a big telephoto, this shot of the full moon over the Andes would have been impossible.

Remember that good photography comes from your heart and your mind, not your wallet.

2. There is no “knack”

AK-NoatakPreserve-KellyRiver-1083-469

Some people take to photography quickly, others more slowly, but everyone has to learn. Photography is an art, not a gift.

A few times, I’ve been told by people looking at one of my images, “You have such a gift.” I know they are being kind, that they are offering a compliment, but I can’t help feeling insulted. I want to say, “It’s not a gift! I worked my ass off to make that image! That shot is the result of years of effort, of early mornings, and hours of travel, of study and practice, tens of thousands of failed and deleted shots, and thousands of dollars in equipment. Nothing about that image was given to me, I earned it.”

Of course, I don’t say that. Instead, I smile as though they’ve just said the nicest thing, and say thanks.

AK-WragellStEliasPark-NabesnaRoad-July2006-10

Photography can be learned. With practice you can see the way lines and light interact to create a pleasing image. Or how those elements can become jumbled, resulting in a photo that just doesn’t work. With time and effort, you get better at recognizing the difference. It’s a process I work on every day.

So no, photography is not a knack – it’s work.

3. You’ve got to be patient

I spent 20 minutes hand holding a big lens to make this image, as I waited for an albatross to turn in profile over the waves.

I spent 20 minutes hand holding a big lens to make this image, as I waited for an albatross to turn in profile over the waves.

Yeah, lots and lots of patience.

I’ve guided hundreds of photographers into wild locations to make images. Sometimes we’ve arrived at a site, and the light has been perfect, or the wildlife is waiting in the perfect place, as though they’d been staged there. But that is rarely the case. More often, we have to wait, and wait… and wait.

The pages of magazines are filled with spectacular images, timed to perfection. But those didn’t just happen. The images were made because the photographer knew how to be patient.

Few things are so hit and miss as photographing the aurora borealis. (There are lot of misses.)

Few things are so hit and miss as photographing the aurora borealis (there are lot of misses).

The best images all require time and effort.

This is a hard reality for many of my clients (students) to swallow. They just want the photo to be there, though it rarely is. To be honest, I’m not very good at patience. I like to move and explore, but it’s the times where I force myself to wait and sit silently, that I often walk away with something good.

4. There is nothing wrong with being an amateur

AK-BrooksRange-BairdMtns-aerial-31Jul-12

Being an amateur does not mean you are any less talented than a professional photographer. In fact, in many cases, I’d say it is just the opposite. You see, professionals spend much (most even) of their time doing the dirty work: invoicing, marketing, tip-tapping away at the computer, and much less time actually making and working with images. The images we professionals shoot are often those made for clients, not those we make for ourselves. Inherently, photos made for others are not as good as those we are passionate about. Amateurs can shoot whatever they please, and that means they are making photos that matter to them.

Skill and artistic sensibilities are not the sole territory of professionals. Some of the finest photographers I know do not make their living from it.

AK-ANWR-Kongakut-108094-731

And equipment! Here is the biggest irony: pros often can’t afford the latest and best gear. With the exception of the very top people in the industry, we pros aren’t millionaires, or anywhere close. Out of our meagre incomes have to come our mortgage, food, computers, software fees, travel, and yes, camera equipment. When I made the transition to full-time freelancer, that new reality hit me like a falling piano. Science fiction writer John Scalzi once wrote that you shouldn’t consider leaving your day job until you are making TWICE your normal income with your writing (or in this case photography). It’s good advice.

So yeah, there is nothing, NOTHING wrong with being an amateur.

AK-GAAR-AIR-1073-615

5. Postprocessing is a tool, not a crutch

I’m not the first to say it, but I’m going to repeat it, there is no un-suck filter. If your image stinks when it goes into Photoshop or Lightroom, it’s going to stink when it comes out, no matter how much you crop it, add contrast, or saturate.

This image took a lot of work in post-processing, but it was a solid image going in. Nothing in Lightroom will make a bad image good.

This image took a lot of work in post-processing, but it was a solid image going in. Nothing in Lightroom will make a bad image good.

For the love of god, don’t over-process your images. What matters in an image is the way it speaks to the viewer, that the photo means something. Make your image meaningful, and you won’t ever have to rely on post-processing to be successful.

Sunset over the Noatak River, Gates of the Arctic National Park, AK USA.

Conclusion

In the end, what really matters about photography is not the final image, but the process of making it. So forget about the shiny new gear, practice the art, be patient, don’t get caught up in labels, and make your best image in the camera. Everything else is details.

Do you have anything else you’d add to this list? Please share in the comments below.

googletag.cmd.push(function() {
tablet_slots.push( googletag.defineSlot( “/1005424/_dPSv4_tab-all-article-bottom_(300×250)”, [300, 250], “pb-ad-78623” ).addService( googletag.pubads() ) ); } );

googletag.cmd.push(function() {
mobile_slots.push( googletag.defineSlot( “/1005424/_dPSv4_mob-all-article-bottom_(300×250)”, [300, 250], “pb-ad-78158” ).addService( googletag.pubads() ) ); } );

The post 5 Uncomfortable Truths About Photography by David Shaw appeared first on Digital Photography School.


Digital Photography School

 
Comments Off on 5 Uncomfortable Truths About Photography

Posted in Photography


How Thinking Film and Shooting Digital Can Improve Your Photography

27 Mar

Film is not dead. But since the advent of digital photography, about 20 years ago, film has certainly taken a back seat. Since just over a decade ago, when digital cameras were widely available to the masses, film has almost been completely replaced. However, there’s a lot to be learned from the disciplines of analog days, before the ability to take photos so instantly, and at a phenomenal rate and remarkable quality, was made accessible to everyone with a digital camera.

think film shoot digital creative project_0000

Back in film days, we only had a limited amount of frames we could shoot on one roll. Often the camera sat for days and weeks until we had shot all the frames on the roll of film. We then carefully rewound the film and packaged it off to the film developers, then we wait…hours, days, weeks before we even saw the images we shot. Shooting film was no doubt a methodical exercise in process and patience.

think film shoot digital creative project

But, film has made a comeback in recent years. Many professional digital photographers have added film to their arsenal, others have made the complete switch back to film, and there are those who never made the switch to digital in the first place. Exciting days for analog in this predominantly digital age!

One way to learn from the disciplines of shooting film is to think in film mode.

think film shoot digital creative project

Go out with your camera with the following restraints:

  1. Set yourself an imaginary film roll number. Limit the number of frames you can shoot to 12, 24, or 36.
  2. Keep your ISO to a set number like 100, 200, 400, or 800 – which are the common film speeds from those days.
  3. Use only one lens. I’m sure not many of us, unless we were professionals then, walked around with an array of lenses in hand. Often we just used one lens, carried no back up film, or batteries, or external flash!

think film shoot digital creative project

Now shoot like you have a film camera in your hand and adopt these mindsets:

1.Don’t spray and pray!

When you take a photo, bear in mind how many frames you have left, and think carefully before you press the shutter. You cannot spray and pray with film, therefore have to exercise restraint. Look at things carefully, with an intentional eye, and imagine what the scene might look like before you take the shot. This helps you compose the frame more meticulously, and look at the light and dark contrast of the scene with more discernment.

think film shoot digital creative project

2. Think of a story or theme, or limit yourself to one place.

Boundaries are always helpful, they stretch you to think outside the box, more than when you have all the freedom in the world to photograph anything you please. It also helps make a cohesive story at the end, should you wish to collate your photos together on a blog or in an album.

think film shoot digital creative project

3. Don’t fear deep darkness or the raging midday sun.

Film is so good at retaining details in highlight and shadow areas of a photograph, that the dynamic range of the image is miles better compared to the digital camera image. Film also has a very forgiving nature when it comes to underexposure and overexposure over a wide range of stops. So with your film brain on, don’t fear extreme brightness or deep darkness. However bear in mind the settings to use that could help you in such circumstances.

When your subject is in bright daylight, and you don’t have a light meter handy, adopt the sunny f/16 rule. This means you use the following settings: aperture f/16 and your shutter speed set to the reciprocal of your ISO, or film speed. For example, if you have set your ISO to 100, this means your aperture will be f/16 and your shutter speed to the closest of 100 which is 1/125 (or any equivalent exposure value such as f/11 at 1/250, or f/8 at 1/500).

think film shoot digital creative project

4. Go where the light is

Whether it be natural light or any other available light, whether under the brightness of the sun or just candelight in a room, find the light. Film is extremely sensitive to light and if you adjust your shutter speeds in low light accordingly, you will be surprised at how well film can capture ambient light. Remember when shooting in low light, steady yourself or your camera, lower your shutter speed and adjust your aperture (open it wide). Your ISO cannot be changed; with film you only have two sides of the exposure triangle to play with.

think film shoot digital creative project

5. Edit for a film look

Nowadays there is a plethora of Lightroom presets, and Photoshop actions, that replicate the film look. If you are a dab hand at Photoshop, you can probably do it yourself from scratch. The main elements you are after to replicate the general film look are: pastel tones, creamy highlights, soft shadows, low and controlled contrast, reduced saturation, matte look (reduced black output), creamy skin tones, and some grain. Of course the actual overall look depends of the type of film used, but this list would encompass the general look and feel that film gives to an image.

think film shoot digital creative project

The photos I have used in this article were taken with a D700 and a 35mm f/1.4G, captured one day in London when I went out thinking film and shooting digital. I shot 22 frames out of 24 in three hours, nailed 19, botched two and fixed one in Photoshop.

think film shoot digital creative project

I hope you try this exercise and have fun with it. Share below in the comments how many frames you managed to shoot under great restraint, and then celebrate!

think film shoot digital creative project

amzn_assoc_placement = “adunit0”;
amzn_assoc_enable_interest_ads = “true”;
amzn_assoc_tracking_id = “dpsgeneral-20”;
amzn_assoc_ad_mode = “auto”;
amzn_assoc_ad_type = “smart”;
amzn_assoc_marketplace = “amazon”;
amzn_assoc_region = “US”;
amzn_assoc_linkid = “6710d26f550e9793f41475ee806fee9e”;
amzn_assoc_emphasize_categories = “13900861”;
amzn_assoc_fallback_mode = {“type”:”search”,”value”:”digital cameras”};
amzn_assoc_default_category = “Photo”;

googletag.cmd.push(function() {
tablet_slots.push( googletag.defineSlot( “/1005424/_dPSv4_tab-all-article-bottom_(300×250)”, [300, 250], “pb-ad-78623” ).addService( googletag.pubads() ) ); } );

googletag.cmd.push(function() {
mobile_slots.push( googletag.defineSlot( “/1005424/_dPSv4_mob-all-article-bottom_(300×250)”, [300, 250], “pb-ad-78158” ).addService( googletag.pubads() ) ); } );

The post How Thinking Film and Shooting Digital Can Improve Your Photography by Lily Sawyer appeared first on Digital Photography School.


Digital Photography School

 
Comments Off on How Thinking Film and Shooting Digital Can Improve Your Photography

Posted in Photography


Weekly Photography Challenge – The Humble Vegetable

26 Mar

Earlier we looked at some artsy images of everyday objects – vegetables.

Williamo!

By Williamo!

Weekly Photography Challenge – the humble vegetable

This week we want you to go find some produce and photograph it! Think outside the box:

  • Try black and white
  • Shoot macro
  • Go for an abstract
  • Backlight it
  • Light paint it
Samandel.com

By samandel.com

Flavio~

By Flavio~

Lynn Friedman

By Lynn Friedman

Amelia Crook

By Amelia Crook

Woodleywonderworks

By woodleywonderworks

Tristan Bowersox

By Tristan Bowersox

Gillie Rhodes

By Gillie Rhodes

Tim Geers

By Tim Geers

Jar []

By jar []

Share your images below:

Simply upload your shot into the comment field (look for the little camera icon in the Disqus comments section) and they’ll get embedded for us all to see or if you’d prefer upload them to your favourite photo sharing site and leave the link to them. Show me your best images in this week’s challenge. Sometimes it takes a while for an image to appear so be patient and try not to post the same image twice.

David Reber

By David Reber

googletag.cmd.push(function() {
tablet_slots.push( googletag.defineSlot( “/1005424/_dPSv4_tab-all-article-bottom_(300×250)”, [300, 250], “pb-ad-78623” ).addService( googletag.pubads() ) ); } );

googletag.cmd.push(function() {
mobile_slots.push( googletag.defineSlot( “/1005424/_dPSv4_mob-all-article-bottom_(300×250)”, [300, 250], “pb-ad-78158” ).addService( googletag.pubads() ) ); } );

The post Weekly Photography Challenge – The Humble Vegetable by Darlene Hildebrandt appeared first on Digital Photography School.


Digital Photography School

 
Comments Off on Weekly Photography Challenge – The Humble Vegetable

Posted in Photography


How the Square Format Can Enhance Your Street Photography

24 Mar

Square format and street photography

In my last article about choosing the best lens for street and travel photography, you may have noticed that all the photos used to illustrate it, were in the square format. That’s not a coincidence. I recently discovered that I really like this aspect ratio for street photography. It’s made a big improvement to my photos, and I thought it would be interesting to go a little deeper into the reasons why.

It started when I read a book by street photographer Willem Wernsen. I noticed that virtually all his photos were square, and I had an aha moment. There was something about the aspect ratio that worked really well. I couldn’t wait to try it out.

The square format and street photography

So, what is so good about the square format? I think it comes down to two factors. The first is to do with a fundamental weakness of the 3:2 aspect ratio of the 35mm format, that full-frame and APS-C cameras use. The long rectangle is difficult to use well, especially when the camera is turned on its side in the portrait orientation.

You can learn more about this in my article Aspect Ratio: What it is and Why it Matters

That’s why some photographers historically prefer using medium, or large format cameras, for landscape and portrait photography. These are two subjects where it seems especially difficult to compose within the 35mm rectangle, in the portrait orientation. The shorter rectangles of these cameras (not to mention the 4:3 aspect ratio of Micro four-thirds cameras) just seems to work better.

Square format and street photography

Keeping street photography simple

The other factor is that the square format greatly simplifies the decision making process. Street photography is often about reacting quickly to the scene in front of you. The fewer decisions you have to make, the quicker you can do so. With the square format, there is no need to consider whether the composition would be better if you turned the camera on its side.

Another benefit of the square format is that is seems much easier to create an effective composition within the square frame, than it does within the rectangular one. A good tip is to look for strong shapes, and simplify the composition as much as you can.

square-format-street-photography-02

Camera settings

If you would like to try out the square format, it is relatively easy to do so, as most modern digital cameras let you select the aspect ratio. If your camera has an optical viewfinder it will probably display guidelines to let you know how to frame the scene. Check your user manual.

If your camera has an electronic viewfinder you will see a cropped, square image. This, combined with the smaller size and quiet operation, makes mirrorless cameras ideal for street photography.

Square format and street photography

If you would like to shoot in black and white, as I have done for the photos in this article, then you can do so by setting your camera to its monochrome mode. Mirrorless cameras display the scene in black and white in the viewfinder, a great aid to composition. Digital SLRs display the photos in black and white when you play them back on the LCD screen.

If you shoot Raw, most cameras will let you uncrop the image in Lightroom if you want to (the exceptions are Nikon and Panasonic, which crop the image even for Raw files). The key is to convert the Raw files to DNG when you import them into Lightroom. If you keep them in their native format, Lightroom won’t let you uncrop them.

Using Raw also lets you convert your black and white files to colour if you wish to.

Square format and street photography

Your turn

Have you tried using the square format for street photography? How did you get on with it? Please let us know in the comments, and share some of your photos.

Square format and street photography


Mastering Composition ebookMastering Composition

My new ebook Mastering Composition will help you learn to see and compose photos better. It takes you on a journey beyond the rule of thirds, exploring the principles of composition you need to understand in order to make beautiful images.

googletag.cmd.push(function() {
tablet_slots.push( googletag.defineSlot( “/1005424/_dPSv4_tab-all-article-bottom_(300×250)”, [300, 250], “pb-ad-78623” ).addService( googletag.pubads() ) ); } );

googletag.cmd.push(function() {
mobile_slots.push( googletag.defineSlot( “/1005424/_dPSv4_mob-all-article-bottom_(300×250)”, [300, 250], “pb-ad-78158” ).addService( googletag.pubads() ) ); } );

The post How the Square Format Can Enhance Your Street Photography by Andrew S. Gibson appeared first on Digital Photography School.


Digital Photography School

 
Comments Off on How the Square Format Can Enhance Your Street Photography

Posted in Photography


Beginner’s Guide to Water Droplet Photography

22 Mar

Have you ever looked at those great water droplet or splash images and found yourself scratching your head wondering how did they do that?

10

Well, those great images are usually done in studios, with electronically programmable eyedroppers, and motion triggers that fire the camera at an exact split second, allowing the photographer to freeze motion on that exact perfect moment. All that specialized gear makes all this process controllable, but if you own a camera and an external flash, you can also give this type of photography a try.

Water drops are an interesting subject to photograph, as it gives you the opportunity to explore techniques you wouldn’t normally do, and will probably give you some great images to add to your portfolio.

In this article, I will give you some interesting tips on how to get started with water droplet photography, with just some basic equipment.

Gear

Besides your camera and lenses of choice, you will need an off-camera flash, and a wireless trigger or dedicated extension cable.

01

Even though you can get great images without it, flashes with the high-speed sync (HSS) function will allow you to use shutter speeds above 1/250th, and freeze the motion much better.

02

A shutter cable release is also a good accessory to use, as it will allows you to fire your camera without touching it.

03

Finally you will need an eyedropper, or a wet sponge, with a system to hold it in place above a container with water. Usually I prefer to use a sponge, as it can produce bigger drop. I use a nano clamp and a gooseneck, attached to a tripod, to hold things in place.

Here is the complete setup:

04

Safety

Electronics and water don’t get along very well, so will need to be extra careful when doing this type of photography. Safety first, so a good piece of advice, is to protect your equipment with cellophane wrap, so any accidental water spillage won’t damage it.

05

Lighting

The first step is to keep in mind, that water is a specular surface, so you should not light the water but rather what the water reflects. Here I’m using white cardboard to bounce the light that reflects on the water surface.

06

Exposure: ISO 2000, 1/8000, f/11

The f/11 aperture allows me to have some depth of field, and the 1/8000 shutter speed, together with the flash at full power on HSS mode, allows me to freeze the action.

You can get a lot of different effects with slower shutter speeds and different apertures. This is a plain simple image, but you can get creative in a lot of ways here. One thing I use a lot is colored gels in front of the flash, to create some dynamics in the image.

07

Here I am mixing yellow and blue gels to create this colorful image.

08

Timing

The perfect timing to press the shutter release is something really hard to accomplish, as it’s humanly impossible to be that accurate. But, with some practice, and a little bit of luck, you will end up some great shots. To be honest, the random nature of the results is something that I really enjoy.

Here is a sequence of images that didn’t work as good as the last one.

09

Once you get the hang of it, you can experiment with food colorants and different liquids. Milk is a good choice, as it gives you drops with more consistency, and therefore best splashes.

10

You are only limited by your imagination here. With some basic Photoshop skills, you can take your images to the next level with some photo composites, like this image I created for a strawberry yogurt advertisement campaign.

11

So, there are some basic techniques to produce great water droplet images, without specialized equipment or motion triggers. Give it a try, I’m sure you’ll get great results!

This week on dPS we are featuring articles on special effects. Check out the others that have already been published here:

  • How to Photograph the Full Band of the Milky Way
  • Fire Spinning with Steel Wool – A Special Effects Tutorial
  • Special Effect – How to Create Multiple Flash Exposures in a Single Frame
  • Stacking Light Trails for Night Photography Special Effects
  • 26 Unique Special Effects Photos to Spark Your Creativity
  • Weekly Photography Challenge – Special Effects
  • Tips for Shooting Through Objects to Create a Special Effect
  • How to Add Vintage Frame Overlays Using Alien Skin Exposure X
  • 8 Steps to Great Long Exposure Landscape Photography
  • How to Create In-Camera Double Exposures

googletag.cmd.push(function() {
tablet_slots.push( googletag.defineSlot( “/1005424/_dPSv4_tab-all-article-bottom_(300×250)”, [300, 250], “pb-ad-78623” ).addService( googletag.pubads() ) ); } );

googletag.cmd.push(function() {
mobile_slots.push( googletag.defineSlot( “/1005424/_dPSv4_mob-all-article-bottom_(300×250)”, [300, 250], “pb-ad-78158” ).addService( googletag.pubads() ) ); } );

The post Beginner’s Guide to Water Droplet Photography by Ivo Guimaraes appeared first on Digital Photography School.


Digital Photography School

 
Comments Off on Beginner’s Guide to Water Droplet Photography

Posted in Photography


How to Build the Best On-Location Photography Lighting Kit

22 Mar

Digging around the Internet, there are tons of resources available for constructing the perfect studio lighting setup for photographers, but very little is written about the best travel photography lighting kits. As a result, this article is an entirely DIY approach, comprised of lots of sleuthing and trial and error, to create the ideal lighting kit, that’s compact and easy to travel with. Let’s start with the essentials: the lighting gear!

photography lighting equipment

Best Travel Photography Lights

Compared to studio lights, you really can’t go wrong with speedlights when you’re looking for portability. As a Canon shooter, this means having a Canon 580EXII as my main light, and two Canon 430 EXII Speedlites as my secondary lights. A possible lightweight and travel-friendly alternate light source is the Westcott Ice Light, which offers continuous LED lighting, although in general it doesn’t quite have the oomph and output that speedlights do.

All flashes are powered by Panasonic Eneloop AA batteries, which have been a huge money-saver, thanks to the fact that they are rechargeable, and have all been extremely reliable to date. To sync all three speedlights, I have PocketWizards that I always carry as backups, but primarily rely on Yongnuo RF-603CII-C1 remote flash triggers for two reasons:

  1. They’re small and low-profile
  2. They’re incredibly cheap and affordable

Amazingly, the Yongnuos are also very reliable, and haven’t once failed in two years of constant usage.

Compact Light Stands

photography lighting equipment

Next on the list are light stands in the form of Manfrotto 5001B Nano stands. Weighing in at just 2.2 pounds (1kg) each, these light stands fold down to a mere 19 inches (48cm), while still having a maximum height of 74.4 inches (1.9m). They aren’t the most stable or sturdy light stands out there, but they travel extremely well, and work just fine for simple speedlight setups. Two light stands gets their own umbrella adapter and accompanying umbrella, while one lucky stand is adorned with a Westcott Rapid Box lighting modifier.

Lighting Gear Extras

As with most photo shoots, you never quite know what extra accessories you might need when on location, so my lighting kit varies from shoot to shoot. Some common extras include a a Benro Travel Flat Tripod, Canon shutter release cable, mini gold/silver reflector, speedlight color gels, gaffer’s tape, spare batteries, and camera body and lens rear caps, in case of drops and spills (sad to say these have come in handy more than once).

Bonus tip: I recommend using a lightweight zippered women’s cosmetic bag to hold, and organize, your smaller items such as remote triggers, batteries, front and rear caps, etc. This is the easiest way to keep those items contained in one spot for easy access, with less chance of losing them while at a shoot.

photography lighting equipment

Lighting Gear Bags

After a huge laundry list of items, you’re probably now wondering how to carry all of this stuff. Finding the perfect lighting gear bag was by far the most challenging part of assembling this DIY kit. But after lots of hunting, I found the best solution to be a Lowel Litebag, which come in a range of sizes.

With a thick and sturdy vinyl exterior and soft interior, this zippered bag has padded partitions that can be removed, or modified to suit a variety of needs. It has an adjustable, nicely padded shoulder strap and handles, making it easy to carry, even when heavy with equipment inside. It isn’t sufficiently padded to take a solid beating, but it will definitely protect your gear to a reasonable extent, without the added bulk and weight. Unfortunately, this bag isn’t the easiest to find, but it is incredibly solid, and holds all of the gear I mentioned above, with room for more!

photography lighting equipment

In Conclusion

As a traveling, or on-location photographer, it’s important to have a go-to travel photography lighting kit that is compact and flexible, while still keeping your gear safe from harm. If you’re searching for a flexible lighting kit, try out the above recommendations, and let me know what you think the comments below! Also, if you have another travel lighting kit setup, I’d love to hear about your own suggestions and modifications.

amzn_assoc_placement = “adunit0”;
amzn_assoc_enable_interest_ads = “true”;
amzn_assoc_tracking_id = “dpsgeneral-20”;
amzn_assoc_ad_mode = “auto”;
amzn_assoc_ad_type = “smart”;
amzn_assoc_marketplace = “amazon”;
amzn_assoc_region = “US”;
amzn_assoc_linkid = “6710d26f550e9793f41475ee806fee9e”;
amzn_assoc_emphasize_categories = “13900861”;
amzn_assoc_fallback_mode = {“type”:”search”,”value”:”digital cameras”};
amzn_assoc_default_category = “Photo”;

googletag.cmd.push(function() {
tablet_slots.push( googletag.defineSlot( “/1005424/_dPSv4_tab-all-article-bottom_(300×250)”, [300, 250], “pb-ad-78623” ).addService( googletag.pubads() ) ); } );

googletag.cmd.push(function() {
mobile_slots.push( googletag.defineSlot( “/1005424/_dPSv4_mob-all-article-bottom_(300×250)”, [300, 250], “pb-ad-78158” ).addService( googletag.pubads() ) ); } );

The post How to Build the Best On-Location Photography Lighting Kit by Suzi Pratt appeared first on Digital Photography School.


Digital Photography School

 
Comments Off on How to Build the Best On-Location Photography Lighting Kit

Posted in Photography


8 Steps to Great Long Exposure Landscape Photography

21 Mar

longexposure_landscape2

In this article I will outline eight steps, that will help visualize what you’ll need to capture beautiful, well-planned, and unique images that you’ll be happy with.

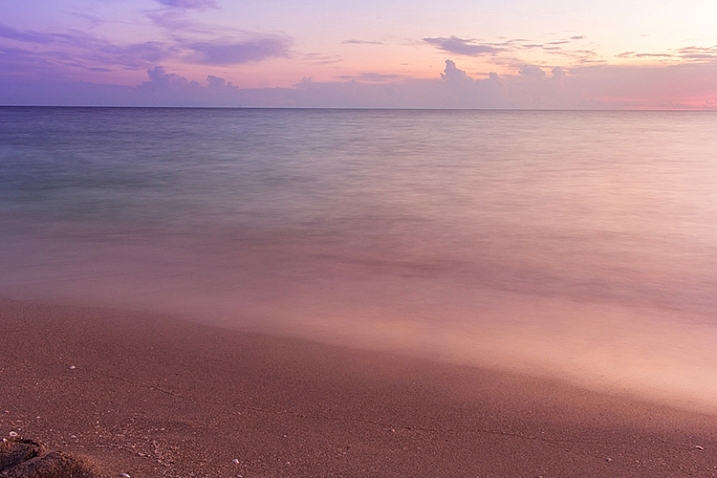
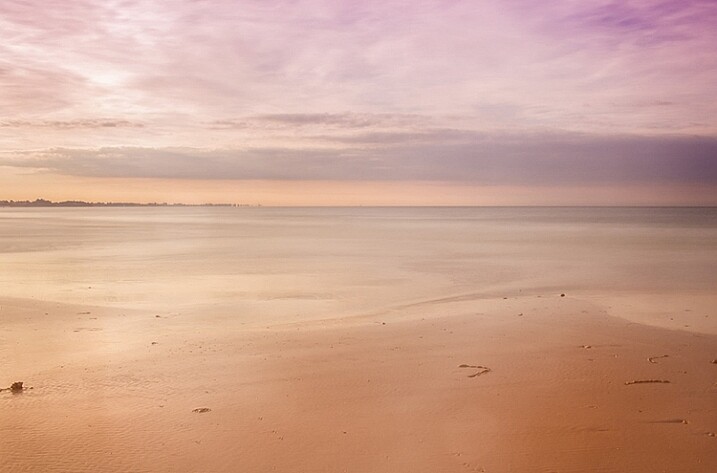
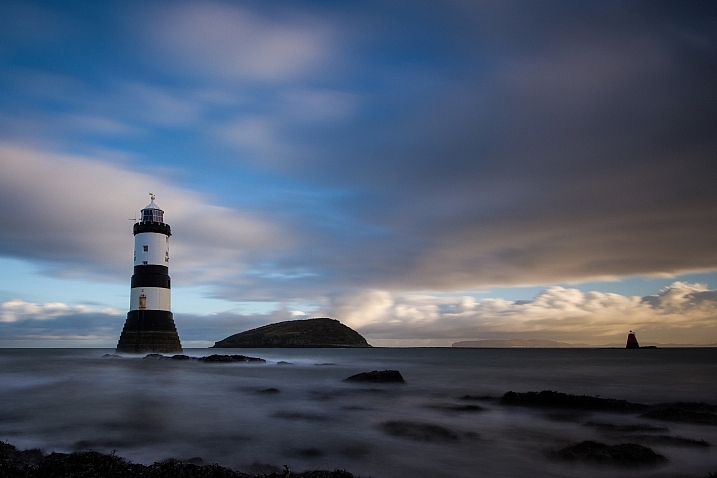
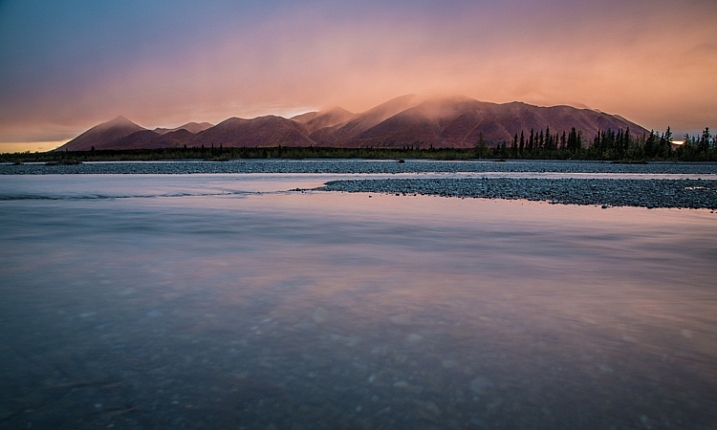
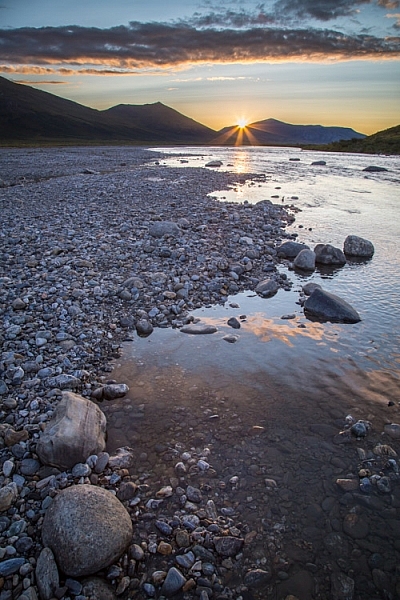
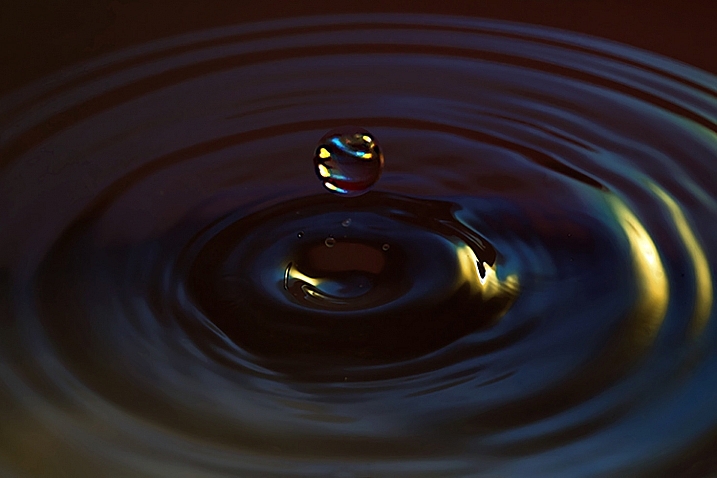
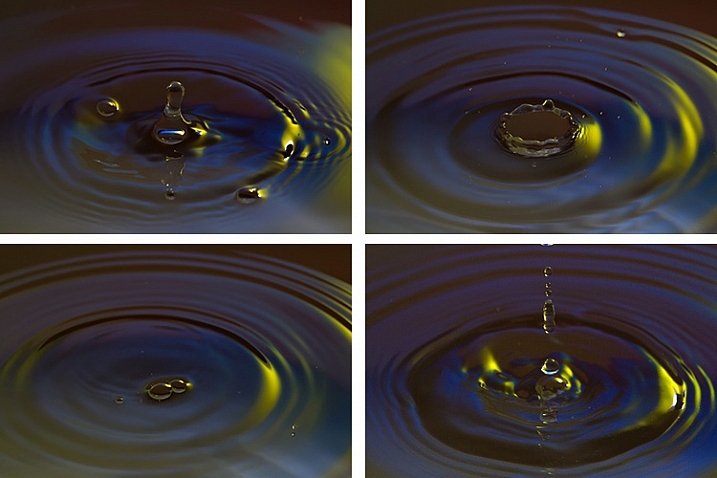
Long exposures are the true artworks of photography; a normally static and bland scene can become a dynamic masterpiece when the shutter is left open, and the capturing of movement occurs. Surf on a beach becomes a swirling, cloud-like mass, and grasses flowing in the wind become a single, beautiful entity. This is a situation where what you see, and what you end up with, are usually two very different things, and the results are often breathtaking.

But capturing that beauty can be challenging. So what do you need to focus on to make a long-exposure landscape shot work? Let’s explore that a bit more.

David McAughtry

By David McAughtry

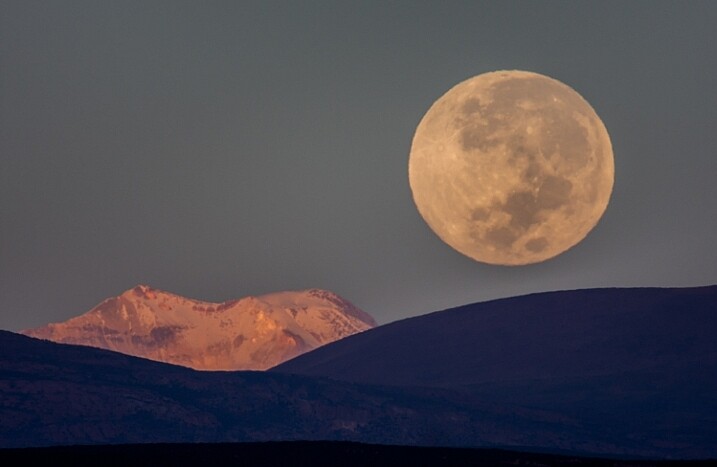
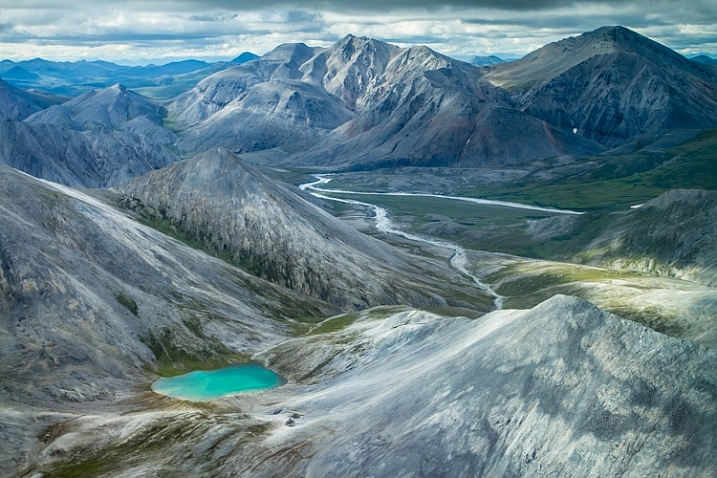
1. Choose your location wisely

Before you even shoot your landscape, you’ll need to decide what type of shot you’ll tackle, and what environment you’d like to shoot in – whether it be a grassy plain, a seascape, or a busy highway.

Long exposure photography is about capturing, and translating movement within a frame. Spend some time deciding what you’re trying to capture, and what movement you want to accentuate. Rolling waves? Swaying grass? Flowing clouds?

Take a moment to envision what your scene will look like, and what parts of it will be stationary, and which parts will be fluid.

Aaron

By Aaron

2. Be patient and wait for the right time

Long exposures, at their very basic premise, require one of two things to work properly. Either very dim light situations such as the golden hour time periods, very early, or very late in the day – OR modifiers added to the camera to diminish the light that is coming in through the lens.

The reason you need one of these is because leaving the shutter open for longer periods of time, monopolizes one corner of the exposure triangle. When a normal amount of light strikes the camera’s sensor for an extended period of time, you’re guaranteed an overexposure. Therefore, you’ll need to change one of the variables to reduce that amount of light.

longexposure_landscape

The solution? Plan your shoot for very early in the morning, and very late in the evening. The darker it is outside, the longer you’ll be able to leave your shutter open, and therefore the more motion you’ll be able to capture in your image.

If you’re unable to shoot at those times, you’ll need to invest in a neutral density filter, preferably one with the ability to reduce the amount of light coming in to your lens by 10 stops, or more. These filters also add an extra layer of uniqueness to your images, because they allow you to shoot these long exposures at times of the day you normally don’t expect to see them.

3. Select the perfect lens

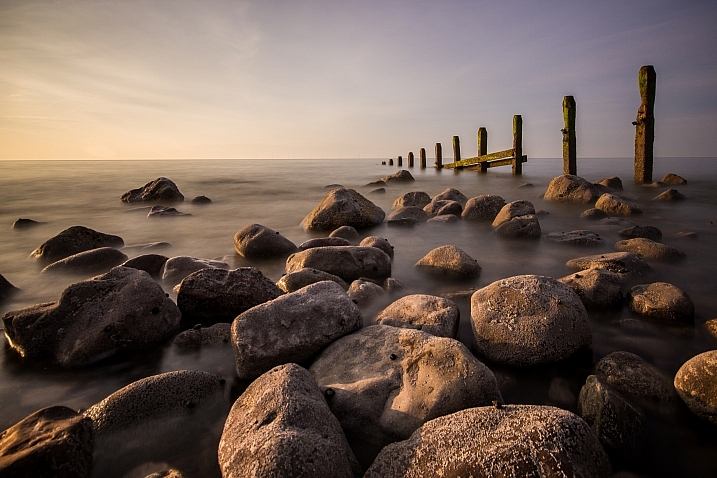
Of course, there are no hard and fast rules about which lens you’ll need to use, but traditionally, landscapes are captured with wide-angle lenses, to broaden the view and translate a sense of expansiveness.

Can you capture a landscape with a standard 50mm lens? Of course you can! But to maximize the open feel of a scene, consider using something wider. Keep in mind that the more you capture within the frame, the more movement it will contain.

070515_

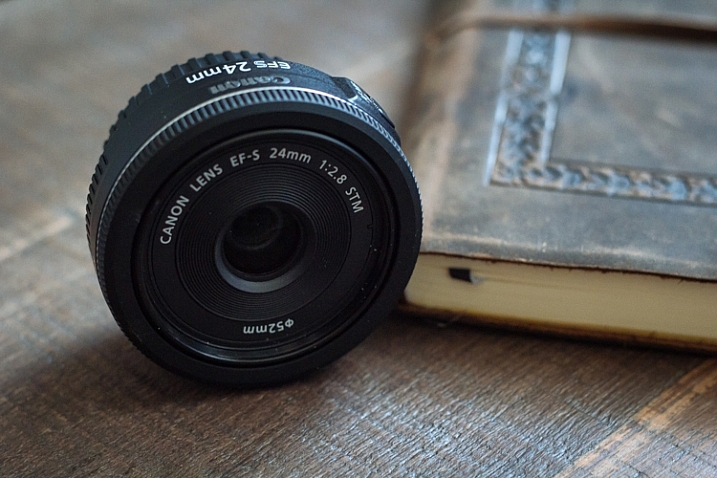
I personally use a 24mm f/2.8 pancake lens for most of my landscape shots. While it’s not as wide as what some people use, I find it gives me a good middle ground, with a wide focal length, and very little of the distortion traditionally associated with super-wide glass.

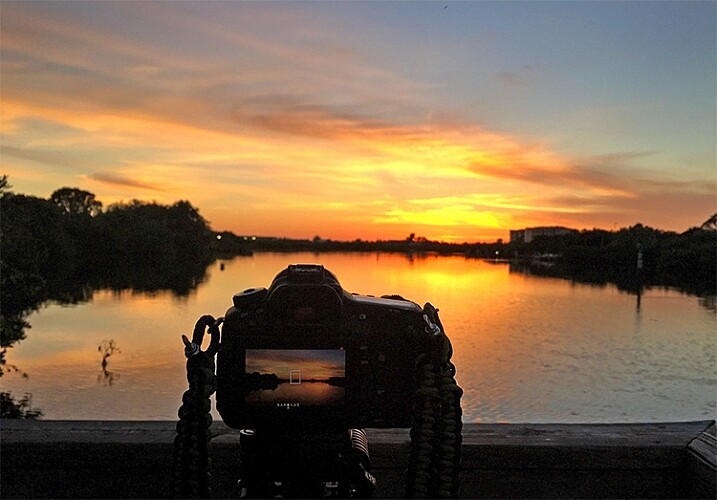
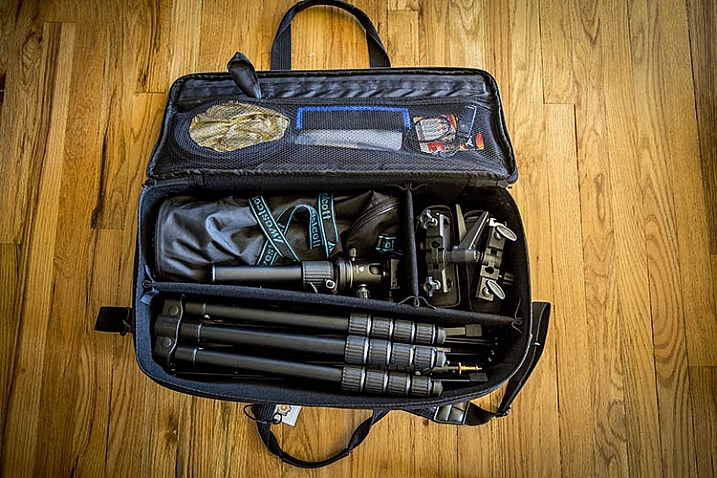
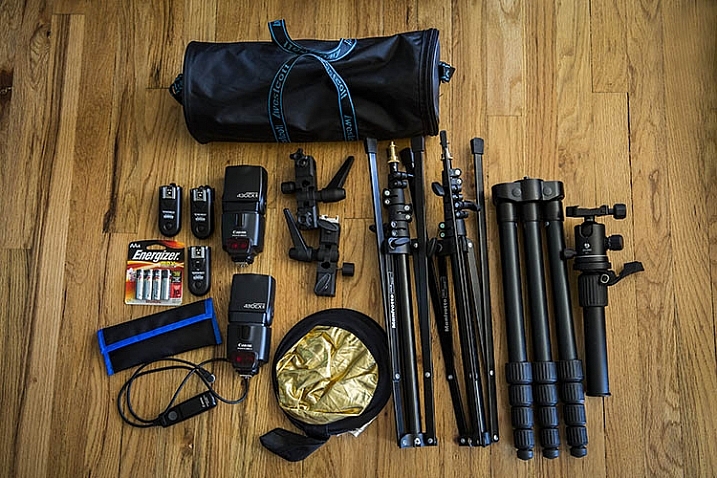
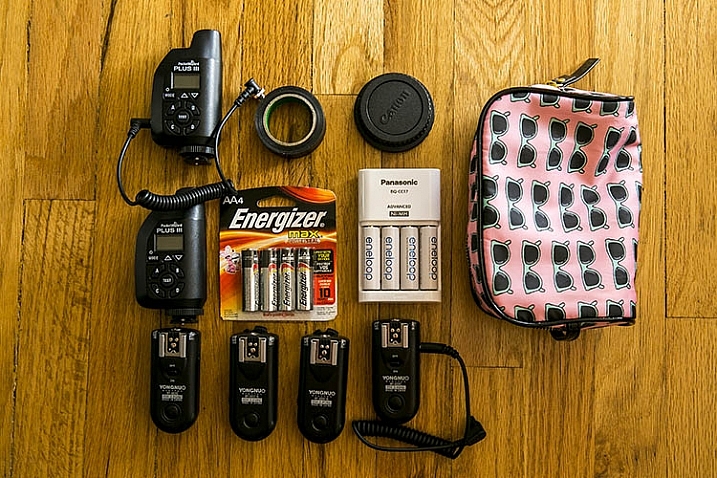
4. Bring the proper equipment

While we’re speaking about the planning phase of your shoot, it’s a perfect time to consider what gear you’ll need to pull off a long exposure landscape. As it happens, it’s the same equipment you’d need for any other long exposure shot.

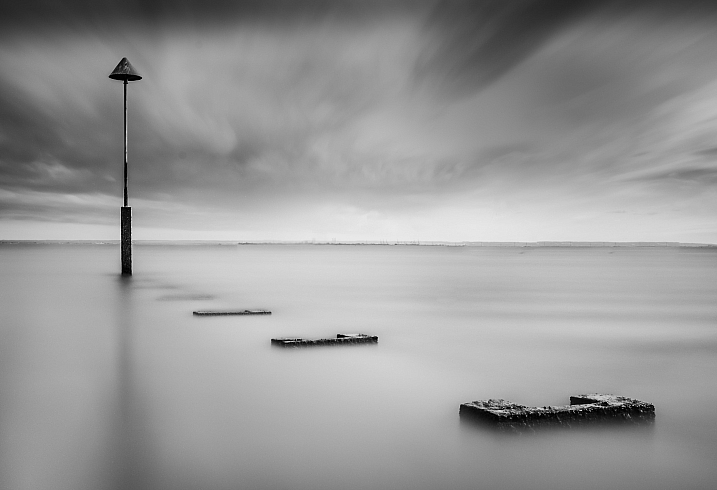
A tripod is a invaluable piece of gear for any landscape photographer, and for a long exposure, it’s an absolute requirement. Exposures of several seconds, which are required to produce movement within the image, need a stable base for the camera. The slightest amount of movement can cause blurriness, and that is amplified with longer and longer shutter times. Invest in a good, sturdy tripod, and ensure nothing will blow or bump into the unit while in operation.

013016_

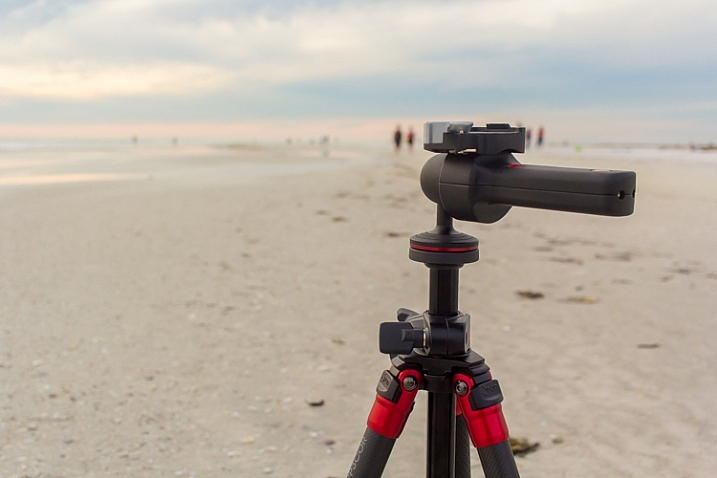
Another essential accessory for this situation is a remote shutter release. There’s really no excuse for any landscape photographer to not have one, as they can be found for your camera model for $ 10, or so. These releases connect to your camera, and allow you to activate the shutter without ever touching the camera body itself. This keeps the vibration during the shutter click to an absolute minimum.

5. Use the correct camera settings

Since you’re using longer exposure times to pull off this type of shot, you’ll need to make adjustments to other parts of the exposure triangle. Generally, this means you need to stop your aperture down as far as you can, while maintaining sharpness, and reducing your ISO to the lowest setting. These two settings will allow you to bump your exposure time up, to long enough to capture movement in your image.

Fortunately this also gives you some bonus advantages; a lower ISO (such as 100), will keep the noise and artifacts in your shot to a minimum, giving you the best possible image quality. In addition, lenses tend to be sharper in the middle aperture ranges. Using apertures such as f/8, f/11 or f/16 will give you a nice, deep depth of field throughout the picture, while also taking a sharper, clearer photo than what you’d generally get with an extreme aperture of f/22 (due to diffraction).

022916_

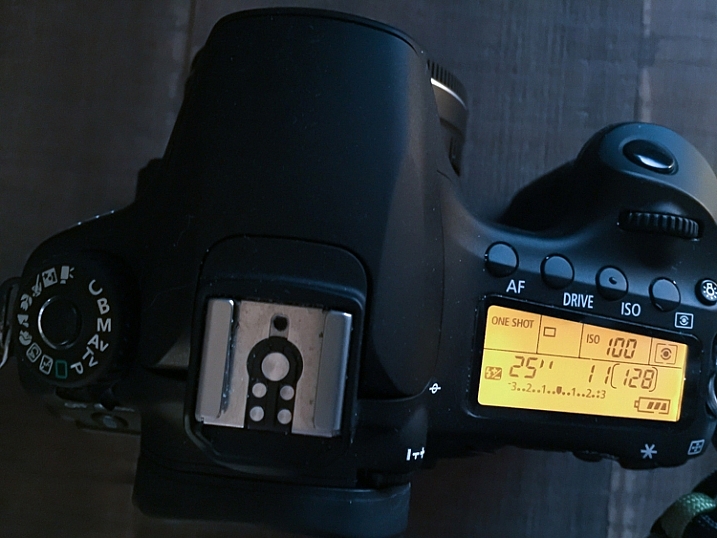
As always, shoot in RAW. This will capture as much data as possible, and allow you to make non-destructive edits to the file later. Shooting in RAW format also negates the need to fiddle with white balance while shooting, since that can be adjusted in post-production.

If you do set white balance at the time of the shot, it’s usually a good idea to select the Daylight preset, or a custom white balance setting of your own, that counterbalances the extreme warmth encountered at sunset, and vice-versa for a shot at sunrise, which is a cooler time of the day, color temperature-wise.

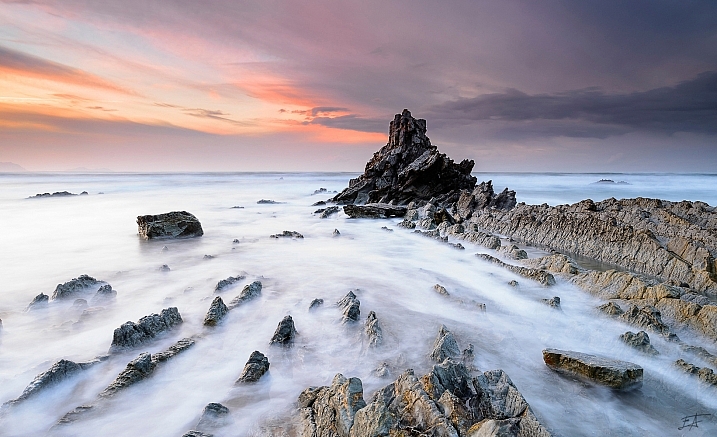
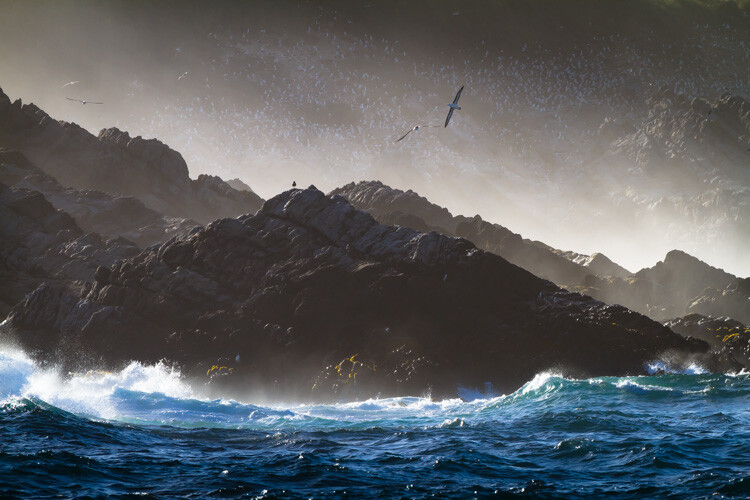
6. Focus on your composition

Ekaitz Arbigano

By Ekaitz Arbigano

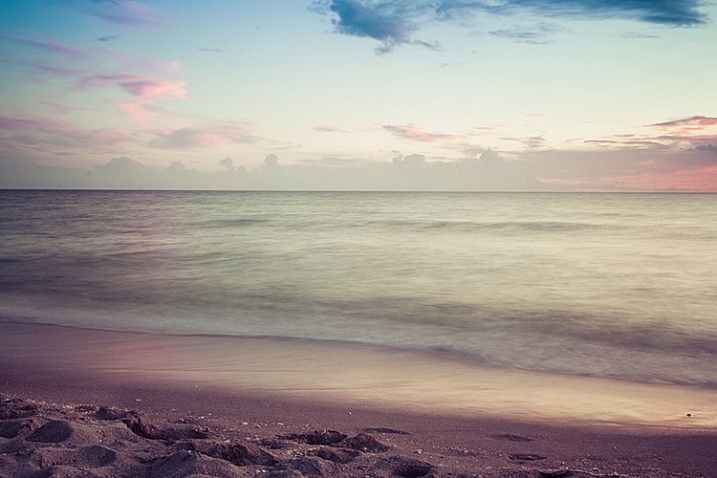
When you have your equipment and settings where they need to be, it’s time to take a moment to compose your shot. What are you capturing? The movement of a body of water like the surf from the ocean? Adjust your composition to allow for more of the water to be in the composition, instead of the sky. Are you trying to focus on the movement of clouds across the sky? Then give that part of the scene more attention within your frame to accentuate it.

7. Envision and anticipate movement

Shooting a moving scene, and attempting to capture that movement involve a bit of foresight, not unlike a marksman leading his target, by visualizing where the target will be when the shot gets there.

longexposure_landscape3

How far will the clouds move in the duration of the exposure? In which direction? Plotting this out before you click the shutter will improve your final image.

For example, capturing the ebb and flow of surf pounding a beach, requires knowing where the surf-line will end, and begin to recede back into the ocean, to properly compose it. Watching the movement of the subject you’re shooting, will help anticipate where it will appear in the final image. It’s always pays to plan ahead!

8. Enhance beauty in post-production

Finally, (and yes, this can be a touchy subject), learn to excel with the post-production process. A long-exposure image will already by eye-catching just by its inherent properties, but it’s important to take time during editing to enhance the beauty you’ve already captured in camera.

This shot initially had a cooler white balance, due to being shot in the morning, as opposed to during sunset.

This shot initially had a cooler white balance, due to being shot in the morning, as opposed to during sunset.

Since you’ll be shooting early or late in the day, tones will most likely already be dramatic, but may require some light boosting of the colors, or dodging and burning in Photoshop to add a bit more.

Since you shot at a low ISO to begin with, you likely won’t have to deal with noise reduction. After your exposure and tones have been taken care of, a little sharpening is all that stands between you and the final image.

Aaron

By Aaron

So that’s it folks, the eight steps to get you started on the path to taking great long exposure landscape shots. What other tricks of the trade do you use to get the perfect capture? Sound off in the comments below, and as usual, let your voice be heard.

This week on dPS we are featuring articles on special effects. Check out the others that have already been published here:

  • How to Photograph the Full Band of the Milky Way
  • Fire Spinning with Steel Wool – A Special Effects Tutorial
  • Special Effect – How to Create Multiple Flash Exposures in a Single Frame
  • Stacking Light Trails for Night Photography Special Effects
  • 26 Unique Special Effects Photos to Spark Your Creativity
  • Weekly Photography Challenge – Special Effects
  • Tips for Shooting Through Objects to Create a Special Effect
  • How to Add Vintage Frame Overlays Using Alien Skin Exposure X

googletag.cmd.push(function() {
tablet_slots.push( googletag.defineSlot( “/1005424/_dPSv4_tab-all-article-bottom_(300×250)”, [300, 250], “pb-ad-78623” ).addService( googletag.pubads() ) ); } );

googletag.cmd.push(function() {
mobile_slots.push( googletag.defineSlot( “/1005424/_dPSv4_mob-all-article-bottom_(300×250)”, [300, 250], “pb-ad-78158” ).addService( googletag.pubads() ) ); } );

The post 8 Steps to Great Long Exposure Landscape Photography by Tim Gilbreath appeared first on Digital Photography School.


Digital Photography School

 
Comments Off on 8 Steps to Great Long Exposure Landscape Photography

Posted in Photography