RSS
 

Posts Tagged ‘Photography’

NASA astronaut Jeff Williams showcases ISS photography equipment

15 Apr

NASA astronaut and Expedition 47 flight engineer Jeff Williams posted a video recently detailing some of the equipment he uses to capture his incredible view of the planet from the International Space Station. So what kind of specialized gear does one use in space? Turns out the crew uses ‘regular photography equipment’ to capture still images and videos, with the Nikon D4 being one of several cameras used. A variety of lenses are used as well, including the massive 800mm lens (with 1.4x teleconverter, no less) shown in the video.

In addition to the photography equipment, Williams introduces viewers to the Cupola, the ‘window on the world’ that gives astronauts a full view of Earth from a single vantage point. Other windows are used to capture handheld photos and videos as well, and Williams explains that some videos are animated panoramas made from stitched still images.

You can see Williams’ photos on his Instagram and Facebook pages.

Via: SLR Lounge

Articles: Digital Photography Review (dpreview.com)

 
Comments Off on NASA astronaut Jeff Williams showcases ISS photography equipment

Posted in Uncategorized


10 Ideas to Instantly Improve Your Photography Composition

14 Apr

It is an illusion that photos are made with the camera; they are made with the eye, heart and head. – Henri Cartier-Bresson

My photography training took place back in the early 90s, at an intense technical photo school in California. I love tech in all forms, and I love reading my camera manual. I love the precision and procedure of processing my own colour film, and I love learning the ever-advancing skills on photo software – I am a total tech nerd. But technical knowledge will only get you so far; it’s really the second part of the story in photography. Photography composition is the first part.

EPESTENIDEASDPS 01

The first part is your vision of what you want your photography to be, and learning the ability to compose compelling images. Your technical knowledge will only give you the ability to execute your vision, and make the most of the composition that you have created. It can’t replace the ability to see and to compose stunning compositions.

So all things should flow from a good composition. And when we are learning about composition I like to keep in mind that quote that may or may not have been spoken by Picasso (it’s under dispute on the internet): “Learn the rules like a pro and break them like an artist.” Rules, guidelines, ideas about composition will give you a place to start, help develop your skills and propel you out of a rut. But they should not be followed slavishly or forever.

Here are my ideas on what you can do to make your compositions more captivating. But, bear in mind that creating totally unique compositions comes down to creating your own style . So don’t be swayed too much by other photographers’ advice on this subject. Photography is an examination of the world through your eyes, it’s totally subjective, totally about connecting with what inspires and excites you. Just pick up ideas that make sense and motivate you.

EPESTENIDEASDPS 02

To practice, pick one concept from below that jumps out. Don’t take all these ideas and try to incorporate them into your photography all at once. Pick one and really embrace it – then the results will come.

So here are my 10 favourite tips on how you can instantly improve your composition.

1. Light

“Light makes photography. Embrace light. Admire it. Love it. But above all, know light. Know it for all you are worth, and you will know the key to photography.” George Eastman

For me more than anything, photography is about light, and learning to identify interesting light is one of the best skills to learn. Light that is doing something interesting, or is beautiful or colourful; will take a good subject and turn it into something completely amazing.

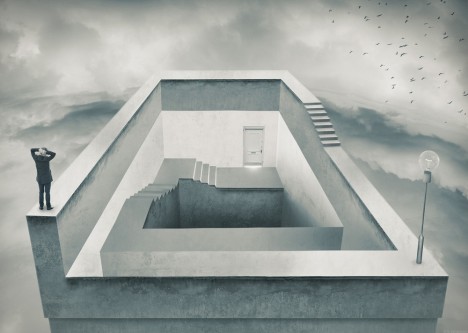
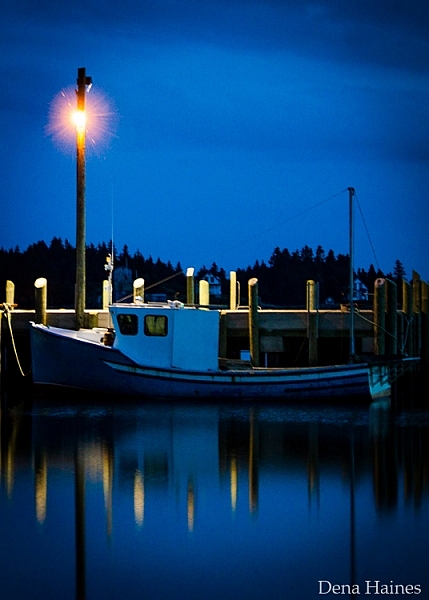
Light is my starting point when I am taking photos. It is the thing I consider first, and what affects me the most when deciding what to photograph. Look for light doing strange and wonderful things – creating long shadows, diffused light falling over a broken wall, reflecting, creating bursts of colour. Look for the colour of light, too: the cool blue light before dawn, the cold, almost transparent light of a winter’s afternoon, the rich orange light of near twilight – and how that affects your subject. Think always: how can I get the best out of the light that I am photographing?

EPESTENIDEASDPS 03

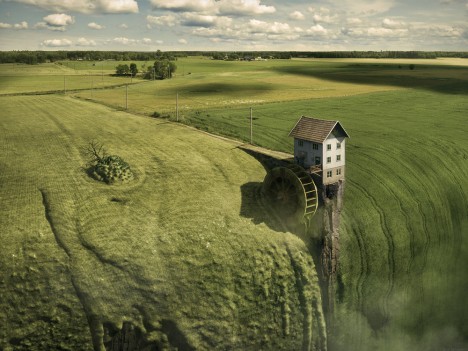
In the photograph above, the beautiful light is obvious. I have used the silhouette of the column, to contrast the dappled light which is illuminating the clouds beautifully. This contrast makes the light look spectacular because it’s showing off its range of colours and depth against the heavy dark column.

Learning to notice light in all its forms and colours is an excellent way to improve your compositions.

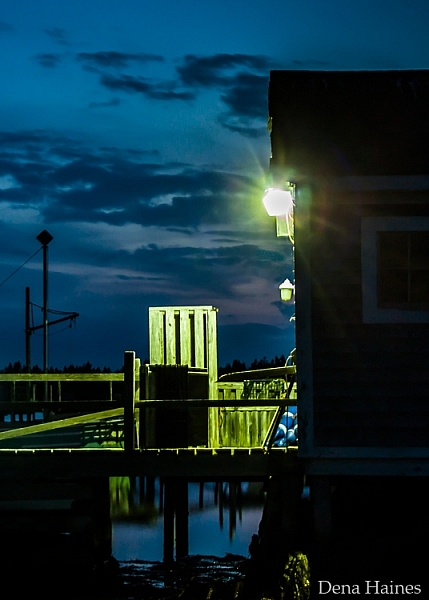
When you see a subject you wish to photograph, look at the light around it. If it’s not interesting light – if it’s flat, boring, or draining the sense of colour – have a look at what else is happening with the weather. Maybe you can wait for clouds to pass, come back later or earlier in the day, see if you can organize the composition to incorporate light from other sources. It doesn’t have to be natural light. Artificial light, and particularly the play of natural and artificial light, can make an inspirational combination.

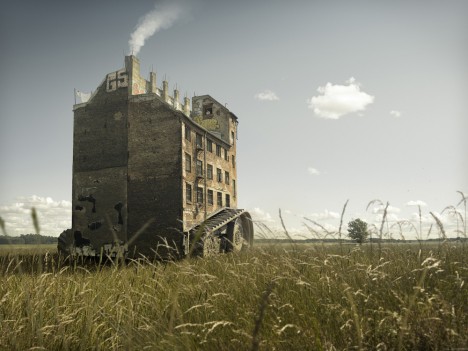
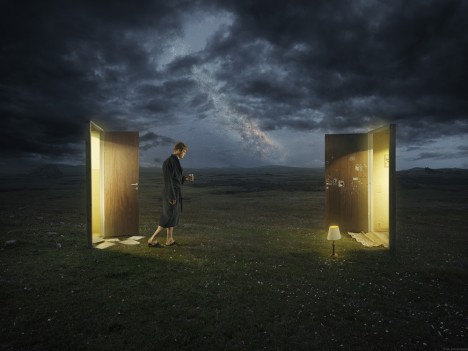
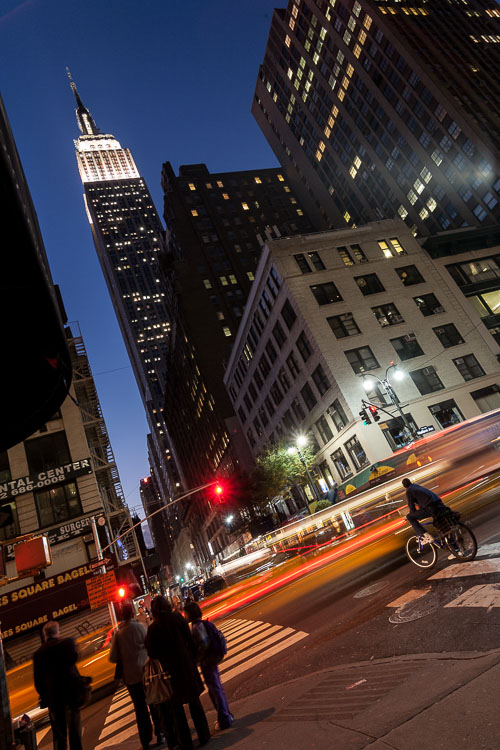
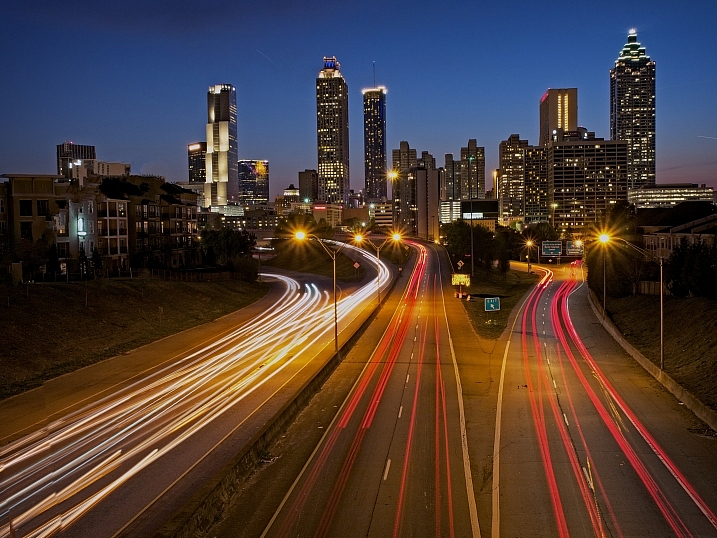
Here’s another photo where the main subject is the light, but this one is more subtle. The absence of light is most pronounced in this shot, and then all of sudden the glow of dawn light is reflected in the windows. Again, there is a contrast of darkness against light.

EPESTENIDEASDPS 04

There is lots of negative space in this photo, an overload of industrial blandness, wastelands. And then these two buildings and the sudden glow of the charming light.

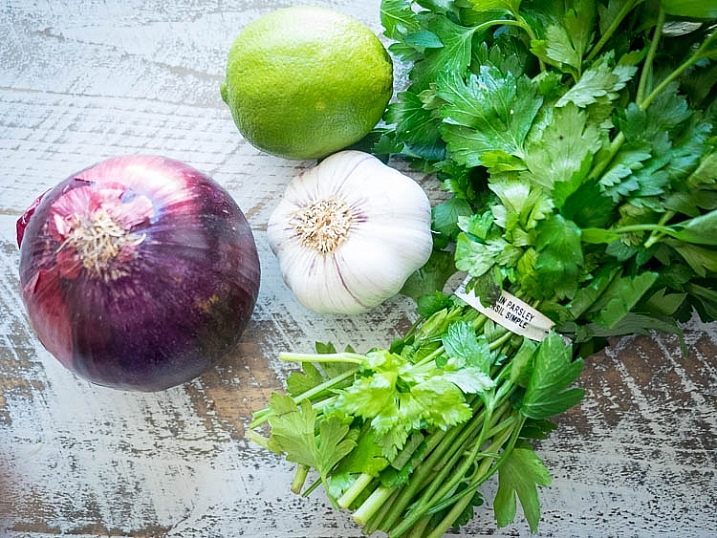
2. Simplicity: think in threes

“The ability to simplify means to eliminate the unnecessary so that the necessary may speak.” Hans Hofmann

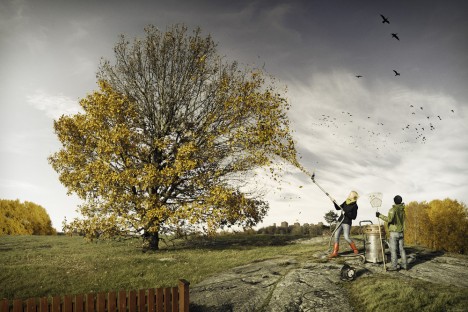
Simplicity is often very hard to accomplish, and can be more challenging than more complex compositions. I find there can be a misunderstanding about how to achieve simplicity in your photos. People often think it’s about taking a photo of one subject. But actually I rarely take photos which contain only one subject. Usually there has to be one subject with at least one, but usually, two supporting elements. So I like to say – think in threes.

Humans love to think in threes – (breakfast, lunch, dinner; past, present, future; and small, medium, large). We like to find rhythms and patterns in everything.

EPESTENIDEASDPS 05

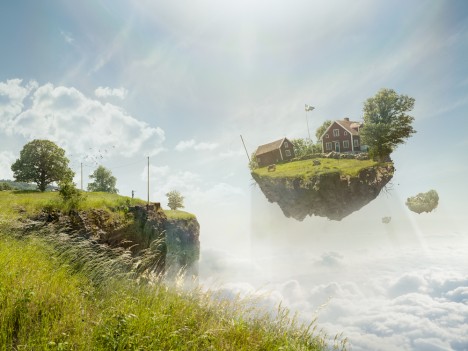
This photo above is a very good example. How many elements make up this photo? Well, first you have the beautiful blue gradated sky, then the wild, chaotic pattern of the bare branches. That’s all very nice, but it’s the third element that is the subject, and that really makes the photo – the two men blending into the branches, while creating distinct human shapes. The photo without any one of the elements wouldn’t be as interesting.

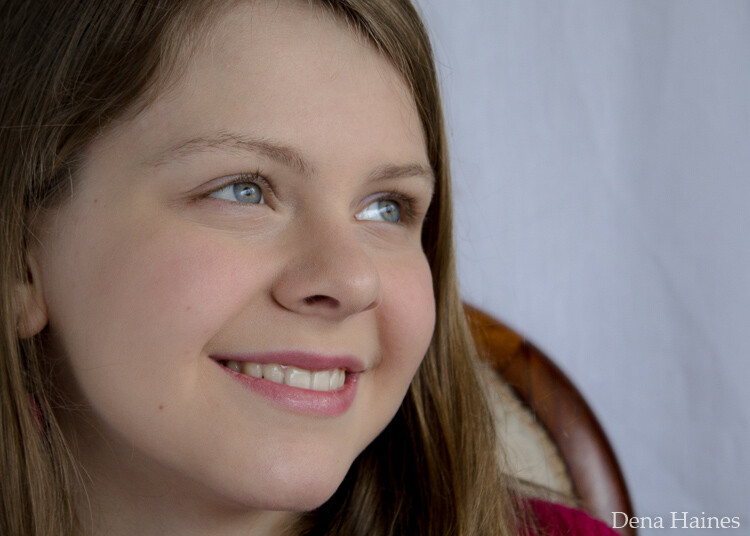
I am a particular fan of very simple compositions when photographing people and I often use plain and colourful backgrounds. In the photo below, again there are three strong elements: bright pastel colours, the two guys and the strong lines.

EPESTENIDEASDPS 06

It also works when photographing pigeons! Another photo with three elements: the grey, slightly dishevelled pigeon, the wash of colour, and the texture and lines of the wet paving stones.

EPESTENIDEASDPS 07

3. Move your feet

When you are looking at a professional photographer’s work, one thing that they do more than an amateur photographer is move. You may have a killer shot laid out before you, but you still have to find the killer angle that will make the shot really special. Every shot has a perfect angle, and it’s your job to find it. If you are shooting a subject you love and then look at your images and are disappointed with what you find, I guarantee it’s because you haven’t found the perfect angle.

Get up on that roof, lie on the floor, move your feet around until what you see in frame is the best possible angle, the best possible position you can manoeuvre yourself into. Get dirty if you have to. This requires patience (and good knees), and patience is one thing I think most amateur photographers need to develop more of.

EPESTENIDEASDPS 08

There is one particular culprit in our kit that discourages us to move, and makes many of us lazy – a zoom lens. This should NEVER be a replacement for moving around a scene and finding the best angle. Do not fall into the trap that just because you have the subject in frame you can just zoom in to get it. Compose your best possible shot in frame, zooming in only if it’s totally the right thing to do , and not as a default option for moving. My best advice for zooming is pick a focal length, then move your feet and find the angle you need.
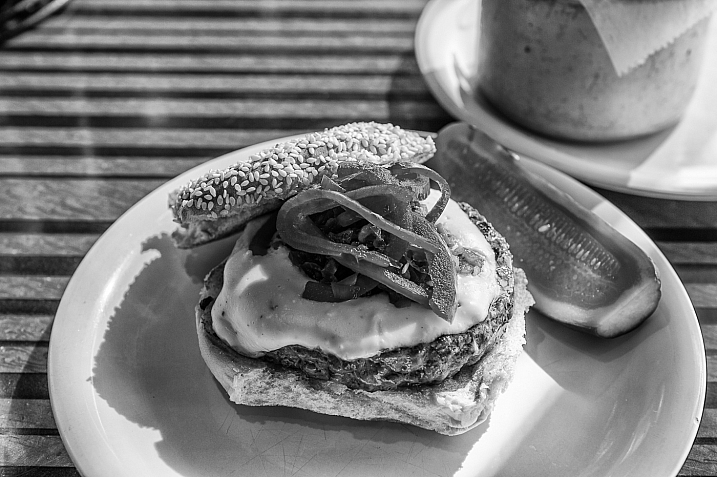
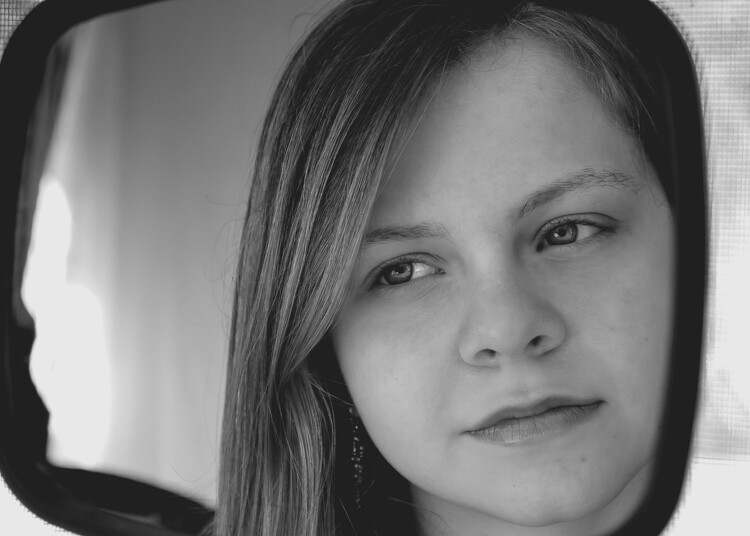
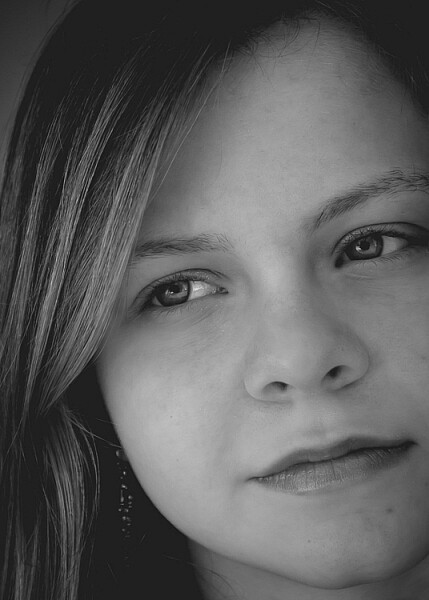
4. Get closer

Robert Capa said – “If your pictures aren’t good enough, you are not close enough.”

This concept reminds me of when I once read about a famous chef, who believes that the difference between home cooks and professionals is that home cooks are afraid of heat, and don’t turn their gas hobs up high enough. It’s the same with photography – obviously!

EPESTENIDEASDPS 09

If you feel yourself not wanting to get closer, then this is definitely an idea you should explore. You will almost be able to notice in your images that barrier of fear you set up of getting closer because there will be a distance to your subject. Push through that fear, and your images will benefit from more intimate images. The iconic travel photographer Steve McCurry always photographs subjects within a few feet of himself. For him that is the distance that feels most intimate. That is his style.

Take a deep breathe, hold your fear in check, and just get closer. Investigate as though nothing is holding you back.
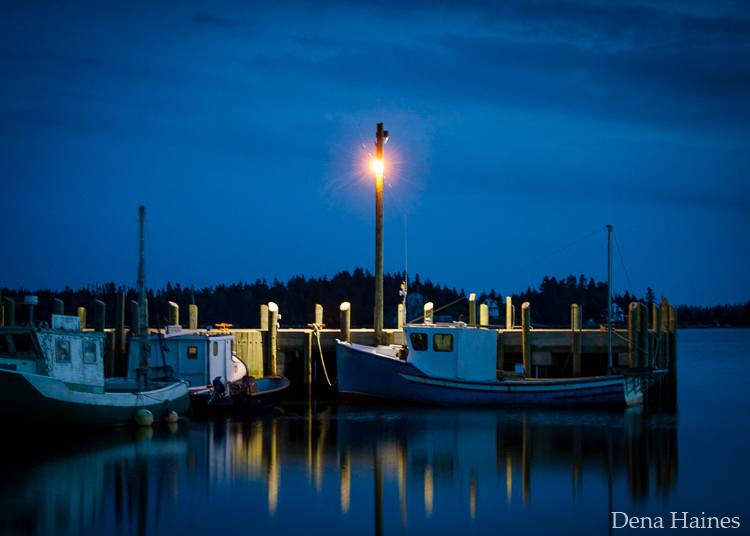
5. Build your photo

When I am out wandering around looking for things to shoot, I am looking for elements that I can combine. Often it starts with one thing; it could be anything – an odd looking person, a beautiful shaft of light, a piece of amazing graffiti on a pockmarked concrete wall. If one thing strikes me, I start to look around to find something else to build on that first element to make it more interesting.

EPESTENIDEASDPS 10

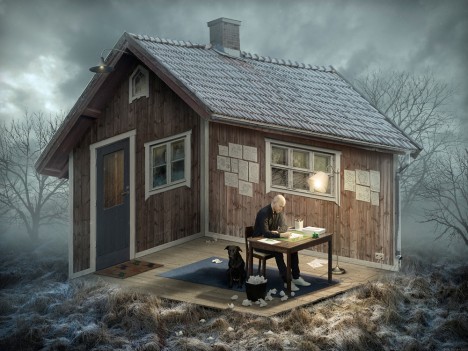
In this photo above I think you’ll agree that if you took away the light in the window you’d have a perfectly lovely shot. But that light is what makes it work. It’s that additional element, creating another layer of depth, and providing an echo almost of the church light of the same colour. I passed this spot on many mornings and often took this particular shot, but one morning the window light was on and it changed it from a beautiful scene into a great image.

6. Look behind you

I shoot in places where I often find myself surrounded by other photographers – the Eiffel Tower at Dawn, sunset on Westminster Bridge – and it continuously stuns me that almost every (or even every) photographer will be pointing the same way and shooting the same thing. Now of course a purple pink sunset over the Houses of Parliament is gorgeous – but that light will also be doing incredible things to everything around you. So, while everyone is going nuts at the obvious, do something different – turn around, walk down that alley way, do what everyone else is not doing.

When I was in Paris I was intimidated about shooting the city. It’s the most visited city on earth (hence the most photographed). It is a small city and much of what’s amazing to photograph has been shot to death. I wanted to shoot the Eiffel Tower differently. Here is one shot I liked. You’ve got opulent gold, beautiful dawn sky, the iconic Eiffel Tower – all pretty so far – but then you have this injection of something that most photographers would have avoided – the cleaners.

Have the patience to explore other angles.

EPESTENIDEASDPS 11

The streets cleaners are a vivid contrast against the opulent gold, and while I kept the iconic Eiffel Tower in the shot, it’s really only as a background. Paris is obsessed with tidying itself, so this is also a nice little comment on the city.

7. Simplify your kit (and get really familiar with it)

I think most people generally have too much kit. If you have a lot and you don’t use it daily or even weekly, you’re not going to have that intimate knowledge of how it responds to situations and subjects. Try reducing to just one lens for a while and really get to know it.

When you have a lens that you know exactly what it will do in every situation, you’ll be able to execute even more interesting compositions, as you aren’t leaving things to chance. Chance is something that professional photographers will go out of their way to avoid.

8. Find beauty in the mundane

It’s easy to get a spectacular shot when you have a spectacular subject. But to make simple, boring, or mundane things look interesting – now that’s a challenge! But it’s a challenge I invite you to take up, because it’s an amazing way to train your eye to reveal the beauty of any subject.

This for me is a good example. There are three things that are interesting in this photo (can you guess?) You have the bold colours, and then a little bit of light falling on the wall to create a contrast, and the lines. Now if light was falling on the whole wall, or if there was no light at all, the photo would be totally boring. But can you see how just three simple elements working together can make a photo?

EPESTENIDEASDPS 12

And as I am obsessed with colour and light, I admire this shot.

EPESTENIDEASDPS 13

It’s part of a longer story I am working on in Istanbul at dawn, but to me it shows that there is no subject that isn’t worthy of attention from your camera.

9. Pre-visualize

I love my digital camera, but I also still use film, and now that I’m mainly digital I appreciate the discipline and grounding I received from training in film. I use these skills to help me now.

One super important skill that will really help your compositions is pre-visualizing. It’s a skill you had to have when you shot film, because otherwise you were just shooting randomly.

Pre-visualizing is, “the ability to anticipate a finished image before making the exposure” (Ansel Adams said that, not me). What I love about this, is that it’s about creating space between seeing a shot, and taking it. It’s about being prepared, thinking through what you want to capture, looking at all of the elements of light, positioning, etc., and then picturing in your mind what the final image will look like. For example, imagine your final output was a print. Imagine the print in your hands. What would it look like? If you can see it clearly then your are pre-visualizing. If not, then keep working at it until you see the image in your head. When you have a solid picture in mind, take the shot.

EPESTENIDEASDPS 14

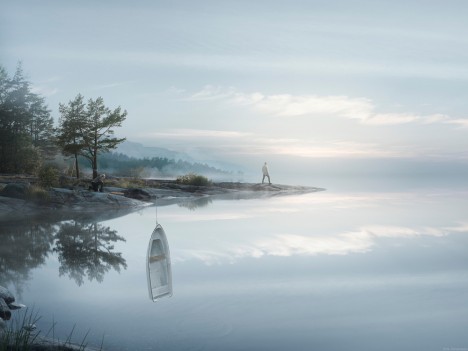
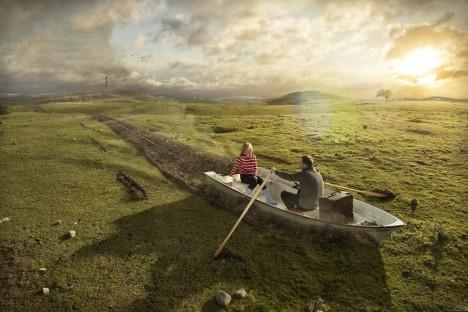
You can also use pre-visualization when you think about timing. A lot of landscape photography is really about waiting around for the perfect moment, that great light. Here is one situation (above) where I knew the scene had potential, but was pretty flat, and if nothing else happened it wouldn’t be interesting. So, I waited for the sun to rise just that little bit more and ping, the clouds were filled with pink light giving the photo more depth.

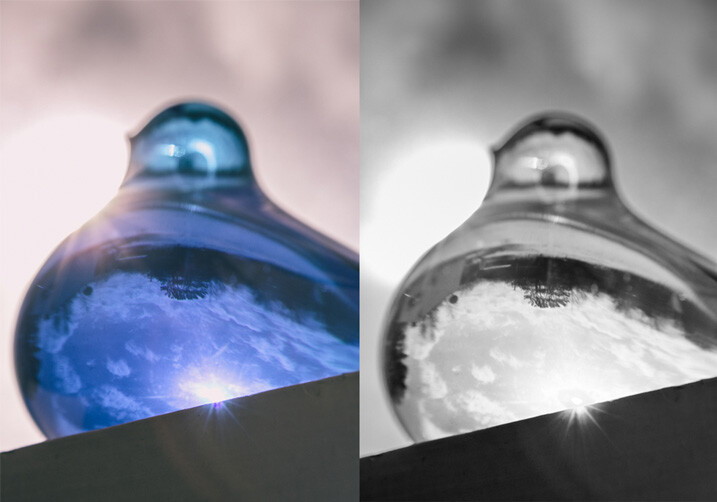
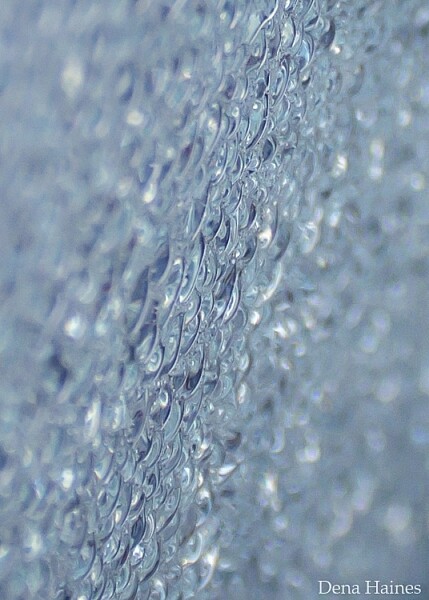
10. Look for patterns

EPESTENIDEASDPS 15

Patterns come in many forms, and are extremely pleasing to the eye. A pattern is anything that is repetitive, that turns your subject from its innate quality, into something more abstract. So people will look and respond more to the pattern and shape that it makes, and less to the subject itself.

“Whatever emotional response a single design element arouses is multiplied when it is repeated in a pattern.” – Bryan Peterson

Patterns are particularly effective when you fill the frame with your subject, and totally cut off the rest of it. These are particularly interesting to look at.

EPESTENIDEASDPS 16

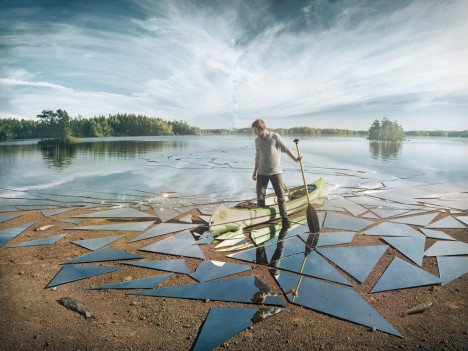
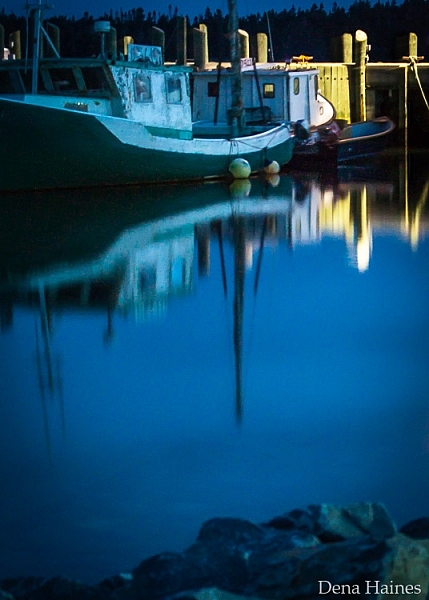
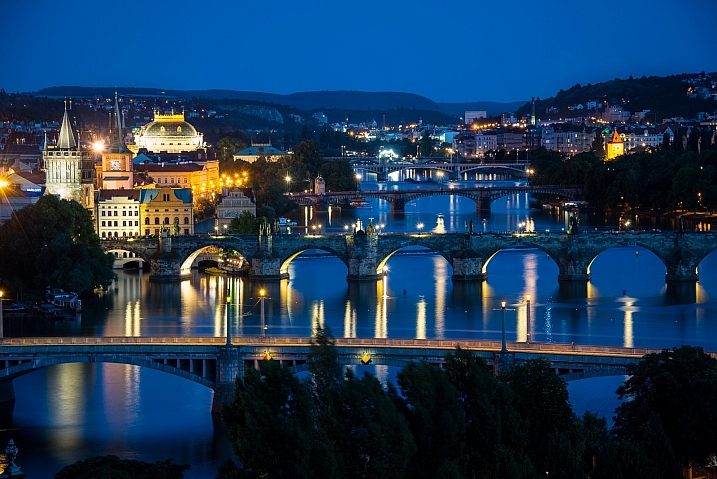
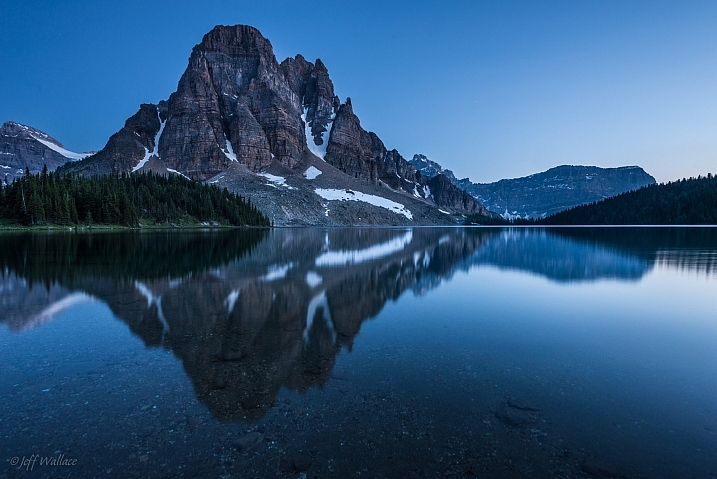
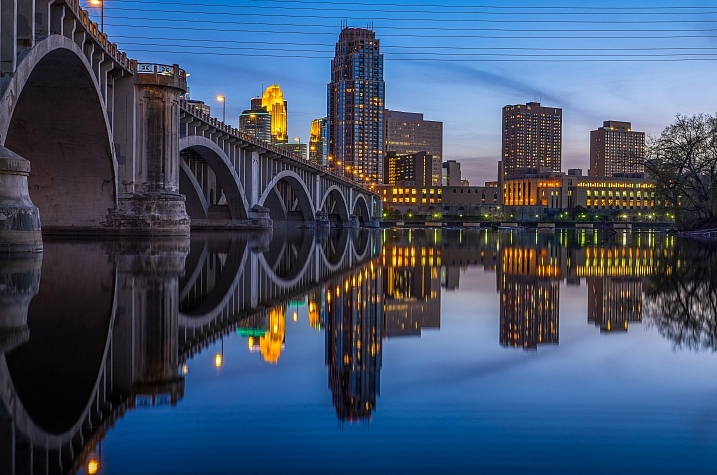
Another way to create patterns is reflections. I love playing with reflections. Anywhere you have a bit of water, even just rain on the street, or shiny surfaces, you have the ability to play with reflections.

EPESTENIDEASDPS 17

Once you start looking out for patterns you’ll start seeing them everywhere.

Time to practice

I’d love to know what you think of these ideas, and if you put any into practice. Which compositional techniques do you use to enhance your photos?

googletag.cmd.push(function() {
tablet_slots.push( googletag.defineSlot( “/1005424/_dPSv4_tab-all-article-bottom_(300×250)”, [300, 250], “pb-ad-78623” ).addService( googletag.pubads() ) ); } );

googletag.cmd.push(function() {
mobile_slots.push( googletag.defineSlot( “/1005424/_dPSv4_mob-all-article-bottom_(300×250)”, [300, 250], “pb-ad-78158” ).addService( googletag.pubads() ) ); } );

The post 10 Ideas to Instantly Improve Your Photography Composition by Anthony Epes appeared first on Digital Photography School.


Digital Photography School

 
Comments Off on 10 Ideas to Instantly Improve Your Photography Composition

Posted in Photography


Student takes 2016 Zeiss Photography Award top prize

13 Apr

$ (document).ready(function() { SampleGalleryV2({“containerId”:”embeddedSampleGallery_3406645931″,”galleryId”:”3406645931″,”isEmbeddedWidget”:true,”standalone”:false,”selectedImageIndex”:0,”startInCommentsView”:false,”isMobile”:false}) });

A 25-year-old photojournalism student beat a host of professionals to Zeiss’s €15,000 top prize in its first Zeiss Photography Awards. Tamina-Florentine Zuch’s project about train travel in India took her six weeks to shoot, and explores how the nation behaves on the world’s most extensive railway network. Zuch wins Zeiss lenses to the value of €15,000, and will receive her prize during the Sony World Photography Award ceremony in London this month.

Zeiss says its inaugural competition, with the theme ‘Meaningful Places’, attracted 22,000 images from 3139 photographers across 116 countries and was successful enough that the company will repeat the exercise next year.

Runners up in the competition included Melanie Hübner (Germany), Francisco Salgueiro (Portugal), Patricia Ackerman (Argentina), Helen Mountaniol (Ukraine), Jorge Lopez Munoz (Spain), Erez Beatus (Australia), Lasse Lecklin (Finland) and each of them will have their work shown at the Sony World Photography Awards exhibition.

For more information on the awards, and to see the entries of all of those shortlisted, visit the Zeiss Photography Award website.


Press release:

ZEISS award for new perspectives

The winner of the first-ever ZEISS Photography Award has been chosen. The prize goes to Tamina-Florentine Zuch from Hannover with her photo series documenting a train journey through India.

“Meaningful Places” was the theme of the first-ever ZEISS Photography Award “Seeing Beyond,” which invited professional photographers and ambitious amateurs to showcase for the first time their talent to a renowned jury and to the broader public. The contest attracted 3,139 photographers from 116 countries – from Albania to Zimbabwe. A total of 22,000 images were submitted. “The results are superb – we were really excited by the breadth and quality of the applications,” praised Scott Gray, CEO of the World Photography Organisation, which organizes the ZEISS Photography Award.

In Tamina-Florentine Zuch, 25, the ZEISS Photography Award has found a worthy winner. Zuch, a student of photojournalism and documentary photography in Hannover, traveled through India by train last year for a period of six weeks. Her pictures show children sleeping in hammocks in stuffy train carriages, men risking their lives as they ‘surf’ railway cars, and exotic landscapes as they pass by. Her “Indian Train Journey” brings this journey to life. Some of the images, which are very intimate, demonstrate Zuch’s photographic mastery at such a young age, her patience, and her sensitivity and tact in dealing with subjects from a completely different culture. “Tamina Zuch has an incredible eye for composition, light and a feel for the right moment. She combines these characteristics again and again in her pictures,” said Steve Bloom, one of the three jurors, enthusiastically. “‘Indian Train Journey’ is a very personal and poetic journey that is told by a fresh, young voice,” added Hans-Peter Junker, juror and editor-in-chief of the reportage magazine View.

As the winner, Zuch will receive ZEISS lenses of her choice for a total value of EUR 15,000, as well as an offer to cooperate further with ZEISS. Seven other photographers – Melanie Hübner (Germany), Francisco Salgueiro (Portugal), Patricia Ackerman (Argentina), Helen Mountaniol (Ukraine), Jorge Lopez Munoz (Spain), Erez Beatus (Australia), Lasse Lecklin (Finland) – made it to the shortlist, which gives them the opportunity to present their work at the Sony World Photography Awards Exhibition at Somerset House in London from April 22 to May 8, 2016.

In 2017 the ZEISS Photography Award will enter a new round, with a different theme. “We want to create a platform for photographers to show their art and their idea of creation to an interested public, and to pay tribute to that,” said Dr. Winfried Scherle, Executive Vice President Consumer Optics Business Group of Carl Zeiss AG. And Scott Gray praises: “The ZEISS Photography Award provides photographers with an exciting opportunity to expand their creative boundaries. We look forward to working with ZEISS on more contests in the coming years.”

Articles: Digital Photography Review (dpreview.com)

 
Comments Off on Student takes 2016 Zeiss Photography Award top prize

Posted in Uncategorized


Impossible Photography: 15 Reality-Bending Images Defy Logic

12 Apr

[ By Steph in Art & Photography & Video. ]

erik johansson 1

A floor is a ceiling, a lake is made of shattered glass, carpets of grass cascade over the edge of the world and buildings sprout wheels and wander away in the fantastically surreal world of Erik Johansson. The photographer has spent much of the last decade refining his reality-bending image manipulation techniques, combining dozens of real photos to create effects that are often hyperrealistic yet physically impossible. As unlikely as it may seem, Johansson uses no CGI, stock photos or digital illustrations in his work – each image is a complex collage of his own photographs, captured on his Hasselblad HD5-40 camera.

erik johansson 12

erik johansson 13

erik johansson 14

On his YouTube channel, the artist offers behind-the-scenes videos for many of his works so we can see just how each one is assembled. For his newest piece, ‘Impact,’ Johansson carefully cut four massive mirrors into fragments, arranged them in a field and photographed his model standing among them in a kayak. Photos from this shoot are ultimately blended with images of a lake and additional studio photos of cracked mirror shards.

erik johansson 2

erik johansson 3

erik johansson 4

erik johansson 5

erik johansson 6

Depicting just about every step the artist takes during the process, the videos are just as impressive as the final images and make it clear that the arduous process requires many hours of retouching. Johansson even leaves in the parts where he experiments with various effects and ideas that don’t make it to the final version.

erik johansson 7

erik johansson 8

erik johansson 9

erik johansson 10

As he explains on his website, Johansson is interested in capturing ideas rather than moments, but with the goal of making each one look as realistic as possible, saying “The only thing that limits us is our imagination.”

Share on Facebook


[ By Steph in Art & Photography & Video. ]

[ WebUrbanist | Archives | Galleries | Privacy | TOS ]


WebUrbanist

 
Comments Off on Impossible Photography: 15 Reality-Bending Images Defy Logic

Posted in Creativity


5 Quick Tips for Better Blue Hour Photography

11 Apr

tips for blue hour photography

Blue hour is a special time for photographers. The sky turns a different shade of blue, it’s velvety and delicious. It’s easy to take photos during blue hour because you don’t have to worry about harsh lighting or shadows.

In this article, you’ll learn:

  • When blue hour takes place
  • How to capture blue hour photos   
  • The best subjects to shoot for blue hour photography 

When is blue hour?

Blue hour happens twice a day, just before sunrise and just after sunset. It lasts between 20 to 40 minutes, depending on the weather, and your geographical location. During this time, the sky can turn different shades of blue and reflect orange, yellow, purple and pink.

blue hour photography tips 2 blue hour photography

To catch the blue hour, look up your local sunrise/sunset times and plan on being there early. There is also a great website that tells you exactly when the blue hour is, based on the date and your location.

5 easy tips for blue hour photography

Blue hour photos look amazing! While they might appear complicated to create, they aren’t. Blue hour photography is easy, the hardest part might be getting there before it’s over. These tips will help beginners get started with blue hour photography.

Howard Ignatius

By Howard Ignatius

1. Shoot in Shutter Priority mode

During the blue hour, the sky will be relatively dark because the sun is below the horizon. You’ll need a long/slow shutter speed to let in enough light for properly exposed photos.

Putting your camera in Shutter Priority mode allows you to manually choose your shutter speed. A shutter speed of one to six seconds should get good results. For the photos in this post, I used a six-second shutter speed in Shutter Priority.

Jeff Wallace

By Jeff Wallace

In Shutter Priority mode, your camera will choose the aperture and ISO (if your ISO is set to auto) automatically. This makes things easier when you’re getting started with blue hour photography.

2. Use a remote or self-timed shutter release

Pressing the shutter release button can cause camera shake, which will create blurry photos. To avoid this, use your remote or set the camera’s self-timer to two seconds.

3. Use a tripod

As mentioned above, you’ll be using a slow shutter speed, so a tripod will help you capture a sharp image. If you hand hold your camera during a slow shutter speed, your photos will be blurry because of camera shake.

Image by dPS Managing Editor – Darlene Hildebrandt

Image by dPS Managing Editor - Darlene Hildebrandt

Image by dPS Managing Editor – Darlene Hildebrandt

4. Shoot in RAW

It’s best to capture RAW files when shooting the blue hour. This will give you the highest quality capture, and the best advantages when editing. One nice advantage of shooting in RAW is that you can adjust the exposure compensation in editing. This way, if your photos came out a little too dark or light, you can adjust them up or down accordingly.

But if you have a point and shoot that only captures JPEGs, don’t worry – you can still get great blue hour shots.

Image by dPS Managing Editor – Darlene Hildebrandt

5. Include electric lights

Your blue hour photography will be easier if you choose a location near electric lights. This extra light may also add drama and interest to your photos.

car-trails-750px-03

Image by Darlene Hildebrandt

blue hour photography tips

Image by Dena Haines

While you want electric lights in your photos, don’t shoot too close to them. If you are standing too close to the light source, lens flare could be a problem. You could get unwanted, randomly placed, light spots in your photos.

What to photograph during the blue hour

The easiest subjects to get started with are landscapes that include electric lights.

Mike Boening Photography

By Mike Boening Photography

Miroslav Petrasko

By Miroslav Petrasko

Some blue hour landscapes to consider include:

  • Cityscapes
  • Busy winding roads
  • Beaches
  • Wharfs
  • Bridges
  • A fair or circus
  • Marinas
tips for shooting the blue hour

I love blue hour photos that include water reflections.

Mac H (media601)

By Mac H (media601)

What are your favorite blue hour subjects? Let me know by commenting on this post. And if you have any tips for blue hour photography, please share as well as your images.

googletag.cmd.push(function() {
tablet_slots.push( googletag.defineSlot( “/1005424/_dPSv4_tab-all-article-bottom_(300×250)”, [300, 250], “pb-ad-78623” ).addService( googletag.pubads() ) ); } );

googletag.cmd.push(function() {
mobile_slots.push( googletag.defineSlot( “/1005424/_dPSv4_mob-all-article-bottom_(300×250)”, [300, 250], “pb-ad-78158” ).addService( googletag.pubads() ) ); } );

The post 5 Quick Tips for Better Blue Hour Photography by Dena Haines appeared first on Digital Photography School.


Digital Photography School

 
Comments Off on 5 Quick Tips for Better Blue Hour Photography

Posted in Photography


Weekly Photography Challenge – Panning

09 Apr

If you want to see action and motion, check out these 30 moving panning images.

Panning is the technique of moving your camera to match the direction and speed of an object that is moving in front of you, while shooting at a slow shutter speed. The result will blur the background, and make the subject relatively sharp. The trick is to get your speed and timing just right – it takes a bit of practice so now is a good time to do just that!

Andreas Nilsen

By Andreas Nilsen

Weekly Photography Challenge – panning

If you need some help perfecting your technique check out these dPS articles:

  • Showing Speed: Using Panning When Shooting Action
  • Mastering Panning – Photographing Moving Subjects
  • The Art Of Panning
  • Intentional Blur- How to Create it and Why it’s Awesome
  • How to Create Better Photos by Adding a Sense of Motion
  • Using Slower Shutter Speeds to Show Motion in Your Images
Chaval Brasil

By Chaval Brasil

Eric Heupel

By Eric Heupel

Alcidesota@yahoo.com-OFF-For Several Months

By alcidesota@yahoo.com-OFF-For Several Months

Shinichi Higashi

By Shinichi Higashi

Brian

By brian

Share your images below:

Simply upload your shot into the comment field (look for the little camera icon in the Disqus comments section) and they’ll get embedded for us all to see or if you’d prefer upload them to your favourite photo sharing site and leave the link to them. Show me your best images in this week’s challenge. Sometimes it takes a while for an image to appear so be patient and try not to post the same image twice.

googletag.cmd.push(function() {
tablet_slots.push( googletag.defineSlot( “/1005424/_dPSv4_tab-all-article-bottom_(300×250)”, [300, 250], “pb-ad-78623” ).addService( googletag.pubads() ) ); } );

googletag.cmd.push(function() {
mobile_slots.push( googletag.defineSlot( “/1005424/_dPSv4_mob-all-article-bottom_(300×250)”, [300, 250], “pb-ad-78158” ).addService( googletag.pubads() ) ); } );

The post Weekly Photography Challenge – Panning by Darlene Hildebrandt appeared first on Digital Photography School.


Digital Photography School

 
Comments Off on Weekly Photography Challenge – Panning

Posted in Photography


8 Tips for Food Photography Newbies

08 Apr

Making food look appetizing, is not quite as simple as photographing your plate. There are a number of tricks that you can use to really enhance the subject. By using your camera creatively, you can capture the scrumptious side of food. Whether it’s your favorite dessert, or a full meal, these tips will help take your food photography to the next level.

8 Tips for Food Photography Newbies

1) Use a very shallow depth of field

When you’re about to take a photo, the first technical question you want to ask is, “What kind of background would be best?” With food photography, you typically only want a sliver of the subject sharp, and the rest of the plate to be a soft blur. To do this, choose the widest aperture your lens allows. At f/2.8 the opening in your lens is physically wide open, creating what’s known as shallow depth of field. If you’re using a kit lens, the effect will be enhanced if you use your lens at a longer focal length, and get closer to the food.

2) Less is more

N I C O L A

By N i c o l a

Irudayam?

By Irudayam?

While looking at the scene through your camera, ask yourself, “What’s really the subject here?” This simple question will help to shape your composition. While this may seem rudimentary at first, the impact is undeniable once applied. For a helpful reminder, consider taping a small note to the inside of your lens cap. Check all four corners of the frame carefully. Anything that does not work towards emphasizing the chosen subject should be eliminated. The goal is to create a clean frame as opposed to visual clutter.

3) Design your composition

Think beyond the obvious subject, and consider shape and form when crafting your composition. Adding a knife for instance, can balance a composition if placed in the rule of thirds. By shooting from directly overhead you create an elegant frame. In the image above, the towel in the left hand corner adds a pop of color, while the parsley, lime and avocado all add various shades of green. To add more shine to your silverware or reflective objects, in this case the knife, use a reflector board to bounce in extra light.

4) Get messy

Tracy Benjamin

By tracy benjamin

Stefano

By Stefano

To make your food photography look real and not staged, try adding crumbs to the set. This imperfection may seem odd at first, but it adds visual appeal. A bit of cheese sprinkled over the plate is an easy way to accomplish this. A little bit goes a long way here, so be subtle with your approach.

5) Use a high ISO

Simply put, the higher the ISO number is, the faster light can get into the camera. At ISO 800 you will get light into the camera faster than you would at ISO 100 or 200. When shooting food indoors you will often need to be at 1600 or even 3200. I generally do not recommend using ISO 6400 or higher as they will show an increased amount of digital noise, also known as grain. If noise is an issue for your camera, try using Lightroom’s noise reduction tool.

Editor’s note: as this article is aimed at newbies the author assumes you’ll be shooting handheld. If, however, you will be shooting with a tripod, it is recommended to use the lowest ISO possible to keep noise to a minimum and get the sharpest, crispest images possible.

6) Use natural light to your advantage

Felipe Neves

By Felipe Neves

Terence Lim

By Terence Lim

Rather than adding flash, or working with harsh artificial light, take advantage of the beautiful natural light available. This can give a food picture a feeling of bright airiness. Look for spaces where sunlight streams through a window to set up your shot. The morning is typically the best time of day for this, as the light is softer, with less contrast. You can keep shooting in the afternoon but you’ll want to move the food into an area with even light, to avoid harsh shadows.

7) Try black and white

David Pacey

By david pacey

Jazz Guy

By Jazz Guy

Perhaps the most famous food photo of all time is Edward Weston’s “Pepper No. 30”. It was captured in black and white, and shows the shape and form of the subject beautifully. In your food photography, try shooting in monochrome from time to time. Not only does the lack of color simplify the shot, but it also works well to reveal contrast, highlight, and shadow. If shooting in RAW, convert the shot to black and white in post-production. One of my favorite tools to do this is Exposure X by Alien Skin, as they have a large array of creative options.

8) Take a bite

DLG Images

By DLG Images

Xsomnis

By xsomnis

Great food photography doesn’t need to be staged. Once you are done with your shoot, go ahead and take a bite. This photo adds a sense of authenticity to your shoot. If you’ve made the viewer want to take their own bite, you’ve succeeded in your goal of creating scrumptious food photographs.

googletag.cmd.push(function() {
tablet_slots.push( googletag.defineSlot( “/1005424/_dPSv4_tab-all-article-bottom_(300×250)”, [300, 250], “pb-ad-78623” ).addService( googletag.pubads() ) ); } );

googletag.cmd.push(function() {
mobile_slots.push( googletag.defineSlot( “/1005424/_dPSv4_mob-all-article-bottom_(300×250)”, [300, 250], “pb-ad-78158” ).addService( googletag.pubads() ) ); } );

The post 8 Tips for Food Photography Newbies by Chris Corradino appeared first on Digital Photography School.


Digital Photography School

 
Comments Off on 8 Tips for Food Photography Newbies

Posted in Photography


Lytro CEO confirms exit from consumer photography business, focus on VR

05 Apr

In a recent blog post, Lytro CEO Jason Rosenthal has confirmed that the company is headed out of the consumer imaging business to focus instead on developing a light field virtual reality platform. Rosenthal admits that it was too risky to compete in an established consumer space (that was in decline, no less, thanks to smartphones), and determined the value-add of light field technology to VR would have greater impact. Hence, Lytro has scrapped product development in the consumer camera space.

Says Rosenthal, ‘The cold hard fact was that we were competing in an established industry where the product requirements had been firmly cemented in the minds of consumers by much larger more established companies.’ He also mentions the rise of smartphones and consumer satisfaction with image quality from them.

And ‘while consumer Light Field cameras offered a number of true technological breakthroughs such as interactive 3D pictures, radical lens specs, and the ability to focus a picture after the fact,’ the reality was that there was much more investment Lytro would’ve had to make to its cameras competitive with modern cameras in image quality. Meanwhile, VR companies and Hollywood studios were increasingly asking for light field technology in cinematic and next-gen content. ‘We had just raised $ 50MM in new capital. We didn’t have the resources to both continue building consumer products and invest in VR.’

Accordingly, in November of last year, Lytro announced Immerge, a 360° light field video capture device, just after announcing plans for layoffs as the company shifted direction toward video and VR. The pro-grade Immerge was a confirmation of this change in focus. It’s currently only a concept camera, capable of recording live action VR in what Lytro claims as ‘six degrees of freedom’ that, if we understand correctly, should allow for multiple perspectives from multiple angles of view, as well as focus and depth-of-field control after-the-fact. This is a clear benefit for VR capture, which aims to capture as much scene content as possible for the viewer to explore in a virtual environment. 

The decision to shift the company’s focus was not taken lightly. Rosenthal details the anxiety he felt before shifting the company vision, but now says ‘My middle of the night panic attacks are gone. I wake with a burning desire to go to work because I am so excited by what we are building and its potential to help shape VR.’

Have a read of Rosenthal’s full blog post here. It’s quite insightful in laying out some of the considerations Lytro has faced as a company. Some of us here are certainly disappointed that Lytro appears to be completely exiting the consumer camera space, as light field technology had a lot of potential in revolutionizing autofocus, in decoupling depth-of-field and light gathering ability, bringing depth-based image editing to the table, and in radical lens design previously thought impossible, thanks to the ability of light field data to perform certain corrections – even image stabilization – after-the-fact as opposed to optically. That said, we certainly understand the change in direction and are very excited to see what Lytro brings to VR and video.

We’ll be following closely. Let us know your thoughts in the comments below.

Articles: Digital Photography Review (dpreview.com)

 
Comments Off on Lytro CEO confirms exit from consumer photography business, focus on VR

Posted in Uncategorized


12 Tips For Indoor Natural Light Photography

05 Apr

Feeling frustrated with indoor photography?

Harsh shadows and weird skin tones are common problems. In this article, you’ll learn how to improve your indoor photography.

natural light photography indoors

8 tips for indoor natural light photography

Working with natural light indoors can be a little tricky. These beginner tips will help you create beautiful photos using natural light.

1. It’s all about the windows and doors

You’ll want to get to know the light that comes through them. Sometimes it floods the room softly. Other times it beams in, bouncing off the walls and floor.

Soft light will add a soft glow, and harsh light will give a dramatic or moody look.

indoor natural light photography tips 2

Take note of what kind of light enters each room throughout the day.

The color of light also changes during the day. It has a warmer look at sunrise and sunset. During midday, it has a cooler or neutral color. Use this to add different effects to your photos.

2. Turn off the lights

Natural light doesn’t like competition. Electric lights can affect your white balance. This is because the color of light varies with the source. Skin tones can look odd when artificial light mixes with natural light. The easiest way to fix this problem is by turning off all electric lights.

3. Shoot in Aperture Priority mode

In Aperture Priority mode, you choose the aperture. With indoor natural light photography, you need to let in as much light as possible. To do that, you’ll want a wide open aperture. The lower your aperture number (f-stop), the wider your aperture is open.

When you use a wide aperture, your depth of field will be shallow. So your subject will be in focus, while your background is left soft and blurry. This adds a beautiful effect to portraits and product shots.

indoor natural light photography

For portraits, an aperture of around f/5 or f/6 will keep the entire face in focus. Focus on the eyes for best results.

Note: Also shooting in RAW is better than JPEG for indoor natural light. RAW files give you a lot more to work with when editing.

aperture priority for indoor natural light photos

Aperture Priority is marked with either an AV (Canon cameras, pictured above) or an A (Nikon cameras). To adjust the setting, you’ll turn the small dial (pictured on the right).

4. Choose your White Balance

To get good white balance take your camera out of Auto White Balance (AWB). The button for changing white balance is usually marked with a WB somewhere on the back of the camera (or use your Canon Quick menu if you shoot that brand).

For proper skin tones choose Daylight (the one with the picture of the little sun). This will give good results, not too blue and not too yellow. If you want to warm things up a little, choose Cloudy. This will add more yellow. Try a shot with Daylight, then one with Cloudy, and see which looks right or which you prefer.

You can adjust your White Balance while editing (if you shoot in RAW) but getting it right while shooting makes editing easier.

5. Use a light catching backdrop

A backdrop will help catch the light and bounce it back on your subject.

light catching backdrop for natural light photography

In the above image, the white material helps to cradle the light around the flowers.

catch natural light with a backdrop

This backdrop is made with a freestanding collapsible clothes rack and a long piece of white material. I love how easy it is to set up and move around.

6. Use a light box

A light box will create a similar effect as the backdrop, but it will help control the light even more.

use a natural light light box for indoor photos

I made this light box out of Lego and used the same piece of white material pictured in tip #5.

tips for natural light photos

 7. Use a reflector

A reflector is used to bounce natural light back on your subject.

use a reflector for natural light photography

tips for indoor natural light photography

For these shots, I used a reflector and the backdrop. My daughter was sitting with her left side facing the window. She was holding the reflector in her right hand, which helped lighten the shadows.

8. Use a mirror

A mirror is another great way to control natural light. Hang a mirror in the window. I used a large suction cup with a hook to hang the mirror.

indoor natural light photography tips

Have your model look in the mirror. As you take your shot make sure your reflection is not in the mirror. It can take some patience to get the angles and reflections under control, but it’s worth it.

I used a small handheld mirror for this shot. A larger mirror would require less cropping.

tips for indoor natural light photos

9. Tidy up

There are often things lying around the house, especially if you have kids. This clutter can be distracting in a photograph. It’s worth taking a couple minutes to tidy up before you start shooting.

In a small space, a backdrop can serve a double purpose. It will control light and create a blind to background clutter. It can help make a small space more workable. For most of the photos in this article, I pushed our sofa and table into the middle of our living room, so I could set up in front of our largest window. Without the backdrop, this location wouldn’t work.

natural light photography indoors 2

10. Place your subject close to the window

Place your subject a foot or two away from the light source. This way you’ll make the best use of the natural light, and avoid the harsh contracts that can be created by being too close to the window/door. Try backlit, side lit, and full light by having your model face different angles to the window. 

11. Use the curtains

Use curtains or blinds to help diffuse harsh light. When the sun is beaming into the room, the light can blow out your photos. Pulling the curtains can soften the light and help with proper exposure. If the curtains are not suitable, you could use a sheer piece of material to hang over existing curtain rods.

12. Shoot reflective objects

Natural light can turn the most common thing (like the moisture on the window pictured below) into something beautiful.

natural light on glass objects

natural light on reflective objects

natural light through water on the window

Have fun playing around with reflective objects and natural light. I love the way light creates reflections and glistens on shiny/iridescent objects.

You’ve got to love it

It’s easy to love indoor natural light photography.

The setup is inexpensive, portable, and easy; and you can create beautiful photos no matter the weather or time of day. Don’t forget to have fun, and let that inner beauty shine through.

have fun with natural light

Your turn

Let me know how your experimenting goes by commenting below. I can’t wait to see what you create. Please share your photos as well.

googletag.cmd.push(function() {
tablet_slots.push( googletag.defineSlot( “/1005424/_dPSv4_tab-all-article-bottom_(300×250)”, [300, 250], “pb-ad-78623” ).addService( googletag.pubads() ) ); } );

googletag.cmd.push(function() {
mobile_slots.push( googletag.defineSlot( “/1005424/_dPSv4_mob-all-article-bottom_(300×250)”, [300, 250], “pb-ad-78158” ).addService( googletag.pubads() ) ); } );

The post 12 Tips For Indoor Natural Light Photography by Dena Haines appeared first on Digital Photography School.


Digital Photography School

 
Comments Off on 12 Tips For Indoor Natural Light Photography

Posted in Photography


5 Tips for Using Risk Taking as a Tool for Better Photography

03 Apr

With the rising tide of enthusiast photographers and the ubiquitous camera phone, there is more competition for eyeballs than ever before in the photo industry. How can you ever stand out from the crowd to be noticed? The trick is both deceptively simple and incredibly complicated: take more risks. Great photographers rarely play it safe, but before you head into the world with reckless abandon, let’s dive into what kinds of risk taking is productive.

1 – Your camera is a tool, not a pet

You’ve received your very first, very shiny, very expensive DSLR kit. Your instincts are to cradle and protect the expensive piece of equipment. Don’t. While you shouldn’t fully submerge your camera, or throw it off the balcony and expect good results, coddling it like your newborn child won’t do you any good either. It’s a tool and is meant to be used out in the world. It should get a few scratches in the paint and some wear and tear on the grip. Take a look at the following images and ask yourself where the camera is.

CmscottiRisk01

CmscottiRisk02

CmscottiRisk03

For the first two, the camera is sitting on the bow of a kayak roughly four inches above the water. For the third image, the camera is a half inch off the muddy ground. Water is often a camera’s worst enemy, but without the risk of the camera getting wet, these images would not be possible. Water is not your camera’s only enemy though. Dings and scrapes, dust, and even wild animals pose a threat.

That said, there are ways to be smart about risk taking and mitigating potential problems. For example, when kayaking you could store the equipment in a dry bag, so it is only exposed when you stop to take a photograph. You could have a friend kayak with you and help stabilize your kayak, or warn you when a large wave is coming. (It is recommended to do outdoor activities with a buddy anyway for general safety). You can use various coverings, coatings, and cases as well to protect your gear.

CmscottiRisk04

You don’t even have to be in the water to expose your camera to harsh elements. The spray from Wli falls in Ghana was strong enough to reach me 300 meters away. I kept a light jacket in front of my camera until the right moment.

2 – Know your tools

In order to take risks in a smart fashion, it helps to know the limitations of your tools. Does your camera have dust or weather sealing? Does the lens? Did you remember to put a clear (UV) filter on the front of the lens to protect against the basic threats? Is the body primarily plastic? Does it have a metal frame? A quick visit to the manufacturer’s website or a websearch for your equipment’s user manuals should get you the information you need.

There are many more things to consider, but the point is to learn as much as possible about your kit. Your DSLR and lens may be weather sealed and can handle light rain but the audio recorder may not be and may wind up being the weak link.

It’s wise to know how to use your camera well. Often in risky situations you will want to expose your equipment to that risk for the least amount of time possible. The better you know your camera, the less time you’ll spend fiddling with settings. Be sure to practice using your equipment in a low-stress environment, before exposing yourself to a risky situation. Digital Photography School is a great resource for articles on the nitty-gritty workings of your camera, so you don’t have to travel far to get started mastering your gear.

3 – Do your homework on your subjects too

CmscottiRisk05

Let’s say you have been given an assignment that involves getting into an occupied cage at the zoo. How do you prepare? It isn’t enough in this situation to know your gear alone. You need to learn about the animals you are interacting with, some basics on their behavioural cues, and what potential stressors may be present. Luckily in this situation you are likely to get help from the zoo’s staff; in fact, they are required to enter the enclosure with you. But be sure to meet with them prior, and take some time online or in a library to supplement your knowledge. Be sure to ask questions specific to your situation as well.

CmscottiRisk06

Photo courtesy of Clare Hancock.

In this case, what do you do if an animal approaches you and grabs, bites, or otherwise latches onto the camera? It turns out in the case of lemurs, just hold still and they’ll lose interest pretty quickly. The point is don’t panic and don’t be afraid to ask questions, even if they sound far-fetched.

CmscottiRisk07

What would you do in this situation? Photo courtesy of Clare Hancock.

In the same vein as asking questions to be prepared, don’t be afraid to ask questions during a shoot either. You are only expected to be an expert photographer. In this particular example, the zoo staff are there to help everything go smoothly. Don’t let pride prevent you from tapping into their expertise. Consider the photo above, I had no idea what to do when a wallaby and her baby decided I made a comfy resting place. I checked with the keepers to make sure there wasn’t any risk to myself or the wallabies. There wasn’t, so I continued to shoot from that position until she eventually hopped away.

Being informed is the best way to enter a potentially risky situation. The zoo session may seem specific, but consider what would go into photographing a tall ship setting sail, or snowboarders screaming down slopes, or even your own dog in your backyard. Snapping good images often involves getting in close, or shooting from a unique angle that could involve having a camera accidentally knocked out of your hands on a crowded ship deck, having snow sprayed onto your camera, or even having an excited dog slobber all over your equipment or tackle you. Do some homework, be aware of your surroundings, ask questions and you will have mitigated most of the riskiness.

4 – Taking risks in your career

Using risk as a tool in your career is not specific to photography, but it is especially important in this field. If you always use the same tried and true portrait poses, and standard three point lighting that you learned in your high school photo course, you are likely going to be stuck at a studio in the mall holding a stuffed giraffe in one hand and a remote trigger in the other, praying that baby Jesse stops crying. (If you work at one of these and enjoy your job, that is awesome and you are honestly a much more patient person than I). Most photographers I know have bigger dreams than this, whether it is running their own mall studio or becoming a successful commercial photographer. Unless you run into some magnificent stroke of luck and were born with real talent, this is going to a lot of time, more effort, and a few risks.

I am no Warren Buffett when it comes to business sense, but I can say the biggest jumps in my own career came from taking big risks. When former Ghanaian President John Atta Mills passed away in July of 2012, I was just coming out of graduate school and interning at the Daily Guide newspaper in Accra. President Mills was the first Ghanaian president to die in office and his state funeral was considered one of the most important stories in the region. I had just arrived in country, knew only what I had read about the culture and only had two weeks to convince my new, sceptical editor to let me be a part of the team covering the story. I worked very hard with my new coworkers, contributing to as many stories as possible, and hanging out with the reporters to learn about Ghanaian politics, history and culture.

CmscottiRisk08

Two days before the funeral, I convinced my editor to let me go on the assignment. Going in I was scared. I felt like I could never be prepared enough, and doubted every decision I made during the assignment. Regardless, I took the risk of screwing up an important assignment, and managed to rise to a challenge. The images ran front page and an entire centrefold was dedicated to my images of the event. Moments like these demand taking risks. If you have ambitions beyond photography as a hobby, you will need to get used to going in over your head. Risk will always force you to be a better photographer.

CmscottiRisk09

However, the risks you can take regarding your career can be mitigated to some extent as well. The key, as you already know, is being prepared. This is a much more abstract process compared to mitigating risks related to camera equipment. While some things are the same, – knowing your tools and subjects well enough to work efficiently – others go a little beyond the act of photography itself. They involve politics in your particular branch of the profession, and knowing just how far you can push yourself.

CmscottiRisk10

As I eluded to earlier, I am not the kind of guy you will see doing family portraits or weddings. I am horrible at convincing the average person to smile or look natural. I simply am no good at those kind of portraits. That said, after I won my first photo award I ran out and bought a Vivitar flash, cloth backdrop and three hot lamps. I was convinced I was going to quit my job waiting tables and pay for my impending college career with my photographic talent. I was wrong… very wrong. I managed to perform poorly on three portrait sessions before realizing that my foray may have been a mistake, and I was out a few hundred dollars in studio gear.

I knew nothing about the family portraiture business. I didn’t do any research aside from reading a couple of gear reviews and really burned myself in the process. Worst of all I didn’t know my equipment very well. I had a total of one lesson in studio lighting under my belt at the time and may have purchased a book, that to this day, I have read a total of three pages of. I took a dumb risk and hurt my confidence and disappointed people in the process.

CmscottiRisk11

Crappy portrait of Markus Sales

5 – When things go wrong

There is one catch to risk taking. What if it doesn’t pan out. You may end up with broken equipment, angry customers, or bodily injury. What now?

Broken equipment is relatively easy to deal with: mourn the loss of your trusted tool, then buy a new one. If you are worried about not being able to afford replacing equipment, talk to your insurance company about whether your homeowners or renters insurance will cover your gear outside your home. Specific camera (and commercial) insurance policies are available as well. Be sure to find out what is covered and how they handle claims.

Smoothing customer relations or repairing a career are tougher issues. Patience and good customer service skills will go a long way, but every case has to be approached individually. Giving a discount for a mediocre portrait shoot might work in one case, but blowing an expensive commercial shoot is going to take a whole different approach. I have been lucky enough that I haven’t had to do this in my own career, but I encourage joining professional associations and talking to other professional photographers to learn what consequences there might be, and how to recover from them.

Bodily injury is the worst on this list. If you are risking your life or serious injury for a photograph, STOP! No photograph is worth getting hurt or dying for. There has been a recent rash of people dying while taking selfies or trying to capture memories from crazy angles over the edge of a skyscraper. It doesn’t matter if it could be the best photo ever taken, this kind of risk is never worth taking in the first place. Broken cameras can be replaced, careers rebuilt, and customer relations smoothed over, but the best photo of your career is worthless if you die or are maimed in the process. Just don’t do it.

One final disclaimer

The nature of risk taking is that the result could be game changing good, or painfully bad. You can fail and fail hard. The advice given here is simply what I have learned over the course of my own career, and it may not apply to you at all. There is no guarantee that taking any kind of risk will result in a positive outcome. Ultimately, you must decide if the risks you take – if any – are worth taking. The outcomes of taking those risks will be entirely yours, so use your best judgment. If you do decide to take a risk, be smart about it and do everything in your power to lessen that risk. Best of luck out there.

googletag.cmd.push(function() {
tablet_slots.push( googletag.defineSlot( “/1005424/_dPSv4_tab-all-article-bottom_(300×250)”, [300, 250], “pb-ad-78623” ).addService( googletag.pubads() ) ); } );

googletag.cmd.push(function() {
mobile_slots.push( googletag.defineSlot( “/1005424/_dPSv4_mob-all-article-bottom_(300×250)”, [300, 250], “pb-ad-78158” ).addService( googletag.pubads() ) ); } );

The post 5 Tips for Using Risk Taking as a Tool for Better Photography by Christopher Scotti appeared first on Digital Photography School.


Digital Photography School

 
Comments Off on 5 Tips for Using Risk Taking as a Tool for Better Photography

Posted in Photography