RSS
 

Posts Tagged ‘Photography’

Tips for Different Approaches to Architecture Photography

17 Jun

Architecture is all around us, it is an integral part of our lives. We live in it, we work in it, we eat out in it, and in most towns a lot of money has been spent on it so they stand out to say something. We all know what those buildings are, and have maybe even taken photos of them, but they are often just snaps. There is nothing wrong with getting those, but it could be nice to try and get a lot more with the image, such as the essence of the building, what it says about its placement and where it stands.

So here are some tips for how to photography architecture to help you get started:

LeanneCole-architecture-006

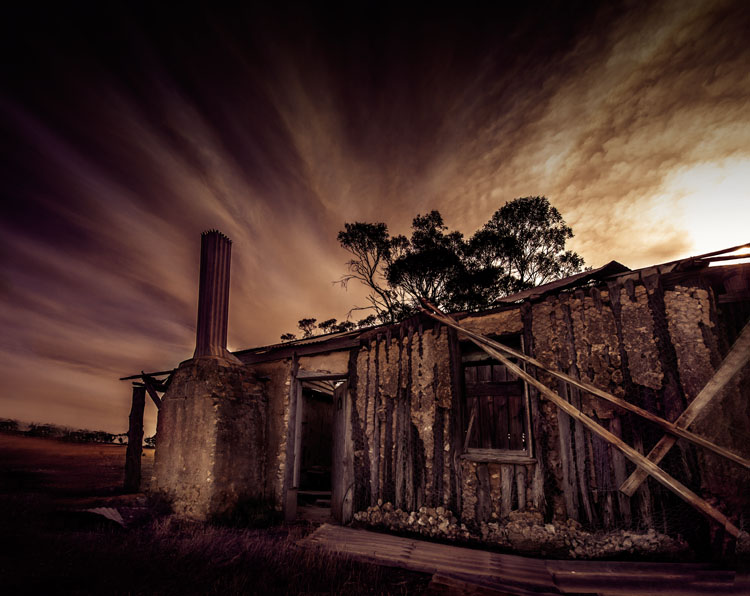
An old home that no one has lived in for a long time. The clouds in the sky look like a long exposure, though they were just like that.

Architectural photography is not a prominent genre, yet so many people take photos of buildings, so why is it a subject that is not discussed a lot? Think about how often there is a building in your images.

Common types of architectural photography

Most people, if you ask them what architectural photography is, are likely to say real estate. It is probably the most common type and you do see it everywhere, but there are many other ways of taking photos of structures.

URBEX Photography

With the rise of URBEX (Urban Exploring) architecture is being photographed in a new way. Photographers are getting into abandoned structures to take photos. The decay and destruction that happens to a building after it has been abandoned, gives a new story to it. This is even more true with the items that are left inside the buildings, and these items help to give us a hint as to what was there before.

LeanneCole-architecture-008

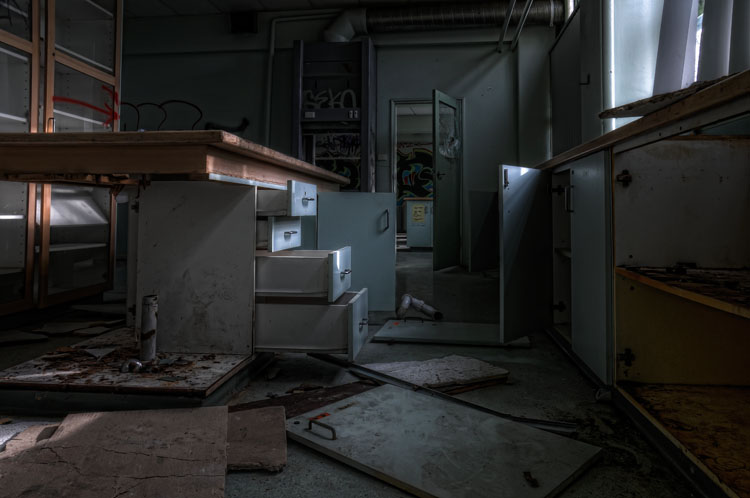
URBEX exploring, an old school that was closed down and vandals have been into.

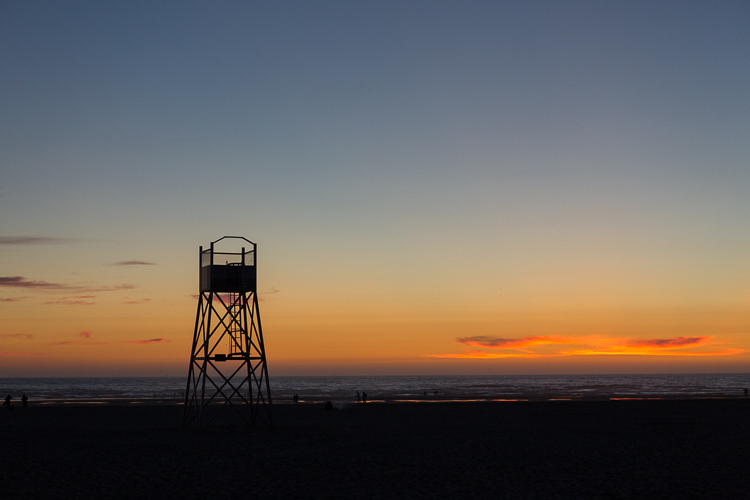
Long Exposure Photography

Long exposure photography is also very popular now. Neutral density filters (ND Filters) are used to give subjects a timeless feel, and using them on architecture has been as common, pointing the camera straight up to a building and photographing it as the clouds move behind it. Read: Using a 10 Stop Neutral Density Filter to add Drama to the Sky

LeanneCole-architecture-009

The long exposure helps give the image a sense of drama and a better look at the architecture of the bridge.

Alternatively

Those are the most common sorts of architectural photography, but you can do other types as well. You can make the building the subject, and create your image around it. You can do fine art images using the buildings, and create moods or stories around them.

Architecture around you

As stated earlier, architecture is all around, and you don’t have to go far to find buildings to photograph. It isn’t necessary that the building be architecturally important, more that you find it interesting, as that will help you to engage with it. It can be about what the building is or was, and how much it meant to the area it is in.

LeanneCole-architecture-005

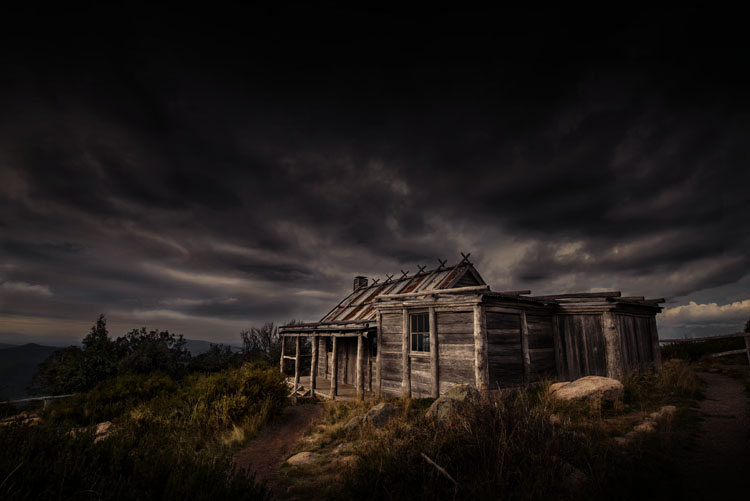
An old hut on top of a mountain. Photographing it with the surrounds helps to place it, and the sky helps make it moody.

Different ways of photographing architecture

Most people seem to photograph buildings more as a record rather than as a work of art. Architecture can offer so much more, and you can get some amazing portrait style images.

There is the potential to tell stories. Whether that story is about what the building was used for, or what its function is now, you can use that to help take your images and process it afterwards. Maybe there is a certain part of it that you are very attracted to.

Photograph aspects of it

You don’t have to photograph the whole building. Think about parts of it that might make interesting images. It is so easy to forget that the light fittings are really interesting, or the doors might have wonderful carvings. If you find a building you like, tell the whole story of it and then select the parts that you like – photograph details. You can take more than one image.

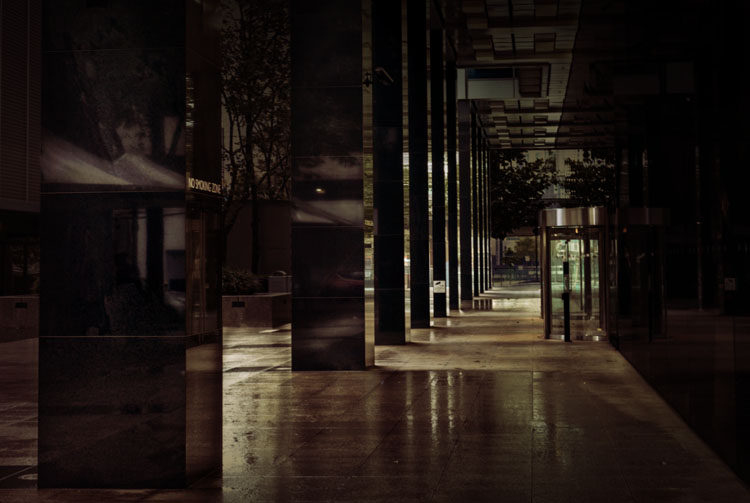
I really like corridors, more so if no one is in them, the idea of it going somewhere, or nowhere. It’s interesting to see what mood you can create with the hallway. Use the image to create a story that is there, or not.

LeanneCole-architecture-001

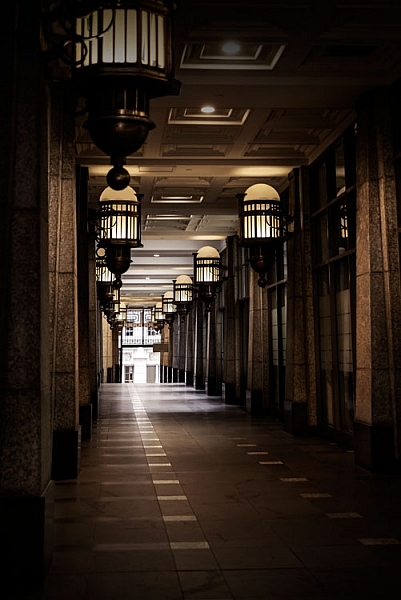
A walkway beside a building with interesting lights.

Look at the surroundings and how they can help tell the story

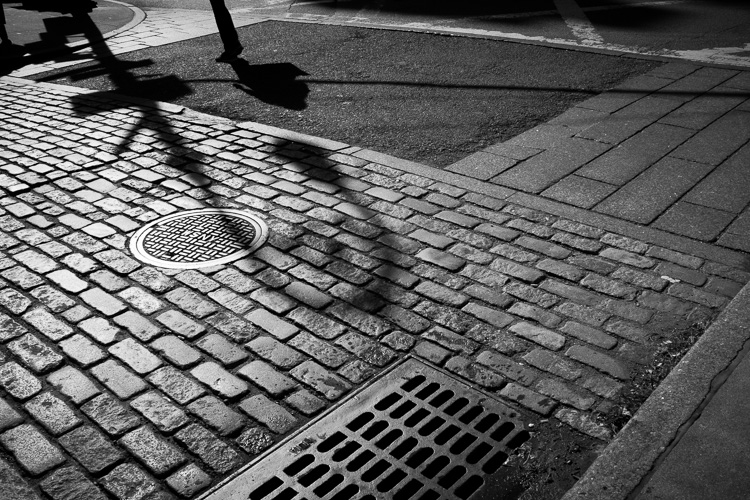
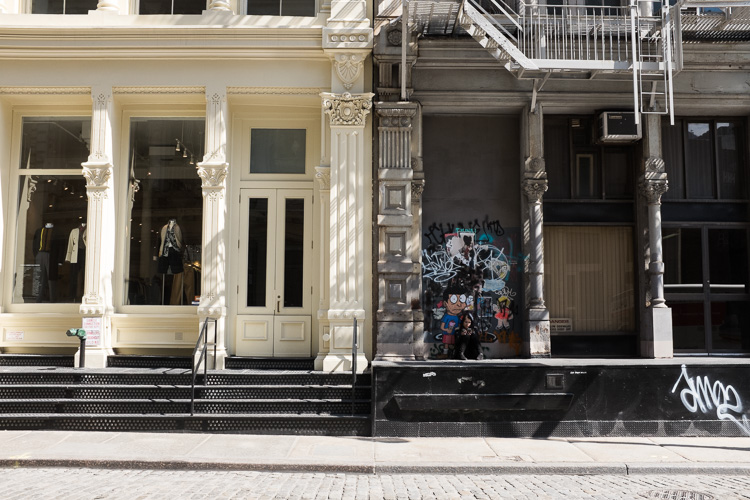
There can be more to what you see than just the building. Look at where the building is situated, and if other buildings or subjects around it can help place it. For example, a modern tower that is surrounded by buildings from the Victorian Era, or the other way around, provide an interesting context. An elaborate theatre that is in the midst of many shops that have closed down. They all help to provide a sense of place.

LeanneCole-architecture-004

The sun hitting the building, then light being reflected on the front from somewhere else gives the station a great look.

Colour or black and white

It is easy to think that everything should be in black and white. It is the artsy way of thinking, but it really shouldn’t be the only way. It should be a personal choice and what you want with your image.

Maybe ask yourself some questions first. Does removing the colour add to the drama of the image? If you leave the colour in it will it distract from the story you are trying to tell? What time frame do you want to express? Is shape and form more important than what is there? If the answers to those questions are yes, then perhaps black and white is more suitable for that image.

LeanneCole-architecture-003

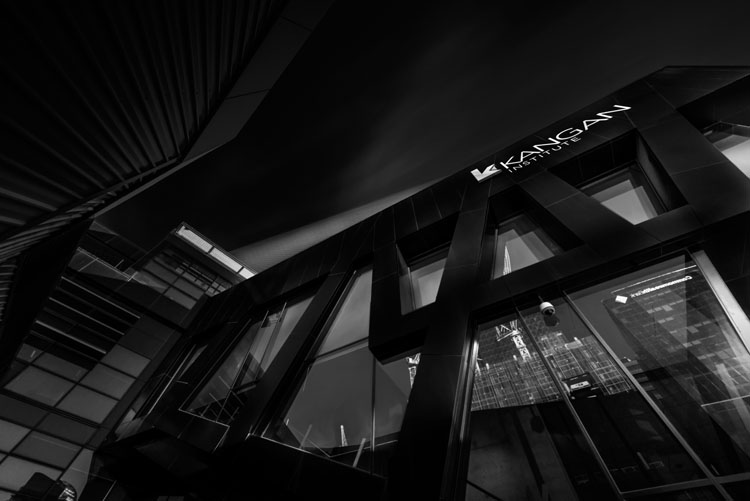
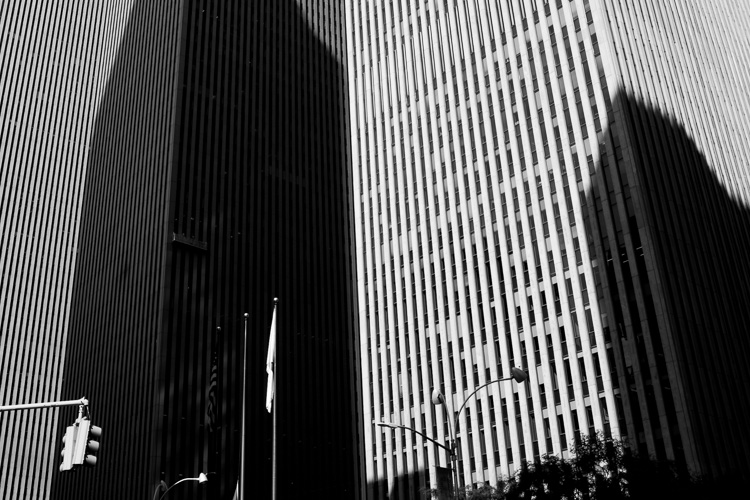
Looking straight up at a building is very popular, especially in black and white.

You get the idea, don’t just do black and white because you think that is what is expected for architecture. Make it a conscious choice, for a reason.

Processing

When it comes to how you process your images, it’s going to depend on the intention you have for the image. If it is to show the structure as it is, then you need to make sure that you only do basic processing.

LeanneCole-architecture-002

The wet ground was good for showing the reflections and making the most of an abstract view.

If you were commissioned to photograph a building, then you need to consider the goal, and how your client wants the final image. Do they want it to look like images that you already do, or perhaps with a different look? Remember your client is in charge of the final image and you need to be mindful of what they want.

On the other hand, if you have just taken the photo for yourself, then you don’t need to care about what other people want or like. You can process it anyway you like.

LeanneCole-architecture-007

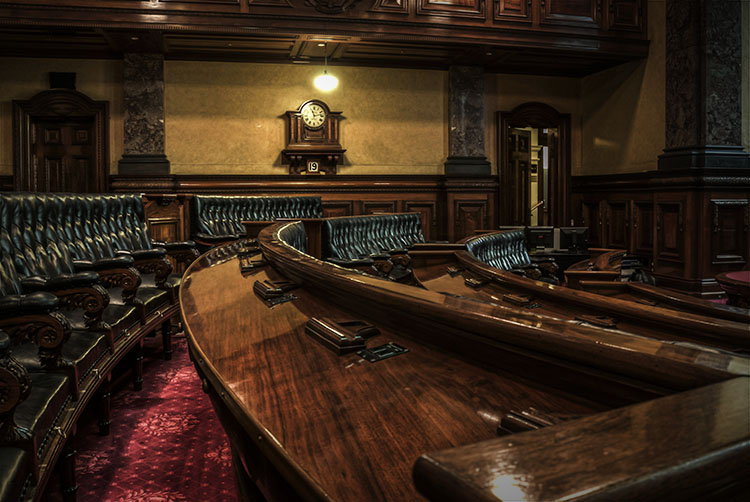
Using the lines in the council chambers to take your eye to the clock.

This is where you get to show your individual style and experiment with your processing. Work out what you like, what you don’t, and create images of architecture that are uniquely yours. In many ways you have a lot more freedom to do what you like to it than other types of photography, like nature for instance.

In the End

With so many different types architecture, it is up to you to find what you like doing. Develop your style and make it yours. There is nothing better than people recognizing your work before they see your name.

Do you have any other ideas or tips for photographing architecture? Please share your thoughts and images in the comments below.

googletag.cmd.push(function() {
tablet_slots.push( googletag.defineSlot( “/1005424/_dPSv4_tab-all-article-bottom_(300×250)”, [300, 250], “pb-ad-78623” ).addService( googletag.pubads() ) ); } );

googletag.cmd.push(function() {
mobile_slots.push( googletag.defineSlot( “/1005424/_dPSv4_mob-all-article-bottom_(300×250)”, [300, 250], “pb-ad-78158” ).addService( googletag.pubads() ) ); } );

The post Tips for Different Approaches to Architecture Photography by Leanne Cole appeared first on Digital Photography School.


Digital Photography School

 
Comments Off on Tips for Different Approaches to Architecture Photography

Posted in Photography


5 Tips to Help Build Your Confidence in Photography

14 Jun

Think of your last bad day of photography, a time where you just blew a whole batch of portraits, or even a couple’s wedding day images were spoiled. As photographers you can’t go back and fix that. Yes if you use RAW, you can get some info back from under or over exposed shots, and editing tools these days can be incredibly useful. But, when you spend more time behind the computer than with you camera it can be a real confidence buster. It may even be taking away from future business, if not your enjoyment of photography.

So how do you build your confidence?

confidence in photography

These DPRK soldiers show confidence and loyalty guarding the DMZ and the 38th parallel of Korea. The soldiers at Buckingham Palace don’t flinch, and that takes practice.

Having confidence exudes confidence, but where does real confidence come from. Well it doesn’t just come from nowhere, that is often called arrogance. It comes from the awareness of your emotional state relative to your cognitive abilities.

If you use your emotions to create, you are being confident. If your emotions are overwhelming you during your shot or photo series, you are likely under-confident. By the book, you may know everything there is to know about the exposure triangle, rule of thirds, color theory, etc., but when you are actually shooting do they do more to help, or do they hinder you?

Confidence is a delicate balance between what you know, and how well you are capable of performing. So let’s look at a couple of examples and analogies to help build your confidence as a photographer.

#1 – Confidence isn’t always consistent

Real confidence is never consistent, and has its slumps. Professional sports is a great example, even superstars have an off night.

So when you have an off night, remember another night is just 12 hours away. If it is the morning, it is still 12 hours away. Even a broken clock is correct twice a day, so don’t beat yourself up. In the short run you may have really blown a photo shoot, or missed the animal of your dreams because you were not being conscious about your settings, or you were simply absent minded. But that is the short term, and as long as you get right back out there, the better off you are going to be.

The best of the best all fail, but what keeps them on top of their game is the arduous task of owning up to being human, and going out to find a solution to your goof. In the long run, they will be memories that you get to look back on with a laugh.

confidence in photography

Baseball is a national pastime in Cuba. Although it was my first time shooting baseball in the barrios of Havana, it wasn’t my first time shooting it.

#2 – Learn from your mistakes

Few people are perfect photographers from birth. Generally, talent comes through sweat, tears, and sometimes even blood. If you make mistakes you can learn from them. Confidence has a conspiracy with failure. So take two steps forward, and one step back. Stay committed, and speaking of commitment and blood, I am not the only photographer who has taken a tumble, and when people ask you if you are okay, you respond with, “Yes the camera is fine”, while your knees and elbow are bleeding.

confidence in photography

Continuing with the baseball theme, after striking out, it only took one big swing to make the winning home run. Don’t give up, live, learn and keep swinging for the fences.

#3 – Be vulnerable

Enter a photo contest, and don’t expect to win. It is a final process of completing the photography and artistic conceptual circle. Letting your photo hang on a wall, while others look at it, even for a few minutes, is a scary prospect for some. But think of leaving your freshly baked pie on the dinner table, and just looking at it. We don’t do that with food, nor should we do that with our photography.

People will love it, like it, dislike it, or downright hate it, but that doesn’t mean you are wrong. It means you have succeeded in making the photography world just a little more interesting. You also never know who you will inspire. Your vulnerability will soon become a strength that will help build your confidence.

confidence in photography

After years of holding on to this photo, I finally entered it into a regional photography competition. It got in, and although I was not a recipient of anything, another gallery called a month later and wanted to host my work for a show.

#4 – Learn from others BUT don’t compare yourself to them

There is a world of knowledge available, and many people who you can learn from. Use them, ask them questions, share ideas – but don’t compare yourself to them. Generally when you compare your own work to others, it may leave you with a sense of there’s more to be desired, and a sense of failure. So learn from their perspectives, their tutorials, and their stories, but don’t get caught up in who is better.

A happy photographer is the best photographer. Furthermore, over time you will begin to see the merits in some of your earlier experimental work. Perfection is not the goal, it is the journey to becoming a more enriching photographer.

IBQ 0174
This Magnolia opening in spring was taken in full sunlight. I saw a series of flowers on a photo stream, and realized I had not taken a photo of something beautiful in a long time. This helped me learn to see, and if our images were side by side, I am sure theirs was better. But I enjoyed doing something different than what I normally shoot.

#5 – Avoid gear envy

There will always be something bigger and better, wait another year and the next new version will be out. So don’t get intimidated by other photographers’ gear, and more importantly don’t let your photos depend on your gear. Think of it as a challenge.

confidence in photography

Taken with a 50mm, manual focus lens from my father’s box of forgotten things, that I found rummaging through his old stuff. Lenses and cameras are fun to have, and fun to buy, but they don’t make the photo.

A small trick I use when the next new thing comes out, and I get in that spiral of getting all gear-junkie about it is to look at some of the classic photographers from 100 years ago or read up on some color theory. This gets me back to the basics, try it yourself.

So if you realize that every showing will not be your best, you can get over thinking that your gear dictates the success and failure of your photos, if you can start to learn from your mistakes, and begin to hang photos on a wall – then guess what? Your confidence will begin to grow, you will have more control (and more power) over photography (situations, light, camera gear, etc.). As your confidence grows it builds and builds on itself.

The next six areas are examples of how confidence will help you in that style of photography. Part one is developing confidence, and part two is a set of examples of how confidence can help in different situations.

How confidence can help you take better photos

In portraiture, confidence helps you connect with, and calm your subject, to bring out their inner spirit. There is little worse than a nervous model and a nervous photographer. Even if you are not 100% sure what you’re doing, show confidence, take your time, and slowly adjust your settings to get things closer to your ideas. Try and keep from getting frustrated and making large adjustments wildly to your gear.

confidence in portrait photography

This young girl in North Korea had never seen an American before, but after me keeping my cool she was much more approachable.

In wildlife photography, confidence lets you trust your gut, and get in the right place at the right time. Luck is important, but perseverance will ultimately lead to success. Having confidence will give you the extra optimism to keep you going, as you wait patiently.

confidence in wildlife photography

On a long road trip from east to west across the US, I hadn’t run into any large animals. In Wyoming I decided to go for another shot at an indiscrete state park, and there were buffalo everywhere.

In travel photography, confidence helps you see beyond the postcard shot. Confidence allows you to see your journey, not the one that is in the travel books. It helps you see the subtleties, and personalize your travel story, rather than trying to just take the photo that everyone else wants you to take.

confidence in travel photography

This sassy little Cuban was just parading on her porch. I walked by without grabbing my camera, then discreetly turned around and caught her exuding luxury, Cuban style.

In fine art photography, confidence will allow your creative side to flow. It will allow you to access what is sometimes referred to in sports as “being in the zone.” This zone, or flow is your brilliance at its best, and confidence supports your ambitions as an artist.

IMG 2012 Edit Edit

One of my favorite images from India, where cricket matches were being played. Using multiple exposures, then giving it a symmetrical clone, I produced something that I cherish. Maybe only you like your photo, but that is what being true to yourself is all about.

In bad weather confidence helps you see the silver lining. For all types of photography we rely on light. A great source of light is outdoors, and when that golden hour turns to wind and rain you have a choice – pack up and go, or think outside the box. Confidence helps you control your surroundings, even when they are out of control, so you can begin to work within them, and use them to your advantage.

IBQ 4876 Edit Edit 2
I can’t say that the weather was bad here, but the timing was. I was just getting to a ghetto outside of San Jose, Costa Rica at night. I wanted to get in and out before I felt compromised, unsafe. So regardless of if it’s bad weather, or bad timing, confidence can help you to push through.

In tough times confidence gives you the grit to continue. Really, this is what a lot of photography comes down to – do you have the gumption to get up early for sunrise, or not? Can you give a genuine smile to your client, even when you are not having the best day? Can you be satisfied with the gear you have, and not think about the next lens you want to get? Can you be the best photographer you can be?

confidence in photography

Symbolically this Burmese woman has had a few more tough times than I have. Confidence in photography will help you put things into perspective.

Confidence is hard to gain and can take years to attain. It is a process, and is easier for some than others. But if you work at it, it will build. Just as you work on other aspects of your photography, your emotions need work to. Confidence is an emotion, so practice with your feelings, and let them grow alongside the cerebral aspects of photography. Be mindful of your emotions, not fearful of them.

Do you have any other confidence building tips? If so, please share them in the comments below.

googletag.cmd.push(function() {
tablet_slots.push( googletag.defineSlot( “/1005424/_dPSv4_tab-all-article-bottom_(300×250)”, [300, 250], “pb-ad-78623” ).addService( googletag.pubads() ) ); } );

googletag.cmd.push(function() {
mobile_slots.push( googletag.defineSlot( “/1005424/_dPSv4_mob-all-article-bottom_(300×250)”, [300, 250], “pb-ad-78158” ).addService( googletag.pubads() ) ); } );

The post 5 Tips to Help Build Your Confidence in Photography by Branson Quenzer appeared first on Digital Photography School.


Digital Photography School

 
Comments Off on 5 Tips to Help Build Your Confidence in Photography

Posted in Photography


Weekly Photography Challenge – Glass

11 Jun

How do you photograph something that is transparent or see through, like glass? See how these photographers did it with 28 images of glass subjects, then see if that gives you some ideas for this week’s challenge.

Designmilk

By designmilk

Weekly Photography Challenge – Glass

This should be easy enough to find subjects for this week’s challenge – glass – the tricky part is how to photograph it. Glass reflects everything including the light source and even yourself. So how you approach this will be up to you. Shoot a crystal glass in the studio, photograph an old weathered window pane, work with the reflections and go with them for effect, or shoot through glass. Get creative.

Bill Gracey

By Bill Gracey

?ethan

By ?ethan

Dara Or

By Dara or

Share your images below:

Simply upload your shot into the comment field (look for the little camera icon in the Disqus comments section) and they’ll get embedded for us all to see or if you’d prefer upload them to your favourite photo sharing site and leave the link to them. Show me your best images in this week’s challenge. Sometimes it takes a while for an image to appear so be patient and try not to post the same image twice.

Matthew Rogers

By Matthew Rogers

Wil C. Fry

By Wil C. Fry

Han Cheng Yeh

By Han Cheng Yeh

googletag.cmd.push(function() {
tablet_slots.push( googletag.defineSlot( “/1005424/_dPSv4_tab-all-article-bottom_(300×250)”, [300, 250], “pb-ad-78623” ).addService( googletag.pubads() ) ); } );

googletag.cmd.push(function() {
mobile_slots.push( googletag.defineSlot( “/1005424/_dPSv4_mob-all-article-bottom_(300×250)”, [300, 250], “pb-ad-78158” ).addService( googletag.pubads() ) ); } );

The post Weekly Photography Challenge – Glass by Darlene Hildebrandt appeared first on Digital Photography School.


Digital Photography School

 
Comments Off on Weekly Photography Challenge – Glass

Posted in Photography


The Uncomfortable Truth About Street Photography

10 Jun

Smiley Face, SoHo, NYC.

As someone who has photographed people candidly since I first picked up a camera over 15 years ago, there is something that needs to be said to everyone that is interested in street photography.

Yes, what we’re doing has importance, whether through the angle of documenting history, noticing interesting moments, fostering ideas, or creating art. These photographs will have cultural value to them in the future, and most of us capture culture and humanity because we like them. We like people. We like to people watch.

Many photographers have been drawn to this genre before even realizing that it has a name, and this helps us realize that this way of viewing the world is instinctive to some people. It comes naturally. I remember picking up my first camera in New York. I could have easily looked up at the tall skyscrapers and epic architecture, and I did and still do, but the people walking around seemed just as fascinating.

Duck Face, SoHo, NYC.

Yes, it’s legal, at least if you’re in the United State and Britain. Yes, it’s within our rights to do this in public, and to share these images as art and for cultural purposes. No, it doesn’t make us bad people.

Street photography will make some people uncomfortable

But no, everything that I just mentioned does not completely free us from culpability out there. We have to consider that the practice of street photography can be inherently uncomfortable to our subjects. Some will understand what we are doing, but others will be weirded out by a stranger capturing a photo of them suddenly in public, whether it is in an obvious or a more candid way. Morality, cultural importance, and the good things that we are trying to create should all be put aside here, so that you realize there is a tradeoff going on. We are creating uncomfortable situations for others.

Student, Broadway

Some would even argue that it is a virtue to create a little uncomfort out there, and that we all need to be thrown off balance every once in awhile. I agree with this statement, but I still realize that there is a negative side to what I am doing.

Some people do not like that we are taking their photograph. Some would not be happy seeing the photograph afterwards. No matter how hard you try, you cannot avoid those people through your daily shooting.

Love, Midtown

This is something that you will have to come to terms with if you practice street photography. You can have a smile on your face and talk to anyone who seems uncomfortable with your presence with a camera. You can tell them that you did not mean to make them uncomfortable, and you can even offer to delete a photo if the person really doesn’t like it. You can do all of those things, but still you need to know that you are making people uncomfortable.

Yes, you.

I’m not saying that this should stop you from doing it, or slow you down, but it should be in the back of your head. It’s a privilege that we are allowed to do this, and we need to respect our subjects in the way that we shoot, even if there is no choice but to occasionally make someone uncomfortable. You can choose who it is you photograph, and the way and situations in which you photograph, but you will never be able to completely get rid of this.

Broadway Joe, SoHo, NYC.

Learn to live with it and accept it as you photograph people, but don’t ignore it.

Do you do street photography? How do you handle this uncomfortable aspect of this kind of photography? Please share your experiences in the comments below.

googletag.cmd.push(function() {
tablet_slots.push( googletag.defineSlot( “/1005424/_dPSv4_tab-all-article-bottom_(300×250)”, [300, 250], “pb-ad-78623” ).addService( googletag.pubads() ) ); } );

googletag.cmd.push(function() {
mobile_slots.push( googletag.defineSlot( “/1005424/_dPSv4_mob-all-article-bottom_(300×250)”, [300, 250], “pb-ad-78158” ).addService( googletag.pubads() ) ); } );

The post The Uncomfortable Truth About Street Photography by James Maher appeared first on Digital Photography School.


Digital Photography School

 
Comments Off on The Uncomfortable Truth About Street Photography

Posted in Photography


5 Tips to Help Get Yourself Out of a Photography Rut

09 Jun

Shootthroughyourrut 01

Are you in a photography rut?

Tell me if this sounds familiar – you’re the person who almost always has a camera with you. Maybe it’s in a backpack or purse, in your trunk, or strapped right to your hip – you’re always seeking that next level. Yet on the flip side, you also find it excruciating when you hit a rut. You know that terrible feeling when you look at your recent work and feel like it’s the endless blip of a scratched record, when you don’t feel inspired, creative, or excited by your own work.

Friend, when it gets to this point, you’ve officially hit a rut. Ruts are the curse of the artist. but fear not — if you handle this wisely, you’ll come out the other side on the next level. Here are a few tricks that have gotten me through my creative plateaus.

Shootthroughyourrut 02

Tip #1 – put the camera away for a while

First, put that camera down. It’s unsettling, isn’t it? You see the world in a series of beautifully composed photos, and not having a camera feels like you’re missing a limb. Sit in that discomfort. Force yourself to look at your surroundings with a fresh eye — no lens between you and the world — and new frames, new light, new ways of capturing this crazy planet will all slowly unveil themselves to you.

If you keep going in a rush to capture it all before it disappears, you’ll never see it properly. Start slow. Look carefully. Don’t take any photos. Keep things captured in your mind just for yourself. When you do pick up your camera again, it’ll feel like a whole new world of opportunity, because you’ve refreshed your own gaze. In the spirit of always keeping your gaze fresh, is the next point.

Shootthroughyourrut 03

Tip #2 – look for new inspiration close to home or online

Find new sources of inspiration. During one of my “leave the camera at home” phases last month, I was hungrily soaking up inspiration from everywhere and everything BUT photography. I sat in slack-jawed wonder at Kehinde Wiley paintings, examined the brush strokes in Japanese calligraphy, studied ancient mapmaking techniques and short shadowy films, and the impeccable detail on the Manus x Machina gowns at the Met Museum.

You don’t have to travel to new countries to find a street you’ve never walked down. This absorption of every art besides photography reminded me over and over that this world is rife with creativity that bursts from its very pores, in a hundred different manifestations. I felt so small, so unimportant, and so refreshed by the many ways of creativity that humans are capable of, that aren’t my piddly little photography efforts. It’s good to feel small, while also being inspired to be bigger. That being said, we come to the next tip.

Shootthroughyourrut 04

Tip #3 – stop comparing yourself to others

Stop absorbing other people’s work. Seriously, give yourself a break from the comparison game, because no one wins. Either you end up in a fetal position in defeat, after a depressing Instagram session in which you realize you’re a talentless hack, or you’re left with that icky smug feeling when you look at someone’s work who isn’t as good as yours. Either way, the comparison game doesn’t improve your art, nor does it improve the world either. Take an Instagram break, stop looking at how other photographers are doing it, and keep working on your own vision. It’s a smarter use of your time, and will take you further (now if only I could figure out how to actually implement this one).

Shootthroughyourrut 05

Tip #4 – take advantage or your own strengths and skills

Take the photo that only you can take. This is the crux of it. Instead of imitating other photographers’ techniques and subjects, have a good hard think about the photo that literally can only be taken by YOU. What communities are you a part of that others would kill to break into? What skill sets do you have, that will open doors that otherwise would stay latched shut? There are so many little components of you that make you unique — so don’t waste your time trying to recreate your current photography idol’s recent shoot.

Shootthroughyourrut 06

Tip #5 – just get some rest

If all else fails – take a nap. Seriously, sometimes I’m just so damn tired that I can’t come up with a fresh idea to save my life. Have a good lie down, and know that the world will still be there, waiting to be captured when you wake up.

In a rut? Leave your techniques for working through it in the comments section below, I can’t wait to hear how you handle it!

googletag.cmd.push(function() {
tablet_slots.push( googletag.defineSlot( “/1005424/_dPSv4_tab-all-article-bottom_(300×250)”, [300, 250], “pb-ad-78623” ).addService( googletag.pubads() ) ); } );

googletag.cmd.push(function() {
mobile_slots.push( googletag.defineSlot( “/1005424/_dPSv4_mob-all-article-bottom_(300×250)”, [300, 250], “pb-ad-78158” ).addService( googletag.pubads() ) ); } );

The post 5 Tips to Help Get Yourself Out of a Photography Rut by Laura Sullivan appeared first on Digital Photography School.


Digital Photography School

 
Comments Off on 5 Tips to Help Get Yourself Out of a Photography Rut

Posted in Photography


Canon USA launches new online photography courses

09 Jun

Canon USA has announced seven new photography courses that will form the beginning of the company’s new Canon Online Learning program. The courses are aimed at the full spectrum of photographers from beginner to professional says Canon, and students will be able to learn at their own pace as the resources aren’t live. There will be video tutorials and downloadable worksheets and assignments for the practical courses, while equipment-based courses intend to help users get the most out of their Canon cameras and accessories.

The first seven courses will be:

  • Understanding EOS Camera Operations
  • Photo 101: How to Take Great Pictures
  • Printing Basics & Beyond
  • Great Landscapes Made Easy
  • Child’s Play: Simple Tips for Photographing Children
  • Getting Started with Flash Photography
  • Canon Insider Guide: EOS Rebel Series

Courses will be priced from $ 19.99 to $ 59.99.

For more information visit the Canon Online Learning website.


Press release

Canon Educates & Inspires With New In-Depth Online Learning Program

Canon Online Learning Courses Designed to Support and Develop Imaging Skills for Passionate Photographers of All Levels

Canon U.S.A., Inc., a leader in digital imaging solutions, is launching Canon Online Learning, a new program of immersive digital courses designed to help photo and video enthusiasts of all levels develop their skills at their own pace. The program, which expands upon Canon’s robust mix of existing free and paid educational offerings, looks to educate parents, travelers, imaging hobbyists and working professionals with proven techniques from recognizable industry talents.

Available now are these initial seven courses, suitable for all skill levels:
* Understanding EOS Camera Operations
* Photo 101: How to Take Great Pictures
* Printing Basics & Beyond
* Great Landscapes Made Easy
* Child’s Play: Simple Tips for Photographing Children
* Getting Started with Flash Photography
* Canon Insider Guide: EOS Rebel Series

These first seven courses, and subsequent classes to follow, will include video guides unique to each course with the option to download or print PDF materials. With the exception of Canon Insider Guide: EOS Rebel Series, courses will also include complementary resources such as bonus video content, lighting/shooting diagrams, shot lists, resource guides and interviews with course instructors. Additional interactive materials may include quizzes, assignments, interactive images and diagrams.

“Canon has always provided industry leading educational resources for our customers. Over the years, we have expanded our offerings to include live workshops, one-on-one in-person sessions and countless free lectures across the country. Now, for those passionate customers looking to take a deeper dive into photography or videography, we have developed a curriculum of content that addresses the various ways our customers use our products today, and it’s available at their convenience online, day or night,” said Yuichi Ishizuka, president and COO, Canon U.S.A., Inc. “This new program also helps familiarize the imaging community with our wide range of educational tools, allowing them to learn valuable tips from our technical experts, as well as our Explorers of Light professional photographers.”

Initial course offerings range from $ 19.99-$ 59.99. To learn more about Canon Online Learning please visit: http://usa.canon.com/onlinelearning or email learning@cusa.canon.com.

Articles: Digital Photography Review (dpreview.com)

 
Comments Off on Canon USA launches new online photography courses

Posted in Uncategorized


Everything you Always Wanted to know about a Career in Photography but were Afraid to Ask

08 Jun

Before I get into this article, I want to set the stage by saying that the objective here is not to diminish or make light of the concerns and questions that novice photographers have. In fact, at some point in our careers, we have all asked similar questions – sometimes out loud, and sometimes just in the solitude of our own minds. There is no wrong or silly question, and there are no right or wrong answers. These are in no particular order, and the views expressed here are solely based on my own experiences.

Memorable Jaunts DPS Article What you want to know - Beach sunset photos

One of my favorite images to date happened by pure accident – I saw the image in my mind even before I took a single frame.

Where can I learn about everything related to photography for FREE?

We are both lucky and unlucky to live in the era of the Internet. Any google search, on average, yields thousands of pages, articles, and YouTube videos. If you have a burning question about anything and everything, the easiest way to learn is via the Internet.

Sites like our own Digital Photography School are a great resource for almost any topic related to photography, from a beginner to an experienced photographer. Other sites like Creative Live offer many classes on various aspects of photography, as well as other creative genres. While most sites provide a great overview of a particular topic, any in-depth research requires time and money. There are number of virtual, as well as live workshops, all over the world covering all aspects of photography. A few that come to mind are The Design School and Clickinmoms (I have used both services and am very happy with the level of instruction provided there – this is just my personal experience).

You could also check out our dPS ebooks and online courses.

Memorable Jaunts DPS Article What you want to know - Chicago Wedding Photos

I learn a lot online, in the comfort of my own home, but every once in while, I like to take a live workshop – not just to update my portfolio, but also to learn from and meet others in the industry!

How do I shoot in manual mode?

Shooting in manual mode is one of the most intimidating things that most amateur photographers face. If you have a DSLR camera that has a manual mode, it is really not that hard once you get the hang of it. The best thing you can do in learning to shoot in manual, is to understand the exposure triangle and how the three key components of photography – shutter speed, ISO and aperture work – independently and with each other. Here is a good article that digs deeper into photographing in manual mode. Remember this too take time and practice. There is another interesting article here in the Digital Photography School archives that explains all three shooting modes and is worth a read.

Memorable Jaunts DPS Article What you want to know - Understanding backlight

Mastering manual mode is important, especially for images like this – backlit golden hour images…this is SOOC (straight out of the camera).

What lens will give me a blurry background?

If I had a penny for the number of times that I get asked this question from other photographers, as well as my clients who are looking to upgrade their DSLR cameras, I would have an overflowing piggy bank! Blurry backgrounds, or bokeh as it is know in the photography space, is actually a function of aperture (i.e. f-stop), focal length, and distance of the subject from the background. Check out How To Achieve Nice Bokeh [In Plain English] from the dPS archives that addresses this issue specifically.

Memorable Jaunts DPS Article What you want to know - Lilacs in the rain-1

A wide aperture on 50mm lens gives a shallow depth of field where most of the background is blurry.

How much money do I need to spend to get started with a photography business?

There are again any different ways to answer this question. You can essentially spend as much, or as little as you want, to get started. At a bare minimum you will need a good camera system (good is a very relative term here, there are several prosumer cameras on the market today, at various price levels). In many places in the world, particularly in the US, there are several rental companies that offer various cameras and lenses for rent. Borrow Lens, Lensrental and LensProToGo are a few that come to mind. You can also check with your local camera shop to see if they offer rental services.

You do not need the latest and greatest camera system to be a professional photographer. While gear is definitely a plus, skill and the ability to work with what you have to get the results you need are far more important, especially when you are just starting out. Once you develop your own shooting style as well as what you want to focus on, you can slowly build up your gear by adding equipment based on your current needs.

How can I make money from my photography, and do it fast?

401(K) 2012

By 401(K) 2012

Sorry to burst your bubble, but the short answer here is that you cannot make money in anything fast. Everything takes time, practice, and patience. Just like any other career, the more time and effort you invest in your photography, the more experience you will gain. With experience comes confidence and recognition. So if your end goal is to be a internationally recognized photographer, treat it like a career and a business and invest in yourself, your education, and your experience. Don’t be afraid to roll up your sleeves and do the hard work – and in time, you will reap the benefits.

How much should I charge for my photography?

This is again something that is very subjective. What you charge for your services depends on many factors like your skill level, the value of photography in the area that you live in, and the buying capacity of the clients that you are targeting. Another thing to understand is the monetary value of your time. Remember your time is not just the amount of time you spend photographing the client – also take into account any travel to and from the location, editing time, and backend work like backing up photos, uploading galleries, and other administrative tasks. Once you have a handle on all these factors as it relates to your situation, charge an amount that makes it worth your while to photograph your clients. If you are looking to earn a living through your photography, then treat it like a business and not just a hobby. Read: 7 Things That Keep You From Charging What You’re Worth (and how to get over them).

What kind of photography should I focus on?

The easiest way to answer this question is to ask yourself what you enjoy photographing. Write down all the genres of photography that interest you, and try them all out if possible. Ask family and friends to model for you, if you are interested in portraits. Photograph different locations at different times of day if you are interested in landscape photography. Experiment with different types of food and styling if you are interested in food photography. Once you have a reasonable amount of experience in these categories, pick one or two to focus on, and give it your best. Don’t be afraid to experiment once in awhile in other genres, just to flex your creative muscles.

Memorable Jaunts DPS Article What you want to know - Bridal Portraits

I am a wedding and lifestyle photographer – that is what I enjoy doing the most. But mixed in my portfolio will be a bit of travel and editorial images that help me flex my creative muscles.

How can I get clients?

This is another big one that I get asked a lot, and I wish there was an easy answer. In fact, this is something that even I still struggle with, six years into my business. Getting new clients, and keeping a steady stream of clients is hard work. You have to constantly market yourself and your services at every opportunity you get. When you meet new people, don’t be afraid to say what you do. It took me a long time to introduce myself as a professional photographer, but once I said it often enough, I realized that I got more confident in not only my photography skills, but also in my business skills. Network and connect with your competitors, as well as other businesses in your area. Do a trade for images if appropriate, and remember not everyone you meet will be interested in getting pictures taken, and that is totally okay.

Memorable Jaunts DPS Article What you want to know - Lifestyle Portraits

A casual conversation at a networking meeting led to an epic family photoshoot and I gained a good friend too.

How can I build a portfolio of my work?

The length of time you invest in yourself and your photography skills is directly proportional to how long you will take to build your portfolio of work. If you constantly focus on learning and improving yourself, the more confident you will become, and the more opportunities you will find to create work that you are proud of. I have a few general rules that I follow in my photography journey

  • Photograph something every week if not every day – the objective here is to learn new techniques and perfect things I already know with respect to my gear.
  • 10:1 ratio – for every 10 minutes I shoot, I want to produce at least one image that I am proud of.
  • Spend time on personal projects – my mantra here is create for the sake of creation.

For me, this is an easy way to constantly update my portfolio with work that I am proud of, and which also represents my creative style.

Memorable Jaunts DPS Article What you want to know - Wedding Styled Shoot

Creating for the sake of creation is a great way to update your portfolio as well as connect with other vendors and creatives in your space.

This is just a small set of questions that I found helpful when I was starting off on my career in photography. If you have others that have helped you navigate the photography waters, feel free to list them in the comments so others can benefit as well.

If you have different questions that you’ve been wanting to ask, this is the place to do it. Let’s see if we can’t get them answered for you as well.


Editor’s Note: This is one of a series of articles this week that are Open for Discussion. We want to get the conversation going, hear your voice and opinions, and talk about some possibly controversial topics in photography.

Give us your thoughts below on the article above and watch for more discussion topics.

See all the recent discussion topics here:

  • 7 Commonly Accepted Photography Beliefs Debunked
  • Is HDR dead? Some dPS Writer’s Thoughts on this Controversial Topic
  • How to Find your Personal Photographic Style
  • Why You May be Failing to Reach Your Potential as a Photographer
  • To Process or Not To Process? Let’s Discuss
  • How much do you process your images? – a dPS POLL
  • Does the Camera Matter? SLR versus Mirrorless versus Smartphone
  • Natural Light Versus Artificial Light: Which is Better?
  • How Limitations Can Help You Grow as a Photographer
  • Brand Name Versus Third-Party Photography Gear: Which is better?

googletag.cmd.push(function() {
tablet_slots.push( googletag.defineSlot( “/1005424/_dPSv4_tab-all-article-bottom_(300×250)”, [300, 250], “pb-ad-78623” ).addService( googletag.pubads() ) ); } );

googletag.cmd.push(function() {
mobile_slots.push( googletag.defineSlot( “/1005424/_dPSv4_mob-all-article-bottom_(300×250)”, [300, 250], “pb-ad-78158” ).addService( googletag.pubads() ) ); } );

The post Everything you Always Wanted to know about a Career in Photography but were Afraid to Ask by Karthika Gupta appeared first on Digital Photography School.


Digital Photography School

 
Comments Off on Everything you Always Wanted to know about a Career in Photography but were Afraid to Ask

Posted in Photography


Brand Name Versus Third-Party Photography Gear: Which is better?

07 Jun

Not long ago, there were two types of camera accessories to buy: brand items designed by known manufacturers such as Canon and Nikon, OR third-party items of questionable quality that you’d likely buy only if you were on a tight budget. Today, this situation has changed, with third-party manufacturers such as Sigma and Tamron stepping up their game and producing alternatives that even serious professionals have begun using.

Still, the question remains: does the brand name truly matter when it comes to camera accessories?

Let’s explore some of the pros and cons of each side. Keep in mind that this is a highly debatable topic, and this is just a short list of general pros and cons for using brand name and third-party items. If you have any other points to add, please mention them in the comments below.

third party camera lenses

Why brand names matter

Brand name items are almost always going to be more expensive than third-party ones, but as most photographers say, “you get what you pay for.” Some reasons for the premium pricing on brand name items include:

Better build quality and dependability

This can be extremely important if you belong to any professional organizations such as Canon or Nikon Pro Services, as cleaning and repair of brand name gear is generally included in your membership. While most third-party manufacturers have begun adding their own repair services, they’re not known to be as fast and consistent as name brands, and guaranteed compatibility with your brand name camera of choice.

third party camera lenses

Guaranteed compatibility

Third-party vendors thrive on the ability to produce accessories and items that are compatible with many major brand name cameras. If you buy say a Sigma 35mm f/1.4 lens, there will be both a Nikon and Canon mount option. This means you have to be ultra diligent to make sure a third-party item will work with your camera model. However, if you buy a 35mm f/1.4 lens from Nikon (for example), you know for sure that lens will work your Nikon camera.

Respect from other photographers

When you shoot with a brand name accessory, you’re more likely to get nods of respect from other photographers who recognize the value of that authentic, name brand lens (the coveted red ringed lenses from Canon and gold ring on Nikon lenses). This is becoming more of a debatable point lately with the rise of high-quality third-party gear options, but there’s still something to be said about acknowledging the real deal over a third-party brand.

Why third-party brands are coming up

Unique innovations

third party camera lenses

As mentioned earlier, the scene for third-party brands has shifted to the point where Sigma and Tamron are no longer necessarily viewed as compromises, just for the budget-minded photographer. Instead, these brands are focusing not only on improving old designs perfected by established name-brands, but they’re innovating alternatives that even Canon and Nikon haven’t come up with. Consider the Sigma 120-300 f/2.8, which is already in its third incarnation, or the Sigma 18-35mm f/1.8 lens, the first zoom lens for DSLRs that holds a consistent f/1.8 aperture throughout its entire zoom range. These are lenses with features that even Canon and Nikon have yet to offer. Quality and consistency of these Sigma lenses might be questionable depending on your photography standards, but the fact that a third-party brand is innovating and selling unique lenses speaks to how third-party brands are shifting in the overall industry. (Read this to see why one dPS writer uses the Sigma 150-600mm for wildlife photography.)

The price is right

Every photographer knows that camera gear isn’t cheap, and while brand name items may be ideal, sometimes they just aren’t realistic price points for what is affordable. This is where third-party items can help beginners, or photographers on a budget, can get their hands on some quality equipment. If the gear is kept in good shape, resale value should still be pretty decent, if and when they decide to upgrade to a brand name alternative down the road.

third party camera lenses

One item you probably shouldn’t buy third-party

When it comes to third-party accessories, there’s one in particular that you may want to make sure is brand name authentic: your camera batteries. Personally, I’ve had mixed experiences using third-party batteries on both my DSLR and mirrorless cameras. Most of the time they work, but every once and a while, there’s a battery that just won’t hold a charge, or fails for some mysterious reason. That battery is always from a third-party brand. A simple way to work around this would be to stock your camera battery arsenal with some brand name batteries, and some third-party ones to make sure you’re covered. There’s nothing worse than having a battery fail when you need it the most.

Over to you

What has been your experience using brand names and third-party brands? Are you partial to one over the other? Do you go for brand name camera bodies and lenses, and opt for third-party accessories like filters, tripods, and batteries?

What has your experience been, let us know in the comments below.


Editor’s Note: This is one of a series of articles this week that are Open for Discussion. We want to get the conversation going, hear your voice and opinions, and talk about some possibly controversial topics in photography.

Give us your thoughts below on the article above and watch for more discussion topics.

See all the recent discussion topics here:

  • 7 Commonly Accepted Photography Beliefs Debunked
  • Is HDR dead? Some dPS Writer’s Thoughts on this Controversial Topic
  • How to Find your Personal Photographic Style
  • Why You May be Failing to Reach Your Potential as a Photographer
  • To Process or Not To Process? Let’s Discuss
  • How much do you process your images? – a dPS POLL
  • Does the Camera Matter? SLR versus Mirrorless versus Smartphone
  • Natural Light Versus Artificial Light: Which is Better?
  • How Limitations Can Help You Grow as a Photographer

googletag.cmd.push(function() {
tablet_slots.push( googletag.defineSlot( “/1005424/_dPSv4_tab-all-article-bottom_(300×250)”, [300, 250], “pb-ad-78623” ).addService( googletag.pubads() ) ); } );

googletag.cmd.push(function() {
mobile_slots.push( googletag.defineSlot( “/1005424/_dPSv4_mob-all-article-bottom_(300×250)”, [300, 250], “pb-ad-78158” ).addService( googletag.pubads() ) ); } );

The post Brand Name Versus Third-Party Photography Gear: Which is better? by Suzi Pratt appeared first on Digital Photography School.


Digital Photography School

 
Comments Off on Brand Name Versus Third-Party Photography Gear: Which is better?

Posted in Photography


Weekly Photography Challenge – Minimalism

04 Jun

It is often said in photography that less is more, but what does that mean? Going minimalist, putting less “stuff” in your images can often help to make them more powerful. The subject becomes more obvious to the viewer, the image is less cluttered and clean, and it has more visual appeal.

Serzhile

By serzhile

Khrawlings

By khrawlings

Weekly Photography Challenge – Minimalism

This week it’s your challenge to photograph less!

Find a subject that you can photograph simply. Make it as clean as possible so focus is on the subject and nothing else. If you have more than one thing in your photo it’s too many – get closer, or find another subject and practice shooting with minimalism.

Andrea Donato Alemanno

By Andrea Donato Alemanno

Kevin Dobo-Hoffman

By Kevin Dobo-Hoffman

Neil Tackaberry

By Neil Tackaberry

Here are some dPS articles to give you ideas:

  • Minimalism: Using Negative Space In Your Photographs
  • Minimalist Photography ~ 4 Tips To Keep It Simple With A Maximum Impact
  • Stop the Rush and Return to Simplicity
  • Minimalism in Photography
  • Another Great Example of Using Negative Space

Share your images below:

Simply upload your shot into the comment field (look for the little camera icon in the Disqus comments section) and they’ll get embedded for us all to see or if you’d prefer upload them to your favourite photo sharing site and leave the link to them. Show me your best images in this week’s challenge. Sometimes it takes a while for an image to appear so be patient and try not to post the same image twice.

googletag.cmd.push(function() {
tablet_slots.push( googletag.defineSlot( “/1005424/_dPSv4_tab-all-article-bottom_(300×250)”, [300, 250], “pb-ad-78623” ).addService( googletag.pubads() ) ); } );

googletag.cmd.push(function() {
mobile_slots.push( googletag.defineSlot( “/1005424/_dPSv4_mob-all-article-bottom_(300×250)”, [300, 250], “pb-ad-78158” ).addService( googletag.pubads() ) ); } );

The post Weekly Photography Challenge – Minimalism by Darlene Hildebrandt appeared first on Digital Photography School.


Digital Photography School

 
Comments Off on Weekly Photography Challenge – Minimalism

Posted in Photography


7 Commonly Accepted Photography Beliefs Debunked

02 Jun

Midtown, NYC

Over the last handful of years, working with photographers of all types, I have come to learn that there are many commonly accepted thoughts about photography that just aren’t true.

Here is my attempt to dispel some of the most common misunderstandings that many photographers have, and to explain why they are a bit misguided.

1. You need to use as low an ISO as possible

Noodletown, Chinatown

Fuji X100 at ISO 3200

Back in the early and mid-2000s, mainstream digital cameras were in their infancy, and one of the worst aspects about them was their ability to work well at high ISOs. The digital noise, above ISO 400, in so many of those cameras was terrible. This was the heyday of noise reduction software such as Noise Ninja, and because of all of this, it was rightfully taught that using the lowest ISO possible was always better.

In the last seven years, I would argue that the greatest improvement that digital cameras have made has been in their ISO capability. You can now shoot with ISOs of 1600, 3200, 6400, and even beyond, with great quality. Even significant noise in many digital cameras has an exquisite quality to it.

Unfortunately, the low-ISO stigma has continued. On a tripod, for landscape photography, or studio photography, a low ISO is usually better. The rest of the time, raise it up. This will allow you to use more ideal shutter and aperture settings, and you will notice that the technical qualities of your images will actually turn out better.

You think all of those gorgeous wedding photographs were done at ISO 200? So many of them were taken at 3200. I will walk around at night shooting handheld with ISOs of 3200 and 6400 on my small Fuji X100S, and the quality of the photographs is incredible.

2. You need a tripod

Cobblestone, SoHo, NYC.

For night and dusk landscape photography, a tripod is very important. But you usually don’t need that tripod during the day, and you can even shoot at dusk or night without one, depending on the specific situation. This tip goes hand in hand with point number one, because the improved high ISO capability in cameras has allowed us the ability to shoot handheld, when we otherwise would have wanted to use a tripod.

How you plan to display the work should be a big factor in your tripod use. Are these travel photographs that you will put in a book or not print larger than 12×18? Consider putting away the tripod and saving your back from the added weight. You will have more energy, and will take even more good photographs. Is it a 40×60 print of a foreground, middleground, background landscape taken at dusk? A tripod will still be necessary for that.

3. A shallow depth of field makes a photo better

Canal Street, NYC.

One of the most exciting times for any photographer is when they jump from that f/3.5-5.6 lens to their first f/2.8 (or below) lens. The ability to create portraits and images with beautiful bokeh for the first time is a great feeling.

However, not every image needs to have bokeh. There is a time and a place for f/2.8 and a time for f/16. Keeping your camera on f/2.8 all of the time is typically not a great practice. There are images where a large depth of field is vital. It’s one thing to have a strong subject, sharp and separated from the background. Those images can be beautiful, but there are times when the background and surrounding elements can be just as important as the main subject, and they will need to be sharp.

Don’t get tunnel vision from shooting at f/2.8 all of the time. After you locate your main subject, see if the surroundings can add to the photo. If they don’t, then you’re free to bokeh them away.

4. Aperture Priority is always the best mode

Club, NYC.

A subtle flash with a 1/2 second shutter to achieve motion blur and stronger ambient light.

When I teach, I’d estimate that 75 percent of photographers pop their camera on Aperture Priority and that is it. This percentage does not include the ones that shoot in Auto.

Aperture Priority has its time and place, but there are many situations where Shutter or Manual can be ideal. I prefer Shutter Priority for any times that subjects are in motion, such as sports, kids running around, images where you want motion blur or motion in water, or street photography. I will even use shutter priority sometimes in event photography with up to a half second shutter, and mixed with flash, so I can add both a sharp aspect and an element of motion.

Manual mode is ideal for studio photography, on a tripod, or in any situation where the lighting is completely consistent. This allows you to dial in the exact exposure, and not leave anything up to chance or the camera’s light meter.

In addition, by shooting in Aperture Priority all of the time, I have noticed that photographers do not develop the ability to pay attention to the shutter speed as much as they should. Because of this, while their exposure will always look good, many images will be taken with too slow of a shutter speed leading to slightly blurry photographs. This will not be noticeable on the back of the camera however, and the image will appear sharp until loaded onto the computer.

5. My photograph is bad because no one likes it on Instagram

The edge, SoHo, NYC.

I love Instagram, but it has had the unfortunate effect of homogenizing photography. As we share photographs and receive likes, we learn to see our work in terms of what other people respond to best. This is a trap. If we create photographs for the purpose of appealing to the masses, then every photographer will end up shooting in the same way. This is why trends like overly designed images or over-saturated colors, which grab attention very well on screens, become the norm.

Being a good photographer is about being a little different. You want to always pay attention to how people relate to you work, and what they like and dislike, but you also want to take that with a grain of salt. Always try to remember how much you liked the photograph before you showed it to anyone else, and keep that feeling. Unique and interesting photographs are ultimately what you want to create, and you don’t want to let Instagram discourage you from taking them.

6. Photographs always tell the truth

I love candid photography because it shows a real moment. However, no matter how true they look, photographs can easily distort reality. The better they distort reality, the more people will believe it to be true.

A photographer’s biases can shine through in their photographs. A person can be captured with an expression that is completely the opposite of the norm for them, and you would have no idea. In addition, photographers are constantly playing a game of what to include and what to exclude. You do not know what is happening around the camera, and it is often significantly different from what you might imagine.

Photographs can lie, they can hide the truth, or they can be ambiguous. This is very important to remember. It will both help you understand the nature of what you are photographing, but it will also allow you to play with this idea, to create more interesting work.

7. A photograph has to be technically perfect to be good

Youth, SoHo, NYC.

One of the noticeable aspects of many old photographs is the lack of technical quality, when compared to today’s standards. This was usually due to the early camera technology that was used. We just have a lot more available to us these days.

What stands out in many of these prints however, is that despite their technical deficiencies, the images still look beautiful. They are still interesting. They are still fantastic. Think Cartier-Bresson, Doissneau, Stieglitz.

Light, sharpness, composition, and image quality are very important to master, but just know that they do not always have to be perfect to create a great photograph. Some images have glaring deficiencies and yet they’re wonderful. Figure out how to take an interesting image and don’t discard every photo that isn’t sharp enough. Sometimes an underexposed or overexposed photograph will look great. Often an unorthodox composition will be just what was needed. Pixel peeping is important to train your eye, but you can sometimes do too much of it.


Editor’s Note: This is the first in a series of articles this week that are Open for Discussion. We want to get the conversation going, hear your voice and opinions, and talk about some possibly controversial topics in photography.

Let’s get it started here – do you agree or disagree with the points in the article above? Do you have any others to add? Give us your thoughts below, and watch for more discussion topics each day this week.

googletag.cmd.push(function() {
tablet_slots.push( googletag.defineSlot( “/1005424/_dPSv4_tab-all-article-bottom_(300×250)”, [300, 250], “pb-ad-78623” ).addService( googletag.pubads() ) ); } );

googletag.cmd.push(function() {
mobile_slots.push( googletag.defineSlot( “/1005424/_dPSv4_mob-all-article-bottom_(300×250)”, [300, 250], “pb-ad-78158” ).addService( googletag.pubads() ) ); } );

The post 7 Commonly Accepted Photography Beliefs Debunked by James Maher appeared first on Digital Photography School.


Digital Photography School

 
Comments Off on 7 Commonly Accepted Photography Beliefs Debunked

Posted in Photography