RSS
 

Posts Tagged ‘Photography’

7 Tips for Doing Crystal Ball Refraction Photography

15 Nov

You’ve have heard of reflections in photography, but have you have tried refraction? When used well, refraction creates compelling images that will leave your audience both wowed and curious. I’ve been approached many times by strangers who are curious about how I photograph with a glass ball. Once you’ve mastered this type of photograph you’ll likely get the same audience. Here are some tips to help you do crystal ball refraction photography.

Doing Crystal Ball Refraction Photography - house inside glass ball

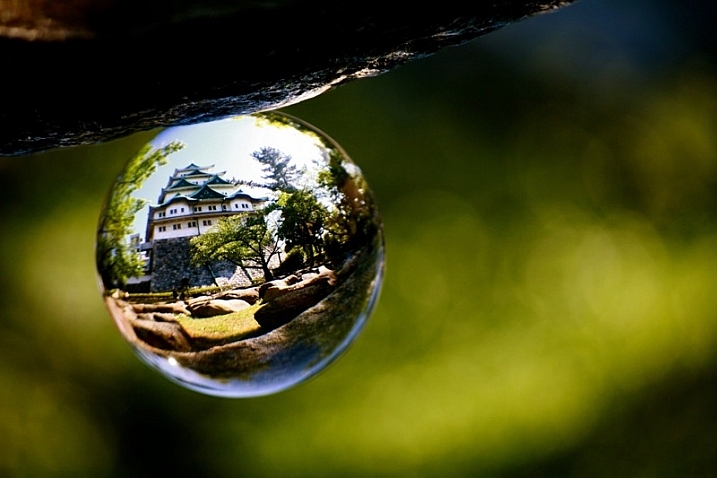
The subject shows prominently in the ball, and around the ball is bokeh.

So what is refraction?

Refraction happens when light passes through an object of denser mass, such as water or glass. When this occurs, light is bent, and there is a distortion. When refraction occurs with a transparent spherical object something magical happens. An inverted image of the scene behind the ball is seen. The lens elements in your camera actually work this way as well. You can use a glass ball as an extra lens element, one you can move around your scene.

Doing Crystal Ball Refraction Photography

How to do refraction photography

Now you know what refraction is, it’s time to learn how to apply it to your photography. If you follow the guide below you won’t go far wrong with this type of photography.

#1 – Dealing with the upside down image

There are instances where it works to have an upside down image in the background or inside the ball. If you want to avoid this, the best way to deal with an upside down background is to blur it out using bokeh. An alternative to blurring out the background is to use reflection since the reflected image will be the right way up inside the ball.

Doing Crystal Ball Refraction Photography - The image inside the ball will be upside down.

The image inside the ball will be upside down.

#2 – Get above your subject

You should get the ball off the ground so it’s level with the subject you’re photographing. A centered subject in the ball will have less distortion and more impact in the frame. There are always exceptions, of course, as leaf beds or puddles work well when the ball is placed right in them.

#3 – Fill the glass ball with your subject

You have to get close to your subject, or it (they) will appear very small inside the ball. The best advice I can give here is to see if your scene would fill a wide angle lens. If so you’re gold.

Doing Crystal Ball Refraction Photography

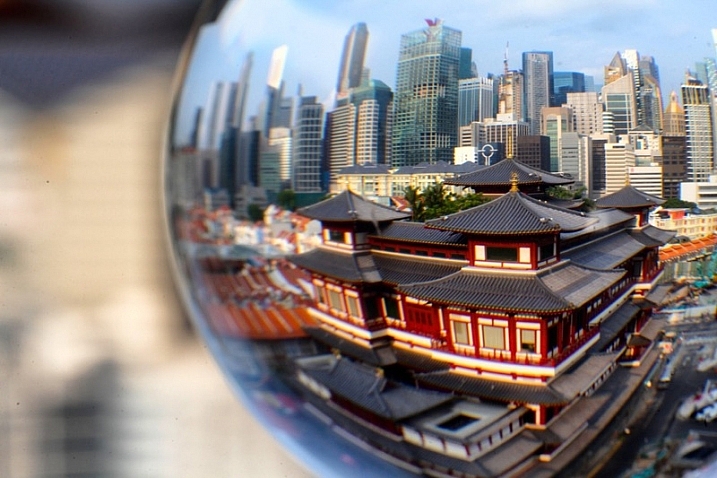
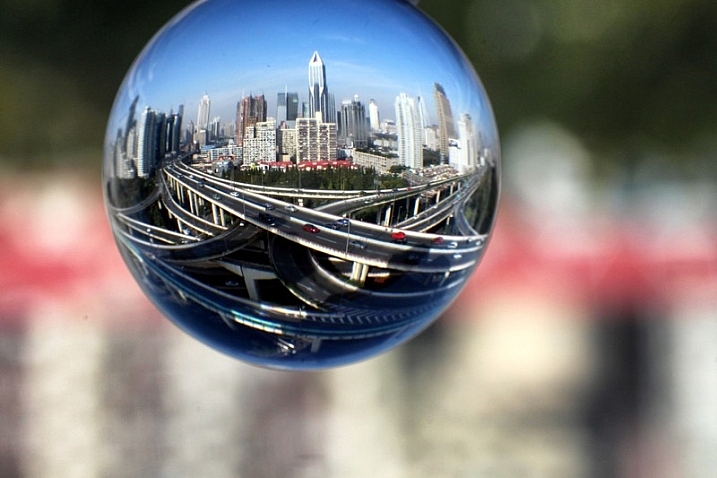
In this photo, the cityscape is captured inside the ball, and a closer framing was employed.

#4 – Choose the correct lens

The best option here is to use a macro lens or a telephoto lens with macro capability. The macro lens will allow you to get close to the ball, making it easier to create bokeh around the ball. Using a wider angle lens can also work if your scene allows it.

#5 – Choose the correct aperture

You need to get the correct aperture for your scene. An aperture that’s too small won’t blur out the background. One that’s too large will make it hard to get a sharp image inside the ball. I would choose an aperture of around f/4, it depends on the scene you are photographing, though.

Doing Crystal Ball Refraction Photography

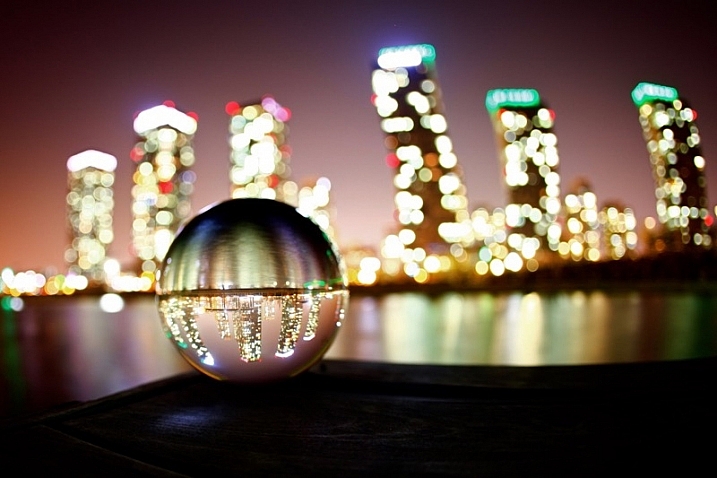
One of the best ways of dealing with the upside down image is to use reflection in the photo.

#6 – Find a safe place to position the ball

This is very important, especially if you are photographing from a high vantage point. The ball needs to sit on a flat surface, finding a crevice to sit the ball on is better. Once you have placed the ball ensure it isn’t going to fall and keep your hands near it during this time.

If there is no place to rest the ball you can ask a friend if they’ll hold the ball for you. You need to be especially careful on a windy day, a strong gust of wind can move the ball if it’s not in a secure position.

In this photo of the Taj Mahal there is reflection in the background, and this reflected image is in fact upside down.

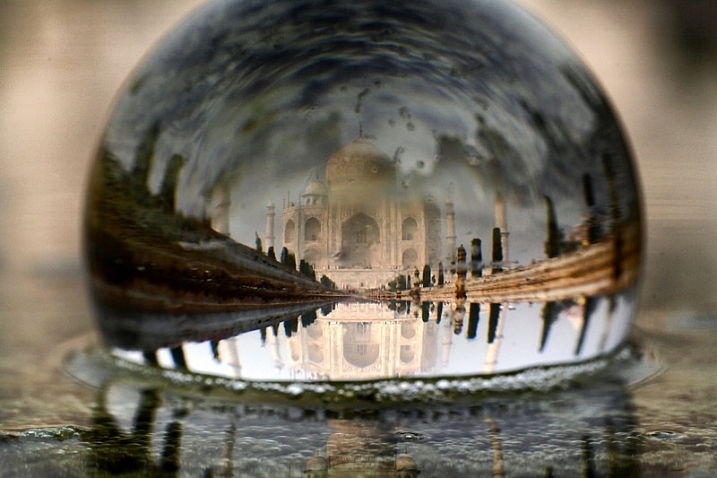
In this photo of the Taj Mahal, there is a reflection in the background, and this reflected image is in fact upside down.

#7 – Lighting the subject in front of the ball

You should have a well-lit subject in any kind of photo, but it’s even more important with refraction photographs. A strongly lit subject will shine through the ball with less reflection appearing on the ball. Look to photograph when the sun is behind you or during blue hour shooting towards lit buildings.

Refraction photography versus a standard landscape

A lot of locations that suit refraction photography with a glass ball will also be good for regular landscapes. The question is why photograph a refraction photo when you could take a wide-angle shot of the same scene? Let’s take a look at some of the pros and cons of crystal ball refraction photography.

Pros of refraction

  • A glass ball is cheaper than a lens and allows you to create a fish-eye like effect.
  • You can move the ball to different positions in your scene.
  • Using a large aperture in conjunction with the ball to create bokeh, is great for minimalism.
  • Scenes created with a crystal ball often have a more artistic feel.
  • The ball creates a natural frame for your photo.
Images that work well as a wide angle photo also work well inside a crystal ball.

Scenes that are well suited for a wide-angle photo also often work well inside a crystal ball.

Cons of refraction

  • The larger glass balls are heavy to carry, in an already heavy camera bag.
  • You need a macro lens, something a landscape photographer may not normally carry.
  • Distortion on the edge of the ball.
  • It’s difficult to get a sharp image inside the ball.
  • The image in the ball is upside down.
This is a wide angle photo of a famous road junction in Shanghai.

This is a wide angle photo of a famous road junction in Shanghai.

The choice of taking a glass ball is yours to make, I highly recommend experimenting with it, though.  The pros really outweigh the cons, and following the tips in this article will help. You may also find weight an issue, so I recommend scouting a location before shooting with the ball. Then return for a second visit with just the equipment you need to take the photo, this will reduce the weight somewhat.

Experiment with the ball

The first thing you’ll need of course is a crystal ball, you can buy them easily through amazon for 27$ . While you wait you can try filling a wine glass with water, you’ll get the refraction effect this way too.

Now you’re ready to get started, so head to a local landmark and start experimenting. The list of subjects is really endless; you can start with a lone tree, a church, or a cityscape scene. If you have any photos that show refraction please add them to the comments below, it would be great to see them.

Natural landscape look great inside the ball. This is a volcanic lake found in Indonesia.

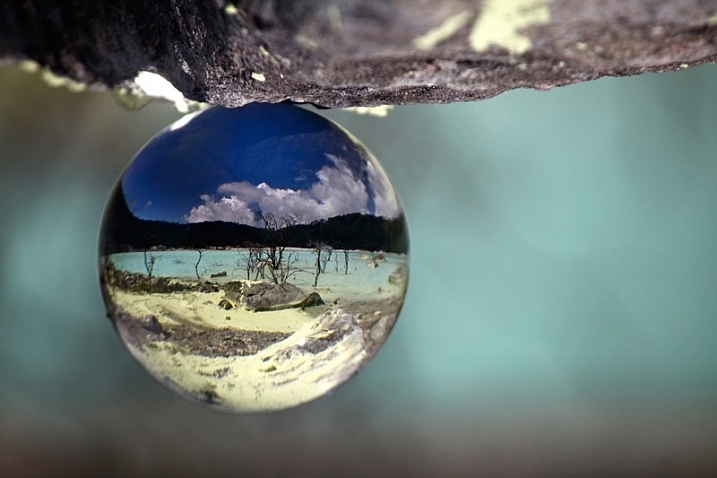
Natural landscapes look great inside the ball. This is a volcanic lake found in Indonesia.

googletag.cmd.push(function() {
tablet_slots.push( googletag.defineSlot( “/1005424/_dPSv4_tab-all-article-bottom_(300×250)”, [300, 250], “pb-ad-78623” ).addService( googletag.pubads() ) ); } );

googletag.cmd.push(function() {
mobile_slots.push( googletag.defineSlot( “/1005424/_dPSv4_mob-all-article-bottom_(300×250)”, [300, 250], “pb-ad-78158” ).addService( googletag.pubads() ) ); } );

The post 7 Tips for Doing Crystal Ball Refraction Photography by Simon Bond appeared first on Digital Photography School.


Digital Photography School

 
Comments Off on 7 Tips for Doing Crystal Ball Refraction Photography

Posted in Photography


Great heights: Tim Kemple’s aerial mountain photography

13 Nov

$ (document).ready(function() { SampleGalleryV2({“containerId”:”embeddedSampleGallery_8811300677″,”galleryId”:”8811300677″,”isEmbeddedWidget”:true,”standalone”:false,”selectedImageIndex”:0,”startInCommentsView”:false,”isMobile”:false}) });

Adventure photographer Tim Kemple has made a project of photographing some of the world’s tallest peaks from high-altitude planes and helicopters. ‘I’ve always been fascinated by the mountains. Call it a genuine obsession honestly,’ he tells Resource Travel. 

Given the potential risks – and great expense – to fly near these behemoths, Kemple has been working on his passion project slowly, crossing locations off his list one by one. When he’s done, he hopes to have captured each of the seven summits and a number of his favorites photographed. We’d say he’s off to an excellent start.

Read the full interview and see more of Kemple’s photos at Resource Travel

Articles: Digital Photography Review (dpreview.com)

 
Comments Off on Great heights: Tim Kemple’s aerial mountain photography

Posted in Uncategorized


Field Test: Wedding Photography with the Fujifilm X-T2

09 Nov

When it comes to special occasions, weddings are about as special as it gets. Special for the couple getting married, of course, but also for their families and guests. And from candid portraits to group shots, to simple details and private moments, weddings provide endless opportunities for creative photography.

For this field test, we’ve brought the Fujifilm X-T2 to Guemes Island to shoot the wedding of our friends Tim and Erin, with DPReview’s Editorial Manager and professional portrait and wedding photographer Wenmei Hill.


This is sponsored content, created in partnership with Fujifilm. What does this mean?

Articles: Digital Photography Review (dpreview.com)

 
Comments Off on Field Test: Wedding Photography with the Fujifilm X-T2

Posted in Uncategorized


Weekly Photography Challenge – Bokeh

07 Nov

Have a look at these images of bokeh to get some ideas.

bo·keh /b??k?/noun
PHOTOGRAPHY
noun: bokeh
  1. the visual quality of the out-of-focus areas of a photographic image, especially as rendered by a particular lens.
Web4camguy

By web4camguy

Weekly Photography Challenge – Bokeh

This week your challenge is to create and shoot some bokeh. If you need some help check out these articles:

  • How to Achieve Background Blur or Bokeh
  • How to Create a Delicious Blurry Bokeh Background in 4 Easy Steps
  • How to Create Bokeh In-camera and Using Photoshop
  • How to Create a Spectacular Background Using an El Bokeh Wall
  • How to Create a Unique Bokeh Portrait for Under $ 10

JD Hancock

Abdul "B.as.it" IM

By Abdul “B.as.it” IM

Chris Jones

By Chris Jones

Share your images below:

Simply upload your shot into the comment field (look for the little camera icon in the Disqus comments section) and they’ll get embedded for us all to see or if you’d prefer, upload them to your favorite photo-sharing site and leave the link to them. Show me your best images in this week’s challenge. Sometimes it takes a while for an image to appear so be patient and try not to post the same image twice.

Share in the dPS Facebook Group

You can also share your images on the dPS Facebook group as the challenge is posted there each week as well.

googletag.cmd.push(function() {
tablet_slots.push( googletag.defineSlot( “/1005424/_dPSv4_tab-all-article-bottom_(300×250)”, [300, 250], “pb-ad-78623” ).addService( googletag.pubads() ) ); } );

googletag.cmd.push(function() {
mobile_slots.push( googletag.defineSlot( “/1005424/_dPSv4_mob-all-article-bottom_(300×250)”, [300, 250], “pb-ad-78158” ).addService( googletag.pubads() ) ); } );

The post Weekly Photography Challenge – Bokeh by Darlene Hildebrandt appeared first on Digital Photography School.


Digital Photography School

 
Comments Off on Weekly Photography Challenge – Bokeh

Posted in Photography


How to Find Your Photography Niche: You Don’t Have To Master It All

05 Nov

When it comes to photography, there can sometimes be this strange assumption that we are (or should be) experts in all types of photography. Photography is essentially painting with light, so there’s no reason why we shouldn’t be able to do newborn photography, astrophotography, weddings, family portraits, landscape photography, and food photography, right? Light is light, whether it’s on a newborn or a spider, right? The simple answer is yes, and no. But, there’s good news, you don’t have to master it all. Let’s talk about how to find your photography niche.

find-your-photography-niche

Different strokes for different folks

Much like a chef benefits from learning about cooking as a whole, photographers benefit from learning the fundamentals that apply across all types of photography: aperture, shutter speed, ISO, finding light, capturing movement and emotion, and focus. However, much like chefs often break off into different specialties, photographers also tend to break off into different niches. Some photographers find that they love newborns, but hate weddings (raises hand). Others love landscapes, but don’t enjoy photographing humans ever. Some photographers love to work in a studio, while others prefer to work only outdoors with natural light. Finally, some photographers prefer to shoot in digital, while others prefer film.

niche-photography

Do what you enjoy

Whichever type of photography sparks your passion and fills you with joy? Do that. Whether that’s black and white portraits, lifestyle newborn images, macro photography of spiders, or architecture – do what you love.

Then when it comes to post-processing, if there’s a method that transforms your image the way that you’ve always pictured it in your head, do that. If it’s a hipster vintage wash, do it. If it’s a quick curves adjustment and nothing else, do that too. Heck, if it’s black and white with selective coloring that makes you happy when it comes to post-processing, by all means, do that.

Do it even if it isn’t cool, and no one else is doing it. Whether you consider photography to be a craft or an art, it is most certainly an opportunity to have a creative voice. And as corny as it may sound, your authentic voice, whether expressed in cooking or in photography, is important.

find-your-niche-photography

It’s okay not to do it all

Just in case no one has ever told you before, it’s okay not to do it all. If you specialize in food photography and someone calls you up and asks if you’ll consider accepting a wedding booking, it’s okay to say, ‘Thank you so much for thinking of me, but no.” It’s okay to love photographing families and have absolutely zero interest in doing macro photography of insects.

Whether you’re an amateur or a professional, it’s really hard sometimes to admit that a particular area of photography isn’t your preference or your strong suit. No one wants to feel incompetent. On the other hand, there’s no shame in telling someone that you are unable to accept a newborn booking because it isn’t your specialty and consequently you aren’t familiar enough with newborn posing safety to feel comfortable with accepting that job.

Say it with me – I do not have to master it all.

photography-specialty

Finding your niche

If you’re reading this article and thinking, “Okay great, so how do I find my niche?’ The answer is simply to try everything you can. Trying different types of photography is very different than feeling compelled to master every type of photography. Giving different genres of photography a try in low stakes (often unpaid) environments allows you to experiment, and to discover what it is that you really love.

It also requires possibly humbling yourself a bit and allowing yourself to be taught by someone else. Even if you’re the best wedding photographer in your state or area, you may not know the first thing about being a wildlife photographer. So if you really want to learn, you have to be ready and willing to be taught.

photography-you-love

Benefits of trying things

My personal niche in photography is newborns and families. It’s what really makes me excited, and what I really enjoy most. However, every time that I’ve stepped outside that comfort zone, with the goal of learning about another genre of photography, it’s been worth it.

I’ve not been a master of every genre that I’ve tried, nor have I enjoyed them all, but I’ve learned something valuable in every case. When I buckled down and focused on landscape photography, it gave me an opportunity to review techniques of composition, metering, and shooting with a relatively small aperture in ways that I don’t typically use on a daily basis when it comes to people photography.

finding-photography-passion

When I made an attempt to learn about astrophotography (a genre of photography that had always greatly intimidated me) I had the opportunity to learn more about long exposures, and the technique of shooting with a wide open aperture in a different application than portraits. Are my astrophotography images perfect? Absolutely not! I’m not an astrophotography expert, and probably never will be. I have two kids, so staying up all night to photograph the stars is a special kind of sleep deprivation torture that I have no interest in repeating with any frequency.

Yet, there’s also a certain importance in taking something that you have no idea how to do and learning the steps necessary to make it happen. When all the pieces finally fall into place, and you have an image that sort of resembles the gorgeous astrophotography images that you see in magazines, it’s a pretty amazing feeling. Like creating something out of thin air.

photography-niche

Conclusion

The more types of photography you try, the more you’ll find yourself saying both “Yes!” and “Nope, I don’t need to do that ever again.” You may also find that there are several types of photography that you enjoy, which is fine. When I suggest finding your niche, I’m not suggesting that you choose one photography genre and one post-processing style and stick to those for the rest of your life and career.

Your niche in the photography world should grow, shrink, and evolve over time. Give yourself the freedom to identify the types of photography that you really enjoy, and forget the rest of it. You do not have to master it all.

What’s your photography niche? What types of photography do you love? Are there any types of photography that you hate? Chime in below!

googletag.cmd.push(function() {
tablet_slots.push( googletag.defineSlot( “/1005424/_dPSv4_tab-all-article-bottom_(300×250)”, [300, 250], “pb-ad-78623” ).addService( googletag.pubads() ) ); } );

googletag.cmd.push(function() {
mobile_slots.push( googletag.defineSlot( “/1005424/_dPSv4_mob-all-article-bottom_(300×250)”, [300, 250], “pb-ad-78158” ).addService( googletag.pubads() ) ); } );

The post How to Find Your Photography Niche: You Don’t Have To Master It All by Meredith Clark appeared first on Digital Photography School.


Digital Photography School

 
Comments Off on How to Find Your Photography Niche: You Don’t Have To Master It All

Posted in Photography


Tips for Doing Macro Underwater Photography

04 Nov

Look at the photograph below. What an unreal, alien animal! It could be right out of one of the many upcoming Star Wars sequels. You just don’t see creatures like that in your everyday life. It’s a sea slug (to be scientifically precise: Nembrotha Kubayana) which I photographed 20 meters underwater on a reef in the Philippines. The head of the slug is only about a centimeter across, so the image is quite a close-up (macro photograph).

Nudibranch1

If it doesn’t sound easy to dive 20, 30 or more meters below the ocean’s surface to take a picture of a slug the size of your pinky – it isn’t. But with the right gear, with the proper knowledge and experience using that gear, and with skills to find those small animals you can do it too. So let’s talk about each of these points one at a time.

The Gear

Naturally, you will need an underwater camera. There are a number of great choices these days. Compact cameras have greatly improved in recent years, and you can get a pretty good deal on a camera plus the fitting underwater housing. Many camera manufacturers make acrylic housings for their own compact camera models, which tend to be a lot cheaper than third party models. To have any chance of taking good macro shots, you need a strobe or a video light as well.

underwater-macro-setup

Me with my underwater camera setup. Note the diopter (magnifying lens) attached to the front of the lens port. The strobe is relatively close to the port and aimed slightly forward. The closer the subject, the closer the strobe can be to the port. The farther away the subject is, the further the strobe has to be to avoid backscatter.

If you have a lot of money or if you are obsessed with underwater photography (like myself) you can get yourself a DSLR, and put it in an underwater housing. I have been using a Canon 5DII in a Hugyfot (machined aluminum) housing, with two Inon z-240 strobes for several years now. Camera choice is an interesting and complex issue, but I want to concentrate on the gear you need specifically for underwater macro photography.

Macro lens

Tambja

Another sea slug, from Botany Bay, Australia.

Modern macro lenses are technological miracles. If you are using a DSLR or a mirrorless camera, you can switch lenses. So you need to mount one that is capable of focusing close up, with significant magnifying power. I routinely use the Canon 100mm f/2.8 macro lens(price it on Amazon or B&H Photo), which can focus at 35 centimeters. That distance is measured from the sensor plane, hence I can place the subject only a few centimeters in front of the housing’s lens port. The sharpness this lens achieves when capturing minute animals is simply amazing. Nikon’s 105mm macro (price it on Amazon or at B&H Photo) is a legendary lens as well, and for cameras with cropped sensors (mirrorless cameras and entry to mid-level SLRs) 60mm macro lenses do a great job.

Other options

A small, but clever piece of gear I have been using with quite some success, is an extension tube. It’s simply a spacer inserted between the macro lens and the camera body. The extension tube eliminates the ability of the lens to focus to infinity (not used in macro photography anyway) and adds another 20% of magnification. The fact that no additional lens elements are introduced is a good thing for image quality.

Diopters (also called close-up filters) are also highly recommended. A diopter is simply a magnifying glass which is placed on the front of the camera’s lens. This is not ideal in terms of the optics, and distortions towards the edges are possible. With diopters, it makes sense to invest in a quality product to minimize such distortions. However, the amount of magnification achieved with a good diopter is absolutely mind-boggling. It can turn your underwater camera setup into a field microscope.

Goby2

Another goby, very well camouflaged on a soft coral.

You can get both dry diopters which are attached to the actual lens, and wet diopters which are attached to the lens port on the outside of the housing. Wet diopters exist for DSLR and compact camera underwater setups. The convenient thing about the wet ones is that you can take them off underwater, and shoot larger animals again.

Tip: Make sure you store your wet diopter in a safe place when it’s not mounted.

Request: If you see a wet diopter for a 10cm diameter macro port, with a gray plastic mount somewhere on the west coast of Cebu, please return it to me.

How to use your macro gear

I’d like to stress two things when it comes to the proper camera technique for macro underwater photography – camera settings and strobe placement.

Almost all the light for your underwater photographs will come from your artificial light source anyway, so the shutter speed is usually not important. It needs to be equal or slower than the maximum speed your camera can synchronize with the strobes. That kind of information will be in the user manual for your camera since it differs between camera models. Otherwise, a shutter speed as fast as possible is beneficial for sharp images.

Goby1

A small goby on a piece of hard coral, with the entire image in sharp focus. Canon 5DII, Canon USM 100mm f2.8 lens, at f/22.

Aperture considerations

A small aperture helps to keep the whole scene in your image sharp. Macro lenses naturally have a shallower depth of field due to the distance to subject being much smaller. So to photograph a tiny goby and all of the pretty coral it perches on, with all of it in focus, I use an aperture anywhere from f/22 to f/32 (that’s the smallest my Canon 100mm f2.8 macro can do).

There is also the option of using a wider aperture to achieve a Japanese-style effect in your images. Such a photographic style is indeed popular with Japanese underwater photographers these days. It is somewhat reminiscent of the late medieval Japanese painting style where the artists would just hint at a few twigs to depict a tree. How wide you can go depends on your lens, the distance to the subject and its orientation. The aperture of f/4.2 used in the picture below is as wide open as I can go. Whenever I can, I set my camera to approximately correct values before the dive so that I don’t have to find my way around in the menus while already underwater with a cool fish showing up in photographic range.

Stick

Only the face of this stick pipefish from Sydney in Australia is in focus. This Japanese style shot gives the image a dreamy atmosphere. Olympus TG-1, at f/4.2.

Lighting

You will need to use artificial light for most of your macro shots. Light-hungry macro lenses will not make good images with sunlight in many situations on land, and underwater, with so much sunlight absorbed by the water above you, they do even worse. The internal flash of most cameras is not strong enough and it’s in a less-than-ideal position just above the lens.

Avoid back-scatter

The external strobes you use should be mounted on some kind of adjustable or bendable arm. Keep them positioned moderately close to your lens, and a bit behind it. In underwater photography, you are always aiming to avoid back-scatter. Your strobe will light up the suspended particles in the stretch of water between your lens and the sea slug, and this will make your image look as if taken in a snow storm. There is nothing quite as annoying in underwater photography than a well composed, well lit shot, with a lot of back-scatter ruining it. You can take care of back-scatter in post-processing to some degree in some shots, but it’s a pain and better avoided, to begin with. Back-scatter is to underwater photography what blisters are to hiking.

A diver on a shipwreck in the Philippines. These are harsh conditions for underwater photography. I had my strobes turned outwards, and placed away from the camera, but not enough. The illuminated particles (the backscatter) stand out especially in front of the darker part of the wreck.

A diver on a shipwreck in the Philippines. These are harsh conditions for underwater photography. I had my strobes turned outwards, and placed away from the camera, but not enough. The illuminated particles (the back-scatter) stand out especially in front of the darker part of the wreck.

When shooting wide-angle underwater, you need to place your strobes far away from your lens and slightly outward-oriented to avoid illuminating any particles in front of the lens’s wide field of view. This minimizes the amount of light reaching the space between your lens and the subject.

Positioning your strobes

In underwater macro photography, the situation is not quite as difficult. Still, the further away you are from the subject (the distance may vary between the subject almost touching the front of the lens port to no more than 30cm) the more you need to move your strobes away from the lens. When I am really close, I try to mimic a ring-flash with my two underwater strobes. In case you haven’t seen one, a ring-flash is a circular light source which is mounted on the front of a macro lens. Such a strobe is often used in land-based macro photography. It provides very even illumination. Putting one of my underwater strobes close to each side of my camera’s lens port gives me a similar type of direct, smooth illumination.

How to find good underwater macro subjects

Photo legend Jim Richardson is quoted as saying that, “If you want to be a better photographer, stand in front of more interesting stuff.”. Underwater, that’s not quite true. You need to hover in the water in front of more interesting stuff, or at least lay in the sand in front of more interesting stuff, but that doesn’t look quite as stylish. And you should definitely not lay on corals in front of more interesting stuff because you may break them and it will evoke the rightful anger of a lot of other divers!

Hunter

A flamboyant cuttlefish hunting in the Philippines. This animal is about 5cm long.

Good buoyancy will have other advantages besides not breaking corals (thank you again for not doing that). If you are stable in the water, you will be able to position yourself in a proper position in front of the animal you’d like to shoot. You will also not stir up silt or sand from the bottom, which would then cloud the image you are about to capture and cause the aforementioned dreaded back-scatter.

Whipcoralgoby

Whip coral goby, Moalboal, Philippines.

Back-scatter happens, to the best of us, including myself (above).

In the bottom image (before) we see way too much backscatter. I did two things. First I corrected the exposure of the image, cutting off the darkest part. This eliminated some of the unsightly dots. The remaining white dots I removed with the healing brush in my image processing program. The resulting image on top is vastly improved by these two post-processing manipulations.

Don’t spook your subjects

A neutrally buoyant, controlled, and calm approach towards your photo subjects will also reduce the chance of spooking them. There is a lot to be said for good buoyancy when photographing underwater. If you are not quite there yet with your positional control while diving, try photographing less easily spooked animals like slugs and sea urchins, and save the shrimp (very nervous) or the blennies (very fast) for the future once you have improved your buoyancy.

Blenny

A blenny. Not easy to catch!

Hunting subjects

What you have to figure out next is where to find those psychedelic slugs and the fish straight out of Salvador Dali’s sketchbook. If you are on a diving vacation in some foreign tropical land, just follow your guide, and pay good attention to what he points at. The guys and gals guiding every day, year in and out, in the same location, usually know their reefs really well and are proud to show off the unusual animals on it. It also helps to have a quick chat with your dive guide beforehand and to tell him that you are out to find interesting macro subjects.

If you are diving on your own, things will move a bit slower. You will have to become that expert guide yourself. Study the reef when you are diving and study marine life books and web resources on land to figure out what to look for, where, and when. Certain animals will only be active at night, or at sunset (like the famous mandarin fish shown below). Some crabs will only live on one species of soft coral, and some shrimps will only live on the skin of certain sea cucumbers. If you don’t know where to look for them, it’ll be near impossible to find them. It’s a curious psychological effect that you will find such animals over and over again after you have spotted them once for the first time.

Mandarin

A mandarin fish! So pretty!

Nudibranch2

Sea slug laying its eggs (these slugs called nudibranchs are hermaphrodites, functioning as males and females at the same time). It was magic moments of animal behavior like these that got me addicted to macro photography underwater.

Conclusion

To become a skilled macro underwater photographer you need patience. Go for a dive, take some shots, come back, look at them, and think about them. Rinse (your camera gear, and yourself) and repeat. Take your time to inspect your work, and to reflect on what you could do differently next time. I recommend that you consider the points above during each and every iteration and the following questions:

Did I bring the right gear? Did I use it properly? Did I do a good job in finding that fascinating new sea slug?

Please put your comments and questions below, and do please share your underwater photos there too. We’d love to see them.

googletag.cmd.push(function() {
tablet_slots.push( googletag.defineSlot( “/1005424/_dPSv4_tab-all-article-bottom_(300×250)”, [300, 250], “pb-ad-78623” ).addService( googletag.pubads() ) ); } );

googletag.cmd.push(function() {
mobile_slots.push( googletag.defineSlot( “/1005424/_dPSv4_mob-all-article-bottom_(300×250)”, [300, 250], “pb-ad-78158” ).addService( googletag.pubads() ) ); } );

The post Tips for Doing Macro Underwater Photography by Dr. Klaus M. Stiefel appeared first on Digital Photography School.


Digital Photography School

 
Comments Off on Tips for Doing Macro Underwater Photography

Posted in Photography


Weekly Photography Challenge – Spooky

02 Nov

This Halloween week we looked at some spooky images by other photographers already. Now it’s your turn in this weekly photography challenge.

Milomingo

By milomingo

Weekly Photography Challenge – Spooky

Halloween conjures up images of ghosts and goblins, witches and warlocks, ghouls and skeletons who come out of the closet. Now is the time to create your scariest, spooky image and post it here for our theme this week. Maybe it’s dramatic lighting that makes your image scary. Or perhaps someone in a costume, make sure to use spooky monster lighting.

Anant Nath Sharma

By Anant Nath Sharma

Milomingo

By milomingo

Dun.can

By Dun.can

Jonathan Hollander

By Jonathan Hollander

Share your images below:

Simply upload your shot into the comment field (look for the little camera icon in the Disqus comments section) and they’ll get embedded for us all to see or if you’d prefer, upload them to your favorite photo-sharing site and leave the link to them. Show me your best images in this week’s challenge. Sometimes it takes a while for an image to appear so be patient and try not to post the same image twice.

Share in the dPS Facebook Group

You can also share your images on the dPS Facebook group as the challenge is posted there each week as well.

googletag.cmd.push(function() {
tablet_slots.push( googletag.defineSlot( “/1005424/_dPSv4_tab-all-article-bottom_(300×250)”, [300, 250], “pb-ad-78623” ).addService( googletag.pubads() ) ); } );

googletag.cmd.push(function() {
mobile_slots.push( googletag.defineSlot( “/1005424/_dPSv4_mob-all-article-bottom_(300×250)”, [300, 250], “pb-ad-78158” ).addService( googletag.pubads() ) ); } );

The post Weekly Photography Challenge – Spooky by Darlene Hildebrandt appeared first on Digital Photography School.


Digital Photography School

 
Comments Off on Weekly Photography Challenge – Spooky

Posted in Photography


Five Photography Rules You May Want to Ignore

02 Nov

A few years ago when I purchased my first Canon dSLR I took a free 2-hour class on digital photography from a local school. They offered free seminars as a way to market their series of intensive 6-week photography courses. I was new to digital photography at the time, having learned on 35mm film. During the class I scribbled away in the notebook the instructor handed out. I was given several photography rules to follow, but is that the best advice?

My camera-loving orange tabby Carter, shot in low light, requiring a relatively high ISO of 1600 to get a fast enough shutter speed to hand hold.  ISO 1600, 1/125th, F4 @ 105mm.

My camera-loving orange tabby Carter, shot in low light, requiring a relatively high ISO of 1600 to get a fast enough shutter speed to hand-hold. ISO 1600, 1/125th, f/4 @ 105mm.

The thing about photography is that it’s a series of decisions starting with the brand of gear you choose and it funnels down to your favorite subject, your preferred shooting mode, your shutter speed, aperture and ISO. By applying popular advice to all situations, you eliminate too many of the key creative decision about how your images look. Go ahead and disagree with or ignore rule-of-thumb photography advice. The choices you make allow you to create images that feel right to you – and that’s the real sweet spot.

So let’s look at five supposed photography rules and see if you agree or disagree with them.

1. Set the ISO at 400

One of my instructor’s key points was to set the ISO at 400 and forget it.”

Since I didn’t know anything about digital photography, it like pretty good advice, so I tried it. I also made a lot of blurry images. Set at ISO 400, and limited by a wide open aperture of f/3.5 on my kit lens, I often couldn’t gather enough light for a shutter speed fast enough to prevent motion blur. I flipped back to Auto Shooting Mode (Full Auto or Program) and suddenly my images were sharp again.

I dissected the settings on the Auto Mode shots and – you’ve probably guessed this already – the main difference while in Auto Mode was that the ISO was higher, enabling a faster shutter speed and reducing motion blur.

five-photography-tips-to-ignore-n

While this image wouldn’t have made the cut because of the awkward composition, the horse is also a bit blurry because my ISO was too low, allowing my shutter speed to lag. It wasn’t fast enough to freeze the motion of the moving horse. ISO 800, 1/160th, f/5.6, 176mm.

Increasing your digital ISO makes your camera’s sensor more sensitive to light, meaning you can shoot at smaller apertures and/or faster shutter speeds in low light conditions. Like film, increasing your ISO can create a grainier, noisier image. But unlike film, digital cameras have extraordinary ISO capacity. High-end cameras like the Canon 1Dx Mark II have an ISO capability of 51,200 expandable to 409,600! Sticking to ISO 400 is like pretending you’re still shooting film and disregarding all the recent digital technology advances.

Earlier this year I was in Mesa, AZ photographing the Salt River Wild horses at dawn. During blue hour, I started with my ISO too low, my shutter speed lagged, and I shot a whole series of blurry images (see image above). Purely by luck, at ISO 800, only this one didn’t have motion blur.

Five Photography Tips to Ignore A

ISO 800

The next day, I started at ISO 12,800 to keep my shutter high enough to prevent motion blur, gradually decreasing my ISO was the sun grew brighter.

Five Photography Tips to Ignore B

ISO 12,800

Five Photography Tips to Ignore C

ISO 1250

While these images might be noisier than those shot at ISO 400, noise is almost always preferred to motion blur. Digital noise can be managed, while an unintentionally blurry picture can rarely be saved.

Setting your ISO to an unrealistically low value and leaving it there is the sort of advice or rule I’d encourage you to ignore.

2. You never need to shoot faster than 1/500th of a second

There’s a famous teaching photographer (I mentioned him here too) who says that you never need to shoot faster than 1/500th of a second. I ignore his advice too. Here’s why.

Five Photography Tips to Ignore D

Shutter speed 1/500th

This image, shot at 1/500th of a second, shows motion blur in the horse’s legs. Sometimes you may want to intentionally include motion blur in your images because it shows speed in a dynamic way, and in this case, that’s what I wanted. If I wanted no motion blur, I would need to have chosen a faster shutter speed.

Five Photography Tips to Ignore E

Shutter speed 1/640th

This image, shot at 1/640th of a second, is sharper. It has very minimal motion blur in the legs but again, it still shows motion blur.

Five Photography Tips to Ignore F

Shutter speed 1/1000th

If you shoot at 1/1000th and above, you can get crisp, blur-free images of fast-moving objects or animals in motion. In this image, even the water droplets are frozen in time.

Depending on your creative goals, you may want to experiment and shoot from 1/100th, all the way up to 1/8000th of a second. That’s the reason to ignore this rule. Adhering to 1/500th of a second as your maximum shutter speed takes too many of your creative choices away from you.

3. Serious photographers always use tripods

Has your instructor or mentor told you that to be serious about making images, you must always use a tripod? That’s another piece of advice you might want to ignore, unless the type of work you make truly requires a tripod. Night photography, for example, typically requires a tripod because of the longer shutter speeds.

Five Photography Tips to Ignore G

Night photography – with a tripod

Long exposure photography, astrophotography and shooting landscapes at dusk or dawn are all good examples of when to use a tripod in order to make excellent images.

Macro photography often requires a tripod but sometimes doesn’t. This image was made hand-held.

Five Photography Tips to Ignore H

Macro photography – handheld

Street photography never requires a tripod. The most serious street photographers I know use small camera bodies with prime lenses. What makes them serious is that they carry their cameras all the time and are always ready to shoot. For a street photographer, lugging around a tripod actually seems a little ridiculous, doesn’t it?

Five Photography Tips to Ignore I

Street photography – handheld

I’m a very serious photographer and I almost never use a tripod. I have two: a Travel Flat Benro tripod and a Gitzo with a Really Right Stuff BH 40 Ball Head. I always have one in the car or in my suitcase, but I rarely use either one anymore.

Does that mean I’m no longer a serious photographer? No, of course not. I travel all over the world to photograph horses and wildlife. I’m very serious about the images I make. The thing is, my images don’t usually require a tripod. Using one is sometimes even counterproductive when photographing fast bursts of action.

When two wild stallions start to fight out in the desert, I begin to shoot while adjusting my body position to look for the best angles for the scene to improve my composition. Sometimes a wild stallion spat can last for mere seconds. If you had to pause to adjust your tripod, you’d likely miss the action.

Five Photography Tips to Ignore J

Wild stallions – hand-held. ISO 250, 1/800th, f/8 @ 98mm

Being a serious photographer isn’t about the gear you choose to use or not use. Being serious is about making images with intention. Your intention might be totally different than the photographer using the tripod. If it is, ignore his advice to use one.

4. Only shoot in Manual Mode

Most of the professional, money-making photographers I know actually shoot in Aperture Priority so I think this rule is more the advice of old-fashioned, learned-on-film photographers. These photographers grew up using Manual Mode since that’s the only option that was available. They didn’t have the choice of Auto, Aperture or Shutter Priority Modes.

So that’s the rub. You do have a choice. You also have stellar gear that is going to make the right exposure choice 90% of the time. Why not learn to use all the modes on your camera?

At a cocktail party for your bestie’s 40th? Use Auto Mode to make sure you get the shot. Shooting fast action? Use Shutter Priority. Shooting in quickly shifting light? Use Manual Mode and set your ISO to Auto. Shooting a portrait? Experiment with Aperture Priority and then give your camera’s Portrait Mode a try.

Five Photography Tips to Ignore K

Self-portrait shot in Portrait Program Mode. 100, 1/100th, f/3.5 @ 50mm

Cameras today have amazing functionality. Anyone telling you to exclusively use Manual Mode may have different photography goals than you do. If your goal is to make sure you make the best images possible, ignore their advice and learn all of your camera’s capabilities backwards and forwards.

5. Only shoot in your lens’s sweet spot

If you’re keeping track, by heeding all of this well-intentioned advice, your camera is in Manual Mode and attached to a tripod. Your ISO is set at 400 and you’re using a maximum shutter speed of 1/500th. There has to be a rule about aperture and focal length too, right? There is.

The sweet spot is a combination of the aperture and focal length where your lens functions at its absolute best. If you’ve read reviews about zoom lenses you may have read something along the lines of; “Wide open at f/5.6 at the maximum focal length of 400mm, the corners get soft and there’s a noticeable loss of sharpness throughout.” Photographers write reviews like that so that you can avoid shooting in the so-called soft end of your lens and gravitate towards its sweet spot.

You can evaluate the sweet spot of your lens by making a series of images of the same subject, in the same lighting conditions, using each aperture at every focal length and comparing the results. (Read: How To Find Your Lens’ Sweet Spot: A Beginner’s Guide to Sharper Images for a full description of how to do this.) That sort of evaluation sounds soul-crushing and unnecessary to me. If you buy a zoom lens, you’re buying it because you need that focal length in your bag. Why run a test on your lens that might make you hesitate to use it at its maximum focal length?

Five Photography Tips to Ignore L

The real sweet spot is making images that feel right to you. ISO 2500, 1/80th, f/4.5 @73mm

Instead how about learning the capabilities of your lens by truly using it? Over time, you may gradually learn that the sweet spot is 100mm at f/8, because every image you shoot at that aperture and focal length is amazing. Rather than avoiding the rest of your lens’ focal length range and aperture combinations, you can shoot a second image using the sweet spot. If there isn’t time to shoot a second image, that’s okay. Just be grateful you had a lens capable of capturing the image at all.

Bottom line

The bottom line is that as you progress in your photography journey, you get to make the decisions. What advice and rules will you follow, and which will you toss out?

Be disagreeable with me! What photography rules have you been taught that you ignore now? Please share your experience in the comments below.

googletag.cmd.push(function() {
tablet_slots.push( googletag.defineSlot( “/1005424/_dPSv4_tab-all-article-bottom_(300×250)”, [300, 250], “pb-ad-78623” ).addService( googletag.pubads() ) ); } );

googletag.cmd.push(function() {
mobile_slots.push( googletag.defineSlot( “/1005424/_dPSv4_mob-all-article-bottom_(300×250)”, [300, 250], “pb-ad-78158” ).addService( googletag.pubads() ) ); } );

The post Five Photography Rules You May Want to Ignore by Lara Joy Brynildssen appeared first on Digital Photography School.


Digital Photography School

 
Comments Off on Five Photography Rules You May Want to Ignore

Posted in Photography


A Simple Way to Conquer Your Fear of Street Photography

02 Nov

Frustrating, isn’t it? You are ready to go out, your camera is in your hands, it’s a nice day outside and once you actually go where people are….panic starts settling in. It’s that old fear of street photography.

It’s almost like, as soon as you start putting the camera to your eye, your heart starts beating faster and you start sweating. You can’t think about the picture anymore, it’s gone. You are pretty sure you can get a nice shot if only you could get close enough. But you chose to play it safe and settle for some wide angles where everyone is pretty far away.

fear-street-photography-2

That, my friends, is called the fear of street photography. And if you are reading this, I am pretty sure you want to get rid of it, right? The good news is, you not only can, it’s actually probably not the way you think. Oh, and take it from a guy that couldn’t even look his own older brother in the eye.

But before diving into the logistics of fear, let’s get two things straight and out of the way first.

1 – Getting closer means nothing

There’s an unspoken creed amongst street photographers, it’s the notion that that you always need to be close for it to be a good image. While it is probably better to be closer than not, that’s just one thing. A bad image is a bad image, whether it’s close or far away. Just getting close won’t magically make an image good. Look at the image below, I’m not particularly close to the guy in the middle and he’s not even facing me!

fear-street-photography-3
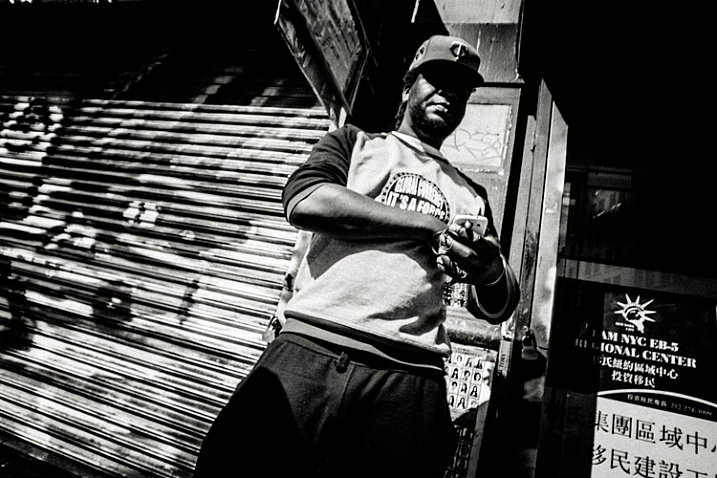
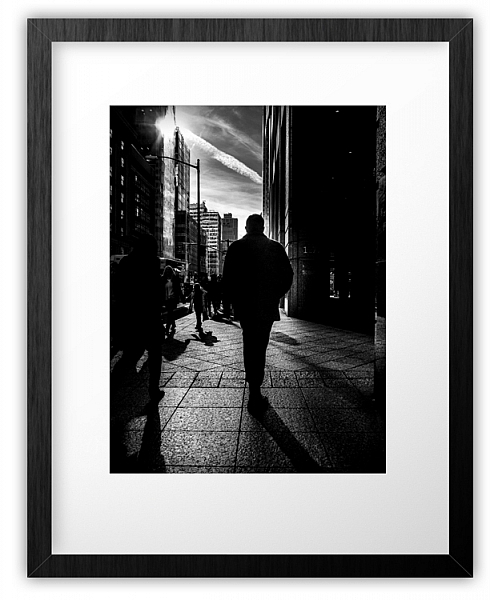
It’s not just about getting close. There are far away images that are great and very close images that are the epitome of boring. If anything, you might NOT want to get too close to people, so that you can include them and their surroundings. All of this to say what? Street photography is an art form, it’s about images, and getting closer sometimes has no bearing on the final results!

2 – A smaller camera is better

Some cameras bring more attention to them than others. No one would really notice a pocket camera, but pull out a double battery DSLR with a large lens and you will be noticed. So, use a small camera, it’s de facto less attention on you, at least for the time being.

With that being said, let’s get to the nitty gritty of fear!

fear-photography-1

People don’t really care about what you do

Sorry to break it to you. You are not so important that all the people in the street want to do is to notice you. Except if you are Brad Pitt, or Beyonce. If you are, call me! If you are just a regular Joe like the rest of us, the bottom line is this; people just don’t care about you. They care about themselves, and it’s easy to prove. Just go out in the streets without a camera and ask yourself how many of these people actually notice you.

Hint: Very few, most likely none will notice you.

Psychology tells us we all have something called the spotlight effect, where we believe a spotlight on us, that everyone notices us, but that is not the case, it’s just how we feel. But it’s not the same when you have a camera with you and near, right? Yes and no. Again, most people won’t notice you with a camera, but even if they do, what’s the problem?

fear-street-photography-4

Why you fear street photography

What’s the problem if people notice you taking a picture of them? Well, let me ask you a question. Don’t worry, it relates to the matter at hand. Do you feel guilty when your boss pays you? The answer (except if you are doing something fishy) is probably NO. Because you exchanged value for it. Your time and skills in exchange for his/her money, nothing wrong there.

But it’s not the same on the streets. There you feel like you are TAKING something from the person you are photographing. Something that is theirs, and you took it. That’s called stealing, right? So doesn’t it logically follow that you feel fear because you fear being caught at thievery? It’s easily proven. As soon as you ask for permission the fear dissipates because there is no more tension.

street-photography-fear

You fear because you think you are doing something inherently wrong. Let’s look at it in another way, do you feel any fear when just walking down the street? No, because you don’t feel you are doing anything wrong. Fear in street photography comes from fearing the reaction of others to your perceived wrong-doing. And between me and you, if I was stealing, I would feel fearful!

The cure for fear

The answer then is understanding the value exchange that happens on the street. You are not taking anything, you are making a photograph. You are creating something. Of all the people and things to photograph, you have chosen one person to make an image of them. You have acknowledged that person’s existence and importance.

street-photography-fear-03

Sounds cheesy? The photograph is the ultimate ego tool. Check your Facebook, everyone is clamoring for attention through their selfies. Why can’t you be the one that bestows that attention on them with your lens?
Images are so powerful, that a Japanese photographer got carte blanche to photograph Yakuzas, Japanese mafia. Quite powerful, no?

By making a photograph of someone, you are acknowledging their existence, something that every one of us needs and desires at a deep level of our psyche.

fear-street-photography-5

The exchange between you and the subject

Go down the street, give a nod to someone. Smile, and say hello. You have just altered someone’s day with your acknowledgment. Images are like that, they are visual acknowledgment. Once you stop seeing what you’re doing (photographing them) as something that’s wrong and actually see it as something good by exchanging value (they get to participate in the making of an art piece in exchange for their photo) your outlook will start to change. And by doing so you change your way of approaching street photography and the fear will dissipate.

The street photographer’s posture

This is truly where the magic happens because here’s a truth – the street reacts to you. The way you are in the street will dictate how people react to you. That’s the whole secret. But wait. If that was the whole secret, why then did I write all of the stuff above? Couldn’t I just cut to the chase, get right to this part? The streets react to you, so it’s all about appearing confident, right?

fear-street-photography-6

Well, not really because I don’t believe you can fake it. I could tell you to go up and down the streets and act confident, to fake it till you make it so to speak. But I think people smell these things like a dog smells fear. If you think you are doing something wrong, it’s probably going to show in your posture and people will react accordingly.

Street Karma

Think about this with me – you look out your window and this guy is just strolling by your house, all happy go lucky. Then you look out your window once again and see this shady looking guy, looking right and left, as if he is doing something wrong. How are you going to react towards each one? Towards the first one you might even smile, but to the other, you may be ready to call the police.

The same rule applies on the street, it’s called street karma. You will get out of it the energy that you put into it. And it’s no woo-woo stuff either. It’s because of mirror neurons, those things in your brain that make you tend to mimic others. The street reacts to you. That’s what makes the difference between getting a dirty look and a smile of amusement.

street-photography-fear-04

Conclusion

As you have seen, people care less about you than you may think, and the streets react according to how you hold yourself. Act like a thief, be treated like one. But act like you are enriching the world, and people will react differently.

Such things can be faked. It all comes from knowing that what we are doing in the street isn’t anything wrong. Indeed we are not thieves because as photographers we seek to simply interpret the reality that is in front of us with our lens. Now go out there and shine forth. Be yourself, stay focused, and keep on shooting.

googletag.cmd.push(function() {
tablet_slots.push( googletag.defineSlot( “/1005424/_dPSv4_tab-all-article-bottom_(300×250)”, [300, 250], “pb-ad-78623” ).addService( googletag.pubads() ) ); } );

googletag.cmd.push(function() {
mobile_slots.push( googletag.defineSlot( “/1005424/_dPSv4_mob-all-article-bottom_(300×250)”, [300, 250], “pb-ad-78158” ).addService( googletag.pubads() ) ); } );

The post A Simple Way to Conquer Your Fear of Street Photography by Olivier Duong appeared first on Digital Photography School.


Digital Photography School

 
Comments Off on A Simple Way to Conquer Your Fear of Street Photography

Posted in Photography


The future is bright: technology trends in mobile photography

01 Nov

The future is bright: technology trends in mobile photography

Smartphones have long overtaken the trusted digital compact camera as the most popular imaging device among consumers. So it’s no surprise that for some time now the mobile industry has been a major driving force of innovation in imaging. 2016 is slowly yet surely coming to an end, and has been a fruitful year in terms of innovation in mobile imaging. What better time to look back at the most important technology trends that have emerged over the past few months?

Multi-lens-cameras

Dual-cameras have been around for some time now, but this year we’ve seen the introduction of two new types of this camera category with real potential to have a lasting impact on mobile imaging. The dual-camera modules in the Huawei P9 and Honor 8 capture images on a color and a monochrome sensor at the same time. Thanks to the lack of a color array filter, the latter can record better detail, higher contrast and a wider dynamic range than its color counterpart. After capture, the image information from both sensors is combined, resulting in better overall image quality than on a conventional camera.

 The dual-cam in the Huawei P9 combines images from color and monochrome sensors.

Both the LG G5 and Apple’s new iPhone 7 Plus use dual-cameras for optical zooming. However, there is an important difference. On the LG the standard wide-angle lens is accompanied by a super-wide-angle. The Apple’s secondary lens offers an equivalent of 56mm, double that of the 28mm standard lens.

 Apple’s iPhone 7 Plus uses a dual-camera setup for digital zooming.

Lack of optical zoom is one of the key limitations of conventional smartphone cameras. The digital zoom functions implemented in most smartphones lead to a deterioration of image quality and can’t really be considered an alternative. This is why the solutions from LG and Apple represent a real step forward that can help expand the creative potential of smartphone photography. The concept of dual-cameras is still in its infancy and it’s probably only a question of time before we’ll see smartphones with more than two camera/lens combinations – the very approach that the the Light L16 camera development team is taking.

Raw-capture on smartphone cameras

Raw-capture on smartphones is not a totally new topic either. It was first introduced to the high-end models in Nokia’s Lumia line and came to Android devices with version 5.0 of the Google OS, which was introduced in 2014. Since then many high-end devices from Samsung, Huawei, LG and other manufacturers have supported the feature. However, with the introduction of the seventh iPhone generation and iOS 10, Raw capture is now finally available on the other major mobile platform, iOS, massively expanding its potential user base. 

 The Huawei P9’s DNG files can be edited in Adobe Camera Raw or other Raw converters.

The advantages of the Raw file format are the same on a smartphone camera as they are on a DSLR or mirrorless system camera. Instead of leaving the conversion of the captured image data to the algorithms of the camera’s JPEG-engine, the photographer can adjust many image parameters after capture, without any loss of image quality, by processing manually in a Raw-converter such as Adobe Camera Raw, Lightroom or Capture One.

With the small image sensors in smartphone cameras digital exposure compensation can only be applied within narrow limits, but white balance, sharpness, contrast, noise reduction and many other parameters can all be modified. Especially in difficult lighting situations shooting Raw can be a lifesaver. However, it can also help achieve more natural image results when the camera’s default settings produce too vibrant images, as is often the case with smartphone cameras, or to create different versions of the same image – for example one for large-scale printing and one for viewing on the web.

There is no doubt that the conversion of Raw image files can improve the quality of an image, or at least adjust it for specific requirements. However, the crucial question is if this all makes sense on a smartphone. Here, opinions are mixed. On one hand it can be argued that photographers who are willing to put time and effort into Raw conversion would typically shoot with their DSLR or system camera to start with. On the other hand, you never know when you encounter a great photo opportunity. If the only camera you’ve got is the smartphone in your pocket, Raw conversion can make the difference between a good and a great image.

Modular solutions

For many users an elegant and thin smartphone body is an important buying criterion. Unfortunately those characteristics stand in direct contrast to camera performance. Larger sensors offer lower noise levels and better dynamic range. Bigger lenses provide for brighter apertures or offer zoom capability. A powerful xenon flash also requires space. One of the solutions to this dilemma is a modular approach: for general everyday day use you carry the slim smartphone in the pocket. When better image quality and camera features are required, for example while visiting an event or when traveling, an external camera module is attached to the smartphone.

Previous approaches, for example Sony’s QX-models or the Kodak Pixpro SL modules, which are compatible with most smartphones and connect to the device via Wi-Fi, were unfortunately cumbersome to operate. Connection to the smartphone was often slow and occasionally unstable, leading to laggy image transmission and operation.

However, this year Lenovo has revived the camera module concept by introducing the Hasselblad True Zoom. The TrueZoom is so far only compatible with the smartphones of Lenovo’s Moto Z series but, on the upside, attaching and operating the device work much more seamlessly than anything else we’ve seen before. The TrueZoom attaches to the smartphone magnetically and, with a 10x zoom lens and xenon flash, instantly transforms it into a connected travel zoom camera, without any rebooting or other configuration steps.

The Hasselblad True Zoom camera module attaches magnetically to smartphones of the Lenovo Moto Z series.

The fact that the True Zoom is only compatible with a handful of phones won’t contribute to a wide distribution of the device. However, it is showing what is currently technologically feasible in terms of smartphones and external modules working together. Things could get even more interesting if market leaders Apple or Samsung show an interest in camera modules and make them popular with the masses.

Algorithms trump hardware

As mentioned above, your standard smartphone doesn’t provide enough space for large image sensors, zoom lenses or powerful flash units. However, mobile devices have one definite advantage over conventional cameras: computing power.

Thanks to powerful chipsets modern smartphone cameras can record and digitally merge several image frames in a split-second. This process, called image stacking, captures more image information than a single frame. The resulting JPEG files show better detail, lower noise levels and a wider dynamic range than standard exposures. In very dark scenes this method can also achieve a brighter exposure than conventional capture. In addition, camera shake and blur in low light are less of an issue, as the individual frames of the image stack can use faster shutter speeds than a single standard exposure.

 The HDR+ mode in the Google Camera app uses frame stacking for improved image results.

Apple offers such high dynamic range and night modes in its iPhone cameras and Google has implemented them into the HDR+ function of its Google Camera app, which is also used as the stock camera app on the new Pixel and Pixel XL phones. Again, development of such technologies is still in relatively early stages. Over the coming years more powerful processor hardware and better algorithms will likely further improve smartphone image quality, without a need for larger sensors or faster lenses.

Outlook

It’s probably fair to say that in the conventional digital camera sector the rate of innovation has noticeably slowed down over the last few years. In contrast, many of the new concepts that are currently being applied in mobile imaging are still in their infancy. It remains to be seen which ones will be here to stay and which ones will be forgotten in the nearer future. However, there’s no doubt that mobile photographers have a lot to look forward to. 

Articles: Digital Photography Review (dpreview.com)

 
Comments Off on The future is bright: technology trends in mobile photography

Posted in Uncategorized