RSS
 

Posts Tagged ‘Photographs’

4 Ways the Time of Day Affects Your Photographs

07 Oct

You have probably heard the saying, “The early bird gets the worm,” and in some ways that phrase can be repurposed to apply to photographers as well. “The early photographer gets the picture” isn’t always true in a literal sense, but learning to recognize changes that happen throughout the day, and how they affect your pictures is critical to developing a deeper understanding of photography in general. If you’re looking for a way to enhance your own photography, get better shots, or just try something new, getting up early to take some photos in the morning hours can have a dramatic impact on your pictures.

morning-vs-afternoon-flower-morning

What you will see below is a collection of shots that are similarly-composed, but taken at different times of the day. The idea is not necessarily to see which picture is better, but to help you visualize and understand how much impact the time of day has on your outdoor pictures.

1 – Colors and Shadows

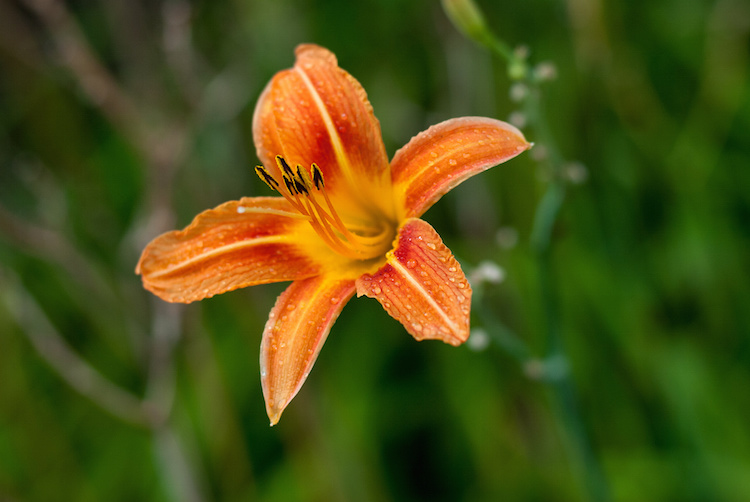
One advantage of shooting in the morning is that the sun is not directly overhead, which means light is diffused in the sky, and essentially coming from all directions. This helps your subjects have more even  lighting, and makes it easier to get a good overall exposure since there isn’t the same degree of high contrast between light and dark areas that happens later in the day. This picture of some flowers in the morning illustrates the concept, and shows how diffused morning light can affect not just the shadows, but the color and vibrance of the picture as well.

morning-vs-afternoon-flowers-730am

Flowers at 7:30am: 50mm, f/1.8, ISO 200, 1/180th of a second

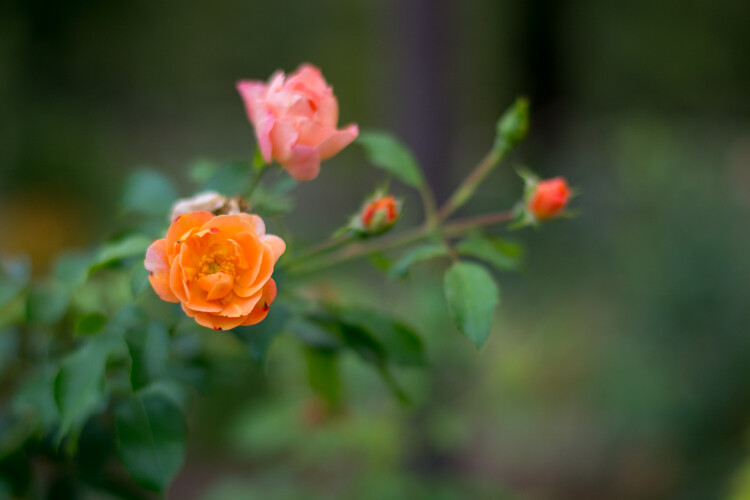
Revisiting the same scene later in the day revealed an image that is similar in overall composition but quite different in some significant ways. The colors on the orange flower are not as rich and vibrant as they are in the morning photo, and the individual petals create harsh shadows that can be somewhat distracting.

Flowers at 1:45pm: 50mm, f/1.8, ISO 200, 1/6000 second

Flowers at 1:45pm: 50mm, f/1.8, ISO 200, 1/6000 second

While taking photos later in the day often means you have more light available, it comes with an important tradeoff: the midday sun often often leads to a greater degree of contrast with brighter highlights and darker shadows.  However, this is not to imply that shooting later in the day is an inherently bad idea. Learning to shoot at different times of the day is not just about knowing how things are lit, but understanding how nature itself changes. Different times of day are not necessarily better or worse, but each has its own set of opportunities and challenges.

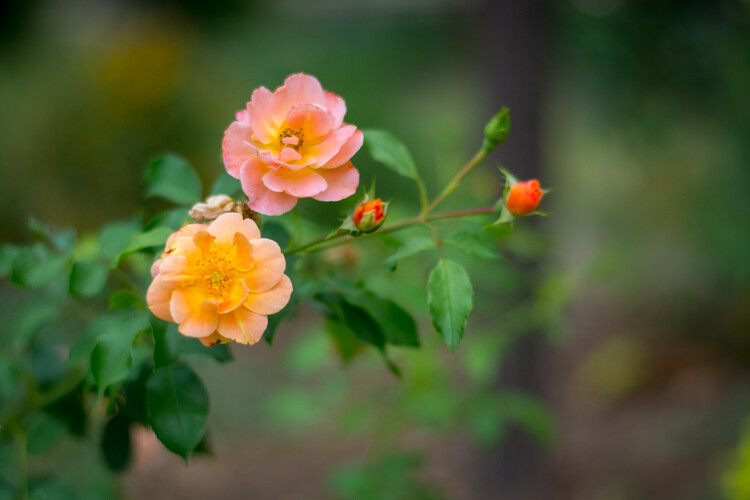
Notice how the pink flower has opened up and is much more vibrant than in the morning. No amount of early sunlight can coax a flower into full bloom, and sometimes you simply have no choice but to shoot later in the day if you want to get a particular picture. Wildlife shooters often take pictures in the morning or evening, but not necessarily because of the light. They do it because many animals are simply much more active at that time, than in the middle of the day.

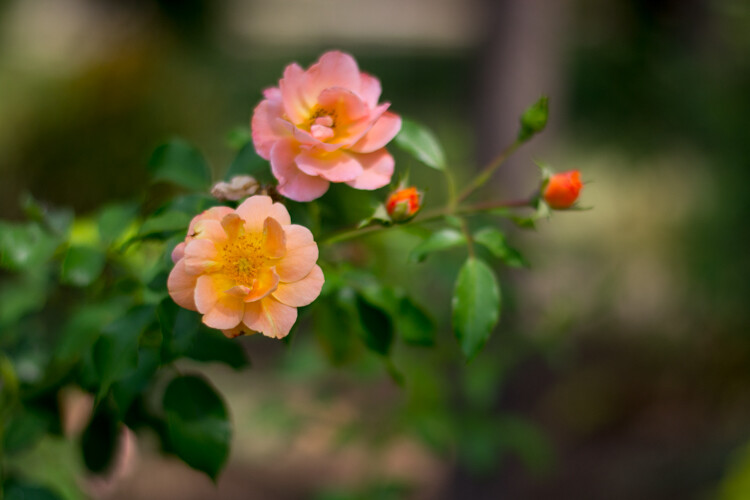
One of the best solutions, which is not always possible but does offer some creative opportunities, is when you can get pictures in the middle of a cloudy or overcast day. That scenario gives you the nature advantages of shooting in the middle of the day, with the lighting advantages of morning or dusk. In this final picture, which was taken during a moment of thick cloud cover, you can see how the pink and orange flowers are in full bloom, while the light is much more similar to the morning image. The shadows are soft and diffused, which lends a warm and pleasant feeling to the image.

morning-vs-afternoon-flowers-1215pm

Flowers on an overcast day: 50mm, f/1.8, ISO 400, 1/6000 second

2 – Background Elements

One nice thing about shooting pictures in the morning is how the early sun can cast a nice even light on your subject. But, there are other elements of a photographic composition to take into account as well. Here are two pictures of some seed pods on a magnolia tree, taken a few hours apart. In these examples you can see that the morning light doesn’t just affect the color and shadows on the subject, but has a notable impact on the background elements, and other parts of the picture as well.

In the first image the subject (i.e. the seed pod in the foreground) is evenly lit, with nicely saturated colors, and the composition has a nice warm tone overall. There are a few drawbacks though – the building in the background which faces to the east is so brightly lit it’s distracting, and the sky does not yet have the rich blue tones that can happen later in the day.

morning-vs-afternoon-magnolia-735am

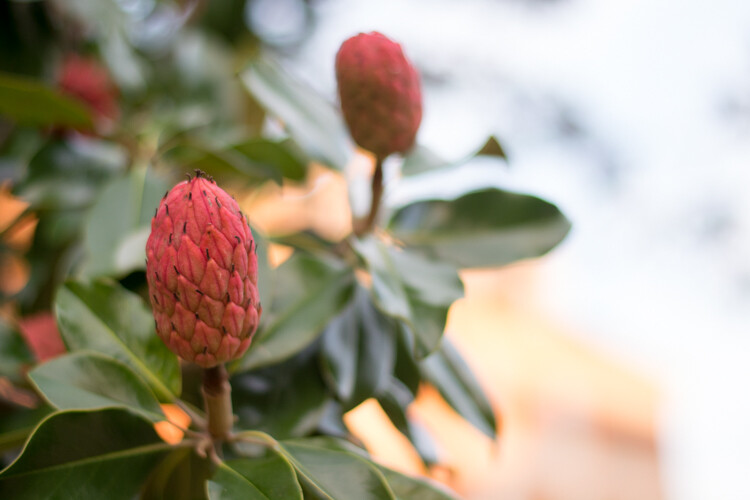
Magnolia seed pods at 7:30am: 50mm, f/1.8, ISO 400, 1/500 second

Here’s the same composition taken a few hours later, which illustrates that shooting in the bright sunlight has some tradeoffs tradeoffs that are both good and bad. While the building in the afternoon photo is not overexposed and the sky has more of a pleasing blue tint, the subject is somewhat backlit which causes a bit too much contrast for my liking.

morning-vs-afternoon-magnolia-1435pm

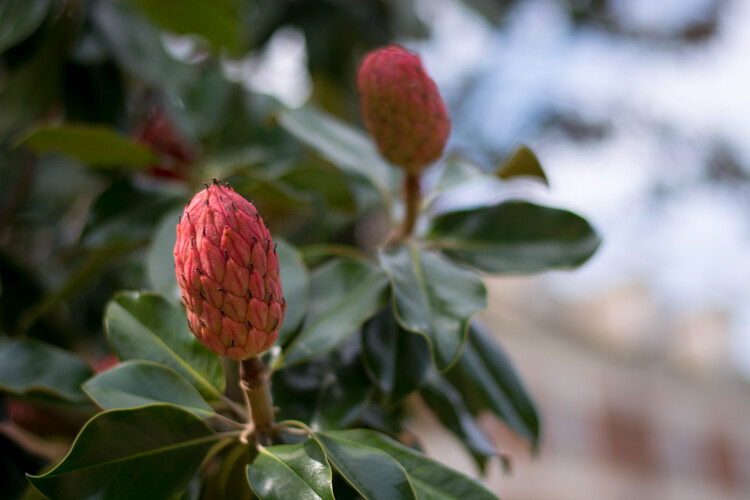
Magnolia seed pods at 2:35pm: 50mm, f/1.8, ISO 100, 1/1500 second

Again, the message here is not about why taking pictures at a particular time of day is better or worse, but understanding the effect it will have on your images. Some of the problems with the afternoon picture could be mitigated if I simply took the picture from a different angle or used another subject. I could also have used the pop-up flash on my camera as a fill flash which would have fixed some of the shadows on the subject. These challenges also become a little easier to work with if you are taking pictures of people and not immovable inanimate objects because you can tell them where to go, bring umbrellas, or use structures to manipulate the light.

3 – Even Lighting

I already gave some examples of how the early morning sun can have a pleasant effect on a single subject, but it can also cast an entire scene, or even a landscape, in an entirely different light compared to the afternoon. This image of a path on the Oklahoma State University campus is one of the most pleasing examples of how shooting in the morning can give you an incredible advantage when it comes to just working with light. The entire scene is evenly lit, and even the undersides of the tree branches are green. There are no harsh shadows and the morning light creates a warm and welcoming feeling overall.

morning-vs-afternoon-path-730am

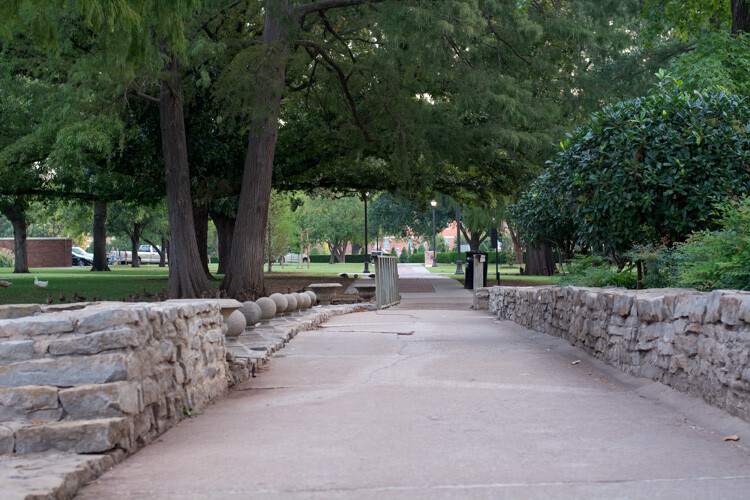
Path at 7:30am: 50mm, f/4, ISO 400, 1/60 second

In the next image you can clearly see evidence of some of the challenges posed by midday sunlight. The image is awash with contrasting areas of light and dark, and the shadows on the path are disjointed and distracting. There is no one clear focal point for the image, and the undersides of the leaves are so dark they are almost unrecognizable. It looks like an entirely different scene, even though it was the same location.

morning-vs-afternoon-path-1345pm

Path at 1:45pm: 50mm, f/4, ISO 200, 1/1500 second

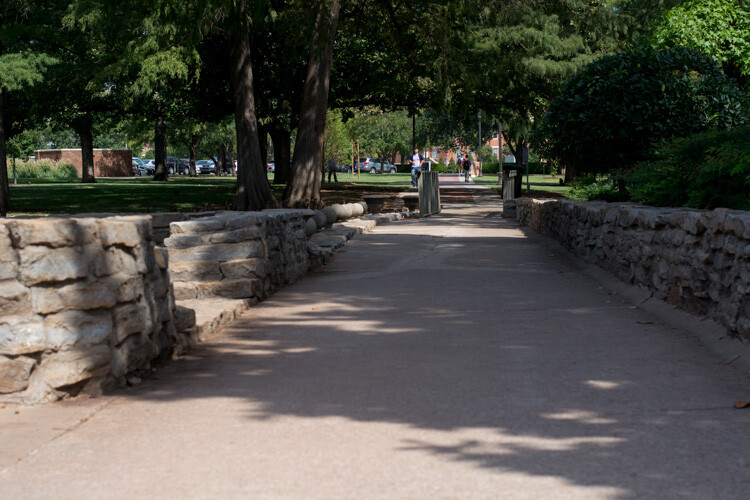
The final image in this series illustrates one additional hurdle that must be overcome when shooting during the day – other people. In most parts of the world, and especially on a college campus, there simply is not much human activity in the early morning. Later in the day you will usually find yourself contending with workers, pedestrians, students, tourists, children playing, or a variety of other types of individuals who might inadvertently get in the way of letting you take the picture you want.

morning-vs-afternoon-path-1215pm

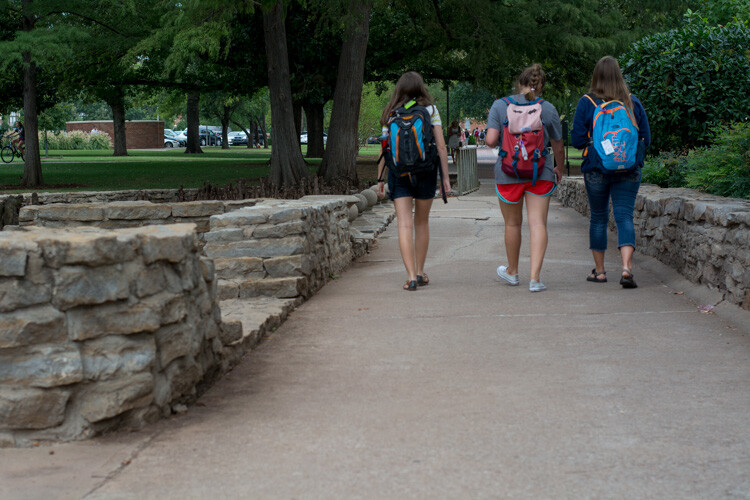
Path at 12:15pm: 50mm, f/4, ISO 400, 1/1500 second

Almost any outdoor photographic situation will have far fewer people around in the wee hours of the morning, which can not only give you better pictures, but a greater sense of peace and calmness as you go about the business of taking photos. The other point to note about the image above with the students walking, is that even though there was plenty of cloud cover which meant nice evenly-diffused lighting, the undersides of the trees are much darker than in the 7:30am photo. This illustrates how even though cloudy and overcast days are great for photos, there are still some aspects of shooting in the morning or evening that can be advantageous.

4 – The Human Impact

Finally, here’s one more example of how pictures in the morning can be much different than pictures later in the day. This bronze statue is a friendly sight for shoppers and drivers in downtown Stillwater, Oklahoma. Taking his photo as the sun is creeping over the horizon yields a well-lit image with a hometown feel, as the shops of main street recede into the background. Colors are even and not overly-saturated, and there is neither too much, nor too little, contrast on the statue itself.

morning-vs-afternoon-bronze-730am

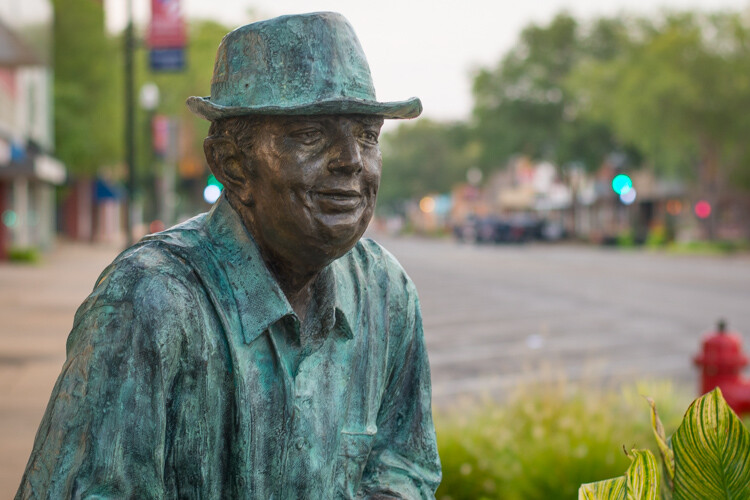
Bronze Man at 7:30am: 50mm, f/2.8, ISO 200, 1/60 second

The same photo in the late afternoon looks dramatically different, but not just because of the lighting. In the second picture (below) the light is clearly coming from overhead, as the top of his shoulders and side of his hat are much brighter and the contrasting light is creating much deeper shadows on his overcoat. This is not necessarily a bad thing, as the result is an image that shows more texture on the statue, even though one of the tradeoffs is that the side of his head is shrouded in shadow. However, the most critical difference here is the background, which is now filled with passing shoppers and parked cars. The picture seems cluttered, the focal point is less obvious, and instead of a friendly small town main street it now seems like a sterile commercial shopping center.

morning-vs-afternoon-bronze-415pm

Bronze Man at 4:15pm: 50mm, f/2.8, ISO 200, 1/1500 second

Hopefully these examples give you a better idea of how the time of day in which you take pictures can dramatically affect not just the lighting, but many aesthetic elements of your photographic compositions as well. What are your favorite tips for shooting at different times of the day? Leave your thoughts in the comments below.

googletag.cmd.push(function() {
tablet_slots.push( googletag.defineSlot( “/1005424/_dPSv4_tab-all-article-bottom_(300×250)”, [300, 250], “pb-ad-78623” ).addService( googletag.pubads() ) ); } );

googletag.cmd.push(function() {
mobile_slots.push( googletag.defineSlot( “/1005424/_dPSv4_mob-all-article-bottom_(300×250)”, [300, 250], “pb-ad-78158” ).addService( googletag.pubads() ) ); } );

The post 4 Ways the Time of Day Affects Your Photographs by Simon Ringsmuth appeared first on Digital Photography School.


Digital Photography School

 
Comments Off on 4 Ways the Time of Day Affects Your Photographs

Posted in Photography


Start Making Photographs to Become a Better Photographer

25 Sep

If you are an avid reader of this site, most likely you are a photography enthusiast wanting to learn more and advance your craft. If you really care about doing so, it is time to stop taking snapshots and start making photographs to become a better photographer.

Taking versus making can be a question of semantics; that’s why I prefer to call it snapshot versus photograph. But beyond semantics, in my humble opinion, you graduate as a photographer the moment you start making photos instead of taking them, regardless of the results. But wait, regardless of the results? Well, not really. Of course, you want great photos. What I mean by that is that you’ll progress in your craft the moment you start thinking about your photos, your vision, and how to reflect it with your image. The results could be bad or good, but you are thinking as a photographer. When you start thinking as a photographer, the results will come, sooner or later.

New Orleans Skyline

So what’s the difference? Taking a photo is the result of an impulsive reaction; you just press the shutter because you are there and you shoot it. Taking a photo is just snapping what you see. Instead, making a photograph is a process. When you make a photo, you are creating something from your vision. You are constructing it, and you are putting what comes from you in it.

The process of making a photo can take different periods of time. For some, it is a longer, thoughtful process, and for others it is a just a moment. For a National Geographic photographer, making a photo can take months; there is a lot of planning, research and being there just to get the right image that makes the cover of the magazine. For a street photographer, making a photo is totally different; they only have a split second to get it right without the luxury of setting up. But, there are other things they can control, like location, time of the day for best light, and so on.

I am telling you that you graduate as a photographer when you start making photographs because, for most us, enjoying the creative process is what makes us different from the rest. It does not matter if you are an enthusiast, serious amateur, or pro – we all enjoy it. Sure, learning how to expose, compose and post-process is important, but it’s something you can learn with enough practice and attention. That’s the technical aspect of photography, and when you master the basics, there will be always something new learn. But besides that, it comes with the freedom to stop thinking about aperture/depth of field and ISO/noise, and focus more on the photos you want to create.

Making a photograph will also help you to cut the clutter. When I first started to go on travel photography trips, I used to come back home with thousands of photos that were taken in just a span of a couple of days. That made the selection process a daunting task. First, who really wants to see thousands of photos? Second, is there any meaning in them? When you take the time to plan a more thoughtful photograph, you cut the clutter because often you’ll shoot less, but come out with better content.

Happy woman in Taung Tho Market Inle Lake

Last, I want to leave you with a couple of examples, starting with the opening picture of this article. I was going to be in New Orleans only for a long weekend and one the things I wanted to photograph was the skyline of the city. So, I started my research ahead of time to find the best spot to do it. I only had three nights in the city and as I wanted to shoot during the blue hour, I really didn’t have the chance of messing it up. Once I knew where I was going to make my photo from, it was all a matter of arriving there in time to set up and wait for the right moment. So besides finding the location and arriving early to set up, I also had the right tools with me to make it happen. I knew I wanted to include the Crescent Connection Bridge, so I brought a wide angle lens. I knew that it was going to be a long exposure, not only because of the time, but also because I wanted a smooth reflection over the Mississippi River, so I also brought a tripod and a neutral density filter to make a long exposure.

Sometimes making a photo also means finding an interesting subject, and trying to learn more from them by staying for a while, instead of grabbing a shot and moving. I found this amazing woman for this photo (above) from the Taung Tho Market of Inle Lake in Myanmar. I sat there taking pictures of her for a while, and I remember she pretended I was not there until I told my guide to tell her that she was beautiful. Her reaction was priceless and that made the photo.

Monk in the Punakha Dzong

Other times, making a photo means waiting for something interesting to happen if you are in the right place. For the Bhutanese monk above, I found myself on a big patio surrounded by typical and colorful windows that I wanted to photograph, while I was visiting one of the many monasteries. But I needed something else besides the windows. Because I had seen them earlier, I knew that another monk would walk across my frame sooner or later, so I carefully composed my photo and waited until this one walked by.

There you have it. As you can see, there are different meanings and ways to create photos, and not just take them. But the most important thing is for you to understand that you can be a better photographer by making photos instead of just taking them. Plan and enjoy the process, and results will follow. By the way, if you are already making photos, why don’t you share one with us in the comments below with a short caption on how you made it and why.

googletag.cmd.push(function() {
tablet_slots.push( googletag.defineSlot( “/1005424/_dPSv4_tab-all-article-bottom_(300×250)”, [300, 250], “pb-ad-78623” ).addService( googletag.pubads() ) ); } );

googletag.cmd.push(function() {
mobile_slots.push( googletag.defineSlot( “/1005424/_dPSv4_mob-all-article-bottom_(300×250)”, [300, 250], “pb-ad-78158” ).addService( googletag.pubads() ) ); } );

The post Start Making Photographs to Become a Better Photographer by Daniel Korzeniewski appeared first on Digital Photography School.


Digital Photography School

 
Comments Off on Start Making Photographs to Become a Better Photographer

Posted in Photography


6 Tips for Creating More Captivating Landscape Photographs

07 Sep

2-for-1 special

As part of Landscape Photography Week here on dPS, we’re offering TWO for the price of ONE on our best-selling Living & Loving Landscape Photography ebooks!

Click here to take advantage of this offer.


If landscape photography is your passion, you probably love to visit new places, and photograph beautiful natural scenes. But have you ever been unable to capture the beauty you saw in front of you in your camera? Do your images come out flat and boring? With these six tips, you’ll take your photography to the next level by creating more captivating landscape photographs that really stand out.

1. Time your shoot for the perfect light

Making interesting photographs is all about the light. Boring light creates boring photographs. Dramatic light creates dramatic photographs. Once you find a scene to work with, be patient and wait for the dramatic light that will enhance your image. You may even have to return on a different day to make the most of the scene.

Devils Tower, Wyoming by Anne McKinnell

The quality of the light that illuminates your scene is going to change depending on the weather and the time of day.

Weather

The effect that weather has on your photo is usually obvious – a clear, blue sky gives a distinctly different feeling than dark storm clouds. Direct sunlight causes high contrast and dark, clear shadows – but the light becomes soft and even on an overcast day.

Time of Day

We know that the sun rises in the east and sets in the west, but the direction of the sun with respect to your landscape also makes a big difference. It could mean the difference between the sun being in, or out of the frame. It determines which side of a mountain is lit, and can change the way the shadows fall in a grove of trees.

When you’re scouting your location, try to figure out where the sun will be at different times of day, what effect that will have on your landscape, and when you think the light will be at its best. This can be as simple as deciding whether you are at a sunset or sunrise location, so you know the best time to return to the scene.

Joshua Tree National Park by Anne McKinnell

Keep in mind, as well, that the colour of the light changes throughout the day. When the sun is low in the sky (towards sunrise or sunset) the light takes on a warm golden hue, but in the middle of the day the light turns a brighter white. Just after the sun sets, and again before it rises, the blue hours give a scene a soft, cool tone.

2. Use the right equipment

Use a tripod to keep your camera steady and allow for longer exposures. A tripod will also help you be more purposeful in the way you compose the frame.

Choose your lens based on the type of photograph you want to make. A grand vista type of landscape photograph is usually made with a wide-angle lens, with a focal length below 35mm. The shorter your focal length, the larger your angle of view, and the more of the scene you can fit in the photo. However, by doing this you shrink everything within the frame.

Ajo Sunset by Anne McKinnell

If there is something in your frame that you want to appear large in the scene, using a longer focal length will emphasize it. Longer focal lengths are also excellent for more intimate landscapes that do not include a massive expanse of space.

3. Use the right camera settings

Understanding the exposure triangle is critical when it comes to choosing the best camera settings. Generally, for landscape photographs where nothing is moving in the scene, you don’t need to worry about shutter speed, especially if you are using a tripod (see tip #2 above).

In landscape photography, one very important setting is aperture, since that controls the depth of field in your image. When making a grand vista type landscape, you usually want everything from foreground to background to be in sharp focus.

To get your photo sharp all the way through, use a small aperture, like f/11, to maximize your depth of field. However, smaller doesn’t always mean sharper – because of an optical phenomenon called diffraction, images tend to get softer when the aperture is too small. Therefore, the clearest images are typically made closer to the middle of a lens’ aperture range. I recommend shooting landscapes at f/11 instead of f/22 for the sharpest possible photo.

Organ Pipe Cactus National Monument Arizona by Anne McKinnell

That leaves ISO as the last factor in the exposure triangle. For the best image quality, your ISO should be set to a low value, like ISO 100.

If nothing is moving in your landscape, use aperture priority mode, set the aperture to f/11, set the ISO to 100, and then let the camera calculate the appropriate shutter speed to get a good exposure.

However, if there is something moving in the scene, you can set a higher ISO, to allow for a faster shutter speed.

4. Separate your foreground, middle ground, and background

When composing your landscape photo, try to arrange it with elements in the foreground, middle ground, and background. Make sure they are framed to be distinct, and separate from each other, in order to create a sense of depth that draws the viewer into the picture.

Big Bend National Park , Texas, by Anne McKinnell

Background features are common things like mountains, the horizon, and sky – while foregrounds can be nearby objects such as trees, grasses, man-made objects, and even rocks on the ground in front of the camera. The middle ground, of course, is everything in between that occupies the main part of the scene.

Not all photographs have these three distinct areas, but if you can compose your image so it does, you’ll have a photo with great depth and more impact.

5. Include a point of focus

Sunsets and forests and seashores are beautiful, but they need something small to give them a sense of scale. Almost anything can serve this purpose – a person walking through the scene, a single silhouetted tree, a boat floating in a lake, a dock, or an animal – anything to give scale to the immensity of the landscape and create something for the eye to be drawn to.

Clark Dry Lake by Anne McKinnell

6. Bracket your shots

Landscape scenes can be very high in contrast, so it’s a good idea to shoot a few different exposures to make sure you get details in both the highlights and shadows. Some cameras will have an automatic bracketing feature built-in, but if not, you can do this manually. Simply take one picture at the recommended settings, then turn your exposure compensation button (+/-) to +1 and take another. Repeat this at -1 and you’ll end up with three pictures of different brightnesses. Later, when editing them on your computer, you can decide which exposure looks best and even combine multiple images in Photoshop or Lightroom (using the new Merge to HDR feature in LR CC or LR 6) to get the most detail possible.

Good light, the right equipment, the right settings, a strong composition, and a good exposure all work hand-in-hand to ensure you’ll make captivating landscape photographs.


Here on dPS this is landscape week – here is list of what we’ve covered so far. Watch for a new article (or two) on landscape photography daily for the next couple days.

  • 6 Tips for Better Low-Light Landscape Photography
  • Landscape Photography and the Human Element
  • 5 Ways a Telephoto Lens Can Improve Your Landscape Photography
  • Landscape Photography from the Side of the Road
  • 32 Majestic Landscape Photos to Inspire Your Wanderlust
  • Weekly Photography Challenge – Landscape
  • Landscape Photography – Shooting the Same Location Through the Seasons
  • How to Solve 5 Composition Conundrums Faced by Landscape Photographers

googletag.cmd.push(function() {
tablet_slots.push( googletag.defineSlot( “/1005424/_dPSv4_tab-all-article-bottom_(300×250)”, [300, 250], “pb-ad-78623” ).addService( googletag.pubads() ) ); } );

googletag.cmd.push(function() {
mobile_slots.push( googletag.defineSlot( “/1005424/_dPSv4_mob-all-article-bottom_(300×250)”, [300, 250], “pb-ad-78158” ).addService( googletag.pubads() ) ); } );

The post 6 Tips for Creating More Captivating Landscape Photographs by Anne McKinnell appeared first on Digital Photography School.


Digital Photography School

 
Comments Off on 6 Tips for Creating More Captivating Landscape Photographs

Posted in Photography


Twisting History: 40+ Surreal Altered Vintage Photographs

20 Aug

[ By Steph in Art & Drawing & Digital. ]

vintage photos long 3

Many of us have picked up old black and white photographs and wondered what their backstories are, but these artists take history into their own hands, altering the images to produce new narratives. In the following 40+ revised photographic histories, new elements are combined with the mysterious original images, giving them a sense of surreality that could then serve as the basis of an entire book if the creative chain were to continue.

Black-and-White to Colorfully Surreal by Jane Long

vintagephotos long 5

vintage photos long 4

vintage photos long 2

vintage photos long 1

A figure in a found black-and-white photograph catches artist Jane Long’s eye and she begins to envision them in a new setting, giving them a story, making them somehow less anonymous. She digitally restores and colorizes each image and combines them with other photographs to create entirely new, surreal compositions. “I wanted people to see these figures as real people, more than just an old photograph. Adding color completely changes our perception of images.”

Library of Congress Images Get Horror Makeover by Jim Kazanjian

vintage photos kazanjian 1

vintage photos kazanjian 2

vintage photos kazanjian 3

vintage photos kazanjian 4

Historical photographs archived by the Library of Congress are a lot more interesting in the hands of digital artist Jim Kazanjian, who combines them in unexpected ways to create terrifying architectural creations straight out of a horror movie. “I’ve chosen photography as a medium because of the cultural misunderstanding that it has a sort of built-in objectivity. This allows me to set up a visual tension within the work, to make it resonate and lure the viewer further inside. My current series is inspired by the classic horror literature of H.P. Lovecraft, Algernon Blackwood and similar authors.”

Crazy Hyper-Colored Collages by Eugenia Loli

vintage photos lolli 4

vintage photos lolli 1

vintage photos lolli 3

These smash-ups of vividly colored vintage photographs juxtapose entirely unexpected elements, like gigantic children riding tortoises through a city park or a war plane dropping candy instead of bombs. “I start by finding a ‘base’ image, and then I sort of build around it. Sometimes I have a concrete idea of what I want to do, and sometimes I leave the images to fit together by themselves,” says artist Eugenia Loli. “Sometimes, after a lot of juxtaposing, the ‘base’ image might not even be a part of the final collage. Most of the time I try to ‘say’ something important via my art, but other times it’s just about doodling.”

Bizarre Details Painted Onto Photos by Colin Batty

vintage photos batty 1

vintage photos batty 2

vintage photos batty 3

vintage photos batty 4

vintage photos batty 5

Can you imagine what the original subjects of these photos would think if they saw artist Colin Batty’s alterations? They might be a tad disturbed to see their own heads on fire or replaced by gigantic eyeballs. The artist paints with acrylics directly onto cabinet cards from the early 1900s.

Next Page – Click Below to Read More:
Twisting History 40 Surreal Altered Vintage Photographs

Share on Facebook


[ By Steph in Art & Drawing & Digital. ]

[ WebUrbanist | Archives | Galleries | Privacy | TOS ]


WebUrbanist

 
Comments Off on Twisting History: 40+ Surreal Altered Vintage Photographs

Posted in Creativity


Your Money or Your Photographs! Ransomware and How to Survive an Online Stickup

08 Jul

ATTENTION! Your PC is blocked due at least one of the reasons specified below. The warning is dire. You’ve been “caught” doing something illegal. Your photos and other data have been locked away from you because it’s “evidence” against you. But don’t worry, if you pay the “fine,” all will be released and you’re off the hook. Don’t pay and, Continue Reading

The post Your Money or Your Photographs! Ransomware and How to Survive an Online Stickup appeared first on Photodoto.


Photodoto

 
Comments Off on Your Money or Your Photographs! Ransomware and How to Survive an Online Stickup

Posted in Photography


How to Take Great Photographs at the Fairground

02 Jul

Packed with people, bright lights and fast-moving rides, fairgrounds can provide photographers with loads of opportunities to take some colourful and creative images. So, why not grab your camera, head to your nearest fair and try out some of the following ideas for yourself.

Somethingwicked750

When to visit

Fairgrounds can be fun to take pictures of, whether you go in the daytime, or at night. However, with their bright lights, they really come alive once the sun has gone down. My preferred time to arrive is around one hour before sunset, as this allows you to take a look around before it gets dark, and gives you time to plan your shots.

Arriving at this time will also enable you to shoot during the crossover period – the part of the evening where the sun has set, but there is still light and colour in the sky. The deep, dark blue sky provides a striking contrast to the bright, colourful lights and can often look better in photographs than a fully black night sky. In my opinion, this is the optimum time to capture fairgrounds in all their vibrant glory.

What to take with you

Whatever lens you choose to take, there should be some great photo opportunities awaiting you. However, if possible, take a variety of lenses to expand the range of shots you can take. A wide-angle will be useful for capturing the action of fairground rides and a telephoto will enable you to crop closer into details, or people on the rides. The accompanying shots were taken using 24-105mm and 70-200mm lenses. When visiting the fair with friends and family, I have also found it useful to take a 50mm (f/1.8) lens so that I cAN take some pictures of them enjoying themselves.

If you’re planning to capture the fairground rides after sunset you are going to need a tripod due to the slow shutter speeds that you will be using. A remote shutter release will also come in very useful to reduce the risk of blurred images from camera shake.

Photographing fairground rides

Tango750

The most dynamic and exciting photographs of fairground rides aim to convey a sense of speed and movement. Slow shutter speeds are used to capture the colourful trails and patterns created by the fast-moving lights. They’re fun to take, and you can get some dramatic shots relatively easily.

Once you have decided which ride to shoot, fix your camera to your tripod and fit a remote release. (Remember to turn off Image stabilization if your lens has this.) Shutter speed is the most important aspect of getting the correct exposure in this instance, so set your camera to shutter-priority or manual mode. The amount of movement you capture in the image will vary on a number of factors, not least the speed of the ride itself, but a good place to start is with a shutter speed of one second.

Set the ISO to the lowest setting available and the white-balance to Auto, as this should be effective in most situations. (For long-exposure shots such as these, I would recommend shooting in RAW so that you will be able to change the white balance settings during post-processing if necessary.) Autofocus may struggle in low-level light, so manually focus on a part of the ride when it is not moving.

Take a test shot using these settings while the ride is stationary to check the exposure. Pay particular attention to the sky and, if necessary, use exposure compensation. Then, as the ride begins to move, play around with the shutter speed to see what works best. Anything longer than ½ second should produce a decent amount of motion blur and light trails, the effect does depend on the speed of the ride. Keeping the shutter open for a longer time means that you can capture more light trails and patterns – although sometimes this can result in images with messier light trails and a lack of clear, distinct shapes. Ultimately, your choice of shutter speed will depend on the nature of the ride (how fast and how much it moves – vertically, horizontally, diagonally etc.) and your creativity (personal preferences between clean light trails or chaotic swirls of colour).

When composing your shot, give some thought to the angle you are taking it from. Try to get in close and shoot from a low angle, looking up at the ride to minimize distracting backgrounds, but always stay a safe distance from moving rides. Remember to leave enough space in the frame to capture all of the movement so that you don’t inadvertently cut anything off. Spend some time watching how the ride moves before taking a shot. Also, with all the movement going on, try to include a still element in the frame to help ground the image. Signage, fairground stalls, or even (non-moving) spectators can add to the story you are telling in your final image.

Photographing people at fairgrounds

Fairgroundportrait750

Fairgrounds are not just about the rides. By providing great lighting and a fun-filled atmosphere, they’re the ideal place to try out some candid photography. Candid shots of people engaging in activities around the fair will be more interesting than shots of people sitting around doing nothing and often will add an element of story to your image. Also, by being focussed on the activity, your subject is less likely to focus on you taking their photograph. This can produce better candid shots because as soon as a person knows they are being photographed, their natural behaviour tends to disappear quite quickly. Why not take advantage of all the activities on offer at the fair, and try to capture people’s reactions to the action – whether that is trying to win a prize on a fairground stall, eating one of the many sugar-based treats on offer, or even waiting in line for a ride.

When taking candid pictures, set your camera to continuous shooting mode and take a number of shots in quick succession to stand a better chance of perfectly capturing the reaction you want from your subject. Use a wide aperture to let in lots of light. It may also be necessary for you to increase the ISO setting to get the correct exposure. A telephoto lens with a focal length of around 200mm should enable you to capture the (often extreme) reactions of people on fairground rides for some particularly dramatic candid shots.

The lighting at fairgrounds can also be great for illuminating people for some posed shots. Colourful lights can produce great background bokeh for fun portrait shots of friends and family. Simply put, bokeh is created by out-of-focus light so you will need a shallow depth of field. Using a very wide aperture will help, but you will also need to think about the distance between the subject and the light sources (the further away the better) and the distance between the subject and your camera (stand close to the subject and use a reasonably long focal length). There is often enough light available from other sources to fully illuminate the subject, but a flash with a diffuser may also come in handy.

Get creative

Superbowlzoom750

One of the best reasons to take pictures at fairgrounds is that they’re a great place to get really creative as a photographer and experiment with a range of techniques. You can add movement and drama to your images, even when the rides are not moving. For instance, try to create a zoom burst effect in-camera. Use the slow shutter speed settings detailed previously, then manually change the zoom on the lens, while the shutter is open. Experiment with different shutter speeds and staggered zooms; you may be surprised at how the effect changes. For even wilder shots, try the zoom effect on a ride that is moving – to illustrate the type of effects you can achieve, the two shots below show the same moving fairground ride with the zoom burst technique applied to the second image.

Steamup452750

Steamup45zoomburst750

A good way to add an increased sense of speed to a slower ride, such as the dodgem cars or carousel, is to take a panning shot by moving your camera in line with the moving subject during exposure. The aim is to keep the subject (carousel horse) as sharp as possible and the background as blurry as possible. Shoot in shutter-priority mode and select a speed of 1/30th of a second to start. You can then experiment with slower speeds depending on the level of light and the speed of the subject. Make sure to shoot in continuous shooting mode and, if your camera has it, use automatic focus tracking. Press the shutter half way to activate the focus tracking when the subject enters the frame. Lock focus on the subject and, as smoothly as possible, pan your camera to match the movement of the subject and take your shots.

Funfairhorsepanning750

Finally, when leaving the fair, try to capture the fairground lights as part of a wider landscape shot if possible. If the fair is anywhere near water (on a seaside pier, for example) look out for the creative potential of reflected fairground lights.

Have fun!

When taking pictures at the fairground, like at any other busy event, stay safe, keep an eye on your kit and remember to have some fun while you are there!

Geesespectators750

googletag.cmd.push(function() {
tablet_slots.push( googletag.defineSlot( “/1005424/_dPSv4_tab-all-article-bottom_(300×250)”, [300, 250], “pb-ad-78623” ).addService( googletag.pubads() ) ); } );

googletag.cmd.push(function() {
mobile_slots.push( googletag.defineSlot( “/1005424/_dPSv4_mob-all-article-bottom_(300×250)”, [300, 250], “pb-ad-78158” ).addService( googletag.pubads() ) ); } );

The post How to Take Great Photographs at the Fairground by Richard Beech appeared first on Digital Photography School.


Digital Photography School

 
Comments Off on How to Take Great Photographs at the Fairground

Posted in Photography


Infographics 101: 10 Most Expensive Photographs in the World

26 Jun

The most expensive photograph in the world was sold at auction in 2007 and is worth a staggering €3.2 million. Titled “Rhein II” it was taken by Andreas Gursky in 1999. The image is digitally manipulated removing a factory building and dog walkers to leave the Rhine River flowing horizontally between fields under an overcast sky. The identity of the Continue Reading

The post Infographics 101: 10 Most Expensive Photographs in the World appeared first on Photodoto.


Photodoto

 
Comments Off on Infographics 101: 10 Most Expensive Photographs in the World

Posted in Photography


Linnaeus Tripe photographs of 1850s Burma and India on show in New York and London

13 May

An exhibition of photographs taken by Captain Linnaeus Tripe during a tour of India and Burma is on show in The Metropolitan Museum in New York, and will then move to London’s Victoria and Albert Museum. The collection of 60 images made on paper negatives display historic places, buildings, geology and the infrastructure of parts of the two countries, and were in some cases the first photographs ever to be taken of these sites. Read more

Articles: Digital Photography Review (dpreview.com)

 
Comments Off on Linnaeus Tripe photographs of 1850s Burma and India on show in New York and London

Posted in Uncategorized


Save The Memory Project restores over 400,000 photographs from Tsunami-hit areas of Japan

15 Apr

A project to salvage, clean, scan and return photographic prints found in the areas devastated by the August 2011 Great East Japan Earthquake and Tsunami has reunited over 90,000 images with their rightful owners since shortly after the disaster struck. The Save The Memory Project has recovered over 400,000 prints from the rubble of affected areas, having cleaned, scanned and posted digitized versions to an online system for owners to claim. Learn more

Articles: Digital Photography Review (dpreview.com)

 
Comments Off on Save The Memory Project restores over 400,000 photographs from Tsunami-hit areas of Japan

Posted in Uncategorized


25 Photographs of the Moon with Peace and Tranquility

28 Mar

The moon and night sky is a mysterious thing. Photographs of the moon can be tricky, but done well can convey an overwhelming sense of peacefulness and calm. I love doing night photography and when you can get the stars, moon or the Milky Way it’s even better.

Enjoy these images of the moon and allow yourself to star gaze and be inspired:

Photograph Moonlight shadows by Otto Hütter on 500px

Moonlight shadows by Otto Hütter on 500px

Photograph Bats under the moonlight by Weerapong Chaipuck on 500px

Bats under the moonlight by Weerapong Chaipuck on 500px

Photograph Winter Night by Arild Heitmann on 500px

Winter Night by Arild Heitmann on 500px

Photograph Looks like a Vulcano by Gianmaria Veronese on 500px

Looks like a Vulcano by Gianmaria Veronese on 500px

Photograph Lunar Eclipse Over Mt Shasta Revisited by Sean Bagshaw on 500px

Lunar Eclipse Over Mt Shasta Revisited by Sean Bagshaw on 500px

Photograph Dying Earth by Michael  Goh on 500px

Dying Earth by Michael Goh on 500px

Photograph El Matadors View by Ted Gore on 500px

El Matadors View by Ted Gore on 500px

Photograph The Blood Moon by Timothy Green on 500px

The Blood Moon by Timothy Green on 500px

Photograph Road to Nowhere - Supermoon by Aaron J. Groen on 500px

Road to Nowhere – Supermoon by Aaron J. Groen on 500px

Photograph Golden Bay: When Night Falls by Yan Zhang on 500px

Golden Bay: When Night Falls by Yan Zhang on 500px

Photograph Winding Owens by Nagesh Mahadev on 500px

Winding Owens by Nagesh Mahadev on 500px

Photograph BY THE LIGHT OF THE MOON by Michelle Cobble on 500px

BY THE LIGHT OF THE MOON by Michelle Cobble on 500px

Photograph Storybook by Jeff Lewis on 500px

Storybook by Jeff Lewis on 500px

Photograph Pearly Gates to Nirvana by Yuga Kurita on 500px

Pearly Gates to Nirvana by Yuga Kurita on 500px

Photograph The Polarizer by Miles Morgan on 500px

The Polarizer by Miles Morgan on 500px

Photograph Moon by Uccio78 on 500px

Moon by Uccio78 on 500px

(Okay that was a sneaky one – it’s not the moon but I think the image is great so I shared it)

Photograph Ancient Memories by Raza Durrani on 500px

Ancient Memories by Raza Durrani on 500px

Photograph The Old Bridge by Mostafa Hamad on 500px

The Old Bridge by Mostafa Hamad on 500px

Photograph with filter by Kajo_Kamil_Sadlon on 500px

with filter by Kajo_Kamil_Sadlon on 500px

Photograph Paying Reverence To The Rising Moon by Jeff Deveau on 500px

Paying Reverence To The Rising Moon by Jeff Deveau on 500px

Photograph Good Night... by Ahmet Kizilhan on 500px

Good Night… by Ahmet Kizilhan on 500px

Photograph Halo by Michael Bollino on 500px

Halo by Michael Bollino on 500px

Photograph Flight from moon by Michael Priesch on 500px

Flight from moon by Michael Priesch on 500px

Photograph Illuminate my Heart by Sherry Akrami on 500px

Illuminate my Heart by Sherry Akrami on 500px

Photograph Pink Moon  by MO AOUN PHOTO on 500px

Pink Moon by MO AOUN PHOTO on 500px

googletag.cmd.push(function() {
tablet_slots.push( googletag.defineSlot( “/1005424/_dPSv4_tab-all-article-bottom_(300×250)”, [300, 250], “pb-ad-78623” ).addService( googletag.pubads() ) ); } );

googletag.cmd.push(function() {
mobile_slots.push( googletag.defineSlot( “/1005424/_dPSv4_mob-all-article-bottom_(300×250)”, [300, 250], “pb-ad-78158” ).addService( googletag.pubads() ) ); } );

The post 25 Photographs of the Moon with Peace and Tranquility by Darlene Hildebrandt appeared first on Digital Photography School.


Digital Photography School

 
Comments Off on 25 Photographs of the Moon with Peace and Tranquility

Posted in Photography