RSS
 

Posts Tagged ‘Photographs’

5 Tips for Shooting Glass to Enhance Your Street Photographs

20 Dec

As any studio photographer will tell you, photographing translucent and reflective objects like glass for product work can be an ordeal. It’s not impossible, but it sure isn’t easy, with plenty of variables and tricky reflections to minimize and avoid.

Naturally, you can imagine my foray into street photography was both a welcome change and a culture shock. Stepping out of the studio and into the realm of street photography, I went from an incredibly controlled environment to anything but! That’s when I began to view glass in a different light. Yes, the very bane of many a studio photographer’s existence can actually be a street photographer’s blessing.

Shooting through glass

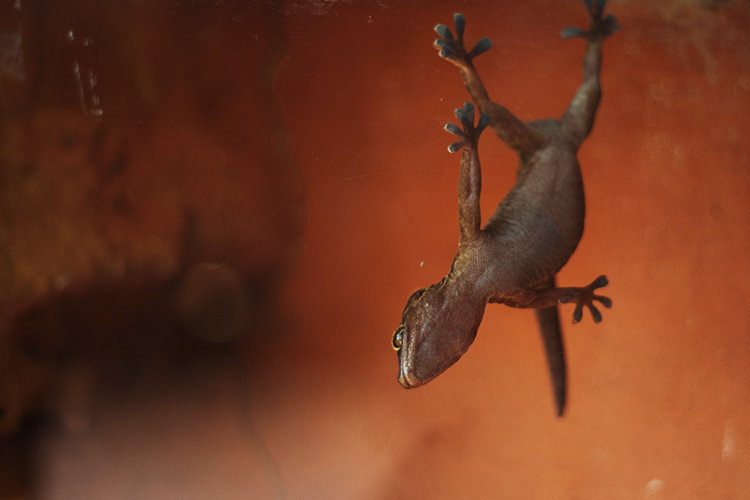
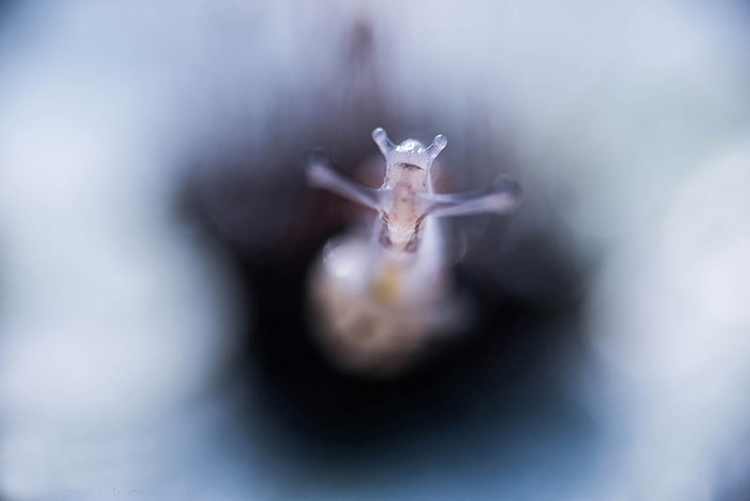
Photographing through glass lends unique perspectives, like this photo of a gecko hanging upside down on a glass enclosure.

There aren’t many fixed objects that pose opportunities as readily to a street photographer as glass. As photographers, we all (mostly) use glass in our lenses as its inherent properties focus light and correct optical aberrations, allowing us to record sharp images. Glass surfaces in the street, however, present a variable and volatile abundance of opportunity. It can soften, reflect, highlight, disguise, frame, and transpose. Glass constantly changes with the environment yet it behaves as a physical barrier between the photographer and subject, allowing for a degree of ease between the two.

For the sake of this article, I’ve narrowed the benefits of glass to only the most obvious and dramatic – color, pattern and texture, reflections and depth, glass as a physical barrier, framing and finally, distortion and perspective. Okay, so I combined a few points, but you’ll soon see that glass isn’t just for selfies and reflections. Shooting through glass can actually change up your practice and give you a whole new perspective on street photography.

1 – Color

photography-through-glass05

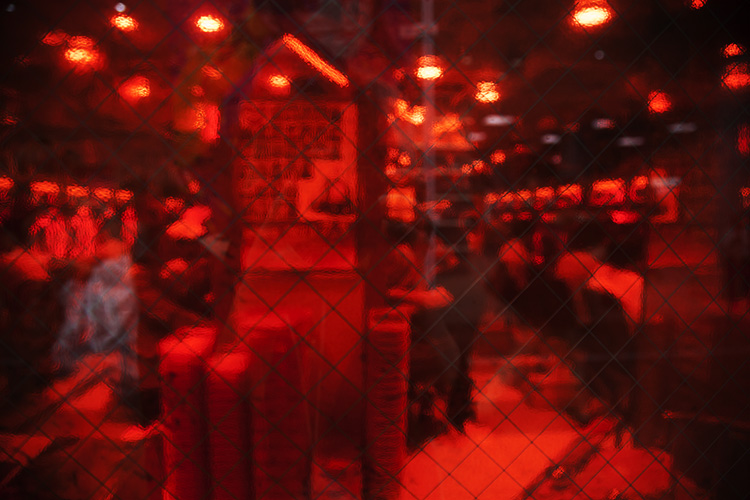
The saturated red of the glass between the subject and I adds a sense of voyeurism.

Color greatly influences how a viewer reads an image. Shooting through colored glass is a great way of adding atmosphere to your photographs without post-production. Red glass, like that found on decals or nightclubs, suggests a sense of intimacy or passion, whereas blue could suggest an aquatic or daylight setting. Color eludes to the time of day a photograph was taken and a highly saturated image can also take on a surreal appearance, distancing the viewer from the photograph and creating a feeling of voyeurism. Try photographing subjects through tinted feature walls at late-night shopping malls or through the aged glass of old windows.

photography-through-glass06

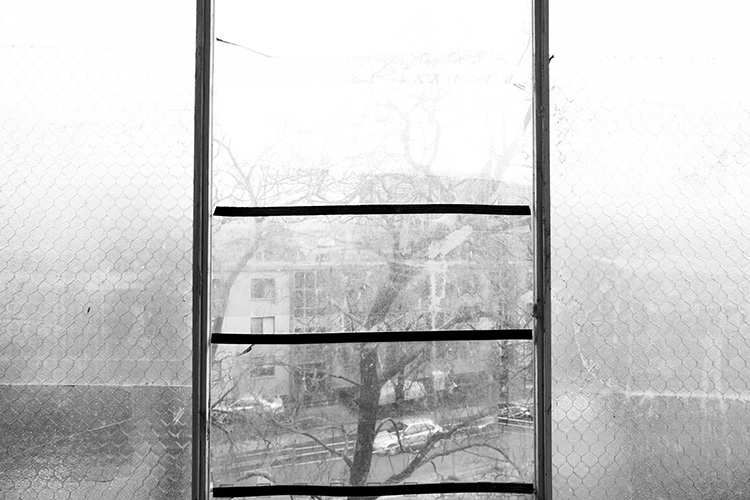
2 – Pattern and texture

Using pattern and texture in a photograph explores how an image feels as well as how it looks. Textural images appeal to our sense of touch and it allows photographers to form greater connections with an audience. Photographing textured, semi-opaque and reinforced glass divides an image into smaller sections. This prompts a viewer to dissect an image in pieces to gain a greater understanding of the whole.

Different textures are great for images with organic and inorganic subject matter too. Creating juxtapositions that draw attention to subjects that are usually discounted creates engaging subject matter. Texture also affects the way light interacts with glass, softening the subject matter behind it and emphasizing form and shape over content.

photography-through-glass04

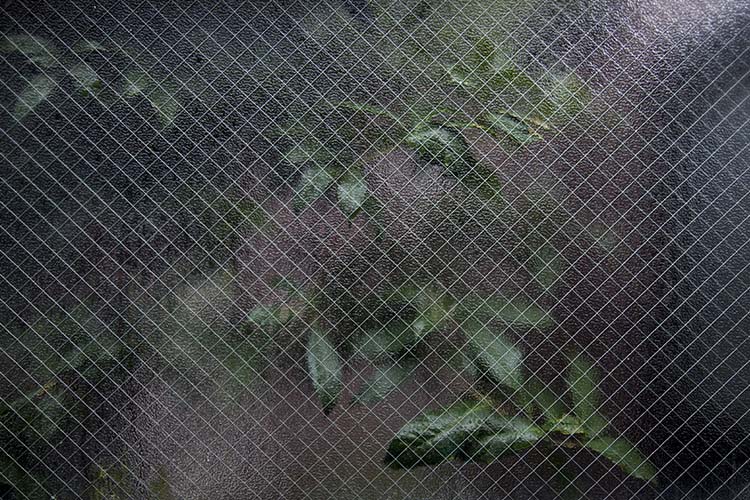
The rough, reinforced glass in the foreground of this image highlights the soft, organic form of the plant in the background.

photography-through-glass07

3 – Reflections and depth

Want to add context to a portrait but running low on legroom? Reflective glass windows are a great way to add depth to a photograph. Reflections in glass create a greater sense of atmosphere and give the viewer more information about an image. The characteristics of reflected light add tonal variety to a photograph, drawing a viewer in for a closer look. The closer you are to a glass surface, the less it will reflect, try stepping back or shifting the camera angle. Stepping back also has the added bonus of minimizing your chances of disturbing a potential subject.

photography-through-glass02

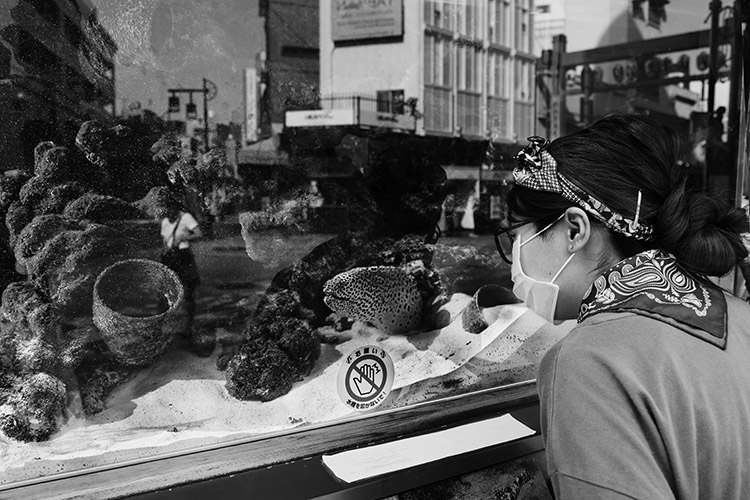
This photograph features a woman inspecting an eel in a shop window, but also includes a reflection of the street, adding depth and a greater sense of context.

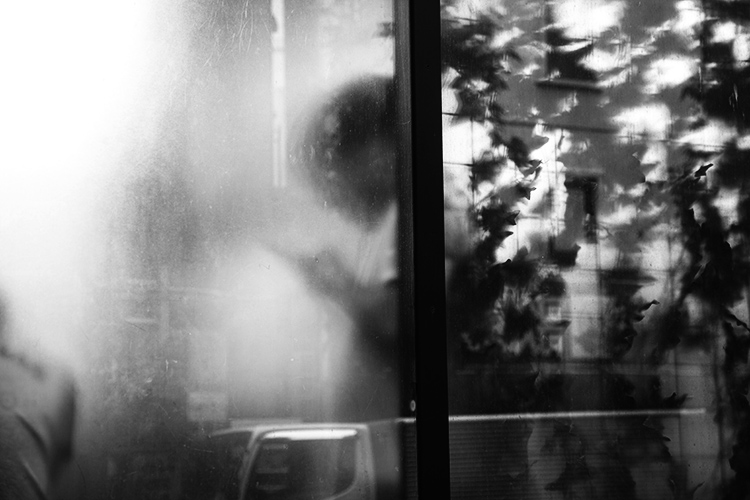
4 – The invisible wall

In my time as a street photographer, I’ve noticed an interesting psychological phenomenon. When I’m photographing subjects through transparent panes of glass – people are much more at ease. Photographing people through a glass window or panel seems to add a degree of separation. My theory is that when there is a physical barrier between you and the subject, people subconsciously feel more comfortable. Glass reduces noise and light, creating a physical partition that lures people into a sense of security.

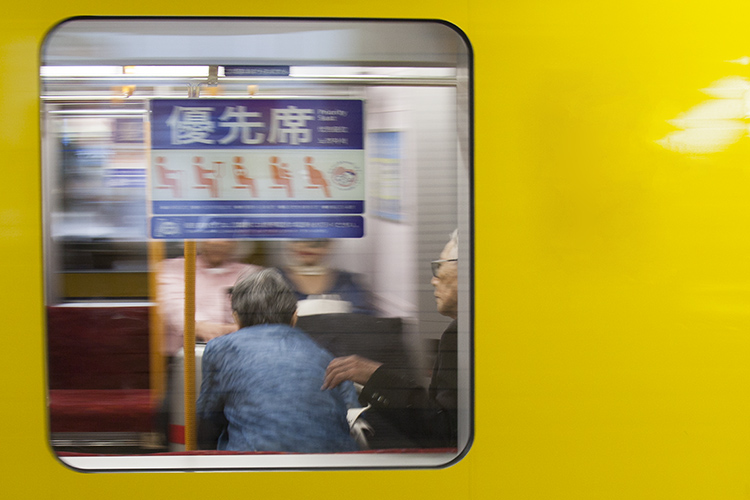
I find that when separated by a pane glass people are more likely to look directly into the lens too, allowing their curiosity to run a little freer behind a physical partition. Some of the most natural street portraits I have taken have been through glass partitions and windows. Train rides offer an excellent opportunity for unencumbered street photography.

photography-through-glass12

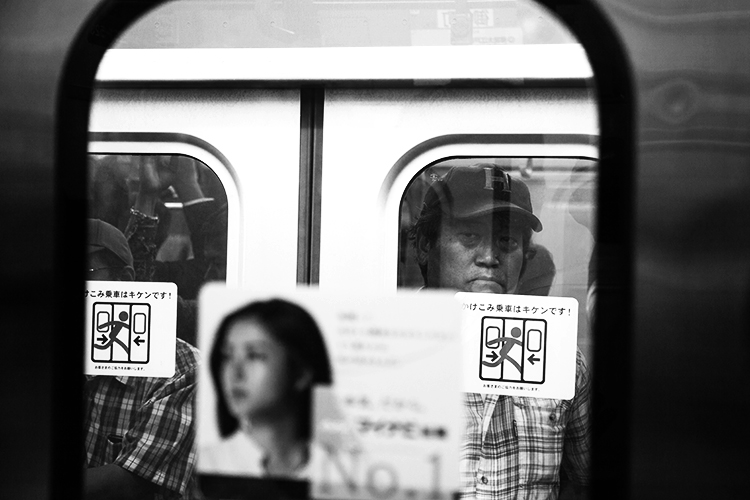
Taken from a train window, the subject and I had a bit of a stare-off before I took this shot.

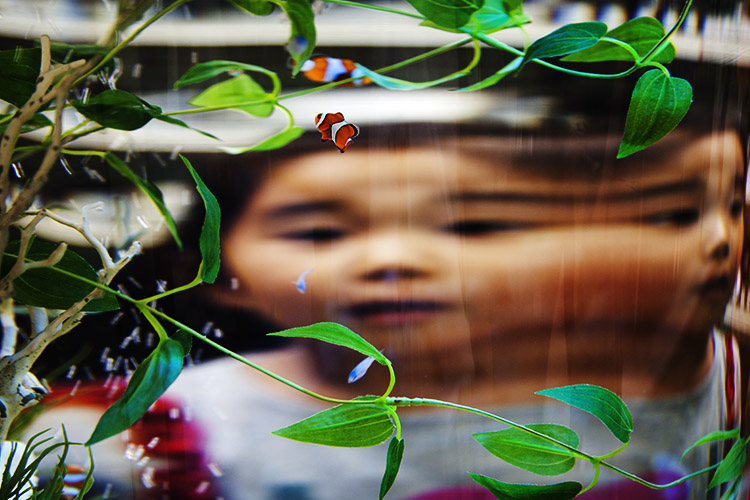
Also taken from a train window, this child was watching my train leave the station. I was quick enough to place my camera against the glass to capture her looking back at me.

5 – Framing and perspective

Emphasizing the photographer’s point of view can lend a voyeuristic atmosphere to an image. Framing is the use of shapes in the environment to guide the viewer’s eye to a point in a photograph. Photographing through glass partitions or windows emphasizes that you have captured a moment without prompting a subject, like looking through a keyhole.

Viewing a subject photographed from above feels different to viewing a photograph taken from below. One great way to take advantage of glass’s transparent nature is to focus on various animals’ attraction to transparent surfaces. Inhabitants of urban landscapes such as lizards, frogs, spiders, snails and insects all negotiate glass surfaces with ease.

A photographer with a keen eye can exploit these opportunities to capture unique perspectives of our fellow city-dwellers. Like humans, animals seem more at ease with a wall of glass to separate them from potential predators, allowing you the chance to capture a more natural photograph.
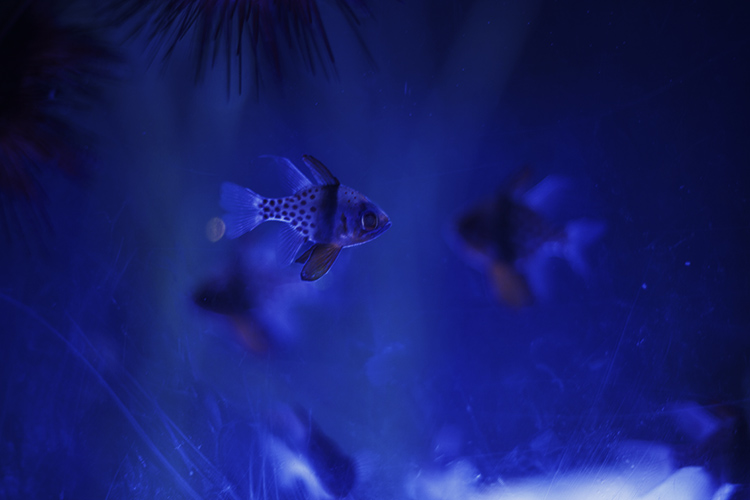
photography-through-glass13
photography-through-glass11

photography-through-glass03

Distortion

Light traveling through glass often behaves in surprising and interesting ways. If light touches even the most minute curved surface it refracts, distorting anything viewed through it. Planning a shot in front of a pane of glass can yield fascinating and surrealistic photographs.

Try experimenting with different thicknesses of glass at varying degrees of curvature. Aquariums and aquatic displays are good for honing this technique because the water inside the glass containers amplifies the distortion. Holding variously shaped prisms over the front of your lens can yield some surprisingly effective and interesting results too.

photography-through-glass08

Conclusion

Transparent, opaque, tinted, laminated, textured, reinforced… there are endless varieties of glass and each presents a unique opportunity for you as a photographer. Although I’ve tried to list a few of the more dramatic ways to use glass in street photography, the potential is limitless and exciting.

photography-through-glass14

They key to taking great street photographs is to be open to opportunity and quick on the shutter button. With limited time to capitalize on the moments that are presented to you, focusing on surfaces like glass that can yield fascinating results quickly and is a fool-proof way of enhancing your craft.

googletag.cmd.push(function() {
tablet_slots.push( googletag.defineSlot( “/1005424/_dPSv4_tab-all-article-bottom_(300×250)”, [300, 250], “pb-ad-78623” ).addService( googletag.pubads() ) ); } );

googletag.cmd.push(function() {
mobile_slots.push( googletag.defineSlot( “/1005424/_dPSv4_mob-all-article-bottom_(300×250)”, [300, 250], “pb-ad-78158” ).addService( googletag.pubads() ) ); } );

The post 5 Tips for Shooting Glass to Enhance Your Street Photographs by Megan Kennedy appeared first on Digital Photography School.


Digital Photography School

 
Comments Off on 5 Tips for Shooting Glass to Enhance Your Street Photographs

Posted in Photography


Getting the Right Timing for Great Outdoor Photographs by Planning Ahead

09 Sep

There is more to taking great outdoor photographs than a pleasing composition and the correct exposure. There is another important aspect. One that is too often overlooked when trying to capture a beautiful scenic subject or vista. The right timing is required to get great photographs.

Often on social media sites, images are posted that show ideal composition and exposure. But they are not photographed at the best time of day to capture the most attractive and interesting image. Some say that taking the most eye-catching photos is only about luck; being in the right place at the right time. But with the proper preparation, the odds of creating an exceptional photo can be increased. Certainly, without any pre-planning, you may be able to create “okay” images on a regular basis, but let’s examine the role timing takes in capturing more stunning images.

Here shooting toward the east in the evening produced some nice light on this image.

Shooting toward the east in the evening produced some detail-revealing light on this image.

Research

Much preparation for an outdoor photo shoot can be done from your computer, before even leaving the house. Listed here are three very effective tools that can help you find great shots. They can show you where you want to be, and when you want to be there:

  • Google Earth: The Google Earth software provides street views of any location on earth. This is very useful, as you can literally see and plan a shot from your computer before leaving to shoot. Google Earth gives you the ability to determine the best location, and its ideal angle to capture before even arriving!
  • GPS: Use GPS devices to help navigate to the exact location where you plan to shoot.
  • The Photographer’s Ephemeris: TPE is a very useful on-line tool to help plan outdoor photography. Its maps show how natural light falls on the earth both day and night for any location on earth, and for any time or day in the future!

    Screen capture from TPE showing the direction of the sun at the time the image of the statue and church was captured.

    A screen capture from TPE shows the direction of the sun when the above image of the statue and church was captured.

Time of day

Photographing at the right time of day is a big factor to getting the right light for a special image. It is a well-known fact among serious art-driven photographers, that some of the best light for making great outdoor images, happens early in the morning and late in the afternoon. These are called the “golden hours”.

But in addition to shooting during those times, notice should be taken as to where the sun is casting its light. Shooting into the light will mean that your subject will be in the shadows, or even silhouetted. Yes, the exposure can be compensated in this situation, but watch what happens to the sky in the image. It will be blown out and colorless. There are times when this shot may work, but the point here is to always be aware of the direction of light.


Same location as above, but this time it was shot in the morning. Notice how the sky is completely blown out when getting the exposure on the statue. Even tho this is nearly the same image as above, it doesn't have near the impact.

Same location as above, but taken facing into the morning sun. Notice how the sky is completely blown out when the exposure is set for the statue. Even though this is almost the same image as above, it doesn’t make near the same visual impact.

Don’t leave this factor to luck. When planning a trip, try to schedule the day around good light. Shoot westward in the morning, and toward the east in the late afternoon and early evening. Midday light in most cases is very harsh, and produces very contrasty images and deep shadows. Again, producing arresting images in this light is possible, but is also definitely more challenging.

So what does one with a camera do in the middle of the day? Rest or travel! The bottom line is, that if you are on vacation, with an open agenda, and are looking to take great photos of the sights, plan around the light to get the best results.

Using TPE I was able to determine the exact day that the sunrise would aline with the bridge to capture a one of a kind image.

Using TPE I was able to determine the exact day that the sunrise would aline with the bridge to capture a one of a kind image.

Season

Considering the season of the year can make a great difference in your photos. The angle of the sun changes from season to season. For instance, photographing a deep canyon in the winter will produce a much different image than one taken in the summer. Because of the lower angle of winter sun, light won’t reach the canyon floor as it would in summer.

Besides the change in light, there is the obvious a variation of foliage colors (or the absence thereof) from one season to the next, that can completely change the image captured at a given location. Sometimes it is fun to capture a four-season image of the same subject and location.

Weather

Weather conditions are a great factor when it comes to capturing the perfect scene. They should always be considered, even though they can’t be planned.

Overcast days, while not great for sky images, often produce very nice even lighting. This is ideal for shooting things like waterfalls. Bright sunlight can make it almost impossible to capture the scene without blowing out the water, and making it necessary to use a Neutral Density filter. Don’t look at dreary weather as always being a negative; rather, turn those negative conditions into a positive result. For instance, a foggy morning may mess with a pre-visualized image in one location, but an alternative location nearby may be perfect for foggy conditions.

This waterfalls was captured while the sun was shining. Notice the hot spots created by the sun on the water.

These waterfalls were captured while the sun was shining. Notice the hot spots created by the sun on the water.

Same waterfalls as above by this time captured in cloudy conditions allowed for a long exposure with out the hot spots or a ND filter.

Cloudy, overcast conditions allowed for a long exposure of the same waterfalls, removing the hot spots or need for an ND filter.

Rainy conditions may also produce pleasing effects on the subjects being photographed, darkening bright rocks and saturating foliage. However, it may be necessary to use a polarizing filter to reduce glare.  Also, when faced with unexpected weather conditions, be patient! Some rather fantastic shooting conditions occur following storms. Watching and waiting for just the right weather-related effects can provide an opportunity to capture a unique image, of even the most commonly photographed locations.

Special Occurrences

You could be out all night. Your tripod and camera all set up to watch the skies to photograph a meteor shower, and not see a single streak of light!  But with a little research you can ascertain when the next large meteor shower will occur. Thus the chance to capture the desired photos will be increased. To take the meteor shower experience one step farther, look for a night without a moon. This will help the stars to appear more vividly in the photographs. Use The Photographer’s Ephemeris to find special occurrences of the moon or sun, or look for times when the sun or moon rise or set may be in line with a special location. This a fun and creative way to produce a fascinating image, instead of an ordinary one.

Using TPE to reseach is image I knew the exact time an location of the full moon rising. What really made this image was the sunset at my back that was casting some fantastic light on the city. Knowing this facts allowed me to create a one of a kind image of Marietta Ohio. One that I have sold many times.

Knowing when and where the moon would rise allowed me to plan and be ready to capture a unique image of Marietta, Ohio. Using TPE to research this image, I knew the exact time and location of the full moon rising. The sunset light behind me cast fantastic light on the city, that absolutely defined the shot, prints of which I have successfully marketed.

Day of the week

Every photo event timing factor considered so far has had something to do with light and lighting. But timing also includes the aspect of planning a less stressful, more convenient, and possibly more productive photo shoot. The day of the week is one such factor.

Time off from day-to-day activities often happen for many individuals and families on the weekends. Many are out visiting popular locales en force on those days. High traffic photo sites are best visited mid-week. There will be a better chance of having more room to work, free of other photographers attempting to get the same shot.

Conclusion

To wrap up this article on timing and preparation, remember the five P’s of capturing that great image:

Proper Planning Prevents Poor Photographs

Whether just taking a day trip or a long vacation, planning your photographs around the best available light will increase your chances of capturing a memorable image.

Do you have any tips for planning for the best light? Please leave them in the comments below.

googletag.cmd.push(function() {
tablet_slots.push( googletag.defineSlot( “/1005424/_dPSv4_tab-all-article-bottom_(300×250)”, [300, 250], “pb-ad-78623” ).addService( googletag.pubads() ) ); } );

googletag.cmd.push(function() {
mobile_slots.push( googletag.defineSlot( “/1005424/_dPSv4_mob-all-article-bottom_(300×250)”, [300, 250], “pb-ad-78158” ).addService( googletag.pubads() ) ); } );

The post Getting the Right Timing for Great Outdoor Photographs by Planning Ahead by Bruce Wunderlich appeared first on Digital Photography School.


Digital Photography School

 
Comments Off on Getting the Right Timing for Great Outdoor Photographs by Planning Ahead

Posted in Photography


‘Ansel made photographs, he didn’t take them’: Jeanne Adams interview

27 Aug

Ansel Adams’ name is synonymous with landscape photography, but a new interview with Adams’ daughter-in-law Jeanne reveals more about a lesser known side of his work. The long-time CEO of the Ansel Adams Gallery talks with Advancing Your Photography’s Marc Silber, discussing the legendary photographer’s portraiture and architectural imagery, and shares some stories of Adams’ interactions with his workshop participants. 

Articles: Digital Photography Review (dpreview.com)

 
Comments Off on ‘Ansel made photographs, he didn’t take them’: Jeanne Adams interview

Posted in Uncategorized


15 Photographs from Ed Ruscha and the Great American West

16 Jul

I had a wonderful opportunity to attend the press preview on Thursday for the new exhibition “Ed Ruscha and the Great American West,” which opens today and runs through October 9th at the de Young Museum in San Francisco.

Ed Ruscha has long been a hero of mine. With my own photography focusing on the American Road and my background growing up in Los Angeles, so much of Ruscha’s work has always rung true to me personally and I’ve felt a certain sort of affinity with it. Gas stations, neon signs, old swimming pools, and the images of a uniquely American experience, fill the current Ruscha exhibition. Mixed in with these beautiful, nostalgic and iconic images are the words that further explain this modern life: “Honey . . . . I Twisted Through More Damned Traffic to Get Here,” “God Knows Where,” “Slobberin Drunk at the Palomino” I remember back in high school or was it college once watching X, or maybe the Blasters or the Knitters perform back at North Hollywood’s Palomino, my memory is hazy and alcohol likely was involved.

“In 1956, at the age of 18, Ed Ruscha left his home in Oklahoma and drove a 1950 Ford sedan to Los Angeles, where he hoped to attend art school. His trip roughly followed the fabled Route 66 through the Southwest, which featured many of the sights—auto repair shops, billboards, and long stretches of roadway punctuated by telephone poles—that would provide him with artistic subjects for decades to come.” This may be all the inducement you need to read to get you to this show.

Here are 15 photographs that I took on Thursday at the new exhibit representing my own interpretation.

Standard

Every Building on the Sunset Strip

A Particular Kind of Heaven

Slobberin Drunk at the Palomino

Honey . . . . I Twisted Through More Damn Traffic to Get Here

Hollywood

Poolside, Series of Nine Photographs

God Knows Where

Burning Gas Station

Hollywood, 19698

La Brea, Sunset, Orange, De Longpre

Texas

Ed Ruscha

15 Photos from Ed Ruscha and the Great American West-9

Ed Ruscha and the Great American West Exhibition Store

Complete 15 photo set here, but everything usually looks better on Ello. ?

More Ruscha here.

More de Young Museum here.


Thomas Hawk Digital Connection

 
Comments Off on 15 Photographs from Ed Ruscha and the Great American West

Posted in Photography


National Geographic details how it searches for altered photographs

06 Jul

The cover photo for National Geographic’s February 1982 issue featured a camel train in front of the Pyramids at Giza. Soon after publishing the issue, National Geographic was called out for having manipulated the image, altering it to place the pyramids closer together so that the horizontal photo would be better suited for the magazine’s vertical cover. Since then, National Geographic has been vigilant in monitoring for photo alterations, the process of which it described in a recent issue.

Speaking about manipulated photos, National Geographic Editor in Chief Susan Goldberg said, ‘At National Geographic it’s never OK to alter a photo. We’ve made it part of our mission to ensure our photos are real.’

As part of that mission, the publication requires its photographers to submit raw files with their images; this goes for members who submit photos to Nat Geo’s ‘Your Shot’, as well. In the absence of these raw files, Goldberg says the company asks the photographer ‘detailed questions about the photo.’ As well, the company’s director of photography Sarah Leen explains, ‘We ask ourselves, Is this photo a good representation of what the photographer saw?’

Ultimately, though, what is acceptable to one person or organization may not be acceptable to another, something Goldberg highlighted with an example. One of the publication’s photographers recently had a photo rejected by a contest panel of judges who deemed the image overprocessed. National Geographic didn’t share that view, however, and published the photo itself.

Articles: Digital Photography Review (dpreview.com)

 
Comments Off on National Geographic details how it searches for altered photographs

Posted in Uncategorized


How to Use a Reflector and Diffuser to Enhance Flower Photographs

26 Jun

Photograph Flowers 2016-05-11at15-41-06

cover-fill-card

Learning to see and use light is one of the most important steps to creating great photographs. As you become more aware of what nice light really looks like, you can start to manipulate even the harshest conditions with some simple tools. The photo above was shot in bright sunshine using both a diffuser and a reflector.

full-sun-overview

Practice

To practice this exercise, find some flowers in bright sun. You can photograph flowers that are planted in your garden, or in pots.

Photograph-Flowers-in-sun-3

Photograph-Flowers-in-sun-2

Notice the quality of light on the flowers. In bright sun, there are strong highlights and deep shadows. There is lot of contrast, which comes through in the image.

Photograph-Flowers-2016-05-11at15-34-44

Notice how you lose detail in the highlights. The bright spots caused by the sun don’t add anything to the photograph, in fact, they are very distracting. Our eyes tend to go toward the brightest spots in a photograph and in this situation, the highlights are drawing our eyes away from the center of interest – the flower.

Photograph-Flowers-2016-05-11at15-09-23

Add a reflector

Now, try using a reflector. Light bounces just like a billiard ball. By placing a light colored, reflective surface opposite the light source, you can bounce light back into the subject. In this instance, our light source is the sun, so I placed the reflector under the leaves to bounce the light back into the shadows. You can use almost anything as a reflector. In this example, I’m using a piece of white poster board.

Read DIY How to Build and Use a Reflector to Take Better Portraits and 10 Ways to Use a 5-in-1 Reflector for more help on using reflectors.

Just-below-full-sun-using-fill-cards

Notice the difference in the image above, compared to the one without the reflector. Can you see how bouncing the light back in brightens up the flower? The exposure settings haven’t changed. The only difference is the reflector (also called a fill card) in the second shot.

Photograph-Flowers-2016-05-11at15-08-06

Diffuse the light

Now, we are going to use a diffuser to soften the light.

Photograph-Flowers-reflector-above-better2

Here we are starting to see some really beautiful, soft light. Notice how even the light is and how much softer the flowers feel. The highlights and shadows are not as severe and harsh, and more detail is retained in both areas.

Photograph-Flowers-reflector-above

Use a reflector and diffuser

Take it a step further.

Photograph-Flowers-2016-05-11at15-09-41

Let’s use a diffuser with a reflector, and see how that looks. Here’s a tip for you: If you can’t prop up your reflectors and diffuser and press the shutter button, you can use the 2-second self-timer on your camera to free up an extra hand.

Photograph-Flowers-reflector-above-and-below

With the diffuser above and a reflector below, the flowers start to take on a magical feel.

Photograph-Flowers-2016-05-11at15-12-20

fill-card-reflector-top-and-bottom

cover-fill-card

Now you can see how using a reflector and diffuser can drastically improve your flower photographs. I also want to add that none of these photographs were manipulated in Lightroom or Photoshop in any way, other than a little sharpening. The dramatic difference in the photographs was created entirely by manipulating light.

Please share you comments and questions below, then try this exercise at home and post your photos in the comments below. I’d love to see them!

googletag.cmd.push(function() {
tablet_slots.push( googletag.defineSlot( “/1005424/_dPSv4_tab-all-article-bottom_(300×250)”, [300, 250], “pb-ad-78623” ).addService( googletag.pubads() ) ); } );

googletag.cmd.push(function() {
mobile_slots.push( googletag.defineSlot( “/1005424/_dPSv4_mob-all-article-bottom_(300×250)”, [300, 250], “pb-ad-78158” ).addService( googletag.pubads() ) ); } );

The post How to Use a Reflector and Diffuser to Enhance Flower Photographs by Vickie Lewis appeared first on Digital Photography School.


Digital Photography School

 
Comments Off on How to Use a Reflector and Diffuser to Enhance Flower Photographs

Posted in Photography


How to Enhance Urban Night Photographs Using Luminosity Masks in Photoshop

19 Jun

As the sun sets on a city’s skyline, thousands of lights come flooding the concrete jungle, turning every urban scene into a photographer’s paradise. Every corner around the city suddenly seems too irresistible not to be photographed.

Image 01

Urban night shots is probably one of the most common photos taken at night. The way most people shoot cityscapes at night is to keep the camera still, press the trigger, and snap the shot. The result is often an uninspired image, with overexposed highlights due to the long exposure. This problem can be fixed by blending multiple exposures, to recover details in the highlights with luminosity masks.

Image 02

Overexposure of highlights circles in red.

Using Luminosity Masks is a way of making a selection based on the luminosity (or brightness) value of the pixels. The main advantage of luminosity masks over other selection tools is its ability to feather the edges, which makes the transition seamless. One of the earliest articles detailing how luminosity masks works was published by Tony Kuyper. You can learn more about luminosity masks here.

In this tutorial, I will show you step by step, how you can recover detail in the highlights of your urban night shots, using luminosity masks in Photoshop. There are two parts to this: taking the multiple exposure, and editing them in Photoshop with luminosity masks.

Part one: How to take multiple exposures

  • Step 1: You need a tripod, and a camera that has aperture priority and manual mode.
  • Step 2: Mount your camera on the tripod and compose your image. In aperture priority mode, set the aperture and ISO settings you want, and take a shot with the default metering mode (usually matrix metering).
  • Step 3: Review the image on the LCD screen and take note of the shutter speed. Switch your camera to manual mode and dial in the ISO, aperture, and shutter speed that you used for the first shot.
  • Step 4: Speed up your shutter speed by one stop and take a shot again. For example, if the initial shutter speed was 30 seconds, stopping up by one stop would be 15 seconds (the shutter speed halves).
  • Step 5: Repeat step 4 until you can see details in the highlights by zooming in on the LCD screen on your camera, and checking the histogram for clipped highlights (blinks).

Tip: Use a remote release and/or enable mirror lockup (in a DSLR) to ensure the sharpness of your photos.

Part two: Recovering the highlights using luminosity masks in Photoshop

Step 1: If you use Adobe Lightroom, select all the images you want to blend. Right click on the mouse, choose Edit in > Open as layers in Photoshop. Otherwise, you can open them individually in Photoshop, use the move tool and drag each image into a single file as layers.

Step 2: Make sure the images are arranged such that the brightest exposure is at the bottom of the layers. To make sure all images are absolutely aligned, select all layers, then go to Edit > Auto-Align Layers. You may have to crop the image a bit after alignment.

Image 03

The layers are arranged so that the brightest image is at the bottom.

Step 3: Make sure you have luminosity masks Photoshop Actions to add and remove luminosity masks. If you don’t, you can download it here (the file is zipped, so make sure you unzip it first, then follow the instruction on how to install it here).

Step 4: To start off, make all layers invisible except the bottom two (layer 1 and 2). You can do so by unchecking the eye icon next to each layer. Next, create a mask for Layer 2 and fill it with black.

Image 04

Step 4: Next, generate luminosity masks based on Layer 1 (the brightest exposure). To do that, select Layer 1 on the layers panel, and generate the luminosity mask with the Photoshop Action.

Step 5: Go to Channels panel, select a Brights luminosity mask that targets just the highlights. In this case, Brights 2 seems like a good choice because it is not too restrictive and has good feathering on the edges.

Image 05

Step 6: Select Brights 2 luminosity mask by holding down CMD (Mac) or CTRL (Win) and left click on the mask. You should see marching ants appear on the image. Depending on your image, if you do see a pop-up window that says “Warning: No pixels are more than 50% selected…”, don’t worry about it and just click ok.

Step 7: Go back to the layers panel and click on the mask on layer 2. Select the brush tool, set the opacity to 50%, color to white, and paint over the layer mask to blend the darker exposure (Layer 2) into the brighter exposure (Layer 1 below). Depending on your image, you can choose to paint just the brightest highlights or all of them. In this example, I chose to paint all the highlights. If you find the marching ants annoying, hit CMD (Mac) or CTRL (Win) + H key to hide them.

Image 06

Details in the highlights are gradually recovered.

Step 8: Delete the luminosity masks generated previously because you now need luminosity masks based on the brightness of Layer 2, where you have just blended in the darker exposure. To do so, remove the current luminosity masks with the Photoshop Action.

Step 9: Now select Layer 2 and generate luminosity masks with the Photoshop Action.

Step 10: Select Layer 3, add a layer mask, and fill it with black.

Step 11: Go to the Channels panel, select a brights mask that targets the highlights. In most cases, selecting the same mask should do the job. In this example, I have chosen the Brights 2 mask again.

Image 07

Comparison of Brights mask for Layer 1 and Layer 2.

Step 12: Hold down CMD (Mac) or CTRL (Win) and click on Brights 2 mask to select once again. Go back to layers panel and click the mask on Layer 3, then use a white brush as before, and paint over the highlights again. You should see details being recovered gradually. At this stage, you should consider painting over the brightest highlights only instead of the whole image. In this example, I only painted the highlights as circles in the illustration below.

Image 02

Step 13: Repeat Steps 8 to 12 until you are done with all the layers. Your final image should have a more balanced exposure, with details in the highlights. You can then apply further tonal or color adjustments, and sharpening to your image.

Image 08

Final image.

Bonus: Adding a reflection and color to the lights

This involves a lot of editing, and may not be for everyone. For those of you who are into post-processing, you can clean up the image by removing unwanted objects, add a reflection, and change the color of the lights.

Adding a reflection

This only works if you have an empty foreground in your image like the example here.

  • Step 1: Use the rectangular marquee tool and make a selection of the city’s skyline. Then, copy and paste it as a new layer.
Image 09

Copy and paste the selection as a new layer.

  • Step 2: Select the layer of the copy, hold CMD (Mac) or CTRL (Win) + T to transform. Move your cursor to the image, right click and select > Flip Vertical. Use the move tool to position the flipped image lower to align the border.

Image 10

  • Step 3: You can add a ripple effect to the reflection by going to the top menu and selecting Filter > Distort > Ripple. Keep the size of the ripple to medium, set the amount you like, and press ok.
  • Step 4: Increase the contrast of the reflection by adding a curves adjustment layer, and clip it to the reflection layer only. To do that, right click on the curves layer and select Create Clipping Masks. You should see a little arrow on the curves layer pointing down at the layer below it. You can also reduce the opacity of the reflection layer if you like.
image-11

Clipping curves adjustment to the layer below.

Image 12
Final image with reflection.

Adding color to the lights

  • Step 1: You need a visible layer to begin with. If you don’t have one, you can go to the menu on the top and choose Layer > Merge Visible.
  • Step 2: Generate luminosity masks based on this layer. Remember to delete any luminosity masks you had before this.
  • Step 3: Select a brights luminosity masks that targets the highlights. In this example, I know from before that brights 2 mask works very well, so I’m going to choose it again. Select it by holding cmd (Mac) or ctrl (Win) + left click on your mouse.
Image 13

Brights 2 luminosity mask.

  • Step 4: Add a new layer, and change the blend mode to soft light. The selection should be automatically loaded onto this new layer already.
  • Step 5: Now fill the with the color of your choice by holding down Shift + Backspace, select a color, and press ok. You should now see the color of the lights have changed subtly.

Image 14

  • Step 5: If you want the effect to be stronger, duplicate the layer once or twice until you like it.
Image 15

Duplicate the layer for a stronger effect.

  • Step 6: The final step is what makes the lights glow. Double click on the top layer to bring up the layer style. Check the box for outer glow, and pick a color that is slightly darker than the one you have used before. Click ok and your done!
Image 16

Apply outer glow for the final touch.

Apply a few other tweaks and sharpening and you’ve got yourself a cool urban night cityscape!

Before

Before

Image 01

After


googletag.cmd.push(function() {
tablet_slots.push( googletag.defineSlot( “/1005424/_dPSv4_tab-all-article-bottom_(300×250)”, [300, 250], “pb-ad-78623” ).addService( googletag.pubads() ) ); } );

googletag.cmd.push(function() {
mobile_slots.push( googletag.defineSlot( “/1005424/_dPSv4_mob-all-article-bottom_(300×250)”, [300, 250], “pb-ad-78158” ).addService( googletag.pubads() ) ); } );

The post How to Enhance Urban Night Photographs Using Luminosity Masks in Photoshop by Yaopey Yong appeared first on Digital Photography School.


Digital Photography School

 
Comments Off on How to Enhance Urban Night Photographs Using Luminosity Masks in Photoshop

Posted in Photography


5 Steps to Increase the Sharpness of Your Photographs

13 May

Image001

Here are five steps you can take which help to increase the sharpness of your photographs:

1) Keep your lenses, filters, and camera sensor clean

Somewhat of an obvious point, but a very important one nonetheless. If your lenses and/or filters have dust or debris on them, however small and unnoticeable to the naked eye, it can create ugly soft spots on your photograph. There have been countless times I was in such a hurry to go shoot, I didn’t check the glass to see if it needed a good cleaning. This especially holds true if the lens I am using has been sitting on my shelf for a while, collecting dust. Even if the lens has been wrapped up in a pouch with a cap on top, it can still accumulate dust on the outer element.

Quick side issue: This is why it’s a good idea to keep a protective filter over your lenses when they are resting on a shelf, or when you are traveling. Along with the front lens cap, a protective filter helps to keep dust off the lens glass. If you get scuff marks or dirt on a cheap protective filter, who cares? But if you scuff up the outer element on the lens, it’s costly to fix.

Back on point: It can be very frustrating to think you’ve got yourself a good shot, only to upload the images to your computer and see ugly spots scattered all over the image. You can use the Dust and Scratches Filter in Photoshop, use the healing brush, and/or clone away only so much before the smudges become a real time-consuming burden.

This is easily avoidable if you make it a routine to clean your glass before heading out to shoot.

Image002

2) Shoot at the lowest possible ISO

The higher the ISO, the more noise you introduce into the image.

Sometimes you absolutely have no choice but to shoot at a higher ISO. For example, if you are in a poorly lit gym shooting your kid’s basketball game, you are going to need a relatively high ISO to freeze the action, even with a fast lens. Newer cameras mitigate this issue somewhat, because they are able shoot at higher ISOs without a significant amount of noise.

Additionally, if you are only going to be displaying low resolution photographs on Facebook or elsewhere on the internet, or printing small 5X7 pictures, you can get away with some noise in the photo. But, if you are going to be creating larger prints, or will be showcasing the images on the internet at a high resolution, you want your images tack-sharp, and lower ISOs undoubtedly help. There are all kinds of software programs which can help reduce noise in a photograph, but the more noise you are correcting, the softer the image will become.

This segues nicely into the next step because, if you lower ISO, your shutter speed will slow down (assuming aperture is constant). One way to shoot tack-sharp photographs at slow shutter speeds is to use a sturdy tripod.

Image003

3) Use a sturdy, well-grounded tripod

On a tripod, you can shoot at any shutter speed and the camera and lens will (ideally) stay motionless. This assumes your camera is firmly fastened to the tripod head, and the tripod’s foundation is well anchored and balanced on the ground. Don’t take that for granted – just because you’re on a tripod doesn’t mean everything will stay locked in place. Make sure your tripod feet are solidly on the ground before setting up the camera (I usually press down relatively hard on the tripod to make sure the ground won’t give way…this is especially important on loose ground like mud, wet rocks, or sand).

Then, once your composition is set, make sure your tripod head is locked in position. Additionally, If your tripod has a hook beneath the centre column, hang something with a little bit of weight on it to further lock down the tripod (I usually hang my backpack on the center hook). Even a gentle gust of wind, or the vibration from a nearby car passing by, can introduce minor camera movement into a tripod setup, so you want that setup locked down as tightly as possible.

Image004

4) Mind your shutter speed

If you are going to hand-hold the camera, it is customary to choose a shutter speed that is at least as fast as the reciprocal of the focal length you are using. For example, if you are shooting with a 50mm lens, then you will want your shutter speed to be at least 1/50th, or faster, to get acceptable sharpness. Any slower and you risk motion blur. If you are shooting with a 500mm telephoto, then you want at least 1/500th or faster, and so on. The one caveat to this formula is if your camera or lens has some sort of additional stabilization, like Nikon’s Vibration Reduction (VR – called Image Stabilization or IS on other cameras). This will allow you to shoot at slower shutter speeds, usually by several stops, without introducing significant motion blur.

Image005

5) Lock-up the mirror before firing away

When you are looking through the viewfinder in a DSLR, what you see is the light which passes through the lens, but you don’t actually see it until it bounces off a couple of mirrors. The light of the scene enters through the lens, bounces off of a mirror that sits at an angle directly in front of the shutter/sensor, then it travels through a pentaprism or penta-mirror, before it finally reaches the viewfinder.

So, in order for the exposure to be taken, the mirror in front of the sensor has to flip up, then the shutter opens to allow light to hit the sensor. If the mirror flips up at the same time the shutter opens, there is the potential for very slight movement of the camera due to vibrations caused by the mirror flipping up.

Most modern DSLRs give you the option of locking the mirror up well before the exposure is taken. The Nikon D810, for example, gives you the option of locking up the mirror anywhere between one and three seconds before the shutter opens (Nikon calls it Exposure Delay Mode). I always choose three seconds, unless there’s a need to shoot quicker. That makes sure the camera is nice and still before the shutter opens and the exposure is taken.

Note: if you’re using a mirrorless camera you don’t have to worry about this step!

This is also helpful if you forgot to bring along a remote shutter. Pressing the camera’s shutter release almost always causes slight movement in the camera. But, if the camera waits a couple of seconds after the mirror flips up, it gives the setup time to become completely still again.

Image006

Do you have any additional tips or tricks to increase sharpnes in your images? Please share in the comments below.

googletag.cmd.push(function() {
tablet_slots.push( googletag.defineSlot( “/1005424/_dPSv4_tab-all-article-bottom_(300×250)”, [300, 250], “pb-ad-78623” ).addService( googletag.pubads() ) ); } );

googletag.cmd.push(function() {
mobile_slots.push( googletag.defineSlot( “/1005424/_dPSv4_mob-all-article-bottom_(300×250)”, [300, 250], “pb-ad-78158” ).addService( googletag.pubads() ) ); } );

The post 5 Steps to Increase the Sharpness of Your Photographs by Jeb Buchman appeared first on Digital Photography School.


Digital Photography School

 
Comments Off on 5 Steps to Increase the Sharpness of Your Photographs

Posted in Photography


Six Essential Steps to Taking Great Photographs

05 May

Whether you have been creating photographs for years, or only for few weeks, your goals and dreams are to create great photographs that everyone will admire. You may notice this is not an easy task, and I’m sure that most of the time you experience more disappointments than successes. But don’t worry, I have for you six essential steps that will help you speed up the process, and give you confidence on your journey to these elusive great photographs.

Step 5 - Organise by eva polak

Step 1 – See

Seldom does a photograph succeed because of unusual technique or exotic equipment. Most of the time it succeeds for one simple reason – the photograph was well seen. So, to create great photographs we just need to learn to see better.

Unfortunately this isn’t as easy as it sounds. There’s more to seeing than just looking. It requires time and patience. Begin by concentrating on the objects before you; see how light strikes those objects; see colour, see quality and direction of light, see contrast, see texture, lines,forms and shapes, see details.

The strength of a photograph is directly related to how well, and how carefully you see things around you.

Step 1 - See by eva polak 2 Step 1 - See by eva polak

Step 2 – Feel

Feeling has to do with the emotions generated by a place or subject. Sometimes you need to just sit and absorb your surroundings. Listen to the wind and the birds. Smell the flowers. Feel the rough texture of the trunk you sit on. If you are photographing an animal, watch its movement and behaviour. If you are photographing people, listen to their words, and try to understand their feelings expressed by body language. You can’t photograph the smell of flowers, the sound of birds, or the feelings of a person, but the emotions generated by them can guide you in finding the essence of the scene or subject.

Step 2 - Feel by eva polak 2 Step 2 - Feel by eva polak

Step 3 – Think

This is the most important step in the process. Strong images begin in the mind, not in the camera. Before you begin photographing ask yourself, “Why am I about to take this photo?”

Think about how you will use that sensual input and combine it with your camera, the lighting, and the mood. Is the lighting the best? Would soft, overcast light work better? What about angle of view? High angle? Low angle? Which lens will give the effect you are after? What about shutter speed and aperture?

Answering all these questions is very easy when you have a clear idea of why you want to take an image. Your choices will be completely different when you want to just record your holiday, as opposed to capturing the warm glow cast over the scene by the evening light.

Step 3 - Think by eva polak 2 Step 3 - Think by eva polak

Step 4 – Isolate

Many good shots have been spoiled through poor composition. We tend to concentrate our attention on the subject of a photo, remaining oblivious to what is going on beyond. Make a habit of spending just a second or two before pressing the shutter, checking the viewfinder for any unwanted elements. Get rid of those chaotic objects in the picture. Simplify. Isolate only those elements that convey the message you are trying to express. Emphasize the strong lines, shapes, patterns, textures or colours – but not all of them at once. Be bold and decisive. Ask yourself why. What does it contribute to the overall image? Can you make it stronger by isolating even more? Would you hang that picture on your wall? If not, why not?

Step 4 - Isolate by eva polak Step 4 - Isolate by eva polak_2

Step 5 – Organize

Having isolated carefully, you now need to organize or arrange the elements in the strongest possible way. Where should you place the subject in the frame? In the centre? If so, why? The arrangement may be too boring or static, or on the other hand, it may convey a sense of peacefulness. Or should you put the subject near the edge of the frame? What about the picture orientation itself? You have a choice of creating a vertical or a horizontal image. Which is best for the subject? Vertical orientation tends to emphasize vertical lines or the height of things. Horizontal orientation can give emphasis to sweeping panoramas or the movement of subjects. When you make these choices, always by guided by the message that you are trying to express.

Step 6 - Experiment by eva polak Step 6 - Experiment by eva polak_2

Step 6 – Experiment

Digital photography makes it easy to experiment because you have instant feedback on the LCD screen. Look for new ways to portray familiar subjects. Don’t always photograph the same kinds of scenes in the same ways. Be creative, try different lenses or compositions or angles of view. Play with light. Investigate, explore, observe, evaluate. Don’t be afraid to make mistakes, and above all, have fun!

googletag.cmd.push(function() {
tablet_slots.push( googletag.defineSlot( “/1005424/_dPSv4_tab-all-article-bottom_(300×250)”, [300, 250], “pb-ad-78623” ).addService( googletag.pubads() ) ); } );

googletag.cmd.push(function() {
mobile_slots.push( googletag.defineSlot( “/1005424/_dPSv4_mob-all-article-bottom_(300×250)”, [300, 250], “pb-ad-78158” ).addService( googletag.pubads() ) ); } );

The post Six Essential Steps to Taking Great Photographs by Eva Polak appeared first on Digital Photography School.


Digital Photography School

 
Comments Off on Six Essential Steps to Taking Great Photographs

Posted in Photography


7 Quick Tips on How to Use Visual Balance to Make Better Photographs

19 Dec

Balance is one of the characteristics of good composition. It is the way elements of an image are arranged to create a feeling of stability. If you imagine that your image is a set of scales, all elements of your composition should be balanced to make a photograph feel stable.

balance 1 eva polak

There are many ways to create balanced images. The easiest way to achieve it is by using symmetry, as it guarantees left to right, or top to bottom balance. The results look formal, organized, and orderly.

If you would like to create a balanced composition that feels more casual, free, and energetic, then use asymmetry.
To understand this concept, let’s go back to our analogy of a set of scales. If you have several small items on one side, they can be easily balanced by one large object on the other side. Visual balance works in a very similar way, but it can be affected not only by the size of objects, but also by their value, colour, texture, quantity, orientation and isolation.

Different colours, shapes and sizes create different degrees of visual interest. So, to achieve asymmetrical balance you need to arrange elements of all different visual weights, when composing your image, in such a way that each side is still balanced out.

balance 2 eva polak

There are seven basic factors to consider when you compose your images with visual balance in mind. Let’s have a close look at how you can use these different factors affecting visual weight and gain some advantage.

1 – Colour

1 Colou by Eva Polak

Colour has many properties that can affect an object’s visual weight relative to others in the photograph, such as saturation, brightness, darkness, and hue. Warm colours advance into the foreground and tend to weigh more than cool colours, which recede into the background. Red attracts attention better than any other colour, and thus has the highest visual weight as opposed to yellow, which has the least visual weight. Also bright colours attract more attention than subdued colours.

2 – Size

2 Size by Eva Polak

Large elements appear heavier than small ones. Size is an evident visual weight factor because, in the physical world, an object that’s bigger than another will naturally be heavier, and will take up more physical space. Large elements command more attention. We naturally see them first, or spend more time looking at them anyway.

3 – Value


3-Value-by-Eva-Polak.jpg

Value is a powerful tool for balancing images. Dark elements feel heavier than light items. The higher the value-contrast (between object and background), the heavier will be the weight of the object.

4 – Texture

4-Texture-by-Eva-Polak.jpg


Texture adds visual weight to items in photographs. Texture is just more interesting and our eyes are drawn to it. Smooth areas will feel lighter than those with a lot of heavy texture.

5 – Isolation

Objects isolated in a space appear heavier than those surrounded by other elements. Look at the image below with a brown circle on it. Your eyes go directly to the brown circle first because there’s nothing else to see.

5-Isolation-by-Eva-Polak.JPG


6 – Quantity

A few small objects can balance out a single large object. Repetition of objects can be used here as well. In the example below, the three small berries are balancing out the large berry.

6-Quantity-by-Eva-Polak.jpg


7 – Orientation

Vertical objects appear heavier than horizontal objects. A diagonal orientation carries more visual weight than a horizontal or vertical one. Lines can be very powerful in your composition. Pay close attention to them.


7-Orientation-Eva-polak.JPG

Remember, you don’t have to balance colour with colour, or light with dark – you can mix and match your visual weights. For example, a counterweight to a large, bright area might be a small red object. Experiment with different kinds of balance and play around with visual weight. See what works best for your images and the story you want to tell.

As you go out exploring with your camera on your next photo shoot, keep balance in mind and the seven factors of visual weight. Look closely and try to determine which elements are commanding the most visual weight when you compose your photographs, and see how they affect balance in your images.

If you have any comments or questions please post them below. And we’d love to see your visually balanced images.

googletag.cmd.push(function() {
tablet_slots.push( googletag.defineSlot( “/1005424/_dPSv4_tab-all-article-bottom_(300×250)”, [300, 250], “pb-ad-78623” ).addService( googletag.pubads() ) ); } );

googletag.cmd.push(function() {
mobile_slots.push( googletag.defineSlot( “/1005424/_dPSv4_mob-all-article-bottom_(300×250)”, [300, 250], “pb-ad-78158” ).addService( googletag.pubads() ) ); } );

The post 7 Quick Tips on How to Use Visual Balance to Make Better Photographs by Eva Polak appeared first on Digital Photography School.


Digital Photography School

 
Comments Off on 7 Quick Tips on How to Use Visual Balance to Make Better Photographs

Posted in Photography