RSS
 

Posts Tagged ‘Photographing’

Tips for Photographing a Lunar Eclipse

02 Apr

_MG_5566-M
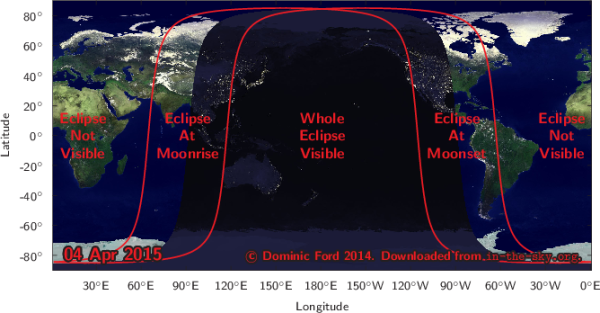
While some obscure astronomical events get over-hyped, a total lunar eclipse is always a crowd-pleaser. It is easy to observe and photograph, even among the bright lights of the big cities. April’s Easter Lunar Eclipse (2015) is visible from North America, across the Pacific to Australia, and eastern parts of Asia. The photography advice below will also serve the rest of the world well in September when an eclipse is visible to those who miss out on this one.

Eclipse Details for Saturday April 4th, 2015

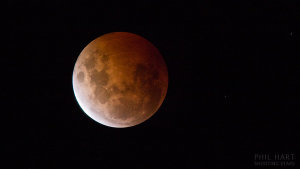
A lunar eclipse occurs when the alignment of the moon’s orbit is just right, taking it inside Earth’s shadow at the time of full moon, when the moon is opposite the sun. This total eclipse occurs on Saturday April 4th, 2015, in the morning for observers in the Americas, and the evening for those in Australia and Asia. In total, this eclipse lasts for three and a half hours but totality, where the moon is fully inside our shadow, only lasts for around five minutes.

Because the moon only grazes into the shadow, this eclipse is likely to be a little brighter than usual, and the color more orange than red. For people in eastern Canada and the United States, as well as western parts of South America, the moon will set before the total eclipse begins, but you will have the opportunity to create unique images of the moon setting partially eclipsed.

lunar_201504

Visit in-the-sky.org for event times in your area. Change your location on the right hand side if the automatic selection is incorrect.

Photographing a Lunar Eclipse

There are two main approaches to photographing a lunar eclipse using just a DSLR and a tripod, excluding more complex approaches with telescopes and tracking mounts.

  1. You can get in as close as possible with a telephoto lens to capture detail of the changing partial, and total phases of the eclipse.
  2. Create wide-field and composite images showing the stages of the eclipse as the moon moves through the sky.

Wide-field Eclipse Composites

Lunar Eclipse over Maryborough Station-M

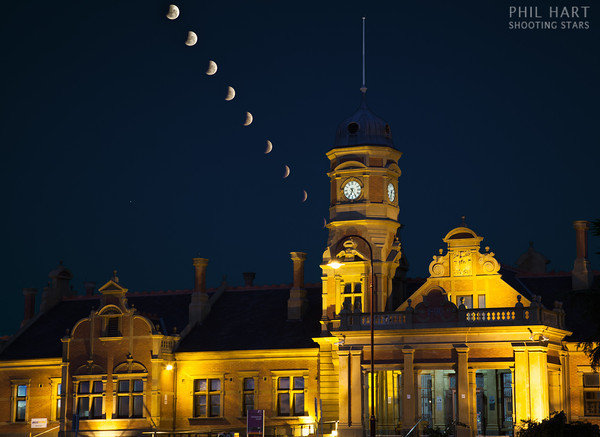
Partial phases of a lunar eclipse over Maryborough Station.
Canon 5D Mark II, 24-105mm lens at 82mm.
Nine exposures of the moon each 1/90 sec, f/8, ISO 200.
Images stacked is PS using lighten blending mode with one 2 second exposure of the foreground.

The moon moves across the sky at approximately 15 degrees per hour or 50 degrees over the full duration of the eclipse. You need a wide angle lens around 18mm focal length (28mm on a full frame camera) to capture all the stages of the eclipse in one field of view. An alternative is to frame up part of the eclipse with a longer focal length about 50mm (80mm on a full frame camera) like the image above which shows the partial stages in more detail.

In the northern hemisphere, the moon (like the sun) moves from left-to-right through the sky. So at the start of the eclipse, position the moon in the left side of the frame leaving it room to move across the image during the eclipse. Reverse that advice in the southern hemisphere. Night sky planetarium Apps such as Stellarium and SkySafari (iOS only) allow you to visualize the path of the moon through the sky to help plan your framing.

Telephoto Eclipse Images

With a moderate telephoto lens you can get nice detail of the changing stages of a lunar eclipse. During the partial stages the brightness of the moon allows for very short exposures, so trailing it should not be a problem, although you will need a sturdy tripod and use mirror lock-up to reduce vibration.

Lunar Eclipse Partial Phases Composite Canon 1100D, 300mm lens with 1.4x teleconverter, 1/125 sec, f5.6, ISO200

Lunar eclipse partial phases composite.
Canon 1100D, 300mm lens with 1.4x teleconverter, 1/125 sec, f/5.6, ISO 200

During totality, the Moon’s brightness greatly reduces, however this eclipse will be a little brighter than usual. Aim for exposures of around one second with the aperture wide open, and push the ISO as much as you need to, being careful not to blow the highlights on the brighter edge. You should be able to capture images like this one below, which is an example of what you can do even with regular affordable cameras (although nice lenses do help).

_MG_5566-M

Totality during a lunar eclipse
Canon 1100D, 300mm lens with 1.4x teleconverter, 1/2 sec, f/5.6, ISO 200

Eclipse at Moonset

In the eastern United States and Canada, and the western half of South America, the moon will set during the partial stages before total eclipse. Through central areas the moon will set while totally eclipsed which will make it much dimmer than a normal moonset and potentially hard to see amongst bright city lights. In the western half of North America you get to enjoy the partial phases leading up to, and including the total eclipse, then capture the moon setting as the partial phases reverse at the end of the eclipse.

You can use apps and software like The Photographers Ephemeris (Android/iOS) and Photo Pills (iOS only) to plan the alignment of the moon against landscape features as it rises or sets. Australian photographer Colin Legg captured this shot of the moon rising during an eclipse last year. An astronomer would immediately recognize the unusual configuration – a crescent moon can normally only appear in a twilight sky in the same direction as sunrise or sunset. Here the crescent moon appears amidst the beautiful shading of Earth’s shadow and The Belt of Venus, opposite where the sun set about 15 minutes earlier. Similar images before sunrise will be possible across North and South America during April’s lunar eclipse.

2014-10-08-Lake-Ballard-Lunar-Eclipse-115mm-1200

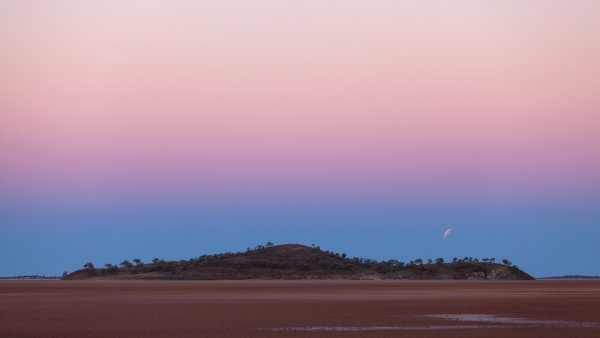
Lunar Eclipse over Lake Ballard, Western Australia – image courtesy of Colin Legg

Will you get out and give it a go? Share any comments and questions below, and if you get a great shot of the eclipse share it here too. You might want to share it on the weekly photography challenge Shoot the Moon also.


fi3-340x220Want more night sky photography tips? Right now Phil’s eBook Shooting Stars is 50% off over at Snapndeals. Now only until April 27th!

googletag.cmd.push(function() {
tablet_slots.push( googletag.defineSlot( “/1005424/_dPSv4_tab-all-article-bottom_(300×250)”, [300, 250], “pb-ad-78623” ).addService( googletag.pubads() ) ); } );

googletag.cmd.push(function() {
mobile_slots.push( googletag.defineSlot( “/1005424/_dPSv4_mob-all-article-bottom_(300×250)”, [300, 250], “pb-ad-78158” ).addService( googletag.pubads() ) ); } );

The post Tips for Photographing a Lunar Eclipse by Phil Hart appeared first on Digital Photography School.


Digital Photography School

 
Comments Off on Tips for Photographing a Lunar Eclipse

Posted in Photography


Photographing Special Events Like the Birth of a Baby

17 Mar

200

Sometime in your life as a photographer, you might be lucky enough to get the chance to photograph an event that is so special, so sacred, so personal, that all you can do is be grateful that you have been invited to be part of that unforgettable moment.

My photos and words will focus on photographing the birth of a brand new baby, but there are many other events, some happy, some sad, that you might be asked to photograph, and these suggestions may help you with those times too.

057

Be Respectful

Above all else, be respectful. This moment isn’t about you. It isn’t about your amazing sparkling personality. It isn’t even about making sure you “set up a perfect shot”. My goal at each birth is that ultimately, they won’t even remember that I was there. They will have beautiful photographs that help them remember all the delightful details of that moment, but they won’t have memories of a photographer barking orders, or pushing their birth coach to the side to get a better shot.

133

I have a rule for myself that I don’t disturb anything that is going on. I try not to move anything, and I don’t give any suggestions to anyone about where they should be or what they should do. I have stood on a chair for a better vantage point, but I want to capture what would happen if I wasn’t even there.

Make sure that you have permission, and that the hospital, or wherever you are photographing the event, is okay with you being there. You might want to mention to the nurse, midwife, or doctor, that you have no intention of getting in their way, and that they can let you know if you are, and you will move.

199

Discuss Expectations

Make sure you know exactly how much they want photographed. Especially in a situation like a birth, there are many different comfort levels. Sometimes I photograph everything, and sometimes I photograph only what they’d want to show friends and children later. Make sure you know what they’re hoping to get, and make sure they know what you are willing to deliver. Birth stories can be very unpredictable, so make sure you are both prepared for things going differently than how you planned.

177

Every single birth story I have photographed has been vastly different, but that’s one of the things that makes them so amazing to photograph. I am photographing events as they unfold, not knowing when or exactly how everything will happen. I even photographed two births in the same night one time, one right after the other, and they were both their own unique, perfect story. I was a bit tired the next day, but it was so worth it!

104

Be Prepared

Since you won’t know how long you will be there, and what might happen, be prepared for anything. Make sure your batteries are fully charged (I will admit that I had a bit of learning curve on this one. I had three batteries in my bag, all at one bar. As I checked one after the other, I couldn’t believe that I had forgotten to charge my spares. Luckily one battery lasted the entire time, (and it wasn’t a big deal, but it could have been a tragedy), make sure you have extra memory cards, and have your camera ready to go at a moment’s notice.

I give the parents my cell phone number, my home number, and my husband’s cell phone number. I tell them to keep me updated as we get closer to the due date, and let me know about any labor, even if they think it might be false labor. It’s a guessing game to know what time to be there, but I try to be there around one or two hours before delivery, erring on the side of being there too early rather than too late (I missed a delivery by five minutes one time. The hospital was 30 minutes away, and neither I nor the parents expected labor to go that fast. It was one of my saddest days as a photographer).

116

You might even want to bring water, a snack, and a book or magazine to read. If things are progressing slowly, you will be glad you brought them. You don’t want the laboring mother, or her birth coach to feel like they need to worry about feeding and entertaining you. Remember, they shouldn’t even remember that you are there.

188

Be a Keen Observer

Watch carefully so you don’t miss any emotions. Be aware of what could be coming, so you can position yourself in the right place at the right time. In the above photo, I knew that the mom didn’t know if she was having a girl or a boy, and I also knew that she had four boys already. I knew the moment she found out would be a very emotional moment. When she heard, “It’s a girl!” and had that baby placed in her arms, there was no holding back the tears of joy for any of us. Yes, I cry during births. It hasn’t hurt my camera yet.

Be sensitive about emotions that they may not want to remember in a lot of detail later. Some moments during labor are very intense, and sometimes a mom might not be as in control as she hopes to be. I had a friend tell me once that she had a photographer at her birth, and she was disappointed later when she got the photos and saw herself. Her good memories of the experience were overshadowed by seeing pain and loss of control on her face in the photos.

280

The story that you are telling with your photos will be a big part of the memory that will stick with them, long after that day. The moments of pain can be captured by photographing the support and love: a hand held, a shoulder to lean on. Tell the story true, but focus on the strength, love, joy, wonder, and amazement.

Have you ever had the chance to photograph a birth or other special event? I’d love to hear about your experience in the comments.

googletag.cmd.push(function() {
tablet_slots.push( googletag.defineSlot( “/1005424/_dPSv4_tab-all-article-bottom_(300×250)”, [300, 250], “pb-ad-78623” ).addService( googletag.pubads() ) ); googletag.pubads().enableSingleRequest();
googletag.pubads().disableInitialLoad();
googletag.pubads().collapseEmptyDivs( true );
googletag.enableServices();
} );

googletag.cmd.push( function() { googletag.display( ‘pb-ad-78623’ ); } );

googletag.cmd.push(function() {
mobile_slots.push( googletag.defineSlot( “/1005424/_dPSv4_mob-all-article-bottom_(300×250)”, [300, 250], “pb-ad-78158” ).addService( googletag.pubads() ) ); googletag.pubads().enableSingleRequest();
googletag.pubads().disableInitialLoad();
googletag.pubads().collapseEmptyDivs( true );
googletag.enableServices();
} );

googletag.cmd.push( function() { googletag.display( ‘pb-ad-78158’ ); } );

The post Photographing Special Events Like the Birth of a Baby by Melinda Smith appeared first on Digital Photography School.


Digital Photography School

 
Comments Off on Photographing Special Events Like the Birth of a Baby

Posted in Photography


Tips for Photographing Cars

03 Mar

tips-photographing-cars-01

The scene setup – by placing parking a car in the shade of a building on a sunny day, you can use the ambient light as your main light, illuminating the contours of the vehicle.

Photographing reflective surfaces is no walk in the park. So, as you can imagine, photographing cars, which are essentially just giant reflective objects, is really difficult. It comes with all the same challenges, magnifies them, and adds the new wrinkle of your subject being too heavy to reposition easily. Sounds like fun, right? It can be, and it can still be pulled off without the use of a commercial studio, a giant cyclorama wall, or car-sized softboxes.

Made in the Shade

Take a look at the image above, you can see that I have a Tesla Model S set up in the shade of a building, on a sunny day. By positioning the car so that the ambient light illuminates the overall contours of the car and then placing lights in the shadow areas, it treats the ambient as the main light, and uses the surroundings to advantage, rather than fighting against them. This will minimize the frustration of trying to eliminate the ambient light, which would likely be an exercise in futility, especially when using small flashes.

tips-photographing-cars-02

The ambient light reading – by exposing for the highlights on the car’s windshield, I was able to determine which areas in which to add flash.

Before setting up any lights it’s helpful to start by taking a test shot, getting an exposure of the car’s highlights, especially such as the windshield, which would typically be the brightest spots. This exposure will likely look pretty dark, not unlike the image above. It will allow you to see exactly what the ambient light is doing and whether you need to reposition the car to change the angles of the light falling on the car. This exposure will also help you to determine where to add your flashes. The diagram below shows the lighting diagram used for the Tesla shot.

tips-photographing-cars-03

The lighting diagram – after getting an exposure of the ambient light, I was able to determine where to best place my three speedlights.

tips-photographing-cars-04

The raw file – the shadow areas are filled in with accent lights, although some cleanup in post-processing was needed.

I own three flashes, and I needed all of them for this shoot. When lighting reflective surfaces, you need a large, soft light source. To accomplish this, I brought several 40×60” white foam core panels with me, along with several light stands and sand bags. I set up two panels, one at each end of the car, securing them to light stands. I then aimed a full-powered flash into each panel. Since I couldn’t set up a third panel to light the middle of the car without blocking my view of it, I set my third flash on the ground, aiming it into the tire rim. The light placement was effective, although a bit of cleanup in post was still needed.

tips-photographing-cars-05

The lightroom settings – I chose to desaturated the image, one color channel at a time (rather than toggling over to Black and White mode or lowering the global saturation) in an effort to retain the mood in the photo.

The most obvious issue that needed taken care of was the unsightly reflection in the car door. Though the white panel served in lighting the contours of the side of the car, it left a garish reflection. Eliminating it required something a bit more powerful of a tool than the what Lightroom’s Spot Removal tool offered. Instead, I used Lightroom to color grade the image as well as bring up the highlights in a few areas, (see above). The red highlighted areas show where I painted in a brush adjustment, raising up the Exposure, Brightness, and Clarity sliders.

I also chose to desaturate the image, since it was already essentially monochromatic, except for the grass. Note that I kept the file in Color mode, rather than toggling over to Black and White mode or lowering the global saturation, and opted to instead desaturate the individual color sliders in the HSL panel. This is because I wanted to preserve the dark, moodiness in the image, and for reasons I don’t didn’t quite understand, the overall brightness of the image increases when I toggle over to Black and White mode. I also used the Luminance sliders to control the highlight and shadow portions of the image. For example, by lowering the Yellow slider in the Luminance panel, I dimmed the highlights in the grass, which had yellow in it, and shifted the focus back to the car.

tips-photographing-cars-06

The final shot – once the image was color graded and minor spots had been removed, I opened up the file in Photoshop to remove the white-board reflections, specifically the white panels at the base of the building in the background and the edge of the roof, (Figure 6). If specialized cleanup is not your forte, it’s totally acceptable (if not recommended) that you send the file off to a retoucher to finish it up for you.

Attention to Detail

Tips photographing cars 07

The setup – I am not a car person. By that I mean that I couldn’t tell you one old hot rod from another. That said, I find them to be absolutely gorgeous objects to look at. So, when the owner of this beautiful machine led me back to the spot where his latest project sat, I got really excited when my eyes caught sight of the immaculately restored, 1932 Ford Roadster (I only know the name because he told me). The details were phenomenal. Though I knew nothing of its history, and didn’t even really care about driving it or even riding in it, I knew that I had to photograph it. The owner pulled out a vintage magazine photo of a similar car and asked if I could make a photo that looked like that. I smiled and said, “We can do better than that.”

But first, the car needed to move. He had parked the car in front of a large, white door, in full view of the morning sun. This meant harsh, direct light, which was unflattering and boring. I quickly scanned the area, spotting a one-story brick building across the street, with a wall, still in the shade. I asked if he could drive the car over there, positioning it just inside the shade (see above).

Tips photographing cars 08

The lighting diagram – similar to the previous Tesla scenario, I used two of my lights to illuminate the front, and back ends, of the car. This time, however, I placed my third light between the car and the back wall, creating a nice separation between them.

Since I had come to the shoot prepared to photograph portraits and not cars, I didn’t have white panels to bounce light off of. I still only had three flashes that I could use to light an entire car. But just like the previous scenario, I used the ambient sunlight as the main light, adding accent lights to the front and back portions of the car. It helped that I had less car to light. This was a two-seater roadster, and thus was about three feet shorter than the Tesla. This meant that the back rear flash was able to light both tires this time, freeing up my third light to be placed between the car and the building behind it. That created a nice separation between the car and the wall. It also served to highlight the amazing detail of the open-air hood, which allowed you to see straight through to the wall (see below)

Tips photographing cars 09

The final shot – my favorite part is the open-air engine that allows you to see straight through to the back wall.

Do you have any other tips for photographing cars? If you’ve tried it share your ideas. If you haven’t give it a try and share your images and any questions you may have.

googletag.cmd.push(function() {
tablet_slots.push( googletag.defineSlot( “/1005424/_dPSv4_tab-all-article-bottom_(300×250)”, [300, 250], “pb-ad-78623” ).addService( googletag.pubads() ) ); } );

googletag.cmd.push(function() {
mobile_slots.push( googletag.defineSlot( “/1005424/_dPSv4_mob-all-article-bottom_(300×250)”, [300, 250], “pb-ad-78158” ).addService( googletag.pubads() ) ); } );

The post Tips for Photographing Cars by Nick Fancher appeared first on Digital Photography School.


Digital Photography School

 
Comments Off on Tips for Photographing Cars

Posted in Photography


Vital Tips for Photographing and Editing Interiors

15 Feb

Shooting interiors can be tricky. Spaces tend to either look cold and empty, or warm and inviting. While we always strive to capture what the eye sees, the complexity of the human eye will never be matched by the lens of any camera. Still, there are things you can do before, during, and after shooting an interior space that will go a long way in improving your chances of ending up with stellar photos.

Not sure where to start for improving your architectural photos? Here are my favorite tips for photographing interiors, plus some tricks for touching them up with Adobe Lightroom.

Interiors1

How to Shoot Your Best Interior Photos

Grab your favorite camera and use these tips for snapping more professional-looking photos every time.

1. Prepare the space

Set the stage by taking the time to de-clutter and open up the space. Clear all flat surfaces and floor areas. Open all blinds and curtains. Clean any dirty dishes in the sink and put them away. Be sure to clean the space much more so than you would for yourself. We get used to clutter and become blind to it, but a bit of clutter in a photo goes a very long way.

2. Add warmth and life with personal touches

The space should feel lived-in and inviting, like the kind of place you can imagine yourself spending your days.

You can create those feelings in your photos, by adding personal touches. Set the dining table for two and place a vase of fresh flowers in the center. Transform an empty breakfast nook into a great spot to lounge by adding a newspaper, coffee cup, and a plate or bowl of light (and pretty) snacks. Hang a fluffy bathrobe on a hook next to the bathtub.

When it comes to decorations or color palettes, you want to either fill the space with personality to play up the uniqueness of it, or keep everything neutral with pops of bright color.

Interiors2

3. Fill the room with light

All interior lights MUST be on. While they’re not necessarily helpful in actually lighting the space, they help to create the ambiance. The absence of interior lights will give the space a cold, empty feel.

When using flash, never directly point it into the space. Instead, bounce it off the ceiling or walls, depending on what the space offers. If you can help it, always use flash as a source to fill in shadows, rather than as a main source. That said, if there is enough ambient light (which is your ultimate goal), skip using flash altogether.

Also, play with the strength of your flash. For my Canon, I like to slightly overexpose by about 1/3 of a stop and push the flash to about +2/3 in ETTL mode. Each camera can be different, so don’t be shy about experimenting with what works best with yours.

For outdoor shots, consider setting your flash to manual mode and using it as the fill light. I tend to set mine at 1/16th of full strength, but again, experiment with what works with your camera’s setting and your personal preference.

4. Shoot low

Keep verticals as truly vertical as possible by shooting from a slightly lower camera angle. If you’re going for a graphic composition, watch your horizontals as well. It’s quite easy to fix these issues in Lightroom during your final edit (see more in the first editing tip below).

5. Strike a balance

When composing your shot, focus the viewer’s attention on where you want it to go. Consider using staged items to add depth and interest in the foreground. Try blurring the background to make foreground objects really pop. Avoid flat looking photos by contrasting different elements in the foreground, middle-ground and background. Remember to aim for balance, not distraction.

Using the background to show a connecting room is also a great way to give the viewer a sense of space. This will add interest and make the viewer feel like they can visualize walking through the home.

Interiors3

How to Edit Your Interior Photos

Import your photos to Lightroom and follow these basic editing steps to create more powerful images. Tip: You can also use Photoshop for many of the steps laid out below.

1. Straighten out the lines

Doing this will instantly polish up your photos. If you shot at a height of roughly five feet from the floor and kept the camera level, the amount of straightening you have to correct should be minimal. In Lightroom, you can find this tool under Lens Correction under the Manual section (tab).

2. Fill in and even out the light

Screen Shot 2015 02 10 at 2 01 28 PM

Before doing any adjustment to brightness or exposure, be sure to correct any lens vignetting that may have happened. This is when the corners of the image are a bit darker, and is a common effect in wide lenses. You can find the slider for this setting in Lightroom under Lens Correction, Manual, then Vignetting.

Once your corners are corrected, use the Adjustment Brush to correct the exposure in bright or dark areas. This is your time to “dodge and burn.” I find that erring on the side of overexposure actually has a more natural feel to the space. I recommend pushing the overall exposure up slowly, then when it feels too bright, start pulling back.

You can also lighten dark areas slightly with the shadows slider in the top (Basic panel) section. However, be careful not to lighten so much that you bring out grain (noise) or that the image looks fake.

3. Perform color corrections

Adjust the overall temperature as needed. You’re aiming for warmth, not yellow. Also, bump up the Vibrance a bit instead of messing with the saturation. Oversaturating can quickly make a photo look too fake, while Vibrance is a more subtle tool that helps give the color a little extra kick. Again, playing with the sliders on these settings, and seeing what your eye is comfortable with, will go a long way toward honing color-correcting skills.

Interiors4

4. Adjust the clarity and sharpness

Push the Clarity slider up (to the right) slowly. Clarity is a great way to polish up a photo without going overboard on contrast; plus, it gives the photo an overall crisp look. Depending on the image, you may want to simultaneously play with darkening the blacks a bit, too.

Lightroom has two great presets built-in for sharpening: faces and scenic. I use scenic for architectural mages because it sharpens a bit more than the preset for faces. It’s a subtle, but vital, touch.

5. Clean up with spot removal and cloning

Use the Spot Brush tool to remove any dust spots or other anomalies that may have gotten onto the photo. You will see two options in Lightroom for the brush: Clone and Heal. Healing is a great option when correcting small spots, as it will have a softer blend to it. Next, use the Cloning tool to remove any glares or reflections of you in the photo. You can also use it to remove address numbers, if requested.

While I typically use Lightroom for editing photos, my personal preference for cloning is Photoshop’s stamp tool. It seems to allow for more control over the brush itself, therefore making it easier to clone in a way that looks natural.

How do you shoot and edit interior spaces? Share your tips and photos in the comments section below.

googletag.cmd.push(function() {
tablet_slots.push( googletag.defineSlot( “/1005424/_dPSv4_tab-all-article-bottom_(300×250)”, [300, 250], “pb-ad-78623” ).addService( googletag.pubads() ) ); } );

googletag.cmd.push(function() {
mobile_slots.push( googletag.defineSlot( “/1005424/_dPSv4_mob-all-article-bottom_(300×250)”, [300, 250], “pb-ad-78158” ).addService( googletag.pubads() ) ); } );

The post Vital Tips for Photographing and Editing Interiors by Natalia Robert appeared first on Digital Photography School.


Digital Photography School

 
Comments Off on Vital Tips for Photographing and Editing Interiors

Posted in Photography


7 Things I’ve Learned from Photographing Storms

12 Feb
henrietta-supercell-1-Panorama

A massive supercell near Henrietta Texas in May, 2014. © James Brandon

I’ve been a professional photographer for around five years now. I’ve photographed a lot of different subjects throughout the years, but nothing in the world could have prepared me for photographing storms. When I stood in front of my first supercell on May 8th of 2013, I was hooked. A low hanging wall of cloud hovered over the field in front of me as its rotation increased by the second. The 40mph winds at my back were feeding moisture and warm air into the storm. The grass in the field was all bent down towards the monster looming in front of me. Yeah, that’s all I needed to become totally obsessed.

That was back in the spring of 2013. Since then I’ve become good friends with a few very seasoned storm chasers and have gotten a chance to ride along with them on several storms, both last season, and now this season. Mike Mezeul, for example, has become a great friend over the past couple of years and we even lead workshops together now. He’s an absolute wealth of knowledge when it comes to weather and I highly suggest you check out his work.

Shelf Cloud Over Ardmore, Oklahoma


In these brief two seasons of chasing, I have already racked up countless hours chasing, God knows how many miles, and my bank account certainly knows how many tanks of gas. In spite of all that, I’m still very new to this world of storm chasing and storm photography, and to be honest, at this point, I’m more of a storm photographer than a storm chaser. I’ve already started getting a lot of questions about storm chasing so I thought I’d put together an article here on dPS going over some of the things I’ve learned thus far, with the preface that I am not an expert at this point. Whether you’re interested in dipping your toes into this genre of photography or just want to know more about it; read on.

1) Storm chasing and storm photography are two very different things

This is something that has become more apparent the more I go out. It’s tough to separate the two because when I go out in search of storms, even I say that I’m going storm chasing (but I’m really not at this point). The people up front in the car are the chasers. The driver is actually doing the chasing and the person riding shotgun is navigating and forecasting. Me? Well most of the time, at this point, I’m in the back; along for the ride. So you might say that I’m chasing with them and you might not. Who cares. I have been in the passenger seat a few times now (in charge of forecasting and navigating) and it is not easy. You can’t be focused on getting pictures in that seat. You’re responsible for navigating the road networks out on the chase — staying one step ahead at all times — while also keeping an eye on the storms using radar.

I haven't photographed a tornado yet, but this is about as close as I've come. This wall cloud (the section of a storm where tornadoes DO come from) began lowering behind the tree line while rotating quite rapidly. © James Brandon

I haven’t photographed a tornado yet, but this is about as close as I’ve come. This wall cloud (the section of a storm where tornadoes DO come from) began lowering behind the tree line while rotating quite rapidly. © James Brandon

2) Becoming a good chaser takes time, dedication, mentoring and experience

Learning about weather has become a huge passion of mine ever since starting the process of getting my private pilot’s certificate (which I finally got back in late 2012). Weather has to be a passion to get into chasing. It just has to. You’ve got to have an intimate knowledge of weather patterns, frontal systems, pressure systems, lifting mechanisms, dry lines, triple points, dew points, troughs and so much more. You have to know when a scary looking cloud is just that; a scary looking cloud. Many rookie chasers (yes, I’ve done this) will see a scary, ominous looking cloud that is low to the ground and think it’s a tornado forming. They are looking in one direction — at the wrong part of the storm — while the actual danger is somewhere else. Lucky for me, I’ve always had experts with me to point out what I should be concerned with, and what I shouldn’t be.

This image shows an area of outflow from the storm that was moving off to the right. At one point the cloud began to resemble a funnel that was almost touching the ground. However, it wasn't rotating and it was on the wrong part of the storm. A few minutes later, tornado sirens began going off in the small town nearby, even though the storm wasn't tornado warned yet. Someone had called in and said a tornado was on the ground.

This image shows an area of outflow from the storm that was moving off to the right. At one point the cloud began to resemble a funnel that was almost touching the ground. However, it wasn’t rotating and it was on the wrong part of the storm. A few minutes later, tornado sirens began going off in the small town nearby, even though the storm wasn’t tornado warned yet. Someone had called in and said a tornado was on the ground.

3) Until you become a seasoned chaser, NEVER go alone

The best chasers out there have dedicated their lives to this stuff. It’s not a weekend hobby. Seriously: Don’t go out alone if you’re a rookie. Just don’t do it. You’ll be putting both your life and the lives of others at risk. Going out on your own means becoming driver, navigator, forecaster, and photographer all at the same time. Just earning a permanent spot up front in a chase vehicle is a coveted thing that takes years (and should) of experience to accomplish. It’s referred to as the “hot seat” for good reason. When you’re on your own, it’s impossible to be totally safe. You have to concentrate on driving, but you also have to pay attention to the storm. That means that you’ll likely be using some sort of radar app on your phone or laptop and will be checking that instead of paying attention to driving. This is a recipe for disaster that will catch up to you eventually.

4) Like any hobby/interest, there are a lot of egos and hot heads

I’m sure this one is going to piss some people off but it’s just the truth. It’s true with anything though. Go buy a Remote Control car and get into RC car racing. Go join your local camera club. Buy an RV and start spending time with fellow RV owners. Every group has them. In storm chasing you will see them driving on the wrong side of the road, passing people with their amber lights flashing while driving 90 in a 55 to get to a storm that’s still 20 miles away (risking lives just to get on a storm), parking their cars just off the side of the road and then leaving their doors open so that traffic has to swerve around them…the list goes on.

Stormy Skies After A Storm | Keller, TX


Most of them also cover their entire car in storm chasing decals, weather instruments, antennas, and amber lights. The point is: Pay attention to the stuff that these people do and don’t do it. Having amber lights on your car doesn’t make you any more important than the guy in front of, or behind you. Storm chasers are not law enforcement or emergency services. Being a chaser doesn’t give you any special powers or authority.

5) There are also a lot of amazing people

While there are a lot of egos out there, there are just as many incredible people who have more knowledge about weather than I could ever even dream of. These are the people who make storm chasing a noble pursuit. Some of them are self taught, some have masters and doctorates in meteorology or climatology. I’ve had the fortune of meeting some amazing people already just in two seasons. If you can befriend these people, and honor their knowledge and authority, you will have a good chance at advancing your own knowledge at an accelerated pace.

A beast of a supercell in Throckmorton, TX back in May of 2013. Around 10 minutes after I took this photo the storm fell apart and disappeared.

A beast of a supercell in Throckmorton, TX back in May of 2013. Around 10 minutes after I took this photo the storm fell apart and disappeared.

6) It’s not about tornadoes

Sure, easy to say for the guy who hasn’t photographed a tornado yet. In all seriousness though, tornadoes occur in somewhere around 1-2% of supercells. I don’t do this for a living and it’s still a very new passion, so I’m not going to drive 10,000-15,000 miles across the country ever year in search of tornadoes. Even if I did, I’d still see tornadoes so seldom that if that were my goal, I’d feel like a failure. On top of that, tornadoes are incredibly dangerous and destructive, and take lives every year. If I can one day photograph a beautiful tornado in the middle of nowhere, miles away from a town or residence, I’ll be happy. But if there’s a town nearby, or a neighbourhood, or even just a house, I’ll be praying against a tornado each and every time. I’m not after tornadoes. I’m after structure.

Standing in front of a supercell with 30-50mph winds at your back, watching as it rotates and grows, is one of the most awe-inspiring things you’ll ever witness. Seeing the raw power and fury of mother nature is just incredible. I’ve stood in a field with warm, moist 40mph winds at my back feeding the storm in front of me. Then, in an instant, the air turned dry and super cold. The storm had began ingesting the cold air from the evaporating rain it was dropping, and in essence it killed itself by doing so. Within 10 minutes, the entire storm was gone.

An image of a rotating wall cloud from the storm I described in the paragraph above. This was actually my first storm to ever photograph.

An image of a rotating wall cloud from the storm I described in the paragraph above. This was actually my first storm to ever photograph.

7) Chasing has become a circus in recent years – tread lightly

It’s something you can’t fully understand unless you see it. With shows like Storm Chasers, the constant media attention that chasers get during storm season, social media, etc., an innumerable number of people have come out of the woodworks to chase storms in the U.S. When the Storm Prediction Center posts a moderate or severe risk day, you can rest assured that the roads will be packed with chasers (especially if it’s during a weekend).  This can, and does, present an added element of danger to chasing storms. I’ve heard stores of road networks being completely clogged up from just chasers while a tornado is on the ground nearby. Because of this, the people I chase with usually don’t go out chasing on days like this. Some of the best storms I’ve seen to this day were on slight risk days when most chasers stayed home.

A CG (cloud to ground) lightning bolt strikes in a field somewhere in east Texas as a storm moves off in the distance.

A CG (cloud to ground) lightning bolt strikes in a field somewhere in east Texas as a storm moves off into the distance.

In closing

Storm photography, storm chasing, whatever you want to call it, has become something I look forward to all year long now. The main months for chasing in Texas, and the surrounding area, is March through May – which means I have to dream about it from June through February. Sure, supercells can pop up in the surrounding months but not nearly as often. If you want to see what chasing is all about, please follow the advice that I set out above. These storms kill people every single year and should not be taken lightly. Don’t go unless you can secure a seat in the car of an experienced and knowledgeable chaser. For the record, someone who chases storms doesn’t necessarily qualify as an “experienced and knowledgeable chaser.” There are many people who chase solo year after year who shouldn’t be out there. Use caution and choose wisely.

If you have any questions, let me know in the comments below! To follow along with me during the upcoming storm season, be sure to follow me on Instagram. Thanks!

googletag.cmd.push(function() {
tablet_slots.push( googletag.defineSlot( “/1005424/_dPSv4_tab-all-article-bottom_(300×250)”, [300, 250], “pb-ad-78623” ).addService( googletag.pubads() ) ); } );

googletag.cmd.push(function() {
mobile_slots.push( googletag.defineSlot( “/1005424/_dPSv4_mob-all-article-bottom_(300×250)”, [300, 250], “pb-ad-78158” ).addService( googletag.pubads() ) ); } );

The post 7 Things I’ve Learned from Photographing Storms by James Brandon appeared first on Digital Photography School.


Digital Photography School

 
Comments Off on 7 Things I’ve Learned from Photographing Storms

Posted in Photography


Celestial Cityscapes: Photographing Dubai from Above the Fog

16 Jan

[ By WebUrbanist in Art & Photography & Video. ]

dubai skyscrapers above fog

Home to the tallest building in the world, Dubai is a city rich in skyscrapers that seem almost otherworldly when seen piercing through seasonal layers of urban fog.

dubai city aerial view

dubai sunrise cloud city

Photographer Daniel Cheong resides in this surreal desert city and has taken to capturing images of it from above, particularly during times when the weather is transitioning from warm to cool and producing the effects seen in these shots.

dubai cryogenic marina

dubai dawn cloud city

In some cases the viewer can see glimpses of the streets, buildings and marina below, but in others the entire built landscape appears perched on a layer of clouds.

dubai fluidity urban photo

dubai landing planet

While his photographs do represent reality, they also employ digital blending techniques that combine multiple exposures to make them seem almost more real than reality (but without the stretched effects sometimes seen in overly-processed HDR).

dubai fog blues

In doing so, he emphasizes “this slight element of the surreal, or hyper-reality often found in painting.” A world traveler, Cheong was “born in Mauritius, originally of Chinese descent, and French by nationality.” Of his picture-taking prowess, he writes: “I’ve always loved photography, but only became serious about it when I bought my first DSLR in Singapore, back in 2006.”

dubai cryogenic sunrise

“I then aimed to perfect the technique of Digital Blending, which consists of manually blending multiple bracketed exposures in order to obtain the maximum dynamic range, while trying to keep a very natural look and avoiding the common mistake of many ‘overcooked’ HDR images. This slight element of the surreal, or hyper reality often found in painting is what I am trying to achieve”

Share on Facebook


[ By WebUrbanist in Art & Photography & Video. ]

[ WebUrbanist | Archives | Galleries | Privacy | TOS ]


WebUrbanist

 
Comments Off on Celestial Cityscapes: Photographing Dubai from Above the Fog

Posted in Creativity


6 Tips for Photographing Dogs in Action

11 Dec

Canine action images are my absolute favourite thing to photograph. The freedom you can see in their expressions that split second as they leap into the air in excitement, and being able to freeze that moment into a single photograph is amazing. It’s a lot of fun for the photographer, dog, owners and is a good challenge too!

ArticleImage1

Safety first

Before you attempt any of the tips in this guide, please remember that no image is worth risking the safety of you or the animal. With dogs it is important that you only choose locations where dogs are permitted, that are secure and well away from hazards such as roads, and that you are able to keep the dog under control while they are moving. Also be aware that some dogs may not be willing or able to go at a full-out run. This is okay. When photographing pets, the goal is to capture the personality of the animal. If they aren’t comfortable running then just capture them at their own pace.

PoochRacing

The dogs need to have fun too!

The key to good animal photography, in my opinion, is remembering that your animal handling skills are equally important to the shot as your photography skills. Anyone can take a perfectly focused photo with a bit of practice, but the expression that you capture in your images is what will set them apart from the rest. To get expression from the dog, it is important that both you and the owner use a very positive, encouraging voice when calling the dog, and have plenty of rewards waiting for them by the camera. Some of my personal favourites include squeaky toys, tennis balls, favourite dog treats and peanut butter.

ArticleImage2

How do you get the dog to run the right way?

It is helpful to know a bit about the dog’s training level, health and personality before you begin. This allows you to create a plan of action for the best way to capture the image you have in your mind. It also gives you the information that you need to keep you and the dog safe.

For well-trained dogs with a reliable sit and stay, I have the owners ask the dog to stay in a spot around 20 metres from where I am shooting. The owners then stands directly behind me and calls them towards the camera. For younger dogs, or ones with less training, using a secure location becomes even more important. I recommend using a quiet dog-friendly park, or even the dogs own backyard to reduce distractions. If you have another person that is able to help keep the dog in place then this can be used in place of the sit/stay. Another option is to keep the dog on a lead and have the owner run alongside them. The lead can be kept or you may choose to remove it later using Photoshop. Also consider whether you need to direct them at all. Some of my favourite action images have been captured while the dogs were simply being themselves, racing around having a blast with their favourite toys during their session!

ArticleImage3

Choose your settings wisely

Now that you have the tools to get the dogs going in the right direction, it’s time to focus on capturing the fun! Grab your camera and your favourite telephoto lens. My current combination is the Canon 5D MkIII with a Canon 70-200mm f/2.8 lens, though many images in this article were created with a Canon 60D. Choose a spot a good distance away from the dog which will give you plenty of opportunity to catch the right moment in their run. Also try and get down to their level. This will give you a fresh perspective of the dog and also make it easier to capture the expressions on their face as they run towards you.

ArticleImage4

I photograph all my sessions in full manual mode as I enjoy having complete control over the final image. Generally I start with a shutter speed of 1/1000, an aperture of f/2.8 and adjust the ISO to suit. If you aren’t comfortable with full manual mode yet, using shutter priority mode or sports mode are both good starting points for these types of images. As you have more practice, you will find the combination of settings that works best for you and the type of photos you like to create.

ArticleImage5

Nail that focus

One of the most difficult parts of photographing dogs in action is nailing the focus. I recommend using a single focus point with the camera in AI servo mode and back button focusing. This means that the camera will continue to refocus on that single point as long as you are holding down that back button. If you aren’t already using back button focusing, give it a try – it is a great tool to have for all types of photography.

ArticleImage6

Timing is everything

Another challenge you face with action images is getting the timing right. I recommend trying a method that many horse riders use. When any new rider starts taking horse jumping lessons, one of the first things they learn is to count the horses strides. Counting aloud each time the horse’s leading leg leaves the ground, this helps riders to feel when a horse is going to take off and be prepared for the jump that follows.

This same technique works for photographing any type of animal photography. Focus on the dog as they run. Each time the dog’s front legs leave the ground, count aloud. This will give you a steady and reliable time to take the photo, and you can easily adjust it to capture different moments in their movement. This technique is definitely easier with larger dogs with longer strides, but with practice it will get easier to see the stride. Keep working at it!

ArticleImage7

Do you enjoy photographing dogs in action? I would love to see some of your work! Share them in the comments below.

googletag.cmd.push(function() {
tablet_slots.push( googletag.defineSlot( “/1005424/_dPSv4_tab-all-article-bottom_(300×250)”, [300, 250], “pb-ad-78623” ).addService( googletag.pubads() ) );
} );

googletag.cmd.push(function() {
mobile_slots.push( googletag.defineSlot( “/1005424/_dPSv4_mob-all-article-bottom_(300×250)”, [300, 250], “pb-ad-78158” ).addService( googletag.pubads() ) );
} );

The post 6 Tips for Photographing Dogs in Action by Kelly Wolfe appeared first on Digital Photography School.


Digital Photography School

 
Comments Off on 6 Tips for Photographing Dogs in Action

Posted in Photography


Photographing in Airports

20 Nov

Miami International Airport Terminal

Ahh, the joy of travel photography, who doesn’t love that? But like everything in life, all that glitters is not gold. For travel photography, you actually need to travel, and in many circumstances, air travel and lengthy waits in airports are common.

Nobody likes being stranded in a terminal for hours, or experiencing delays, missed or long connections, all of which happen pretty often. But it can be different for us, the ones who embrace photography. Instead of just sitting there doing nothing, we can have some fun doing what we enjoy the most. At least, that’s what I do – and believe me, the time goes by much quicker when you are there with your camera in hand.

New American Airlines terminal in Miami

Despite the obvious of not photographing in prohibited areas, you shouldn’t encounter any problems wandering and snapping away. I was a bit skeptical the first time, especially in the US, however, I’ve never had any issue.

Perhaps you are thinking that there are not interesting things to photograph in airports. Well, think again. These can be rather compelling places; they come in all forms, shapes and colors.

There are always appealing activities around the tarmac and you can shoot through a window. Just be on the lookout for opportunities. The image below was shoot with an iPhone. I didn’t have my camera handy that day and I was rushing to the gate; it was raining and I thought the water drops on the glass made it somehow exciting.

IMG_0701

Watch out for unique architectural features. It could be a modern place, a recently built structure, or just a small terminal on a remote exotic destination. Walk around slowly and try to find what makes that place different, sui generis. This colorful skybridge in Miami called “Harmonic Convergence” is a good example of an art installation that is unique to the airport and can’t be found anywhere else. When you spot a space like this, take your time, try different angles, and if necessary wait for the right moment to happen.

Person rushing out in airport

Massive glass walls are most likely to be present in contemporary terminal halls and waiting areas. These are wonderful to work with and you stand a chance of getting great photos. Just meter the light to get a good exposure of the exterior during daytime and the interior will be probably e dark or underexposed. This juxtaposition creates a great contrast; it is then possible to play with forms and figures of people standing or walking by. Silhouettes against a brighter background are always fascinating.

20140525_untitled_0002

You can also think of hallways, food courts, waiting areas and shopping areas. You can really do a lot and it will be much better than just sitting there doing nothing and getting bored. After all, you’ll be fastened to your flight seat for some hours, so what better way to kill the painful wait by just having some fun photographing the airport?

There you have it – next time you need to spend some time at the airport, just pull out the camera and fire away. It will be fun, I promise.

Editor’s note and disclaimer: the suggestions made in this article are by the author and you need to be aware of the legalities and possible issues of taking photos in an airport, as different rules may apply in different countries. It is not a public place so you do not automatically have blanket approval to take any person’s photo. You could possibly be asked to stop, have your camera seized or be restricted from getting on your flight. Practice with extreme caution. dPS is not responsible for any damages resulting from following these tips.

The post Photographing in Airports by Daniel Korzeniewski appeared first on Digital Photography School.


Digital Photography School

 
Comments Off on Photographing in Airports

Posted in Photography


7 Tips for Photographing Groups

04 Nov

Whether you’re an amateur or professional photographer, whether you usually photograph people, products, landscapes or insects, the time will come when you will be asked to photograph a large group of people.

Image H smaller family group

Of course large is a relative term. If you are used to photographing couples or taking individual portraits, large could mean a group of five people. In general, I consider large to be a group of seven or more.

The festive season is fast approaching, and this is the time of year when you are most likely to be asked to photograph large groups. During this season, families tend to congregate in one place, some travelling far and wide for the privilege of togetherness. Sports teams, dance clubs and social groups start winding down for the holiday season, and love to have an annual or seasonal record of their group.

Wedding and school photographers are the true experts in group photography. I am neither of those; I’m a family and children’s photographer, and I don’t mind admitting that I’m a one-trick pony.

However, over the past few months and for one reason or another, I have been asked to photograph an increasing number of large groups. Sometimes the lessons we need to learn find us, and it has been said that we best teach what we most need to learn. With that in mind, I’d like to share some of the lessons I’ve learned along the way, both through my own trial and error, and through tips for photographing large groups, passed on to me from other photographers.

#1 – Choosing a location

You won’t always have the luxury of being able to choose your location – sometimes you’ll be stuck with your aunt’s backyard, or some other less-than-ideal spot. If you have the luxury of choice, look to open spaces and uncluttered backgrounds.

There are two reasons why simplicity is even more important with a group shot than with any other kind of portraiture.

  • First, by its very nature, a group shot is cluttered. With so many different faces and competing outfits, your group shot can end up looking very messy if the background is also complicated.
  • The second reason is that, in order to keep your entire group in focus, you will need to shoot at a higher number f-stop than you would for a single portrait, so you won’t benefit from the blurred background that you would when shooting wide open.

When it comes to locations, my personal favourites are parks, gardens and beaches. The colours of nature never seem to clash or compete with your subjects. If you’re in a rural setting, and trees and grass are not your thing, look for hay bales, rustic sheds and timber fences. If you prefer an urban feel, seek out the unadorned walls and steps of old buildings and churches, or the clean lines of modern architecture.

The images below illustrate the different moods that you can create with background. Although the playground shot is a little busy, it conveys colour and fun.

Image A  teen group on branch

Image B teen girls in playground

These images show how you can create a different look to the same grouping, simply by changing your shooting position.

Image C group on lawn front

Image D group on lawn side

#2 – Lighting

Soft, even, light is imperative when photographing a group. If you can choose the time of day to shoot, opt for early morning or late afternoon to early evening, when the light is gentle and warm.

If you’re stuck shooting in the middle of the day, avoid harsh shadows by shooting in open shade such as beneath the canopy of a large tree, or in the shadow of a building. Importantly, make sure the light falls evenly on your group, and that there are no patches of sun on anyone.

#3 – Use a tripod

If you are photographing a small group, and you want to get creative with poses and shooting angles, you probably won’t need a tripod. While they go a long way towards preventing blurry images caused by camera shake, I personally find them restrictive.

However, when photographing a large group, you’ll probably want to keep your subjects in one position while you fire off lots of similar shots. A tripod has the benefit not only of preventing camera shake, but allowing you to take a number of shots at the same angle and focal length. So, when you discover that your perfect image is marred by one person blinking or doing something weird with their mouth, it’s easy to take spare parts from the other images and transpose them in Photoshop (do a head-swap).

#4: Lens and aperture selection

Lens and aperture preference are always controversial. To photograph a large group, I’d recommend playing it safe and using a 50mm lens. Depending on the depth of your group arrangement, stick with an aperture of f/9 or higher to ensure that everyone is sharp, and always do a test shot first.

To avoid distortion when using a lens that is 50mm or below, make sure you leave plenty of space between the people at either side of the group, and the edge of the frame. No one will thank you for making them look wider than they are (which is what a wide-angle will do to the people on the edges)!

While we’re on the subject, it’s a good idea to leave some space around your group to allow for different cropping ratios.

#5 – Vary the head heights

If your subjects are huddled close together on a level surface, chances are the people at the back will only be visible from the eyes up in the final images.

You can easily remedy this by placing them on a graduated surface. A flight of steps is ideal, or a sloping lawn, a playground slide, the branch of a tree – anywhere that you can stagger the height of the heads to make sure everyone can be clearly seen without sitting in a dead-straight row.

If you happen to be stuck with a flat surface, use chairs for a formal arrangement. Place some people standing behind the chairs, some seated on the chairs, and some sitting on the ground in front. The ground is a good spot for younger children, who get fidgety if asked to sit still for too long.

For something a little different, find a vantage point that allows you to look down on the group. This might be a balcony, a ladder, or a chair.

Image F- group tiered on tree

#6 – Last call: Nose check!

I can’t tell you how many hours I’ve spent in Lightroom cleaning up little noses (and big ones), fixing smudged eyeliner and removing lint from clothing.

While you are preparing your set-up, ask the women in the group to reapply their lipstick and check their hair and makeup.
Immediately before you start shooting, ask the adults in your group to check their partners’ and children’s faces and clothing, paying special attention to noses, teeth and eyebrows. Have a packet of tissues and wet wipes handy. If you feel uncomfortable asking this, think of all the hours you’ll save post-processing.

#7 – Ready, steady, shoot!

Once you have your group positioned, work quickly. Fire off a test shot for exposure, focus, and depth of field. When checking the image on your screen, enlarge it to the maximum size and make sure everyone from the front row to the back is in focus. Adjust your aperture if necessary. When photographing smaller groups, you can get creative with depth of field by focussing on some individuals and allowing others to soften, but that’s a whole other story. With a large group, everyone should be in focus.

With your camera’s drive mode set to continuous shooting, ask everyone in the group to close their eyes and open them on the count of three. Fire multiple shots on the count of three, and then repeat the process a few times to ensure you have at least one great image.

As to obtaining an image with everyone’s eyes open, the jury is still out as to the best method. What works for me is to set the camera’s drive mode to continuous shooting, and ask everyone in the group to close their eyes and open them on the count of three. I fire multiple shots on the count of three, and then repeat the process a few times to ensure I have at least one great image.

When you are satisfied with what you’ve captured, you can break the group down into individual families and other groupings, and have some fun with it. Ditch the tripod and get creative with posing and shooting positions. Avoid meltdowns by photographing families with the youngest children first, and use common sense when it comes to mixing children with water, pets, and climbable objects.

Image G girls under unbrella

Over to you

What kind of groups have you photographed? What are your tips for photographing groups? What did you do right, and where did it go wrong?

The post 7 Tips for Photographing Groups by Karen Quist appeared first on Digital Photography School.


Digital Photography School

 
Comments Off on 7 Tips for Photographing Groups

Posted in Photography


4 Tips for Photographing Bugs and Insects

29 Oct

Sometimes the most interesting things to photograph are right under your nose, even though you might have to look a little harder to see them. Bugs, insects, and other creepy crawlies might not seem like compelling subjects, but if you take a bit of time to examine the smaller creatures who inhabit the world around us, you might not only come away with new and exciting photographic opportunities but a renewed sense of wonder and admiration for the beauty of creation. If you have never tried this type of photography before, you can get started right away without any special equipment and these tips for photographing bugs might give you a few ideas to try out along the way.

butterfly-flower

#1 Keep your eyes open

This might sound obvious, but the first step in learning to take photos of insects is learning how to see them in the first place. Our six and eight-legged counterparts are all around us, but they don’t usually announce their presence with a trumpet blast. You often have to look just a little harder to see them, but you can great shots of bugs and insects on trees, shrubs, rocks, benches, buildings, or almost anywhere if you just keep your eyes peeled. The next time you head outside, whether it’s in a park or just in your own backyard, spend a little time examining the world around you to see if you can spot some of the amazing little critters that often go overlooked by us busy humans.

bee-flower

I wanted to get a closer look at some magnolia flowers, and noticed that they were full of bees. It took a while, but I finally got a shot of one of them on his way to gather some nectar.

Most days I have a fairly predictable routine involving work and home duties, and sometimes I get a little stuck when it comes to scratching my photography itch.  It can seem like there is just nothing new under the sun worth photographing, and it’s times like that when bugs are ideally suited to draw out a bit of creativity.  Sometimes I will find myself crouching down on the ground, straddling a fence, or perched atop a ladder in order to get a better view of these small critters.  It’s fun, challenging, and a great way to get some fascinating photographs.

#2 Be patient

While insects are great at giving you unique photographic opportunities, they aren’t so good at following directions. Most of bugs simply will not listen to perfectly reasonable requests like “Hold still,” or “Turn the other way.” To compensate for their lack of cooperation, you often have to simply wait until a good photo opportunity presents itself. This could mean watching a cicada explore a shrub, keeping your eye on a beetle as it blazes a trail across your lawn, or waiting for dinner to fly into a spider’s web. The slightest sound can disturb our tiny little friends, so take care to move about quietly and not intrude on what they are busy doing. If your camera has a long zoom lens, you can use it to get right up close and personal even if you are far away, but unless you have plenty of light your shutter speed might not be fast enough to capture the action.  In those cases bumping up the ISO is a good way to compensate, though your picture might end up looking a bit grainier or noisier than you prefer.

spider-grub

This garden spider built quite the web next to a fence, and his handiwork was rewarded when another bug wandered over to investigate.

Sometimes you have to keep an eye on a critter for quite a long time, and even after all your waiting they might just decide to scurry off or fly away.  This can be an exercise in frustration as you wait for what seems like hours with nothing to show for it.  Nothing is guaranteed when you set out to take pictures of insects, but if you can find a balance between shooting and waiting, you might be pleasantly surprised at the results you get.

#3 Capture the eyes, not just the insect

This tip might seem a bit strange, and it’s not always easy to accomplish, but if you can capture the eyes of an insect it lends an entirely new dimension to your photographs.  As the saying goes, the eyes are the window to the soul, and while this certainly holds true for humans it also works for animals and even bugs.  When you can get a shot of an insect’s eyes it can be almost like the two of are sharing a moment, watching each other and allowing you to be in the other’s space for a few brief moments.  Even though the insect might not care one bit about you or why you are pointing a rounded lens in its face, capturing its eyes will add an emotional hook to the image that would otherwise be lacking.

I don't know what this wasp was thinking, but judging by the look on his face I imagine it was something like "Leave me alone, and I'll leave you alone."

I don’t know what this wasp was thinking, but judging by his expression I imagine it was something like “Leave me alone, and I’ll leave you alone.”

katydid

This katydid seems like an inquisitive fellow, or at least that’s what I tell myself based on the expression on his face.

I’m no entomologist, and I have no idea if these insects were thinking anything at all when I took their pictures, but seeing their eyes and faces lends a significant amount of depth to what would otherwise be just another photo of just another bug. It takes time and patience, but if you try to capture your insect subjects’ eyes you can draw your viewers into your photographs in new and compelling ways you may not have considered before.

#4 Alter your perspective

One of the biggest mistakes you can make when photographing insects is to stand above them and point your camera down. You might get some pictures of spiders, beetles, or giant ants, but they will probably not be nearly as interesting, compelling, or engaging as they could be if you simply tried a different angle. I followed this cottonwood borer for almost a half hour as he climbed all over a pine tree, all because I wanted to get the picture from a more unconventional angle. I could have just taken a photo while he was on a branch or the trunk, but shooting him from a low angle while he was stretching out his front leg made for a much more engrossing photograph.

borer

This technique can also be used to transform almost anything into a more captivating photograph. People, pets, familiar scenery, even common household objects can take on entirely new dimensions if you examine them from new and unfamiliar angles. Of course it works great with bugs and insects, but the next time you pick up your camera try it with almost anything around you.

Of course one of the best ways to get photographs of insects is to invest in a macro lens for your camera, and even though they can be quite pricey the results they produce are absolutely astounding.  All of the photos in this article were taken with either a 35mm or 50mm prime lens, which have minimum focusing distances of about 12 inches. Macro lenses can focus on objects right in front of the lens, which can give you some outstanding pictures of insects, bugs, or anything else for that matter. But even if you only have the kit lens that came with your camera you can still get some amazing images. If you have any to share, leave them in the comments below as well as any other tips you might have for getting pictures of our small little friends.

Some other options for doing macro shots without investing an expensive lens:

  • Reverse Lens Macro: Close Up Photography Lesson #3
  • Getting Up Close with Close-Up Lenses
  • Alternatives to Buying a Dedicated Macro Lens for your DSLR
  • Extension Tubes: Close Up Photography Lesson #2

The post 4 Tips for Photographing Bugs and Insects by Simon Ringsmuth appeared first on Digital Photography School.


Digital Photography School

 
Comments Off on 4 Tips for Photographing Bugs and Insects

Posted in Photography