RSS
 

Posts Tagged ‘Photographic’

Three Tips for Overcoming a Photographic Plateau

11 Aug

Let’s face it…growing up isn’t always easy. There are lots of hurdles to overcome during our journeys as photographers. At one time or another, we all hit rough spots with some aspect of photography. Take heart though, whether it’s a problem with technique, gear, or simply finding your own creative uniqueness, I can personally guarantee that someone else is struggling with that same problem.

But there’s one situation too often encountered by beginners and even pro photographers alike – the dreaded “plateau”. This is a stage that often happens when we feel like our photography has a reached a point where it is no longer improving. It’s a terrible feeling.

Three Tips for Overcoming a Photographic Plateau

Fortunately, overcoming a photographic plateau is easy once you identify and diagram the source of the problem. It’s here where you can run into trouble because critiquing your own performance in order to self-diagnose why you have plateaued is an exercise in self-realization. Here are three common reasons why photographers plateau in their work and some solutions that can push you into a new phase of growth.

Here are three common reasons why photographers plateau in their work and some solutions that can push you into a new phase of growth.

You’ve stopped learning new techniques

I get it. I really do. There comes a time when you reach a level of confidence in your craft. You feel comfortable in the techniques you practice and more and more of your images turn out just as you imagined them in your head. In itself, confidence that you know what you’re doing is a huge accomplishment in itself. The problem arises, and thus the plateau happens when you stop looking for new things to learn.

Three Tips for Overcoming a Photographic Plateau

How to overcome it

I used the word “comfortable” earlier. Becoming comfortable in your photography can be a creative death sentence. Simply put, don’t become overly comfortable to the point where you think there’s nothing else to learn. There are always advancements being made in the world of photography.

Three Tips for Overcoming a Photographic Plateau

Someone is refining a new method of shooting with a filter. There are more things to learn in the digital darkroom during post-processing. There’s always something new to learn. Learning new techniques not only keeps your mind limber but also improves your craft and the potential of your photographs.

Ignoring needed gear upgrades

I’ll admit it, I love photo gear. There are few artistic mediums where technology advances more quickly than it does in photography. The way your gear facilitates your work is a careful balance between mechanical capability and your personal skill level.

Three Tips for Overcoming a Photographic Plateau

The most expensive camera in the world will not make you a top notch photographer. At the same time, there may come a moment in your journey where your skill legitimately surpasses the capability of your gear. This can cause a plateau due to the fact that your lens will not become physically sharper and your camera’s maximum ISO rating of 6400 will never be able to shoot at 24,000.

How to overcome it

Learn what gear meets your current skill level and still leaves room to grow. However, the remedy for gear top out is not to automatically run out and buy the latest and greatest camera or lenses or anything else for that matter.

The very first thing you need to do if you’re a gear shopping photographer is to begin researching. Research and research some more. Read unbiased gear reviews and talk to other photographers who shoot with the same equipment you’re considering purchasing. The reason for this is so you know exactly what you need and you spend your money ONLY on those things and nothing more.

Shooting the same thing over and over

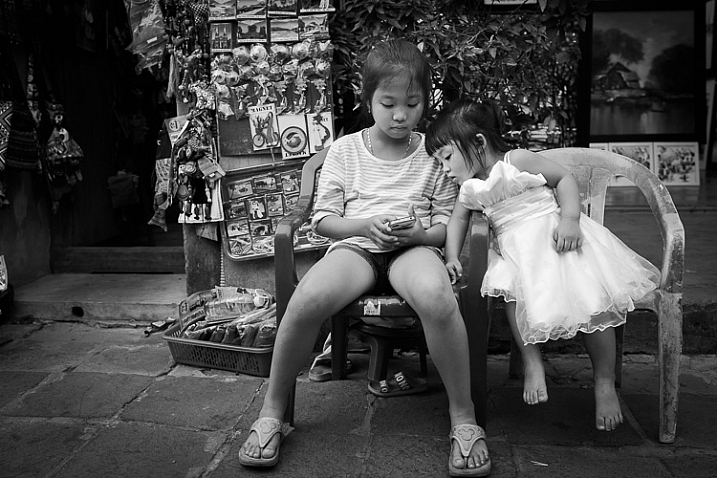
We all have certain things we love photographing. There are genres of photography which draw us in for one reason or another. For me, it is landscape and wilderness/adventure photography.

Three Tips for Overcoming a Photographic Plateau

For others, street photography is their love, while still others thrive on doing portraits in the studio. Whatever your passion may be, there will likely be a point where you find yourself shooting the same thing over and over and over again. While this is not always a bad thing, it can cause you to hit a creative wall and ultimately, plateau.

How to overcome it

This problem perhaps has one of the most polarized solutions of all. Simply go photograph something that you normally wouldn’t consider shooting. I know, sounds easy, right? It practically is, but completely switching gears and branching out into new areas of photography can feel unnatural, awkward, and downright scary.

Three Tips for Overcoming a Photographic Plateau

Still, shooting a few portraits here and there when you’re used to shooting only landscapes can be a great creative palette cleanser. Getting out into nature and slowing down can be a welcomed break for street photographers who generally shoot only in concrete jungles. Whatever change of pace you temporarily switch to, it will usually breathe new passion into your original modality and help you move past that plateau.

Some closing thoughts

Sooner or later, to some degree, we all will hit a plateau in our photography. How we handle that moment when it comes can make all the difference.

Usually, understanding the problem is a huge step in solving it and moving on with your photography. Try new things. Research and see if your work does, in fact, need that full frame camera sensor. Branch out and try a style of photography that you generally don’t practice. The key to overcoming a photographic plateau is the realization you need recharging once in a while. It’s a normal part of becoming a stronger and more capable photo maker.

The post Three Tips for Overcoming a Photographic Plateau by Adam Welch appeared first on Digital Photography School.


Digital Photography School

 
Comments Off on Three Tips for Overcoming a Photographic Plateau

Posted in Photography


How to Find Your Photographic Zen – Tips to Recharge When You’re Feeling Stuck

07 Aug

Lately, I have been feeling very burned out and unmotivated with my photography. Several months ago I was preparing for a summer away from my business. My days were spent photographing editorials, working on client images and writing photography articles to prepare for a three-month sabbatical. I was working non-stop for several weeks as well as managing other aspects of my life. All that hustle to be prepared seemed to have gotten the best of me. I was feeling completely unmotivated and stuck, almost to a point of being irritated to pick up my camera and take a few shots.

I knew this was a phase, and that I just needed to ride it out. But at the same time, I was trying to understand how to effectively manage this so that my craft and my business wouldn’t suffer too much.

How to Find Your Photographic Zen - Tips to Recharge When You're Feeling Stuck

This was the scenery outside my bedroom window. I was so out of it that I did not even bother cleaning the window of raindrops before I took this shot (smudges seen in the bottom left of the frame) – I took the shot because I had to not because I wanted to!

As I write this article, I have spent the past 10 days living in a mountain village with incredible views of the Nanda Ghunti mountain range of the Himalayans right outside my bedroom window. My days are spent completely cut-off from most of the outside world, having copious amounts of tea, belly laughs with family, and intimate conversations by the fireplace listening to the frogs and beetles chirping all night long. I have probably lost many followers on social media, and I have several hundred unanswered emails. But I have come to the realization that time away from the outside world is just the thing I needed to recharge and get back my mojo!

So if you are like me and feeling a little deflated with your art, here are a few tips to help you overcome that lull and get back into it with renewed passion.

#1 – Permission to take a step back

Let me tell you something – burn out is very real and happens to everyone at some point in their lives, no matter what field of work you are in. For people in the creative arts, burn out tends to happen faster and more often because as a creative, all your senses are heightened and you are aware of everything around you 24/7. For photographers, burn out manifests either as a lack of interest in picking up the camera or disliking everything you create. If this sounds like you, acknowledge it and please give yourself permission to walk away from it all – even if it’s just for a day. If you can afford to take a longer break then do so.

#2 – Capture heartfelt stories and frames

As photographers, we have an incredible opportunity to document life stories – whether it is of people or for landscapes. The wrinkles and toothless smile of an elder speak volumes about his life’s journey. Don’t just take the shot and walk away. Spend a few minutes and listen with both your heart and your head. Then when you do take the shot, it will become so much more meaningful and special – even if it is just for you and your subject.

How to Find Your Photographic Zen - Tips to Recharge When You're Feeling Stuck

On the left – A young village girl gave me the sweetest of smiles when I handed her an extra piece of candy that I had purchased for my kids. She pointed to my camera and asked me to take her picture and was giggling with laughter when I showed her the back of the camera! On the right – the local temple priest was going to town and as we were waiting for a ride together he started chatting with us. Everything about him calmed me down and gave me a sense of peace!

How to Find Your Photographic Zen - Tips to Recharge When You're Feeling Stuck

These three generation of women were chatting up a storm as I passed them by during a photo walk. When they saw a camera in my hand, they called me back to come take their picture! – I happily obliged and was offered a hot cup of chai in exchange – Before I walked away, I had made a new set of friends!!

#3 – Take a wabi-sabi approach to your images

A wabi-sabi method requires a slower, quieter approach to life. The concept is very similar to Japanese Zen gardens that promote tranquility and calmness. Slow down and quiet your mind. Stop chasing that next award winning frame for just a few minutes and open your eyes to all that is around you. Stop – Look – Feel and then click. This will make each frame more meaningful and help you convey the story better once you yourself understand what is unfolding around you.

How to Find Your Photographic Zen - Tips to Recharge When You're Feeling Stuck

The fog was so thick that it covered the whole valley and only the tops of some of the trees were visible – this scene was so soothing and almost like a painting. It was the perfect zen for my troubled mind!

#4 – Rule of Thirds and negative space

Try and step away from rules and conformity. Resist the urge to put everything in the dead center of the frame. Instead embrace negative space, the rule of thirds and/or focus on singular elements in your frame. Not only will you create work that is different from the rest but you’ll also learn to approach life in a very different way – more relaxed and free flowing as opposed to stressful and rigid.

How to Find Your Photographic Zen - Tips to Recharge When You're Feeling Stuck

#5 – Free-range photography

The best thing I can do for myself based on my personality is to practice free-range photography. For me, this means breaking free from my norm (leaving the status-quo and photographing something completely out of character). Not only does this clear your mind of preconceived photography habits and notions but also gives you a fresh perspective in the art of photography.

Do not approach this exercise with the idea of perfecting it and getting award winning shots. Instead, approach it with the idea of doing something different, making mistakes, and yet having fun with it.

How to Find Your Photographic Zen - Tips to Recharge When You're Feeling Stuck

I am fascinated with the old doors, windows, and archways found in India. To me, their textures, colors and characteristics speak volumes about their history.

Conclusion

So if you are feeling stuck and burned out in your photography, know that it is absolutely normal and expected. Don’t fight that feeling. Instead, accept it and embrace it with open arms. Once you accept it, you will figure out a way to work around it and create a meaningful body of work because you have given yourself permission to recharge, renew and get reenergized with your craft.

The post How to Find Your Photographic Zen – Tips to Recharge When You’re Feeling Stuck by Karthika Gupta appeared first on Digital Photography School.


Digital Photography School

 
Comments Off on How to Find Your Photographic Zen – Tips to Recharge When You’re Feeling Stuck

Posted in Photography


This art installation re-imagines photographic equipment as weapons

14 Jan

Shoot Portraits, Not People: Jason Siegel’s photographic ‘weapons’

Photo by Jason Siegel

Glance at a piece from Jason Siegel’s ‘Shoot Portraits, Not People’ art installation and you might think you’re looking at a high-powered weapon. But if you look closer, you’ll quickly see that guns and grenades are all made up of photographic equipment.

Siegel is a Denver-based lifestyle photographer, with a professional portfolio that includes work for clients in the clothing and music industries. Stepping outside of the printed image for this project, he gathered over 200 pounds of cameras, lenses, flashes and other pieces of equipment for this project. He worked with metal sculptor Keith D’Angelo to build the weapons and military paraphernalia, a process you can get a glimpse of in the behind-the-scenes video below.

‘Shoot Portraits, Not People’ opens today at BLK MKT gallery in Aspen, and will run through the month of January. See more of Siegel’s work by heading to his website or following him on Instagram and Facebook.

Via PetaPixel

Shoot Portraits, Not People: Jason Siegel’s photographic ‘weapons’

Photo by Jason Siegel

Shoot Portraits, Not People: Jason Siegel’s photographic ‘weapons’

Photo by Jason Siegel

Shoot Portraits, Not People: Jason Siegel’s photographic ‘weapons’

Photo by Jason Siegel

Shoot Portraits, Not People: Jason Siegel’s photographic ‘weapons’

Photo by Jason Siegel

Shoot Portraits, Not People: Jason Siegel’s photographic ‘weapons’

Photo by Jason Siegel

Shoot Portraits, Not People: Jason Siegel’s photographic ‘weapons’

Photo by Jason Siegel

Articles: Digital Photography Review (dpreview.com)

 
Comments Off on This art installation re-imagines photographic equipment as weapons

Posted in Uncategorized


Fujifilm says photographic paper prices will increase starting in October

25 Aug

Fujifilm has announced an upcoming price increase that will be applied to photographic papers starting this October. The company says it expects the price increase will be ‘of at least [a] double digital percent,’ though a specific percentage has not been provided at this time. The price change will be implemented across the globe.

The company cites a decrease in demand for photographic papers as the cause, saying that while it has made changes to its production to deal with a ‘rising expense ratio,’ it expects that demand will continue to decrease in the future, necessitating a price increase.

Via: Fujifilm

Articles: Digital Photography Review (dpreview.com)

 
Comments Off on Fujifilm says photographic paper prices will increase starting in October

Posted in Uncategorized


Canon and Sony dominate EISA awards for photographic equipment

16 Aug

The European Imaging and Sound Association (EISA) has awarded Canon and Sony four titles each from the 19-strong list of photography products it has held up as the best of the year. The European DSLR Camera award, which is the main photography title, went to the Canon EOS 80D, while the EOS-1D X Mark ll won the European Professional DSLR category. Canon also picked up awards for its EF 35mm F1.4L II USM lens (Professional Lens of the Year) and for its imagePROGRAF Pro-1000 printer.

Sony’s awards came in the Premium Compact  for the Cyber-shot RX1R II, Professional Compact System Lens for the FE 85mm F1.4 GM, Prosumer Compact System Camera  for the a6300 and Photo & Video Camera for the a7S II categories.

Sigma collected the DSLR Zoom Lens title for its 50-100mm F1.8 DC HSM Art lens, while Tamron won the overall DSLR Lens award for the recent SP 85mm F1.8 Di VC USD. Other notable awards are Prosumer DSLR of the Year for the Nikon D500 and Fujifilm’s X-Pro2 collecting the Professional Compact System Camera title. The Photo Innovation award went to Panasonic’s DUAL IS system as demonstrated in the GX80.

The EISA Awards have been running since 1982 when the only title was Camera of the Year – which went to the Minolta X700. Today’s awards are decided by the 14 editors of the Photography Experts group who represent weekly, monthly and bi-monthly photography magazines from 14 countries across Europe.

For more information visit the EISA website. 

Articles: Digital Photography Review (dpreview.com)

 
Comments Off on Canon and Sony dominate EISA awards for photographic equipment

Posted in Uncategorized


How to Accelerate the Development of Your Personal Photographic Style with Lightroom

16 Jul

If you want more Lightroom help from Viktor, get 50% OFF his Four Seasons Lightroom Preset Collection, on now at Snapdeals (only until July 19th, 2016)

Over the years, Lightroom has become the most important tool for my photography. I use it for organizing and editing my photos, as well as publishing them to various channels. But, this hasn’t always been the case.

Images Personal Artistic Style in Lightroom 01

When Adobe introduced Lightroom years ago, 100% of my editing was done in Photoshop. But, gradually over the years with every new version or update of Lightroom, it became a one-stop destination for all of my post-processing activities. Today, Lightroom meets 90% of my photography needs with Photoshop meeting only 10%.

Compared to Photoshop, I love Lightroom because of its nondestructive RAW editing and speed. But, if I had to choose my favorite Lightroom feature, it would be the ability to create presets.

Images Personal Artistic Style in Lightroom 02

Notice patterns and make them into presets

Preset functionality drastically changed the way I approach photo editing and helped me accelerate the development of my personal style. Yet, when presets were first introduced in Lightroom 3, I initially overlooked the feature until I decided to put an extra effort toward increasing the efficiency of my editing.

When I started analyzing the way I take and edit photos, I noticed certain patterns. I recognized that the way I take pictures directly affects the way I process photos in Lightroom.

For example, when shooting landscapes and cityscapes, I always set the exposure for the highlights (sky) that results in underexposed foreground shadow areas. Then, as I begin editing, I start by opening up the shadows, recovering details in the highlights and adding a graduated filter to the sky area. I boost contrast and clarity, increase the saturation and vibrance. This usually results in an oversaturated sky so I only desaturate the blue hues. I also ensure that the vegetation in my photos is not electric green by shifting the green hues toward the yellow spectrum. In the final steps, I add vignetting, increase sharpening and reduce noise.

Images Personal Artistic Style in Lightroom 03

Though these steps soon became second nature, it also meant that I performed anywhere from 20 to 30 identical adjustments to every edited photo. When I realized this, it quickly became obvious that if I recorded the common edits and adjustments as a Lightroom preset, then I could reuse them again and again more efficiently.

When I finally saved the edits listed above, my first preset was born. I named it “Natural” because it fully reflected my photography style in achieving a natural and well-balanced look, with rich colors.

Images Personal Artistic Style in Lightroom 04

Create variations

I then created two more presets, based on the first Natural preset. I shifted the color balance toward warm colors (yellow, orange) to emulate the warm hues of the early morning. I called this one “Sunrise.” Another preset I created was “Overcast” in which I decreased saturation and boosted contrast to imitate cloudy and darker days.

These three presets – Natural, Sunrise and Overcast — were the foundation of my Landscape collection.

Images Personal Artistic Style in Lightroom 05

Over the years, I gradually created new presets while making sure each of them reflected my taste and photography style. At some point, I looked back and realized that I was actually defining and perfecting my own artistic style while also exploring different artistic directions and the future of my work.

Today, I have three main preset collections that cover the different aspects of travel photography: Landscape Collection, Cityscape Collection and People Collection.

Experiment and save

I use the preset-based editing approach on a daily basis because it not only saves me an enormous amount of time editing, it also keeps my artistic style consistent. But, at the same time, I am also able to continue experimenting with new approaches that can be saved as new presets that reflect my evolving style.

I highly recommend that you try a similar approach with your photography.

Images Personal Artistic Style in Lightroom 06

Making your own presets

Here are some actionable steps that can help you jumpstart the process of creating your own presets:

If you’ve been using Lightroom and have a decent sized photo collection, select your favorite photos from the archives and create your own presets based on the edits and adjustments of the selected photos. Continue refining your presets over time to make sure that they are generic enough to work with a variety of photos. Also, keep growing your preset collection, and be sure to organize them by topic and/or style.

For photographers who are just starting out and don’t yet have a sizeable archive, I recommend using someone else’s presets as a starting point. It is fairly common that well-established photographers are willing to sell or give away their Lightroom presets to help budding photographers. Simply find a photographer whose style you like, and use his or her Lightroom presets as the foundation for your future collections.

You can even try to reverse engineer them to figure out how certain effects were achieved. Also, don’t be afraid to modify the presets until you come up with something exciting and unique to you.

Images Personal Artistic Style in Lightroom 07

Conclusion

Developing your personal artistic style in photography is a long, and sometimes chaotic and uncontrollable process. By recording your artistic tastes and versions as Lightroom presets, and by using them as the foundation for your preset-based editing routine, you can accelerate, simplify, and streamline an otherwise extremely complex process.

If you want more Lightroom help from Viktor, get 50% OFF his Four Seasons Lightroom Preset Collection, on now at Snapdeals (only until July 19th, 2016)

googletag.cmd.push(function() {
tablet_slots.push( googletag.defineSlot( “/1005424/_dPSv4_tab-all-article-bottom_(300×250)”, [300, 250], “pb-ad-78623” ).addService( googletag.pubads() ) ); } );

googletag.cmd.push(function() {
mobile_slots.push( googletag.defineSlot( “/1005424/_dPSv4_mob-all-article-bottom_(300×250)”, [300, 250], “pb-ad-78158” ).addService( googletag.pubads() ) ); } );

The post How to Accelerate the Development of Your Personal Photographic Style with Lightroom by Viktor Elizarov appeared first on Digital Photography School.


Digital Photography School

 
Comments Off on How to Accelerate the Development of Your Personal Photographic Style with Lightroom

Posted in Photography


How to Find your Personal Photographic Style

03 Jun

Finding your personal photographic style is something of a holy grail to photographers, yet seldom an overnight occurrence. Nor would you want it to be, as developing a style that is uniquely yours is one of the most exciting and rewarding aspects of photography. For a lot of photographers, it is an ongoing, ever-evolving process, influenced by many factors. Some photographers find a single style that works for them, which they stick to and hone, while others might develop two or more dominant styles.

image showing personal photographic style

The beach and water feature in many of my images

What defines a photographic style?

Personal style can be defined by any number of things. It can be your choice of subject matter, the way you light or style your subjects, your shooting angle, cropping, a particular colour or tonal range you’re drawn to, your post-processing style, or any combination of these and more.

Consider those photographers, whose work is instantly recognizable. Some of the greats such as Annie Leibovitz, Ansel Adams, Henri Cartier-Bresson – their styles are so distinctive that the viewer is left in no doubt as to whose work they are viewing. Adams is probably best known for his iconic black-and-white images of the American West, and his renowned technical perfectionism. Cartier-Bresson is considered by many to be the father of modern photojournalism. His style was humane and spontaneous, and he broke many rules in order to capture the decisive moment. Leibovitz developed her trademark style, involving the use of bold primary colours and unexpected poses, while working at Rolling Stone magazine. Her highly styled fashion and celebrity portraits bear her signature in every detail.

There are many photographers with unique styles, who may not yet have reached such heights of fame. The photographs below are the work of  Australian-based photographer Juanita Haslett (Little Forest Photography). Juanita’s style is distinguishable by her unposed approach to her subjects, the subjects themselves (usually young children), the wild, natural settings, and her distinctive editing style.

image showing personal photographic style

Photo credit: Juanita Haslett, Little Forest Photography

image showing personal photographic style

Photo credit: Juanita Haslett, Little Forest Photography

image showing personal photographic style

Photo credit: Juanita Haslett, Little Forest Photography.

Forget what everyone else is doing

When I was finding my feet as a portrait photographer, I was thrown off course time and time again by what other people in my industry were doing. Everywhere I looked were posed newborns – Photoshopped composites of babies in baskets, bowls and nests, babies in froggy pose, babies hanging in dreamcatchers, and swaddled in an assortment of wraps, headbands and hats with ears. Alongside the posed newborn images were photos of small children in forests and fields, bathed in an otherworldly golden light and sun flare – always the sun flare!

I figured that since everyone seemed to be photographing this way, it was what clients wanted. As I tried to recreate what they were doing (and had been doing long before I came along) their images populated my news feed every time I went online, serving as visual reminders of what I was failing at. In trying to do what everyone else was doing, I found myself lost in a sea of sameness.

image showing personal photographic style

My daughter chose to learn the bassoon rather than the piano. Her choice to do something different has helped her stand out from the pack, and has opened many doors for her.

The thing about stand-out photographers is that they stand out precisely because they are not doing what everyone else is doing. Your style is what sets you apart from everyone else. Sometimes, this means being brave and following a less popular path. So, be inspired by others, but don’t compare yourself. Admire their work, but don’t try to emulate it, because you will only end up looking like a poor imitation of something great.

The examples below are the work of Steve Scalone, a Melbourne-based photographer whose clean, graphic composition and unusual shooting angles are his trademark. Steve specializes in a very different genre to mine, but I follow his work, and admire it because it reminds me of the importance of being brave and different.

Image showing finding your personal photographic style

Photo credit: Steve Scalone

Image showing finding your personal photographic style

Photo credit: Steve Scalone

Image showing finding your personal photographic style

Photo credit: Steve Scalone

Figure out what inspires you

It’s helpful to understand how your passion was born. Keeping this at the forefront of your mind will help keep those doubts in check when they come creeping in, as they inevitably will. While you shouldn’t try to copy anyone else’s style, there is nothing wrong with being inspired by others. For many of us, another photographer’s work is what ignites that first spark in us, urging us to explore this medium further.

Who or what made you first fall in love with photography? Was there a family member whose photos struck a chord?  A photo you saw in the newspaper, or an exhibition you attended? Sometimes it’s a combination of many things, and it can be hard to pinpoint the one thing that’s had the greatest impact.

For a long time, I thought my first photographic love was Cartier-Bresson, evidenced by my love affair with black-and-white and candid photography. However, I was only introduced to Cartier-Bresson’s work when I already owned an SLR, by which stage the stable door had long been left open, and the horse had well and truly bolted.

image showing personal photographic style

My admiration for Cartier-Bresson is evident in my love of black-and-white street photography.

image showing personal photographic style

My first real engagement with photography was through my father. He documented our childhood growing up in South Africa in the 1970s, with a Minolta SLR and slide film. He had no formal training, just an eye for light and composition. Dad regularly treated us to slide shows, and none of us complained because his photos were so beautiful. There wasn’t a dull or dreary image among them, since Dad’s most active shooting season was during our summer holidays, in the mountains and on the coast.

image showing personal photographic style

My father documented our childhood in South Africa on slide film. Photo credit: Erik Holmgren

After we immigrated to Australia, the slides became even more important to us. Projected life-size on the wall, they allowed us to re-live all those happy memories, and kept our birth country alive for us when we were desperately homesick.

It was only recently that I realized just how much of an impact my father’s photography has had on my style. First, I favour natural over heavily edited. With so many editing tools at our disposal, there is the temptation to fiddle and alter until we end up with an image that is nothing like what we set out to capture. Dad’s photos have a beautiful rawness about them; they tell it as it really was.

Second, I am drawn to water and other natural environments, particularly when photographing children.

Third, I love big, beautiful photographic wall art, and I’m sure it harks back to those slideshows! I love how you can see all the detail of expressions and connections within a photograph when it is projected large on the wall.

image showing personal photographic style

My father’s photography has had a huge influence on my style. Photo credit: Erik Holmgren

Develop your style

Spend an afternoon looking back over the photographs you’ve taken. It’s a rewarding rainy day activity! Create a collection of your favourites, but don’t overthink it. Be spontaneous, and you’ll gravitate to those images that make your heart skip a beat.

Now take a good look at them. Do you notice a pattern? It may be subtle, and it may take a while to see it, but here are some things to consider:

What do you like to photograph? Let’s say it’s children. Are they young children or teens? What are they doing when you photograph them? Do you like to catch them in action, or quiet reflection? Candid or styled? Are they indoors or out? What do their surroundings look like?

image showing personal photographic style

Warm colours of early morning or late afternoon light contribute to style.

What about focal length? Do you photograph close up, or do you like to include some background to help tell the story? Do you favour the compression of a zoom lens or do you prefer a wider angle lens? Do you like to keep some background detail, or do you shoot with a wide aperture to keep it soft? Do you shoot from above, below, behind, in profile? Do you compose your images with lots of foreground, lots of sky, or do you frame your subjects with things like trees?

Now think about the lighting. What time of day have you taken your favourite photos? Are they brightly lit or full of shadows? High key, deliberately underexposed, or somewhere in between?

Is there a colour or tonal range that dominates your photos? There will be evidence of this in your choice of subjects, locations and your editing style. You might find the majority of your favourites are black and white, or maybe you’re drawn to warm reds and golds, or even neutrals. Do you prefer to edit for crisp colours and sharp images, or do you favour the softer outlines and colours that are reminiscent of film?

image showing personal photographic style

Black and white is one of my two dominant styles

All of these elements contribute to your photographic style. Once you identify them, you can start honing in on your style by emphasising the things that move you, and then watch your style grow.

So, how has your style developed? Have you noticed a big difference in the way you shoot or edit now, compared to where you were say, three years ago or even six months ago? Share your before and after photos in the comments section below, and any tips you might have for developing a personal photographic style.


Editor’s Note: This is one of a series of articles this week that are Open for Discussion. We want to get the conversation going, hear your voice and opinions, and talk about some possibly controversial topics in photography.

Let’s get it started here – do you agree or disagree with the points in the article above? Do you have any others to add? Give us your thoughts below, and watch for more discussion topics each day this week.

See all the recent discussion topics here:

  • 7 Commonly Accepted Photography Beliefs Debunked
  • Is HDR dead? Some dPS Writer’s Thoughts on this Controversial Topic

googletag.cmd.push(function() {
tablet_slots.push( googletag.defineSlot( “/1005424/_dPSv4_tab-all-article-bottom_(300×250)”, [300, 250], “pb-ad-78623” ).addService( googletag.pubads() ) ); } );

googletag.cmd.push(function() {
mobile_slots.push( googletag.defineSlot( “/1005424/_dPSv4_mob-all-article-bottom_(300×250)”, [300, 250], “pb-ad-78158” ).addService( googletag.pubads() ) ); } );

The post How to Find your Personal Photographic Style by Karen Quist appeared first on Digital Photography School.


Digital Photography School

 
Comments Off on How to Find your Personal Photographic Style

Posted in Photography


Photographic Education, Specialties, and Business: Interview with Photographer Melanie Weij

18 Mar

In one of our recent newsletters, I asked our subscribers to share their stories with me. The newsletter celebrated the beginning of spring and was dedicated to inspiration and aspiration in the contemporary photographic world. I always encourage readers to hit the reply button and get involved in the conversation. And often, you do (high five!). So did our subscriber, Continue Reading

The post Photographic Education, Specialties, and Business: Interview with Photographer Melanie Weij appeared first on Photodoto.


Photodoto

 
Comments Off on Photographic Education, Specialties, and Business: Interview with Photographer Melanie Weij

Posted in Photography


How to Use Anchor Colours to Challenge Your Photographic Eye

24 Jan

It is a good thing to break from the norm once in a while, and do something different to challenge your personal photography. Limiting yourself to a few rules could help with this and encourages you to learn something new.

One new thing to try, is to use anchor colours in your photography. An anchor colour could be any colour that does one or more of the following:

  • Dominates the picture
  • Makes the picture interesting
  • Draws the viewer to explore elements in your picture in more depth
  • Emphasizes the subject of your picture

Set yourself a challenge. Perhaps on a family day out, ask your kids to choose a colour each, and get them to point out things with their colour choice for you to take photos of. This gets them involved in the activity, and at the same time challenges you to come up with a creative way to photograph the subject matter.

0dominantcolour

You can always decide on the colours yourself too, or ask a couple of friends to choose the colour for you, so it becomes more of a challenge, and there is no initial bias on your part. This will stretch your imagination and push you to look out for things you would otherwise not notice immediately.

You can limit yourself to one or two colours, and do a series on each colour, or you can choose many colours. However, make sure each picture you take only has one anchor colour in it.

It is important however, to add some limitations to this challenge, such as time, or location, or both. Take one day, or a few hours, to really focus your mind on anchor colours for this exercise, so there are boundaries and limitations to your options, which will force you to think and see more creatively than usual. The photos on this article were taken on a single day within a three or four hour span.

1fillframe1

Fill the frame

It is easy enough to find an object of the colour choice and snap a picture of it. But that doesn’t mean your picture comes out creative, or any better than the average snapshot. To further hone your photographic eye, make it your aim to capture interesting images, and use your anchor colour to enhance your image within this context.

Here are some tips on how to use anchor colour in an interesting way. With your anchor colour firmly in mind.

1 – Symmetry

Use symmetry, or asymmetry, be that with patterns, or arrangement of objects, to draw focus to your subject. Better yet break the rules and fill the frame with the subject matter.

6symmetry

Symmetry in action

5assymetry

Assymmetry in play

2fillframe3

Fill the frame

2 Rule of thirds

Use compositional elements like the rule of thirds, centred, and off-centred subjects. Adhering to the rule of thirds often gives a sense of balance to the picture, and is a very widely used composition practice. Centred compositions give an imposing and authoritative feeling to the picture. Sometimes it can take away any mystery from the image. Off-centred composition adds tension and can sometimes make for an unnerving image.

7ruleofthirds

9ruleofthirds2

3 – Crop creatively

Cropping creatively is a really fun tool that helps you engage with the viewer, or elicit some kind of a response from them. The main thing to remember when cropping an image of a person, is not to crop at the joints. Other than that use your visual and creative instinct.

10creativecrop1

11creativecrop2

4 – Leading lines and perspective

Even when the picture is full of colours, if you compose your picture so that the lines lead to the main colour you want to emphasize, or frame your picture so that the anchor colour is on the converging lines of the rule of thirds, then they will draw the eye and dominate the image.

13leadinglines1

14perspective

5 – Framing

Looking through an object so there is a foreground element to your picture – having a foreground frames your subject matter and directs focus to it. The foreground is closer to the camera, and therefore often appears blurry. This also creates a feeling that you are an indirect observer and evokes mystery, like you have just uncovered something new.

Finding a good foreground is as easy as standing behind an object, so that the object stands between you and the subject matter, or hold something up in front of the edges of your lens. I use this technique a lot when shooting portraits. You can use a leaf, a magazine, a piece of fabric – anything that you can hold just ever so slightly within your lens’ view to add a sense of looking through something.

15lookingthru

A really good thing to use is a prism or plastic jewel because that reflects light or flare onto the lens so you get a light effect too.

Have you used anchor colours in your images? Share them here in the comments below.

googletag.cmd.push(function() {
tablet_slots.push( googletag.defineSlot( “/1005424/_dPSv4_tab-all-article-bottom_(300×250)”, [300, 250], “pb-ad-78623” ).addService( googletag.pubads() ) ); } );

googletag.cmd.push(function() {
mobile_slots.push( googletag.defineSlot( “/1005424/_dPSv4_mob-all-article-bottom_(300×250)”, [300, 250], “pb-ad-78158” ).addService( googletag.pubads() ) ); } );

The post How to Use Anchor Colours to Challenge Your Photographic Eye by Lily Sawyer appeared first on Digital Photography School.


Digital Photography School

 
Comments Off on How to Use Anchor Colours to Challenge Your Photographic Eye

Posted in Photography


David Stewart’s ‘Five Girls’ wins £12,000 Taylor Wessing Photographic Portrait Prize

18 Nov

A photographer who has charted the growing up of his daughter and four of her friends has won the Taylor Wessing Photographic Portrait Award with a re-staged picture he entered into the 2008 competition. Five Girls 2014 shows the group six years on from an original image that was taken right before their GCSE school exams (11th grade). Read more

Articles: Digital Photography Review (dpreview.com)

 
Comments Off on David Stewart’s ‘Five Girls’ wins £12,000 Taylor Wessing Photographic Portrait Prize

Posted in Uncategorized