RSS
 

Posts Tagged ‘Photographer’

Start Making Photographs to Become a Better Photographer

25 Sep

If you are an avid reader of this site, most likely you are a photography enthusiast wanting to learn more and advance your craft. If you really care about doing so, it is time to stop taking snapshots and start making photographs to become a better photographer.

Taking versus making can be a question of semantics; that’s why I prefer to call it snapshot versus photograph. But beyond semantics, in my humble opinion, you graduate as a photographer the moment you start making photos instead of taking them, regardless of the results. But wait, regardless of the results? Well, not really. Of course, you want great photos. What I mean by that is that you’ll progress in your craft the moment you start thinking about your photos, your vision, and how to reflect it with your image. The results could be bad or good, but you are thinking as a photographer. When you start thinking as a photographer, the results will come, sooner or later.

New Orleans Skyline

So what’s the difference? Taking a photo is the result of an impulsive reaction; you just press the shutter because you are there and you shoot it. Taking a photo is just snapping what you see. Instead, making a photograph is a process. When you make a photo, you are creating something from your vision. You are constructing it, and you are putting what comes from you in it.

The process of making a photo can take different periods of time. For some, it is a longer, thoughtful process, and for others it is a just a moment. For a National Geographic photographer, making a photo can take months; there is a lot of planning, research and being there just to get the right image that makes the cover of the magazine. For a street photographer, making a photo is totally different; they only have a split second to get it right without the luxury of setting up. But, there are other things they can control, like location, time of the day for best light, and so on.

I am telling you that you graduate as a photographer when you start making photographs because, for most us, enjoying the creative process is what makes us different from the rest. It does not matter if you are an enthusiast, serious amateur, or pro – we all enjoy it. Sure, learning how to expose, compose and post-process is important, but it’s something you can learn with enough practice and attention. That’s the technical aspect of photography, and when you master the basics, there will be always something new learn. But besides that, it comes with the freedom to stop thinking about aperture/depth of field and ISO/noise, and focus more on the photos you want to create.

Making a photograph will also help you to cut the clutter. When I first started to go on travel photography trips, I used to come back home with thousands of photos that were taken in just a span of a couple of days. That made the selection process a daunting task. First, who really wants to see thousands of photos? Second, is there any meaning in them? When you take the time to plan a more thoughtful photograph, you cut the clutter because often you’ll shoot less, but come out with better content.

Happy woman in Taung Tho Market Inle Lake

Last, I want to leave you with a couple of examples, starting with the opening picture of this article. I was going to be in New Orleans only for a long weekend and one the things I wanted to photograph was the skyline of the city. So, I started my research ahead of time to find the best spot to do it. I only had three nights in the city and as I wanted to shoot during the blue hour, I really didn’t have the chance of messing it up. Once I knew where I was going to make my photo from, it was all a matter of arriving there in time to set up and wait for the right moment. So besides finding the location and arriving early to set up, I also had the right tools with me to make it happen. I knew I wanted to include the Crescent Connection Bridge, so I brought a wide angle lens. I knew that it was going to be a long exposure, not only because of the time, but also because I wanted a smooth reflection over the Mississippi River, so I also brought a tripod and a neutral density filter to make a long exposure.

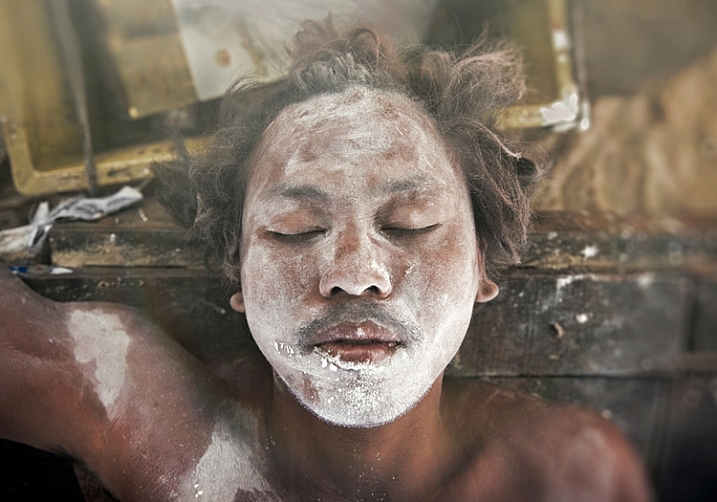
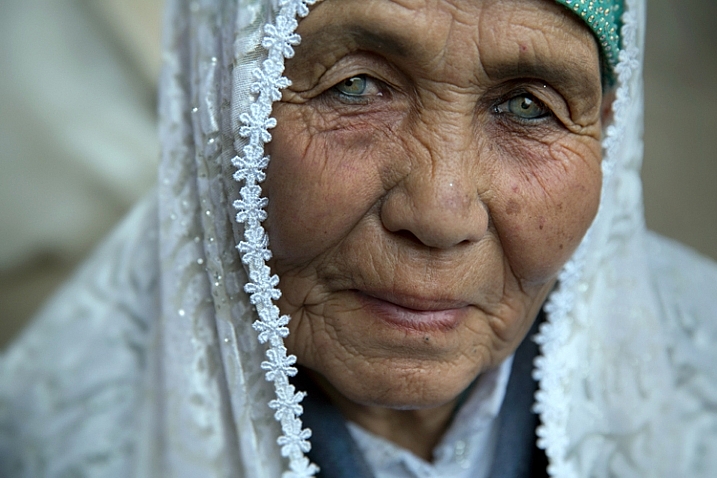
Sometimes making a photo also means finding an interesting subject, and trying to learn more from them by staying for a while, instead of grabbing a shot and moving. I found this amazing woman for this photo (above) from the Taung Tho Market of Inle Lake in Myanmar. I sat there taking pictures of her for a while, and I remember she pretended I was not there until I told my guide to tell her that she was beautiful. Her reaction was priceless and that made the photo.

Monk in the Punakha Dzong

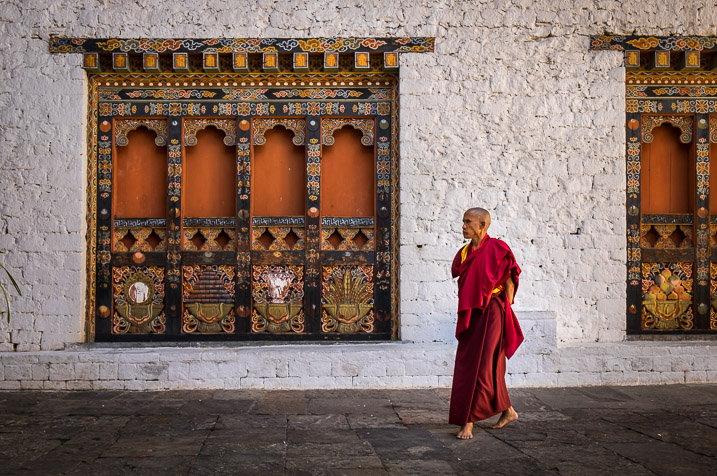
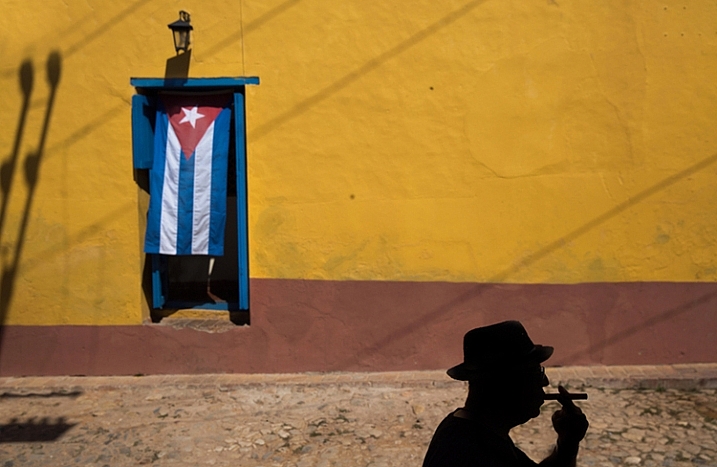
Other times, making a photo means waiting for something interesting to happen if you are in the right place. For the Bhutanese monk above, I found myself on a big patio surrounded by typical and colorful windows that I wanted to photograph, while I was visiting one of the many monasteries. But I needed something else besides the windows. Because I had seen them earlier, I knew that another monk would walk across my frame sooner or later, so I carefully composed my photo and waited until this one walked by.

There you have it. As you can see, there are different meanings and ways to create photos, and not just take them. But the most important thing is for you to understand that you can be a better photographer by making photos instead of just taking them. Plan and enjoy the process, and results will follow. By the way, if you are already making photos, why don’t you share one with us in the comments below with a short caption on how you made it and why.

googletag.cmd.push(function() {
tablet_slots.push( googletag.defineSlot( “/1005424/_dPSv4_tab-all-article-bottom_(300×250)”, [300, 250], “pb-ad-78623” ).addService( googletag.pubads() ) ); } );

googletag.cmd.push(function() {
mobile_slots.push( googletag.defineSlot( “/1005424/_dPSv4_mob-all-article-bottom_(300×250)”, [300, 250], “pb-ad-78158” ).addService( googletag.pubads() ) ); } );

The post Start Making Photographs to Become a Better Photographer by Daniel Korzeniewski appeared first on Digital Photography School.


Digital Photography School

 
Comments Off on Start Making Photographs to Become a Better Photographer

Posted in Photography


Abandonment issues: The urban explorations of Russian photographer Ralph Mirebs

20 Sep

You might already know the work of photographer and urban explorer Ralph Mirebs – his series of photos of abandoned Soviet spacecraft went viral earlier this year. His fascination with science and technology have fueled his photography, and he’s passionate about documenting abandoned industrial spaces striving to always answer the question ‘What was this used for?’ See his work and find out more in our Q&A. Read more

Articles: Digital Photography Review (dpreview.com)

 
Comments Off on Abandonment issues: The urban explorations of Russian photographer Ralph Mirebs

Posted in Uncategorized


Q&A: Gearing up for the National Football League with sports photographer Otto Greule

16 Sep

As the National Football League season sweeps in, sports photographers across the United States take to the stadiums to create iconic images. In a Q&A below, veteran sports photographer Otto Greule shares insider knowledge & outstanding imagery to give insight into his fast-paced, visual craft.

Articles: Digital Photography Review (dpreview.com)

 
Comments Off on Q&A: Gearing up for the National Football League with sports photographer Otto Greule

Posted in Uncategorized


Why Every Photographer Should Use a Manual Focus Lens

27 Aug

Your camera is smart. It has processors that are able to run algorithms, for near instantaneous adjustments to compensate for lighting conditions and changing environments. I’m a professional lens reviewer, and tend to complain if a lens/camera combination takes more than a split second to achieve accurate autofocus. But the reality is that most modern camera/lens combinations achieve accurate autofocus remarkably fast. Modern DSLRs can pretty much see in the dark, and still focus reasonably well with a near absence of light, and their performance at extremely high ISO settings is phenomenal.

Yes, your camera is most certainly smarter than your father’s, but the question is, are you a smarter photographer than your father?

Dustin Abbott DPS MF 15

Could it be that the wizardry of modern processors, sensors, and autofocus motors (AF) cocoon modern photographers from what actually happens in the process of taking photos? And, in doing so keep us from having to learn some of the essential basics of photography that could make us better? Here is why I think every photographer should spend some time with a manual focus only lens.

Aperture

A press release for a modern lens will say something like, “Nine rounded aperture blades.” That means next to nothing to most modern photographers for one simple reason – they will never see those blades. All they will ever see is the glass within the barrel of their lens. The reason for this is simple: lenses with an automatic iris aperture (the camera sets the aperture electronically), focus with the lens wide open (aperture blades withdrawn), and only stop down to the chosen aperture in the split second when that the shot is taken. It is pretty amazing how quickly this all happens, when you stop and think about it.

Most lenses produced for Canon EF mounts (excluding Samyang/Rokinon lenses along with a few non-mainstream models) have an auto iris aperture control. Even Zeiss manual focus lenses in Canon (ZE) mounts have automatic irises, and Samyang/Rokinon is retooling many of their lenses with AE versions with auto aperture control. Put simply, very few modern lenses in a Canon mount have an actual aperture ring. Nikon shooters get a few lenses with manual aperture rings (for some reason Zeiss lenses include one on Nikon [ZF] mounts.)

Auto aperture iris control is great for convenience. Just twist the dial on your camera (often in third stop increments) and select the aperture you want, or even let the camera choose it for you in an auto mode. It’s quick and painless.

The downside, of course, is that the actual significance of what is happening when that iris is opened wide or closed down is often lost upon modern photographers. We can talk about “stopping down” a lens or the advantage of a wide aperture prime, but until you have actually seen the difference in an aperture iris you won’t have a full sense of what that really means. Take a look at this series from the new Rokinon 50mm f/1.4.

When you actually see that aperture closing down you really get a sense of the difference between the f-stops and how much more light gathering there actually is at wide apertures. This series starts at f/1.4 and goes to f/8 – see how much difference the aperture size makes in the amount of light entering the camera?

Dustin Abbott DPS MF 8

Dustin Abbott DPS MF 9

Dustin Abbott DPS MF 10

Dustin Abbott DPS MF 11

Dustin Abbott DPS MF 12

Dustin Abbott DPS MF 13

Dustin Abbott DPS MF 14

My wife is an intelligent woman. She even has a pretty decent eye as a photographer, and has taken some great photos. But despite having been married to a gear guy since 1997, and having a hundred or so lenses going in and out of our house, she still to this day often gets confused about aperture. It can be confusing, as the logic (due to the way that f-stops often get reported) is backwards. Bigger numbers mean smaller apertures -and that seems backwards. There is no mistaking this with a manual focus lens with a manual aperture ring – you can physically see the aperture iris shrinking as you stop the lens down (choose a smaller aperture size – larger f-stop, like f/11 etc).

More photographers would get what aperture numbers really mean in terms of light gathering, if they physically saw the aperture blades close down or open in their lenses.

Light Gathering

Most cameras have a standard focusing screen, that does not show the true depth of field. This, added with the fact that the camera typically focuses with the lens wide opened, means that you often don’t get a sense of how much less light is available when the lens is stopped down (f/4-f/16, for example) or how much more is available at large apertures (f/1.2-f/2.8). Most DSLRs have a DOF (depth of field) preview button somewhere, but it is often in an obscure location and rarely gets used by many people. For this reason many photographers have never seen the true depth of field of any of their wide aperture lenses, or any other lens for that matters. This changes when you use a manual focus lens (particularly with a focus screen that shows true depth of field). More on this in a moment.

Yes, it is a pain when the viewfinder is quite dark when you have a manual aperture lens mounted and stopped down to, say, f/8. That’s the reason that modern lenses and cameras don’t show you this in your viewfinder. But it also means that you aren’t being forced to learn what f/8 really means in terms of light gathering. You also don’t see how much more light is available, or how much more shallow the depth of field is with a large aperture. You don’t really think about your aperture setting at the time of capture, resulting in a loss of creativity because your mind isn’t forced to visualize what aperture means to the shot.

But beyond this, manually selecting your aperture really helps you to mentally dial in the relationship between aperture and depth of field. The fact that you have to think about selecting the aperture, and see a difference in the viewfinder, in both the depth of field and the amount of light, helps you to realize how shallow depth of field shots (with a large aperture) and large depth of field shots (with a small aperture) are going to turn out. I have learned how to mentally visualize how depth of field is going to affect a scene so much more because of using manual aperture lenses. Here is a series from the Zeiss Planar T* 50mm f/1.4 lens. It starts at f/1.4, f/2, f/2.8, and then finally shows f/4. Notice the huge difference this makes to the degree in which the background is blurred.

Dustin Abbott DPS MF 1

Dustin Abbott DPS MF 2

Dustin Abbott DPS MF 3

Dustin Abbott DPS MF 4

The large aperture shots are much more attractive, and give a better three dimensional effect to the image. You probably won’t always shoot with manual focus lenses, but using one will help train your brain to visualize your shots more effectively and artistically.

Depth of Field and Focus

It is quite a revelation to use a wide aperture, manual focus prime, with a focusing screen like an EG-S that shows true depth of field. At close to medium distances you can actually watch focus travel from one thing to another, and subjects pop into focus. It really helps you think about storytelling as a part of your imagery. When you think about what you want in focus, it means that you have become intentional about what you want your viewer to see.

Many cameras have AF point spreads that are not wide enough to reach the edges of the frame. Manual focus lenses remove that limitation, and I am more likely to take an image with my subject in focus in an extreme corner when I use one. The rule of thirds for composition is a great starting tool, but sometimes rules are made to be broken. Take a look at this shot of a family games night. The cards are in the extreme bottom corner. Your eye goes there first, but then considers the whole out of focus scene beyond. Your brain allows you to mentally fill in the blanks, and image possibilities, rather than just a looking at a scene.

Dustin Abbott DPS MF 7

Many macro photographers have learned to choose to use manual focus at those very fine distances. It is often challenging to place an AF focus point right where you need it (particularly when using a tripod), but manually focusing allows you to simply focus until what you need to be in focus is sharp. I’ve heard a lot of people fuss over the focus speed of some macro lenses, including the amazing EF 100mm f/2.8L IS. All I can say is that you need to use a manual focus macro lens sometime. Using the Zeiss Makro-Planar in either a 50mm or 100mm focal length helps you to realize how much the macro range adds to the focus possibilities of such a lens. There are so many extra focus points! Using a manual focus macro lens will certainly help you appreciate the AF on macro lenses, and will also help you understand why the AF focus (distance) limiter switch is there and how to properly use it.

Dustin Abbott DPS MF 6

Dustin Abbott DPS MF 5

Learning to focus with a manual focus lens will help your mind to understand how to better use autofocus lenses (particularly those with focus limiters).

In Conclusion

We live in a high-paced world. We want everything to be faster and easier. But great art is rarely created is rarely created in a rush. When I am shooting professional event work and weddings, I tend to use image stabilized, wide aperture, zoom lenses. They are big and heavy, but they are extremely flexible and deliver great results. I need speed in those situations, but some of my most creative shots in my catalogue have been taken with manual focus lenses. I slow down and become more creative. Some of my most critically acclaimed images have been taken with manual focus lenses, both inexpensive and expensive ones.

If you have been guilty of doing most of your photography in a rush, do yourself a favor a get yourself a manual focus lens (even a cheap one). If you want a cheap option, grab yourself an SMC Takumar 55mm f/1.8, and an adapter to your mount of choice. You can probably get a lens and an adapter for under $ 100. It takes some amazing pictures, and will open a world of appreciation for some of the lenses from another era. It will probably also make you a better photographer.

Even better is the SMC Takumar 50mm f/1.4, or if you want to use a value oriented modern manual focus lens, try one in your favorite focal length from Rokinon or Samyang (same thing, just rebranded lenses). You’ll find a number of reviews of different ones on my website. If you are willing to spend more and want the finest optics and image quality available, Carl Zeiss makes some of the best lenses period. They tend to be mostly manual focus, and I’ve had the privilege of using and reviewing many of them.

Once you learn how to take good pictures with a manual lens, shooting with your modern gear will seem easier than ever, and you might even use it more creatively. These are just a few reasons why every photographer should spend some time with a manual focus only lens.

googletag.cmd.push(function() {
tablet_slots.push( googletag.defineSlot( “/1005424/_dPSv4_tab-all-article-bottom_(300×250)”, [300, 250], “pb-ad-78623” ).addService( googletag.pubads() ) ); } );

googletag.cmd.push(function() {
mobile_slots.push( googletag.defineSlot( “/1005424/_dPSv4_mob-all-article-bottom_(300×250)”, [300, 250], “pb-ad-78158” ).addService( googletag.pubads() ) ); } );

The post Why Every Photographer Should Use a Manual Focus Lens by Dustin Abbott appeared first on Digital Photography School.


Digital Photography School

 
Comments Off on Why Every Photographer Should Use a Manual Focus Lens

Posted in Photography


On the fly: SeattlePI.com photographer captures Blue Angels from the air

01 Aug

The Blue Angels announced their arrival in Seattle this week as they usually do – suddenly, and with a lot of noise. While we’ve been able to catch glimpses of them flying over from our office windows, as they prepare for a local maritime festival. But our view is nothing like the view SeattlePI.com photographer Josh Trujillo had during their flyby yesterday afternoon. Read more

Articles: Digital Photography Review (dpreview.com)

 
Comments Off on On the fly: SeattlePI.com photographer captures Blue Angels from the air

Posted in Uncategorized


How to Become a Professional Travel Photographer – Two Paths

27 Jul
Ethiopian Meskel festival - By oded wagenstein

Ethiopian Meskel festival – by Oded Wagenstein

Many people are mistaken in thinking that travel photography is just about traveling and making photos. While, although that sounds like a dream job, not many people will pay you to just travel and take nice looking photos. Like any job, travel photography is work –  and usually, it’s very demanding.

Yes, you get to go to amazing places, meet exciting people, and the world is your office. But, it also has many downsides: sleeping in flea-infested guesthouses, never-ending bus rides from hell, harassment from corrupted policemen, loneliness, and lack of job stability to name a few.

Are you still here? Good! Let’s talk about how to become a travel photographer. There are two ways to approach this: finding a client, or finding a job that allows you travel.

Georgia - by oded wagenstein

Aperture f/5.6, shutter speed 1/6000th, ISO 400. Exposure Compensation: -1.3
-Image by Oded Wagenstein-

First option – Find a client

As a travel photographer, you have many potential clients. Here I will discuss the most common: Governmental tourism organizations, NGOs, Commercial organizations and Media

Governmental tourism organizations

Many governments strive to promote tourism in their countries. To do so, they need photographs to show the things and activities tourists can see and do in their country. Budget-wise, they have usually deep pockets.

Pros: This is the most organized option, the client has a big-budget, and gives you access to places closed to the public.

Cons: It’s very hard to get your foot in the door. Usually these organizations prefer to work with big, well known magazines and newspapers that can promise not only good photographers, but wide exposure to their audience of readers.

hindukush - By oded wagenstein

hindukush – by Oded Wagenstein

Tip from a pro: Instead of trying to work with a large media organization like a magazine or newspaper, become a small media icon yourself. If you have a large and influential presence on social media, such as Facebook and Twitter, you might be more appealing to these organizations than old school media. So, start a blog, gain followers, and who knows, you could be their next photographer.

Taking the first step: In most cases, working with governmental tourism organizations will never be your first career step. But starting a working relationship with a travel magazine or newspaper, or starting a blog and a Facebook page is a good idea. It’s best to specialize in a specific area of travel, such as adventure, food, etc.

Portrait from Cuba - By oded wagenstein

Aperture f/4, shutter speed 10th, ISO: 500, Exposure Compensation -0.3
-Image by Oded Wagenstein-

NGOs

Some large NGOs (non-governmental organizations) need visual material to help them support their cause and attract donations.

Pros: It depends on the organization, but the work usually deals with super interesting projects on subjects like: animal rights, public health, or any other hot topic that demands the world’s attention.

Cons: This is not the job where you will be asked to shoot lovely landscapes and flowers, as many NGOs need photography as visual proof of their cause. This means you might be asked to get photos of matters that the local government wants to hide from the public eye (animal abuse, theft of natural resources, child abuse, etc.)

Tip from a pro: You can start by volunteering with an NGO that supports a cause you believe in. Then, through your working relationships with people from the inside and demonstrated photography skills, you might get to become the official photographer of the organization.

Taking the first step: You don’t always have to start somewhere far away. If this is your first time doing volunteer work, it would be wise to start locally. A nursing home or an animal shelter are good examples. You will start establishing your portfolio, and work for a good cause at the same time.

japan - By oded wagenstein

Aperture f/4, shutter speed 100th, ISO: 320, Exposure Compensation -1.7
-Image by Oded Wagenstein-

Commercial organizations

If you are a top notch, worldwide known photographer, it is very likely that customers from all over the world will want to use your services (for fashion, events, sports, architecture, products etc.). But as we are focusing on travel photography, commercial organizations that deal with traveling and tourism are more likely to hire you. Notable examples are hotels, tour companies, airlines and so on.

Pros: The commercial brands who hire a travel photographer are usually worldwide, and that can mean traveling a lot.

Cons: As traveling for free and shooting tourist destinations is a dream job for almost anyone, the fees offered for the job can be quite low. It’s common the photographer only gets paid with benefits like free flights or accommodation.

Tip from a pro: To work with the big brands, you need to market yourself in a way that will appeal to these types of clients. The kind of architectural or food photography a hotel chain needs is very different from what a tour company that specializes in extreme travel. Don’t try to work in all genres and styles. That’s a good path to becoming an inadequate photographer. Focus only on the genre and style you love and put all of your heart and effort into it.

Taking the first step: Approach the client with already made photos. Visited a nice hotel during your last vacation? The hotel’s management will probably be very happy to publish your images if they are good. Most likely they won’t pay you as they did not order the images from you, but they will give you a credit under the photo. But this would be a good start as you’re now published and have a working relationship with a known brand for your CV.

Bakery in cuba - by oded wagenstein

Aperture f/4, shutter speed 10th, ISO: 1000, Exposure Compensation -0.7
-Image by Oded Wagenstein-

Media

Having your travel photography printed on a glossy page of a well-known magazine…if that’s not a childhood dream, then what is? I will divide “media” into three areas: magazines and newspapers, digital platforms, and stock photography agencies.

Magazines and newspapers: Although they tend to be seen as old fashioned and don’t pay as well as other industries mentioned here, working for a newspaper (if you are into photojournalism) or a travel magazine is sure to be an interesting and creative job.

Digital platforms: These days digital platforms and websites are the leading source of information for most people. Although most well-known websites prefer to work with stock agencies (explained below) rather than directly through freelance photographers, some do have their own regular contributors and might send you to cover a story.

Stock photography: Shooting for stock photography is a subject for a different article (or five of them) but you can see stock agencies as the middle man between provider (the photographer) and buyer (magazines and websites). In order for news agencies or image bank websites to send you on assignment, you’re required to be a contract photographer. Each organization has its own contract and demands.  But some photo agencies will be willing to pay for your independent travel images if they are sellable. Do not expect large amounts. But hey, it’s better than nothing.

Thailand - by oded wagenstein

Pros: Dealing with the most interesting stories and places around the globe.

Cons: Of all the other clients, this one will probably pay far less than the commercial world. But hey it’s not all about the money, right? The work is usually as a freelancer as well.

Tip from a Pro: In order for a magazine or news agency to pay for your trip and fee, they need to be positive that you can deliver the job. Establishing a strong portfolio is a must.

Taking the first step: Again, like in other cases, starting locally is best. Ask to contribute photos, or propose a travel story, to your local newspapers.

Trinidad, Cuba - by oded wagenstein

Aperture f/5, shutter speed 100th, ISO: 100, Exposure Compensation -2.7
-Image by Oded Wagenstein-

Second option – Find a job that requires traveling or relocation

If the instability of the freelance photographer’s way of life isn’t for you, you can always find a day job that involves traveling. Then you can go to lots of places, be paid for it through your job, and do travel photography in your spare time. Jobs like flight attendant, global salesperson, English teacher (or a spy!) are just several of many professions that let you visit your dream locations, without being too risky on the financial side.

portrait of a dark boy - by oded wagenstein

Aperture f/3.5, shutter speed 100th, ISO: 200, Exposure Compensation -1
-Image by Oded Wagenstein-

Conclusion

This all may sound hard or even impossible. But, like in most arts, you need to be really good at what you do in order to make a living from it. You need to devote at least 50% of your time to marketing your portfolio, and above all, love your craft with all your heart.

Uzbekistan - by oded wagenstein

Aperture f/4, shutter speed 10th, ISO 160, Exposure Compensation 0
-Image by Oded Wagenstein-

The author would like to thank Nicholas Orloff for his assistance in writing this article

googletag.cmd.push(function() {
tablet_slots.push( googletag.defineSlot( “/1005424/_dPSv4_tab-all-article-bottom_(300×250)”, [300, 250], “pb-ad-78623” ).addService( googletag.pubads() ) ); } );

googletag.cmd.push(function() {
mobile_slots.push( googletag.defineSlot( “/1005424/_dPSv4_mob-all-article-bottom_(300×250)”, [300, 250], “pb-ad-78158” ).addService( googletag.pubads() ) ); } );

The post How to Become a Professional Travel Photographer – Two Paths by Oded Wagenstein appeared first on Digital Photography School.


Digital Photography School

 
Comments Off on How to Become a Professional Travel Photographer – Two Paths

Posted in Photography


On top of the world: Photographer faces fears to capture rare wedding photos

24 Jul

Photographer Brian Rueb was approached by two friends to shoot their wedding – a familiar proposal for many photographers. However, there was a slightly unusual twist in this case, as the couple planned to tie the knot on top of Half Dome in Yosemite National Park. Read more

Articles: Digital Photography Review (dpreview.com)

 
Comments Off on On top of the world: Photographer faces fears to capture rare wedding photos

Posted in Uncategorized


The imaginative work of Moroccan photographer Achraf Baznani

18 Jul

Featuring miniaturized versions of himself as the lone character in his surrealist, cartoon-like scenarios, Achraf (pronounced ash-raaf) Baznani’s conceptual imagery incorporates symbolic elements like tea cups, lightbulbs, and glass jars. His images create a dream-like mix of fantasy and the real world. Check out his work and find out more about him. Read more

Articles: Digital Photography Review (dpreview.com)

 
Comments Off on The imaginative work of Moroccan photographer Achraf Baznani

Posted in Uncategorized


Singaporean photographer makes 360 degree interactive video of tour of North Korea

14 Jul

A photographer from Singapore has created a navigable 360° video of a tour he made of North Korea. Aram Pan has set out to make a documentary that ‘captures the essence of North Korea through the use of 360° panoramas, photos and videos.’ Through collaboration with authorities in North and South Korea, Aram has gained extensive access to the usually closed country and has been able to tour popular sites as well as meet and photograph local people. See video

Articles: Digital Photography Review (dpreview.com)

 
Comments Off on Singaporean photographer makes 360 degree interactive video of tour of North Korea

Posted in Uncategorized


Photographer captures once-in-a-lifetime Las Vegas sunset

11 Jul

Photographer Tony Eckersley’s balcony overlooking the Las Vegas strip from his downtown apartment is usually good for a dramatic sunset or thunderstorm. But even by those standards, the scene he encountered earlier this week was unusually spectacular. As a thunderstorm passed over the city, he was able to capture the sunset to the west with the storm continuing over the east side. Learn more

Articles: Digital Photography Review (dpreview.com)

 
Comments Off on Photographer captures once-in-a-lifetime Las Vegas sunset

Posted in Uncategorized