RSS
 

Posts Tagged ‘Photographers’

5 Tips for Newbie Landscape Photographers

10 Sep

2-for-1 special

As part of Landscape Photography Week here on dPS, we’re offering TWO for the price of ONE on our best-selling Living & Loving Landscape Photography ebooks!

Click here to take advantage of this offer.


I don’t specialize in Landscape photography but I wanted to go out and see what I could learn so that I could impart some useful tips for beginners who are new to shooting landscapes.

Gear for landscape photography

What gear did I bring with me? I brought two cameras, one lens and a tripod. A wide angle is generally the go-to lens for landscape shooting. I brought my 24-120mm f/4G.

Landscape shot of the Dublin mountains

The Dublin mountains

A tripod is essential for landscape photography for two reasons. First, you will will want to shoot with a small aperture like f/16, that means also using a slower shutter speed. It is better to keep ISO down low to 100 or 200 for less noise. Secondly, by having your camera on a tripod also helps you frame your shot, I’ll cover this more below. If you are going to do long exposures, I would recommend a cable or remote trigger release too. You could also use the built-in self-timer.

Note: I didn’t mention any kind of filters as in Neutral Density (ND), polarizers and so forth. I don’t have any, but I also feel that they are best used when your skills are more advanced and you want to capture movement to produce soft, blurry clouds and misty waterfalls. Plus they are not cheap to buy.

1 – Where do you start?

Start in your own locality. I know for me, I can get so used to my surroundings, that I don’t bother to actually see what’s there. I suppose it’s just familiarity. But when you travel to a new country you have fresh eyes, and everything around you is new and exciting.

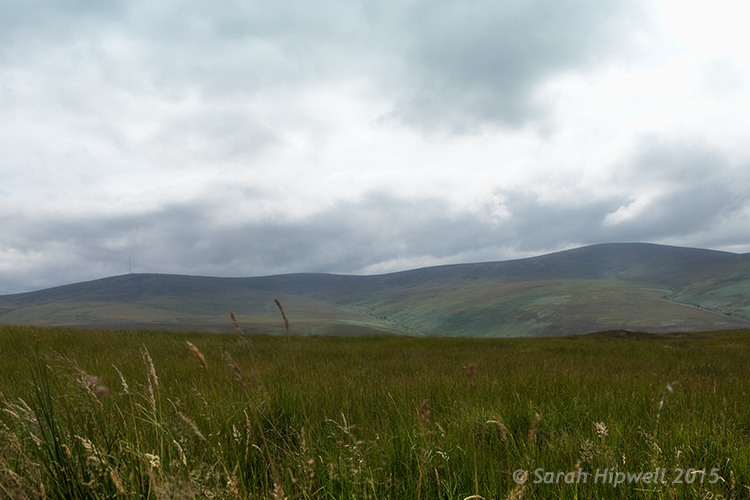
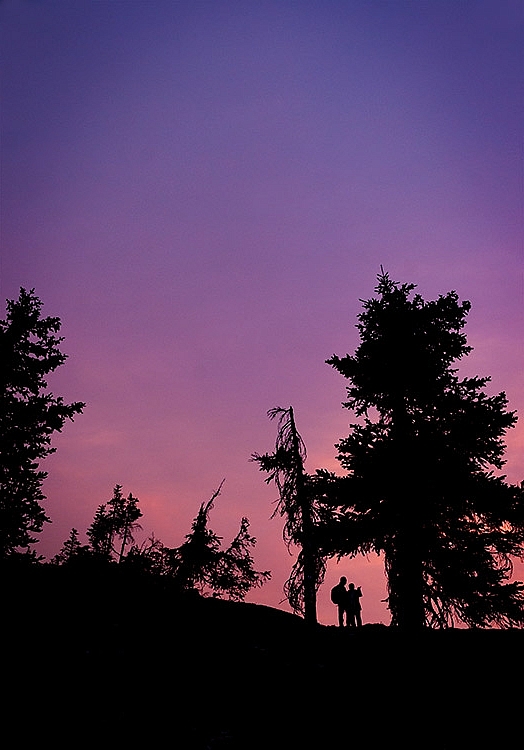
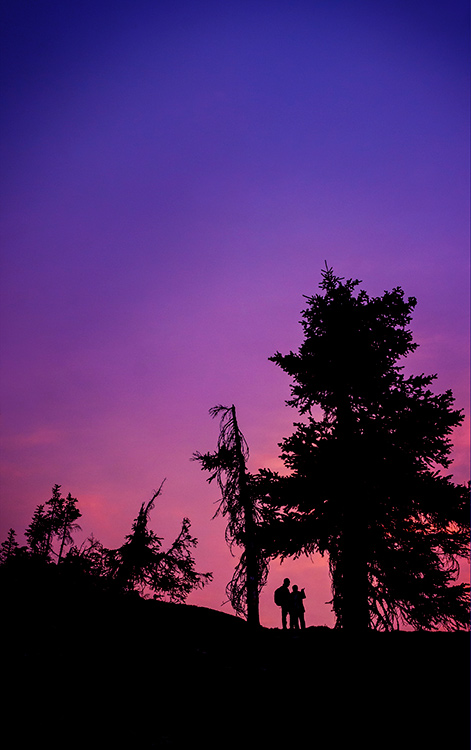
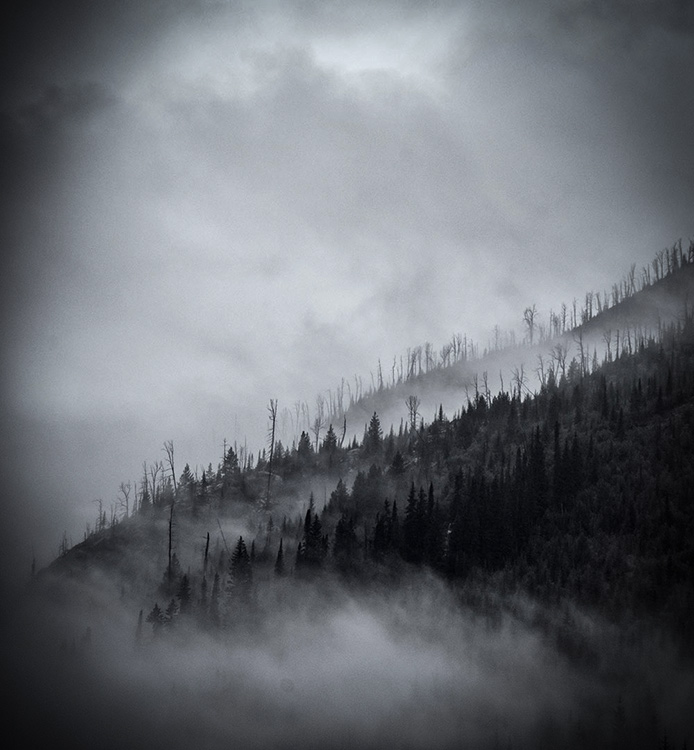
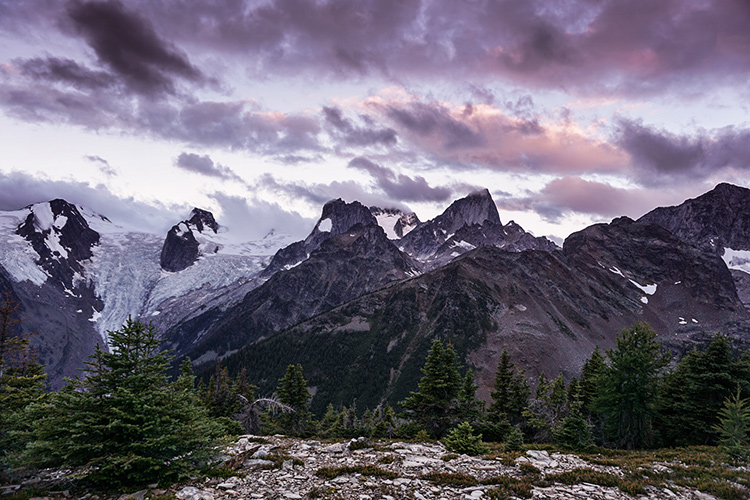
So as I live at the foot of some wonderful mountains, I knew where to begin. By car, it only takes me 20 minutes (approximately) to arrive at some breathtaking scenery. My first port of call was this spot, see photo above.

Scoping an area beforehand is an important aspect in landscape photography. This gives you a lay of the land, a chance to look for the best vantage points, see where the sun sets, and so on.

2 – Time of day

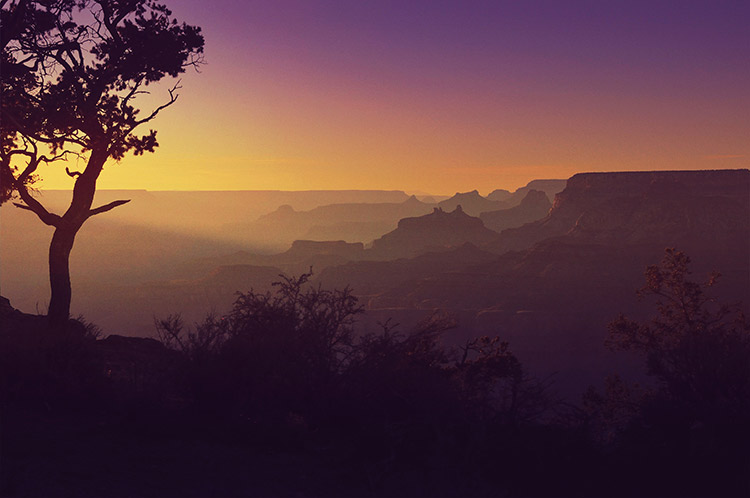
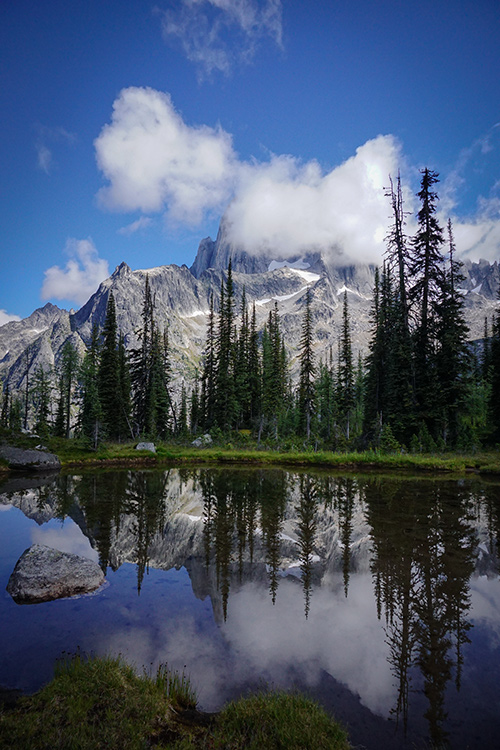
The time of day is crucial, as most landscape photographers shoot in the golden hour or at dawn. This doesn’t mean that you can’t shoot at any other time of the day.

Trees-in-forest

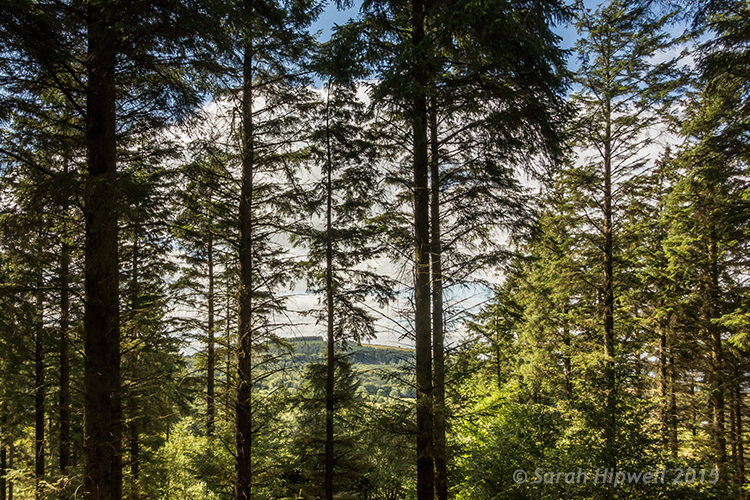
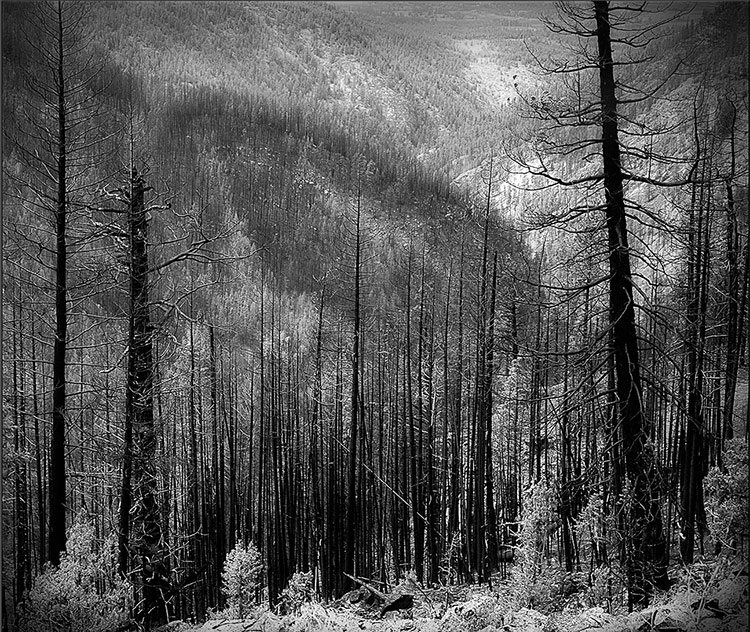
Tibradden forest in the Dublin Mountains. I know it’s not taken at the golden hour but I do like the blue sky and white clouds peaking through the trees.

3 – Shoot Raw

I am not going to debate the merits of RAW versus jpeg here. Simply put, RAW offers the most detail, which is essential if you want to get the best out of your images for landscape photography. You can also use the graduated filter in Adobe Camera Raw (ACR) to retrieve details that may have been lost, such as blown out skies, or underexposed areas in mountain regions where shadow detail needs to be brought out. See more about using the Graduated filter in ACR.

The reason Graduated Neutral Density filters (not to be confused with regular Neutral Density filters) are used by landscape photographers is because the land and the sky need different exposure readings – so if you expose for the sky, the land can be too dark and if you expose for the land, the sky gets washed out. This is where a graduated filter comes in handy. The top part is dark, fading to transparent at the bottom.

4 – Where to focus?

For landscapes, you are usually aiming to have the foreground, as well as the background, in clear focus. So, you need a small aperture such as f/16. This means that the depth of field (DOF) is bigger, and more of the image is in sharp focus. As a general rule of thumb, you should focus roughly one-third up from the bottom of the frame.

Focus on an element in your scene using autofocus then switch back to manual focus on the lens to lock it. This ensures that you achieve maximum sharpness and depth of field throughout. If you have Live View, you can zoom the view in to full magnification to manually focus. For more in-depth knowledge on focusing for landscapes, especially how to use hyperfocal focusing, I’d recommend that you read Getting Landscapes Sharp: Hyperfocal Distances and Aperture Selection.
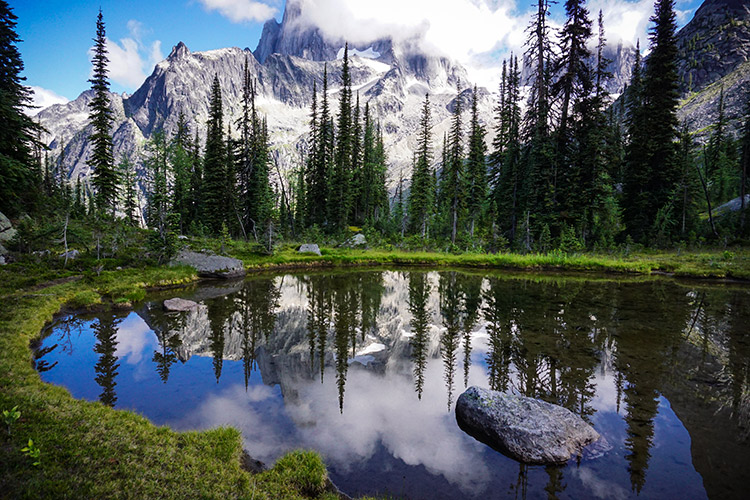
5 – Composition

Composition is essential when framing a landscape shot. I really had to change my style of shooting. I spent more time looking around before even pressing the shutter button. I needed to see what I was going to frame in my shot. The landscape around me was fantastic and expansive.

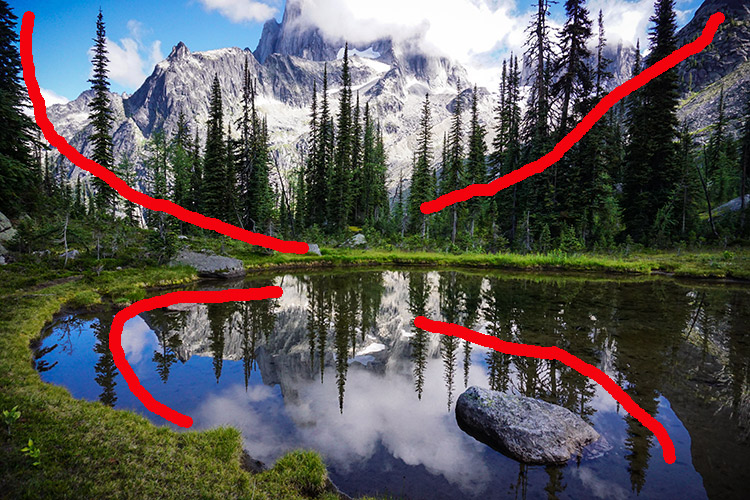
This is where the rule-of-thirds is a useful guide. Think of your photo with imaginary lines that are drawn dividing the image into thirds both horizontally and vertically. Place important elements of your composition where those lines intersect.

Rule-of-thirds for composition

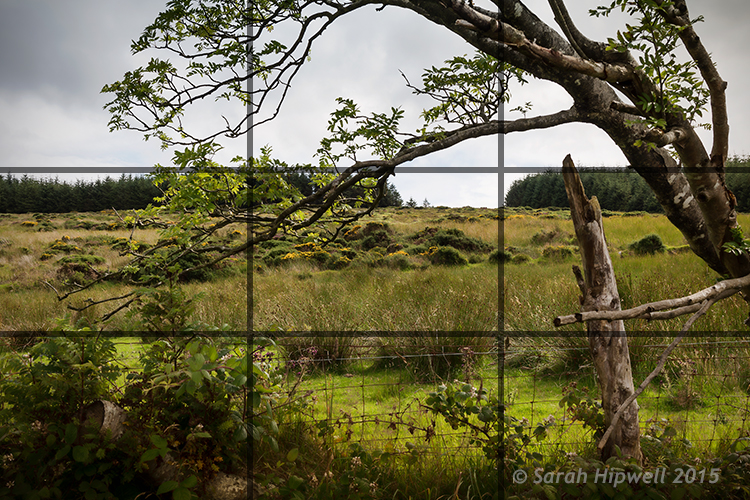
I really like this tree and the way it’s branches were leaning in so far to the left of the photo. I thought one of the branches seemed to hover over the gap in trees in the background which seemed to say what-is-through-there? Maybe I have watched too many Hobbit movies!

Don’t be afraid to experiment. The next shot maybe not classified as a typical landscape shot but I just loved the lighting on the ferns. I opened the aperture to f/4.5 because I wanted a shallower depth of field, so that the background was a little blurred, giving the ferns some separation from the background.

Close-up-ferns

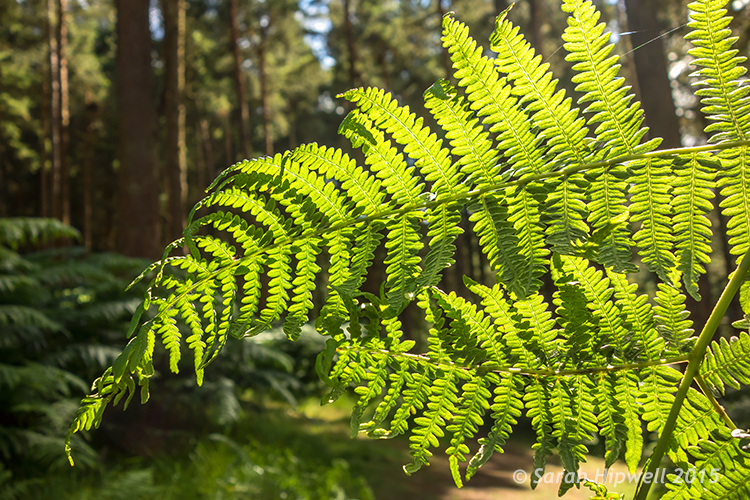
Close-up of some ferns in Tibradden forest in the Dublin Mountains using a wider aperture of f/4.5

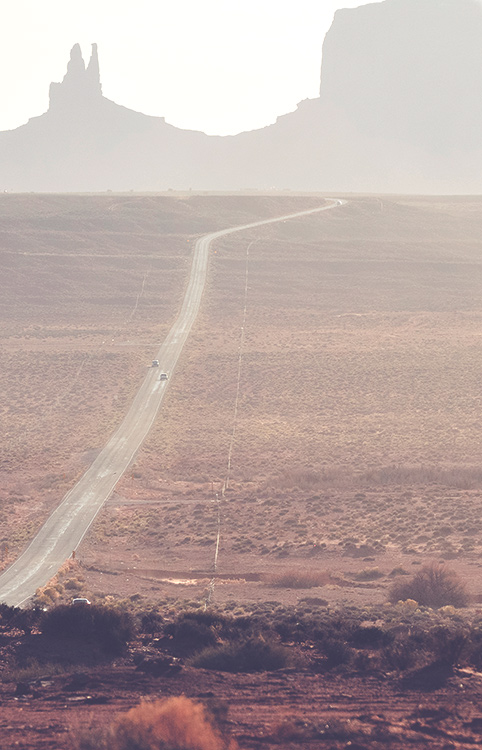
You don’t have to shoot just using landscape (horizontal) mode, try shooting in portrait mode (vertical) as well. I shot the next two images using the portrait style. I wanted the rope bridge to be the focus of attention amongst all the tall trees.

Activity-park-in-forest

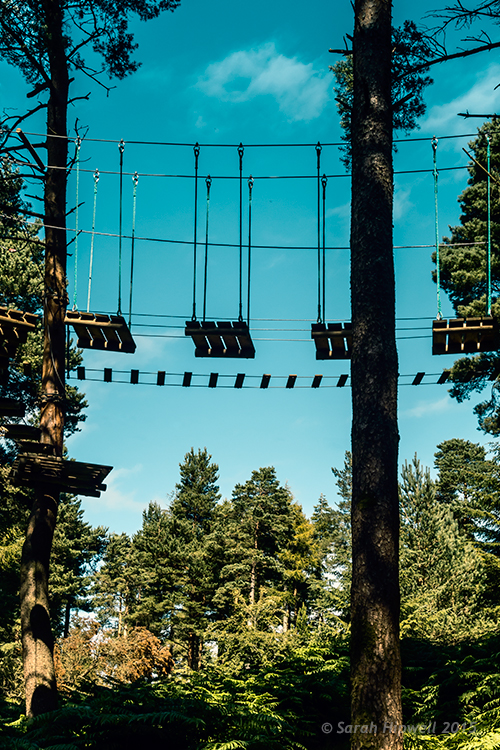
A rope bridge forms part of an activity centre in Tribadden forest.

rope-bridge-shadow-in-forest

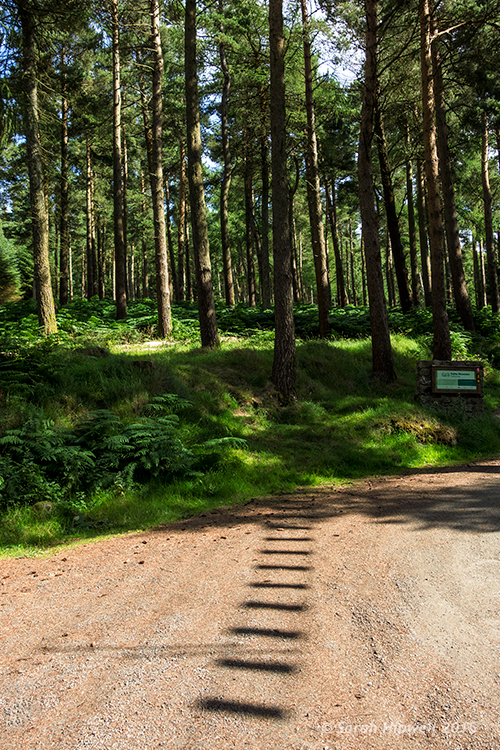
The shadow of the rope bridge suspended 13 metres up in the trees made an interesting viewpoint leading into the base of the tree.

Tip: Trees like buildings can converge when using wide angle lens. This can be corrected in post-processing, using the lens correction filter in Photoshop or Lightroom. Also try not to have the body of trees touching the side of your frame, crop them out. It will only make your shot close in on itself, give your image room to breathe.

Conclusion

All in all, this exercise was a great excuse to get outdoors and get fresh air. If you don’t shoot landscapes, I would certainly recommend going out and giving it a go. It makes for a great day out plus you are honing your photography skills, just don’t forget the sandwiches!

Are you a landscape photographer? What techniques did you use? If so please share in the comments below.


Here on dPS this is landscape week – here is list of what we’ve covered so far. Watch for a new article (or two) on landscape photography daily for the next day or so.

  • 6 Tips for Better Low-Light Landscape Photography
  • Landscape Photography and the Human Element
  • 5 Ways a Telephoto Lens Can Improve Your Landscape Photography
  • Landscape Photography from the Side of the Road
  • 32 Majestic Landscape Photos to Inspire Your Wanderlust
  • Weekly Photography Challenge – Landscape
  • Landscape Photography – Shooting the Same Location Through the Seasons
  • How to Solve 5 Composition Conundrums Faced by Landscape Photographers
  • 6 Tips for Creating More Captivating Landscape Photographs
  • Tips for Getting Started with Urban Landscape Photography
  • 3 Simple Steps to Make Your Skies Pop in Lightroom
  • Equipment Tips for Landscape Photography

googletag.cmd.push(function() {
tablet_slots.push( googletag.defineSlot( “/1005424/_dPSv4_tab-all-article-bottom_(300×250)”, [300, 250], “pb-ad-78623” ).addService( googletag.pubads() ) ); } );

googletag.cmd.push(function() {
mobile_slots.push( googletag.defineSlot( “/1005424/_dPSv4_mob-all-article-bottom_(300×250)”, [300, 250], “pb-ad-78158” ).addService( googletag.pubads() ) ); } );

The post 5 Tips for Newbie Landscape Photographers by Sarah Hipwell appeared first on Digital Photography School.


Digital Photography School

 
Comments Off on 5 Tips for Newbie Landscape Photographers

Posted in Photography


5 Goal Setting Strategies for Photographers

07 Sep

We all have goals to achieve. But why are some people successful at achieving their goals while others only add new items to their to-do list day by day and year by year? In this post I collected some goal setting strategies to help you get your photography career and business on a fast track. A goal is not always Continue Reading

The post 5 Goal Setting Strategies for Photographers appeared first on Photodoto.


Photodoto

 
Comments Off on 5 Goal Setting Strategies for Photographers

Posted in Photography


How to Solve 5 Composition Conundrums Faced by Landscape Photographers

07 Sep

2-for-1 special

As part of Landscape Photography Week here on dPS, we’re offering TWO for the price of ONE on our best-selling Living & Loving Landscape Photography ebooks!

Click here to take advantage of this offer.


Do you ever get frustrated when reviewing your landscape shots? In the field you thought you’d nailed the scene, but back at your computer you now see that things don’t look so great. I know sometimes my frustration seems endless after a landscape shoot. There are just so many questions about how to shoot and compose breathtaking landscapes.

DSC01032edit

Landscapes are both one of the easiest things to photograph, and the most difficult. Easy – because landscapes are everywhere, and they don’t really move, so no expensive technical equipment is needed. Often novice photographers mistake this ease of access with easy photography. Landscapes are difficult to photograph well because, like most other subject matter, the devil is in the details, and there are a myriad of details to pay attention to in landscape photography.

It is these details that create conundrums for photographers, especially when it comes to composing a great landscape shot.

When I’m out with a photography class, students seem to have several common dilemmas they want solved. So in this article we’ll explore these compositional conundrums and try to get you some solutions.

1) How do I choose my point of interest?

Most photography guides say that a great image must have a strong point of interest. In an expansive vista it’s often difficult to decide on just one central point. In fact, you may often feel like the entire scene is THE point of interest. But try thinking about the scene this way – why are you attracted to this scene? What is it that make it so stunning?

It might be the light at sunrise or sunset, or a confluence of streams, or maybe the patterns of wildflowers.  Take a moment to think about why you want to photograph this landscape. In a few moments a story will start to evolve in your mind.

If your story is about the light, where in the scene is the light most spectacular? In the clouds? Reflecting off water? Lighting up a mountain peak? You’ll soon find your answer, and will have solved conundrum #1. You now have a solid point of interest.

DSC01032editsymmetry

All roads lead to Rome – or in photography, to your center of interest. The symmetry of the scene is mirrored in both the reflection and the composition.

2) What should I include and exclude in the frame?

This is a big compositional conundrum for most photographers. Sometimes you may want to create a frame for your scene with something from the surrounding environment – tree branches are a common framing device. But will they be distracting? Will they prevent your viewer’s eye from traveling INTO your image, to land softly on the great point of interest you carefully identified above? Sometimes the scene itself will have framing elements in it. Should you use these?

If you decide to use this type of compositional device to frame your subject, should it be on the right? On the left? On the top, or all three sides?

_2DS2439before

BEFORE: The half tree on the left does nothing to move the viewer to the center of interest. Let’s remove it.

_-2DS2439after

AFTER: Using the framing technique AFTER removing distracting elements.

There are really only two considerations with objects at the edges of your viewfinder frame.

The first is to make sure that your leading lines are not broken by the object. So, if there is a nice big tree on the left of your composition, make sure to position yourself in such a way that the tree helps guide the viewer towards your centre of interest. If it is just a big dark shape on the left of your scene it may not add to the composition, and in fact may be detrimental. Large vertical objects on the left, or in the centre of the frame, tend to arrest the viewer’s gaze, and make for a weak composition.

Second, if you are going to use objects around the edges as a framing technique, be bold, and do it with purpose. Make sure your viewer doesn’t think it was a mistake, or something you didn’t notice. Bits of branches or clouds that seem to poke into the frame are more like intruders than active participants in your image. Move around a bit more to make sure there are no interlopers jutting in, or remove them in post-production.

2015-03-25-23.35

Be bold – add it like you mean it – include elements with purpose. This tree is here on purpose and its branch leads to the sun ray that takes you right into the center of interest, the glowing layers of the landscape, framed by the dark shrubs in the foreground.

If you’re using a wide angle lens, you know to include lots of the foreground to guide the viewer into the frame. But often students ask me what makes a good foreground? They walk around a bit, point to various items, and ask, “Would this be good? How about this? Or this?”

Because of the way the wide angle lens exaggerates perspective, you should take advantage of that by choosing a foreground subject that can create leading lines into your image. If there’s a big boulder in your scene, how does it look close-up through the wide angle lens? Does it create a pointer, or a set of lines that lead to your main point of interest? That will make a good foreground.

If the objects closest to the camera consist of mainly horizontal lines, running left to right in the frame, they may not be a great foreground to include, unless you can shoot at an angle so they become leading lines into your image. You may need to walk around the scene a bit more to see if this will work with the overall view. If not, choose another foreground, or if there is nothing that works, you can always select another lens – a 50mm is often a great choice for landscape photography.

Which brings us to the next conundrum – focal length, your lens.

3) What focal length is best for landscapes?

I think this is always the first question I get asked when shooting landscapes with a group, “What lens are you using?”

But the real question is what is your artistic intention for your image? If you want to get that awe inspired feeling you have as you view the scene into your image, why not try 50mm. This lens on a full frame sensor approximates what your eye sees in terms of angle of view. So it could be the best choice if what you want to convey is that awesomeness of the view that you are seeing with your eyes. Lately I have been using a 50mm (full frame) lens for landscapes almost exclusively.

4-whither-the-phoenix

The big picture, wide angle lens, and 50mm works well too.

Remember too, that the longer the focal length, the more compressed the image gets, and the closer the background becomes. It’s not just a matter of getting nearer or getting more in the frame, the entire look of your image will be very different depending on the lens. This is a definite conundrum for landscape photographers, because the choice is usually very subjective. If, as I mentioned above, you have nothing suitable for a creative foreground, try your 50 mm to get the big picture but without the perceptive grabbing view of the wide angles. If your intention is to get a more intimate view of the place, then a longer lens would be a better choice.

2_DSC6358W

A more intimate look at patterns, textures, and shapes with a 200 mm lens.

So your choice of lens has a few considerations, but a quick check of your intention, and the surrounding space you are standing on, will help you solve this one.

4) Should I Shoot Vertical or Horizontal?

This is another common landscape photographer conundrum, and one that I often have myself. Fortunately this one is very easy to solve. My way of dealing with this is to shoot the scene both ways, then do an honest critique once I am back at a computer to view the full images. But given the traditional style of landscape photography, most often the horizontal or (curiously!) named “landscape” orientation will serve you best.

However, some things may be more suitable for the vertical (portrait) camera orientation: scenes with reflections in lakes, scenes with dramatic skies where the sky has a dominant role in your story, scenes that include the moon, or a dramatic afternoon sun with some lens flare shining through trees or objects, and scenes that include people beside tall objects or monuments so you can capture the sense of scale.

When in doubt, shoot both ways. It’s easier than having to go shoot the place again, if that is even possible. So conundrum #4: solved!

DSC01030W

_DSC1467

Horizontal or landscape orientation – the scene has a certain mood and story.

This image tells a very different story and has a different mood.

_DSC1451W-

Vertical shot, with a telephoto lens. Depth is compressed and the background is much closer in the frame.

5) Is this scene photo-worthy?

As unfortunate as it is, not every grand landscape is suitable for making a great photo. It may be that the light is not right, that there is just no place for the eye to rest, or that your point of view is not providing  a clear enough vantage point. There may be too many distracting items poking into your frame that would be too hard to remove in post-processing. There are numerous reasons that a landscape might not make a good photo. But consider this a challenge – capture it anyway, see if you can make something of it. Try different lenses, camera orientations, walk around a bit more. Get down like a worm and see if there is any vantage point that will give you a creative point of view.

Practice every chance you get, and know that the conundrums will present themselves in every landscape, but hopefully now you have them solved!

DSC00826W

A pretty scene, but not such a great photo. Not every landscape will make a killer photograph. Do you know how to tell if it will or not?

Have you ever struggled with any of these conundrums? What are some of your landscape photography struggles?

Have you solved them? How did you decide what to do?


Here on dPS this is landscape week – here is list of what we’ve covered so far. Watch for a new article (or two) on landscape photography daily for the next couple days.

  • 6 Tips for Better Low-Light Landscape Photography
  • Landscape Photography and the Human Element
  • 5 Ways a Telephoto Lens Can Improve Your Landscape Photography
  • Landscape Photography from the Side of the Road
  • 32 Majestic Landscape Photos to Inspire Your Wanderlust
  • Weekly Photography Challenge – Landscape
  • Landscape Photography – Shooting the Same Location Through the Seasons

googletag.cmd.push(function() {
tablet_slots.push( googletag.defineSlot( “/1005424/_dPSv4_tab-all-article-bottom_(300×250)”, [300, 250], “pb-ad-78623” ).addService( googletag.pubads() ) ); } );

googletag.cmd.push(function() {
mobile_slots.push( googletag.defineSlot( “/1005424/_dPSv4_mob-all-article-bottom_(300×250)”, [300, 250], “pb-ad-78158” ).addService( googletag.pubads() ) ); } );

The post How to Solve 5 Composition Conundrums Faced by Landscape Photographers by Alex Morrison appeared first on Digital Photography School.


Digital Photography School

 
Comments Off on How to Solve 5 Composition Conundrums Faced by Landscape Photographers

Posted in Photography


10 Keys to Choosing the Best Domain and Hosting for Photographers (+Free Giveaway!)

03 Sep

You might have already found a website design of your dreams and even picked a platform to create it. But if you haven’t yet chosen a domain name and reliable hosting for your photo website, the job is not done. We have you covered, though. In this post you will find some essential tips on how to choose the best domain and hosting for the Continue Reading

The post 10 Keys to Choosing the Best Domain and Hosting for Photographers (+Free Giveaway!) appeared first on Photodoto.


Photodoto

 
Comments Off on 10 Keys to Choosing the Best Domain and Hosting for Photographers (+Free Giveaway!)

Posted in Photography


Palette’s Cube sampler allows photographers to accurately match color

27 Aug

Australian company Palette has announced a sampling device that can read the color of items it is placed on, allowing photographers to match the exact chromatic values when processing images in Photoshop. Read more

Articles: Digital Photography Review (dpreview.com)

 
Comments Off on Palette’s Cube sampler allows photographers to accurately match color

Posted in Uncategorized


A 10 Step Personal Development Strategy for Photographers

25 Aug

In this article I want to lay some foundations, on which I will build in future articles. I am not talking here about image development, but your personal and professional development as a photographer. As a full-time working photographer, I am well aware of the 10,000 hours I have invested in my art and craft – not just once, but many times over the last two decades – and it doesn’t end. This is ongoing and if you don’t continue to invest in your personal development, you will not improve and remain static.

Hidden Kingdom

Regardless of whether you are at the start of your journey, having just recently picked up a camera, or have been working in the field for decades, this overview will apply and help you improve.

“If you don’t know where you’re going, don’t complain about the destination!”

1: Nobody is born brilliant

Pick any field: from music, sports, arts, academia, whatever, and pick the best-known people in any of them. They started off as babies playing in mud and sucking their thumbs. Yes, they applied themselves and made life choices to get where they are, but they are all the product of hard work and dedication. We all have a capacity to be brilliant in our own way.

2: Education should never stop

You invest the best part of your childhood in school and the better part of your 20’s and 30’s climbing ladders at work – whatever that may be. This is normal; you accept it as the necessity of making a living.

When it comes to hobbies and pastimes we vary in our commitment to study. There are plenty of folks who only do photography to wind down on the weekend and get away from the stress of a professional career. If that’s you, don’t worry, as I often say, “Learning should be Fun.”

Into the West

3: Effortless development

Be inspired – surround yourself with excellence. When I started to get serious about wanting to become a better photographer, I sought out the very best photography in the fields that interested me. This can be found in many of the excellent online forums these days – images are everywhere and you need to find the best.

Why? Excellence inspires excellence. It allows you to set the bar for yourself and establish a standard for which you aspire. I don’t mean to offend, but if you surround yourself with mediocrity, it will drag you down and create a “that’s good enough” mentality.

Inspiration should be used to help seek out styles you gravitate towards, themes, moods and forms of expression. Plagiarism is a great way to grow, we all do it, but I would recommend trying to develop your own style as soon as you can, rather than copying others. Why, because you’re the best in the world at being you!

4: Truly evaluate where you are right now

This is actually harder than it sounds, as you are trying to compare yourself to a massive spectrum of talent out there in the world. Many times I have gotten to the stage where I thought, “Hey, I’m not bad at this.” Only to find the work of some unknown guy from Romania, whose work blew me away! Honest evaluation can be very humbling.

Life on the Edge

Remember when you were a kid and you used to get your height measured with a pencil mark on the kitchen wall? Remember that feeling when you’d grown an inch over the summer? That’s what photographic development is like – you can feel the inspirational creative muscles stretching and growing.

5: Ask yourself WHY?

I can answer one question about every one of my images, “Why did I make it?”

To be honest, those reasons have changed significantly over the years, especially now this is my career. But typically the more you understand why you are making (or taking) photographs, the sooner you can begin to channel purpose, and specific expression into your work.

I have been through every stage of WHY in my own development. I know when I am forcing it and making images just because I have a camera in my hand. I know when I am making contrived compositions, because I feel I have to make images, even when I don’t feel like it. Equally, I know when I am on fire, running on instinct in the fast lane, charged up with a lot of technique and subconscious understanding.

Professional photographers often talk about utility, having a preset use for an image even while it is being envisaged. For example, while I am in the field, I may be thinking, “That image can be used to advertise a workshop, that one will work well in an eBook or article, that’s a portfolio image to showcase my work, that one is great for Social Media” and so on.

Symphony of Light

6: What is photography?

I am well aware that you could ask a million people and get a million different answers, but this is mine!

“Photography is a visual language: its aim is to communicate something to another person. That something is in the voice of the person who made the photograph. The clearer the photographer’s intention, the more likely the viewer will understand the intent.”

As with spoken language, the more articulate you are, the better you can be understood – by people who understand your language!

Leading on from the why in point #5 above, you have to ask yourself what? – “What am I trying to say with this photograph?”

7: Speak the language of photography

When you admire an image, think about words that explain why you like it. I would imagine the majority of those words would be adjectives, for example: Moody, evocative, dramatic, calm, reflective, soothing, energetic, sad, happy, etc.

Only photographers use technical language to describe photographs. Shutter speeds, exposures, apertures, noise, depth of field, etc.

When you make your images, concentrate on the adjectives. If you make an image to be moody, you can bet the viewer will think it is moody too. Advertising agencies do this all the time, they manipulate their viewers with subliminal messages in film, photographs to make them more likely to buy a product.

This was one of the biggest developments in my own images – I always try and instil a very distinct mood, or feeling, into my work. Start to think in terms of key words that describe your work.

The Wester Isles

8: Understand the creative cycle

Many people describe photography as a process – as if it is linear and follows a set path. In some regards this is true, and certainly from a teaching point of view it is the only way to explain it without melting your student’s brain.

However, recall what it was like learning to drive a car, especially a manual transmission with a stick shift. All those things you have to learn to do simultaneously: steering, mirrors, signals, brake, accelerator, clutch, gears, changing lanes, avoiding pedestrians and cyclists. Now, you manage it with ease, totally subconsciously while having in depth conversations with passengers, kids in the back, or on a hands-free phone to the office.

Photography is the same – the trick is to determine what can become subconscious, and what needs to be at the front of your mind. I call it the creative cycle because there is feedback.

You are unique, because when you look at one of your own photographs, it triggers memories for you – you were there when it was taken and you crafted it in-camera and in processing. When you see the final image, you get it. Other viewers only get what you show them – they have no experiential perspective. You need to be super-articulate with your images to allow a viewer to feel something.

The photograph itself forms an emotional bridge between the event experienced by a photographer and a viewer who only experiences it second hand – but gets it!

9: Disciplines

The First Dawn

Again, I’ve seen the whole process written in many ways, with lots of subsets. For me it is this:

Seeing – Shooting – Expressing

You see something; you organize it, get the light in the camera and then use a computer (typically these days anyway) to make it look the way you want. You can hold up that image and compare it to what you wanted to say about that moment in time, and determine how successful you have been in your expression.

How other people feel about it is a product of how well you get that message across.

The shooting phase is mostly technical and you should become very adept with your camera. Know what it does, know how to expose well and get the light into the computer where it’s useful.

10: Aim for second impressions

The world is full of images. We see thousands every day, and every one we see sparks a snap decision in our brains.

  • First Impression – Wow/Yuk – I like/don’t like that (formed in maximum two seconds)
  • Second Impression – Wait a minute, there is something about this one! (10-30 seconds)
  • Third Impression – This image changes my view of the world, inspires me, makes me want to change, etc. (one minute to the rest of your life)

The Heart of Me

If you are going to open your mouth, you normally think before you speak. It saves a whole lot of trouble. Do the same before you post an image online. You’re still saying something – just with an image instead of words. It represents you; it is a statement from you. Value your work and value what you have to say – then others will too.

googletag.cmd.push(function() {
tablet_slots.push( googletag.defineSlot( “/1005424/_dPSv4_tab-all-article-bottom_(300×250)”, [300, 250], “pb-ad-78623” ).addService( googletag.pubads() ) ); } );

googletag.cmd.push(function() {
mobile_slots.push( googletag.defineSlot( “/1005424/_dPSv4_mob-all-article-bottom_(300×250)”, [300, 250], “pb-ad-78158” ).addService( googletag.pubads() ) ); } );

The post A 10 Step Personal Development Strategy for Photographers by Alister Benn appeared first on Digital Photography School.


Digital Photography School

 
Comments Off on A 10 Step Personal Development Strategy for Photographers

Posted in Photography


9 Helpful Apps for Photographers

24 Aug

Hopefully I’m not the only photographer in the world that tends to get quite excited when I discover a new app, or software that could definitely be used in my career. Yes I’m a bit geeky, but you know what – geeky is the new cool. Anyway, throughout my four years as a professional I’ve come across some really great Apps that you could use for your photography, even if you’re not a pro. What makes this more interesting, is that these Apps are not commonly talked about, so chances are they are probably new to you.

So, let’s get to it:

Quick Disclaimer: I am in no way affiliated with, paid by, or asked to list any of these apps/programs. I am not rewarded in any way from any of the software creators. This is purely a list of apps that I have found useful, besides the all too famous ones like Photoshop and Lightroom.

1) Instagram (Mac and PC – $ 0.00)

Instagram

To get this app to work you need to download and install both parts:

  • ARC Welder extension for Google Chrome
  • Instagram App Direct Download:

Have you ever wanted to share some of your photographic work on Instagram? Well, with this little app, it all becomes possible. Besides the occasional bugs here and there, it does its job just like it would on a phone – and makes sharing your work a real pleasure.

Love:

  • Posting images from my computer. It’s easy, accurate, and can be a huge plus to your workflow as a photographer.
  • How simple it is to set up and get running
  • You can comment, like, post, and update your profile – just like you would on your phone.

Love not so much:

  • Occasional bugs where it doesn’t load correctly.
  • I use a 27” screen, and it works there perfectly. However, when I’m using the 15” display on my MacBook, I cannot resize the window to show the bottom part (the most important part of the window). I’m sure there’s a solution for that somewhere. It does bug me sometimes, but a simple closing and reopening of the app normally fixes it.

Conclusion: Definitely worth testing as I’m sure they will release updates to fix the issues so, it’s worth having it and following along.

2) Blogo ($ 29.99 Mac Only in the App Store)

Blogo

If you’re not familiar with WordPress as a place to build and hold your website, I’d definitely recommend you go and check it out. It’s such a great platform to host a website (although, there is a bit of a learning curve). But, you are already familiar with WP, then Blogo is for you, especially if you love to write articles on your blog.

Blogo presents you with a stylishly clean writing panel, with the ability to add images where you like, as well as easily add Alt-tags, descriptions, links, and other SEO necessities you would normally do directly in WordPress. The best part is, you can write away online and offline, travelling or at home. A simple Publish button will send your post directly to your website and voila, it’s done. Now, the cherry on the cake = it is INCREDIBLY easy to set up. It takes less than one minute to get up and running, plus, their support is second to none.

Love:

  • The clean, stylish writing panel.
  • The features and its offline ability
  • Adding images and SEO tweaks to your images has never been easier
  • Previewing your post on your website (from within Blogo) without actually publishing it
  • Top notch support
  • Very fair pricing

Love not so much:

I personally had some issues with WPML (A multilingual plugin for wordpress that allows me to have a German and English website). But, they were right on top of it and are keeping me updated weekly (via personal emails) to let me know how it’s going.

3) JPEG Mini (Free Trial, $ 19.99, Mac and Windows)

Jpegmini

While we’re on the topic of websites, if you take pride in your website and use it as a highly-valuable business tool, chances are you’ve come across the dilemma of choosing between high-quality, sharp images OR website load speed. Putting it in the simplest form, the higher quality the image, the bigger the file size. The bigger the file size, the longer the page takes to load. So, catch 22? Not with JPEGmini.

JPEGmini does an incredible job of reducing the size of your JPEGS, yet retaining a very acceptable image quality. The best thing is, it’s an application so you can optimize your images on your desktop, offline, and get them ready to be uploaded. I use this program religiously for our website.

750px size original image - 368kb

750px size original image – 359kb

750px-jpegmini

JPGmini version 750px - 148kb

JPEGmini version 750px – 144kb

This original image was 359kb (fairly big for an image online). After JPEGmini = 144kb!!! Notice a difference in quality? Here’s what it did with the full sized file:

fullsize-jpegmini

Love:

  • Their lossless compressions and the speed at which it works
  • Bulk optimizing. Drag as many images you want into the window and it’ll get right to work, showing you how much you’re saving
  • Fair pricing (especially if you’re going to use it a lot)
  • Options included to either overwrite the original file or make a copy of it.
  • Lightweight program that works offline
  • So easy to use
  • Mac and PC compatible
  • Free Trial
  • Lightroom Plugin

Love not so much:

I can’t find anything wrong with it.

Conclusion: 100% worth it if you’re into blogging, and want to optimize images for your website, while keeping a fine ratio between size and quality. Do yourself a favor and at least try it, it’s quite incredible.

4) Pixieset (free options as well as paid subscriptions for more features and storage space)

Pixieset

There is a familiar battle between Pixieset versus PASS as there is the Nikon versus Canon debate. Both are great in their own ways, and both do the same thing. However, I personally use Pixieset. I have not really tried PASS, so please do not think I’m being negative towards it. I just found Pixieset to do exactly what I need, when I need it, perfectly every time. Why would I look for something else?

So, what is Pixieset? It’s a stunning, clean, and professional way to create client galleries and send them out. It is so good, that 100% of my clients love it (no lie)! You upload the high-resolution files (pro version only) to the online gallery, design it with a few clicks and some information, and voila, it’s done. It’s responsive, easy to use for anyone (even grandma), and allows your clients to download the high-resolution files (pro version only) or smaller web sized images whenever they want.

Love:

  • The responsiveness: Works amazing on computers as it does on mobile devices.
  • Allows downloads a range of file sizes (from Web, to high resolution, to Full resolution).
  • Let’s face it, the world has shifted to Digital mediums. This is the perfect solution to delivering your work to your clients.
  • Has a Lightroom plugin to automatically upload a set to Pixieset.
  • Frequent updates and features being added.
  • Password protected galleries to make them private.
  • Clients can favorite images and send that list to you, as the photographer, very easily. Perfect for when clients choose images for albums, or to make adjustments on files.
  • The above favorite list can be easily added into your Lightroom catalog to show only those files. Saves you having to manually go and choose the files.
  • Amazing support! These people love their customers.

Love not so much:

You can’t really edit offline, but that’s okay, it’s not to serious. That’s it.

5) Automator (Built into OS X)

Automator

Ever stumbled upon this awesome little robot guy? Well, believe it or not – he’s actually very useful. Remember how I mentioned I always resize my images before compressing them with JPEGmini? Well, Automator is my go-to tool to resize (if I don’t want to do it in LR or PS). Why? Because it’s simple. That’s why. It does its job and it does it fast, and well.

How does it work?

Setting up Automations may seem a bit daunting at first, but it’s really simple once you get the hang of it. Here is the step by step guide:

  1. Open Automator on your Mac (I use spotlight, so CMD+Space and type in Automator)
  2. You’re presented with a drop down window giving you a list of documents you can create. For this purpose (resizing), create an Application
  3. Now, you need to add something to this Application. Above the list of all the options you can choose, there’s a search box. Type in SCALE. The last choice, Scale Images, is the one you want.
  4. Drag it over to the right into the open space.
  5. You will be asked if you want to add another function to the application about creating copies of the original file. Add it if you like, or don’t, it’s up to you. I don’t, I normally copy my High Res from their HD place, put them in a folder on the desktop and resize/rewrite over them. Simple. Just make sure you have them all in full resolution saved somewhere else!
  6. Under the Scale Images options on the right, you can choose between: To Size (pixels) or To Percentage (%). Choose Size, then simply type in how big you want your images to be (on the longest edge). I’ve created eight different sizes and saved them all on my desktop. This way, if I need a 750px image, I have the automation there already. If I need 2048px for Facebook, it’s there.
  7. Choose your size and finally click on File > Export > Give it a Name > Choose Location > and BAM! There you go.
  8. To use it, simply drag your image files onto the actual icon of the Automator and away it goes. Resizing all the images you dragged (it supports bulk drag too, awesome huh?).

6) Smart Albums 2 (free to try, $ 299.00, Mac and PC compatible)

Smartalbum

Before you run away after seeing the above price tag, just hear me out. If you’re into designing albums for your clients, be it Wedding Albums that you sell, or session albums, Smart Albums fixes that all-to-common problem of using really bad, boring, slow and unappealing design software that 99% of the printing companies offer. I mean, some of them are appalling.

Smart Albums links up to some of the most popular printing companies around the world and lets you design your album the way you want, according to the sizes, spreads, and specifications of your chosen printing company. It does this in a beautiful, fast, and very easy to understand way. Yes, it’s expensive, but if it’s a business that you are running, you’ll make it back after one sale. Totally worth it, given the amount of time you save and how much more efficient the whole thing becomes. Of course, it’s free to try so give it a go before you decide if it’s really for you or not.

They have over 30+ printing agencies that are compatible with Smart Albums, on an international level. They work in the USA, Europe, Africa and Asia. They’re constantly adding new agencies to their list, so the chances are high that your favorite printers will be listed.

Love:

  • The simplicity of the program and how easy it is to use.
  • The humungous list of agencies that they can work with.
  • The support. Great help from their team.
  • Mobile support.

Love not so much:

The price is pretty heavy. But, the good thing is that it’s a one-off payment. No need to pay yearly (unless you want their cloud storage).

7) AstroPad (Mac and iOS only: Free, or $ 20 for Pro Features)

Astropad

Own an iPad? Want a graphics tablet to edit your photos with, like a Wacom? Want a free solution that works surprisingly well? Then, AstroPad is for you. After downloading the App both on your Mac and your iPad, you can pretty much control your entire computer from your iPad. Using touch gestures and special movements, you can set this app up to work for you, not against you. If you happen to have a stylus for the iPad, then you’re even closer to having a free graphics tablet. Definitely worth trying, as it’s free, and you may even improve your post-processing, especially if you need delicate movements with the brush tool.

Love:

  • The idea of using an iPad as a graphics tablet.
  • That you can see your image on the iPad and paint/adjust/edit directly on it.
  • That it’s free.
  • That you can control more than just Photoshop.
  • Use it wirelessly (Wi-Fi) or plugged in (when you don’t have Wi-Fi).

Love not so much:

It can have a little delay in terms of what you do on the iPad and what comes out on the computer – only slightly, but enough to notice.

8) Sunseeker ($ 9.99 iOS only)

Sunseeker

Sunseeker is an app for the iPhone or iPad that augments reality into its software to track the sun. It’s surprisingly accurate, and is a perfect tool for photographers who rely on the sun for their shoots. It’s a great way to plan where the sun will be in the sky at a certain point in time. Can you imagine how easy it would be when location scouting?

Simply point the phone up to the sky and follow the trail until you find where the sun will be. You can move a slider to change the position of the sun at a certain hour of a certain day. What’s great is that it uses your camera and projects its overlay on top of what you’re seeing. So, if there’s a building in front of you, you’ll see at what point the sun will just start to hide behind it; giving you valuable planning information as to when is the best time to do something.

Love:

  • That it uses the camera to project the sun’s future and past placement.
  • That it’s simple, easy to use, and fits in your pocket (iPhone only).
  • A great planning tool that you should have with you. Even if you don’t use it too often, it does come in handy from time to time.

Love not so much:

The sliders to change the time of day, and the position of the sun are quite small, and to pin point an exact day can be quite frustrating as you almost always overshoot it.

9) Tave (Free to try, $ 24 – $ 49 per month subscription)

Tave

Running a photography business can be quite chaotic if you don’t have a decent system or workflow. Keeping track of your clients, their anniversaries and important dates, logging your expenses and income, tracking weather, and planning the shoots can all add up to the mess. Tave solves that and 99+ things more. I was hooked on it the moment I set everything up.

Love:

  • A complete business management tool that sits safely online, and can be accessed by more than one person (if you choose).
  • Amazing reports and financial tracking.
  • Huge customizations.
  • Great support. Offers live Chat right in your dashboard.
  • You can create questionnaires to send to your clients that will automatically record their answers, and place them in their respective job areas.
  • Verified by accountants.
  • Works internationally.
  • Works on mobile devices.
  • Tons of features!

Love not so much:

  • It does require a fair amount of time investment to set it up. But once you do, it’s groovy.
  • It doesn’t work offline.
  • A little bit of a learning curve, but they have really great support, and are more than willing to help you along the way.

Conclusion

Those are the nine apps that I personally recommend and use. I hope that I’ve introduced you to some great things that you can use for your own photography. Again, I gain no benefit from listing these apps besides the satisfaction of actually sharing some information with you.

What are your favorite apps for photography that aren’t talked about too often? I’m not talking about Editing Apps, as they’re everywhere, but any apps that you know of that are worth checking out? Let me know in the comments below.

googletag.cmd.push(function() {
tablet_slots.push( googletag.defineSlot( “/1005424/_dPSv4_tab-all-article-bottom_(300×250)”, [300, 250], “pb-ad-78623” ).addService( googletag.pubads() ) ); } );

googletag.cmd.push(function() {
mobile_slots.push( googletag.defineSlot( “/1005424/_dPSv4_mob-all-article-bottom_(300×250)”, [300, 250], “pb-ad-78158” ).addService( googletag.pubads() ) ); } );

The post 9 Helpful Apps for Photographers by Shayne Thomas appeared first on Digital Photography School.


Digital Photography School

 
Comments Off on 9 Helpful Apps for Photographers

Posted in Photography


A Street Photographer’s Guide to New York City

10 Aug
Smiley Face, SoHo, NYC.

Smiley Face, SoHo, NYC.

Street photography and New York City are terms that often go hand in hand. New York is a diverse city of nearly 8.5 million eclectic and vibrant souls, all packed into a tiny island and its surrounding boroughs. Each area of the city has its own unique character and flavor, and there are so many interesting, unique moments that you can see here on a daily basis. It is one of the great locations in the world for this genre of photography.

As a lifelong New Yorker, let me state that it can also be very easy to overrate this city. Street Photography can, and should, be done everywhere and the fact that an image has been taken in New York does not make it any more interesting than an image taken anywhere else. The fact that millions of images are taken here each day makes it that much more difficult to create an one that stands out from the rest, but that is also part of the appeal.

If you live in a less populated place, or are tentative about trying street photography, New York is one of the best places to come to get over those fears. The streets are packed with people who are all in a rush, tourists are constantly photographing so you will not stand out, and most importantly, a lot of people move to, or visit this city, to be noticed. It is an environment ripe to practice and improve street photography.

Here are nine suggestions to keep in mind for doing street photograph in New York City (keep in mind these tip can be applied elsewhere as well).

1. Slow down and don’t try to photograph it all at once

Red Flower, East Village, NYC.

Red Flower, East Village, NYC.

Up, down, left, right, tall buildings everywhere – it is so easy to become trigger happy here. You should experiment and take a lot of images, however, that is also one of the easiest ways to miss the most interesting moments. Sometimes the best moments will be subtle, or they will come upon you in an instant. Look with your eyes first and locate something of interest, then capture it with the camera. Don’t just stick your head in the viewfinder and start shooting away.

Watch your surroundings and take it all in. Explore. Find interesting compositions, look at the light, and get a feel for the people walking around. Try to go beyond only capturing the grand or iconic aspects of the city. Go beyond the images that you have seen in books. Seek out the little details and let the streets surprise you.

2. Put yourself in the middle of the commotion and take what comes to you

The corner of Prince and Broadway, SoHo.

The corner of Prince and Broadway, SoHo.

Busy street corners are a beautiful thing. Head to one, pick a spot, and suddenly people will start coming at you from every direction. They will start intersecting and interacting with each other. It is what Jane Jacobs referred to as a ballet,

“The ballet of the good city sidewalk never repeats itself from place to place, and in any once place is always replete with new improvisations.”

It you are tentative, choosing a spot in this manner will allow your subjects to enter your personal space, instead of you entering theirs. Since you will not be walking, and your camera will be ready in your hands, it will also make you more able to notice interesting moments and able capture them before they disappear.

Each street corner has a different flavor to it. If you go to SoHo, you will find the trendier crowd. If you go to Wall Street, you will get businessmen. If you go to Times Square, you will get the tourists and people in cartoon costumes harassing young children. Usually, you will get a mix of all types of people, but each corner will have its own identity. Spend a little time each day on a few corners capturing what happens around you.

3. Cut out the preconceived notions of what the city should look like

Police, Manhattan Bridge.

Police, Manhattan Bridge.

You’ve probably seen movies and read books about the city, and have expectations for how it is supposed to look and act. The TV shows Friends and Sex and the City are just not realistic interpretations of what New York is actually like.

It can be a good idea to scout images ahead of time, to have an idea how an area looks. It’s also fun to try and recreate images that you love. But on a day to day basis, try to also get those images out of your head. A once in a lifetime image is one that will surprise you, it will be different in some way from all the rest. Allow yourself to notice those serendipitous moments.

There is so much to see here. No matter how much time you have, you can’t see it all. But you haven’t truly seen New York City until you’ve spent at least half a day wandering around, with no end point. Carve out some time, pick a direction or a location, and just walk.

4. Rent a small camera or a prime lens

Cortlandt Alley, NYC.

Cortlandt Alley, NYC.

Note: If you have a larger DSLR and a zoom lens, I shot street photography for a long time this way, and it is very possible to do so successfully. However, larger cameras can make it more difficult and cumbersome, and can make things more uncomfortable for your subjects.

New York has an array of great camera shops where you can rent either a light prime lens for your DSLR or am entirely different smaller camera. A light 35mm lens is my favorite tool for street photography. Go for the f/2.8 version over the f/1.8, since it is much smaller and lighter. If you are very nervous about getting close to your subjects, rent a 50mm so you can shoot from a little further away. (Note: If you’re using a cropped or APS-C sensor a 50mm f/1.8 and an 85mm f/1.8 would be equivalent).

Consider trying a mirrorless or micro four thirds camera. See how you like it, and you may never go back. I suggest the Fuji X100 line, but there are a variety of cameras that will do the trick.

Some recommended camera rental shops in NYC are: Foto Care, CSI, and Adorama.

5. Set up your camera to catch fast moving scenes

The streets of New York move quickly. Interesting moments will appear, and disappear, all around you that is why it is important to set up your camera so that it can freeze scenes successfully. You want to set it up in such a way that you no longer have to worry about the settings, and can just shoot with ease.

Encounter, SoHo.

Encounter, SoHo.

I prefer using shutter priority for street photography. Many people prefer aperture priority, but the reason for shooting in shutter priority is to have the most control over your aperture. I know that sounds counter-intuitive, but hear me out. To freeze motion, I will usually set the camera to 1/320th or 1/250th of a second. In the bright sun of summer my shutter speed is usually at 1/320th or 1/400th, otherwise I am usually at 1/250th. At dusk and into the night I will go all the way down to 1/125th if it is absolutely necessary. The next step is to raise your ISO. I usually shoot anywhere from ISO 800 to ISO 3200 (and ISO 6400 outside at night). In bright summer sunlight, I am usually around ISO 400.

The goal is to be able to use the smallest possible aperture, while still having a shutter speed that is fast enough to freeze the scene. The smaller the aperture, the more depth of field you will have. This will give you a lot of flexibility if you happen to miss focusing on the subject, which happens frequently. In addition, if you are combining multiple subjects or complex scenes with interesting elements all over the frame, it will make sure that as much of the scene as possible is sharp. Whenever the light is strong enough, I prefer to be at least at f/8, and ideally between f/11 and f/16.

When you become comfortable with all of this, the next step is to try zone focusing. I would suggest that you start with your normal method of focusing until you get comfortable, then give zone focusing a try. When I walk out the door with my Fuji X100S I usually turn the autofocus off and have the camera pre-focused to 2.7 or 3 meters (8.75-9.75 feet). I will then adjust with the focusing ring accordingly (closer or further away) as I come across images, or turn on autofocus to capture scenes where nothing is moving.

6. Try street portraiture

Did I mention that New Yorkers like to be noticed? Find people that catch your eye, and tell them you are creating a photo project of the city. You will be surprised at how many people will allow you to photograph them. This is a great way to get more comfortable on the street, and with portraiture in general. Once you get a couple people to say yes, you will find yourself feeling so much better.

Flattery is always a good idea when asking to take a portrait, and I usually try to spend about 30 seconds getting my shots. Don’t take just one quick photo and run away, but don’t take too long either. Take a quick look at the lighting and the background to make sure that you get a complete image, and try to capture them with an interesting expression if possible.

7. Photograph at night

Coney Island at Night.

Coney Island at Night.

Set your camera on 1/160th of a second and ISO 3200 or 6400 and wander. The city glows at night and everything looks more interesting. Forget the heavy tripod unless you are doing architecture images. Instead, find areas that are lit by store signs or street lights, and create your images that way.

New York is extremely safe these days and I photograph at night by myself all the time, but be smart about it. Particularly if you do not know where you are going, it can’t hurt to take a friend along or to stick to high traffic areas. But the areas where most people visit in Manhattan are all very safe at night.

8. Some areas to explore

Yosemite, SoHo.

Yosemite, Corner of Prince and Broadway, SoHo.

My favorite locations in NYC are:

  • SoHo: Stop on the corner of Prince and Broadway, one of the busiest and most fashionable corners in the city, and then walk over to Greene Street and head south to see some gorgeous cast-iron architecture.
  • 5th Avenue below Central Park: Stop on each corner from 58th Street to 53rd Street for some of the busiest and most interesting corners in the city. You might bump into the famous fashion street photographer, Bill Cunnigham.
  • The East Village and Lower East Side: Young hipsters, old punk rockers, and about a hundred other demographics gel together in these vibrant neighborhoods. The buildings are old and beautiful, and the streets are interesting and weird. Some great street art is there as well. Stop at VolaVida gallery on 4th Street and Avenue B to purchase an affordable and authentic street art piece.
East Village, NYC.

East Village, NYC.

  • Anywhere on Broadway: Literally anywhere. Start at Columbus Circle and walk all the way down Broadway until your feet hurt.
  • Chinatown and Columbus Park: Chinatown has some of the most beautiful streets in New York. Eat dumplings while you photograph and visit Columbus Park, where people go to gamble. Be respectful while you photograph there. Afterward, visit Pell Street and Doyer’s street (nicknamed The Bloody Alley for its nefarious past). These are two of the most beautiful streets in all of New York.
  • Coney Island: One of the most vibrant places in the city, particularly in the warmer months. Photograph the boardwalk and beach, eat a hotdog, and go on a few rides.
  • Grand Central and the 42nd Street subway station: Photograph in Grand Central, then take the shuttle to the 42nd Street station. Walk back, stopping to photograph at Bryant Park and on the steps of the New York Public Library. Pop into the lobby of the Chrysler Building while you are there.
  • Bushwick (Brooklyn): This is one of the centers of street art in New York. Take the L train to Morgan Avenue and explore a handful of blocks in every direction. When you get hungry, stop at Roberta’s for some pizza.

9. Take the typical tourist photos

Arch and Empire State Building, Washington Square Park.

Arch and Empire State Building, Washington Square Park.

You are visiting the city for a reason. The architecture and the sites are awe-inspiring, beautiful, and they deserve to be photographed well. History is around every corner. Do not apologize or feel bad, for taking the typical tourist and architecture images of the city. However, whenever possible, try to think of a way to make them stand out in some way. This is not always possible, but occasionally it is, and when you are able to figure out how to take an image like that, it is a special moment.

Just don’t take a selective color photo of a yellow taxi with a black and white background. I beg you. Please, please don’t do that!

googletag.cmd.push(function() {
tablet_slots.push( googletag.defineSlot( “/1005424/_dPSv4_tab-all-article-bottom_(300×250)”, [300, 250], “pb-ad-78623” ).addService( googletag.pubads() ) ); } );

googletag.cmd.push(function() {
mobile_slots.push( googletag.defineSlot( “/1005424/_dPSv4_mob-all-article-bottom_(300×250)”, [300, 250], “pb-ad-78158” ).addService( googletag.pubads() ) ); } );

The post A Street Photographer’s Guide to New York City by James Maher appeared first on Digital Photography School.


Digital Photography School

 
Comments Off on A Street Photographer’s Guide to New York City

Posted in Photography


5 Incredible Storm Photographers and Their Best Images

30 Jul

I’ve been a landscape and travel photographer for nearly six years now. While I will always love standing in front of an amazing landscape at sunset, nothing on earth can compare to the feeling I get when standing in front of a massive supercell with 40-50mph winds at my back, watching it twist and churn, as it tries to lower itself to the ground. It’s the most intense and pure mixture of awe, fear and respect for mother nature that I’ve been able to find to this day.

henrietta-storm-james-brandon

© James Brandon. Henrietta, TX Supercell

ranger-tx-supercell-james-brandon

© James Brandon. Ranger, TX Supercell

I’m just now wrapping up my third season of chasing these incredible storms (you can check out some of my storm images above) and over the past three years I’ve been fortunate to meet some incredible chasers; some of whom are even better photographers. So here’s a collection of four of the best chaser photographers out there (along with a few of their best images). Be sure to check out their websites and links to see more of their amazing work!

Mike Mezeul II

Mike has become one of my best buds over the past few years, we even lead workshops around the world together now (you can find more info on that through the link to my site in my bio). He took me on my first chase and to this day I chase with him about 99% of the time. He’s been doing this stuff for upwards of 15 years now, and is just as good at putting us in position for a storm to develop, as he is at photographing them. In fact, the last time we chased we drove out to west Texas and he put us within 30 minutes of storm that exploded into a supercell.

Check out more of Mike’s work at his website and be sure to follow him on Instagram as well!

storm-chasing-article-4

A storm chaser stands in front of an approaching supercell thunderstorm just north of Gillette, Wyoming in May of 2014. © Mike Mezeul II

"Ardmore Supercell" © Mike Mezeul II

“Ardmore Supercell” © Mike Mezeul II

“A tornadic supercell thunderstorm sweeps across the plains at sunset near Ardmore, Oklahoma.”

storm-chasing-article-5

“Pink Mammatus” © Mike Mezeul II

“Mammatus clouds glow a vibrant pink over west Texas after severe weather rolled through the area.”

storm-chasing-article-13

“Awakening” © Mike Mezeul II

“A cloud-to-ground lightning bolt strikes over Albany, Texas as the Milky Way shines above.”

Mike Olbinski

I’ve known Mike online for about the same time as I’ve been a professional photographer. We met back in the HDR Days, and I remember being amazed when he got into storm photography. Then, one of his images of a haboob decsending on Phoenix went absolutely viral overnight and he was officially on the map as a storm photographer. But that wasn’t it, he hit gold again a couple years later with his Booker, TX timelapse which you’ve likely seen on TV and even movies. Coincidently, I just met Mike in person for the first time a few weeks ago while out chasing in west Texas. He’s an incredibly nice dude and fantastic photographer. I’ll be joining him soon to photograph Monsoon season in his home state of Arizona. Can’t wait!

Check out Mike’s work at his website and on 500px and read his article here on dPS: How to Photograph Lightning – the Ultimate Guide

storm-chasing-article-9

“Phoenix Haboob” © Mike Olbinski

“A gorgeous dust storm and low level clouds roll into downtown Phoenix on July 3rd, 2014. Always amazing to see a scene like this, but toss in a little sunset color and it blew my mind.”

storm-chasing-article-12

“Storm of the Apocalypse” © Mike Olbinski

“A view of the Booker, Texas supercell which was one of the most amazing sights I have ever seen. You can see the crazy timelapse of this storm below.”

storm-chasing-article-11

“Alanreed Supercell” © Mike Olbinski

“This storm earlier spawned a brief tornado near Groom, Texas. It moved to the east/northeast across the rolling farmlands…I caught up to it once again here just north of Alanreed. The hail core and structure was magnificent to behold.”

Marko Korosec

Marko is an incredibly talented photographer and chaser from Slovenia. I was turned on to his work through a friend, and when I began scrolling through his images on 500px, my jaw began to drop lower with every image. He seems to be on just about every major photogenic storm there is, and that’s a feat in and of itself. Capturing these storms as well as he does is a whole other feat. I haven’t met Marko in person yet, but I’m sure it’s only a matter of time before we run into each other out on the road beneath a storm.

You can follow Mark on his website and 500px.

"Sunset Supercell " © Marko Korosec

“Sunset Supercell ” © Marko Korosec

“Nicely striated supercell at colorful sunset near Bledsoe, New Mexico on May 29th, 2015″

"Electric Night" © Marko Korosec

“Electric Night” © Marko Korosec

“A lightning barrage during the cold frontal passage over the city of Trieste, Italy on October 14th, 2014.”

"Independence Day" © Marko Korosec

“Independence Day” © Marko Korosec

“Spaceship shaped supercell storm near Julesburg, Colorado on May 28th, 2013″

James Langford

I met James Langford out on the road during one of my first chases with Mike and have since run into him while chasing several times. James is just an all around nice dude. If he’s not chasing on his own, he’s usually “now-casting” (forecasting for a chaser from home) for someone who is. He’s got an incredible collection of storm images as well as some jaw-dropping time-lapses.

You can follow James at his website and Facebook.

langford-1

“Perfect Symmetry” © James Langford

“This was captured in western Oklahoma. Experiencing the power and beauty of thunderstorms is something that is really hard to translate into images.  This particular storm was one of the most beautiful I had ever seen.  It moved very slowly the whole time we photographed it, and the structure and colors were incredible.”

langford-2

“The Beast” © James Langford

“Capture near Piedmont, Oklahoma, this incredible storm in Central Oklahoma had hail the size of grapefruits and a small tornado around the time this image was created.  I’ve never seen structure and colors quite like this and it ranks as one of my favorite images of all time.”

Kelly DeLay

I met Kelly a couple of years ago through Mike Mezeul. He had a great 2015 season capturing both the Hico supercell and the twin tornadoes in Colorado that went pretty viral. You can view more of his work at his website Clouds365.com and his 500px page.

© Kelly DeLay. Hico, TX Supercell

© Kelly DeLay. Hico, TX Supercell

“Visually, has to be one of my favorite storms ever. This was a very discreet storm and as you can see the rotation was quite evident. The hail core was quite impressive as well, producing baseball sized hail that knocked out a few storm chaser’s windshields.”

© Kelly DeLay. Sister tornadoes - Simla, Colorado

© Kelly DeLay. Sister tornadoes – Simla, Colorado

“My most favorite image of my career. I did describe it as a “shot of a lifetime”. For years I wanted to capture a discreet supercell (no other storms around) with a tornado underneath. I was very surprised to see not just one, but two tornadoes both spinning in the opposite direction.”

© Kelly DeLay. Belle Fourche, South Dakota

© Kelly DeLay. Belle Fourche, South Dakota

“The lightning field was so intense preceding the core, you would see a flash nearby and immediately hear a BOOM. Thats close! Feeling a little safer near Belle Forche, South Dakota I got out and captured a few shots. Again, all you would see is a quick flash. Amazed to look at the back of my screen to see this.”

For more storm photography see:

  • 7 Things I’ve Learned from Photographing Storms
  • How I Shot And Edited It – Stars, Storm and Basecamp, Nepal
  • 33 Blustery Bad Weather Images
  • How to Photograph Lightning – the Ultimate Guide

googletag.cmd.push(function() {
tablet_slots.push( googletag.defineSlot( “/1005424/_dPSv4_tab-all-article-bottom_(300×250)”, [300, 250], “pb-ad-78623” ).addService( googletag.pubads() ) ); } );

googletag.cmd.push(function() {
mobile_slots.push( googletag.defineSlot( “/1005424/_dPSv4_mob-all-article-bottom_(300×250)”, [300, 250], “pb-ad-78158” ).addService( googletag.pubads() ) ); } );

The post 5 Incredible Storm Photographers and Their Best Images by James Brandon appeared first on Digital Photography School.


Digital Photography School

 
Comments Off on 5 Incredible Storm Photographers and Their Best Images

Posted in Photography


Pet Photography: 5 Simple Tips for Animal Photographers

14 Jul

For armature or professional photographers who use their skill for weddings, portraits, engagement, maternity or any other popular family photography, adding “pet photography” to your business card can be an added rise in business for you. How can a family photo be complete without Fido in the picture? Doing pet photography, or just understanding how to photograph a pet for Continue Reading

The post Pet Photography: 5 Simple Tips for Animal Photographers appeared first on Photodoto.


Photodoto

 
Comments Off on Pet Photography: 5 Simple Tips for Animal Photographers

Posted in Photography