RSS
 

Posts Tagged ‘Photograph’

How to Photograph a Rainbow

17 Mar

Wanna learn alchemy?

Then listen up because there’s photography gold at the end of this rainbow.

More specifically, we’re gonna show you three ways to create a rainbow and then photograph it.

Pick up a tip or two and you’ll be gold baby, solid gold.
(…)
Read the rest of How to Photograph a Rainbow (248 words)


© laurel for Photojojo, 2017. |
Permalink |
No comment |
Add to
del.icio.us

Post tags:


Photojojo

 
Comments Off on How to Photograph a Rainbow

Posted in Equipment


How to Photograph a Real Estate Interior or Property

16 Mar

Are you or someone you know thinking of selling or renting out a property? Whether it’s a house, an apartment, a restaurant, or a hotel; the key to successfully marketing it is with captivatingly well exposed, and well-composed photographs. Here are a few tips on how to successfully photograph a clear, bright interior with visible exterior showing through the windows. Learn how to stack your bracketed photos so that your finished photographs show the outside and the inside of your rooms clearly and perfectly balanced.

The problem with interiors

Here is what it looks like when you expose for the inside or interior of a room.

How to Photograph Real Estate Interiors or Properties

This is what it looks like when you expose for the outside.

How to Photograph Real Estate Interiors or Properties

This is a big problem, right? You can very rarely get a well-balanced shot of the interior of a room without blowing out the windows. The trick is to take several bracketed exposures of each room and stack them, in order to get a clear, evenly exposed photograph.

Here is what you want your final photo to look like.

How to Photograph Real Estate Interiors or Properties

Equipment needed

This is what you will need to shoot interiors:

  • DSLR with auto bracketing feature.
  • Tripod – I like to use a tripod with a bubble level on the head to ensure straight horizontals.
  • Wide-angle lens – Depending on your camera’s sensor, use the widest angle lens that you have available.
  • Shutter release – Not essential, but quite useful to reduce camera movement (resulting in a blurry image) when pressing the shutter.

Quick and easy steps to achieve the perfectly exposed shot

Firstly, it’s recommended to do a little home staging of the rooms that you want to photograph. Having it clear of clutter and clean definitely makes for better photographs. You can arrange some flowers and some fruit bowls to warm up the interior space, and make it look inviting. Clearing the floors of clutter will also make the rooms look more spacious.

How to Photograph Real Estate Interiors or Properties

You don’t need to redecorate or go through a whole moving process, but definitely, a little planning beforehand will make your photographs look more professional. Sometimes just moving a few pieces of furniture around or putting things away in another room will suffice. Turn on all lights that you feel will give depth to the room and open all curtains and blinds. I always like to show the outside, but of course, if the view is not a very nice one, you may want to shut the blinds partly.

A wide-angle lens is best for this type of photography because you will want to get most of the room into your shot. I often find that shooting from corners of the room and getting three walls into my shot will help the viewer get a better feeling for the size of the room. Sometimes shooting from the doorway also works well if the room is very small.

You often have to squeeze and make yourself small to get behind your tripod. I sometimes find myself in some pretty strange positions in order to get the perfect shot. You may even develop some contortionist skills doing this type of photography. Move around the room to find the perfect angle that showcases the best features of the room. Also, try not to shoot directly at windows. Instead, if possible, try to shoot at an angle.

How to Photograph Real Estate Interiors or Properties

Setting up and shooting

You will want to set up your camera on a tripod and shoot at waist level, not eye level. The verticals need to be straight and by lowering your camera and shooting straight you will achieve a better-composed photo with a better angle. Look at the view from your camera and try to assure straight vertical lines when looking at cabinets or tall furniture.

Set your camera’s auto bracketing feature (AEB) to shoot several shots. Depending on the amount of light in each room, you will need to shoot between three to nine bracketed exposures at 1 to 1.5 stops between each. I prefer to use natural light as much as possible, so timing the photo shoots with the time of day is essential. Usually, the more light you have in a room, the more brackets you will need.

How to Photograph Real Estate Interiors or Properties

A shutter release will assure that the camera will not move during the bracketed shooting. You will want to shoot quickly and have the camera as steady as possible if you’re not using a shutter release.

Blending exposures

There are several different techniques to stack your photos in order to blend your bracketed exposures together. I personally use a stacking software called Photomatix Pro 5. I am satisfied with the results I can achieve with minimal adjustments and I enjoy the time-saving quality that it provides.

You can search for other HDR software and choose the one that best suits your needs and budget. You usually get a trial period or a trial version that includes watermarks. This will allow you to test with your own photos in order to see if you like it before you purchase it. Recent versions of the most popular photography software like Photoshop and Lightroom now have a HDR merge feature to perform HDR processing and tone-mapping.

How to Photograph Real Estate Interiors or Properties

Your photos are ready when you feel like the room is evenly exposed and you can see the outside view clearly through the windows.

Conclusion

Have fun experimenting with your photography and showing your friends and family what great, professional looking interior photographs you took of your property! They may even ask you to photograph their properties if ever the time comes when they are contemplating selling or renting.

Don’t hesitate to show me your photos in the comments section.

The post How to Photograph a Real Estate Interior or Property by Sandra Roussy appeared first on Digital Photography School.


Digital Photography School

 
Comments Off on How to Photograph a Real Estate Interior or Property

Posted in Photography


The Power of a Photograph – Iconic Moments Captured as Images

09 Mar

As photographers, we have a great power. We can capture moments in time that are unique, iconic, emotional and powerful. Photography has the power to change things.

By Bronson ABbott

See some of the ways that photographs have this power:

  • We have the power to capture human moments
  • Moments of loss the desperation
  • Of Defiance
  • Moments of bravery
  • Those of love and respect
  • And moments of triumph

How do you use your photography in powerful ways? What are you favorite iconic photographs from history and why? Please share in the comments below about how you feel photography is powerful in our lives.

The post The Power of a Photograph – Iconic Moments Captured as Images by Darlene Hildebrandt appeared first on Digital Photography School.


Digital Photography School

 
Comments Off on The Power of a Photograph – Iconic Moments Captured as Images

Posted in Photography


Women Photograph is a directory of female photographers

22 Feb

Women Photograph is an online directory of female photographers. What started as a spreadsheet has grown to a database over 500 members strong thanks to its creator Daniella Zalcman, a freelance documentary photographer. We asked her a few questions about her experiences, the directory and its origins.


What has your own experience been like as a female photographer in a male dominated field?

At the beginning, it was definitely tough. I started stringing as a news photographer in New York when I was 19, and it was very much a boy’s club back then. Getting anyone to take me seriously was always a challenge, and I can’t tell you the number of times I had a male photographer try to adjust the settings on my camera for me or make a joke about the size of my lens. There was a lot of casual sexual harassment that I think I and many of my female colleagues normalized for a long time — sometimes it’s just easier to shrug and move on. But I’ve done enough shrugging.

Now, I’m a relatively established photographer and I spend most of my time working on long form documentary projects on my own. I rarely interact with news photographer scrums, or even assigning editors, so I’m able to avoid the more frustrating interactions. But I see young women coming up in the field, and I see the attrition rates between photojournalism school and photographers in the first 3-5 years of their careers, and I know what they’re going through. And something needs to change.

What inspired you to create Women Photograph? How did it start?

It started with a Google Form last July. I was frustrated by the number of photo editors who were telling me they didn’t know where to find women photographers, so I wanted to have a resource on hand that would render that excuse invalid.

How many photographers are included now?

Right now, the private database (which includes more complete information like e-mails, phone numbers, languages spoken, geographical areas of expertise, HEFAT/PPE info, and so on) has 525 members. The site is a little slower to build out because it requires that each photographer send me an image and I’m manually entering them all — so it’s probably at around 300 right now.

What’s the response to it been like so far?

It’s been great! It’s provoked a lot of good conversations, which is really what I’m hoping for. If the presence of this site at least makes photo editors who traditionally rely on the same cadre of male news photographers think about their hiring practices, then I think that’s a good start.

Why do you think it’s important to hire female photographers?

This isn’t just about equality in hiring practices — though obviously that’s important to me too. It’s about making sure that the people in charge of visually documenting our diverse, complex world are diverse themselves. We can’t look at everything through a predominantly white, male gaze — that’s irresponsible and, frankly, colonial. We need our storytellers to be as diverse as our audience and our subjects.

Articles: Digital Photography Review (dpreview.com)

 
Comments Off on Women Photograph is a directory of female photographers

Posted in Uncategorized


How to Photograph Close-Up Details of Newborns and Infants

29 Jan

Newborn portraits warm hearts and bring tons of joy to those who view them, especially if they are the new parents or extended family of the newborn. Often, we focus on capturing the new baby among their surroundings with various props and scenes setup. One area we might overlook in our quest to photograph their fresh new life is the tiniest of parts in comparison to the larger world around them. Parents love these special details of newborns just as much, and you’ll enjoy taking them, too.

newborns

The Gear

Using a macro lens or a close-up filter will help you get in tight without the need for cropping in post-processing which may degrade the image quality later. Ideally, you want to use a macro lens as they stay sharp while allowing you to get in closer than ever before.

Close-up details of newborns macro lens

If you don’t have a macro lens or close-up filter in your lineup, a zoom lens works well, too. You can be a short distance away and still get close-up without needing to crop. Post-processing may help with sharpness if you’re using a zoom lens.

Non-macro fixed lenses may be a little more challenging to use for getting close up, depending on their minimum focusing distance (how close you can be to the subject while still keeping it in focus). Investing in a fixed macro lens or close-up filters would be more suitable for this application.

The Hands

Everyone remarks on the small hands of a baby and how soft they are when they’re holding them. There are two ways to photograph close-up details of newborn hands to make an impact.

The first way to photograph new hands is up close. Hands resting near their body or close to their face shows the small details on their hands and provides a glimpse into how soft they are.

Close-up details of newborns hands

The second way to photograph their hands is against another person’s hand, finger, or an object that shows the actual size of their hand. By capturing hands near or holding an object, the viewer easily can gauge how small the baby’s hands are in comparison to the world around them.

Place their hand around a parent’s finger, or a special family heirloom like wedding rings to show their true size.

Close-up details of newborns hands

As the newborn grows, hands become an integral part to how they begin to use their body or hold themselves steady. Make sure to give some focus to their hands in the coming months as they grow and start to grasp objects, use them for balance, or while they are relaxing in a seated position.

Close-up details of newborns hands

The Face

A newborn’s face is priceless to their parents. Photographing details of their face at various angles will give you more than just a straight-on standard image. Their tiny nostrils or eyelashes can have a tremendous impact on the viewer. Ears, lips, and hair are just as valuable to capture in an image when focusing close-up and on details.

Close-up details of newborns face

As the child grows, his or her face will change tremendously from those first few weeks. Photographing their face over the course of infancy will be a proud addition to their baby album as they morph features from one parent to another over a short time.

Close-up details of newborns face

The Feet

The feet are extra soft and cuddly, minus the wrinkles of age or use. They might be pricked and prodded before they get home, but photographing them alone is worth the additional editing time it may take to remove small pricks from hospital needles. Getting in close to shoot details of newborn feet makes the viewer almost want to touch them and feel how smooth and gentle they are.

Close-up details of newborns feet

Try capturing their feet while they are lying on their back and while also snuggled up on their stomach. Both angles will give you options to again add-in family heirlooms in addition to showing just how tiny they are in comparison to their parents’ fingers. Parents love these types of images that embody the love they have for their new addition.

Close-up details of newborns feet

Also, as growing infants become more aware of their feet, you’ll be able to capture them against a backdrop of their face while sucking on their toes, or pulling back from touching the green grass outdoors for the first time.

Close-up details of newborns feet

Wrap-up

Getting close-up with newborns is essential to telling the entire story of their fresh new life.

Photographing these little parts makes for beautiful wall decor, while also capturing the same features one might ordinarily try to get set in ink for their baby book. To cherish their growth over time, getting in close with macro or zoom lenses offers the best option when focusing on these tiniest of parts and parents will absolutely love these details shots.

Please share your newborn details photos in the comment below, or post any questions you have.

googletag.cmd.push(function() {
tablet_slots.push( googletag.defineSlot( “/1005424/_dPSv4_tab-all-article-bottom_(300×250)”, [300, 250], “pb-ad-78623” ).addService( googletag.pubads() ) ); } );

googletag.cmd.push(function() {
mobile_slots.push( googletag.defineSlot( “/1005424/_dPSv4_mob-all-article-bottom_(300×250)”, [300, 250], “pb-ad-78158” ).addService( googletag.pubads() ) ); } );

The post How to Photograph Close-Up Details of Newborns and Infants by Kate Nesi appeared first on Digital Photography School.


Digital Photography School

 
Comments Off on How to Photograph Close-Up Details of Newborns and Infants

Posted in Photography


How to Create a Dynamic Zoom Burst Photograph

11 Jan

Who doesn’t love warp speed? In this article, you’ll go hurtling into the future at warp speed nine, and you don’t need any federation star fleet spaceships to do it! A DSLR camera with a zoom lens and a tripod is the only equipment you’re going to need for this exciting technique. There are similarities to light painting by camera rotation, and the zoom burst is indeed another form of kinetic light painting. Let’s take a look at this technique, what it will give to your photos, and how to do it.

zoom burst photo cityscape

In this photo, a friend stood still in front of Marine iCty in Busan.

What does this technique add to your photograph?

Put simply, this gives a still frame a much more dynamic edge. This article will look at how you can apply zoom bursting to architectural photos and is best used in an urban environment. The nature of still frames is of course that they’re a single moment, by changing the focal length during long exposure you can add movement and urgency to your frame. The zoom also produces leading lines within your frame that all lead up to your main subject within the frame.

How to take zoom burst photographs

Taking a zoom burst photo is a simple technique, in fact, you can even do this handheld. The effect is achieved by changing the focal length of your camera lens during a long exposure. Follow these steps:

  1. Choose a scene that has mixed areas of light. You can use a forest with mottled light, or an apartment building where some lights are on and some are off.
  2. The exposure should be between half a second and 2 seconds long.
  3. You can take this photo handheld but it’s better to use a tripod.
  4. Change the focal length of the lens during the exposure. Zooming out tends to work better during the night for longer exposures, and zooming in works better during the day.
zoom burst lights

A photo that uses zoom with no stationary phase. This photo is colorful and abstract.

How to take zoom burst photos that show structures

Now that you know how to make a simple zoom burst, which looks abstract in nature, it’s time to move a step further. Now you are going to see how you can introduce architectural structures into this frame.

1 – Choose the correct location

Not all locations work well for zoom bursts, especially if they’re too cluttered. You need to choose a building that’s well lit and not surrounded by others. There are other options you can look at as well such as Ferris wheels or sculptures. Any location you choose should allow you to zoom into the structure, and then zoom out on the lights that surround it.

zoom burst too many buildings

When there are too many building in the frame, the zoom burst shot can get busy.

2 – Set the camera on a tripod

If this is going to be a long exposure of 25 or 30 seconds, you will have to use a tripod. You need to secure the tripod in position, making sure it doesn’t move about. A lot of tripods let you hook your camera bag to the extendable center, doing so will steady the tripod. Apply the same logic you would use to attain a sharp image. The focal length movement of the lens will prevent you getting maximum sharpness, though.

3 – Select the right lens

The best lens for this type of photo is a super zoom, one that goes from 18mm-300mm. A super-zoom gives you maximum flexibility over composition and allows for more creative photographs. If you don’t have a zoom with this kind of range, you can use a kit lens. The 18-55mm lens works very well for the zoom burst.

4 – Focus the camera using Live View

Now compose your photograph in the position you intend to finish your zoom burst. The final composition will be at the wider or widest end of your lenses focal length. Turn the camera’s Live View function on, and zoom into the central structure you wish to focus on. Use the lens’s manual focus so that the image on the Live View screen is sharp. Keep the camera lens in manual focus to prevent loss of focus during the exposure. Keep a mental note of the focal length where you focused, especially if that isn’t the widest part of the lens.

castle zoom burst photo

In this photo, Nagoya castle was focused on using a zoom. I zoomed into the castle.

5 – Zoom into the target area

Select the area of the scene you want to have as the center of your zoom, this should have been decided already during initial scene composition. Ensure that all your settings remain the same, as this is the final step before you begin the exposure. Set the camera to expose for 25-30 seconds, at f/8 or f/11. You can use a smaller aperture if you need to in order to get a longer exposure.

6 – Carry out the zoom burst

Set the camera to the 2-second timer (or 10 seconds if you want to prepare yourself for the zoom). Hit the shutter button to begin the countdown to the exposure. At the point when the shutter is about to open begin slowly zooming out. As the camera is exposing, continue to zoom out keeping it as smooth as possible to avoid camera shake.

You should be zooming out for between two and five seconds, the longer the zoom is the more pronounced the light trails will be in the image. As you zoom keep an eye on the focal length of the lens so you finish at your composed position.

The ferris wheel is a great subject for zoom bursts. The middle is empty, and there is a ring of light to zoom out.

The Ferris wheel is a great subject for zoom bursts. The middle is empty, and there is a ring of light to zoom out.

7 – Allow the camera to finish the exposure

Once you have finished the zoom remove your hand from the lens, without moving the camera. The camera will continue to expose for 20-25 seconds depending on the exposure time you used. The image will now show zoom burst lights and architectural structures in the same exposure.

8 – Carry out post-processing work on the photo

The result in-camera will look nice, but adding contrast in post-processing is important. The image has “lost” five seconds of exposure time, so adjusting the contrast helps. You can use NIK color efex, which has a filter called pro-contrast and is an excellent choice for this type of photo. The centered position of the zoom can’t be adjusted in camera, though cropping the photo in post-processing allows you to move the zoom to an off-center position.

The bridge lit with many lights is a good subject for a zoom burst.

The bridge lit with many lights is a good subject for a zoom burst.

Where should I go to take zoom bursts?

The best place to take this type of photograph is in a city, one that’s well lit, and has interesting architecture. A Ferris wheel is a great structure to use as it’s circular, which helps with the centered nature of the zoom burst. Other architecture can also work as long as it’s alone and not surrounded by other structures. A cityscape with many buildings can look too busy with too many light streaks in one frame.

You can even take zoom burst photos during the day, but you will need an ND filter to do this. An ND filter that allows you to shoot for 30 seconds will allow you to create a zoom burst using the steps listed above, though the zoom should last longer.

img_2957

I look forward to seeing your photos using this zoom burst technique, please post any images you have in the comments section below.

This is a good example of a lone building with lights on.

This is a good example of a lone building with lights on.

In this photo only zoom is used, there is no stationary phase.

In this photo only zoom was used, there was no stationary phase.

This photo shows how a zoom burst and static phase produces an image.

This photo shows how a zoom burst and static phase produces an image combining light streaks and architecture.

googletag.cmd.push(function() {
tablet_slots.push( googletag.defineSlot( “/1005424/_dPSv4_tab-all-article-bottom_(300×250)”, [300, 250], “pb-ad-78623” ).addService( googletag.pubads() ) ); } );

googletag.cmd.push(function() {
mobile_slots.push( googletag.defineSlot( “/1005424/_dPSv4_mob-all-article-bottom_(300×250)”, [300, 250], “pb-ad-78158” ).addService( googletag.pubads() ) ); } );

The post How to Create a Dynamic Zoom Burst Photograph by Simon Bond appeared first on Digital Photography School.


Digital Photography School

 
Comments Off on How to Create a Dynamic Zoom Burst Photograph

Posted in Photography


4 Reasons Why You Should Photograph Concrete

11 Jan

When people ask me if I have a favorite subject to photograph, they are often surprised by my response. See, I really enjoy photographing abstract urban environments, and most of all, I love photographing concrete. Yep, that’s right! Plain old concrete.

As the most common urban material, concrete shapes buildings, lines pathways, forms pipes, columns, bridges, and driveways. Anywhere you look you’ll see concrete, it’s as endless in variety as the reasons I love photographing it. You could say that car parks are a wonderland for me.

concrete-photography-03

This slab of concrete takes on the appearance of a Rorschach test.

However, concrete is often overlooked for more obvious or eye-catching subjects. If you google “urban photography” there are thousands of beautiful photographs of skyscrapers and streets, urban patterns, and underground train lines. But rarely do you see photographs of just concrete itself.

And why would you bother? A photograph of a concrete bollard sounds pretty boring, right? Wrong! Here are a few reasons why concrete can be a photographic wonderland if you simply take the time to look.

concrete-photography-14

The strikingly bold mark on this slab of concrete is the remnant of a red car that got a bit too close.

concrete-photography-01

1 – Concrete is a time capsule

Concrete is popular in construction because it builds durable, long-lasting structures that will not rust, rot or burn. In short, it stands the test of time. This means that concrete construction will invariably wear the markings of the surrounding environment and the people who consciously or unconsciously interact with it.

It is a time capsule and photographing it means documenting the story of what makes up an urban environment. From the freshly laid feature wall, to the roughly poured foundations of an underground car park, or names etched into pathways and paint scratches from cars, it all tells a story.

concrete-photography-13

concrete-photography-15

concrete-photography-11

concrete-photography-16

concrete-photography-17

2 – Abstract expressionism

If  photography is like painting with light, then concrete is a sturdy urban canvas. Another reason I enjoy photographing concrete so much is it has parallels to abstract expressionism. Abstract art, mostly characterized by painting, focuses on the process, the medium, the shape and the color within the frame of the canvas. Through their paintings, abstract expressionists create a visual arena documenting an artist’s movements, thinking and process without relying on the depiction of figurative imagery. Like abstract art, concrete lays bare the visual results of spontaneity, time and the limitations of physics. The lack of figurative references also allows the viewer to explore the image in greater depth, lending their own meaning to the work – which creates a deeper connection with the audience.

Like abstract art, concrete lays bare the visual results of spontaneity, time and the limitations of physics. The lack of figurative references also allows the viewer to explore the image in greater depth, lending their own meaning to the work – which creates a deeper connection with the audience.

concrete-photography-08

concrete-photography-05

concrete-photography-18

The lack of figurative references creates the appearance of an almost alien landscape

3 – Minimalist beauty

Concrete itself is like an abstract expressionist’s canvas, but the act of photographing such a bold subject is actually very minimalist. Photography, when you drill down to the basics, is about light, shade, surface, tone and line. Photographing concrete surfaces doesn’t seek to depart from this, but rather, emphasize it.

Photographing a seemingly menial subject like concrete not only draws attention to its beauty but hearkens back to the simple elegance of photography by documenting the incidental and intentional brushstrokes of the urban environment.

concrete-photography-09

concrete-photography-02

4 – Variety!

No two panels of concrete are the same. Concrete acts as a canvas for a myriad of air bubbles, paint, scratches, graffiti, wear, watermarks, leftover adhesive, etc. Concrete itself forms waves and arches as it is poured. Finishing effects vary too, depending on the type of concrete and the pouring technique. Any portion of concrete maps out the history of that particular time and place with hypnotizing whorls and abrasive texture.

The familiarity of the subject is no deterrent either. Often, as I’m photographing a wall or pathway, passers-by do a double-take, trying to see what it is that I’m photographing. It’s something they may never have considered photograph-worthy before, and it interests them. The beauty is already there, waiting for someone to draw attention to it. Viewers often remark that they never knew concrete could be so beautiful until now!

concrete-photography-10

concrete-photography-12

Conclusion

Concrete is an incredibly variable and dynamic subject, and whats more, it keeps still! As an almost constant presence in history, the use of concrete has evolved with humans to shape our environment. Concrete is a time capsule of intricate details and hidden stories that illustrate the way we interact with the world.

It’s an often overlooked, but delightfully accessible subject, always ready for a photographer to take notice. Next time you are out and about with a camera, take time to look at what concrete has to offer. You may surprise yourself with how fascinating the canvas of the urban landscape can be!

concrete-photography-04

googletag.cmd.push(function() {
tablet_slots.push( googletag.defineSlot( “/1005424/_dPSv4_tab-all-article-bottom_(300×250)”, [300, 250], “pb-ad-78623” ).addService( googletag.pubads() ) ); } );

googletag.cmd.push(function() {
mobile_slots.push( googletag.defineSlot( “/1005424/_dPSv4_mob-all-article-bottom_(300×250)”, [300, 250], “pb-ad-78158” ).addService( googletag.pubads() ) ); } );

The post 4 Reasons Why You Should Photograph Concrete by Megan Kennedy appeared first on Digital Photography School.


Digital Photography School

 
Comments Off on 4 Reasons Why You Should Photograph Concrete

Posted in Photography


How to See and Photograph Light – 6 Tips to Help you Take Better Photos

13 Dec

I was teaching a class recently and someone asked me how they could have made a particular set of landscape images better. Should they have used a different aperture, shutter speed, etc.? “You couldn’t have made those photos any better because the light was terrible.” I explained. You must learn to see and photograph light to take better photos.

How to See and Photograph Light - 6 Tips to Help you Take Better Photos

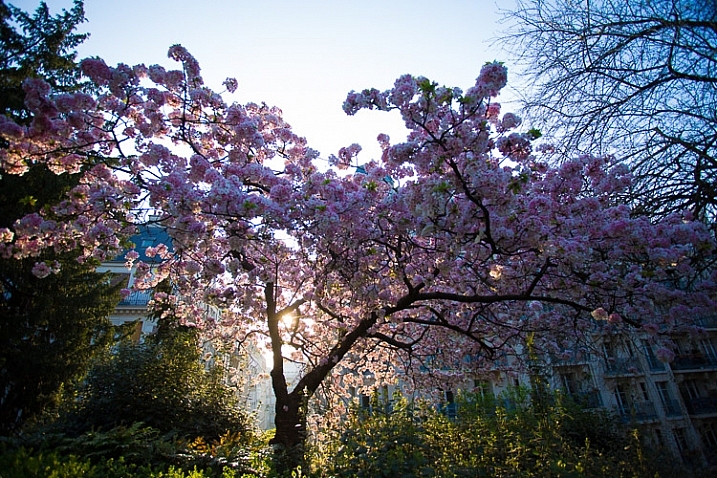
Blossoms at dawn, Paris.

There are times when interesting photos can be made in bad light. But I will unequivocally say that in most cases (as there are always exceptions to the rules, right?) when you have boring light you will have boring photos.

Interesting light transforms any subject. It reveals and enhances the subject’s natural qualities. In many ways, it brings your subject to life. If you follow only one piece of advice in photography it should be this:

“Light makes photography. Embrace light. Admire it. Love it. But above all, know light. Know it for all you are worth, and you will know the key to photography.” George Eastman.

How to See and Photograph Light - 6 Tips to Help you Take Better Photos

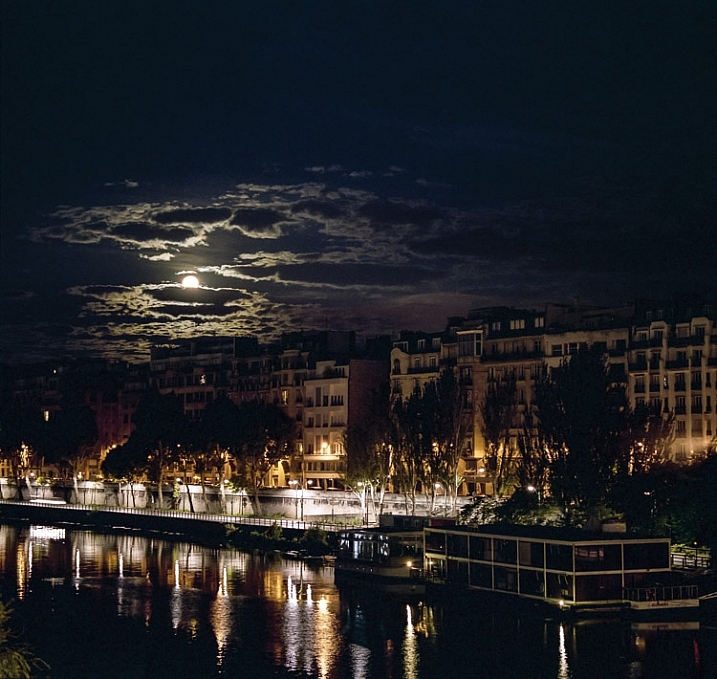
Moonset on the Seine.

In this article, I am going to explore light in many forms, but it’s not a technical article. This is about the how you compose with light, how its different forms affect your subject, the emotions that light communicates, and how when you really chase light you’ll learn to create more compelling and memorable images.

In every single one of these photos, I will say that the subject is the light. The light might be subtle, or very obvious, but what compelled me to snap that shutter was what the light was doing. Here are some tips to get you more involved with capturing the mesmerizing qualities of light.

1) Notice light

“It’s not what you look at that matters, it’s what you see.” Henry David Thoreau

How to See and Photograph Light - 6 Tips to Help you Take Better Photos

This first step seems like a stupidly simple piece of advice right? I mean who doesn’t notice light? Most people notice the obvious aspects of light – it’s a sunny day, it’s stormy, it’s twilight. There is so much more to light, though. It’s a rich, varied and complex entity. Light is creating hundreds of different effects all around us all the time.

The first piece of advice I always give to all my students is – look for what the light is doing and look for light sources. You’re out and you see a beautiful shaft of light on a wall. Ask yourself – where is it coming from? Is it direct or is it being reflected off of something? Is it bouncing off the wall and doing something else?

As you move around light alters – as you enter a square, go under a tree, move behind a building – it’s bouncing and reflecting off so many things. Light is being filtered through leaves, through different urban and natural materials. It’s this constantly changing aspect that you need to become very familiar and intimate with. Light is always changing – as clouds drift across the sun, as the hours pass, as weather systems move.

How to See and Photograph Light - 6 Tips to Help you Take Better Photos

See the shadows on the clouds?

Become a light detective

There are, of course, many times when the light is super flat. We have many days in London where cloud cover is very dense and the light is very flat and gray. Or back in California, where I grew up, in the height of summer at midday the light is hard and almost flat in its piercing white intensity. Then you have to work harder to look for alterations in light. But like life itself, change is something we can consistently rely on.

You’ll also start to notice that when the light outside changes, it also changes the light inside. A drop in the vibrancy of the light outside will make the light inside seem warmer and stronger.

Becoming a good photographer is like becoming a light detective. What is light doing to your subject? What is it revealing about your subject?

How to See and Photograph Light - 6 Tips to Help you Take Better Photos

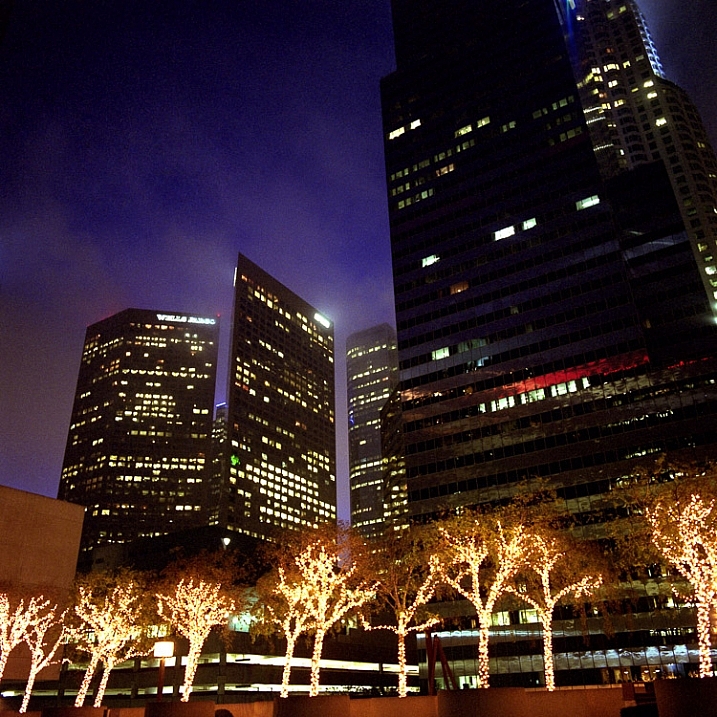
Los Angeles downtown at dawn.

2) Use light to create emotion in your images

“A great photograph is a full expression of what one feels about what is being photographed in the deepest sense and is thereby a true expression of what one feels about life in its entirety.” Ansel Adams

For me, light always creates an emotion, a feeling, or a sense of mood. It doesn’t have to be a strong feeling or even a positive one, but it does have to create an impact with me that goes beyond the initial pleasingness to the eye. I am constantly searching to capture a feeling in my images. Light is a very powerful way to communicate emotions.

So I want you to look at the light in the following photos and ask yourself – how do they make me feel? Light can be a powerful and dramatic element in your photos, creating a deep feeling of awe, about the grand beauty of the world.

How to See and Photograph Light - 6 Tips to Help you Take Better Photos

Dawn over the Grand Canal Venice, Italy.

Light enhances the subject

Of course, the photo above would have been interesting without the dramatic sunrise, after all, it is Venice and the subject is incredible. What the beautiful light adds, though, is a big pop of color, adding a layer of depth and enhancing the awe-inspiring feeling of these amazing buildings. The dramatic color and light matches and enhances the dramatic subject.

It doesn’t have to be big subjects, though. This simple shot of pretty flowers would be quite boring if it didn’t have this lovely dappled light on it. It’s simple but very evocative. If you are starting out, or trying to refresh your basic skills, focusing on detailed shots like this, and what light is doing to the elements in the world around you, is a fantastic way to start playing with, and capturing the magic of light.

How to See and Photograph Light - 6 Tips to Help you Take Better Photos

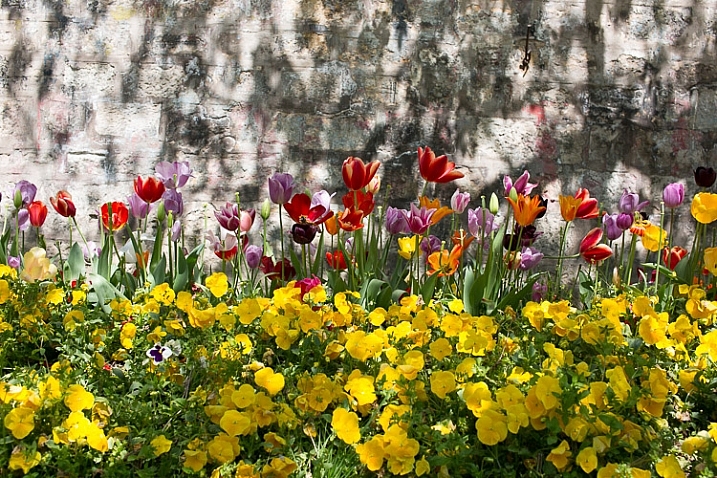
Tulips in bloom Istanbul Gulhane park

I have mentioned interesting and beautiful light. So what is interesting light? Well, to me it’s any light that communicates an emotion, a feeling, or a mood. It’s light that makes you feel something. Even if that’s melancholy.

How to See and Photograph Light

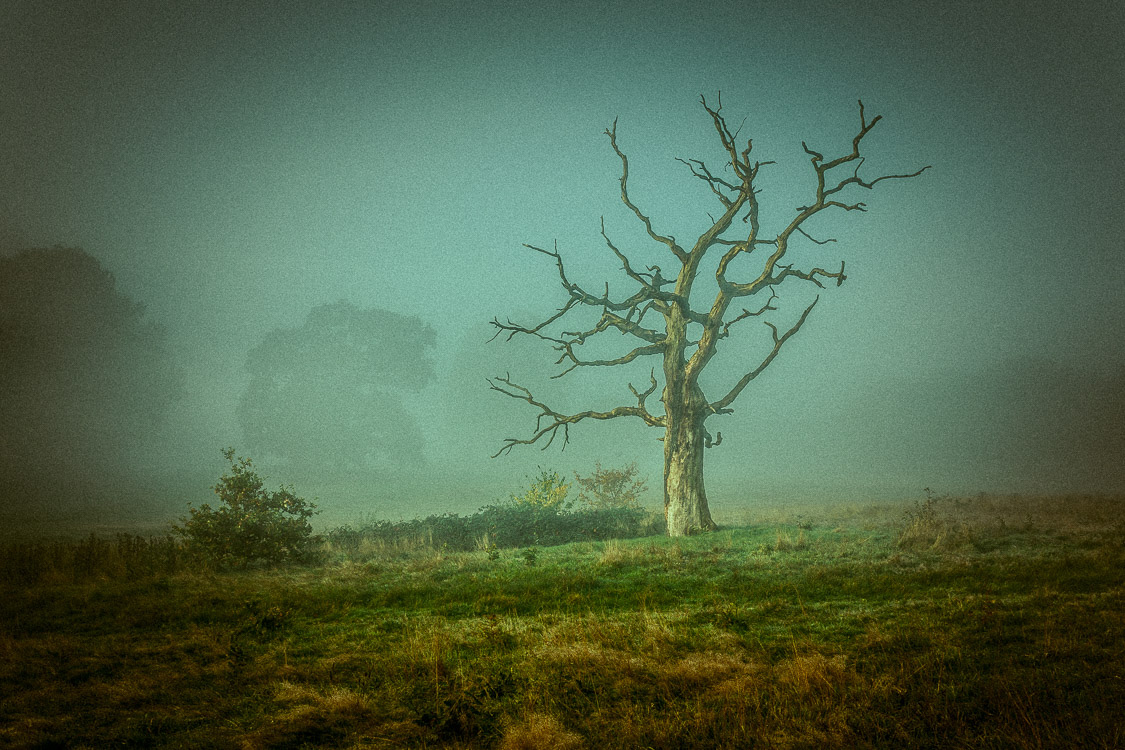
Lone tree on a foggy morning on Hampstead Heath London, at dawn.

I shot the photo above on a cloudy autumnal morning. The light was very diffuse, very subtle, but it was still pretty and interesting to me. It matched the location I was in – the wild heathers and grass along with the stark leafless tree standing alone.

Can you see how the light emphasizes the natural qualities of the tree? How the amazing wild branches, stripped bare, almost like someone’s mind going crazy, are enhanced by the soft light?

In the photo below, to me, the light is offering an amazing feelingof foreboding.

How to See and Photograph Light - 6 Tips to Help you Take Better Photos

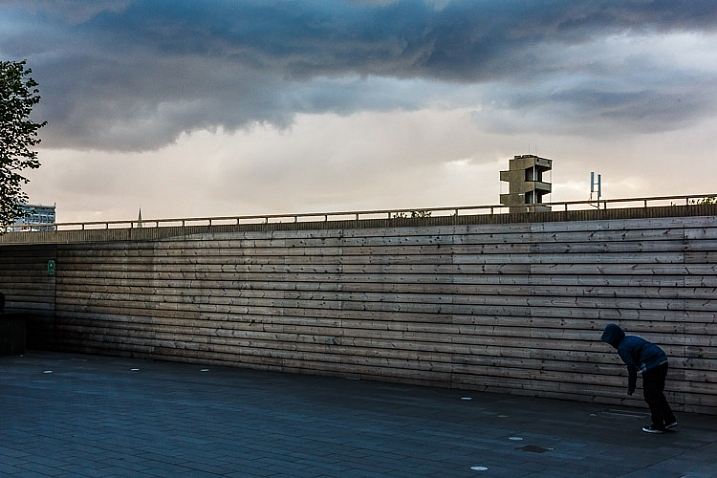
Dark days ahead, London.

3) What is the color of light?

“Light, that first phenomenon of the world, reveals to us the spirit and living soul of this world through color.” Johannes Itten

Color from light is produced when white light is split by a prism into the colors of the rainbow. You also get artificial effects created by the myriad of things that light reflects onto and bounces off.

For me, color is the second most powerful force in my photography, and getting a sense of the color of light is a great way to start using light and color in your compositions.

Compare the color of the light in the following three images.

How to See and Photograph Light - 6 Tips to Help you Take Better Photos

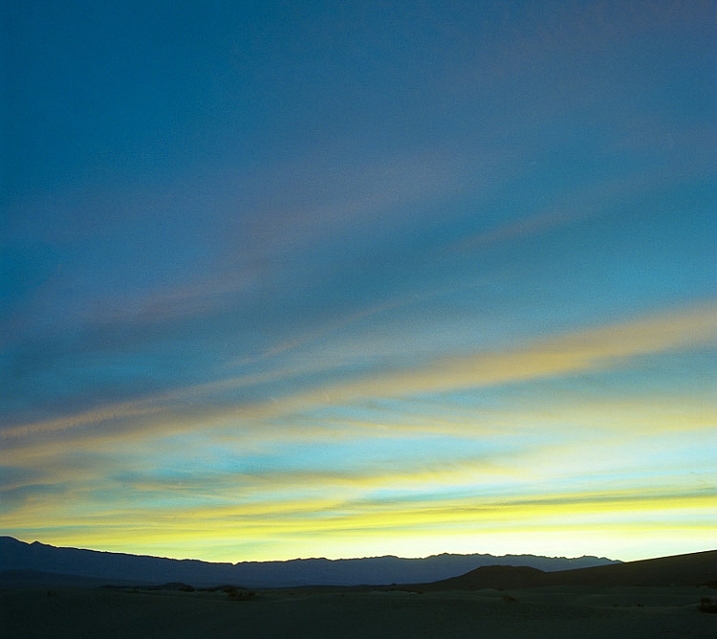
Dawn over Death Valley, California

How to See and Photograph Light - 6 Tips to Help you Take Better Photos

Sunrise over the Bosphorus, Istanbul Turkey at dawn.

How to See and Photograph Light - 6 Tips to Help you Take Better Photos

Near Hackney Wick station London at dawn.

Light is always full of color – even if it’s piercing white. And it’s doing something to the color of your subject.

4) Light can make even dull and boring subjects interesting

“In the right light, at the right time, everything is extraordinary.” – Aaron Rose

Interesting light doesn’t have to just be natural, or even beautiful. Light of all kinds creates mood and feeling within a photo. Your aim is to ensure that the light helps to create a story of some kind for your image, that it tells you something about what it’s like to stand right there, where you were.

How to See and Photograph Light

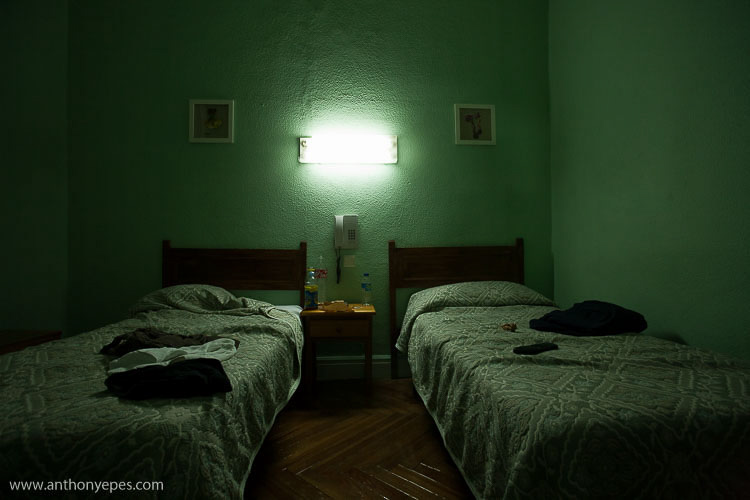
Hotel room, Madrid, Spain.

Above is a great example of harsh light that usually I wouldn’t go near – but it works in this photo because it works well for the subject. I rarely take photos using such unflattering hard lighting. But in a grim hotel room in Madrid, it enhances the feeling of loneliness that the twin (disconnected) beds give off, with the bleak looking paint color. That burst of light wraps up the photo into a nice melancholy package. See, even horrible light can be interesting (in the right circumstances)!

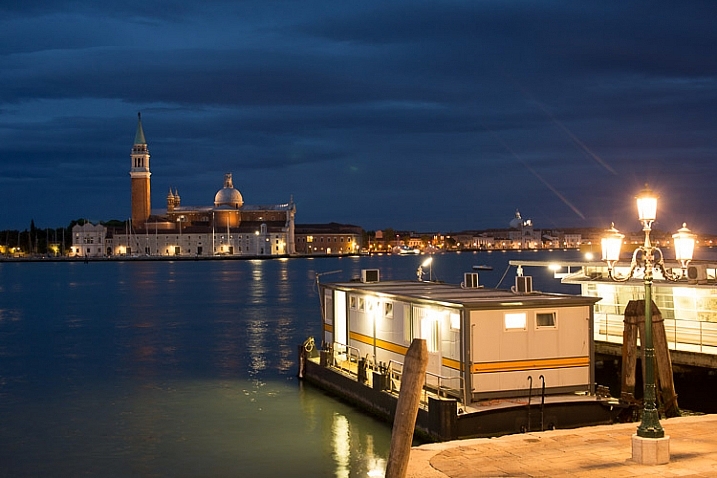
Then you also have the issue of beautiful, gorgeous light making rather dull subjects suddenly quite interesting.

How to See and Photograph Light - 6 Tips to Help you Take Better Photos

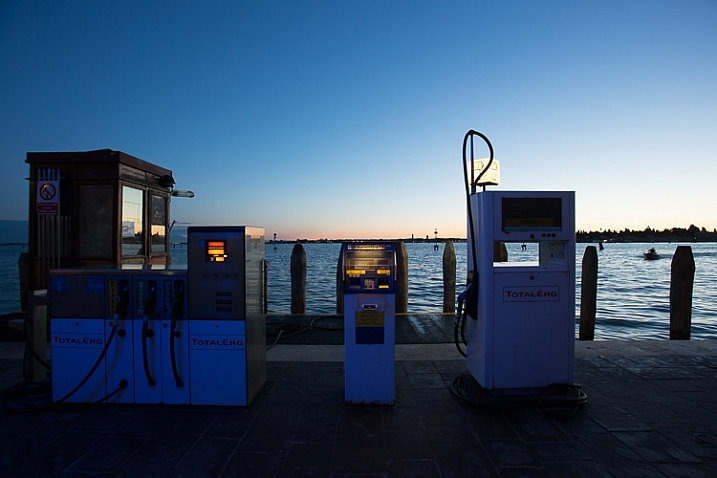
Gas pumps for boats in Venice, at dawn.

Without the rich blue light, this would not be an interesting photo. Plus what gives it another layer of interest are the pops of artificial light.

This following photo has a fascinating subject. But imagine this scene on a gray, drab Parisian morning, when all you want to do is dive into a cafe and eat several pains au chocolat?

How to See and Photograph Light - 6 Tips to Help you Take Better Photos

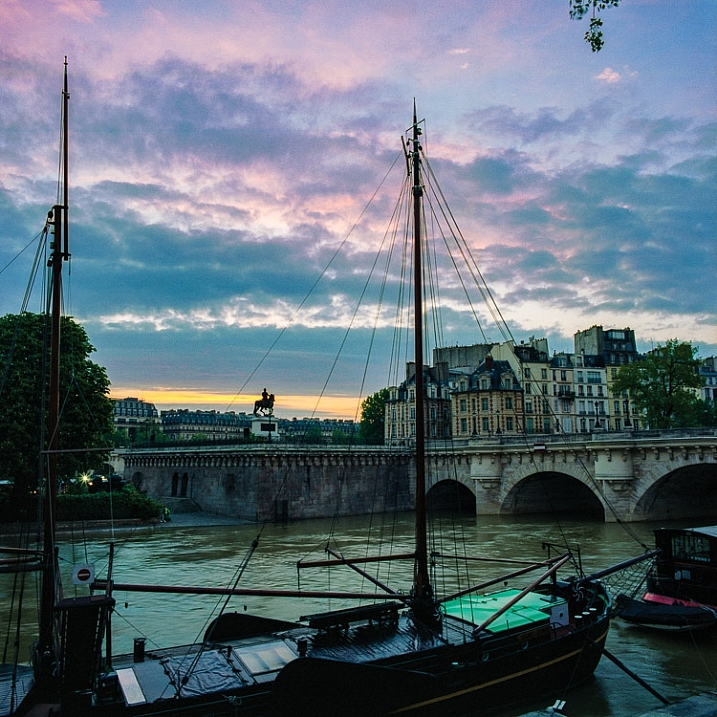
A dawn Idyll on the Seine, Paris.

The light is bringing everything to life – the gray stone buildings, the grayish-green water, the black and browns of the boats. This would be a totally boring photo without that magical light and sky.

5) Use light to tell a story

“There is only you and your camera. The limitations in your photography are in yourself, for what we see is what we are.” – Ernst Haas

I think photographs are at their strongest when they enhance the inherent qualities of the subject you are photographing when they add another layer of story to the photo.

What story do you want to tell?

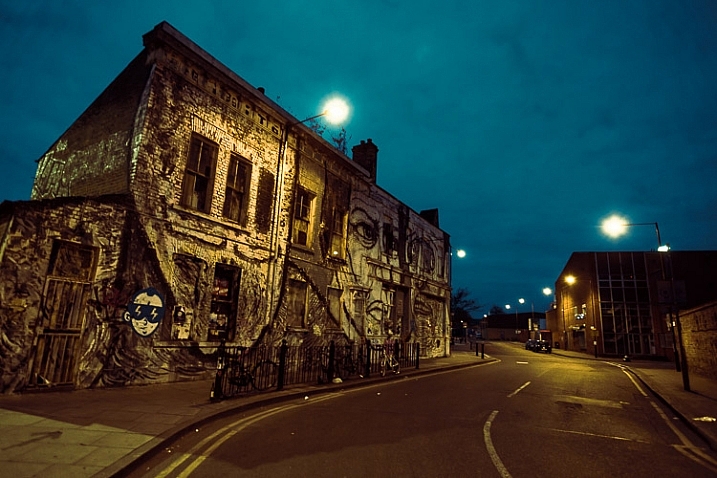
I photograph a lot of cities at dawn; it’s my main subject at the moment. Dawn, though, becomes very repetitive to photograph. It’s often so pretty, but just how many epic sunrises can you photograph? So one of my favorite things to do is to juxtapose that beautiful, ethereal light of dawn with the broken, used or decaying elements of our cities.

How to See and Photograph Light - 6 Tips to Help you Take Better Photos

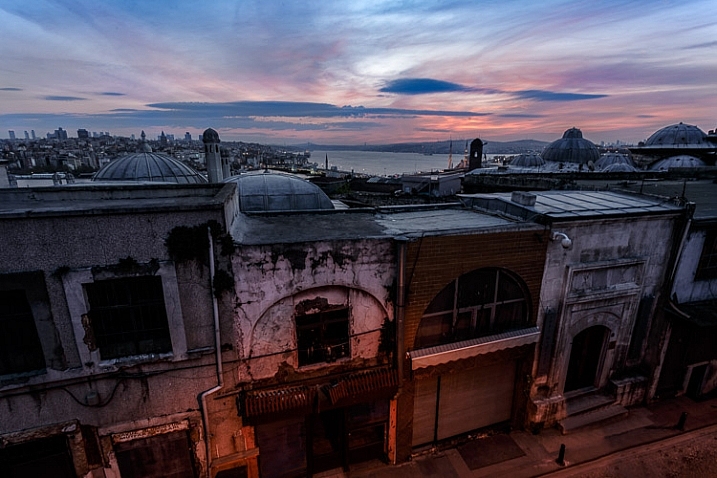
Ancient vista, Istanbul at dawn.

I think it says so much. The hopeful light of dawn, with the heavy feeling you get from the urban scene, and feeling of human impact.

I also love to photograph dawn when the street lights are still on. That mix of the best light nature produces, with that hard functional light we humans create for our cities, is a very interesting thing to play with. The light is telling you more about what it’s like to be exactly where you are – it’s helping to tell the story of your subject.

How to See and Photograph Light - 6 Tips to Help you Take Better Photos

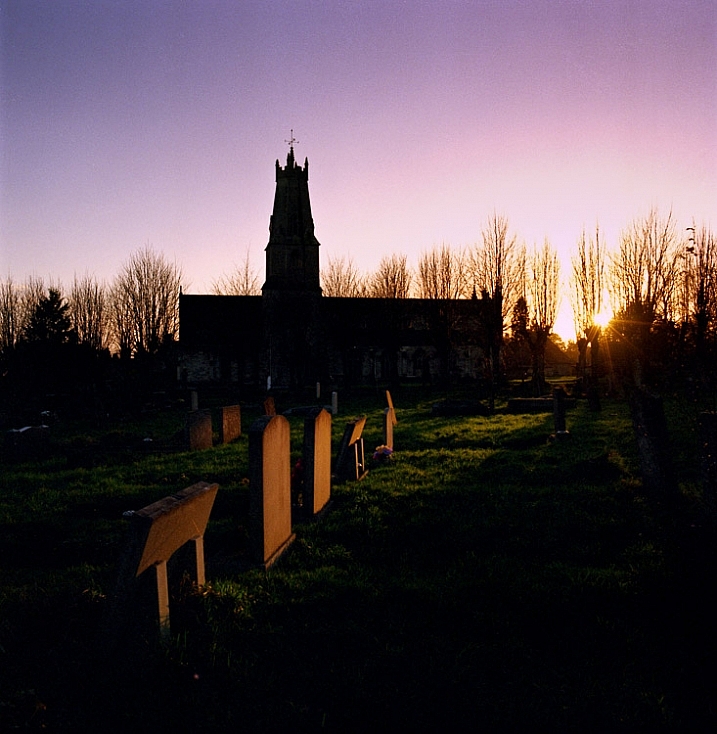
Last light on gravestones, Stroud, England.

In the photo above I was in this graveyard on a winter’s afternoon. I noticed that the sun was starting to set and realized that if I waited, the sun would fall perfectly between the trees, lighting up the gravestones. This stream of light through the trees only lasted a minute or two, but it shows that when you really pay attention to light you can start to anticipate what it’s going to do, and how it will affect your photos. Without that stream of beautiful light the scene would have been really boring.

6) Chasing light is an adventure

“Photography is a love affair with life.” – Burk Uzzle

Photography is such an amazing creative pursuit. I love how it connects me so much more to the world around me. Learning to pay attention to light and how to capture it is one of the best ways to elevate your photography. Becoming intimate and familiar with light will help you become really present with the beauty and wildness of this amazing world.

How to See and Photograph Light - 6 Tips to Help you Take Better Photos

I would encourage you to photograph light – just for the sake of it. It’s a wonderful, thrilling adventure to always be chasing the light.

I’d love to know if you how you go about capturing light and use it in your photos. Please comment below, I love hearing your ideas.

googletag.cmd.push(function() {
tablet_slots.push( googletag.defineSlot( “/1005424/_dPSv4_tab-all-article-bottom_(300×250)”, [300, 250], “pb-ad-78623” ).addService( googletag.pubads() ) ); } );

googletag.cmd.push(function() {
mobile_slots.push( googletag.defineSlot( “/1005424/_dPSv4_mob-all-article-bottom_(300×250)”, [300, 250], “pb-ad-78158” ).addService( googletag.pubads() ) ); } );

The post How to See and Photograph Light – 6 Tips to Help you Take Better Photos by Anthony Epes appeared first on Digital Photography School.


Digital Photography School

 
Comments Off on How to See and Photograph Light – 6 Tips to Help you Take Better Photos

Posted in Photography


How to Photograph the Magical Microscopic World – Photomicroscopy

11 Nov

What is photomicroscopy

There is a whole world right under your eyes where everyday and unique objects take on a fascinating new appearance. This world is microscopic and even though it is right in front of you, the tiny scale makes it difficult to see the incredible detail.

Photomicroscopy in its simplest form is high magnification photography, which in practice involves the use of a microscope to magnify images followed by using a camera for image capture. With the advent of eBay and other online auction style sites, photomicroscopy is becoming far more accessible to the wider population, allowing anyone to see the incredible detail.

photomicroscopy photomicrograph micrograph

Monosodium Glutamate (MSG) at high magnification by polarized light microscopy.

My passion for photomicroscopy

As a scientist, I spend a significant part of my time conducting investigations which require me to use microscopes. It was this exposure (and my embedded love of science) that got me interested in microscopy. Once I caught the bug, I acquired a microscope from an online auction store and purchased the accessories needed to couple the microscope to my Nikon DSLR. It should be noted that you can easily find accessories to couple with most camera brands, so this is not limited to Nikon.

My Nikon attached to the microscope.

My Nikon attached to the microscope.

Over time my setup expanded, to try and optimize the workflow through the addition of focus stacking software and hardware to counter the very shallow depth of field microscopes have.

How to take photomicrographs

photomicroscopy photomicrograph micrograph - toile paper

Two-ply toilet paper by transmitted light microscopy.

Photomicrographs are high magnification images which are captured using both a microscope and a camera, in my case a Nikon D5300 DSLR. First, you need to find an object that can be imaged and prepare it.

Because the depth of field is so narrow, most item(s) need to be cut into thin slices or focus stacked to get an adequate depth of field. Once you have found the item you want to photograph, it is then a case of putting it under the microscope on a glass slide, setting the light to evenly illuminate the item and setting your camera to take the image.

One point to note is that many entry level DSLR’s (including the Nikon D5300) do not meter with microscope adapters. As such, to capture an image you will need to have the camera in Manual mode and use trial and error to adjust your shutter speed to expose the image properly.

photomicroscopy photomicrograph micrograph - chili

Dried chili flake by transmitted light microscopy.

What items look great under the microscope?

A significant number of everyday objects look incredible under the microscope, some of these can be found in the kitchen, while others are more likely to be found outside. Here are a few ideas:

  • Insect wings
  • Pine needle cross-section
  • Lake water creatures (e.g. water fleas)
  • Granules of sand
  • Onion skin
photomicroscopy photomicrograph micrograph - sand grains

Sand grains by transmitted light microscopy (and focus stacked).

photomicroscopy photomicrograph micrograph - onion skin

Onion skin by transmitted light microscopy (and focus stacked).

When you start to add polarization to the mix, a number of chemicals take on a new life, some of these are every day, while others are more unique:

  • Caffeine
  • Menthol
  • Nicotinic Acid
  • Benzoic Acid
  • Stearic Acid
photomicroscopy photomicrograph micrograph - benzoic acid

Benzoic acid by polarized light microscopy.

photomicroscopy photomicrograph micrograph - caffeine

Caffeine by polarized light microscopy.

Tips and tricks for photomicroscopy

As with photography, lighting is essential for photomicroscopy. Microscopes essentially have two types of lighting. One is transmitted lighting which is where the light is shone up through the item. The second type of lighting is where light is shone on the item which is known as reflected lighting. Transmitted lighting is best for transparent samples, while reflected lighting is best for opaque samples.

Using a polarizing filter retrofit will make many chemicals under the microscope come to life due to a property called birefringence. This property is where the refractive index of a material changes based on the degree of polarization and light, leading to many different colors within chemical crystals.

The depth of field in photomicroscopy is VERY shallow, as such you may need to either use thin slices of a material or do focus stacking to achieve a suitable depth of field. There is a range of software packages which can help with focus stacking, these include; Helicon Focus, Zerene Stacker and Photoshop.

photomicroscopy photomicrograph micrograph Peppercorn by reflected light microscopy.

Peppercorn by reflected light microscopy.

A few more images

Here are a couple more example images.

photomicroscopy photomicrograph micrograph

Absorbent Wipe by reflected light microscopy.

photomicroscopy photomicrograph micrograph

Butterfly wing by dark field microscopy.

photomicroscopy photomicrograph micrograph

Glutamaic Acid

photomicroscopy photomicrograph micrograph

Sponge

Have any idea(s) on what might look great under the microscope? Let us know in the comments below, please.

googletag.cmd.push(function() {
tablet_slots.push( googletag.defineSlot( “/1005424/_dPSv4_tab-all-article-bottom_(300×250)”, [300, 250], “pb-ad-78623” ).addService( googletag.pubads() ) ); } );

googletag.cmd.push(function() {
mobile_slots.push( googletag.defineSlot( “/1005424/_dPSv4_mob-all-article-bottom_(300×250)”, [300, 250], “pb-ad-78158” ).addService( googletag.pubads() ) ); } );

The post How to Photograph the Magical Microscopic World – Photomicroscopy by Travis Hale appeared first on Digital Photography School.


Digital Photography School

 
Comments Off on How to Photograph the Magical Microscopic World – Photomicroscopy

Posted in Photography


How to Make a Sketch Inside a Photograph

25 Oct

This is one of those tutorials that’s great to play around with, maybe do it once or twice. But in the end, the thing they are great for is that they always teach you something. It may not be much, but it might help you think in a different way, or learn a skill you didn’t know about. This one is about how to make a sketch inside a photograph.

how-to-make-a-sketch-inside-a-photograph


This is a simple tutorial that can help you learn how to use layers, and combine images. There are so many things you can do with layers, but  in this example, we are going to work on putting a drawing of a scene in front of the photograph. Of course, it isn’t a real drawing, but one that is created from the image using the artistic filters in Photoshop.

The image

Deciding which image you are going to use can be harder than you think. It could take a while to find one that will work well, one with lots of contrast is good. You want an image that will stand out when you put the drawing over the top of it.

How to Make a Sketch inside a Photograph

Open the image and process it normally to get it ready. If you have several layers flatten or merge all of them, and copy that new merged layer so there are two. To copy the layer press Ctrl/Cmd+J.

Turn off the top layer by clicking on the eye icon next to the thumbnail. That will make it disappear, or turn off temporarily.

How to Make a Sketch inside a Photograph - hide layer

Click the bottom layer to select it as the one that you will change into a drawing.

Making the drawing

Go up to the Main Menu and click Filters > Filter Gallery, or use the keyboard shortcut Ctrl/Cmd+F.

How to Make a Sketch inside a Photograph - filter gallery

If you can’t bring up the Filter Gallery or click on it in the menu, it may be because your image is either 16 or 32 Bits, so you will need to change it to 8 Bits.

To change the image to 8 Bits select from the top menu bar: Image > Mode > 8 Bits/Channel. You should now be able to use the Filters Gallery.

How to Make a Sketch inside a Photograph - 8 bits

There are loads of options in the gallery to give you an artistic look. Select the one you like. For this example, I used the Graphic Pen found in the sketch section. If you don’t like any of the ones that Photoshop has to offer, you can look for artistic actions (google search) that may give you a better drawing.

How to Make a Sketch inside a Photograph - sketch filter

Adding the hand

I took several images of my daughter holding a piece of paper. It’s good to get a large variety, and if you have the time, shoot in different lighting conditions as well.

How to Make a Sketch inside a Photograph - hands

Choose an image of the hand holding the paper. Open it in Photoshop and use the Quick Selection tool to select the hand and paper. It doesn’t have to be exact, as long as everything you need is selected. Once you have the hand on the image you can fine-tune it.

How to Make a Sketch inside a Photograph - selection of hand and paper

Press Ctrl/Cmd+C, then Ctrl/Cmd+V. This will copy and paste the selection onto a new layer (in the same document). However, if you go back over to your original image and pressCtrl/Cmd+V it will paste the hand onto your image as a new layer. Use the move tool, the top one in the tool bar.

How to Make a Sketch inside a Photograph

Size and position the hand

If you are lucky the hand will be the correct size, however, if it isn’t you may have to resize it. You might also have to change the angle. Free transform will allow you to do that, press Ctrl/Cmd+T to activate it. If you click on the corners you can make it bigger or smaller (hold Shift down to keep the proportions the same!). If you hover around the corners you will see a small curve appear with arrows on either end, this will allow you to rotate it to the desired angle.

How to Make a Sketch inside a Photograph - transform tool

The hand looks a little odd because it needs a shadow. Take note of your original image and how the shadow was placed. You also need to look at the main image, it will look a bit off if the light is coming from a different direction than the image of the hand.

Creating the drawing on the paper

To get the image on the piece of paper you need to ensure the layer that is the photograph is still not visible. It should still be invisible from when you did the drawing.

Add a mask to the layer with the hand and paper. At the bottom of the layers panel click on the mask icon, looks like a white rectangle with a round black circle in it. It should be down in the bottom right corner.

Next, make sure the layer mask is selected. If there are white lines around the outside of the mask (not the image thumbnail, it means the mask is selected.

Select the Brush Tool and make sure the foreground colour is set to black. Go down the tool bar and find the foreground and background colours. If white is on top click on the arrow above it to make it black (if other colors are showing hit D on your keyboard to set to the defaults of black and white).

How to Make a Sketch inside a Photograph

You could mask out the whole sheet of paper, or leave an edge around the image. For this tutorial, I left a border intentionally. Once you think you have gotten the whole image, press Alt (PC) or Option (Mac), and click the mask. You should then be able to see what you have masked – the black areas are the mask, so make sure there are no white spots left. Brush over any white bits and remove them. If you realize that you are painting white, then the foreground color is wrong. Press X and it will reverse the color so you can go back to painting with black.

How to Make a Sketch inside a Photograph

Putting the photograph back

Once you have the drawing showing through the paper, you need to make the photograph appear again. Click on the eyeball icon next to the image so it is visible. You will notice the whole drawing has disappeared, it is now behind the photograph. You will need to do another mask so you can see the drawing on the paper again.

The beauty of this image is that you can use the same mask that you used for the paper layer.

If you go to the layer mask that you used to show the drawing, press Ctrl/Cmd and click on the mask you will see it make a selection (marching ants around the selected areas). Press Ctrl/Cmd+C, to copy that selection. Then, make sure the photograph layer is selected and click the layer mask icon to create a new one. You should get a new layer mask the same as the other one. (Alternately you can click and hold Alt/Opt, and grab the layer mask from the paper layer and drag it over to the image layer. That will copy the same mask over for you).

How to Make a Sketch inside a Photograph

How to Make a Sketch inside a Photograph

It is time to remove the parts that don’t really belong. You can use the mask that you had for the hand layer. Use your brush tool and remember to make black the foreground colour. You can now mask out the parts of the hand that you didn’t mean to select when you did the quick selection (zoom in close, you can also use the refine edge function).

leannecole-drawing-tutorial-13

Fine tuning

The hand can look a little weird, so next you need to add a shadow that the hand would have created. This will make it more believable looking.

Add a new layer by clicking the icon at the bottom of the layers panel. It is the square outline with the folded corner, usually located next to the trash can. Alternatively, you can go to Menu > Layer > New Layer.

How to Make a Sketch inside a Photograph - new layer

You will need to use the lasso tool. It is also helpful to zoom in so you can see what you are doing. The zoom tool is also in the tool panel, or you can press the letter Z which will make it appear. Click the image to zoom in, or to zoom out press the Alt or Option key and click the image. (Note: Press B to get the brush back.)

On the new layer, draw under the hand with the lasso tool to get the shadow. You don’t have to be exact as it is not going to be really dark. Go up to Menu > Select > Modify > Feather. In the popup window enter the amount of feathering you want. 5 pixels was the setting selected for this image. Alternatively you can press Shift+F6.

How to Make a Sketch inside a Photograph

Add in the shadow area

Fill the selected area with black using the Paint Bucket Tool. Make sure that the foreground colour is black.

How to Make a Sketch inside a Photograph

You may need to add a mask to remove any parts of the hand that you don’t need. You can also change the opacity of the layer so the shadow isn’t as dark. The opacity slider is located at the top of the layers panel near the blending modes. Adjust to where you think the shadow looks natural.

How to Make a Sketch inside a Photograph

To deselect hit Ctrl/Cmd+D.

How to Make a Sketch inside a Photograph

The image is now done.

Conclusion

I don’t know how many of these you would do, but some of the techniques used to create it can be used for many other things. Try doing this tutorial a few times, then see how you can use some of the processes in different ways. Don’t forget to share your images so we can see what you have done.

googletag.cmd.push(function() {
tablet_slots.push( googletag.defineSlot( “/1005424/_dPSv4_tab-all-article-bottom_(300×250)”, [300, 250], “pb-ad-78623” ).addService( googletag.pubads() ) ); } );

googletag.cmd.push(function() {
mobile_slots.push( googletag.defineSlot( “/1005424/_dPSv4_mob-all-article-bottom_(300×250)”, [300, 250], “pb-ad-78158” ).addService( googletag.pubads() ) ); } );

The post How to Make a Sketch Inside a Photograph by Leanne Cole appeared first on Digital Photography School.


Digital Photography School

 
Comments Off on How to Make a Sketch Inside a Photograph

Posted in Photography