RSS
 

Posts Tagged ‘Photograph’

How to Photograph Flowers

01 Sep

I know what you’re thinking.  “Flowers?  Really?  Didn’t he just write about shooting football?”  As a matter of fact, I did.  I shoot lots of different things– a statement which frustrates the hell out of business mentors and advisers who like to talk about branding, creating your niche, and attracting the right kind of client.  And they’re right.  After all, clients want to know that you do precisely what they need you to do seven days a week and twice on Sunday.  Makes sense.  But I was a lawyer for fourteen years.  Photography was my hobby for a long time before I ever even thought of trading in my briefcase for a camera bag ten years ago.  So, yes.  We’re going to talk about photographing flowers– in many ways the ideal subject.  Flowers are pretty, but they don’t require a hair and makeup team on set.  They are neither moody nor volatile, and never cop an attitude.  They don’t require a specific brand of expensive water secretly bottled straight from a hidden stream in Madagascar, and they are never late for a shoot.  Never.

But seriously.  I love shooting flowers.  My wife is actually convinced that I buy them for myself and not her anymore.  She’s (mostly) wrong, but I do take advantage of them while I can.  As with so much of what we do in photography, there are at least two ways of going about this–  ridiculously expensive or affordable.   Guess which way we’re going.

dPS Flowers-001

IT’S NOT AS EASY AT IT LOOKS

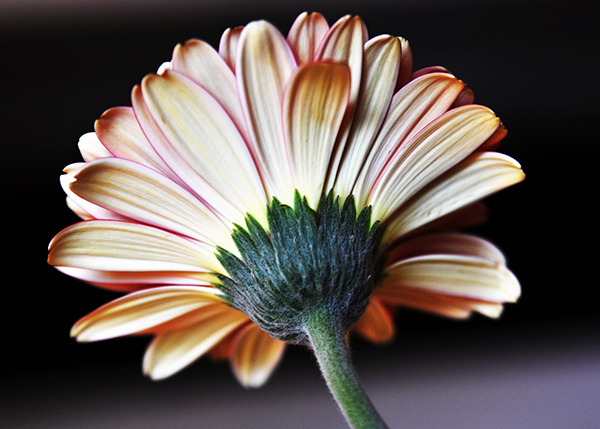
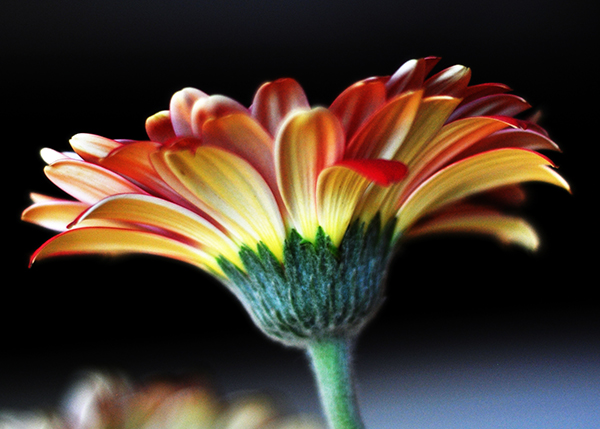
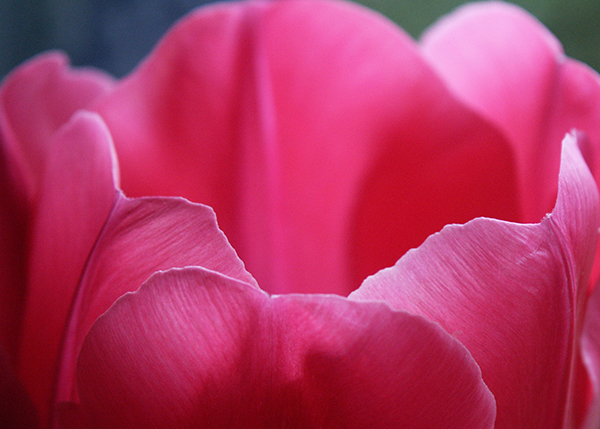
“How can it not be as easy as it looks?” you’re asking.  They just stand there perfectly still.  Get them near the light, push the button, we’re done, right?  Not so fast.  I was at a seminar one time where  Joe McNally said,  “If you want to take more interesting pictures, you need to stand in front of more interesting stuff.”  While I would never (EVER) presume to improve upon his wisdom, my own personal addendum to this guideline is, “But if you’re not going to stand in front of more interesting stuff, at least pick a more interesting angle.”  Six of us can stand around in a circle over the same flower, shoot straight down at it, and end up with six almost identical photos.  Boring, right?  Of course it is.  If you are going to stand an average distance from something, shooting it at an average angle with average camera settings, you are going to get average photos.  Personally, I’d rather not settle for average.  So get down low.  Shoot across it.  Shoot under it.  I actually really like photographing flowers from behind.  It’s not a mortal sin if you take that straight-down-the-middle shot.  No long arm of a photography god is going to descend from the heavens and snatch your camera away.  But promise me that once you take that straight-down-the-middle shot and get it out of your system, you’ll get down on your knees, or into a chair, or on your back, or anywhere else you need to be in order to achieve that interesting angle.

dPS Flowers-005

THE GEAR

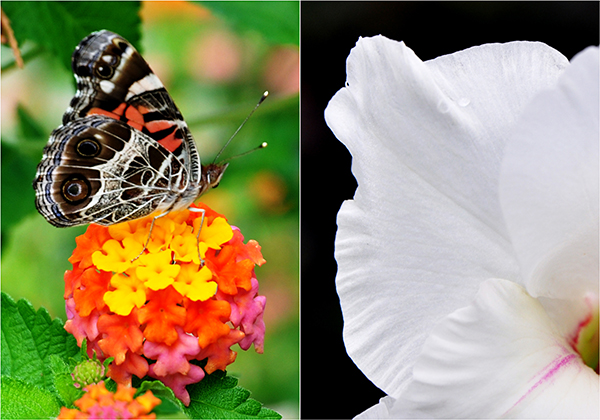
You’ll see some macro photographers really go all out on these images.   While a really good macro lens or a tripod with an inverted center column can help create some truly stunning images, they aren’t always necessary.  Regular zooms can serve you just as well.  Every photo in this article was taken hand-held with one of three lenses: Nikon 24-70mm f/2.8, Nikon 18-70mm f/3.5-4.5 (GASP! A kit lens!), or my iPhone.  Never underestimate the value of a tripod for this kind of work.  I don’t often use one because I tend to have pretty steady hands, but having a tripod on hand is never a bad thing.  Nature tends to provide some pretty great backgrounds, but isolating a single flower on a black or white background can often make for some very compelling images.  A yard or two of black velvet from a fabric store or a poster-size piece of white foam core from an office supply store are simple, effective, and very budget-friendly options for getting that high-contrast look, indoors or out.  You could waste a lot of time creating these backgrounds in Photoshop, by why would you when the in-camera solution is so much easier?  The last piece of gear you’ll find useful is very high-tech.  A spray bottle with water will let you fake that just-rained-on look.  Just make sure it’s set to a fine mist, rather than a full spray.

dPS Flowers-002

START SHOOTING

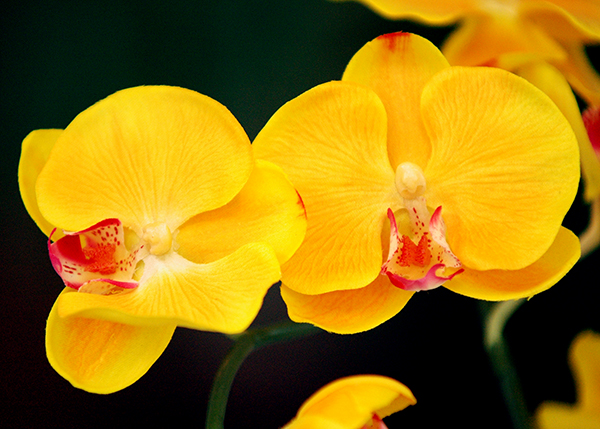
As with any photo, finding the right angle only gets you halfway there.  Don’t forget everything you know about composition.  The usual considerations– Rule of Thirds, negative space, balance, etc.– all still come into play.  One of the advantages of a regular zoom lens over a macro is that by filling the frame with your flower subject, it becomes that much easier to blur out your background.  Start by focusing on one particular flower or a small cluster of flowers in the arrangement.  As you lock focus you will see the depth-of-field effect in your viewfinder.  Make sure that you don’t overdo it on the DOF.  Depending on your composition and camera settings, you could easily blur out your foreground.  Start with your widest aperture. but make sure you try several different combinations of aperture and shutter speed.  Your model is not going to get bored and give you a hard time.  Take advantage of this chance to achieve the look you want.  Remember that sometimes the whole is not always as interesting as its individual parts.  Focus in on details and textures.  Make it interesting.

dPS Flowers-003

HOW AND WHEN TO LIGHT IT — INDOORS AND OUT

Ultimately, diffused natural light is always at the top of my wish list.  Direct sunlight is going to blow out the subtleties and textures you’re trying so hard to capture.  As with all indoor lighting, time is less of an obstacle than when you shoot outside.  Outdoor light doesn’t care if you are photographing flowers, portraits, or a football game.  Light is light and its properties don’t change.  Just like we get the best portrait and landscape light right after the sun comes up and just before it goes down, the same goes for flowers.  We really want that soft, beautiful light to enhance these images, not overpower them.  For that, nothing beats an overcast or cloudy day– Mother Nature’s very own soft box.  For inside, use the biggest window you can find.  The side-lighting it provides will add more dimension than flat lighting from above the flower.  Whatever you do, experiment with your light.  Pay attention to where it falls and the shadows it creates.  You can also be sure that patience and time spent here will dramatically benefit your portrait work as well.

DCF 1.0

TAMING THE WIND

As much as I try to never take my camera out of Manual mode, an argument can be made that exposure modes are there for a reason.  This would be one of those.  When shooting outside, even the slightest breeze can give you fits.  Try switching you camera into shutter priority mode and dial in a shutter speed of 1/250 or faster.  The fast shutter speed should negate the effects of the breeze.  I’m not a huge fan of exposure modes and relinquishing control of my settings (one reason why we’re not talking about your camera’s macro setting in this article), but this is a simple and effective way to remove one of the obstacles in your path.

dPS Flowers-007

POST PROCESSING

My philosophy on editing these images is the same as my approach to portraits.  If you read my post on Basic Skin Smoothing in Photoshop, you know that when people look at my photos I want them to say, “That’s a beautiful ______,” not “Wow, nice editing.”  A slight levels adjustment and contrast bump should really be all they need.  Anything much stronger than that is going to come dangerously close to wiping out the texture and any of the natural feel to the overall image.

dPS Flowers-004

Now go buy some flowers and let me know how it goes.

Post originally from: Digital Photography Tips.

Check out our more Photography Tips at Photography Tips for Beginners, Portrait Photography Tips and Wedding Photography Tips.

How to Photograph Flowers


Digital Photography School

 
Comments Off on How to Photograph Flowers

Posted in Photography


How to Photograph Mixed Skin Tones

29 Aug

by Elena Wilkins

If you ever had my family as your clients, you could feel a tad lost at how to photograph us. Why? Well, there are three of us, and we come in a wide range of skin tones—from my fairly light skin, to my husband’s, pretty dark and handsome; our child fits right in between. We are a true colored family—a perfect fusion of all tones—a photographer’s conundrum, or, maybe even, a nightmare!

Who do you expose for? The mom? The child? Or the father? All three of us would need different camera settings… or a few tricks to make magic happen.

Because very few photographers get enough experience to properly shoot families like mine, or people of darker color in general, and even fewer know to properly process such images to perfection, we always find it hard to find the “perfect” photographer for us. I remember the first time I organized a multi-photographer photo shoot in the Northwest (Washington State), and brought my husband to it—he was everyone’s favorite model to practice on, since he happened to be the very first person of darker hue for most of the photographers at the event. Since I am the photographer and often the subject in our family images, I have been able to perfect these skills.

In this post I will share a few of my tricks, which helped me successfully satisfy not only my picky taste, but many of my darker complexion clients, as well as families, much like mine, with mixed skin tones.

But first, meet my colorful family.

My perfect child. It is the mother’s right to think that her child is the cutest and most perfect :) .

How-to-Photograph-Mixed-Skin-Tones-5

The beautiful duo—both loves of my life.
How-to-Photograph-Mixed-Skin-Tones-4

How-to-Photograph-Mixed-Skin-Tones-3

Things to keep in mind for this post:

  1. as a photographer, I use only natural light—I shoot almost exclusively outside, on location, and barely ever use fill flash, even with darker skin people;
  2. studio techniques for photographing people of color or mixed skin tones might be slightly different—I will not be covering them in this post;
  3. I do not use reflectors, since I shoot solo, but they might be helpful, if you have an assistant;
  4. I shoot RAW, so that I could easily adjust highlights and shadows in post processing;
  5. when I refer to people of color, I mean ALL people, since all of us are of some color :) ,
  6. I live by a motto: get images right in the camera as much as possible to cut down on post processing time—I usually spend no more than 30-60 seconds per image in post processing.

5 Tips and Tricks to Photograph People of Color

1. It’s all about clothing

If at all possible, I ask my dark skin complexion clients not to wear white clothing. It makes life easier. In cases of wedding, as you can imagine, this is not an option. Sometimes I do have clients who want to be wearing white clothing specifically—I never say no! I will discuss how to make those images magical in post processing shortly.

During my initial consultation with clients, we discuss best clothing options for the shoot, depending on the look we want to achieve and the mood they want to create. Often my clients come with a few sets of clothing to the shoot and a wide range of jewelry (for the ladies, and I help them coordinate to create the best, and the most magical images.

I coordinated every piece of clothing and accessories for this shoot, at my client’s request

I coordinated every piece of clothing and accessories for this shoot, at my client’s request

2. Away from Bright Lights

I love to shoot either early in the morning or in the evening, when the sun goes down, lavishing its golden rays to create perfect magic. In cases, especially with weddings, if that is not an option, and I have to shoot in the afternoon sun, I look for evenly shaded areas, so there is no competition between the natural light and my subjects’ skin. If all else fails, I do use fill flash.

This image was shot in an evenly shaded area, away from harsh light. I exposed for Francesca’s face.

This image was shot in an evenly shaded area, away from harsh light. I exposed for Francesca’s face.

3. Expose for the Skin

When shooting a darker skin complexion person, expose for the face. Get the face right, and the rest of the image will fall into place.

If she is wearing complimentary colored clothing, concentrate on getting perfect skin tone, so you won’t need to spend too much time in post processing, and also have something to show your client during the shoot to inspire her with her beauty.

Courtnee’s face was my focus; the brick, as gorgeous as it is, was easily darkened back to its beauty in post processing with a quick action and a few brush strokes

Courtnee’s face was my focus; the brick, as gorgeous as it is, was easily darkened back to its beauty in post processing with a quick action and a few brush strokes

4. Balancing Whites and Darker Skin Tones

If your clients are wearing light clothing, especially true with weddings, make sure not to blow out highlights, so you can adjust it in post processing. This is why I shoot RAW, without exception, when it comes to weddings. I want to make sure I still can tone down my whites in post processing.

In these images I focused on my clients’ faces, making sure not to blow out whites, so I would still get detail in the dress, the shirt and the veil in post processing. In post processing, I used Bridge/Camera Raw, I brought down highlights and whites, bumped shadows, and then finished magic in Photoshop, selectively processing areas of the images that needed extra attention.

In these images I focused on my clients’ faces, making sure not to blow out whites, so I would still get detail in the dress, the shirt and the veil in post processing. In post processing, I used Bridge/Camera Raw, I brought down highlights and whites, bumped shadows, and then finished magic in Photoshop, selectively processing areas of the images that needed extra attention.

In these images I exposed for Candice, since she was the focal point of the images, and ensured that whites were not blown out, so they could be fixed, if needed, in post processing

In these images I exposed for Candice, since she was the focal point of the images, and ensured that whites were not blown out, so they could be fixed, if needed, in post processing

In this image of my little girl, she was facing away from direct light, I made sure to get her face just right, in camera, which left some of the highlights in her dress just a tad too bright. Not to worry! I was able to fix that in post processing, in less than 20 seconds!

In this shot, since she was facing direct light, I made sure not to blow out highlights, so, her face turned out a tad darker, but the dress was not blown out. In post processing I lightened the face and darkened the dress. The image turned out magical, although she might not have been too happy to be interrupted for the image during her playtime.

In this shot, since she was facing direct light, I made sure not to blow out highlights, so, her face turned out a tad darker, but the dress was not blown out. In post processing I lightened the face and darkened the dress. The image turned out magical, although she might not have been too happy to be interrupted for the image during her playtime.

I will mention actions used in processing these two image at the end of the post

I will mention actions used in processing these two image at the end of the post

5. Go for the Mid-Range: Photographing Mixed Skin Tones in the Same Image

If you are photographing people of different skin tones in the same image, go for the mid-range; the rest can be adjusted in post-processing. I always make sure that the lightest person is not too light, while the darkest person is not too dark. If the lightest person turns out too light, you might have a case of blown highlights, and no Photoshop tricks will fix that. If the darkest person turns out too dark and you will try to adjust it in post processing, there might be too much digital noise on that person’s face, compared to the rest of the image.

When I photograph my husband and myself, I usually take a couple of test shots to make sure I do now pale completely next to him. Having over ten years of experience, however, these days I normally do a quick test shot with just him in it, since I know how I would look next to him.

When I photograph my husband and myself, I usually take a couple of test shots to make sure I do now pale completely next to him. Having over ten years of experience, however, these days I normally do a quick test shot with just him in it, since I know how I would look next to him.

Magic Happens in Post Processing

How to Post Process Images with Mixed Skin Tones

While batch processing is the best thing since sliced bread, as you can imagine it is not always possible in situations such as I just described. Batch post-processing can be done only to a point—you could not just throw all images of clients with mixed skin tones into Lightroom and have magic happen. Some selective image post-processing (processing only parts of the images) will need to be done.

Most of us are visual people, so instead of trying to explain something with a thousand words, I created a ten minute video to show you how I photograph and post-process images of clients with mixed skin tones to perfection.

How to Photograph Mixed Skin Tones from Elena Wilkins on Vimeo.

Here are the images used in the video, and, as promised, a list of actions I used in post-processing.

How-to-Photograph-Mixed-Skin-Tones-2

Actions used:

  • Boost action from Pioneer Woman Set 1 (used to boost tones for the entire image)
  • Touch of Light | Touch of Darkness by MCP Actions (used selectively)
  • MCP High Definition Sharpening action by MCP Actions (used for the entire image)
  • Polished Picture Sparkling Eyes by Polished Picture (used to sharpen eyes only)
same set of actions used to process this image

same set of actions used to process this image

In the two images of my little girl, after adjusting them in Bridge/Camera Raw (I decreased highlights to -82, bumped up shadows by +50 and added contrast at +24), I used the same actions as in these images, with an addition of:

  • Polished Pictures Funky Curves (Ruby curve at 40% and Matte curve at 25%, I then painted back her face at 60%).

I hope that having read this post you will feel more equipped to photograph people of color and know how you can create magic in post-processing.

Happy Shooting!

Elena Wilkins is a lifestyle and wedding photographer. Since becoming a Mom, she took a break from full-time photography, concentrating on raising her baby and running a health and nutrition blog Vegalicious, which is filled with images of delicious foods and her colorful family. She still photographs occasional weddings and sessions, dedicating herself to serving people who need her expertise the most—people of color and families with mixed skin tones. She is getting ready to relaunch her photography web-site, Color Fusions, which she will dedicate to sharing tips and tricks of the trade, and serving her colorful clients.

Post originally from: Digital Photography Tips.

Check out our more Photography Tips at Photography Tips for Beginners, Portrait Photography Tips and Wedding Photography Tips.

How to Photograph Mixed Skin Tones


Digital Photography School

 
Comments Off on How to Photograph Mixed Skin Tones

Posted in Photography


Sharon Montrose Answers What It’s Like to Photograph Lions and Other Incredible Animals

15 Aug

When was the last time you got to snuggle a wolf puppy at work?

Never? Us neither. Sharon Montrose, on the other hand, can raise her hand to that one (and we’re green with jelly).

Sharon’s the photographer behind The Animal Print Shop. You might’ve spotted her portraits of wide-eyed baby giraffes, raccoons looking smug, and baby bears being baby bears.

We asked about how she discovered her awesome talent for photographing animal personality and what working commercially is all about.

While wolf pups might not be next up on your model list, you’ll get inspired to sit your pet down for a session!

Sharon Montrose on Animal Photography

p.s. We’re hiring for an amazing opening at Photojojo. We’re looking to re-invent what/how/where we publish online, and we’re seeking one amazing somebody to lead the charge as Editorial & Community Lead.

Who is Sharon?

The first time we heard about Sharon, she was snapping a baby giraffe in this Etsy interview. That’s when we knew that she probably had the best job in the world.

Sharon’s an acclaimed animal photographer who happened upon her talent for capturing portraits of animals when she was inspired to photograph her own dog one day (read more about that in the interview).

While she shoots dogs and cats commercially (you’ve probably seen her photos on billboards), Sharon has had the opportunity to work with less common animals like bear cubs, ostriches, and flamingos in her personal photography. This project is what became her Animal Print Shop series. Read about where the animals come from here.

Looking through Sharon’s portfolio is a roller coaster ride of awwww and is that real! and dang, she’s inspiring. Read on to learn more about how Sharon got started and what gets her inspired.

Is photographing large animals intimidating?

Q: You’ve photographed buffalo, cows, giraffes, lions even! Is it intimidating to stand in front of an animal that large with your camera?

A: No. I’m naturally a somewhat fearful person, but I when I get behind the lens, my fear is goes away–I think I’m too distracted getting my shot to be afraid. 

How do you get great photos of wiggly subjects?

beforeQ: So, kittens and puppies aren’t known for their sitting-still-in-one-spot skills. How do you manage to get great photos of them regardless?

A: Patience and timing. With animals that move around a lot, you have to be ready and focused to hit the shutter in that split second when they stop.

How many shots does it take to get that one photo?

beforeQ: When you’re shooting for your Animal Print Shop series, how many shots does it take to get that one incredible photo?

A: It really depends on the animal–if it’s a calm animal (like a cow) who will just stand there and look around, I can get my shot in a couple frames. Others though, like little lion cubs, are running all over the place and take some serious time and patience.

How did you get into animal photography? before

Q: Did you know you wanted to get into animal photography off the bat? If not, what was getting there like?

A: At first I had a very tough time turning what I loved doing into a way to earn a living. I floundered before I became established as a working photographer. I was shooting headshots and weddings and doing okay at it, but I wasn’t happy doing either and had lost the love I had for photography.

Around the same time, I adopted my first dog (several members of my family also had dogs), so I started taking photos of all the dogs in my life to see if it reignited the love I once had for photography. It did, and I learned an important lesson as a result: I had to have an authentic connection with my subjects.

Shortly afterwards I began work on my first book Dogtionary (Viking Press 2001). The book came after many failed attempts at marketing myself as a private party pet photographer. Back in 1998 people didn’t spend money on their dogs like they do today.

The book (and subsequent books) established me in my niche because the internet was still new, so being published was more productive in those days and there were very few published photographers with dog books in the United States. There were only a handful of us in the shadows of the great William Wegman, Elliot Erwitt, Henry Horenstein, and Keith Carter. I think it was me, Jim Dratfield, Kim Levin, Valerie Shaff, Sharon Beals, Deborah Samuel, Jeff Selis, and Debra Marlin. If I forgot someone, I’m human, please don’t send me hate mail.

Can you describe a shoot in 5 steps?

beforeQ: Can you describe a shoot (let’s say one from your Animal Print Shop series) in 5 steps? Give us an idea of what happens start to finish!

A:
1. Phone calls: Reaching out to my contacts to see if there’s anything out there for me to photograph.
2. Production: Coordinating the logistics and equipment for the shoot.
3. Shoot day: The best day!
4. Editing, post production, and test printing.
5. Producing Materials for New Release: Producing product shots, printing inventory, and adding the new release to the site, plus marketing efforts.

What is having a professional team like?

Q: What is having a professional team like? Are you ever like, “I wish it was just me?” 

A:never wish it was just me. I literally couldn’t do what I do without my team–I’m very lucky to have them.

What didn’t you realize you would be doing?

beforeQ: You’re pretty much running your own business as a photographer. What do you do a lot of now that you didn’t realize you would be doing when you started?

A: Answering questions about myself in interviews. I take my work seriously, but I don’t take myself seriously–so it’s a weird challenge.

How much creative free-reign do you typically get?

beforeQ: In commercial photography how much creative free-reign do you typically get? We’re guessing you’re working with clients’ marketing teams and maybe stylists — how collaborative is it?

A: It’s always a collaborative effort to get the shot, sometimes with many different creatives coming together: creative director, set decorator/prop stylist, production, and my crew.

If I have been selected for a job by a creative team, it’s because they like what I do and believe I can nail their comp, so it’s inherently collaborative.

Usually after we’ve been successful at getting their comp and the client is happy, I’ll shoot variations and freestyle a little to get extra options and make sure they have everything they need — that’s where I get free-reign. And sometimes they end up using those shots instead or in addition to the original concept.

Who are your top 3 favorite photographers?

Sally Mann, Robert Mapplethorpe, Edward Weston.

Where or who is your favorite inspiration? 

beforeQ: When you want to photograph your own stuff, where or who is your favorite inspiration? 

A: Honestly, it’s hard to shoot my own stuff now since I’m so busy running The Animal Print Shop. Inspiration does strike though, and I usually just pull out my iPhone to take a few snaps. It’s usually of my dogs or my crew messing around at the shop to post on Instagram.

Unless I’m in my most favorite place on earth: Yosemite. There you will find me somewhere along the Merced River in all my photo glory looking like a total Ansel Adams wannabe, photo-geek. True story.

Do you have any favorite phone photo apps or tips?

beforeQ: We see you’re on Instagram. (OMG wolf puppy!) Do you have any favorite apps or tips?

A: I like VSCOcam and Squareready. But don’t ask me, I’m old.


Related posts:

  1. How to Photograph the Holidays — From Around the Web Points of Interest Got ideas for great New Year’s Photo…
  2. Photograph Your Friends From Five States Away! Relationships, fragile packages, our feet. Long distance is hard on…
  3. How to Photograph the Galaxy…in 3D! The minute Richard Branson’s Virgin Galactic takes off, you’ll be…


Photojojo

 
Comments Off on Sharon Montrose Answers What It’s Like to Photograph Lions and Other Incredible Animals

Posted in Equipment


Portrait Photography: How to Photograph People in the Harsh Midday Sun

13 Aug

By: Oded Wagenstein

Great tips and tricks on overcoming the harsh mid-day sun to create beautiful portraits on either side of the “golden hours”

The Golden Time

The best time to take almost any kind of  picture, is in the “golden hours”: around one hour before sun down and one hour after sunrise, because that’s when the light is at its softest, lacking hard shadows, rich in colors, bathing your subject in even light, which entering from the side and that gives your subjects face definition.

-Uzbekistan-  Canon EFS 17-55mm f/2.8  Fstop of 3.5, shutter speed@10 ISO 160

-Uzbekistan-
Canon EFS 17-55mm f/2.8
Fstop of 3.5, shutter speed@10 ISO 160

-Tajikistan- Canon EFS 17-55mm f/2.8 Fstop of 5.6, shutter speed@15, ISO 200.

-Tajikistan-
Canon EFS 17-55mm f/2.8
Fstop of 5.6, shutter speed@15, ISO 200.

-China - Canon EFS 17-55mm f/2.8 Fstop of 2.8, shutter speed@10 and ISO 400 Natural light (sunrise) entering the frame from the right

-China –
Canon EFS 17-55mm f/2.8
Fstop of 2.8, shutter speed@10 and ISO 400
Natural light (sunrise) entering the frame from the right

-Tajikistan- Canon EFS 17-55mm f/2.8 Fstop of 5.6, shutter speed@10 and ISO 100 Natural light (sunrise) reflecting from the mountains, which are about 45 degrees to the woman (you can see it in the window).

-Tajikistan-
Canon EFS 17-55mm f/2.8
Fstop of 5.6, shutter speed@10 and ISO 100
Natural light (sunrise) reflecting from the mountains, which are about 45 degrees to the woman (you can see it in the window).

Once this time (golden time) has passed, we are left with harsh, unflattering light that is low in saturation and makes the images look dull and flat as you can see in this photo:

-India- Canon EFS 17-55mm f/2.8 Fstop of 8, shutter speed@10 and ISO 100 The harsh mid-day sun is just above him.

-India-
Canon EFS 17-55mm f/2.8
Fstop of 8, shutter speed@10 and ISO 100
The harsh mid-day sun is just above him.

The Problem

In order to provide solutions, first let’s understand the “problem”: Your camera doesn’t see as well as your eyes.  The “problem” is the camera’s dynamic range.  In plain English, the dynamic range is the distance between the brightest and darkest points in the frame.  Let’s say you take a shot of a man wearing a hat in the middle of the day, when the sun is at its highest and harshest. Your eyes will be able to make out his eyes even under the shadow of his hat, as well as his chin in the strong daylight. That’s because your eyes have the ability to see a large dynamic range.

Your camera however has a far more limited ability to see the dynamic range .If you we go back to our man in the hat, your camera will see his eyes, which are in shadow under his hat as black, while his chin which is in strong sunlight will be blown out and very white.

You might try to “fix it” by changing your aperture/shutter or ISO parameters but, this would only make your image lighter or darker as these actions have no bearing on the dynamic range. Even if we try to use an ND filter, again, this would only make your image darker and would not solve the problem or alter the range.

The Solutions

Move to the shade
Try moving the subject to the shade, or perhaps indoors. When I asked Steve McCurry, the creator of the “Afghan Girl” image, how he works in the mid day sun, he told me that he prefers to work indoors with the harsh light coming in through a window so that it turns to soft even light, and that’s really change my way of “seeing” the harsh light as an opportunity of creating great images by moving to the shade or indoors.

-Thailand- Canon EF 24-70 mm f/2.8L Fstop of 3.5, shutter speed@10 and ISO 160 This woman is sitting in the shade with strong light coming from the street (to her left). A small piece of paper was held above her head to block the light (flag).

-Thailand-
Canon EF 24-70 mm f/2.8L
Fstop of 3.5, shutter speed@10 and ISO 160
This woman is sitting in the shade with strong light coming from the street (to her left). A small piece of paper was held above her head to block the light (flag).

Try turning your subject 45 degrees to the light source (exp: window) by doing so you will be able to create a nice 3D effect.

-Uzbekistan- Canon EFS 17-55mm f/2.8 Fstop of 2.8, shutter speed@10 and ISO 500 Natural light (only) coming from the window on the left side of the frame (about 45 degrees)

-Uzbekistan-
Canon EFS 17-55mm f/2.8
Fstop of 2.8, shutter speed@10 and ISO 500
Natural light (only) coming from the window on the left side of the frame (about 45 degrees)

-Laos- Canon EF 24-70 mm f/2.8L Fstop of 3.5, shutter speed@100 and ISO 1000 I used the soft light coming through a red robe which was on the right side of the frame, in order to "sculpture" the light on his face. It also gave the whole image some sort of orange glow.

-Laos-
Canon EF 24-70 mm f/2.8L
Fstop of 3.5, shutter speed@100 and ISO 1000
I used the soft light coming through a red robe which was on the right side of the frame, in order to “sculpture” the light on his face. It also gave the whole image some sort of orange glow.

Create a Silhouette

Expose your image from the background, so your subject becomes a silhouette in some cases it makes for a wonderful image.

You can do so by using the manual exposure (M mode) or by changing the metering mode to spot and measure from the background.

-Thailand- Canon EF 24-70 mm f/2.8L Fstop of 5, shutter speed@10 and ISO 100 (on spot metering) Natural light only

-Thailand-
Canon EF 24-70 mm f/2.8L
Fstop of 5, shutter speed@10 and ISO 100 (on spot metering)
Natural light only

Burn it Down

Burning the background is not always a bad thing. On the contrary it creates a unique portrait that’s different and interesting

-India- Assistant: Hardik Pandya Canon EFS 17-55mm f/2.8 Fstop of 4.5, shutter speed@10 and ISO 200 Natural light only

-India-
Assistant: Hardik Pandya
Canon EFS 17-55mm f/2.8
Fstop of 4.5, shutter speed@10 and ISO 200
Natural light only

Reflector

By using a reflector, you can minimize the light range by bouncing light back onto your subject, which will add light to the dark areas. Like this image below.  I used a small folding reflector, which I held in my hand while taking the photo.

-Tajikistan- Canon EFS 17-55mm f/2.8 Fstop of 8, shutter speed@10and ISO 100 Natural light+ Reflector (gold color) I held in my hand on the lower left side of the frame + warm natural light bouncing off the mud wall

-Tajikistan-
Canon EFS 17-55mm f/2.8
Fstop of 8, shutter speed@10and ISO 100
Natural light+ Reflector (gold color) I held in my hand on the lower left side of the frame + warm natural light bouncing off the mud wall

-India- Assistant: Hardik Pandya Canon EFS 17-55mm f/2.8 Fstop of 2.8, shutter speed@10 and ISO 100 This nice lady was sitting in the shade of her house + silver color reflector, coming from the right upper side of the frame.

-India-
Assistant: Hardik Pandya
Canon EFS 17-55mm f/2.8
Fstop of 2.8, shutter speed@10 and ISO 100
This nice lady was sitting in the shade of her house + silver color reflector, coming from the right upper side of the frame.

External Flash

Like the reflector, the flash will add more light to the dark areas in turn creating a smaller dynamic range.

-India- Canon EFS 17-55mm f/2.8 Assistant: Hardik Pandya Fstop of 9, shutter speed@10 and ISO 100 Natural light of the background sky + fill light flash (off camera and inside a small soft box) coming from the right side of the frame, about 1 meter in front of the man's face.

-India-
Canon EFS 17-55mm f/2.8
Assistant: Hardik Pandya
Fstop of 9, shutter speed@10 and ISO 100
Natural light of the background sky + fill light flash (off camera and inside a small soft box) coming from the right side of the frame, about 1 meter in front of the man’s face.

HDR

Taking 3 (or more) exposures of your subject and using this technique in post processing could come in very handy.

-India- Canon EFS 17-55mm f/2.8 Assistant: Hardik Pandya Fstop of 11, shutter speed@10 and ISO 100 Natural light of the background sky + fill light flash (off camera and inside a small soft box, coming from the left side of the frame) + HDR effect in Photoshop.

-India-
Canon EFS 17-55mm f/2.8
Assistant: Hardik Pandya
Fstop of 11, shutter speed@10 and ISO 100
Natural light of the background sky + fill light flash (off camera and inside a small soft box, coming from the left side of the frame) + HDR effect in Photoshop.

I would like to thank Hardik Pandya and Linda Burnette for their help on making this article.

Do you have any interesting techniques or methods to overcome the harsh light? Please share in the comments.

Oded Wagenstein is a Travel photographer and writer. He is a regular contributor to the National Geographic Traveler magazine (Israeli Edition) and he is known for his intimate culture portraits. You can join his Portrait & Travel Photography blog and continue to discuss on travel and people photography and get more amazing tips!

Post originally from: Digital Photography Tips.

Check out our more Photography Tips at Photography Tips for Beginners, Portrait Photography Tips and Wedding Photography Tips.

Portrait Photography: How to Photograph People in the Harsh Midday Sun


Digital Photography School

 
Comments Off on Portrait Photography: How to Photograph People in the Harsh Midday Sun

Posted in Photography


29 July, 2013 – Why Do We Photograph

29 Jul

Today’s new article is an essay by regular contributor, Alain Briot. It is titled Why Do We Photograph?, and if the fourth part of a continuing series.


The Luminous Landscape – What’s New

 
Comments Off on 29 July, 2013 – Why Do We Photograph

Posted in News


How to Photograph a Kiss without the Awkwardness

16 Jul

Is this real life or are you in a Taylor Swift music video? You’re in the middle of one of the best kisses of your life!

Amidst the fireworks, stars, and confetti, you catch a glimmer off a camera lens five inches from your face, followed by the sound of a shutter. Moment. Ruined.

Cameras might be notorious kiss-ruiners, but they don’t have to be! Our pal Haley Sheffield is a fantastic wedding photographer who’s a master at capturing kisses that look real, natural, and downright beautiful.

Haley’s tips will show you how to get your couple comfortable and how to direct them to get the best kissing photo possible. Most couples aren’t used to kissing in front of a camera, but they’ll be on-camera kissers in a no time.

Now you can have the best kiss of your life and catch it on camera, too.

Tips for Snapping the Perfect Kiss

p.s. We’re looking to re-invent what/how/where we publish online, and we’re seeking one amazing Editorial & Community Lead to lead the charge.

p.p.s. We’re still on the hunt for an awesome sauce Buyer for the Photojojo Shop. Is it you? Go here.

Why Eliminating Awkwardness Makes for Better Kisses

In my past couple of years as a wedding photographer, I’ve read several articles by some of the industry’s top photojournalists and thought I should be more of a fly-on-the-wall. I’m not giving my clients the room or the opportunity to let those natural moments happen.

Well, that the fly-on-the-wall approach is great in theory and–hey–it works for some people, but you know what I got from it? Photographs of fish-lipped kisses and near-make-out sessions.

In my experience, if you step back thirty feet and tell your clients to “do whatever feels natural”, your clients are not going to look like they just jumped out of a Ralph Lauren ad. They’re going to look uncomfortable. Or maybe a little too comfortable. In their heads, they look like every romance movie they’ve ever seen. In their heads, it’s perfect and magical and worthy of an Oscar.

I want my clients to look at photos of themselves and think, “We look awesome. We look in love. We look happy.” There’s nothing unnatural or inorganic about giving a little bit of direction.

So, if you’re wanting to photograph a kiss without the awkwardness, here are a few tips I’ve developed over the years.

1.HUMOR

If you’re funny, use it to your advantage.

Ask the clients to kiss and then crack a joke as they lean in. You’ll get this beautiful laugh/kiss/smile combo in a natural moment, and probably a sweet kiss with a little extra smirk. Unfortunately, I’m not that funny. So I most often use tip number two.

2. THE SIGNATURE KISS-AND-SMILE

I always, always love a good almost-kiss more than full lip-on-lip action.

There’s something about an almost-kiss or a post-kiss shot that lends to the idea that you’ve really captured a moment in time instead of simply asked the clients to kiss and snapped a picture of it.

This is pretty simple: Ask your clients to hug. Position their arms and hands in flattering pose (if this didn’t happen naturally). Then, ask them to kiss a few times and smile in-between.

It feels goofy, and there will be a little bit of nose-bumping and awkward timing (where one is kissing while the other one is smiling, etc.), but that will lend to an even better almost-kiss smile.

I normally start by saying “Alright, let’s do some kisses and smiles,” and then fire off a few shots until I get a good laugh from the couple. If it doesn’t induce laughter, I’ve found that it often creates this sweet flirtatious moment between them–almost like they’ve forgotten about me for a short time (which is always a good thing).

3. STEP BACK

beforeWhile I feel like my favorite kissing shots have ended up being the close-ups, your clients will always be more comfortable if you start off by giving them space.

So, in the cycle of shooting a kiss, pose or set-up the clients first, tell them you’d like them to kiss-and-smile for a little bit, then back up a good 20-30 feet and photograph them from far away.

This is a great time to get that landscape shot. I often photograph the kiss (and most poses/moments) in this order: landscape, full-body, ¾ body, and close-up.

4. DON’T BE AFRAID TO GIVE DIRECTION

beforeListen. Some people are just awkward. They smush noses or keep their eyes open or kiss like a face-eating-Zombie.

While it can be really uncomfortable to correct a kiss, sometimes you just have to do it.

Tell the clients to tilt their heads instead of smushing noses. If the girl is insecure about her nose, get her to tilt her head away from you.

Ask them to kiss softly if they’re getting a little too sloppy. Say “alright, this time let’s try that again, but both of you close your eyes.” Eliminate the weirdness in the beginning, so you don’t go home from the session praying there was just one frame without the groom’s eyes open.

5. USE MOVEMENT

beforeOftentimes, I’ve realized that clients stiffen up when you put them in uber romantic pretzel-poses.

As rad as the Spiderman kiss is, your clients aren’t Spiderman. They’re not used to hanging upside-down and maintaining a suave composure.

Try to loosen them up by asking them to walk hand-in-hand towards you, and then throw them off by asking them to steal a kiss while they’re walking.

If the couple is right for it, you can ask the guy to hug the girl and spin her around in a circle while exchanging some kisses and smiles.

One of the smallest movements that I’ve found makes a HUGE difference in kiss pictures, is to ask the groom to gently place his hand on the bride’s neck and softly brush her face with his thumb. I normally ask them to do this for a few moments without kissing–just forehead-to-forehead and with their eyes closed.

It really brings their attention into each other, and puts me on the outside just documenting the moment.

OTHER PORTRAIT TIPS

  1. Start out the session by asking the clients how they normally cuddle. Do they normally walk while holding hands? Does she normally wrap her arms around his arm and rest her head on his shoulder? Does he normally place his hand at a certain spot on her back?
  2. Create moments that bring them close, and lessen their time staring into the camera. I often ask my clients to get it really close–like nose-to-nose or forehead-to-forehead–otherwise it looks like they’re avoiding bad breath. (And that joke normally brings on a few chuckles). Sometimes I’ll ask them to walk and try to keep on looking at each other–only looking at the ground if they feel like they’re going to fall, but never looking up at me.
  3. Be yourself. I’m not really a funny girl, and I can be exceptionally calm while photographing (instead of the “YES! YES! Work it, work it!” approach, I’m often exclaiming “Oh, that is just beautiful.”). I don’t know that either approach is better, but I do know that my clients feel way more comfortable in front of my camera now than they did when I was putting on my pseudo-photographer personality. Just be you. Whatever that looks like. It will make them more comfortable being them.

Related posts:

  1. How to Photograph the Holidays — From Around the Web Points of Interest Got ideas for great New Year’s Photo…
  2. How to Photograph Lightning ~Have a cool photo product or site? Reach 270,000 photo…
  3. Schlieren Photography: How to Photograph the Invisible ~Have a cool photo product or site? Reach 270,000 photo…


Photojojo

 
Comments Off on How to Photograph a Kiss without the Awkwardness

Posted in Equipment


Get A Kick: Photograph Soccer!

22 Jun
I moved out to the sideline for this shot.  Right around the 18 yard line is a great place to stand and turn back to the goal for the action there. Canon EOS-1D X, EF 200-400 f/4L IS Extender 1.4X. 1/1000, f/5.6, ISO 800.

I moved out to the sideline for this shot. Right around the 18 yard line is a great place to stand and turn back to the goal for the action there. Canon EOS-1D X, EF 200-400 f/4L IS Extender 1.4X. 1/1000, f/5.6, ISO 800.

I spent a good portion of my career photographing sports, from children all the way up through the pros. One of the most challenging sports to photograph was soccer (football or futbol if you’re outside North America).  I’ve had colleagues liken it to “photographing a moving tree in a moving forest” because you’re focused on one player, while other players are moving across the frame between you and the subject all the time.  It takes patience and some knowledge of the game to be really good at photographing it.

This shot was part of a sequence that started with this player making a run with the ball. A few frames prior to this, he was tripped and went airborne along with the ball. I never would have had this frame if I wasn't shooting at 12 fps. Canon EOS-1D X, EF 200-400 f/4L IS Extender 1.4x. 1/1600, f/5.6, ISO 800.

This shot was part of a sequence that started with this player making a run with the ball. A few frames prior to this, he was tripped and went airborne along with the ball. I never would have had this frame if I wasn’t shooting at 12 fps. Canon EOS-1D X, EF 200-400 f/4L IS Extender 1.4x. 1/1600, f/5.6, ISO 800.

From behind the end line, you can often capture two players fighting for position on the ball. Canon EOS-1D X, EF 200-400 f/4L IS Extender 1.4x. 1/1000, f/5.6, ISO 400.

From behind the end line, you can often capture two players fighting for position on the ball. Canon EOS-1D X, EF 200-400 f/4L IS Extender 1.4x. 1/1000, f/5.6, ISO 400.

Soccer is a fast-moving sport and thus requires your camera to be set a certain way.  I shoot most of my action using Aperture Priority, with the aperture set around f/4 or f/5.6. I want a pretty shallow depth of field so the athletes pop off the background, and so that background objects don’t distract from the subjects.  I then set the ISO to be sure I get a fast enough shutter speed to freeze the action. Generally this means 1/500 minimum.  Faster if you’re using a lens longer the 500mm.   I set my camera’s autofocus system to AI Servo or Continuous (dependent on the brand of camera you use- it means the same thing).  AI Servo or continuous simply means that your camera will focus on the subject and continue to track the subject as it moves towards or away from the camera. Finally, I set my camera’s drive to continuous so that I simply have to press and hold the shutter button to take multiple images. This enables me to take an entire sequence of action, meaning I won’t miss peak action by taking only one shot, or more importantly, I’ll get multiple images to choose from of the play to be sure I get the best shot out of the action.  Note that some cameras have multiple continuous settings, such as continuous low or continuous hi. I suggest getting as many shots as possible and using continuous hi, if you have a choice. For instance, the images accompanying this article were taken using an EOS-1D X, with the drive set to Continuous Hi, which is 12 frames per second.  Realistically, faster is better, but even a consumer camera firing at 4 frames per second can produce outstanding results.

Unfortunately, soccer is a sport that screams for long glass on your camera. The fields are so large, and the game so spread out, that putting anything less than a 300mm lens on the camera will leave you missing a lot of shots. Truth be told, a 500mm lens is ideal.   I found a lens such as Canon’s EF 200-400 f/4L IS Extender 1.4x to be a great combination as I could zoom in and out and cover things close to me at 200mm, and zoom all the way in when the action moved away. Nikon makes a similar lens, without the 1.4x extender built in.  For more cost-conscious options, lenses such as Canon’s 100-400mm or the many 70-300mm lenses on the market are also good choices.

When on the field, or pitch as the rest of the world calls it, I have several places I like to stand.  My favorite place is behind the end line, to the side of the goal. This allows me an angle on the goalie when he comes out to make a play, but also gets action coming more or less right at me.  I find it much easier to photograph players running towards me, rather than to try and pan with action moving parallel to me.  When the action is coming to me, I don’t have to work to keep the AF point on the athletes. When I have to pan with the athletes, there’s always the chance I move too fast or too slow and the AF point loses focus.

I find the combination of speed and physicality to make soccer incredibly rewarding. I love capturing the players fighting for the ball, fighting for position.  I love capturing the emotion as they score a goal, or the dejection of losing a big game. Spending an afternoon at a soccer game provides a ton of great opportunities, so go take advantage of them!

Occasionally, I'll try something a little different.  I had a lot of standard action from this game, so I decided to switch it up a bit and try some panning. The darker backgrounds lent themselves perfectly to this.  Canon EOS-1D X, EF 200-400 f/4L IS Extender 1.4x.  1/10, f/36, ISO 100.

Occasionally, I’ll try something a little different. I had a lot of standard action from this game, so I decided to switch it up a bit and try some panning. The darker backgrounds lent themselves perfectly to this. Canon EOS-1D X, EF 200-400 f/4L IS Extender 1.4x. 1/10, f/36, ISO 100.

Post originally from: Digital Photography Tips.

Check out our more Photography Tips at Photography Tips for Beginners, Portrait Photography Tips and Wedding Photography Tips.

Get A Kick: Photograph Soccer!


Digital Photography School

 
Comments Off on Get A Kick: Photograph Soccer!

Posted in Photography


DISCUSS: When you Photograph People in Black and White, you Photograph their Souls

20 May

NewImageCanadian photojournalist – Ted Grant – is quoted as saying:

“When you photograph people in color, you photograph their clothes. But when you photograph people in Black and white, you photograph their souls!”

This quote often comes to mind when talking about portraiture and I thought it might make an interesting discussion starter.

Do Ted’s words resonate with you?

Post originally from: Digital Photography Tips.

Check out our more Photography Tips at Photography Tips for Beginners, Portrait Photography Tips and Wedding Photography Tips.

DISCUSS: When you Photograph People in Black and White, you Photograph their Souls


Digital Photography School

 
Comments Off on DISCUSS: When you Photograph People in Black and White, you Photograph their Souls

Posted in Photography


How To Photograph Dragonflies

15 May

A Guest Contribution by Steve Berardi from PhotoNaturalist.

Pennant

Dragonflies are among the most photogenic insects. They usually have bright contrasting colors that make them really stand out in their natural environment, and their large size makes them easy to photograph with a standard telephoto lens.

However, there are a few difficulties with photographing them too: they get scared easily and sometimes it seems like they just never land somewhere and take a break so you can photograph them!

So, here are a few things to keep in mind when photographing these amazing insects:

1. Look for them near ponds and streams

Most dragonflies hang out very close to bodies of fresh water: lakes, ponds, and streams. So, when you’re scouting out places to photograph them, make sure it’s a place where you can walk right up to the shoreline of the water (some nature preserves are in fragile habitat, so they won’t let you get too close to the water).

Meadowhawk

Some species can be found farther away from water too (such as the Variegated Meadowhawk pictured above), but you’ll find the most dragonflies near freshwater.

2. They’re most active on sunny days

Dragonflies need the heat of the sun to warm their bodies and fly, so they’ll usually be most active on clear sunny days.

But, that doesn’t mean you shouldn’t look for them on cloudy days too. They’ll be a lot harder to find on cloudy days, but they’re also a lot easier to approach since it’s harder for them to fly away without the heat of the sun. You’ll also get a nice softly diffused light on them with cloudy skies.

Each weather condition has its advantages and disadvantages.

3. Be very very patient with them!

It’s very easy to scare dragonflies and sometimes it may seem like they NEVER land, but the key is patience. If you scare them away, then be patient–they’ll likely come back to that same spot to perch (dragonflies typically return to the same perch all day), you might just have to wait for ten minutes.

Also, some species perch a lot more than others, so again the key to photographing those species who don’t perch often is to wait patiently or wake up super early and try to photograph them before sunrise–if you’re lucky, you’ll even catch a few of them covered in dew.

4. Position your camera so its sensor is parallel to the dragonfly’s body

You only get one geometrical plane of sharp focus, so it’s important to put as much of your subject in this plane as possible. You can do this by carefully positioning your camera so its sensor is parallel to the body of the dragonfly. Then, just make sure you focus on the eyes of the dragonfly.

5. Take shots from lots of different angles

One of the most rewarding parts of photographing insects (or anything in nature) is that it helps you identify your subject–it gives you an opportunity to look more closely at them. However, sometimes the only thing that separates one dragonfly species from another is a few dots on their wings. So, it’s good to shoot photos from lots of different angles to help you identify the dragonfly later.

6. Pay attention to the background

When you’re photographing such an interesting subject like a dragonfly, it’s easy to focus entirely on them and forget about your background. But, a good background is important for any kind of close-up photography, because it can really help draw attention to your main subject: the incredible looking dragonfly.

So, when you’re out there looking for dragonflies to photograph, pay close attention to your background. Ideally, you want it to contrast with the colors of the dragonfly.

7. Use a small aperture — between f/11 and f/16

One of the most frustrating parts of photographing dragonflies is getting their entire body in sharp focus, since you won’t always be able to photograph them with your camera parallel to their body.

So, one way to deal with this is to use a fairly small aperture, usually somewhere between f/11 and f/16 works well. This will also put more of your background in focus, so make sure you find a dragonfly with a background that’s very far away (at least a few feet).

What did I miss?

If you have another tip for photographing dragonflies, then please share it with us by leaving a comment below. Thanks!! :)

About the Author: Steve Berardi is a nature photographer, software engineer, and founder of PhotoNaturalist. You can usually find him hiking in the beautiful mountains and deserts of southern California. Read more of his articles on nature photography at PhotoNaturalist.

Post originally from: Digital Photography Tips.

Check out our more Photography Tips at Photography Tips for Beginners, Portrait Photography Tips and Wedding Photography Tips.

How To Photograph Dragonflies


Digital Photography School

 
Comments Off on How To Photograph Dragonflies

Posted in Photography


How to Photograph Electricity without a Camera

09 May

You’ve always wanted to catch one awesome photo of lightning striking down on Earth’s surface.

Turns out we’ve been doing it wrong this whole time.

Phillip Stearns figured it out: Step 1 — throw out your camera. Step 2 — expose your film with 15,000 volts of electricity.

Inspired by the science between cameras and our very own eyes, Phillip turned to experimenting with peel-apart instant film.

He starts by pouring household chemicals (like bleach) onto the film to manipulate color and then touches a neon tube ballast to the film to electrocute the surface.

The result is a dreamy rainbow of lightning-like images emblazoned onto a final print.

It’s no wonder that Phillip’s main work has dealt with digital glitches. You might call this the ultimate analog equivalent of a glitch.

You can watch how it all goes down in this awesome video.

Extra cool thing: Learn how to make emulsion lifts with instant film!

Phillip Stearns’ Electrified Instant Film

p.s. WE ARE HIRING A WEB DEVELOPER. If you love photography and San Francisco and codes, APPLY HERE.

p.p.s. WE ARE ALSO HIRING AN EVANGELIST/BIZ DEV HERO. Creative deal-maker types, APPLY HERE.

Related posts:

  1. Long Exposures + Facebook Albums = Gorgeously Layered Photos We sign in, and within 10 minutes, we’ve seen photo…
  2. Photograph Your Friends From Five States Away! Relationships, fragile packages, our feet. Long distance is hard on…
  3. How to Photograph the Galaxy…in 3D! The minute Richard Branson’s Virgin Galactic takes off, you’ll be…


Photojojo

 
Comments Off on How to Photograph Electricity without a Camera

Posted in Equipment