RSS
 

Posts Tagged ‘Photograph’

Finding Great Subjects to Photograph Close to Home

05 Aug

You don’t need to take expensive and exotic trips to make good images. So if staying at home is more your thing then a few simple ideas can help you create beautiful images. What you might view as commonplace and bland can still be photographed in an imaginative and skillful way to produce an image that shows a far more striking aspect of the subject or scene. I am not suggesting you get all creative with software manipulation either. I am suggesting explore your imagination and creativity; perhaps push your technical boundaries a little and this will further enhance your photographic skill.

flowers-home

The ability to take an everyday scene and construct from it a superb image will require your application of some or all of the following:

  • vision to see the various elements that might be included in an image
  • concentration and time to develop the idea and assimilate all the components
  • awareness to recognize the potential of a color, shape and form
  • observation to study the scene and time enough to mentally collate the aspects of the image and to try them out in camera
  • willingness to try something new

This skill of making the mundane magnificent is not dependent on the type of camera and lens you use, it works with anything. My particular interest is nature and wildlife, but the skill can readily be applied to most of your chosen genres of photography.

Getting started

To start you should be looking for a spark or catalyst to kick off the mental process. This can be anything that takes your fancy such as color, shape, pattern or motion.

Once you have selected your particular environment, and isolated some elements for a composition, then take some time to arrange and rearrange them in your mind. Walk around, kneel, lie down and test different perspectives. Work the opportunity and let the image evolve, don’t rush it. You may get a few strange looks in certain circumstances, but that is the price you pay.

Something simple like a field of rapeseed (or field of other flowers or crops depending on where you live) is a common, beautiful, bright yellow sight which also heralds the arrival of summer. The endless fields of yellow can be monotonous, but they can provide you with a colorful subject in their own right, or a backdrop for a smaller subject. You can use the color, the size of the field and the detail of individual flowers. Look about for a subject, choose a perspective and include other elements such as: blue sky, clouds, a tree, a car, a sunrise or sunset, or all of the above. Let the image unfold.

Finding subjects close to home

The images here are all taken this year, with this article in mind, all within a couple of miles of my house. This is to demonstrate that there is much on our doorsteps that might keep our photographic needs satisfied, well some of them at least.

Choose any patch of grass on a dewy morning and have a look for a good collection of dew drops and try a backlit shot. The sparkles and perfect shapes of the droplets make an intriguing subject. Here I have turned the image into a black and white just to emphasize the shape and patterns, but often you’ll want to keep the lovely green of the grass.

001 Dewy Morning in the Grass

Garden birds are probably the most accessible wildlife for you budding nature photographers. With some simple skills you can go beyond just taking a record shot, but can create lovely images. Place a bird feeder in a good position, with a decent background, and a thoughtfully placed perch and sit back and wait. Change the perch and change the background at will and you have a whole suite of different images available to you.

002 Robin on Chair

A sunrise over a meadow may be a regular occurrence in your home patch, but to make it a little different get down low in the vegetation. Here I have obstructed the sun with a tree at the edge of the meadow, and thus broken the sunlight up into many light sources coming through the foliage. The background is formed by selecting an aperture that provides sizeable circles of confusion (out of focus light sources) behind the subject. The subject is just a few seeding grass heads, but you can turn the simple into the stunning by constructing an image.

003 Meadow Sunrise

Vast fields of cultivated crops can provide you with a wonderful opportunity. A bright yellow rapeseed field for example. Look for something to isolate within the vast swathe of yellow that provides a point of interest in an image full of color. Sometimes it is simply a color that can spark your thinking, but spotting a dewy web provides a focus for the image. Prowling the edge of the fields on a bright and sunny day will also yield a lot of insect life, which could become your whole new world.

004 Rapeseed Field

You can choose a different day and different weather to change your image. On a foggy day dewdrops collect on spider webs and can give you an abstract view of the rapeseed field. The spark here was the pattern effect of the drops and then the gorgeous yellow background.

005 Rapeseed Field Dewdrops

This image was created by using a long lens that can accommodate a lot of foreground (has a lot of reach and you can stay back from the subject) and can throw the background and foreground out of focus with a shallow depth of field, while filling the frame. If you shoot into the sun, then the sunlight passing through the green foliage will bring out the bright, and almost luminous, green of the leaf with which you can compose the foreground and background. The spark was the beautiful color of the backlit green foliage, completely different from the front-lit color.

006 Garden Bluebell

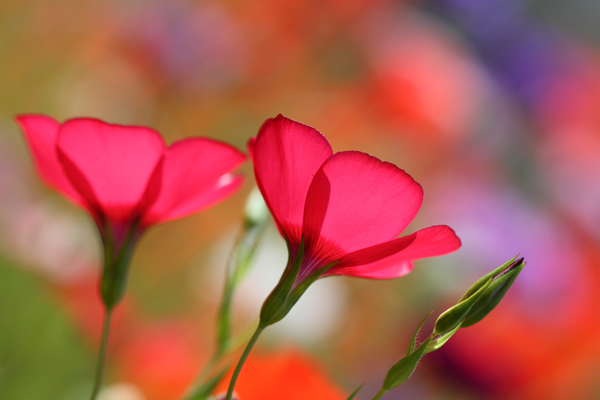
Sometimes simplicity is the only catchword you need to remember. Find a patch of wildflowers, pick the most concentrated spot and shoot away, picking various subjects. The color and the profusion will give you all you need to create an intriguing and colorful image.

007 Summer Flowers

Spring and summer are obviously the prime times for encountering wildlife, and therefore photographic subjects for your nature images are abundant. Unless you live in the tropics, the winter season can be a lot more mundane, so you are probably going to have to work harder. Colorful weeds and insects are always a feature of summer. Putting them together works a treat, although it may take some patience.

008 Dandelion and Ladybird

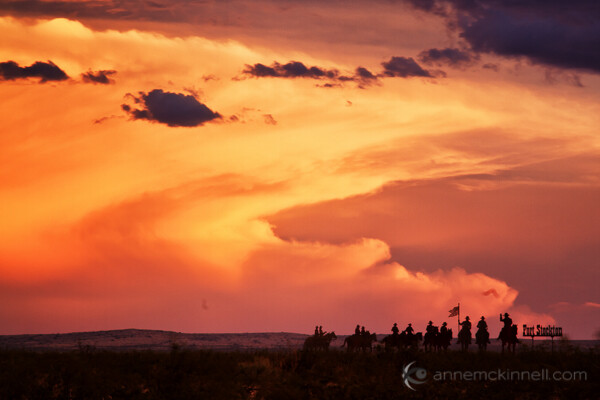
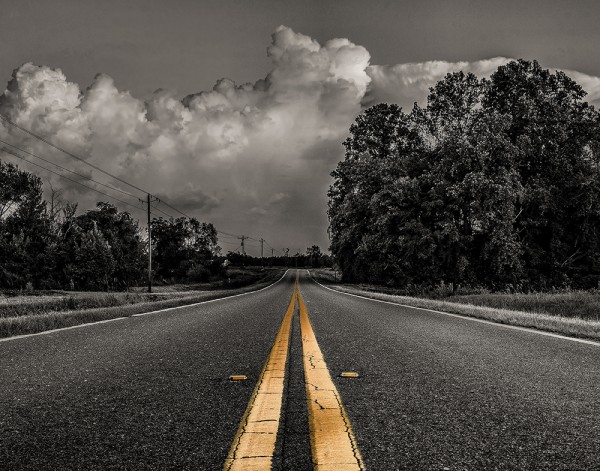
It is not all about your hands and knees or the hedgehog perspective, so a few leading lines and an old barn will give you a far superior image to a snapshot of endless cultivated fields. Throw in a few colorful wildflowers in the foreground, a dark stormy sky and the farm fields you drive past routinely may take on a new perspective.

009 Old Barn in Fields

A very sparse little patch of flowers, with color being their only redeeming quality, can still provide you with a good opportunity. This technique is purely an in-camera one and utilizes controlled motion of the lens. Slow the shutter speed (low light, low ISO, dull weather or a combination) and zoom in or out by hand while the shutter is open gives the resulting motion blur. This can be used in a variety of ways and once you start your imagination may take hold. If you don’t have a zoom do the same with your prime lens but twist the camera in your hands.

010 Flower Burst

So just to show you that you can make great images close to home with a little effort.

Do you have any other tips or tricks for finding ordinary things and making great photos? Please share in the comments below.

The post Finding Great Subjects to Photograph Close to Home by Richard Taylor appeared first on Digital Photography School.


Digital Photography School

 
Comments Off on Finding Great Subjects to Photograph Close to Home

Posted in Photography


How to Photograph Beverages – Video Tips

27 Jul

Earlier I shared a collection of some great images of beverages. If you want to know more about how they may have been created, check out these video tutorials.

Photograph I offer you another drink! by Ivan Gevaerd on 500px

I offer you another drink! by Ivan Gevaerd on 500px

This first video by Phlearn features photographer Rob Grimm, and walks you through how to photograph a beer bottle and glass of beer. I used to do food photography and beverages were part of that. It’s a very specialized, and highly detailed area of commercial photography that requires a lot of lights, reflectors, and patience. A shoot like this might take several hours to get it just right, and it’s a game of inches moving things into the right places.

See more of Rob’s amazing drink shots on his website.

This next video is by Phillip McCordall as we demonstrates shooting a bottle using a slightly different lighting setup and approach. It’s well done (aside from the slight echo in the audio) and has some good tips.

This last one is by The Slanted Lens and go over how to photograph a bottle and combine it with a photo of a person for the final image. Lighting is key when photographing any kind of beverage. More good tips and a little fun at the end of this one.

So if you are doing this week’s photography challenge, beverages have a watch of these videos and remember to share your images on the challenge page.

The post How to Photograph Beverages – Video Tips by Darlene Hildebrandt appeared first on Digital Photography School.


Digital Photography School

 
Comments Off on How to Photograph Beverages – Video Tips

Posted in Photography


How To Photograph Shy Adults

22 Jul

Some people are not as comfortable in front of the camera as others. Perhaps they are shy, or perhaps they believe they have physical “imperfections”, so they aren’t at ease when it comes to having their photo taken. (I put quotes around that term because often these are not imperfections at all, but rather, beautiful parts of their body that they over-think.)

Unless they are a professional model, most people fall into this category to some degree. If they don’t feel comfortable, it will show in the photos. Luckily, there are things you can do that may help.

Annie-Tao-how-to-photograph-shy-adults-article-shy-woman-2

Give your subject something to do

Holding a pose will often garner an awkward expression. Thus, photograph them as they move. People are much more comfortable when they are in motion, than when they are still.

They don’t have to do anything overly complicated. The movements can be subtle, like looking up from a head-down position or fixing something, like part of their clothes.

Annie-Tao-how-to-photograph-shy-adults-woman-with-hands-in-pocket

Do your social psychology homework

Photographing people is part technical and part psychology.

For most people, you cannot start shooting the second your subject arrives and expect them to look natural, so communicate with them before the shoot if they are shy or concerned. Children aren’t the only ones who need time to warm up!

Make sure your subjects know how the shoot will go and what they need to do to prepare for it. If they are concerned about something, address it as quickly as possible. The longer a concern goes unresolved, the more it will grow.

Perhaps they have a scar on their arm they feel self-conscious about. Once you know that, you can address it, like letting them know you will try your best to avoid shooting it. Maybe they aren’t sure what to wear that will flatter their curvy body, so you can give them clothing suggestions or reassure them that you will use certain angles and lighting to accommodate this. Or maybe they are just plain shy, in which case, you want to make sure you talk to them! Let them know a little about you. Talk about common interests.

Making your subjects feel at ease is a very important and integral part of portrait photography.

San-Francisco-East-Bay-engagement-photography-man-helps-move-fiancees-hair-out-of-her-face

Avoid silence

When you have a shy or uncertain subject, being silent for a length of time can be unnerving for them.

Talk to them during the shoot, but be careful not to bark orders at them (ie. “Sit there, look here, put your hand like this, move your body like that!”) because that will achieve the opposite of what you want.

Rather, tell them what they are doing right, so they know to keep doing that, and explain what you are doing before you do it.

The entire shoot doesn’t have to be instructional or too commentated, but a little bit of talking will make your subject feel more confident and “safe”. With these feelings, personalities and natural expressions will surface.

Annie-Tao-How-to-photograph-shy-adults-article-man-carrying-woman

If you are photographing children, you’ll want to read: How to Photograph Shy Children as well.

Do you have any other tips for working with people? Please share in the comments below.

The post How To Photograph Shy Adults by Annie Tao appeared first on Digital Photography School.


Digital Photography School

 
Comments Off on How To Photograph Shy Adults

Posted in Photography


Get the story behind the photograph

08 Apr

12894623965_c2d95f47ef_o.jpg

Most photographs – especially photojournalistic work – exist in a void with little insight from the photographer that captured the image and what they were trying to achieve. ‘The Image, Deconstructed’ looks to turn this around. The website provides interviews with photographers, asking them about their techniques, their gear, their preparation, and their mindsets when they photograph. Learn more

News: Digital Photography Review (dpreview.com)

 
Comments Off on Get the story behind the photograph

Posted in Uncategorized


How To Photograph The Night Sky Part 2: The Stars

11 Nov

Well, I certainly hope you all enjoyed part 1 and have managed to take some stunning photographs of our Milky Way! Photographing stars offers the exact same concept as shooting the Milky Way, but with this, there are a lot of different principles that come into play. The Foreground Stars on their own are rather dull and don’t really make Continue Reading

The post How To Photograph The Night Sky Part 2: The Stars appeared first on Photodoto.


Photodoto

 
Comments Off on How To Photograph The Night Sky Part 2: The Stars

Posted in Photography


How to Photograph the Night Sky, Part 1: The Milky Way

06 Nov

Taking pictures of the heavens can be tricky. Not only do you need a fast camera, but you also need a clear night sky. This can be a tough situation to achieve, as not only are you up against the weather, but you also have light pollution and a number of other factors that can all contribute to making your Continue Reading

The post How to Photograph the Night Sky, Part 1: The Milky Way appeared first on Photodoto.


Photodoto

 
Comments Off on How to Photograph the Night Sky, Part 1: The Milky Way

Posted in Photography


How to Photograph Strangers: The 100 Strangers Project

04 Nov

A Guest submission by Matt John Robinson

Liz

The First Stranger

Taking the portrait of a person whom you’ve just met moments before is one of the most exciting—and in the beginning, unnerving—experiences you can have as a photographer. It’s also one of the most rewarding.

The 100 Strangers Project sounded simple enough: gather 100 portraits of complete strangers after getting their consent. For my mostly introverted self, this meant more precisely: interact with 100 human beings I would otherwise never interact with…AND take their photograph.

Jimmy

The prospect seemed filled with anxiety. Yet the intrigue and amazing possibilities that gathered vaguely in my mind were becoming too palpable to resist. I had seen and greatly admired many 100 Strangers photos by Chris Camino, an online photography contact who was working on the project (known on dPS and Flickr as Paco X).

When I realized that a few of his portraits had been taken only an hour away from me, I had to know more. “How does he do it? How does he interrupt people during their daily routine and so boldly ask for their picture? How do they react, and why would they ever say yes?” Chris was happy to share his process and agreed to have me tag along during his next stop in Philadelphia.

He was honest. He was direct. Chris would see something in a stranger and would stop them, letting them know exactly what he admired and why he wanted to take their picture. The stranger, more often than not, would agree! They might even ask how he’d like them to pose; they might even walk to a more appealing background; they might even glow with the flattery of somebody wishing to take their picture. These strangers, for however brief the encounter, would connect with this photographer. They would trust him.

Allen

It was a rush just watching it unfold before me. I knew I wanted to feel the excitement of photographing a stranger myself. I saw a few interesting strangers and would point them out to Chris, secretly hoping that he would goad me into taking their picture myself. And he would. But I wouldn’t. My courage would build up—almost to the point—and a wave of nerves would wash it all away. What if they refused? What if they thought I was just a creep?

Chris spotted another stranger walking across the street with a friend, and I ambled after him. His stranger agreed very kindly after he introduced himself and me. The woman and her friend were both lovely and seemed like very warm and open people. It occurred to me that this was the perfect opportunity: I had already half-met this “stranger,” the woman’s friend, and judging from her personality she was likely to agree.

While Chris was busy shooting, I walked over to his stranger’s friend with as much an air of confidence as I could muster. I told her that I very much wanted to start the same photography project and wondered if she was willing to be my very first stranger. Not only did she agree to have her portrait taken, but she was flattered to be the start of the project. After the shoot, as she started to walk away, she turned and called back with her bright smile, “Thank you for your kindness.” Thank you for my kindness!

Unknown Stranger 1

I was blown away. So blown away and filled with excitement over my first ever street portrait that I forgot the young woman’s name. But I am oh-so-grateful to have met my unnamed Stranger #1 in her Philly’s ball cap. She opened my eyes to how easy and instantaneous it can be to connect with people you’ve never met, and how truly kind a complete stranger can be.

And the greatest revelation: I, as a photographer, have the power to capture the beautiful qualities of anybody I pass by. Or I can at least make the attempt. And anybody with a camera has that power. It might seem silly to photographers who’ve been doing this for ages, but I really think it’s something a lot of photographers haven’t thought about. I certainly hadn’t.

Emily

It was addicting. A piercing set of eyes, an awesome sense of style, or just a charismatic air—it’s all gloriously walking on the street and waiting to be captured by a camera. I returned to Philadelphia several times and also shot at a few places more locally.

I’m a little over halfway through my project now. No matter where I go, though, it’s all the same. I wait until I find somebody with some quality that I want to capture and then simply walk up to them and introduce myself and the project. Often I will let them know what caught my eye. And the majority of the time these strangers agree… and then it’s time to think about the photo.

Marcy

How to: the Posed Street Portrait

The technical considerations I make for posed street portraits are identical to any that you might make when taking any sort of outdoor portrait. You just have to figure it out a little more quickly.

I almost always make an attempt at carefully pairing my strangers with their backgrounds.

Sometimes I will find a background first, and I’ll wait for a serendipitous stranger to happen upon me. Other times I’ll come upon a stranger without having the time to consider a background before addressing them. In that case, I will always ask if they mind if we continue to walk in the direction they were headed until a suitable background catches my eye (it’s amazing how accommodating the strangers usually are).

It’s just my own personal style to really “create” the portrait. Other street portrait photographers take the opposite approach and prefer to photograph their subject exactly where they found them. The hugely popular Humans of New York photographer Brandon Stanton asks, “Can I take your picture, just like that, right where you are?”

William

100% of my backgrounds are in the shade. I like soft, even lighting, as most portrait photographers do. Working with shade also gives you the ability to shoot any time of day, and midday is actually quite nice. While cloudy skies are appealing because of the ability to shoot out in the open, bright sunny skies make for beautiful shade.

However, not all shade is equal. Sometimes the shadows can still be too heavy depending on how far you are from the open sunlight. For instance, if you’re in the shade of a building, yet there is open sky above you and all around, the lighting may very well be ideal on its own. However, if you’re under the shade of a tree, or on a street surrounded by shade with tall buildings on each side and only a thin strip of open sky, a reflector is usually going to help a lot.

Aside from what’s above you, what the stranger is facing is also important when considering the lighting. If you’re in the shade of a building, and your subject is facing other buildings in the shade, there is hardly any light being reflected sideways and up, so the eyes are going to appear very dark. On the other hand, if the subject is facing buildings/sidewalks/streets that are brightly lit by the sun, their eyes will be nicely illuminated by the reflected light, and you’ll capture a nice catch-light.

For those times when there’s not much open sky or bright surroundings outside the shade, carrying around a collapsible reflector is extremely helpful. You can expand it and have the subject hold it themselves around waist or chest height, depending on the framing, angling it slightly toward their face. This works well when the light is still generally coming from above.

Sometimes, depending on the structures around you and the time of day, the light mostly comes from the side. In this case it is helpful to have somebody hold the reflector on the opposite side the light is coming from (the subject is unable to do this without getting the reflector in the frame), bouncing back the light onto the shadowed side of the face. The strangers I stop often have friends along with them, and they’ve always been happy to assist with the reflector. As soon as the reflector is busted out, the stranger is likely going to ask how you want them to look/stand/pose.

Christian

Posing the stranger can be the second hardest part for a lot of people just getting started, right after the approach. The simplest way, and the way I still use sometimes, is to not even bother with a specific “pose.”

I’ll just ask them, “Ok, let’s get a few straight-faced shots—no smile.” And then after a few frames, warm them up with a joke or two and try to get them smiling (or just ask them to smile).

The way they are standing and holding their arms isn’t important if you’re just shooting head shots. The pose matters when moving out from the head shot, and for that, I’ve done all sorts of things.

You can just start backing up and capture their natural pose while they’re not fully aware that you’re actually capturing the entire body (this is all assuming you’re shooting with a prime—zooming out from the head shot and continuing to fire away would work great as well).

One of my personal favorites is to have the stranger sit down in a specific location that I think will work well with them. I’ll sit down myself exactly where I want them to sit and show them generally how I would like them pose. The stranger will follow suit with their interpretation and usually ask for more direction. I’ll follow with something like, “However your body feels comfortable,” and then start taking photos. At that point I’m looking through the viewfinder and beginning to frame my subject.

Ben Sarah

When it comes to composition, I am a heavy “rule of thirds” guy, especially with the eyes. The rule of thirds isn’t as much a “rule” as it is a way that our visual system scans the frame. For whatever reason, placing key points of the photograph on the thirds lines, or at their intersection, really focuses our attention during visual processing. This is dramatically true for portraits especially.

Placing the subject’s eyes on (or above) the upper third line gives them a much larger impact (try it yourself: on the same image with two different crops, place the eyes on the middle horizontal line and then place it side by side with the eyes on the upper third line).

I also avoid the “floating head.” That is, I almost never frame the subject from just their neck up, leaving their face to be the only thing in the frame. Including a good part of the shoulders in a headshot is key in grounding the subject within the frame and giving them their proper space. It’s a similar element to not cropping the subject at the knees or elbows.

There are of course exceptions to both of these compositional guidelines (you can see them in my own portraits), but they are a great place to start and it’s hard to go wrong when following them.

Katelyn

And finally, the lens and camera settings. Choosing the lens greatly depends on how much of your subject you’re really aiming to capture.

I focus primarily on head shots because of the intimacy it provides through a strong connection with the eyes. Because my primary goal is to come away with a good head shot, I always shoot street portraits with my 85mm f/1.2 lens.

I love the 85mm focal length for several reasons. For one, there is no distortion. Shooting a headshot with a 50mm or wider is going to make the center of the face appear subtly bulbous (and super bulbous if you’re down in wide angle territory). This can be mostly corrected in post, but why not get it right in camera?

More importantly, the 85mm gives you perfect working distance, which is especially important when working with strangers. Standing two feet in front of a stranger with a 50mm lens to get a head shot can feel pretty “in your face” for them. With the 85mm, you’re a bit further back, yet you’re close enough to easily continue communication—to continue chatting and helping them to feel comfortable.

Conversely, if you’re shooting a 200mm, you’re going to be pretty far away, and may have to raise your voice a good bit. You begin to lose your subject’s connection to the camera. And in a street setting, you really might not have enough room to back up, especially if you’d like the option to capture a full length.

I almost always shoot with a very large aperture for head shots in order to isolate the subject through a shallow depth of field as much as possible. For my personal tastes, I don’t mind having the ears and tip of the nose blurred. In my opinion it just places even more emphasis on the eyes, and well, I am in love with a good pair of eyes. It also naturally softens the skin of the forehead and cheeks, which is an added bonus.

I shoot in manual, choosing my aperture and then adjusting my shutter speed to properly expose. I won’t shoot an SS below 1/100 and will boost my ISO if needed from there.

Christina

I hope this post was helpful for anybody interested in outdoor portraiture, and especially those who might be interested in starting this amazing street photography project. It’s a no-brainer that my people skills have improved and I’m a lot more comfortable interacting with complete strangers. And of course, my portrait photography has improved a great deal. All the while, it has been so much fun. If you’re interested in the project, check out our Flickr group for the 100 Strangers Project.

Matt John Robinson is a portrait photographer from Allentown, Pennsylvania. See more of his work at www.mattjohnrobinson.com and connect with him on Facebook and Flickr.

Post originally from: Digital Photography Tips.

Check out our more Photography Tips at Photography Tips for Beginners, Portrait Photography Tips and Wedding Photography Tips.

How to Photograph Strangers: The 100 Strangers Project

The post How to Photograph Strangers: The 100 Strangers Project by Guest Contributor appeared first on Digital Photography School.


Digital Photography School

 
Comments Off on How to Photograph Strangers: The 100 Strangers Project

Posted in Photography


How to Photograph Dramatic Clouds at Sunset

10 Oct

The difference between a nice sunset and a dramatic sunset is all about the clouds.

Of course, the difference between a dramatic sunset and no sunset is all about the clouds too!

A clear sky at sunset might turn a shade of pale blue or pink, which is beautiful and calming, but with just the right amount of clouds the sky becomes alive with fire and drama as the day’s last rays reflect off the clouds making them red, orange, purple and pink.

Desolation Sound Marine Park, British Columbia, by Anne McKinnell

Not all clouds are created equal though. They come in many shapes, sizes, densities, and altitudes, and they all refract or absorb the light in different ways that can drastically change the quality of your photographs.

Types of Clouds

Clouds that hang low in the sky and form a band on the horizon or appear like a thick blanket covering the sky will block the sun’s high-flying rays and make the sunset pretty anti-climactic, if you can see it at all.

Sometimes large and lumpy clouds that are brighter on the top and dark on the bottom can create a lot of contrast, making for a very moody atmosphere. Rain, snow, and hail clouds fall under this category, as the weight of the excess moisture weighs them down.

Storm Cloud by Anne McKinnell

The most radiant displays of colour emerge when the clouds are very high in the sky. They are usually smaller, whiter, and thinner than the low-lying clouds, and they are able to catch the sunlight from beneath, allowing us to view those fiery colours from the ground.

These are more likely to occur when the weather is hot and dry, which is why desert landscapes are famous for their magnificent sunsets. When you want to create a dazzling sunset photo, these are the clouds you want to look out for.

Mesquite Sand Dunes, Death Valley National Park, California, by Anne McKinnell

Predicting the Weather

Sunsets don’t last very long, so it takes a little planning and a lot of luck to have nature set up the perfect sky for you. You never know when the ideal conditions are going to present themselves, but if you tune your senses to the weather and its patterns, you will start to get an idea of when you can expect to see the right amount of clouds in a sunset sky.

Watch the sky over the course of the day to see what kinds of clouds are forming and how fast they’re drifting overhead. Check your local weather forecast to find out when the sun will go down, and try to judge if they’ll be sticking around based on the time of day and the speed of their movement. Keep informed about any storms coming in that will bring low-hanging clouds along with them.

If you have a great view from your back yard, all you have to do is keep your camera at hand so you can dart out when you see a great sky. On the other hand, if your aim is to travel to a more distant location to get your shot, you’ll have to be a little more precise in your calculations to avoid hauling all your gear up a mountain only to have the clouds dissipate. Your best bet is to choose a location that will be beautiful with or without clouds – that way, if nature doesn’t cooperate, you haven’t wasted the trip.

Rio Grande, Big Bend National Park, Texas, by Anne McKinnell

The Perfect Exposure

The most effective way of bringing out the natural saturation of coloured light is to underexpose very slightly – between a half-stop and a full stop. This darkens the rest of the image, making the colour pop in comparison. Use your exposure compensation to adjust this.

To make sure you get the best possible exposure, bracket your shots. This means taking several images at different exposures, so you can analyze them on your computer at home in order to determine which is the most successful. This can be done manually using your exposure compensation setting – take one image using the camera’s default settings, then take one that is underexposed by half a stop and one that is overexposed by half a stop. Some cameras will have an automatic bracketing option that you can utilize to change these settings for you.

Another option is to create a high-dynamic range (HDR) image by combining multiple exposures as I did in this photo of a Joshua Tree. I made one exposure for the sky, another for the mid-tones, and another for the shadows and combined them in post-processing.

Joshua Tree National Park, California, by Anne McKinnell

If you want to soften the appearance of moving clouds, use a long shutter speed to blur them slightly. If they are drifting slowly you’ll need a longer exposure to achieve this than if they’re gliding swiftly across the sky.

Foreground

When you’re going after sunset-specific shots, there’s a good chance that your foreground is going to be silhouetted against the sky. When this happens, it’s easy to forget about the foreground all together. This is a mistake. Remember that every part of your frame is important. The darkened foreground is simply negative space, and should be composed just like the rest of the image. Look for interesting shapes or objects to place in the frame to create a focal point that enhances the picture. If you want your foreground to be more visible, use fill flash (flash with the brightness turned down) to lighten the subject slightly without overexposing.

Fort Stockton, Texas, by Anne McKinnell

Post-Processing

When you bring your photos into an image editing program, you might have the urge to crank up the saturation and make the colours really bold. Resist the urge to go overboard on this feature; a 5% increase is all right, but much more than that can cause your image to take on a cartoonish look that could make it appear inauthentic. If your software allows you to, change the “vibrance” instead. This option is similar to saturation, but it focuses its effects on the pixels with lower colour intensity, preventing over saturation. Be ginger with your adjustments, and when in doubt dial them back a little bit to ensure the alterations are subtle and the final image looks natural.

Post originally from: Digital Photography Tips.

Check out our more Photography Tips at Photography Tips for Beginners, Portrait Photography Tips and Wedding Photography Tips.

How to Photograph Dramatic Clouds at Sunset

The post How to Photograph Dramatic Clouds at Sunset by Anne McKinnell appeared first on Digital Photography School.


Digital Photography School

 
Comments Off on How to Photograph Dramatic Clouds at Sunset

Posted in Photography


5 Creative Ways to Find New Locations to Photograph

05 Oct

There’s truly nothing like visiting a location for the first time – I absolutely love it and I strive to always photograph at least one new location a month.

When I started on my photography journey this wasn’t a hard challenge to meet as even my own backyard was new to me and my camera, but as time went on things got a bit more difficult. New locations became ‘go-to’ spots and there came a point where I was only photographing at places that I had previously visited.

While I’d love to travel the world on a whim I just don’t have the means or time to do so which severely limits the range of my ‘new locations’ to places within driving distance from my house. As a result I’ve developed this list of useful techniques for getting the most out of my local area and I hope that it will help you do the same!

Creative Ways to Find New Photography Locations

#1 – Stuck on Earth

While Google Maps, Google Earth and Google’s Street View tools are great for getting location data, one of the best tools that I’ve used to find locations to photograph is the amazing app created by the people at Stuck in Customs called Stuck on Earth.

It works by fusing Flickr location data with a beautiful map to give you an amazing resource of not only useful locations, but the photographs other photographers have taken at those locations.

On top of searching random locations for photographs that have been tagged in various locations around the world, they have top location lists that have been curated by actual photographers to showcase the best photographs in cities around the world. There’s a bunch of other cool features as well and I highly recommend it as a resource (after all it is free).

You can find out more about it here.

#2 – Join a Photo Club

I’d have to say that one of the best ways to get out and find new locations is by meeting new people local to your area. Even if you’ve lived there your entire life odds are someone else has found interesting locations you haven’t – or better yet – has been able to find a new perspective on a location you thought you’ve picked clean.

Photography clubs often will also hold photo walks which will help you get out to different locations many of which might become your new ‘go-to’ spot when you’re in a pinch to get on location before sunset. It’s a great experience and I highly recommend trying it if you haven’t done so yet.

Have you ever gone on a photowalk? Tell us about the experience in the comments!

#3 – Make an Old Place New By Going At Night

One trick that I’ve done is not necessarily to find a new location, but instead to photograph the same location in the middle of the night.

A-lot-of-Stars

Night changes the way we perceive the world and will more than likely change the way you see a familiar location. It opens up a whole new set of challenges and pushes your camera to its limits of low light image capture, but in my opinion it’s one of the most fun types of photography there is.

Read more about photographing at night here.

#4 – Buy a Guide Book to Your Local State

Guide books might seem dated these days with instant access to so many great tools online, but there’s something to be said about a good guide book that has a friendly voice guiding you to the spots, telling you what to expect, where to park and when the best time to visit is.

Trap Falls 2013

I never would have found out about Trap Falls (pictured above) if I hadn’t gotten a guide book detailing the hundreds of waterfalls and cascades that New England has to offer. It’s amazing the detail that the book goes into about not only where the waterfalls are, but how difficult the hikes are, and how picturesque the fall is.

There are tons of great guide books on Amazon and other bookstores and many of them can be downloaded as eBooks right to your phone or eReader so you can take it with you on your trip!

#5 – Fill up your tank and just drive

Finally, if all else fails, just fill up you tank and drive. One of my favorite things to do is pick a highway and a direction and tell myself, “I’m driving for 50 miles and taking the first exit I see after that”. What I end up doing is putting myself into an unknown town with all sorts of new things to see. I like to bring a friend along for the ride to keep me company as well as a second pair of eyes so that I can be sure to see potential photography opportunities.

Double Yellow

Of course it’s not a fool proof plan and driving around aimlessly can be a bit tricky. While it’s certainly possible that you’ll find a location you might otherwise have overlooked – it’s nearly just as likely that you’ll spend your day driving around with nothing to show for the effort, time and gas you burned.

How Do You Find New Locations to Photograph?

Okay now it’s your turn to help build upon this list – I’d love to hear what techniques you use to continue to discover new locations – leave a comment below and let us know!

Post originally from: Digital Photography Tips.

Check out our more Photography Tips at Photography Tips for Beginners, Portrait Photography Tips and Wedding Photography Tips.

5 Creative Ways to Find New Locations to Photograph

The post 5 Creative Ways to Find New Locations to Photograph appeared first on Digital Photography School.


Digital Photography School

 
Comments Off on 5 Creative Ways to Find New Locations to Photograph

Posted in Photography


How to Photograph a Portrait of a Stranger with the WOW Factor

10 Sep

By Oded Wagenstein

Have you ever met a person, while travelling abroad or at home, who has such an interesting face that you would really like to photograph?  But, just before you press the shutter, you suddenly think, “How am I going to shoot this”?

Because there are so many questions to answer: How do I approach a strange person? Should I photograph from a distance, with a Tele-photo lens, or should I get closer? What if the person will get offended or angry?

It depends on the situation but, in 99% of my portraits, I use what I like to call the “being involved” technique.  This technique requires the photographer to get closer to the subject, by using a wide focal length lens and there is no doubt, that the subject will be aware of the photographer and the camera.

Fstop of 4.5, shutter speed@10 and ISO 320

Fstop of 4.5, shutter speed@10 and ISO 320

There are so many advantages to using this method, for instance the ability to control the composition, the angle, the background, not to mention asking your subject for “one more take” and of course, the possibility of  making a new friend. Creating a close-up portrait, with the technique of “being involved” creates intimacy and gives warmness to the image that you wouldn’t get with a Tele-photo lens in most cases. But, with this method as my students are well aware, there is one big disadvantage, when a person becomes aware of the camera, his behavior and the authenticity and spontaneity of the moment disappears.

Once, on a very cold night, while shooting in Japan, I asked my good friend and great photographer Dave Doisneau – “What kind of super power he would like to have?” (Cold nights in Japan will make you ask stupid and philosophical questions) Dave answered “I would like to be invisible. To be able to photograph a person, inches away from their face without them being aware that I was even there”. This for me sums up my whole philosophy on portrait photography. Losing the spontaneity, or the fear of losing authenticity, are just weak excuses. As a photographer, your job is to bring all these qualities back to your image. How can you do that? (Here’s a little hint for you) Photoshop or expensive equipment won’t help you.

Fstop of 2.8, shutter speed@10 and ISO 100?

Fstop of 2.8, shutter speed@10 and ISO 100

As one of the great photographers, Ansel Adams once said: “You don’t take a photograph, you make it”. The difference between an amateur and a professional is in the preparation.Knowledge is power and the more you know about a person and their culture, the easier it will be for you to become invisible. While I was in the Wakhan valley, between the Afghan and Tajikistan border, I learned, in advance that the people who live there have many cultural dos and don’ts. From the way they greet a stranger (Right hand on the chest and a slight bow) to the proper way to react when invited to a local house (just say yes and prepare yourself for tea, and lots of it!).

Fstop of 4.5, shutter speed@1 and ISO 125

Fstop of 4.5, shutter speed@1 and ISO 125

So before I travel anywhere, I familiarize myself, in advance, with any photography related taboos.  From how will people respond to the camera, to things that you should not shoot. For example, did you know that the people of the Akha tribe in south East Asia, believe that photographing one of their tribe member will actually steal his soul?

You can learn all these things and more by consulting with a photographer who has already visited the place.  The internet is a great place to find him or her. You can consult travel forums, books, or even call the embassy of the country of your destination.

Fstop of 4.5, shutter speed@10 and ISO 200

Fstop of 4.5, shutter speed@10 and ISO 200

Many photographers will advise you to take your camera with you all the times. For me, the camera is just a tool, and as a tool it must not interfere. Have you ever felt uncomfortable because someone is aiming a camera at you? Have you ever thought how YOU look when you stand behind the camera? (A bit like holding a weapon right?).

Nobody likes it when you aim something at them without any explanation or permission. That’s why, when I encounter a new and interesting person, I would like to photograph, I first introduce myself as Oded the person before as Oded the photographer. by the time I take out my camera, the person has lost interest in me, and gone back on his work, I then become invisible and Voilà I can take my shot and I’ve make a new friend into the bargain.

In the past year, I have photographed hostile tribes in South East Asia, gypsy communities in Central Asia and even in the former Soviet Union. If there is one thing that I’ve learned from visiting those places, is that most people would actually like their picture taken, if we do it right. So please give yourself a confidence boast and try it. Anywhere you are on the globe, if you act with respect, be polite, and even have a little bit of sense of humor, most of the time people will act the same way towards you.

Yes, we’ve all got a horror story, of the one person who shouted at us while we took his photo. Think about it for a second; did it happen when you tried to shoot the person without his permission? If you approach a person with dignity, make a connection, and then you take out the camera, what the worst thing that can happen? They will say no, but at least you would have tried right?

Fstop of 5.6, shutter speed@15 and ISO 100

Fstop of 5.6, shutter speed@15 and ISO 100

When you found a person with a unique face, invest the time to break the ice with them, then when you finally have his approval for the shoot, if he’s very polite, you will probably have around 30 seconds to take the shoot before they moves on, that’s some pressure.

This may be the most important section of this article, that many photographers forget, just relax. Being stressed never helps especially when dealing with people or while creating art. It’s true you may not have much time to decide on the focal length, the background, the shooting angle, the shutter or the aperture.

Also, try not to let your technical level stand in your way. How? Before starting to shoot people, try your craft on still life. Flowers would be perfect to start with. Also it would be really wise to invest in some photography course (much more important than buying new equipment). Last but by no means least, don’t forget to RTFM- read the camera’s fu*** manual!

That’s right, creating interesting and strong portraits is not easy. Take your time to work on your craft. Shoot flowers, then your friends and family members. Learn, learn and learn everything you can about your camera and about your subject. Come with respect and most important – relax.

Fstop of 3.2, shutter speed@10 and ISO 200

Fstop of 3.2, shutter speed@10 and ISO 200

Oded Wagenstein is a Travel photographer and writer. He is a regular contributor to the National Geographic Traveler magazine (Israeli Edition) and he is known for his intimate portraits from around the world. You can join his Portrait & Travel Photography Facebook page  and continue to discuss on travel and people photography and get more amazing tips!

Post originally from: Digital Photography Tips.

Check out our more Photography Tips at Photography Tips for Beginners, Portrait Photography Tips and Wedding Photography Tips.

How to Photograph a Portrait of a Stranger with the WOW Factor


Digital Photography School

 
Comments Off on How to Photograph a Portrait of a Stranger with the WOW Factor

Posted in Photography