RSS
 

Posts Tagged ‘Photo’

50 Brilliant Photo Manipulation Tutorials to Understand Photoshop Like a Pro

18 Nov

When it comes to photo editing, the first thing that comes to my mind is Photoshop. Photoshop is the second name of creativity. Photo manipulation may be one of the funniest things you can do with Photoshop. Of course, a person should have lots of patience and time to create some truly stunning artwork, but it’s worth a try. Today, Continue Reading

The post 50 Brilliant Photo Manipulation Tutorials to Understand Photoshop Like a Pro appeared first on Photodoto.


Photodoto

 
Comments Off on 50 Brilliant Photo Manipulation Tutorials to Understand Photoshop Like a Pro

Posted in Photography


DIY: Photo Piñatas

14 Nov
Extra photos for bloggers: 1, 2, 3

Have you ever wondered why piñatas are exclusively reserved for fiestas and strange colorful animals?

Well that’s not the case anymore, amigos! Allow us to introduce Photo Piñatas.

Turn your friends’ faces into awesome candy-filled piñatas for sweet personalized gifts.

You don’t need to wait for Cinco de Mayo, photo piñatas are fit for every occasion.

Need to say you’re sorry? Hard-to-buy-for-friend’s birthday? Father’s day? Proposing? Photo Piñatas for everyone!

Vamos!

Learn How to Make Photo Piñatas

WHY IT’S COOL

Your friends will love having their faces immortalized on a piñata that is just the right size for their personal stash of candy. Who is the ultimate friend? You are.

Ingredients:

before

  • White Card Stock
  • Crepe Paper Streamers
  • Masking Tape
  • Double Sided Tape
  • Ruler
  • Pencil
  • Scissors
  • Candy and confetti to fill your box
  • Photo as large as the front of your box

STEP 1: Cut

beforeIf you’re feeling confident at your geometry skillz, you can cut your rectangles at any dimension.

For the rest of us, measure and cut two 8” squares and four 3” by 8” rectangles out of the white cardstock.

STEP 2: Tape

beforeLay one of the square pieces of cardstock in the middle and tape the four smaller rectangles to its sides to make a cross.

STEP 3: Gettin it 3D

beforeFold each side up and tape corners.

This is starting to look like a real box, right?

STEP 4: Candy Time!

beforePut all the candy and confetti you can fit into the box.

Why don’t you help yourself to a lollipop? You’ve been working hard.

STEP 5: Put a lid on it

beforeTape the remaining square to the top of the box to make your lid. Goodbye candy.

STEP 6: Cut

beforeTrim your photo to the same size as the front of your piñata (8×8″ in our case). Then cut it evenly into 1″ strips.

Yep, just like that.

STEP 7: Fringe

beforeStick a strip of double sided tape neatly along the top edge on the back of your photo strips. Then stick them onto crepe paper streamers.

Fringe time! Cut even, thin strips from the bottom up to just before the edge of the double sided tape. Continue along until the entire strip is fringed.

STEP 8: Stick

beforeStick each fringed strip to the front of your box to put your photo back together again, just like a puzzle.

It is easiest to start from the bottom up.

Taking It Further

  • Get creative with the dimensions. Make smaller cubed photo piñata boxes or go huge and make them life-size
  • Take photos of your friend’s head (no, don’t tell them why) from all sides to make a ‘3D’ photo piñata
  • If the gift is for a couple, mesh their faces together by alternating strips of each one’s face

Related posts:

  1. DIY: How to Make Photo Lollipops Extra photos for bloggers: 1, 2, 3 Aaah Fall, how…
  2. DIY: Fringed Photo Cupcake Toppers Extra photos for bloggers: 1, 2, 3 There is only one thing better…
  3. Make a DIY Photo Ledge — Dress Up Lonely, Blank Walls! Extra photos for bloggers: 1, 2, 3 What’s that you…


Photojojo

 
Comments Off on DIY: Photo Piñatas

Posted in Equipment


11 November, 2013 – Paris Photo Show

11 Nov

Edmund Ronald is a consultant to the photographic industry and a regular contributor to this site. He visited the Paris Photo show this past weekend and now provides us with his report. 

Today’s Home Page photo was taken during a shoot in Norway with Bjørn Rorslett. Bjørn is the subject of our latest video interview. See the November 9 entry below.


The Luminous Landscape – What’s New

 
Comments Off on 11 November, 2013 – Paris Photo Show

Posted in News


How To Save An Underexposed Photo Using Lightroom

10 Nov

Before we even get started I should make clear that this is to be used as a last resort effort to save a photograph that can’t possibly be retaken any time soon, not something we should make a habit out of. We all know that the best way to save an underexposed photograph is to simply pay attention to the histogram while taking photos and if it’s pushed all the way to the left adjust our settings and reshoot.

Of course with that said, there are cases where it’s impossible to reshoot, or we just forgot to check our settings and get home to realize everything is underexposed and in that case we can do one of two things – toss the photo in the trash or try and save it.

Today I’m going to show you…

after underexposed

I’d like to mention upfront that to be able to achieve these kinds of results you really must be photographing in the RAW format – no ifs, ands or buts about it! If you need a bit of clarification as to why RAW is important you can read all about the RAW format here.

Let’s Save An Underexposed Photo

Underexposed histogram

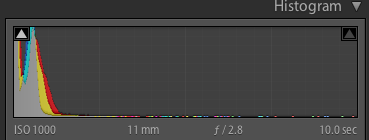
If you do get home and your histogram looks the one to the right than you’ve got an underexposed photograph in serious need of some help. It probably looks very similar to the before image above with just peaks of light in the very brightest parts of the photograph.

Before you give up hope and assume that your shoot is a complete failure there are a few things you can do to try and salvage the underexposed photographs that you’ve taken.

I’m going to be presenting you with three techniques that you can use to get the most out of what you have. However it is important to note that every photograph is different and will present its own unique set of challenges. These three ideas will give you something to try in the event that you do get home and find your photographs have taken a turn for the dark side, but they might not be able to bring them back, sometimes they truly are too far gone.

For this tutorial I’m using a fairly serious example, in most cases I would hope that you won’t have nearly as bad a situation as I have for you today, so let’s get started!

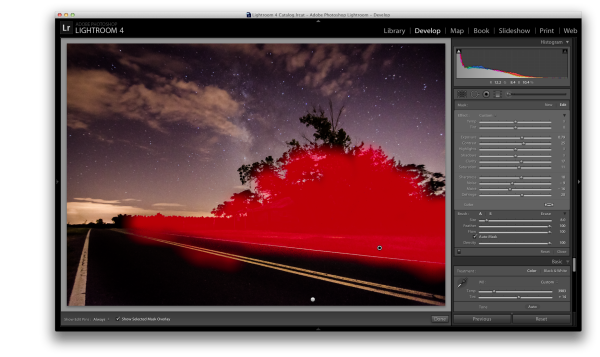
#1 – Save what you can get rid of what you can’t

This might not be the best way to go about things, but it certainly is the easiest way to get something out of nothing.

By simply adjusting the basic settings a bit to expose for the sky in the photograph I create a simple silhouette of the trees and leave it at that. The final step was to clone out the little bits of the run down shack that were peaking out asking for attention, but not adding to the photograph.

Definitely not the best option for this photo, but it is an option worth considering when you are processing your own photos – sometimes you really don’t have to save everything – it might not be what you had intended the shot to be, but that doesn’t mean it’s a complete loss.

Clone Screenshot

Expose for what you have clone out what you can’t save.

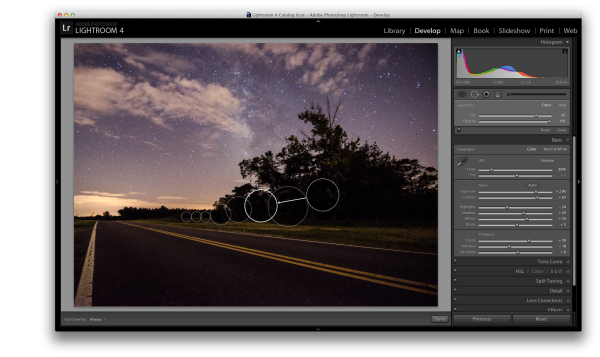
#2 – Use Graduated Filters and Adjustment Brushes Until You Can’t Use Them Anymore

For this second attempt at saving this image I did a lot of the same processing as I did on the first one to get the sky the way I wanted it. Once I got to that point instead of simply giving up and cloning out the run down shack I decided to add a graduated filter and some adjustment brushes to try and save the foreground.

As you can see with just a few modifications I was able to really bring out the hut and add some light to the grass as well as some much needed contrast to the road. This became the after image scene above.

Graduated filter screen shot

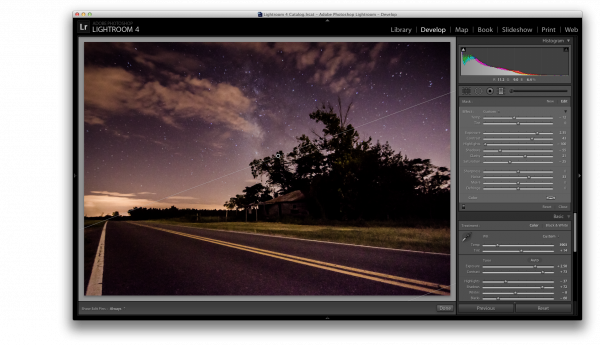
Use a graduated filter to bring light back into the foreground.

Adjustment Brush Overlay One

Add light to the grass and hut with one adjustment brush

Adjustment Brush Overlay Two

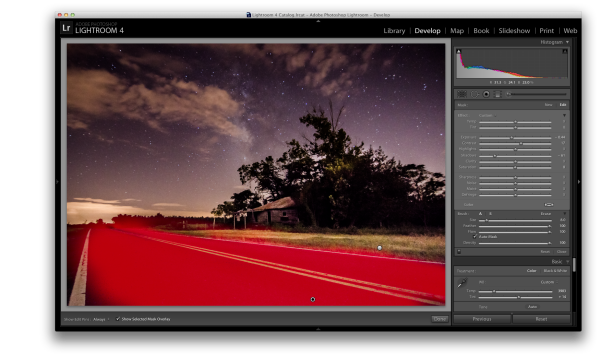
Darken the road to add contrast and remove some noise with a second adjustment brush.

#3 – Convert to Black and White

If we have a really bad case of underexposure, as I do in this photograph, noise will become a problem. As you recover data from the darkest of the shadows you will find that there just isn’t any data there to recover and you’ll end up with pixelated noise in those regions. This is especially true if you were already shooting at a higher ISO.

In cases like this sometimes the only solution left to do is convert to black and white. By converting the image to black and white you essentially are able to hide the color noise leaving only the luminance noise in the photograph. While it’s still not ideal, it can be a useable alternative if you have no other options.

Reduce noise by converting to black and white

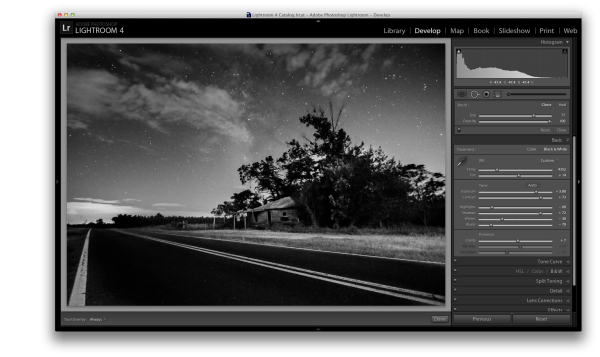
Convert the image to black and white to minimize the effect of noise

For those who enjoy videos this photograph’s edit was part of a weekly series I run on YouTube called Let’s Edit you can watch the video of that episode below.

Post originally from: Digital Photography Tips.

Check out our more Photography Tips at Photography Tips for Beginners, Portrait Photography Tips and Wedding Photography Tips.

How To Save An Underexposed Photo Using Lightroom

The post How To Save An Underexposed Photo Using Lightroom by John Davenport appeared first on Digital Photography School.


Digital Photography School

 
Comments Off on How To Save An Underexposed Photo Using Lightroom

Posted in Photography


Wonderful Photo Project Showcase: Kim Leuenberger’s “Traveling Cars Adventures”

09 Nov

As I previously posted, we have launched a series of articles where amazing photo projects from around the globe will be featured. Today, I’m dying to share with you the photo project called “Traveling Cars Adventures” by Swiss photographer Kim Leuenberger. She is an avid traveler. While traveling the world, she takes her favorite toy cars to capture them in Continue Reading

The post Wonderful Photo Project Showcase: Kim Leuenberger’s “Traveling Cars Adventures” appeared first on Photodoto.


Photodoto

 
Comments Off on Wonderful Photo Project Showcase: Kim Leuenberger’s “Traveling Cars Adventures”

Posted in Photography


Turn Your Photos Into Beautiful Photo Narratives With Exposure

07 Nov
Extra photos for bloggers: 1, 2, 3

There are plenty of places on the web to post a photo your friends will “like.”

Our pals at Exposure have created a way to share photos that’ll make your friends straight up marvel!

Exposure is a super simple way create a photo narrative with your photos. Drag and drop your very best shots onto the page and an algorithm arranges them for you.

Type in a few words and you have a beautifully laid out photo story ready to share.

It takes the tricky out of making a stunning spread so you can concentrate on having adventures and taking great shots.

For inspiration, check out the very best Exposure photo stories already created.

Exposure is rolling out invites as we speak and we’ve got a link that’ll get you to the front of the line.

Sign up for Exposure, Share Your Photo Stories

Related posts:

  1. Turn Your Photos into Beautiful Glass Etchings! Extra photos for bloggers: 1, 2, 3 Before printers spewed…
  2. DIY: Turn Photos Into Beautiful Watercolor Portraits Extra photos for bloggers: 1, 2, 3 Photography and stencil…
  3. Black and White Conversion: The Best Ways to Turn Color Digital Photos Into Beautiful B&W ~Have a cool photo product or site? Reach 270,000 photo…


Photojojo

 
Comments Off on Turn Your Photos Into Beautiful Photo Narratives With Exposure

Posted in Equipment


Non-destructive photo editing feature coming in Android 4.4 KitKat

06 Nov

kitkat.png

Google is giving a sweet treat to photographers in its new KitKat operating system. Android 4.4 will be shipping with a non-destructive photo editing feature in the native Gallery app. From what we’ve seen of the software so far, it appears to offer a huge collection of some of the most advanced editing tools available on any mobile photography app. Learn more on connect.dpreview.com.

News: Digital Photography Review (dpreview.com)

 
Comments Off on Non-destructive photo editing feature coming in Android 4.4 KitKat

Posted in Uncategorized


Photo Term Series #21: Dark-Frame Subtraction

05 Nov


Digital SLRs offer a function called Dark-Frame Subtraction usually called “Long Exposure Noise Reduction” or “High ISO Noise Reduction” in your camera’s settings menu. Dark-Frame Subtraction exposes a camera’s digital sensor less any external light for a matching duration of a photo taken to detect digital noise and electroluminescence. When the Dark-Frame Subtraction feature is active hot pixels, amp glow and other aberrations are subtracted from your photo. This feature works very well in most instances, but does tie up your camera limiting your ability to take a photo in quick succession. For example if you make a 2 minute exposure with this feature on, immediately after your exposure is completed another 2 minute exposure will be made to generate a dark-frame. A net total of 4 minutes will pass before you can review your photo or take another.

Dark-Frame Subtraction is a great thing to take advantage of if you have the time, patience and battery life.

For more on long exposures check out my ebook Photographing the 4th Dimension – Time

Copyright Jim M. Goldstein, All Rights Reserved

Photo Term Series #21: Dark-Frame Subtraction

The post Photo Term Series #21: Dark-Frame Subtraction appeared first on JMG-Galleries – Landscape, Nature & Travel Photography.


Related Stories

  • Photo Term Series #21: Dark-Frame Subtraction – Enclosure
  • The Ancients – Bristlecone Pine Forest, California
  • The Ancients – Bristlecone Pine Forest, California – Enclosure


JMG-Galleries

 
Comments Off on Photo Term Series #21: Dark-Frame Subtraction

Posted in Equipment


Sigma updates SD1 and Photo Pro to support 18-35 F1.8 DC HSM lens

30 Oct

Sigma-Imaging_logo-trans.png

Sigma has released updates for its SD1 and SD1 Merrill cameras – as well as for its Photo Pro software – to add support for the recently released 18-35 F1.8 DC HSM lens. On the camera side, the SD1 firmware update improves color in peripheral areas of the image when the aperture is wide open. As for software, Sigma’s Photo Pro v5.5.3 is now optimized for Raw (X3F) images taken with the SD1 camera and 18-35 lens.

News: Digital Photography Review (dpreview.com)

 
Comments Off on Sigma updates SD1 and Photo Pro to support 18-35 F1.8 DC HSM lens

Posted in Uncategorized


Fro Knows Photo Beginner Flash Guide – Review

29 Oct

It’s a little past 4:00 a.m. and I just finished watching all three hours of the just-released Fro Knows Photo Beginner Flash Guide.  A lot of photography-related books and videos come across my desk, and my favorites are always those that have something to offer not only the beginner, but the advanced photographer as well. This is absolutely one of them. In this follow-up video to his Fro Knows Photo Beginner Guide, Jared Polin (the aforementioned Fro) leads you on an off-camera flash adventure, taking you from hopelessly intimidated to supremely confident in a style all his own. Not bad for a three-hour tour.  With expert assistance from friend and professional photographer Adam Lerner, viewers have a front-row seat to everything from breaking down the contents of an affordable-but-effective light kit, to a behind-the-scenes look at six professional-grade photo shoots, all lit with a single speedlight and a convertible umbrella.

fro-knows-photo-flash-guide

The Beginner Flash Guide starts literally from the ground up, planting a light stand firmly on the floor and explaining not only the contents of the light kit, but how those five or six pieces all work together to achieve professional-quality lighting without breaking the bank. Jared launched FroKnowsPhoto.com in 2010– a brand and a website that quickly became synonymous with making advanced photography techniques accessible not only to professional photographers, but also to beginners, hobbyists, and enthusiasts. The Beginner Flash Guide maintains and elevates that educational philosophy, taking what can be the confusing language and landscape of photographic lighting, and essentially handing the viewer a dictionary and a road map.

Among the nuts and bolts laid out are: The Lighting Kit Explained, Four Ways to Trigger Your Flash, Flash-to-Subject Distance, How Shutter Speed Affects Ambient Light, Understanding Flash Zoom, and Quality of Light. Plus, thirteen “Quick Tips” interspersed throughout the lessons cover some minor and some not-so-minor details on topics ranging from which rechargeable batteries you should use (lithium) to how best to interact with your subject. Word to the wise– make sure you take notes– they’ll make retaining and applying the information to your own photography much easier. An additional, non-video element is the included Flash Photography Field Guide– a six-page PDF designed to be printed and tucked away in your camera bag for quick, easy reference. The field guide does a great job of summarizing the basics covered in the videos, as well as offering suggestions for overcoming some real-world lighting challenges.

Not everyone is lucky enough to have a mentor or someone to show them the ropes when they are first trying to learn this stuff. The BFG can and will fill that void. But even if you already have a firm grasp of off-camera flash principles– or just need a refresher– the lessons in this video guide can enhance and build upon what you already know. There will always be trial and error when it comes to learning and experimenting with photographic lighting. The Beginner Flash Guide, though, can help you minimize the error.

Get your copy of the Fro Knows Photo Beginner Flash Guide here.

Post originally from: Digital Photography Tips.

Check out our more Photography Tips at Photography Tips for Beginners, Portrait Photography Tips and Wedding Photography Tips.

Fro Knows Photo Beginner Flash Guide – Review

The post Fro Knows Photo Beginner Flash Guide – Review by Jeff Guyer appeared first on Digital Photography School.


Digital Photography School

 
Comments Off on Fro Knows Photo Beginner Flash Guide – Review

Posted in Photography