RSS
 

Posts Tagged ‘Photo’

Pics.io rolls out online Raw converter, collaborative photo sharing

20 Dec

LivePicsio_facebook.jpg

As Pics.io continues its efforts to launch browser-based photo editing tools — with support for Raw files — and online storage, the first of its services is available now, for free. Pics.io’s Ukrainian developers have rolled out both Live.pics.io, collaborative online photo sharing, and raw.pics.io, an online Raw file converter. Learn more at connect.dpreview.com.

News: Digital Photography Review (dpreview.com)

 
Comments Off on Pics.io rolls out online Raw converter, collaborative photo sharing

Posted in Uncategorized


Art of Building contest: Vote for your favorite photo

16 Dec

Lady_in_Waiting_by_Linda_Wride.JPG

An eerie view from Alcatraz, the use of child labor in India and a symbol of the Soviet Union’s past industrial rush are some of the finalists in this year’s international Art of Building photography competition run by the Chartered Institute of Building. A panel of judges shortlisted 15 images. Now the contest turns to you to decide the winner. Learn more

News: Digital Photography Review (dpreview.com)

 
Comments Off on Art of Building contest: Vote for your favorite photo

Posted in Uncategorized


Want to remember something? Don’t take a photo

14 Dec

Selfie.jpg

Nowadays we snap photos of every detail of our lives — the food we eat, what our cat is doing, the quirky things we see, the places we go — and we do this in an effort document and remember those experiences. But a new study, published in Psychological Science, suggests it’s possible that the act of taking pictures may actually lessen our ability to recall details of a subject. Learn more

News: Digital Photography Review (dpreview.com)

 
Comments Off on Want to remember something? Don’t take a photo

Posted in Uncategorized


Enter the 2014 World Press Photo contest

11 Dec

NAS1-AL_copy.png

One of the premier photojournalism competitions, the 2014 World Press Photo contest, is now open for entries to professional photographers. The deadline for submissions is January 15, 2014 and the winners will be announced on February 14, 2014. The top award, the World Press Photo of the Year, carries a cash prize of €10,000 (~$ 13,764). Learn more

News: Digital Photography Review (dpreview.com)

 
Comments Off on Enter the 2014 World Press Photo contest

Posted in Uncategorized


Lightroom Workflow – from Setup to Finished Sunrise Photo

01 Dec

One of my favorite times of the day to photograph is sunrise. There’s just something about the peacefulness of being up before the sun, before most of the human world, that allows me to clear my head.

Sunrise photos have always been high on the list of fan favorites and I know that there are a great many DPS readers who love them as well, so I thought I’d share with you a little bit about how I made the shot above from finding the location to setting up the camera and then a step by step walk-through of my Lightroom workflow.

Lightroom Workflow Final Image

Determining a location

To begin a shoot you need a concept, and while photographing sunrise is always a great concept to start with, one of the most important things that you’ll need to do is find a location. This can be difficult to do sometimes, but if you’re struggling to find a new location, check out 5 Creative Ways to Find New Locations for Photography for some inspiration.

I can tell you that the inspiration for this photo came from my sister who saw this boat house while out on an afternoon jog. She sent me a text message demanding that I come spend a night so that I could photograph it at sunrise – and sure enough that’s exactly what I did. The key point to take away from this is, that inspiration can come from anyone and any where, so make sure that you are paying attention to your surroundings as well as what people are saying about their own.

As for getting to the location for a sunrise shoot you’re going to have to wake up early. Well before sunrise. For this reason I typically will either spend the night in a hotel or find a friend or family member who lives close enough to the location to allow me to crash for a few hours, otherwise there might not be any point of sleeping at all. Think of it like this… If you can still see stars – you’re doing it right!

Setting up the camera

Since camera settings will vary depending on your scene I thought I’d share a couple behind the scenes shots. The first is one that my sister took of me while I was setting up my camera and tripod along the shore – notice how close to the water I get. The second shot is a close up that I took of my camera setup during the shoot, notice that for this particularity shot the tripod was nearly flat against the ground to allow me to get a very low perspective, and allow for the foreground sea grass to take up a good portion of the frame.

Lightroom Workflow - Setting up the shot

A behind the scenes shot of yours truly setting up the camera

Lightroom Workflow - Behind the Camera

A photo of the camera set up – notice how close to the water and how low to the ground I put the camera for this shot

It’s important to note that each shoot is going to be different and you must realize that with every sunrise and every location there will be challenges that you will have to overcome. While I can show you examples of how I set up the camera and my thought process behind it, when you get out to your own location it’s up to you to determine the best ways to photograph the scene.

Back home – it’s time to process the photos

Lightroom Workflow - Office

Just for fun I thought I’d throw in this snapshot of my office – What’s your desk look like?

Lightroom workflow – which frame to process?

Before you can start processing you must determine which of the frames you want to use. There’s no “one-size-fits-all” way of doing this, it really comes down to the person behind the computer. Some people like to simply process everything from the start of their shoot to the end. Other people like to meticulously rate everything, fill in all the meta data and stay super organized. My own workflow usually consists of a quick browse through all the photos that I’ve captured in a particular shoot, rating each of the ones I want to edit with a 5-star rating, and leaving everything else untouched for the time being. I’ll usually come back to shoots from time to time, to see if anything I may have missed on my first go through jumps out at me on a second glance.

Lightroom-workflow-collage

Six different frames from the shoot – I chose the bottom right frame for today’s photo

Lightroom workflow – making adjustments

Now that you’ve chosen a photograph to edit, it’s time to dive into the develop panel and get started with the post production workflow.

Lightroom Workflow - Oriignal

Enter the develop panel and select the photo to be edited.

Since this photograph is all about the sunrise, the first step is to make sure that you get your sky exposure as close to perfect as possible. By making a small adjustment here to the exposure slider in the basic tab you can have a great effect on the sky which will set the foundation for the rest of the photograph. It might look a bit under exposed at first, but we will be fixing this and fine tuning everything throughout the tutorial.

Lightroom Workflow - Expose for the sky

Adjust the exposure for the sky

To bring the foreground back into the image you will want to add a graduated filter into the frame (assuming you didn’t use one in the field of course). To do this simply press the ‘M’ key on your keyboard to open that panel in Lightroom. To apply the graduated filter drag in from the bottom of the frame and place the filter on the horizon line. Remember the filter’s effect is greatest starting from the direction you initially dragged in from so here the effect will be greatest towards the bottom of the frame.

Next to bring the exposure back into the foreground by increasing the exposure and shadows sliders (moving them to the right) of the graduated filter until you’re satisfied with the look. You will be able to fine tune the image by using the basic tab a bit later. You can always go back to this graduated filter if you need to make a minor adjustment later on, as well, simply by revisiting the graduated slider panel and clicking on the button (dot) of the graduated slider to activate it for editing.

Lightroom workflow - graduated filter

Apply a graduated filter to adjust the exposure of the foreground without effecting the sky from the previous step

Now that you’ve exposed for the sky and brought back some foreground light, the next step is to add contrast, color, and clarity – all of which will help to make your image ‘pop’. This can be done by using the basic tab in Lightroom, which I’ve covered in Master These Five Lightroom Sliders and Your Photos Will Pop, if you’d like more information.

Lightroom workflow basic tab

After achieving a general evenness in the previous steps use the basic tab to add contrast, color and clarity

At some point you’ll want to clean up the dust spots or remove distracting pieces of litter or other unwanted items from your image so now’s a good time to jump into the clone/heal tool and do just that – as you can see I need to get my sensor cleaned.

Lightroom Workflow - Cloning

Here’s a good chance to clean up those pesky dust spots by using Lightroom’s clone/heal tool

Final adjustments can be made by using a combination of different adjustment brushes. Usually you’ll want to use this tool to control specific areas of the photograph, or specific parts of the exposure. To open the adjustment brush panel press ‘K’ on the keyboard and click on your image to place a brush. If you’d like to use more than one brush you can click on ‘New’ and again click on your image which will allow you to adjust two different parts of your scene separately from one another.

In the photo below I’ve added an adjustment brush to affect the highlights, and contrast of the water at varying levels of intensity. You can control these levels of intensity by adjusting the “flow” slider of the adjustment brush which will determine how much of the effect is applied at each pass of the brush – a lower flow has less effect per pass than a higher flow.

Lightroom workflow - adjustment brush

Fine tune the highlights on the water with an adjustment brush. The red overlay can be turned on and off with the check box below the photo (or ‘O’ on your keyboard)

Before you call it a day – the last step is to dive into the detail panel in Lightroom and apply some sharpening. For some more information on Lightroom’s sharpening options you can watch this Youtube video A Look at Sharpening in LR4, which is part of a weekly series I run on my channel.

Lightroom workflow - sharpening

Apply any sharpening you wish using Lightroom’s sharpen panel.

Lightroom Workflow Export

All that’s left to do now is export and share your work with the world.

Exporting and sharing

All that’s left now is to export the photo and share the results.

I hope this step by step Lightroom workflow helps you learn a bit about how to process your own photos. Share a before and after Lightroom edit in the comments below, and if you’ve got any behind the scenes shots, those are always fun to see as well. Don’t forget to let us know how you achieved the results.

Post originally from: Digital Photography Tips.

Check out our more Photography Tips at Photography Tips for Beginners, Portrait Photography Tips and Wedding Photography Tips.

Lightroom Workflow – from Setup to Finished Sunrise Photo

The post Lightroom Workflow – from Setup to Finished Sunrise Photo by John Davenport appeared first on Digital Photography School.


Digital Photography School

 
Comments Off on Lightroom Workflow – from Setup to Finished Sunrise Photo

Posted in Photography


The Pencil vs Camera Photo Project That Will Make Your Eyes Pop Out of Their Sockets

29 Nov

I’m going full steam ahead to continue our series of articles about awesome photography projects from all over the world. I hope you enjoyed the Cars Adventures and Oh, My Head photo projects we’ve previously posted! Today, I’m going to share with you the Pencil vs Camera project pictures by Ben Heine. His works are bursting full of surrealistic poetry, Continue Reading

The post The Pencil vs Camera Photo Project That Will Make Your Eyes Pop Out of Their Sockets appeared first on Photodoto.


Photodoto

 
Comments Off on The Pencil vs Camera Photo Project That Will Make Your Eyes Pop Out of Their Sockets

Posted in Photography


Photo app promotes creativity with crowd-sourced assignments

28 Nov

app.png

A new app for iOS aims to motivate and inspire photographers by merging assignment-based photography with an optional social media element, all in the palm of your hand. OKDOTHIS offers a wide array of categories, including those created by users, with photo assignments that anyone can participate in. Learn more on connect.dpreview.com.

News: Digital Photography Review (dpreview.com)

 
Comments Off on Photo app promotes creativity with crowd-sourced assignments

Posted in Uncategorized


10 Signs you Might be a Photo Geek

24 Nov

I’ve watched a few of this guy’s videos and I have to say they’re quite funny. If you can’t laugh at yourself, who can you laugh at?

This video is by DigitalRev TV, hosted by, as he puts it in his YouTube profile, “an asian dude with British accent”. He covers 10 tongue in cheek signs that you might be a photo geek if . . .

So, are you?  I’m pretty sure I am but I’m usually the last one to bring a big camera to social events, or any camera at all. So maybe I’m a recovering one? There is hope!

Have any other signs you’d add to this list? Come clean, are you a Photo Geek too? It’s okay, you’re among friends here.

Cheers,

Darlene-1-250x130

Post originally from: Digital Photography Tips.

Check out our more Photography Tips at Photography Tips for Beginners, Portrait Photography Tips and Wedding Photography Tips.

10 Signs you Might be a Photo Geek

The post 10 Signs you Might be a Photo Geek by Darlene Hildebrandt appeared first on Digital Photography School.


Digital Photography School

 
Comments Off on 10 Signs you Might be a Photo Geek

Posted in Photography


Guide to DIY Photo Booth Backdrops

21 Nov

Extra photos for bloggers: 1, 2, 3

Party time! Excellent!

‘Tis the season for some serious partying and these days no party is complete without a photo booth.

Setting up a photo booth is as simple as providing a backdrop and encouraging your pals to point their smartphones toward it.

We’re here to help you with that first part (you herd your own friends in front it).

We’ll teach you three easy-peasy ways to craft a party poppin’ backdrop.

Give your party photos that extra schwing and have your friends chanting “we’re not worthy! we’re not worthy!”

Learn to Make 3 Simple Festive DIY Backdrops

(…)
Read the rest of Guide to DIY Photo Booth Backdrops (490 words)


© Karla for Photojojo, 2013. |
Permalink |
No comment |
Add to
del.icio.us

Post tags:


Photojojo

 
Comments Off on Guide to DIY Photo Booth Backdrops

Posted in Equipment


How To Freeze Moving Subjects in a Long Exposure Photo

20 Nov

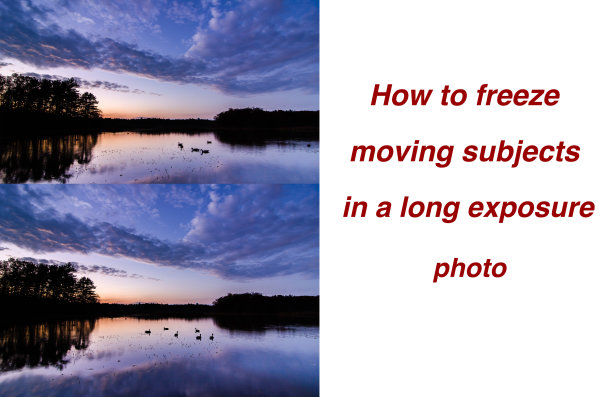
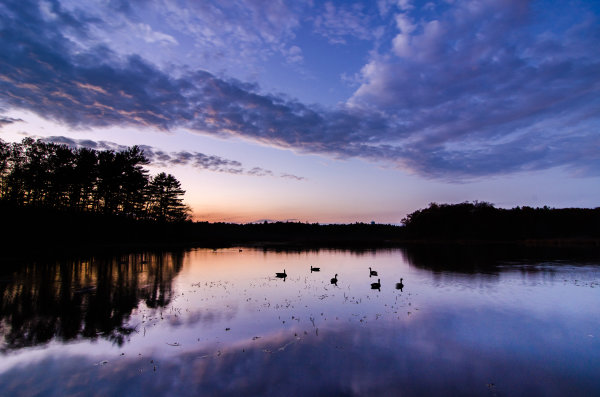
So you have this idea for a photograph where you’ve smoothed out the water on a lake using a long exposure, but want to capture the wildlife swimming on said lake frozen in place – or something similar?  I had that same vision and I’m going to show you how I accomplished it below, so you can follow along.

freeze subjects in long exposure photo

When trying to capture this kind of photograph in a single frame you’re pretty much out of luck. You can either capture a long exposure shot to smooth out the water, OR increase your ISO and capture a shot using a faster shutter speed to freeze your subject. No matter what you do in camera though, one piece of this puzzle will be out of line with the other.

So how do you freeze your subjects in a long exposure scene? Simple – with a little bit of post production.

Part One – Photograph Two Different Images

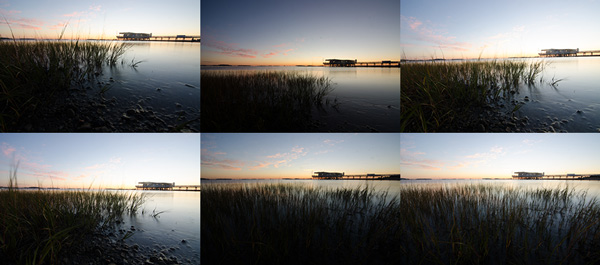
You will need two frames to work with in post production; one with a fast shutter speed to freeze the moving subjects, and one with a long exposure to smooth out the water in the scene. You don’t want to change the Depth of Field between the two frames, and need to make sure that the overall exposure remains the same, so you are left with changing the ISO setting to achieve the results you want.

The long exposure shot will be taken at ISO 100 and whatever settings will be required to get the optimal exposure for the scene in front of you and the faster shutter speed shot will be taken with a higher ISO setting allowing you to achieve a fast enough shutter speed to freeze the motion of the subject you want stationary.

In the example photograph the long exposure was taken at 1.3 seconds, and the high ISO photograph was shot at ISO 4000. This allowed me to get an exposure of 1/30th of a second (still fairly slow, but workable for the desired result).

Part Two – Combining the Images in Photoshop

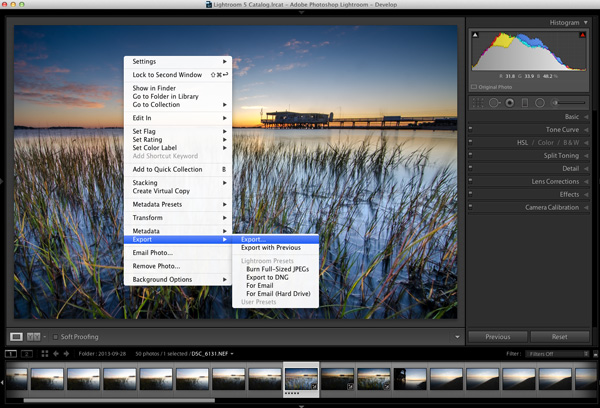
Here’s the first, unprocessed image, straight out of camera. Before you get to freezing the moving subjects you need process the original photo. I will be working in Lightroom 4 to demonstrate.

Original Long Exposure

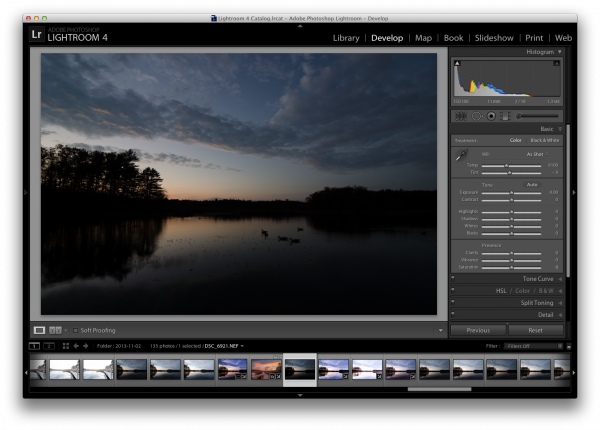
Original long exposure photo in Lightroom

After applying a few graduated filters, some adjustment brushes, and playing with the basic sliders I was able to achieve a result that is pleasing. If you’d like to see exactly how I created this – you can watch the entire process here.

Now that you’ve got the photograph properly exposed you’ll notice that the problem is very evident in the photograph – the moving subjects just wouldn’t sit still for the long exposure. So it’s up to post production magic to solve this issue.

Processed Photo

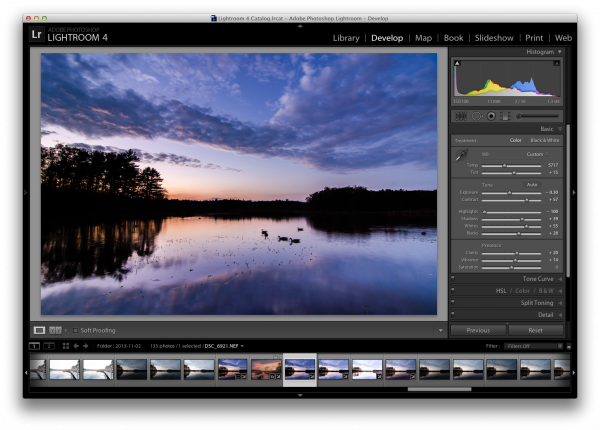
Process the long exposure image to your liking

Use Lightroom’s “sync” feature in the Develop Module to bring the settings from the photo above over to the high ISO photo that you will be using . This will allow you to make sure everything stays the same (color, contrast, tone, etc.) between the two images when you get to creating the composite later.

sync

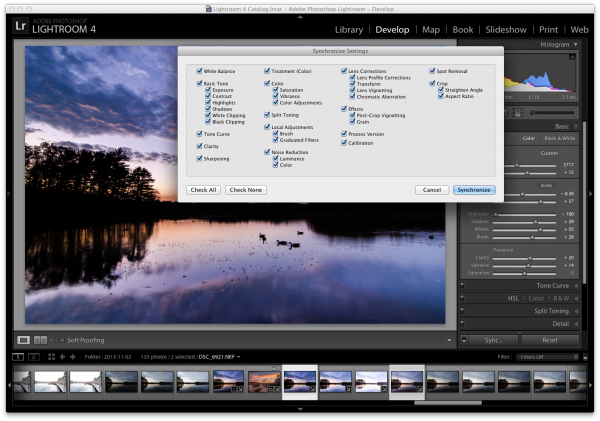
Sync settings from the processed long exposure shot with the high ISO shot used to freeze the subject

I suggest applying some minor adjustments to the high ISO image to get the subjects to stand out more (as they are going to be the only piece of the high ISO used in the final version).

One of the main areas of focus for this example image was to create lines that are as hard as possible for the subjects, so that they stand out very nicely in the composite. To do this, go into Lightroom’s detail section and push up the sharpening quite a bit. You may also want to do some noise reduction to try and compensate for the high ISO exposure with increased noise.

High ISO Exposure

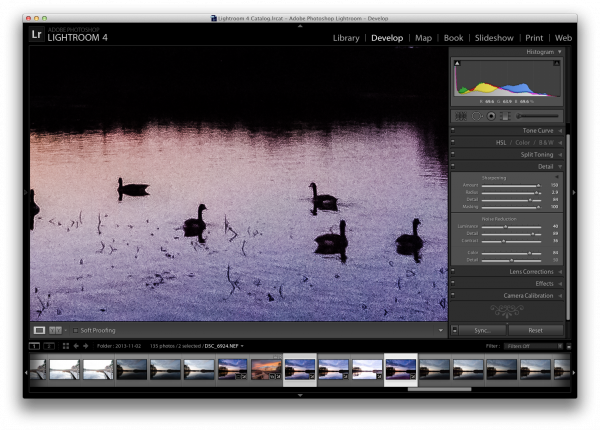
Make some minor adjustments to the high ISO shot and export both images for further processing in Photoshop

While Lightroom is great for processing photos, it is limited in that you can not create composites or work with layers, which is exactly what is needed to finish this project.

Therefore it’s time to bring out the big guns and jump on over to Photoshop. Below, I’ve loaded the two files as layers, (select the two thumbnails in LR, right click on them, and choose “edit in>Open as layers in PS) with the long exposure layer on top and the high ISO layer on the bottom.

Jump into Photoshop

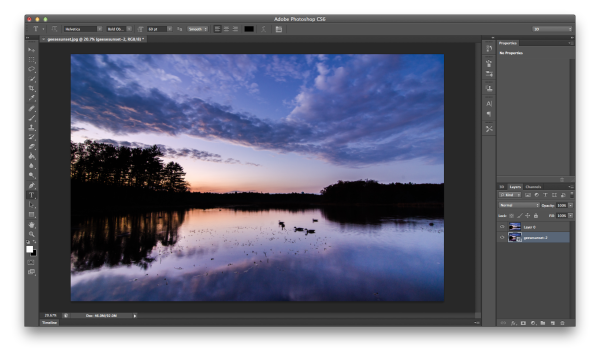
Open both photos as layers in Photoshop – I typically put the high ISO image on the bottom as we will be using less of that image in most cases.

I like to clean up the long exposure shot as well as I can first, so I went ahead and got rid of the blurry geese by performing a simple clone job. Go ahead and do that on your image as well if suitable.

Clone

Clone the blurred subject from the long exposure shot

Next reduce the opacity of the long exposure layer (which I’ve arranged as the top layer). This will allow you to see the high ISO layer as a reference point, while still being able to see most of the long exposure shot as well.

Reduce Opacity

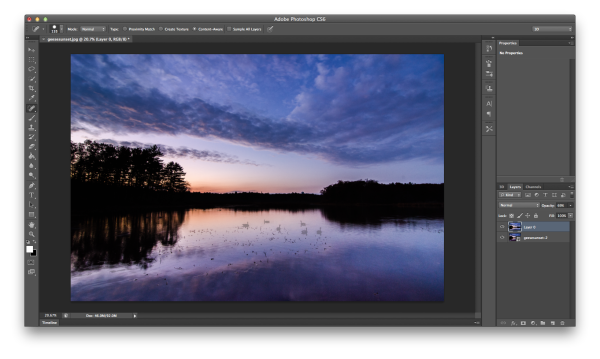
Reduce the opacity of the long exposure layer allowing you to see the high ISO layer below

With the high ISO layer selected, use Photoshop’s selection tool to make a rough selection of the subjects in the frame. Next add a layer mask to the long exposure layer, which you will be using in the next step.

Select high iso subject and add layer mask

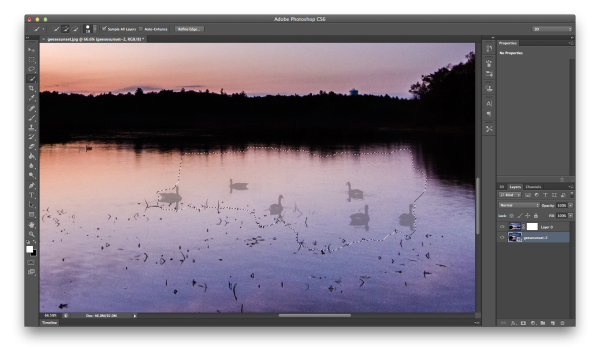
With high ISO layer selected, select your ‘frozen’ subject and add a layer mask to the long exposure layer

Once the subjects have been roughly selected, fine tune the edges of the selection to make sure you’ve got everything you need. Then select the layer mask you added to the long exposure layer and fill in the selection with a black paint bucket fill (make sure your swatches are set to default black/white and use the tool at 100%). This is a very crude way of getting the geese into the long exposure shot, but does the job quickly and it works.

Bring Frozen Subject Forward

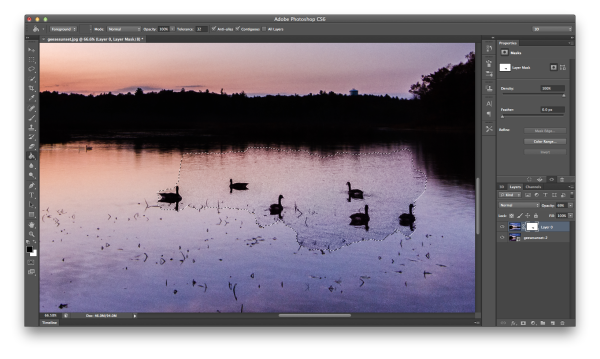
With the layer mask selected for the long exposure layer, use the paint bucket to fill in the selected region

Now that you have your subjects visible within your frame, bring the opacity of the long exposure layer back to 100% and start the clean up. I recommend you work in broad strokes first using a wide brush with the color white selected. This will allow you to get most of the areas between the subjects from long exposure frame back, instead of the noisy high ISO frame.

Clean Up part one

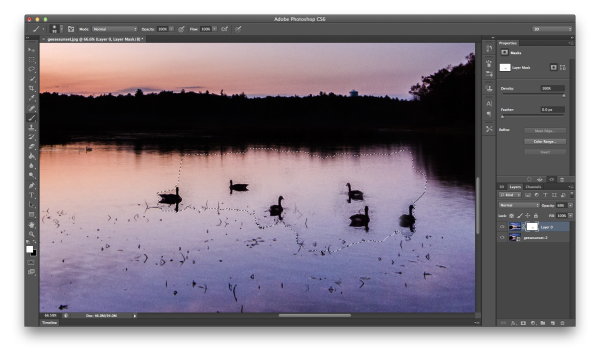
Using a white paint brush clean up the areas in between and around the subject in broad strokes first

Once you have a basic rough clean up done, it’s time to zoom closer and use a finer point brush to do the detail work. It’s a time consuming process. But, this must be done, or the final image will end up looking like two images put on top of one another, and not one cohesive, final image.

Detail Work

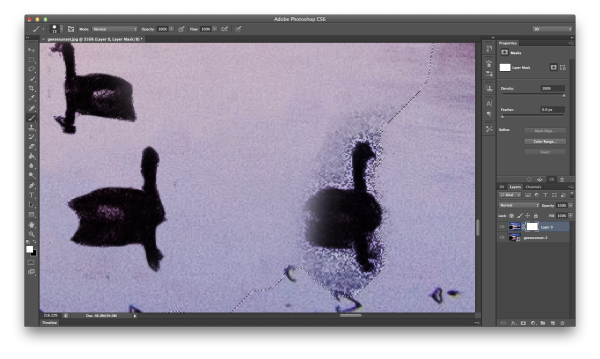
Once you’ve roughed out the clean up – zoom in with a small brush and continue the clean up on a more detailed level

You’re on the home stretch now!

Do one final check of the image by hiding the high ISO image (click the little eyeball next to the layer). By doing this, places the mask has been applied will now be transparent, and you’ll easily be able to tell if there were small areas that need fixing.

Final Clean Up

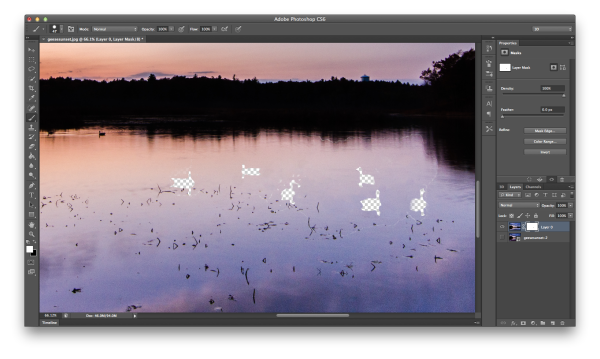
As a final clean up – hide the subject layer and see if there were any spots that need a final adjustment

After the final touch up and a few other minor tweaks in photoshop you’re ready to merge layers, save the image and show your friends. (you can also save a layered version if you think you might want to edit it more later)

geesesunsefinal

Save and share your final shot

Summary and more reading

I hope you got something out of this step by step walkthrough – for more information on how to mask in Photoshop, which is really what this entire process boils down to, check Photoshop Masks 101. If you’ve ever created a long exposure, high ISO composite, I’d love to see it in the comments!

Post originally from: Digital Photography Tips.

Check out our more Photography Tips at Photography Tips for Beginners, Portrait Photography Tips and Wedding Photography Tips.

How To Freeze Moving Subjects in a Long Exposure Photo

The post How To Freeze Moving Subjects in a Long Exposure Photo by John Davenport appeared first on Digital Photography School.


Digital Photography School

 
Comments Off on How To Freeze Moving Subjects in a Long Exposure Photo

Posted in Photography