RSS
 

Posts Tagged ‘Photo’

New Gizmos for Instant Photo Saticfaction

02 Mar

Things are a-changin’ in the world of instant prints. The new Impossible Lab turns any phone or tablet into an instant cam.

Plus, Polaroids now come in round. Yeah, round. :-O

Click on through then scroll along to see the latest.

See Our Instant Photo Tools Roundup
(…)
Read the rest of New Gizmos for Instant Photo Saticfaction (0 words)


© laurel for Photojojo, 2015. |
Permalink |
No comment |
Add to
del.icio.us

Post tags:


Photojojo

 
Comments Off on New Gizmos for Instant Photo Saticfaction

Posted in Equipment


Magic for Nothing: The Best Free Photo Editors 2015

25 Feb

If you are serious about photography, you’ll likely want to start editing your photos soon. Or maybe you’re already editing photos, perhaps on a work or school computer, and you’re ready to set up your own photo editing station at home. Either way, the most popular photo editing options, such as Photoshop and Lightroom, while fantastic programs, might be outside Continue Reading

The post Magic for Nothing: The Best Free Photo Editors 2015 appeared first on Photodoto.


Photodoto

 
Comments Off on Magic for Nothing: The Best Free Photo Editors 2015

Posted in Photography


Using the Lightroom Adjustment Brush to add Dimension to a Landscape Photo

25 Feb

Adding layers of dimension with the Lightroom brush

Lightroom has the power to completely transform your landscape photograph into something far more powerful, something that hits home with viewers, and something that pops off the screen.

By default digital cameras create flatter image files than what you see with your eye. Your eye has the ability to see dimensions like no camera can really capture. Although many try.

What is Dimension?

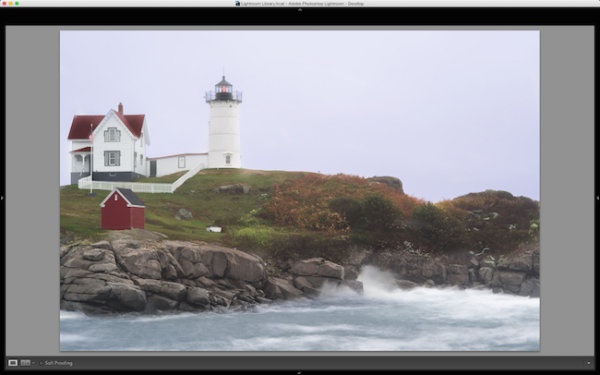
The definition of dimension is: an aspect or feature of a situation, problem, or thing. When utilizing the word dimension in your photograph, think of the features of specific locations and objects within the frame. As an example, in the photo you will see here, there are multiple layers of dimension to play with. There’s the sky, the water, the rocks, the buildings, the grass, and the shed. Each has its own uniqueness to it, and can and should be treated as such.

The Adjustment Brush Tool

Like the other local adjustment tools in Lightroom, the adjustment brush tool has the ability to fine tune specific parts of a photograph. Using the tool can create new dimensions you would never have otherwise seen from a camera rendition. Your eye, however, most likely did see the dimensions.

Lightroom Brush Tool

Where to find the Lightroom brush tool

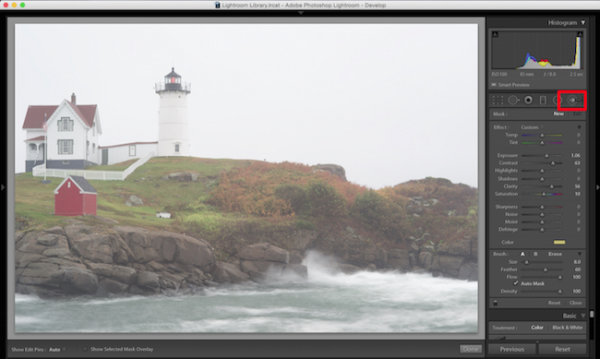
You can see in the first photo that it’s a really cool lighthouse scene, but there is something drastically gone wrong. The photo is super flat. That is because it was a very rainy day with tons of fog everywhere, and mist from the water constantly hitting the camera.

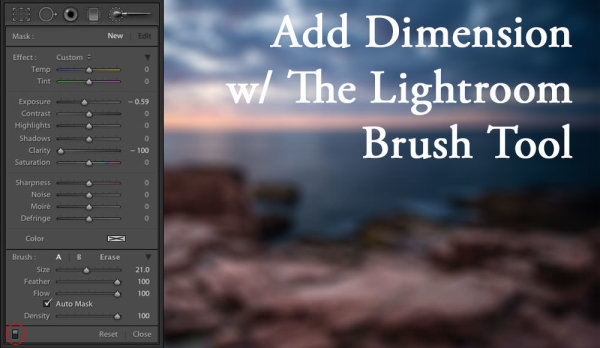
To use the Lightroom Adjustment Brush, open a photo in the Develop module, then select the brush icon at the top right, just under the Histogram (the keyboard shortcut is K).

Once selected, a variety of local adjustments will appear. From there you have a wide range of options that you can make on a very specific section of your photo. For example, sharpness, exposure, or even brushing on a new color.

The first thing you should know before starting with the Adjustment Brush is that Lightroom keeps your last settings whenever adding a new brush. To zero out the settings simply double click on the word Effect.

Also, the Auto Mask feature is very smart. Think of it like a content aware brush. Simply put, it looks at the cross hairs inside of your brush and will try to stay “within the lines” and not brush on what doesn’t match up. This is fantastic for edges. However, the Auto Mask feature uses more Lightroom performance, so you may notice a slow down. My workflow is to fill in big spaces and then turn on Auto Mask when I need it.

As you are brushing in areas, hit the O key on your keyword to see a red mask of where you have brushed (hit Shift+O to cycle through the available mask colors).

Lightroom masking

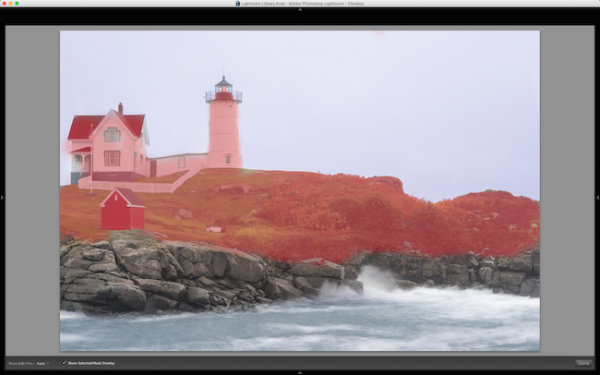
Hit the O key to view the current mask in a red overlay

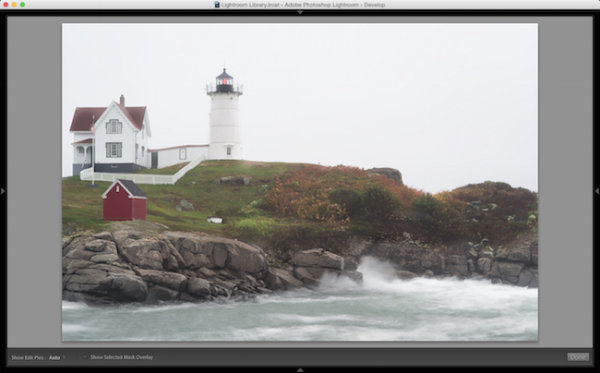
I started brushing the middle section of the photo with more contrast, and reduced highlights and shadows. This broke through the haze and enhanced the greens enough to where I like it.

I then made another brush by clicking on New in the brush panel. This one was to bring down the extreme highlights of the house and lighthouse. I brought it down just enough so it’s still white, but doesn’t blend in with the sky, which is also very white.

Then came a third brush, which was for the rocks. I wanted to make sure they popped out more than anything else. I didn’t want them to just have contrast, so I also used the clarity slider. Clarity will enhance a lot of edge detail, which is awesome on rocks.

Lightroom brush clarity

Add clarity to select objects using the Adjustment Brush

Now that the grass, the structures and the rocks all have different dimensions of contrast, clarity and light, it is time to play with the color dimension. So I created another brush with a hint of transparent blue to the water. This adds more life to the boring gray tone it had previously.

I then did the same with the sky, but with less transparency due to the whiteness of the sky already. Adding a hint of color the white sky helps separate the house and lighthouse from the background even more.

The last brush I added to the photo was on the roof of the house. The intention there was to recover the red color subtly, so it doesn’t take away from the rest of the photo. So I increased the contrast, dropped the exposure slightly and added a hit more red to the roof.

Lightroom brush color

Add color to specific areas using the Lightroom brush

At the end of the day, the photo has multiple layers of dimension. It’s no longer flat, and notone section has the same feel as the rest. Using the brush feature in Lightroom I was able to not only recover color and contrast, but add even more texture and life to the scene.

Think of the Adjustment Brush tool like layers in Photoshop or onOne Software. There are no actual layers but rather brush points which can be adjusted individually.

Below is a video showing what I’ve done with this photograph.

There is a lot more that can be done, like sharpness, noise reduction and even changing color temperature and tinting for specific areas in a photo. But what I have shared here is a handful of what you are capable of doing within your favorite photography workflow software, Lightroom.

I’d love to see some photos you have processed using Lightroom Adjustment Brush tool. Please comment to share with the dPS community.

googletag.cmd.push(function() {
tablet_slots.push( googletag.defineSlot( “/1005424/_dPSv4_tab-all-article-bottom_(300×250)”, [300, 250], “pb-ad-78623” ).addService( googletag.pubads() ) ); } );

googletag.cmd.push(function() {
mobile_slots.push( googletag.defineSlot( “/1005424/_dPSv4_mob-all-article-bottom_(300×250)”, [300, 250], “pb-ad-78158” ).addService( googletag.pubads() ) ); } );

The post Using the Lightroom Adjustment Brush to add Dimension to a Landscape Photo by Scott Wyden Kivowitz appeared first on Digital Photography School.


Digital Photography School

 
Comments Off on Using the Lightroom Adjustment Brush to add Dimension to a Landscape Photo

Posted in Photography


How to Make an Architecture Space Look and Feel Natural in a Photo

24 Feb

The New Age of Architectural Photography

Gone are days of interior photos looking like furniture showrooms. So, too, are the days of exterior photos being full of uplighting accents and HDR effects.

NewAge2

Today, architectural photography is all about lifestyle. The appeal of luxury has shifted away from the material luxury and flashy spaces of high society to an intangible luxury that transpires during quiet moments with loved ones. It’s more about quality of life than quality of goods.

When shooting interiors, your goal as photographer is to create a space that makes the viewer want to be there. You want them to imagine themselves in that space, and most importantly, to escape to it.

As a photographer, you not only have to read a space for its light, material, and flow, but you also need to feel the space. Consider a sleek urban condo in a downtown high-rise versus a historic Victorian house in family neighborhood versus a new construction in a suburban development. Each architectural development stirs up different feelings, and these are what you want to capture in your photography.

So how do you transfer these feelings into your images? Here are four steps to get you started.

1. Set the Stage

Focus on the personality and live-ability of the space. Luxurious bouquets of roses set in an empty room at sunset won’t do the trick. Instead, emphasize the day-to-day moments — an open book and some cushions on the seat of a bay window, a comfy throw blanket draped over the couch, or jewelry laid out on the dresser of a walk-in closet.

NewAge1

2. Mixing Cleanliness with Reality

Yes, the space should be clean. Yes, it should be cleaner than usual. However, it shouldn’t feel sterile. You want it to feel lived in, but not dirty.

All flat surfaces should be wiped down and cleared, except for staging items. Every light fixture should be in working order since they’ll be turned on to ensure the space has adequate lighting. Floors should be mopped or vacuumed. Any areas where the carpet or hardwood floors look old and worn, such as in high traffic areas, should be covered up with inexpensive area rugs. Be aware of any clutter that we get used to in our day-to-day life. A small pile of clutter goes a very long way in photos, and so all those stacks of mail, magazines, and books should be tucked away out of sight.

NewAge3 2

3. Use Optimal Lighting

A well-lit space is crucial! You want to create a look that feels natural, happy, and real, so use all of the light resources available to you. Photos should be shot during the day so you can take advantage of any soft sunlight that pours in.

As a secondary light source, be sure to turn on all of the lights. Yes, all of them. They’ll be turned on to give the space a warm and inviting feel. Long exposures shot on a tripod help brighten up shadows a bit, but you can also use a flash to bounce light off walls and ceilings to fill in shadows.

NewAge4

4. Vary the Photo Set

Wide shots are vital and dramatic and show the overall space well. However, details can be just as compelling.

Materials and traditional luxuries themselves are not important to show in detail. Rather, you must show the personality in the details. Staged items are perfect for shooting close-ups and setting the tone.

That pen and paper on the desk. The pastry and coffee cup on the side table next to an arm chair. The puzzle in progress by the bay window with a view. The tea kettle steaming with boiling water on the stove. These touches take your shots from a simple set of interior photos to the story of a lifestyle.

What are your tips for giving architectural photography a natural look and feel? Share your thoughts and photos in the comments section below.

googletag.cmd.push(function() {
tablet_slots.push( googletag.defineSlot( “/1005424/_dPSv4_tab-all-article-bottom_(300×250)”, [300, 250], “pb-ad-78623” ).addService( googletag.pubads() ) ); } );

googletag.cmd.push(function() {
mobile_slots.push( googletag.defineSlot( “/1005424/_dPSv4_mob-all-article-bottom_(300×250)”, [300, 250], “pb-ad-78158” ).addService( googletag.pubads() ) ); } );

The post How to Make an Architecture Space Look and Feel Natural in a Photo by Natalia Robert appeared first on Digital Photography School.


Digital Photography School

 
Comments Off on How to Make an Architecture Space Look and Feel Natural in a Photo

Posted in Photography


Make Magical Photo Special FX (no spells required)

18 Feb

Ta-da! We’re about to reveal our best tricks for creating magical photo effects.

With a little collection of ordinary objects you can make your photos extraordinary.

Turn the whole world into a whole rainbow party, transform a handful of flour into a majestic cloud, paint the night sky with light and more.

Read on and you too can put the special in special effect photography.

Photojojo’s Guide to Special FX Photography

(…)
Read the rest of Make Magical Photo Special FX (no spells required) (575 words)


© laurel for Photojojo, 2015. |
Permalink |
No comment |
Add to
del.icio.us

Post tags:


Photojojo

 
Comments Off on Make Magical Photo Special FX (no spells required)

Posted in Equipment


Russian gay rights story wins World Press Photo contest for Danish photographer

17 Feb

A photograph that highlights the difficulties facing sexual minorities in Russia has won the World Press Photo contest’s top prize. ‘Jon and Alex’, from a project called ‘Homophobia in Russia’, shows an ‘intimate moment’ between a gay couple from St. Petersburg and won Danish photographer Mads Nissen the Contempory Issues category of the competition, as well as the first prize for a single image, netting him 11,500 Euro and Canon DSLR equipment. See winners

Articles: Digital Photography Review (dpreview.com)

 
Comments Off on Russian gay rights story wins World Press Photo contest for Danish photographer

Posted in Uncategorized


Photo Journaling Can Help you Become a Better Photographer

11 Feb

MonicaDayDPS-Journal-01

Let’s face it, photographers are artists. We love creating works of art in our photography. We love to express ourselves with our camera. We create photographs based on what our mind sees. You can take five different photographers with the same setting or model and get five completely different photographs. We are artists and photograph in our own unique ways. It’s important for us to continue to learn and grown and keeping a journal is an amazing way to do that. Your photo journal will serve two purposes. The first is to document your growth as a photographer. The second is to show where you were mentally when you took your photos. You’ll love being able to reference this information in the future.

Why Journal?

MonicaDayDPS-Journal-03

I learned photography by shooting with a 35 mm Pentax camera I picked up from a pawn shop. I didn’t have the luxury of looking at my screen (or chimping) after each shot. I had to shoot a roll of film, bracket, and then review the contact sheet to see what worked. I did this for months until I was able to predict what my settings needed to be in a variety of situations. I kept a journal of my photos and wrote down the settings that corresponded with each shot. I learned to do this while in art school. Nowadays, you don’t have to do this, but keeping a journal is still an amazing way to see your progress.

How Do You Journal?

MonicaDayDPS-Journal-02

There’s really no right or wrong way to do this, the key is to just do it. Basically, you’ll be writing consistently and adding your photos. When you have an awesome shoot – journal it. When you have a sucky shoot – journal it. Attach your photo and write about your feelings, the settings, the occasion, your equipment, anything new you tried, and anything else you might find relevant. The key is to write about anything that might give insight into how you created that photo. I’ll often add my inspiration sheets to the journal page. It’s just a nice way of referencing where you were pulling your inspiration at that time in your life. I encourage you to date your entries as well.

Just get started and you’ll develop a system that works for you. You can get as creative as you’d like. This is YOUR journal.

Creating Your Journal

MonicaDayDPS-Journal-05

The first thing you want to do when creating your photo journal is to find a book of some sort that you’ll be using. I like big sketch books. These give me plenty of room to attach my photos and to write about them. Next, get to snapping! That’s right. Take photos. Make it a habit to take photos weekly or even daily. You might not use all of these in your journal but you’ll have them to pull from. Take care that you are attaching your photos in a way that they won’t fall out. Double sided tape is excellent. You can even use photo corner adhesive pieces so that you can remove your photos if you ever need to later.

This journal is an expression of yourself, for yourself. You can get creative with it, or keep it simple. This is for your reference only.

MonicaDayDPS-Journal-04

Photo journaling is an excellent way for you to work on your photography and know where you need improvement. It’s a great way to express yourself and keep from being burned out. Photo journaling is a great way to get yourself shooting out of your norm, and even try new things. I encourage you to try this for a while and see how it changes your world. I’m sure you won’t be disappointed.

googletag.cmd.push(function() {
tablet_slots.push( googletag.defineSlot( “/1005424/_dPSv4_tab-all-article-bottom_(300×250)”, [300, 250], “pb-ad-78623” ).addService( googletag.pubads() ) ); } );

googletag.cmd.push(function() {
mobile_slots.push( googletag.defineSlot( “/1005424/_dPSv4_mob-all-article-bottom_(300×250)”, [300, 250], “pb-ad-78158” ).addService( googletag.pubads() ) ); } );

The post Photo Journaling Can Help you Become a Better Photographer by Monica Day appeared first on Digital Photography School.


Digital Photography School

 
Comments Off on Photo Journaling Can Help you Become a Better Photographer

Posted in Photography


Serif launches Affinity Photo, a Photoshop alternative for Mac

11 Feb

Serif has launched Affinity Photo software, an alternative to Adobe Photoshop for Mac users. The company touches on a couple different notable selling points: its software is considerably cheaper than Photoshop, but no less robust, and comes with the added benefit of silky-smooth operation, at least according to its maker. Additionally, because it is newly created for the latest hardware, Serif says Affinity Photo offers performance that Photoshop struggles to match. Read more

Articles: Digital Photography Review (dpreview.com)

 
Comments Off on Serif launches Affinity Photo, a Photoshop alternative for Mac

Posted in Uncategorized


Preparing for a Successful Client Photo Session

11 Feb

“Watch out”, she yelled a little too late as I slipped on an icy patch of snow and tumbled unceremoniously, almost flat on my face. The first thought racing through my head was, “My camera! Please God let nothing happen to my camera!”. Had I researched the location and the weather prior to my photoshoot, I would have realized that the temperatures had dipped quite a bit the night before, freezing the melting snow on the ground. A few hundred dollars later (my lens took the brunt of my fall and the focus ring got dislodged) with my ego a little bruised, I now always check the weather report before I head out. My car is my traveling studio and has everything I would ever need for any type of situation – photography related or otherwise!

Digital Photography School Preparing for your client photoshoot Memorable Jaunts

No matter what your level of photography expertise, a little anxiety or nervousness before a client photo session is very normal and typical. But with a little preparation ahead of time, you can reduce the anxiety, be confident that you have prepared for almost any eventuality, and actually have fun with your clients. I agree that preparations takes on different meaning for different types of client sessions – these are basic guidelines.

#1 Equipment related preparations

This is almost a no-brainer, but something that needs to be reiterated every single time. Recharge camera batteries, reformat memory cards, and clean lenses and cameras. Always carry spare batteries and extra cards. If you are going to be out for the whole day, carry your battery charger. You never know where you might find an electrical outlet, and those few extra seconds of battery life might just come in handy. I am very particular in downloading my images as soon as I get home from a client session. But that does not always happen, and there have been a couple of times where I had images on my card from prior shoots. There is nothing more unnerving than trying to remember if you have downloaded old images (or not) in front of your clients who are ready to be photographed.

#2 Location related preparations

Being a wedding and family photographer in Chicago means I have to deal with different types of clients, with different needs and expectations. Plus, weather is a huge factor in scheduling photo sessions. I am a natural light, outdoor photographer – that is what I do best. In a pinch, I will photograph indoors but that is not my first choice.

For family photo sessions, I have a few locations where I am very comfortable photographing. Those are my go-to location recommendations for my clients but every once in a while, I will get a client who wants to dictate the location. It could be a special place with special memories. This is where google maps comes in very handy. If it’s a local spot close to home, I will scope out the location prior to the shoot. But that is not always practical, especially with out of town weddings and engagement sessions, so I rely on google maps (any similar map tool will also do). Additionally ask around. I belong to several online groups of photographers and often times a quick question to the group gets me all the information I need about a particular location.

Digital Photography School Preparing for your client photoshoot location scouting Memorable Jaunts

Invest in location scouting ahead of time, you never know what hidden gems you may find.

Digital Photography School Preparing for your client photoshoot Location scounting Memorable Jaunts

The bike mural was hidden in an alleyway and could have been easily missed had I not scouted the location ahead of time.

#3 Business related – contracts, model releases and questionnaires

This might be different based on your own photography business, but generally having a contract and a model release is advisable. This helps in level setting for both parties. My workflow is such that clients are required to sign a contract and a model release form prior to the actual session. But life does get in the way and sometimes they forget. I always carry spare model release forms with me – clients are more than happy to sign the forms at the end of session rather than having to go back home and mail out the materials. With my wedding photography clients, I have the couple fill out a detailed questionnaire – this has specifics like names, relationships of people in the wedding party and wedding photo shot list. The more details I can get from the bride, the better prepared I am, even before the main event.

#4 Visualize and plan your poses

A little preparation goes a long way! Hopefully by following the above tips, you are feeling confident and prepared for the photo shoot. Take it a step further and visualize your session even before it happens. Research poses and looks you want to capture that are a true representation of your work. Mentally walk through the shoot. Having an idea of what, when and where will really help you create a road map of how you want to execute the shoot.

It is also okay to write down must-have poses and shots, and refer to them periodically during the shoot. I always take a few minutes during the shoot to check the back of my camera. I am open and honest with my clients and tell them that I want to make sure I have gotten the shot I visualized. Sometimes I also show them the back of the camera to see what I am seeing. Clients appreciate this feedback and it makes them feel like they are doing the right thing. Happy clients = confident clients = happy photographer! Remember that most clients are not professional models and putting them at ease is as much a part of your job as is taking pictures.

A little preparation and previsualization really helps in getting images that resonate with you and your brand.

A little preparation and previsualization really helps in getting images that resonate with you and your brand.

#5 Save the best for last

This goes hand in hand with #4. Most people get very self-conscious when a camera is pointed at them no matter how prepared they are. Often times the first 10 minutes of the shoot are the most awkward and uncomfortable for both parties. Do your best to set them at ease, talk to them from behind the camera, and encouragement them. Since you have pre-visualized your shoot, and also scoped out the location ahead of time, you know the best poses and the best light and location backdrop.

Save this for the last 10-15 minutes of the session. By this time the clients have warmed up to you and the camera and are having a good time. They are more open and receptive to trying out new things ensuring you have the shots that you want.

Traditional Outdoor Family Portraits Memorable Jaunts

One of the last frames of this outdoor family photoshoot – everyone was really relaxed and happy!

Of course, there are still a lot of things that can go wrong no matter how prepared you are. The weather might take a sudden turn for the worse, your car might have a flat tire 20 minutes before the session, the family might cancel at the last minute (I speak from experience). The key is to be prepared for all the obvious and apparent ones and just roll with the punches for the things you cannot control.

googletag.cmd.push(function() {
tablet_slots.push( googletag.defineSlot( “/1005424/_dPSv4_tab-all-article-bottom_(300×250)”, [300, 250], “pb-ad-78623” ).addService( googletag.pubads() ) ); } );

googletag.cmd.push(function() {
mobile_slots.push( googletag.defineSlot( “/1005424/_dPSv4_mob-all-article-bottom_(300×250)”, [300, 250], “pb-ad-78158” ).addService( googletag.pubads() ) ); } );

The post Preparing for a Successful Client Photo Session by Karthika Gupta appeared first on Digital Photography School.


Digital Photography School

 
Comments Off on Preparing for a Successful Client Photo Session

Posted in Photography