RSS
 

Posts Tagged ‘Photo’

Photo Lessons From the Street

18 Aug

Street photography can be intimidating. Snagging candids of strangers is uncomfortable, at first.

While it’s best to simply to get out and learn as you go, it is nice to arm yourself with a few tips. Marius Vieth, a seasoned street-photog, doles out 10 lessons learned in this article. He includes advice on how to blend in, predict patterns and be ready for that crucial moment.

Our favorite tips from the article are:

  • Minimal gear – Take only your camera and forget the added gear. You don’t want to be swapping lenses when the perfect photo-op pops up.
  • Find natural contrasts – Your foreground should be different enough from the background to make them both visually interesting.
  • Simplify your choices – Try focusing on one element (like a color or pattern) for a couple hours.

Photo by Marius Vieth


© Erin for Photojojo, 2015. |
Permalink |
No comment |
Add to
del.icio.us

Post tags:


Photojojo

 
Comments Off on Photo Lessons From the Street

Posted in Equipment


How to Transfer a Photo to Wood – Video Tutorial

17 Aug

This is a good rainy day (or weekend) project for you to try at home. All you need is a print of your image (reversed, demonstrated in the video) on regular paper, a piece of wood, and a couple of other supplies (listed below the video).

Step by step – transfer a photo to wood

This video by SLR Coaching takes you through all the steps to print out your photo and get it transferred and applied to a piece of wood. He’s using pixlr.com to rotate and change the image, you can use that or your preferred photo editing software. If you don’t have Photoshop or Lightroom some other good free options include PicMonkey and Canva.

The mediums he used for the transfer are:

  • Medium gel (you can get matte or glossy finish and can only use it on top of the image as well)
  • PVA glue (although he recommends using a varnish in the second video below – you can get it in matte or glossy finish, spray or paint it on. If you use the paint on and put it on a bit heavier you’ll get a texture on the surface like a painting.)
  • Block of wood (get one at your local hardware or craft store)

Updated video with a few extra tips such as: best type of wood to get, coating the photo afterwards, and a few others.

If you “have a go” as he says, share a photo of your completed project below.

googletag.cmd.push(function() {
tablet_slots.push( googletag.defineSlot( “/1005424/_dPSv4_tab-all-article-bottom_(300×250)”, [300, 250], “pb-ad-78623” ).addService( googletag.pubads() ) ); } );

googletag.cmd.push(function() {
mobile_slots.push( googletag.defineSlot( “/1005424/_dPSv4_mob-all-article-bottom_(300×250)”, [300, 250], “pb-ad-78158” ).addService( googletag.pubads() ) ); } );

The post How to Transfer a Photo to Wood – Video Tutorial by Darlene Hildebrandt appeared first on Digital Photography School.


Digital Photography School

 
Comments Off on How to Transfer a Photo to Wood – Video Tutorial

Posted in Photography


Lowepro Whistler and Photo Sport II backpacks ready for adventure

06 Aug

Lowepro has introduced the Whistler and Photo Sport II backpacks, designed to keep gear safe in the great outdoors. The Whistler is a new series built for alpine adventures, while the Photo Sport II updates a popular rugged design. Read more

Articles: Digital Photography Review (dpreview.com)

 
Comments Off on Lowepro Whistler and Photo Sport II backpacks ready for adventure

Posted in Uncategorized


Enter Summer Landscape Photo Contest, Win Premium Photography Resources!

04 Aug

Summer is a perfect time for travelling and improving your photography skills. Therefore, we decided to run a summer landscape photography contest on Photodoto. Use this great opportunity to challenge your creativity and grow as a photographer. You can win some exciting prizes too! Read on for details. Sponsors and Prizes There are going to be 5 winners in this Continue Reading

The post Enter Summer Landscape Photo Contest, Win Premium Photography Resources! appeared first on Photodoto.


Photodoto

 
Comments Off on Enter Summer Landscape Photo Contest, Win Premium Photography Resources!

Posted in Photography


Think Tank Photo Sub Urban Disguise 30 Shoulder Camera Bag Review

02 Aug

Packing and carrying equipment for travel adventures is always a challenge. With increasing airline restrictions and not being willing to check your gear, you need to find the best possible alternative for your needs. Like most of my peers, I covet several bags. Usually when going abroad I take a bag with all the equipment and a smaller, second bag for everyday outings once on location. As I tend to travel lighter and lighter every day, I was on the lookout for a bag that could serve dual purposes for my recent Italy trip. I wanted a bag that could carry my two Fuji X bodies, some lenses, a filter kit, and my iPad. The other important consideration was that the bag needed to be easy to access and work from.

Think Tank Photo Sub Urban Disguise 30 - Image Courtesy of Think Tank Photo

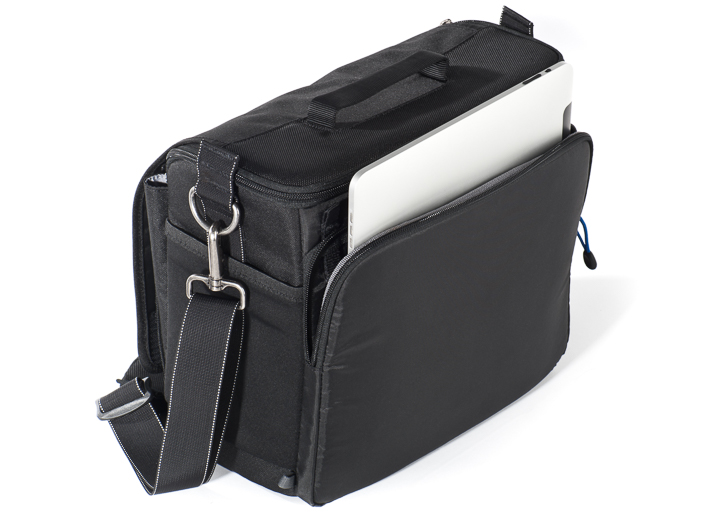
Think Tank Photo Sub Urban Disguise 30 – Image Courtesy of Think Tank Photo

After much looking around, I settled on the Think Tank Sub Urban Disguise 30. As you may know, Think Tank products are legendary and they carry their well-known “non-rhetoric warranty.” This bag is one from their compact series, designed for small kits. There are four different models and the 30 is the biggest of them all, the one that features a separated iPad compartment.

The bag is constructed of high-quality ballistic polyester, treated for water resistance. It features YKK® zippers, stretch pockets on the sides, two-ply bonded nylon thread, and a removable shoulder strap. The interior comes with removable dividers and a rain cover that fits in the main outside pocket.

Besides the main compartment, the Sub Urban Disguise 30 has multiple pockets. There is a front organizer pocket on the front flap that can accommodate personal items. Under the main flap, there is a large pocket that is roomy enough to store bigger accessories, like battery chargers, cables, or perhaps a travel book. There is also a mesh pocket inside the main flap for smaller accessories. The exterior stretch side pockets can fit a bottle of water or a flash.

Think Tank Photo Sub Urban Disguise 30 Details - Images Courtesy of Think Tank Photo

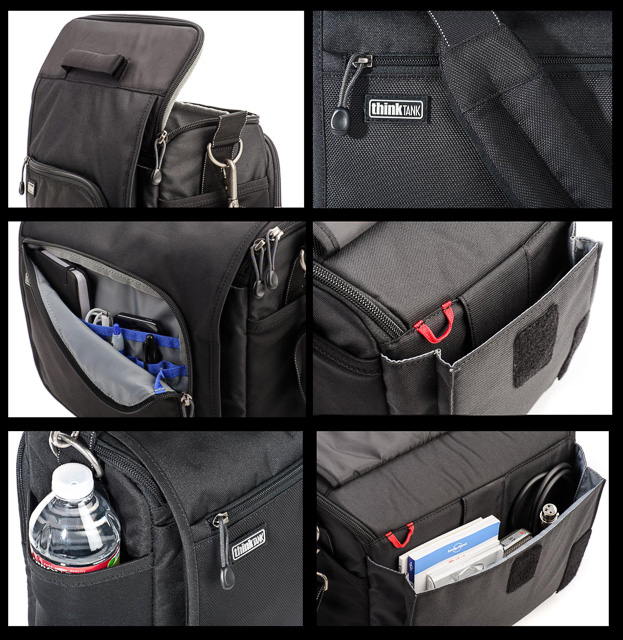
Think Tank Photo Sub Urban Disguise 30 Details – Images Courtesy of Think Tank Photo

The bag dimensions are:

  • Exterior: 12” x 10” x 7.3” ((W x H x D)
  • Interior: 11” x 9.5” x 5” (W x H x D)
  • iPad pocket: 10.7” x 8.5” x .8” (W x H x D)

According to Think Tank, this bag can fit a standard-size DSRL, two to four zoom lenses, a regular iPad, and a 70-200 f/2.8 lens unattached. As I am shooting mirrorless, my use was a little different, and I was able to fit two Fujifilm X-T1 bodies with lenses attached, three separate lenses, a full-size filter kit, the iPad, and accessories, and I had room to spare.

Lower Section Think Tank Photo Sub Urban Disguise 30

My kit bottom layer  contains Fujinon XF 55-200 mm f/3.5-4.8, Fujinon XF 23mm f/1.4 and Rokinon 8mm f/2.8 fisheye for Fuji X mount.

Lower Section Think Tank Photo Sub Urban Disguise 30

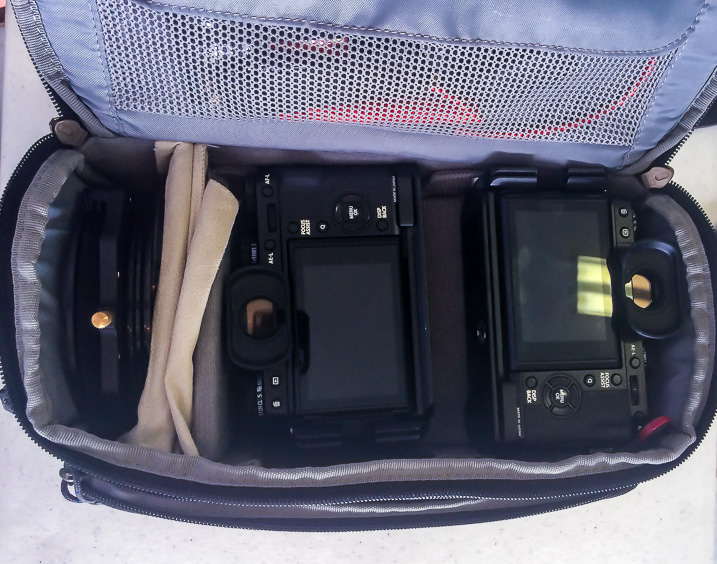
My kit upper layer contains Fujifilm X-T1 body with Fujinon XF 10-24mm f4.0 lens attached, Fujifilm X-T1 body with Fujinon XF 16-55 f/2.8 attached and on there is a complete Lee Filter kit with 3 ND grads and 2 NDs. (Photo taken with iPhone)

As you can see, I loaded mine by layering the interior in two tiers. I placed lenses on the bottom of the bag, which I separated from the top with the provided dividers, and then placed both camera bodies on top for easy access. On the side I had the filter kit. As explained above, one of the things that I was looking for was to have easy access to the gear, and this way I had both bodies with the most used lenses within very easy access. The bag is very comfortable to wear as the shoulder strap is solid but very well padded.

One of the best things about this bag is the way it opens. There is a flip-top lid that folds away from your body, and that really helps you to reach the camera fast. This top lid is zippered and totally separated from the main Velcro exterior flap that accesses the bigger pocket. In the end, the bag was everything that I expected, so I will continue to use it on future trips, especially the ones around cities with lots of walking, and where I need quick access to the cameras, to take a shot and put it away again.

Obviously, how much you can fit in the bag will depend on the type of configuration you use and how you divide the bag internally, but if you want something relatively light for urban walks or travel, this is really a very good option. If you don’t need to carry a tablet, you can also consider this bag’s smaller siblings with three more models to choose from. There is probably one that will suit you well. The price for this bag starts at $ 49.75 and this particular model is $ 84.75, a price that I believe is more than reasonable for all these features and quality.


googletag.cmd.push(function() {
tablet_slots.push( googletag.defineSlot( “/1005424/_dPSv4_tab-all-article-bottom_(300×250)”, [300, 250], “pb-ad-78623” ).addService( googletag.pubads() ) ); } );

googletag.cmd.push(function() {
mobile_slots.push( googletag.defineSlot( “/1005424/_dPSv4_mob-all-article-bottom_(300×250)”, [300, 250], “pb-ad-78158” ).addService( googletag.pubads() ) ); } );

The post Think Tank Photo Sub Urban Disguise 30 Shoulder Camera Bag Review by Daniel Korzeniewski appeared first on Digital Photography School.


Digital Photography School

 
Comments Off on Think Tank Photo Sub Urban Disguise 30 Shoulder Camera Bag Review

Posted in Photography


Photo History Club: Pop Art Photography

29 Jul

I believe one could argue that the general population as a whole has historically had a messy, sometimes turbulent, relationship with art. As artists throughout time have sought to interpret their different realities and experiences as a human being, the end results we call “art” have, at times, ventured into increasingly esoteric realms. That is to say, difficult to understand Continue Reading

The post Photo History Club: Pop Art Photography appeared first on Photodoto.


Photodoto

 
Comments Off on Photo History Club: Pop Art Photography

Posted in Photography


How to Creatively Alter the Light in Your Photo Using Lightroom

28 Jul

photo of a Tokyo streetscape after being fixed in Lightroom

Learn how to fix problem light and enhance your vision for your photos in Lightroom.

If you’re like most of us, you’ve taken photos from time to time that you’ve had high hopes for, only to realize later on that they didn’t turn out the way you’d hoped. Often what looks like awesome light when you captured the image, just doesn’t translate to great light when you view the photo on your computer screen.

When the photos you’ve captured are once in a lifetime memories they deserve better than this. Thanks to Lightroom they can be improved, fairly quickly and easily. In this video you’ll see how to relight a photo in Lightroom. You’ll learn techniques that you can use on your photos to move the light from where it is now to where you want it to be.

You will see how to use the Graduated Filter to darken skies, how to use the Radial Filter and the Adjustment Brush to bring light and saturation to where you want it to be.

Don’t get me wrong, I’m a big advocate of using the correct settings and capturing a good photo right in the camera. I’m also pragmatic and I know that, despite the best of intentions, the photos you capture don’t always look as good you’d like. Lightroom can help.

So here’s how you can use Lightroom’s tools to improve a photo. This rather lifeless Tokyo streetscape is improved so it is a crisper, shinier image with light and saturated color where it should be. This is something you can do too.

We’d like to see what you do with these tools and your photos, so feel free to show us in the comments below.

googletag.cmd.push(function() {
tablet_slots.push( googletag.defineSlot( “/1005424/_dPSv4_tab-all-article-bottom_(300×250)”, [300, 250], “pb-ad-78623” ).addService( googletag.pubads() ) ); } );

googletag.cmd.push(function() {
mobile_slots.push( googletag.defineSlot( “/1005424/_dPSv4_mob-all-article-bottom_(300×250)”, [300, 250], “pb-ad-78158” ).addService( googletag.pubads() ) ); } );

The post How to Creatively Alter the Light in Your Photo Using Lightroom by Helen Bradley appeared first on Digital Photography School.


Digital Photography School

 
Comments Off on How to Creatively Alter the Light in Your Photo Using Lightroom

Posted in Photography


7 Easy Ways to Rock Your Photo Collages

27 Jul

Sometimes one photo just isn’t enough—we know. Photo collages are gaining momentum in the social media universe, but there’s a lot of untapped potential in the art of collage making. With tons of photo collage apps out there, you can pretty much do anything you want with a smartphone and an Internet connection. With all of the different options available Continue Reading

The post 7 Easy Ways to Rock Your Photo Collages appeared first on Photodoto.


Photodoto

 
Comments Off on 7 Easy Ways to Rock Your Photo Collages

Posted in Photography


Shooting Indoors in Ambient Light: Yoga Photo Session

23 Jul

Shooting indoors is always a challenge unless you have a professional lighting setup with you. The light is usually low, so it’s hard to get any kind of depth of field. Lightbulbs inside of lamps tend to glow orange, while overhead florescent lights show up on the greenish side, and aren’t very pretty. So what do you do? Let your Continue Reading

The post Shooting Indoors in Ambient Light: Yoga Photo Session appeared first on Photodoto.


Photodoto

 
Comments Off on Shooting Indoors in Ambient Light: Yoga Photo Session

Posted in Photography


MotoCMS 3.0: The Best Option to Build a Photo Portfolio Website

18 Jul

Photography and web design are going hand in hand. A good-looking website requires stylish photo content to attract audience, as well as to compete with other web pages. And as photography gains more popularity year by year, this rivalry becomes much fiercer. So, acquiring good looking, attractive, creatively different photo web page is a high-priority task for every photographer who Continue Reading

The post MotoCMS 3.0: The Best Option to Build a Photo Portfolio Website appeared first on Photodoto.


Photodoto

 
Comments Off on MotoCMS 3.0: The Best Option to Build a Photo Portfolio Website

Posted in Photography