RSS
 

Posts Tagged ‘Photo’

Are Your Photo Backups Rock Solid?

17 Jul

What would you do if your main computer was stolen, permanently lost, or just completely died?

Did you just get shivers up your spine? If not, you probably have some form of a backup system for your data and photos. That’s great!

Rust.bucket

By rust.bucket

If you got shivers, then you best start thinking about backing up your images, pronto. Let me suggest Backing Up and Saving Your Images: Part 1 as a place to get started.

Even if you are religiously backing up your photos, are you testing those backups? How often?

This article is intended to get you thinking about how precious your images are to you, and if you are doing what you can to ensure they don’t go POOF, and are gone forever.

A Moment to Give Pause

My iMac was recently stolen. I got lucky, real lucky. The thieves did not take my external Network Attached Storage (NAS), its backup disk, nor my iMac backup disk.

It’s because those items were left behind (which were valued at more than my old iMac) that I am not still crumpled into the fetal position, crying my life away in the corner of the basement.

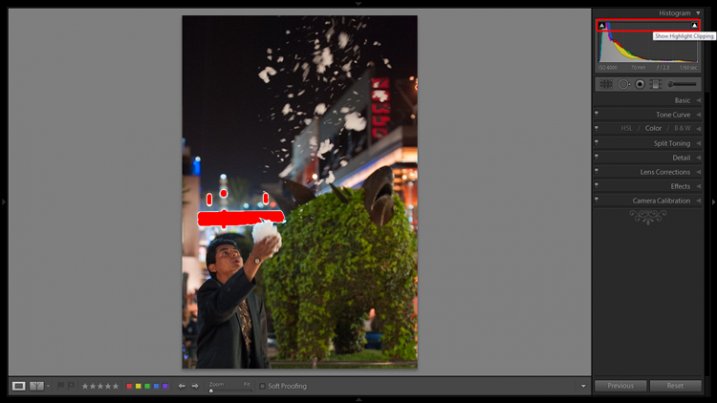
One thing I learned from this experience is that Time Machine, Apple’s native backup facility, is not perfect. I was not able to use the graphical interface to restore my old profile to my new machine, and that’s not even talking abut the photos themselves. In the end I had to fall back on my days as a systems administrator and relearn Unix command line tools to find and copy the files from my backup, over to my main machine.

Keep More Than One Copy

First, if your images are highly valuable to you, you should be keeping more than one copy of all of them (and any associated catalogs like Lightroom). This means at least another disk, or group of disks, backing up your originals.

Think to the future when buying backup discs. If you currently have 500GB of images, I would buy at least a 2TB backup device, like an external harddrive. A four times multiplier should be used at least, depending on your rate of photo capture (and your ability to filter photos as they come in). If you are on a tight budget, go for two times your current size, and trust that harddrives get cheaper as time goes on.

Either way, do the best you can to capture all of your images on a single backup device.

Keep Them Separate

Second, if you can afford it, and if the level of protection you need warrants it, keep a third copy of your files off-site. I mentioned getting lucky that the thieves saw no value in my external storage devices and I intend to never have to be so lucky again.

347561757_200a98ca5c_b

Photo by: wonderferret/flickr

Some backup services, like Apple’s Time Machine feature, make it easy to plug in two backup drives and let the software automatically make backup copies of not only pictures, but all computer files to both discs. Once a full backup is built on both drives, you take one drive off-site. A relative’s house, a friend’s house, or even a safe deposit box. Then, on a regular schedule (mine is once a week), swap the drives.

This way, at worst, you lose a week’s worth of changes if both your main computer and your backup drive go missing, or are caught in a house fire, flood, or other disaster.

Consider Online Storage

Online. The Cloud. That jargon is shorthand for “someone else’s computer”. It can be helpful when considering where to keep a backup of your images.

There are now a plethora of services that, after you hand them some cash, will store your images for you. I suggest doing this as only a backup, but for casual users it might be handy for all your storage. Just remember, those images are on someone else’s computer.

PC magazine often does a decent job of reviewing products and they have a useful list of online backup solutions here. Also don’t forget other services like Amazon and Google’s Picasa which currently have unlimited photo storage (certain restrictions apply).

Understand What a Recovery Will Entail

Now that you have your photos backed up, do you know what it will take to bring them back to life if everything goes south?

Many of us are okay with storing our data on other people’s servers (the cloud), but fail to remember it will possibly take a couple of days to recover the images if things fail. What about a partial failure? Can your backup and recovery software detect a partial loss of data and fill in the gaps? Or will you be left to manually sift through the figurative ashes and fill the holes?

Get to know your backup software not “when I have a moment”, but today. Maybe tomorrow, but no later! You don’t have to obtain guru status, but you should know your way around recovering photos (and other data) while things are calm. I can tell you from experience that when the stuff hits the fan, and the panic of losing all your work sets in, that’s no time to be learning new software.

Screen Shot 2015-06-23 at 3.54.21 PM

Learn your backup and recovery software

Schedule Tests of Your System

There’s only one way to know if your backups work – test them!

The systems administrator in me says you should test your backups monthly. But the realist in me knows few of you will ever do that unless you have an intern, or are making $ 10,000 per month from your photography business, or both.

Be realistic, and again, it will depend on how important your photos are to you. Realistically I suggest one test every three months. Once a season. That keeps your recovery skills fresh enough (hint: write out the steps you take for recovery so you don’t have to learn it new each time) that an honest recovery won’t take too long.

So tell me, are your photo backups rock solid?

If photography is your livelihood, or even if you just take family pictures, it’s best to find out right now with a test rather than find holes in your system after things have gone wrong.

googletag.cmd.push(function() {
tablet_slots.push( googletag.defineSlot( “/1005424/_dPSv4_tab-all-article-bottom_(300×250)”, [300, 250], “pb-ad-78623” ).addService( googletag.pubads() ) ); } );

googletag.cmd.push(function() {
mobile_slots.push( googletag.defineSlot( “/1005424/_dPSv4_mob-all-article-bottom_(300×250)”, [300, 250], “pb-ad-78158” ).addService( googletag.pubads() ) ); } );

The post Are Your Photo Backups Rock Solid? by Peter West Carey appeared first on Digital Photography School.


Digital Photography School

 
Comments Off on Are Your Photo Backups Rock Solid?

Posted in Photography


6 Easy Steps for Post-Processing a Low-Light Photo in Lightroom

16 Jul

The word photography comes from the ancient Greek words for “light” and “drawing”. With the presence of light being a rather important constituent in the making of a photograph, it is no wonder that low-light conditions are often a photographer’s nemesis.

While so many other lighting variables have an immense impact on your images – the quality, direction, color temperature, and intensity – but if you don’t have enough light to begin with, none of these really matter.

This article will walk you through my approach to post-processing an image taken in poorly lit conditions.

A poorly lit image after editing.

With a little Lightroom sorcery, poorly lit images can be brought back to life.


The key is to start with as strong a foundation as possible, which is to maximize the quality of the image captured in camera. For more detailed advice on how to accomplish this, have a read of:

  • How to Shoot in Low Light – 9 Commonly Asked Questions
  • A Guide to Shooting Outdoors in Low Light Conditions
  • Another great resource to bookmark is Cheat Sheet: What Gear and Settings to Use for Low Light Photography

It is also worth noting that, as far as I’m concerned, the debate over whether to shoot in RAW or JPEG does not apply here. If you are shooting in low-light conditions, shooting in RAW is imperative. You want to ensure that you have as much latitude as possible to maximize post-processing efforts.

I will also echo the sentiments of others when I say, you should not rely on editing software as a crutch. Don’t be lazy. Make every effort to use lower ISO settings, noise reduction (NR) features, use slower shutter speeds, etc., in camera first.

What is low-light?

So what do I mean by low-light anyway? I believe this is one factor which contributes to the confusing nature of this topic to begin with. When I think of shooting in low-light, I imagine a scenario where I have a hard time seeing well enough to frame the shot, the camera may struggle to find focus, and without some work, the final image will make it apparent that shooting conditions were challenging.

This is when having better quality equipment pays off. Those of you with camera bodies which can produce clean shots at high ISO settings (just take a look at the Sony A7s) have a distinct advantage from the get go. Throw in a wide aperture, fast, lens and the quality of images these device can capture in near pitch dark is absolutely incredible – especially compared to 10 years ago.

With experience, you will learn the limits of your equipment and editing software to achieve the results which you consider acceptable.

Example

I will work with this street photo I snapped in Santa Monica, California as an example. It was taken long past sunset, with only some dim illumination from distant store windows and street lights. Some hoodlums had dumped soap into a fountain which had then churned into a frothing mess when this passerby stopped, grabbed a handful and blew the suds into the air.

A night shot taken in poor lighting with a Nikon D700 at 70mm, f/2.8, ISO 4,000 and 1/60th of a second.

A night shot taken in poor lighting with a Nikon D700 at 70mm, f/2.8, ISO 4,000 and 1/60th of a second.

The combination of the image being a RAW file, and the less-than-ideal conditions it was taken in, has resulted in an image that is flat, has inaccurate color temperature, is low contrast, and has some noise. There is no exact process that can be replicated on every image, but I will walk you through the steps I toook to bring this photo back to life.

1. Check for clipped highlights, shadows

You can do this in two ways:

  1. Hold the Alt key while clicking on the highlights or shadows slider
  2. Hover the mouse over the small triangles in the upper corners of the histogram.

This will quickly and easily identify the areas of the photo which contain no information, and therefore no details to recover.

Clipped highlights are shown in red

Hovering the mouse over the triangle in the upper right corner of the histogram will illuminate all clipped highlights.

Alt + clicking on the Highlights slider shows clipped highlights

Alt + clicking on the Highlights slider shows clipped highlights

Alt + Shadows slider shows all clipped shadows.

Alt + Shadows slider shows all clipped shadows. This photo has no clipped shadows.

For shooting in low light, you will most often be concerned with clipped shadow areas. If details important to the image are clipped, it may not be salvageable – this is a judgment call to make on an individual basis.

Although it is underexposed, the image has no clipped shadows, and only a small bit of clipped highlights.

2. Adjust exposure correctly for the subject

For this image, the person is the subject so I want him to be properly exposed therefore I will zoom in on him and set the exposure. I want his face to be a bit brighter and clearer so I’ve increased exposure 9/10 of a stop (+0.90).

Before and after of exposure adjustment.

The exposure was increased to brighten the subject. Before and after of exposure adjustment.

3. Increase contrast

This is going to involve a process of trial and error, adjusting several sliders, and analyzing the effects they have on the image in combination with one another.

From what the histogram showed me, and what is obvious by looking at the image, there are significant portions of the image that are dark – the sky, the subjects jacket, etc. These dark areas have nothing to add to the image and after increasing the exposure, have become a lighter shade of gray and have created more noise.

Therefore, I am going to purposefully clip some of these shadowed areas by decreasing the Blacks slider value. I prefer to drag the slider all the way to -100, and start increasing it until the image looks good. At -70 the shadows obscure unimportant details which brings more attention to highlighted areas.

Contrast can be adjusted further in the Tone Curves panel. If this is uncharted territory for you, the article Lightroom’s Tone Curve Explained is a good place to start.

Image showing location of drag and adjust tool in Tone Curve panel

A shortcut for adjusting all similar tones in an image can be found in the Tone Curve panel.

TIP: Using the click and drag tool in the upper left hand corner of the Tone Curves panel is a quick and easy way to adjust tones in your image. Click the tool to activate it; place it over the tone in the image that you wish to adjust (shadows, highlights, etc.); click and drag the tool up or down and it will adjust all similar tones in your image automatically.

4. White balance

As exposure and contrast affect the colors in an image, I prefer to make those adjustments before dialing in the white balance. There are two ways to accomplish this:

  1. Click and drag the Temp slider
  2. Use the Eye Dropper (targeted adjustment) tool to let LR attempt to correct the white balance automatically
Image showing the location of the Eyedropper tool.

The Eyedropper tool is an automated feature that will approximate correct white balance for you.

The key to the Eye Dropper tool is to select an object in your image that should be pure white (or anything that you know is a neutral tone like black or gray). I find the tool can sometimes give you a starting point from which to work, but very rarely gives you an accurate result straight away.

As a result of the sodium vapour street lights, this image is far too warm, has turned the subject’s skin orange, and has made the greens too yellow. I’ve reduced the white balance color temperature from 3,750 degrees to 3,300.

TIP: In the Develop Module, the forward slash key toggles between before and after, so you can quickly see the adjustments you have made. You can also click the the box in lower left with two Y’s, which shows a before and after side-by-side comparison (if that tool bar is not showing, click T on your keyboard to show/hide it). Although this can help guide any changes you make to your image, I find it particularly useful to toggle back and forth when correcting white balance.

5. Clarity

The Clarity slider changes local contrast, especially in the midtone areas of your image. Increasing clarity can help define the edges of objects and add depth to an image, while decreasing clarity will soften details and add a dreamy glow.

Raising the Clarity slider to +25 adds a bit more pop to this image. Adding too much clarity can accentuate blemishes in portraits and dull colors, so use it sparingly.

6. Noise Reduction

Noise and color noise are the downfall of many lo- light photos, especially those taken on less capable cameras. Noise adds a general grainy haze, and color noise shows up as little little specks of random colors, which can look like big splotches on shadowed areas.

It’s often most noticeable in the dark areas of an image but can wreak havoc on skin tones as well. Luckily, it’s easy to fix in LR and doesn’t decrease image quality too much. It does have its limits so always shoot at the lowest ISO possible.

Since this photo was taken on a camera with legendary low-light capabilities (in its day), noise levels aren’t too bad even at ISO 4,000.

The Noise Reduction slider is found in the Details panel underneath the Sharpening sliders. For this image I increased the Luminance slider to +30 and the Color slider to +15.

Image showing before and after noise reduction.

The noise is this image was fairly minimal and Lightroom easily reduces it. Image showing before (right) and after (left) noise reduction.

A side effect of noise reduction is decreased detail so don’t be too heavy handed.

Image before edits.

The original image before any post-processing.

Image after edits.

The original image after post-processing.

That is a basic walk-through of my approach to a photo shot in low-light, or poor conditions. Although the editing process could go much further and get more technical, this is a good starting point to breathe some life back into poorly lit shots.

Do you have any other good post-processing tricks for low-light images to share?

googletag.cmd.push(function() {
tablet_slots.push( googletag.defineSlot( “/1005424/_dPSv4_tab-all-article-bottom_(300×250)”, [300, 250], “pb-ad-78623” ).addService( googletag.pubads() ) ); } );

googletag.cmd.push(function() {
mobile_slots.push( googletag.defineSlot( “/1005424/_dPSv4_mob-all-article-bottom_(300×250)”, [300, 250], “pb-ad-78158” ).addService( googletag.pubads() ) ); } );

The post 6 Easy Steps for Post-Processing a Low-Light Photo in Lightroom by Jeremie Schatz appeared first on Digital Photography School.


Digital Photography School

 
Comments Off on 6 Easy Steps for Post-Processing a Low-Light Photo in Lightroom

Posted in Photography


Newspaper protests strict photo contract by sending a cartoonist to a Foo Fighters concert

15 Jul

In an ongoing trend of protests against strict photo contracts for music photographers, Quebec newspaper le Soleil sent a cartoonist to illustrate a Foo Fighters concert. The publication called the contract one of the harshest it had seen, citing passages that require photographers to surrender copyrights to their images, giving the band the ability to use images in any media without permission or payment. Read more

Articles: Digital Photography Review (dpreview.com)

 
Comments Off on Newspaper protests strict photo contract by sending a cartoonist to a Foo Fighters concert

Posted in Uncategorized


Photoshop alternative Affinity Photo now available in Mac App Store

10 Jul

In February, Serif launched a beta version of its image editing application Affinity Photo. The software is a Photoshop alternative designed specifically for Mac OS X, and the beta has been updated several times since the February launch. Serif has just taken the software out of beta and officially launched it in the Mac App Store. Read more

Articles: Digital Photography Review (dpreview.com)

 
Comments Off on Photoshop alternative Affinity Photo now available in Mac App Store

Posted in Uncategorized


DEAL: Photo Magic ebook – at the magic price of $7!

05 Jul

photomagic-363x448It’s the 4th of July and time for deal #4 in the dPS summer sale.

Today you can pick up a copy of our Photo Magic ebook for just $ 7 here!

At 65% off the normal price of $ 19.99, there’s no better way to learn the tricks and techniques for creating spectacular special effects images:

  • Zoom effect
  • 360 panorama
  • Flour hair flick
  • Light painting sparklers
  • Light painting steel wool
  • Little world
  • Mixing ambient and flash
  • Multiple exposures
  • Star trails
  • Water droplets

And best of all, you don’t need expensive high-end equipment or advanced skills in Photoshop to pull these off — they can all be done with the most basic DSLR.

It’s photography magic, at the magic price of just $ 7… for the next 24 hours only!

Get your 65% discount here.

googletag.cmd.push(function() {
tablet_slots.push( googletag.defineSlot( “/1005424/_dPSv4_tab-all-article-bottom_(300×250)”, [300, 250], “pb-ad-78623” ).addService( googletag.pubads() ) ); } );

googletag.cmd.push(function() {
mobile_slots.push( googletag.defineSlot( “/1005424/_dPSv4_mob-all-article-bottom_(300×250)”, [300, 250], “pb-ad-78158” ).addService( googletag.pubads() ) ); } );

The post DEAL: Photo Magic ebook – at the magic price of $ 7! by Darren Rowse appeared first on Digital Photography School.


Digital Photography School

 
Comments Off on DEAL: Photo Magic ebook – at the magic price of $7!

Posted in Photography


Do I Need a Photo Release For That?

22 Jun

With the increasing presence of quality Smartphone cameras and affordable, pro-grade compact digital cameras, there are more people than ever who have the power of taking photos. But how many people are aware of the legal constraints that come with being a photographer, even on a hobby or amateur basis? Perhaps more importantly, how many of us know when it’s legally okay, or not okay, for someone to snap a photo of ourselves?

Sea2

The answers to these questions are important for both photographers and photo subjects to know, so let’s examine some of the laws that have to do with photography. Before we dive into it, let’s also establish that these are the rules that apply in the United States in particular. If you are based elsewhere, or an American traveling abroad, it may be worth it to investigate photography rules pertaining to specific countries. Also, please note that I am not a legal professional and this is simply advice from another photographer based on experience and consensus of other online sources.

Public versus private places

First of all, let’s be clear that you are always free to sell photos of any subject without permission or a signed release, with one big exception: You cannot legally photograph people in private places without their expressed permission. In the United States, every citizen is guaranteed a reasonable expectation of privacy, meaning if you are in your home or on private property, you have the right to prevent someone from taking your photo if they are standing on your private land. However, the moment you step out into public areas, such as a public park, you forfeit your right to privacy and may be photographed by anyone without your consent. Thinking of this from a photographer’s perspective, it’s also important to realize that no one can legally prevent you from taking a photo in a public space, but they can do so in private spaces.

Editor’s note: Just because you have the legal right to take someone’s photo it doesn’t mean you have the right ethically if they do not wish to be photographed. Be respectful of others as you’d want for your own wishes.

2nd Annual Through the Eyes Of Art Event And The Value Of Black Life Concert

Example of a private space

Using someone’s likeness for promotion

Despite the above notion of freely photographing people in public spaces, it doesn’t mean you can do as you please with those photos. This is where the idea of a person’s likeness comes into play, and this same concept also applies to recognizable private property. In a legal sense, one’s likeness has to do with a representation of that person or private property being used to promote something, such as a product, service, or idea. Every person, whether it be a celebrity or your average Joe/Jane, has the right to protect his or her likeness.

Put into practice, this means that if you take a photo of someone in a public space and were to sell it to a publication or newspaper, you’re likely within your rights of doing so since that person and photo is not being used for the sake of promoting anything. However, you would be restricted from selling or using that photo for any sort of promotion, such as an ad for your product, service, or cause.  The reasoning is simple: that person didn’t consent to having their likeness used to further your promotion. Imagine being dedicated to a specific political party and seeing your mugshot used in an advertisement to promote the opposing party’s campaign. If you didn’t agree to it, you would have the grounds to ask the opposing campaign to take your photo down.

Sea3

To use this photo to promote something or sell something you would need a release

When photo model releases come into play

This idea of protecting one’s likeness is where the need for photo model releases becomes necessary. As a photographer, it all comes down to intent. If you snap a photo knowing there’s a high chance you’ll use it to promote something, it’s best to evaluate that scenario for any instances where a model release might be necessary. In fact, photo releases aren’t just for people. Depending on the use of the photo, you may also need a property release for privately owned buildings. Again, it all comes back to how you plan to ultimately use the final image, as well as the specific rules set in place by the agency or company selling the images. Below are some specific scenarios when you’ll want to have a photo (model or property) release.

Stock Photography

Selling images as stock photography can be a way to make a small, yet somewhat steady side income, but it does come with the expectation that any shots with identifiable people or landmarks come with a photo release to make them commercially licensed. The rules may vary according to the stock agency you work with, but most agencies require releases because there’s a high chance customers will use the photos for commercial purposes to sell something. In these cases, the likeness of people will need to be protected, or at least authorized, for possible commercial use via the photo model release.

Editorial Photography

Sea4

Could be used for editorial

There is one exception to the stock photo rule. In some cases, stock images of people can be sold without a photo release, but only for editorial use in magazines, newspapers, textbooks or other such publications. The one catch to this scenario is that the payout for editorial stock photos is usually significantly lower than if the same photo had a signed release and a proper commercial license. If you have any aspirations of making good money by selling stock photos, you should definitely consider going the commercial licensing route.

Photography Contests

With the number of photo contests available today, many photographers wonder if model or property releases are needed to submit photos to these contests. Again, it all comes down to intent. Some contests are hosted by companies who may want to use those photo entries for possible commercial use, in which case they’ll need signed photo releases. However, consider a magazine that wants to publish winning photos in an upcoming issue, or print images for an exhibit or gallery. In this case, photo releases most likely won’t be necessary. The bottom line is be sure to read the fine print before submitting your work to any photography contests and be on the lookout for how your submitted photos may be used.

Summary

In a nutshell, this is a brief summary to photo releases and some common scenarios when you may want to investigate the need for one. Do you have any advice or questionable encounters with photo releases to share? Let us know in the comments below!

googletag.cmd.push(function() {
tablet_slots.push( googletag.defineSlot( “/1005424/_dPSv4_tab-all-article-bottom_(300×250)”, [300, 250], “pb-ad-78623” ).addService( googletag.pubads() ) ); } );

googletag.cmd.push(function() {
mobile_slots.push( googletag.defineSlot( “/1005424/_dPSv4_mob-all-article-bottom_(300×250)”, [300, 250], “pb-ad-78158” ).addService( googletag.pubads() ) ); } );

The post Do I Need a Photo Release For That? by Suzi Pratt appeared first on Digital Photography School.


Digital Photography School

 
Comments Off on Do I Need a Photo Release For That?

Posted in Photography


Photo Finished: 12 Closed & Abandoned Camera Stores

22 Jun

[ By Steve in Abandoned Places & Architecture. ]

abandoned camera store 1c
Point, click, shut! Camera stores are rapidly fading into obsolescence as smartphones take the place of mass market cameras, film and paid photo processing.

abandoned camera store 1b

Now here’s a developing story… NOT! The long-abandoned Foto Hut on Forbes Avenue in downtown Pittsburgh sold cameras, film and greeting cards while promising to develop film in an unknown number of “hour” – well, either “one” or “24”, it’s hard to tell from the red rectangle on the Kodak Yellow sign. Kudos to Flickr users strawbrryff and john (J Blough) for capturing this frozen-in-time, eternally bankrupt abandoned camera store in November 2010 and February 2011 respectively.

Chick Clinic

abandoned camera store 0c

abandoned camera store 0a

Once a one-stop-shop for Louisville, Kentucky’s photo fans, Schuhmann’s Click Clinic opened in 1946 and its eye-popping animated signage dates from the early 1950s. Schuhmann’s kicked the bucket in 2001, however, and the sign out front was modified to advertise the store’s new tenants: the Show-N-Tell Showgirls Lounge. No cameras allowed, we’re guessing.

abandoned camera store 0b

abandoned camera store 0d

Takes a licking and keeps on clicking? Both the club and the subsequent owners, the circa-2013 Meta bar, cleverly modified the front signage while completely ignoring the former camera store’s other sign, mounted on the back of the building overlooking the parking lot.

Foto Finis

abandoned camera store 2

Flickr user Who Cares? (busy.pochi) snapped this abandoned Photographies camera and book store in February of 2011, and it didn’t take long for graffiti taggers and handbill posters to take advantage of the stores neglected status. One would think a city as photogenic as Paris could support at least a few camera stores.

Morgue & Camera

abandoned camera store 3a

abandoned camera store 3d

A Hollywood landmark since the 1930s, Morgan Camera Shop finally gave up the ghost a few years into the twenty-first century. Boasting an idyllic location amongst Hollywood’s iconic tall palms and a sign influenced by Bauhaus architecture, Morgan Camera played a large roll in introducing 35mm photography to the United States from Europe.

abandoned camera store 3c

abandoned camera store 3b

Morgan Camera exists in an odd sort of limbo – closed to be sure, but otherwise left pretty much alone inside and out thanks to the efforts of the Morgan family, members of whom who still own both the shop and the building.

Next Page – Click Below to Read More:
Photo Finished 12 Closed Abandoned Camera Stores

Share on Facebook


[ By Steve in Abandoned Places & Architecture. ]

[ WebUrbanist | Archives | Galleries | Privacy | TOS ]


WebUrbanist

 
Comments Off on Photo Finished: 12 Closed & Abandoned Camera Stores

Posted in Creativity


Think Tank Photo launches Trifecta 10 DSLR and Trifecta 8 Mirrorless backpacks

17 Jun

Think Tank Photo has launched two new bags, the Trifecta 10 DSLR Backpack and Trifecta 8 Mirrorless Backpack. Both backpacks are designed to hold a photographer’s ‘workhorse’ lenses, including ultra-wide, mid-range, and telephoto zoom lenses. As the names indicate, the bags are designed to accommodate DSLR and mirrorless systems. Read more

Articles: Digital Photography Review (dpreview.com)

 
Comments Off on Think Tank Photo launches Trifecta 10 DSLR and Trifecta 8 Mirrorless backpacks

Posted in Uncategorized


Panasonic 4K Photo reaches to grab stills-from-video dream

12 Jun

Using a video feed to capture stills isn’t a new idea – Nikon’s first electronic camera, the QV-1000C, did it in the late 1980s – but the resolution of 4K makes it more useful. Panasonic has recognized this way of working and has introduced 4K Photo mode to its 4K cameras, to make things easier for the user. We took the feature for a test drive. Read more

Articles: Digital Photography Review (dpreview.com)

 
Comments Off on Panasonic 4K Photo reaches to grab stills-from-video dream

Posted in Uncategorized


Photo District News Presents The Look Competition

07 Jun

Photo District News The Look Competition 2015


Hey there FashionPhotographyBlog.com readers,


We are really excited to announce that our friends over at Photo District News (PDN) are having a competition, called The Look and are open for entries right now!


The Look is PDN’s comprehensive competition for evocative fashion and beauty photography, with categories for professional photographers, such as still photographers and motion photographers, as well as for students of photography.


We are at FPBlog are excited for the next edition of the look and you should be too! I’m sharing this competition to you guys because we know that winning a prize like this could really help give you a boost to your photography existing career or help you start one.

Photo District News The Look Competition 2015


3 Reasons why you should be excited about the Look Competition


Here are our top 3 reasons why we are excited about this competition:


1) The range of work. The Look includes many categories to enter in such as advertising, editorial, still life/accessories, personal work/fine art, runway/street scenes and beauty, plus a motion category for film and a debut/student category for rising stars.

The competition aims to cover all facets of the fashion industry. Last year’s winning work included a series of Chloé handbags shot for Barneys’ look books, a beauty series in Vogue Italia, and a film from a Valentino runway show.

Photo District News The Look Competition 2015


2) The grand-prize package. With a $ 3,500 award to fund a photographer’s work, $ 500 for equipment at B & H, and a one-page profile in Photo District News, the grand-prize package provides the winner with an exceptional opportunity for growth.


3) Promoting the winners. All the winners of this competition will be published in PDN’s October issue this year. Online, The Look winners’ gallery always makes for a beautiful collection of work, and PDN are proud to showcase them! In addition to the print and online gallery, PDN organized an exhibition of the winners’ works at the PhotoPlus Expo at the Javits Center in October last year, which saw 22,000 visitors over the event. PDN will be looking for more opportunities like this to exhibit this year’s winners. You can take a look at last year’s winner gallery by clicking here –> The Look 2014 Winners


Photo District News The Look Competition 2015

The Look Competition Prizes


Here is a recap of the prizes offered in PDN’s The Look Competition for 2015:


ONE GRAND-PRIZE WINNER WILL RECEIVE:


– $ 3,500 cash prize


– A $ 500 B&H Gift Card


– A one-page profile in an issue of PDN


SEVEN FIRST-PLACE WINNERS WILL RECEIVE:


– $ 100 B&H Gift Card


ALL WINNERS WILL RECEIVE:


– A one-year PHOTO+ Basic Membership


– A place in the print/online winners’ gallery in the October 2015 issue of PDN


– The official winners’ seal for The Look


For more information on how to enter The Look competition, you can click and visit this link here -> The Look Competition Details


Entries close June 30th 2015, so do hurry to enter!

Photo District News The Look Competition 2015


Fashion Photography Blog

 
Comments Off on Photo District News Presents The Look Competition

Posted in Uncategorized