RSS
 

Posts Tagged ‘Photo’

Photo gifts for every budget: 2015 Holiday Gift Guides

12 Nov

It’s not easy shopping for a photographer. We’re notoriously picky, our gear is confusingly named and the difference between something we like and something we don’t can come down to what seem like trivial details. But before you give up and just get a gift card, take a look through our carefully selected holiday gift suggestions, grouped by price range, for the photographer in your life. Read more

Articles: Digital Photography Review (dpreview.com)

 
Comments Off on Photo gifts for every budget: 2015 Holiday Gift Guides

Posted in Uncategorized


Photo Tips From Our Furry Favorites, the #dogsofinstagram!

09 Nov
dogs

We took a crash course in barking, then asked our favorite #dogsofinstagram for their secrets to taking the perfect pup pic.

Read through the tips below, peep the “paw”esome photos and enter yourself in our #dogsofinstagram Giveaway.

Don’t have a dog (yet)? Share this post with friends who do, so they’ll post more photos of their furry friend for all to see (and to give them a chance to win big).
(…)
Read the rest of Photo Tips From Our Furry Favorites, the #dogsofinstagram! (722 words)


© Erin for Photojojo, 2015. |
Permalink |
No comment |
Add to
del.icio.us

Post tags:


Photojojo

 
Comments Off on Photo Tips From Our Furry Favorites, the #dogsofinstagram!

Posted in Equipment


The More the Merrier!Group Photo Tips and Ideas

05 Nov

What’s better than a photo of a loved one?

A group photo of a BUNCH of loved ones!

But simply standing around and saying cheese? Yawn. We rounded up group photo ideas that will have everyone running, dancing, and more.

Whether you’re shooting pics of your pals or preparing for family holiday cards, you’ll get a kick out of these ideas and their unique results!

(…)
Read the rest of The More the Merrier!
Group Photo Tips and Ideas (658 words)


© Taylor for Photojojo, 2015. |
Permalink |
No comment |
Add to
Group Photo Tips and Ideas”>del.icio.us

Post tags:


Photojojo

 
Comments Off on The More the Merrier!Group Photo Tips and Ideas

Posted in Equipment


Get Spooky With a DIY Halloween Photo Booth!

27 Oct
Halloween DIY

Photo booths are a must for Halloween parties and we’ve got all the tricks and treats you need to make a screamin’ good one using either your phone or DSLR.

(…)
Read the rest of Get Spooky With a DIY Halloween Photo Booth! (0 words)


© Erin for Photojojo, 2015. |
Permalink |
No comment |
Add to
del.icio.us

Post tags:


Photojojo

 
Comments Off on Get Spooky With a DIY Halloween Photo Booth!

Posted in Equipment


Photo prodigy: The images of 17-year-old Taylor Gray

17 Oct

Taylor Gray may be young, but he’s serious about photography. After taking a borrowed DSLR on a backpacking trip, Gray was hooked on photography and found a new love for adventure and travel. See some of the young photographer’s work. Read more

Articles: Digital Photography Review (dpreview.com)

 
Comments Off on Photo prodigy: The images of 17-year-old Taylor Gray

Posted in Uncategorized


Polarr releases Photo Editor 3 with new features, interface improvements

17 Oct

Polarr has released Photo Editor 3, the third version of its lightweight photo editing software. The new version brings with it support for using a mouse and a touchscreen, as well as a new user interface, adjustment sliders, photo editing guides, and other features. Read more

Articles: Digital Photography Review (dpreview.com)

 
Comments Off on Polarr releases Photo Editor 3 with new features, interface improvements

Posted in Uncategorized


Tips on Choosing a Free Photo Editor for Post-Processing

08 Oct

A question I get asked a lot is, “What software for post processing would you recommend if you were starting out in photography today?”

Don’t know which photo editor to choose, here are some free options worth considering.

My go-to software for editing photos is Adobe Photoshop. This doesn’t mean I am advocating that Photoshop is the only photo editor worth considering – far from it. I will be using Photoshop as a frame of reference only, and not as a direct comparison to other software products mentioned in this article.

Title

Deciding which Photo Editor can be daunting for a beginner, especially as there are so many to choose from!

However, it is the industry’s number one software for professionals. Prior to the new subscription model, Photoshop was a standalone piece of software and was expensive. But even with the subscription model, it’s a recurrent expense, which over time will amount considerably for your buck.

After doing some research, I was quite amazed at the plethora of photo editing software applications, on the market that are relatively inexpensive to purchase. Most of which equip the beginner with more than enough features and tools to get your images looking great.

Also, most of the applications can be downloaded free, for a limited trial period. This gives you a better idea what it’s like, and you’re able to test the software and its capabilities.

Other products can be downloaded for entirely free and some are even web based, so you don’t have to download any software onto your computer. The disadvantage is that you do need a reliable internet connection. Also, I did find the annoying ads that pop up alongside the interface distracting. An alternative to get rid of these ads is to pay for an upgrade.

Let’s take a look at some of the free options:

Pixlr

Pixlr is a web based, online editing tool. You can create a new image, upload an image, or grab one directly from a URL location. I found this product very intuitive and easy to use. The images load up fast in the web browser. The interface is quite similar to Photoshop. It has all the tools like: layers, lasso tool, brush controls, cloning, and filters.

Pixlr-web-based-launch-screen

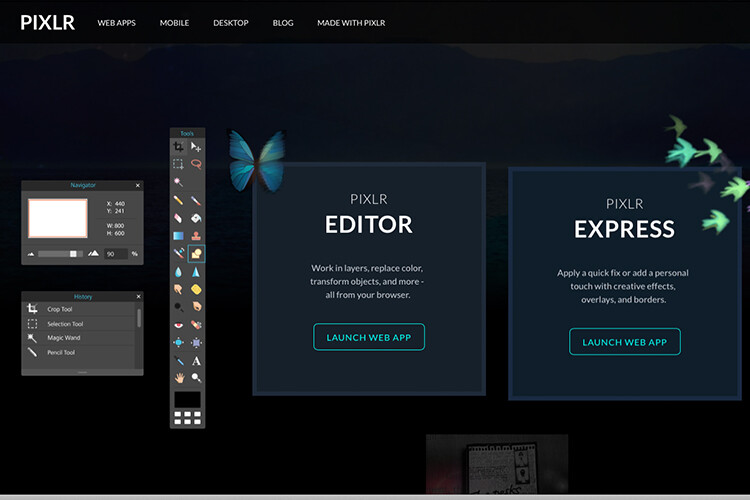
The Launch screen as it appears when you load Pixlr in your web browser.

Pilxr-web-based-image-editor-interface

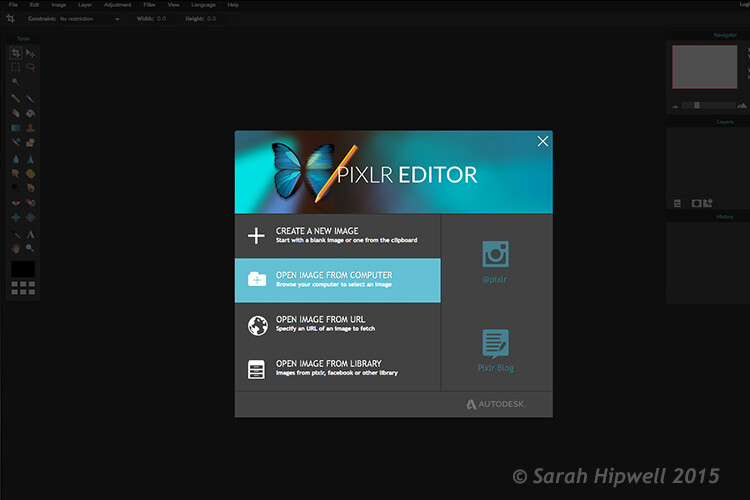
You have four options to choose from when you go to open your file. It’s that easy.

Ok, so where do you start with your post-processing?

When you have your image open, duplicate it so that you keep the original intact. That way, if you completely mess up, don’t worry, you still have the original to begin again.

Post editing is a skill. It does take patience and time to master.

Color correction

I would consider color correction an important area to begin your post-processing.

The Levels setting exists in many image editors. It is a powerful tool for adjusting the tones (contrast) in your image, and for making color adjustments. In Photoshop, you select Layer> New Adjustment Layer > Levels. In Photoshop Elements choose Enhance > Adjust Lighting > Levels. Other image editors place it differently, but essentially it does the same job. The Levels setting is a bit daunting and complex to begin with, but I do feel it is worth the time to get to know.

The Levels dialog box has an image histogram which is similar to the display on the back of your camera. A simple explanation of the histogram is: the shadows (blacks) are on the far left, mid-tones (grays) are in the middle and the highlights (whites) are on the far right. So by adjusting any of the sliders on the bottom, you will affect the contrast of your image.

Levels-in-Pixlr-and-Photoshop

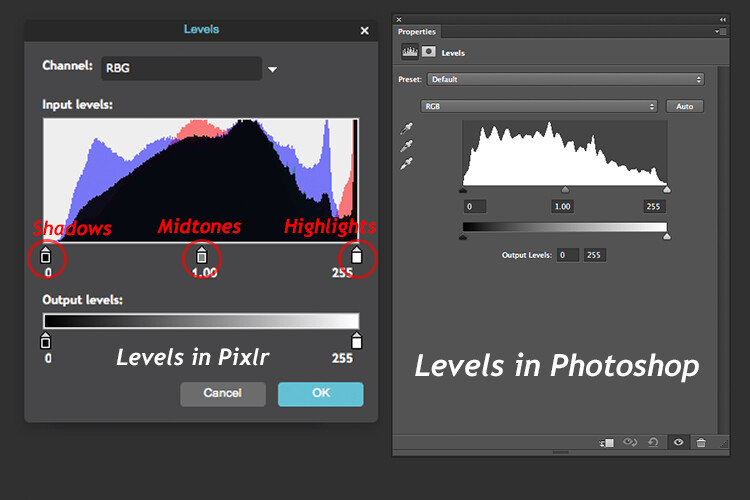
The Levels setting on the left belongs to Pixlr, and on the right is the Levels adjustment as it appears in Photoshop CS6.

Okay, but what about the color of the image?

An easy way to adjust color correction is by changing the color channels which are found in the Levels dialog box. The default setting is RGB in Pixlr.

Adjustment-Levels-Pixlr

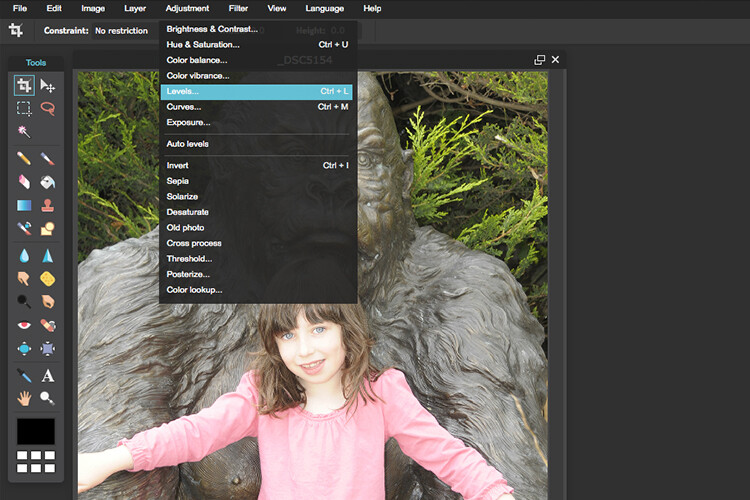
Where you find the Levels setting in Pixlr.

Go to Adjustment Tab and select Levels. Click on the downward arrow next to RGB in Channel, this brings up a drop-down menu for the red, green and blue channels. Choose the first one, which is red. Look at the histogram graph and check for gaps in it.

Color-channels-in-Levels-pixlr

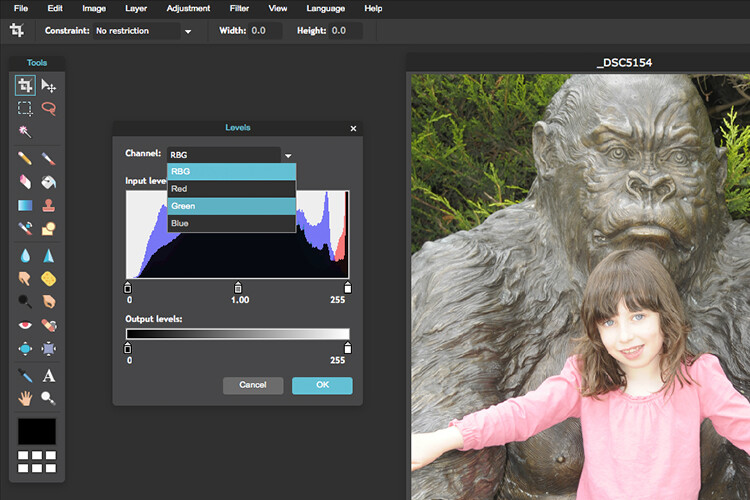
The colour channels appear in a drop down menu by clicking on the small arrow to the right of RGB.

For this image, as it is quite over-exposed a lot of the shadow detail is lost (overly gray and no black in the image), see left of the graph. Move the shadow slider to the right, in towards the middle, where the graph starts to go up.

You want your graph to represent a nice mountain shape starting from the shadows rising high in the midtones and back down to the highlights. See photo. Repeat this process for the other two channels. Click back to RGB.

To add some contrast, just move the middle slider (mid-tones) to the right, see photo below. There is a lot more to learn about the Levels adjustment, but this is just an easy way for beginners to start.

Before-and-after-color-correction-pixlr

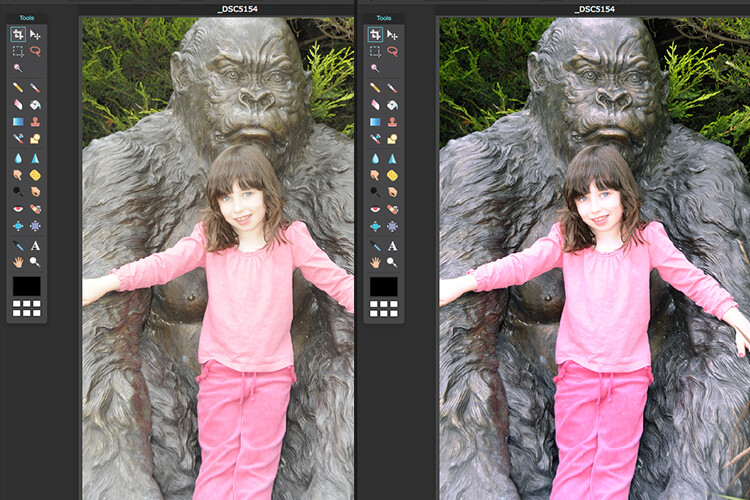
Before and after colour correction on the RGB channels using Pixlr.

Some other alternative web based solutions are SumoPaint, which has a similar interface to Photoshop, and another called PicMonkey.

SumoPaint

Similar to Pixlr, SumoPaint was very easy to use. I was able to adjust the color correction on this image using the Levels adjustment and modifying the color channels, as I did using Pixlr.

Sumopaint-in-browser

Sumopaint-Levels

Sumopaint-Levels-channels

If you prefer to download software onto your computer. Again there is a wide choice of free products available.

  • Paint.net, which is Windows based.
  • Picasa is Google’s photo manager and editor. It plugs into Google+.

Photoscape

Here’s another one that you may or may not have come across, called Photoscape. This software is packed with excellent features for free. It has a built-in image viewer, which lets you see all your images quickly at a glance using thumbnails. It also has a Batch Editor, so if you apply an edit to one photo or resize it – using the Batch Editor will apply the same edit to multiple images. It even has a RAW Converter. For beginners, it offers image cropping, brightness and colour adjustment, red eye removal, and some great effects too. It does appear to more intuitive and offer a less steep learning curve for beginners.
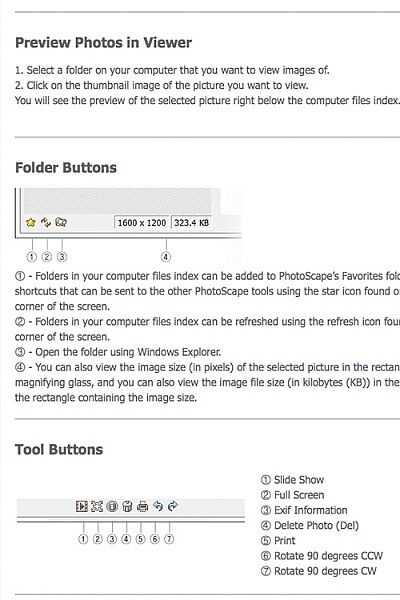
Photoscape

Photoscape

Editor-tool-in-Photoscape

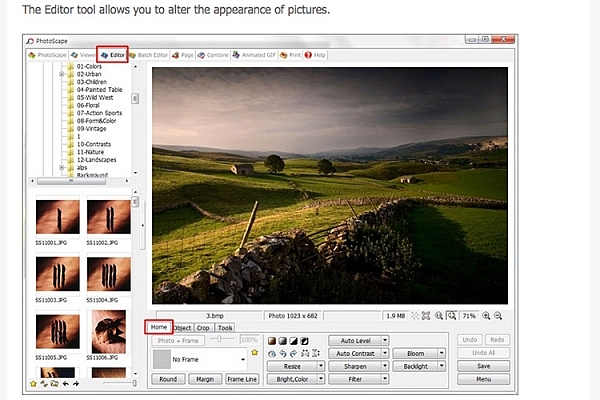
Main editor tools in Photoscape

Adding-frames-in-Photoscape

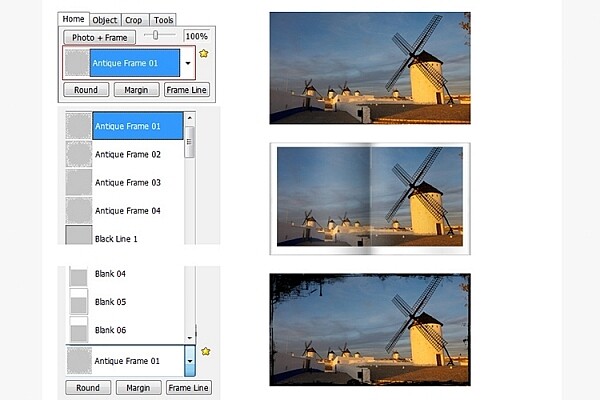
Adding frames in Photoscape

Edit-photo-edge-photoscape

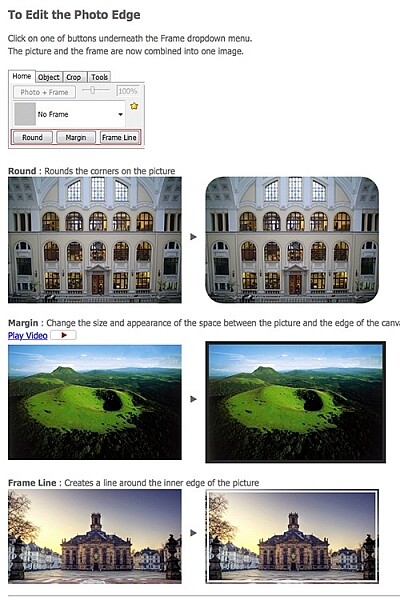
Edit photo edge in Photoscape

Preview, which is Apple’s built-in image and document viewer for OS X, surprised me. It has the capability to crop, resize, and do color adjustment which was quite impressive.

Conclusion

In summing up, there is a vast range of post-processing image editors to choose from. In this article, I only hinted at a mere few. The list is endless!

As a guide for beginners, I would experiment with the free options and test them out for yourself. There is no financial investment only your time. The time invested will give you a better idea which application suits you best in the long run.

Post-processing does require time, no matter how skillful you become at it. Once you have established a certain level of skill at post editing, you can then graduate to purchasing a reasonable priced standalone image editor, if you prefer.

Example products are:

  • ACDsee19 for $ 59.99
  • Photoshop Elements 14 for $ 99.00
  • Adobe Lightroom 6 for $ 149.00
  • Affinity Photo for the Mac is only for $ 49.99
  • PhotoPlusx8 for $ 99.99

Or you could simply download GIMP, (some equate this software as being powerful to Photoshop) which is an open source image editor with versions available for Windows, OS X, and Linux. There are lots of tutorials and resources already on the web to help you further with this software.

In fact, if I was new to photography and I had to decide which photo editor to pick, I would feel spoilt for choice!

Disclaimer: I was not contacted or sponsored to test any of the above software applications. Opinions are purely by the author only.

googletag.cmd.push(function() {
tablet_slots.push( googletag.defineSlot( “/1005424/_dPSv4_tab-all-article-bottom_(300×250)”, [300, 250], “pb-ad-78623” ).addService( googletag.pubads() ) ); } );

googletag.cmd.push(function() {
mobile_slots.push( googletag.defineSlot( “/1005424/_dPSv4_mob-all-article-bottom_(300×250)”, [300, 250], “pb-ad-78158” ).addService( googletag.pubads() ) ); } );

The post Tips on Choosing a Free Photo Editor for Post-Processing by Sarah Hipwell appeared first on Digital Photography School.


Digital Photography School

 
Comments Off on Tips on Choosing a Free Photo Editor for Post-Processing

Posted in Photography


How to Improve Your Long Exposure with Photo Stacking

06 Oct

Recently long exposure photography has been quite popular, mainly in the landscape photography arena. One of the reasons (among the others) is that through a long exposure it is possible to visualize a scene with much more softness and harmony in respect to a standard exposure.

Thanks to the rapid evolution of digital cameras, we are now able to take really long exposures without getting so much digital noise, due to sensor overheating. Moreover, the improvements in neutral density filter quality allow us to take pictures with almost no color cast, and no decrease in sharpness.

Dps les venezia

Venezia by Luca Libralato: stacking of 3 x 260s exposures for a total of 780s (13 minutes)

If you love long exposure photography and you would like to push the exposure time to the edge, this technique of long exposure photo stacking is for you.

Here is the quick explanation of the Long Exposure Stacking technique: by taking several pictures (usually at least 30 seconds each for the purpose of this technique) you can blend them to get a result the equivalent of a long exposure photo with a total exposure time equal (or almost equal) to the sum of the single exposure frames.

This technique is mostly useful, and recommended for landscape photography, but some of the benefits may also be used in other types of photography, where you need maximum quality with several minutes of exposure. The step by step guide will be focused on landscape photography.

The advantages of using this approach are several:

  • Increase the total exposure time.
  • Reduce digital noise and hot pixels (shorter exposure pictures have less digital noise and hot pixels).
  • Reduce vignetting (you will be using a lower ND power per shot with this technique, resulting in less vignetting).
  • Minimize the risk of wasting time and photos (tripod shocks, sudden light change, etc.).
  • Possibility to decide later on the strength of the long exposure effect.
dps_les_manarola

Manarola by Luca Libralato: stacking of 3 x 260 second exposures for a total of 780 seconds (13 minutes)

The disadvantages are:

  • You don’t have a single exposure and this is something which some competitions/contests rules don’t like.
  • Some post-processing skills are required to blend the several exposures.
  • If you are a purist – you may not like this technique.

When this technique should be used:

  • If you want to push the exposure time to some really high values.
  • If your camera sensor is adding a lot of digital noise due to overheating.
  • If you are not sure about the final result of a very long exposure. Since this techniques is based on the sum of several short exposures, you can easily decide later how long the final exposure shall be (check also here for a similar approach: Long Exposure Photography Without a Tripod).
  • With hostile ambient/weather conditions, you can use this technique to minimize the risk of wasting exposure time.
  • If you want to maximize the probability to not miss the right moment in a fast changing light (the right moment can last few seconds, if you are exposing for several minutes, you can miss it for wrong exposure time for example).

Before going over the explanation of the technique, there are at least a couple of required skills you should have (apart from the basics for taking pictures with your camera):

  1. How to perform standard long exposure photography: you can check this awesome tutorial by Francesco Gola to improve your long exposure skills: Step-by-step Guide to Long Exposure Photography.
  2. Basic knowledge of Adobe Photoshop or similar photographic software which allows you to work on images using layers.

Let’s get on with the fun part: the implementation of Long Exposure Stacking!

dps_les_punta_aderci

The Magic Of Punta Aderci by Luca Libralato: stacking of 2 x 260 second exposures for a total of 520 seconds (8:40 min)

Step 1: Gear

The photographic gear needed for this technique is luckily the same gear needed for taking long exposure photos. So if you are already familiar with long exposure photography, you are set. Otherwise here is a short list of all the tools:

  • Digital Camera (which allows long exposure) + Lens (which allows you to mount neutral density filters)
  • Tripod
  • Remote trigger (optional, but suggested)
  • Neutral density filters (optional if you shoot when it’s dark)

For further details about taking long exposure photography, you can check the related resources listed at the bottom of the article.

Step 2: Plan the shot

Never hit the shutter without having properly planned the photo. Of course there are a lot of variables involved, but planning can really play the most important part in a good photo. Do not underestimate the power of accurately planning a landscape photo – because luck can help you once, but planning your photography consistently, will increase the probability that you’ll be ready when the right conditions are present.

dps_les_santa_marinella

Rips Of Darkness by Luca Libralato: stacking of 5 x 120 second exposures for a total of 600 seconds (10 minutes)

Step 3: Take the shots

Once you have planned your photo and you are on location, you should then decide the two most important things in any photo (at least this kind of photo): composition and exposure (supposing you are taking landscape photography, depth of field should not be a variable in most cases). Composition is up to your taste, while exposure is a complex matter and depends upon different factors.

First thing every landscape photographer usually does before taking any picture, is metering the light to decide the exposure time. The final exposure time depends on several factors, such as strength of the wind, the movement of the clouds, water flow, and so on. The question at this point is, “How long shall I expose for?”.

If the light is changing suddenly, or there is a strong wind which can shake your camera/tripod during exposure, you may decide to avoid really long exposures (to avoid wasting shots or missing the right light). This is where this technique comes to your rescue.

Suppose you would like to have a total of eight minutes of exposure, instead of taking one single long exposure file you can split the total exposure time into four consecutive shots of two minutes each (for example). You can freely decide the final length of each exposure and the total number of shots, just keep in mind that you should keep the gap of time between the different photos to a minimum, if you are planning to do stacking. Needless to say that you should be careful in avoiding moving the tripod and the camera between each shot of the sequence. Once you have your consecutive shots, in the next step you will understand what to do in post-processing.

Before you start shooting: make sure you focused correctly and your tripod is stable (avoid sand or uneven floors where possible).

After the shot: make sure your histogram is fine and your picture is properly exposed, or exposed to the right.

Dps les 01 Dps les 02
Dps les 03 Dps les 04
Dps les 05 Dps les 06

Arco Della Pace by Luca Libralato: 6 x 130 second exposures, for a total of 780 seconds (13 minutes)

Step 4: Image Stacking

You should now be at home, or in your favourite cafe/pub with your laptop, and hopefully a coffee/beer. You should have downloaded all of your shots and selected the ones you would like to stack.

The stacking process will be shown for Adobe Photoshop (almost any version supports the feature) but you can use any software of your choice, which allows the use of layers. In Photoshop there are two different methods that can be used to stack files, with the goal to merge them into a simulated longer exposure:

  1. Load files into stack function (Files > Scripts > Load Files into Stack)
  2. Manual stacking

4.1 Load files into a stack

With the first method the procedure is semi automated, since you just need to go to Files > Scripts > Load Files into Stack

Dps les ps stack 01

Photoshop: Load Files into Stack

All you have to do is then select the single long exposure, flag the boxes to Automatic Align Source Images and Create Smart Object.

Dps les ps stack 02

Photoshop: Select files and create Smart Object

Once you have a new document with the Smart Object selected, all you have to do is go to menu Edit > Smart Objects > Stack Mode > Mean. This will weigh all images embedded into the Smart Object, rendering them as a new image which similar to what you would have obtained with a single long exposure of a total time equal to the sum of the single exposure.

Dps les ps stack 03

Photoshop: Set Stack Mode to Mean

You can check the result on the image below.

Dps les ps stack result

Photoshop: Result after stacking

4.2 Manual stacking

By using the second method (which I trust can be used with every software which allows layers) the blending process is manual. The rule is that you have to fine tune the opacity of each layer by decreasing it after each shot.

The mathematic rule is as follows: each shot should have an opacity equal to 1 divided by its position in the stack. Here is a table which shows the rule:

  • First photo (the one at the bottom) 100% (1/1)
  • Second photo 50% (1/2)
  • Third photo 33% (1/3)
  • Fourth photo 25% (1/4)
  • Fifth photo 20% (1/5)
  • Sixth photo 17% (1/6)
  • Nth photo 1/N

This process will exactly replicate the first method (the result will be identical to an automatic Stack in Mean mode).

Step 4: Post processing workflow

At this point, all you have to do is follow your typical post-processing workflow:

  • Clean dust spots, straighten the image, crop
  • Adjust dynamic range with other exposures (3 or 5 bracketing shots for static underexposed parts)
  • Adjust exposure and contrasts
  • Adjust colors
  • Add finishing touches to suit your taste
  • Export

Here is the final result of the example

Dps les arco della pace

Arco Della Pace by Luca Libralato: stacking of 6 x 130 second exposures for a total of 780 seconds (13 minutes)

Conclusions

This technique is very useful sometimes because of its flexibility. Moreover you should consider the benefit in increasing the final quality of your file because of the stacking. It has been proven that by stacking images you can benefit by reduction in random digital noise equal to the square root of the total photos used. So for example if you use four photos, you will have in static part of the photo a reduction by half of the total random digital noise, which is a great achievement especially for underexposed portions. This technique is used a lot (even if with some different variations and implications) in astrophotography or in other fields when increasing the exposure time of a single shot is not suitable.

Don’t hesitate to ask questions in the comments box below if you need help or further explanations.

Related Resources:

  • Step-by-step Guide to Long Exposure Photography by Francesco Gola
  • Long Exposure Photography Without a Tripod by Viktor Elizarov
  • How to do Long Exposure Photography and Light Trails at Night by Barry J Brady
  • 11 Accessories for Long Exposure Photography by Scott Wyden Kivowitz
  • 5 Tips for Better Long Exposure Landscape Photography by David Cleland
  • 8 Tips for Long Exposure Photography by Elliot Hook
  • 5 Tips for Getting Sharper Images When Doing Long Exposures by Kevin Choi

googletag.cmd.push(function() {
tablet_slots.push( googletag.defineSlot( “/1005424/_dPSv4_tab-all-article-bottom_(300×250)”, [300, 250], “pb-ad-78623” ).addService( googletag.pubads() ) ); } );

googletag.cmd.push(function() {
mobile_slots.push( googletag.defineSlot( “/1005424/_dPSv4_mob-all-article-bottom_(300×250)”, [300, 250], “pb-ad-78158” ).addService( googletag.pubads() ) ); } );

The post How to Improve Your Long Exposure with Photo Stacking by Luca Libralato appeared first on Digital Photography School.


Digital Photography School

 
Comments Off on How to Improve Your Long Exposure with Photo Stacking

Posted in Photography


CreativeLive Photo Week: Watch DPReview on Media Panel

03 Oct

As part of CreativeLive’s annual ‘Photo Week’, DPReview took part in a panel discussion with other members of the photography industry to discuss technology, photography, and a lot more besides. Read more

Articles: Digital Photography Review (dpreview.com)

 
Comments Off on CreativeLive Photo Week: Watch DPReview on Media Panel

Posted in Uncategorized


How to Capture a Photo of a Bubble Bursting

30 Sep

Set yourself a high-speed challenge: Capture a bursting bubble

bubbledps1
I have always loved the idea of photography as being a way of taking an instant out of time, and preserving that moment forever. By freezing time in this way, a photograph can show something that may not normally be seen in day-to-day life, and can make an ordinary subject extraordinary.

So, when going through a bit of a creative lull a couple of years ago, I felt that I needed to set myself a challenge to restore my motivation. I decided that I was going to capture the exact moment of a bubble being burst. After some internet research, I came to the conclusion pretty quickly that I did not have the necessary budget for a super slow-motion camera to achieve this. I did, however, become determined to capture a bubble in mid-burst using only equipment I already owned – my DSLR, various lenses and a flashgun (speedlight).

The challenge was lengthy and often frustrating, but when I did successfully take a photograph of a bursting bubble, it was incredibly satisfying. By freezing a moment, the photograph showed something that could not normally be seen by the human eye – a soap bubble with one half completely intact and the other half made up of separate swirls of liquid. The bubble was collapsing in on itself in mid-air. Friends and family who saw the photograph showed surprise and commented that they, like me, had assumed that a bubble just disappeared when popped. A photograph had changed their view of the world simply by freezing a single moment of time and I was reminded just how powerful photography can be.

bubbledps2

With my motivation fully restored, I progressed further and attempted to capture a sequence of shots to show the entire process of a bubble collapsing. One of the shots has even been included in an international exhibition for scientific images. I have included some of these shots here but there are many more on my website at the link shown below in my bio.

I would definitely recommend this challenge to anyone, particularly if you may be in need of a creative boost or maybe need to rediscover your passion for photography. If you do decide to take up this high-speed challenge, here are some things that I learned along the way. I hope that they will be of help to you when capturing a bursting bubble.

1. Use large bubbles

Larger soap bubbles will be easier for you to focus on than small bubbles, and they will also be easier to burst. Additionally, the composition of your shot can really benefit from using larger bubbles – you should be able to get a frame-filling shot of a bubble bursting without the need to crop.

I have previously used a kids’ bubble toy set (purchased for around £1) that came with a bubble wand of around 5cm (2 inches) in diameter. I found this to be ideal for blowing one or two medium-to-large size bubbles, that stayed in the air long enough to capture them being burst. Smaller wands tended to produce streams of little bubbles which were (a) difficult to burst and (b) cluttered up the final shot.

2. Get a friend to help you

You are probably going to need somebody else to help you with this project unless you have superhuman reaction times! Blowing the bubble, bursting the bubble, and setting up the shot was just too much for me to complete on my own. Having someone to blow and burst the bubble for you, allows you to compose and focus your shot without distraction.

3. Shoot indoors

If possible, shoot indoors so that you can limit the movement of the bubble. I have taken a number of shots outdoors, but any slight breeze will cause the bubbles to fly away pretty quickly, making it much harder to set up your shot.

I have found it very useful to shoot in front of a floor-to-ceiling window facing onto a garden. This provides lots of natural light and some pleasing, natural colours for the backdrop, which was the look I was after. Just remember to leave some space between the bubbles and the window to reduce any reflections or glare that you may get from the glass.

4. Use a zoom lens

Even when shooting indoors, the movement of the bubbles will still be somewhat unpredictable. For this reason, I have found it useful to use a zoom lens when shooting bubbles, so that I can adjust the focal length as necessary to focus and compose the shot while the bubble is in mid-air. I have usually taken the bursting bubble images with a Canon 70-200mm f/2.8 lens set to between 100-150mm. A further advantage of using this lens is that it helps to create some pleasing bokeh (blurry out-of-focus highlights) in the background while keeping the bubble details sharp when the focal length is increased.

bubbledps3

5. Shoot in full manual mode

Shooting in full manual mode will give you the control over the settings that you will need to get good results. Firstly, you will need to set as fast a shutter speed as you can get away with, depending on the available light. The action of a bubble bursting is extremely fast and so you will need to set your camera to a shutter speed of 1/1000 second or faster to freeze the action – the faster the better.

With such fast shutter speeds, you will need to use a wider aperture (lower f-number) or a higher ISO setting. However, given the unpredictability of the bubble’s movements, you do not want to have such a wide aperture (and, therefore, shallow depth of field) that you end up with most of the bubble out-of-focus. For this reason, I prefer to increase the ISO setting before dialling in a wider aperture as some additional noise to the image is easier to manage (and can be corrected to a certain extent during post-processing) than an image where the bubble is largely out-of-focus.

If the available natural light is not sufficient to allow fast shutter speeds, a flash can be used to help to freeze the action. However, I would recommend using a diffuser or reflector with any flash, particularly if shooting indoors in front of a window.

6. Focus manually

I have tried to capture bursting bubbles with and without the use of autofocus. My preference is definitely without. My best results have been when I focused manually on the bubble floating in mid-air and pressed the shutter release button as soon as the bubble was to be burst. On several occasions, the autofocus was too slow and I missed the shot as the camera struggled to find focus. If nothing else, this project will give you a lot of practice in manual focusing!

7. Keep calm and carry on

bubbledps4

The speed at which the bubble bursts means that you will probably have to try this many times to get the timing exactly right. Patience is key. Don’t give up on the challenge. Accept that it is going to be slightly frustrating but know that, when you get the timing spot-on, your final image will be much more satisfying.

googletag.cmd.push(function() {
tablet_slots.push( googletag.defineSlot( “/1005424/_dPSv4_tab-all-article-bottom_(300×250)”, [300, 250], “pb-ad-78623” ).addService( googletag.pubads() ) ); } );

googletag.cmd.push(function() {
mobile_slots.push( googletag.defineSlot( “/1005424/_dPSv4_mob-all-article-bottom_(300×250)”, [300, 250], “pb-ad-78158” ).addService( googletag.pubads() ) ); } );

The post How to Capture a Photo of a Bubble Bursting by Richard Beech appeared first on Digital Photography School.


Digital Photography School

 
Comments Off on How to Capture a Photo of a Bubble Bursting

Posted in Photography