As you learn more about using your camera, and start taking beautiful pictures, you might also want a way to share them with the rest of the world. There are many social networking platforms that are ideal for this sort of thing like: Instagram, Flickr, Google Photos, Tumblr, and Facebook, along with hundreds more.
However, one of the most popular, and effective ways, to share your pictures is a simple, humble, tried-and-true blog. Even though blogs are sort of like grandpas in our modern internet age, there’s a reason they have stuck around for more than two decades: they’re intuitive, easy to set up, and they allow you to have full control over your content. Many photographers enjoy using blogs because of their flexibility and customizability, and if you want to spent a bit of money for a dedicated blog platform like Squarespace, or a self-hosted WordPress installation, you can get even more creative.
If you are thinking about pursuing this route there there are some things you need to consider before setting up your own photo blog.
There are many sites that let you build photo blogs, several of which are free.
Know why you are doing a blog
This first point seems kind of obvious, but a lot of photographers find their blogs stalling out, and gathering dust after a few months, because they did not define their purpose for doing the blog when they first began. Many people start blogs because they just want to share random pictures, but if you want a viable long-term blogging solution, you’re going to need something more.
Are you starting a photo blog to get your name out there, and generate sales leads (potential customers)? Do you want to make a mark in your community? Do you want to simply post photos you think are interesting? Whatever your reason for doing a photo blog, it’s important to make sure you at least have one, in the first place. If you have never done a photo blog, then it’s likely you are doing it for personal reasons, such as trying to learn and grow as a photographer. That is an outstanding goal, and one that has helped many other bloggers, become much better at photography as well.
Once you know precisely why you are doing your blog, it will serve as a guide for everything you post. Brandon Stanton started the well-known Humans of New York blog with a specific purpose: to photograph 10,000 people living in New York City. This helped him have a sense of purpose and direction when taking and posting photos, and doing the same thing can greatly benefit you as well. If you cannot explicitly state why you are doing a blog, it is much more likely to gather virtual dust after a short time, and any readers you do manage to pick up, will possibly stop investing their time in it as well.
One of the first pictures I ever posted to my blog. It’s not even an interesting photo, but I was just starting out, and can look back on this to see how much I have learned since then.
In 2008 the web analytics firm Technorati found that roughly 95% of the blogs it tracked, went more than 120 days without being updated. When your blog goes four months without anything new, it is more than likely a failure. So how can you keep your blog not only surviving, but thriving past 120 days, and well beyond? Here are few more tips that might help:
Clearly articulate the purpose of your photo blog to your viewers
Attention spans are short, and people today have a never-ending stream of tweets, news clips, soundbites, app updates, and cat videos coming their way, almost every waking moment. So,how on earth can you make your blog stand out, and get noticed amid all the other sites, apps, and feeds that people check on a daily basis?
New readers should be able to tell within five seconds, what your blog is about. The best option is to have a specific niche that your photo blog serves (e.g. wildlife, surfers, snowflakes, street pictures, etc.). But, even if it’s just pictures you like taking for no particular reason, you should at least make that clear to your readers upfront. You’re basically setting expectations right from the outset, and giving your audience a clear sense of what they will get out of reading your photo blog. Some people do this by having a descriptive name for their blogs, a brief tagline, or a set of pictures that instantly conveys a sense of purpose (e.g. flowers, cattle, cars, sunsets, etc.). Whatever the purpose of your photo blog is, if your readers can’t figure it out, they’re going to quickly move elsewhere.
My blog is specifically for photos I take with my 50mm lens, and I make that clear to my readers immediately when they visit the site. If you don’t let your readers know what your blog is about, they will probably not stick around very long.
Post new content regularly
Not every blog that is updated regularly is going to be a success, but every successful blog is updated regularly. I have seen too many photographers start blogs that are updated daily, then weekly, and before long, the rate at which new pictures are posted slows to a trickle. Soon it’s a photo every couple weeks, then one a month, and then a written apology by the blogger about how he or she has just been so busy lately, but they promise to start posting more photos soon. More often than not, soon becomes later, then later becomes never, and a once-promising photo blog becomes another statistic of failure rates.
The best way to combat this problem, is to not post pictures whenever you feel like it, but instead post them on a regular and predictable basis. This gives your readers something to expect, and also imparts upon you, the blogger, a sense of accountability, which helps keep your camera in your hands and out of your closet. My photo blog is titled “Weekly Fifty”, and because it requires me to post a picture every single week, I almost always carry my camera with me, and am constantly looking for photo opportunities. In almost three years I have never failed to post a photo each Wednesday morning, which has helped me build a nice following, with regular commenters as well.
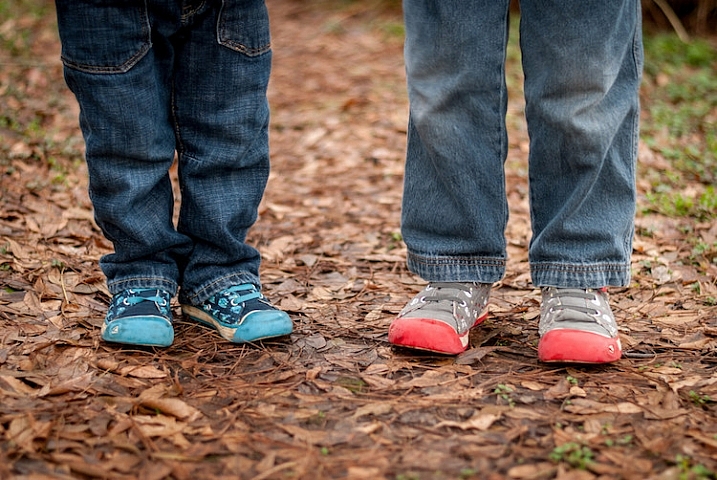
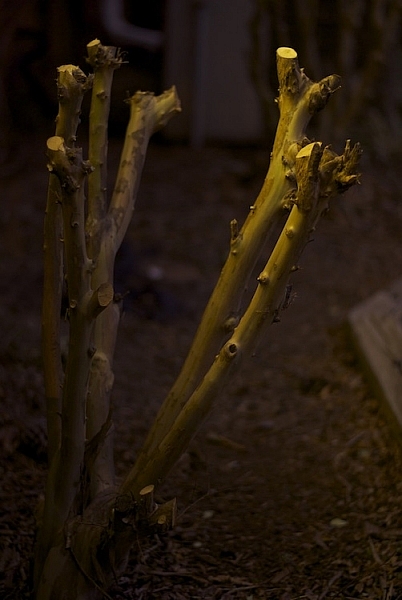
A few years ago I ran out of ideas for pictures to post, but I knew I had to stick with my weekly schedule. So, I made this image, that turned out to be one of my more popular photos.
One trick I like to recommend for photo bloggers, is to schedule your posts in advance. This doesn’t work well for blogs about news or current events, but as a photo bloggers you do not have to be timely in the same manner. I currently have complete posts (each with a photo, written explanatory text, and an accompanying 4-minute audio commentary) scheduled for the next six weeks. I use WordPress, which allows me to schedule posts in advance, so each of these six posts will be automatically published on subsequent Wednesdays at 1:00 a.m. This gives me a bit of padding, if I ever find myself in a position with lots of things going on in my life, and my readers know that they will get a new picture each week, no matter what.
Of course the catch here, is that I can’t merely sit on my laurels in the meantime. I have to keep taking pictures, and producing new blog posts, so that six weeks from now I don’t run out of material. This type of accountability is enormously helpful for photo bloggers, and if you’re not sure where to start, I always recommend doing one picture each week. If that’s too much you can lower it, and if it’s not often enough you can increase it, but I have found that a weekly schedule is a sweet spot that gives you enough time to take pictures, and doesn’t overload your readers with so much new content that they start ignoring it.
Engage with your audience
Building a loyal audience is the holy grail of almost every blogger, but it’s not easy to do. Your readers have many obligations, alerts, people demanding their time, and often it’s difficult enough just to get them to visit your blog in the first place, much less comment on a photo, or offer some kind of reaction to it. Early in the life of your blog, visitors will usually not be invested in your pictures enough to leave comments. But, as you start to build traffic, and readership over time, you will likely have a few people who start to offer feedback on your images.
When you do get commenters it’s essential that you interact with them, in order to build a sense of community, respect, and mutual sharing. If someone likes one of your pictures, say “Thank you” and ask if you can see some of their photos too. If someone offers a bit of constructive criticism on a picture, try re-taking a similar photo using their suggestions. You can offer a Call to Action by posting a photo, and encouraging your readers to take, and share similar photos in the comments section. This type of audience engagement benefits all parties; by giving you even more reasons to continue your blog, giving your readers a reason to keep coming back, and giving new readers a sense that your photos are interesting and worthy of comments.
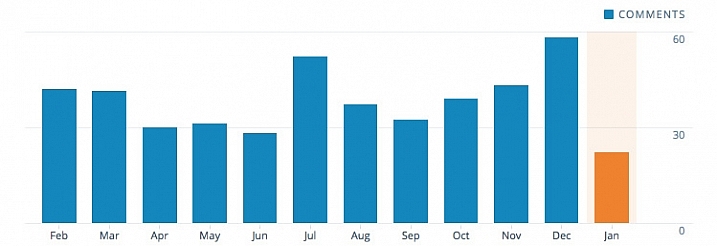
This chart shows my comment statistics for calendar year 2015. I ran my blog for almost a year and a half before getting any regular commenters, and now I get about 40 comments each month. It’s not huge, but it’s a number with which I am very happy.
If your blog grows to mammoth proportions, and you start getting hundreds of comments on each picture, it might not be reasonable to reply to every single one, but until that happens you need to take care to give each commenter a personal response. If people are taking time out of their day to leave comments on your pictures, knowing that you personally read and responded, will make them want to keep visiting your blog, and engaging with you as well as other readers.
On my blog I have a few loyal readers who comment on every single picture, and it’s well worth a few minutes of my time each week to respond to the things they write. This helps make my commenters feel valued, and builds a sense of community that would not exist otherwise.
Push content to your readers
People rarely go out of their way to visit a blog, so instead you need to find a way to push your new pictures to them. One of the most effective ways of doing this is to ask your readers to sign up for email updates, but you can also use social networks to get the word out about each new post.
Every Wednesday my email subscribers get that week’s photo in their email inbox, but I also publish a link to my blog on Facebook and Twitter, and put that week’s image in my Instagram feed as well. (With the last option people are not directed to my blog, but I still get to engage with them about my pictures.) If you would like to ultimately generate revenue from your blog you might want to focus on ways of pushing content to your readers that, as often as possible, will bring them directly to your site and not to somewhere else that also has your photos.
I woke up the morning this photo was published and found two comments had already been posted at about 2am. This type of engagement is possible because these people subscribed to email updates. If you don’t have a way of pushing content to your readers you will likely not get the same level of engagement as you would otherwise.
Define your success criteria
I teach a Project Management class at Oklahoma State University. One concept we talk about often is how to tell if a project is successful, and the same holds true for your photo blog. At what point will you know that your blog has succeeded in meeting your goals? Will you be happy if you have two comments, and 10 social media shares for each picture you post? Are you looking for a way to generate a specific amount of revenue from your blog? Or is your success criteria more esoteric, such as using your blog for a sense of personal growth and development?
Having a set of clearly-defined success criteria is not necessarily essential for a blog, but it will give you something to shoot for, and a way of knowing whether you have gotten there or not. Whatever your success criteria is, take care to not compare it to anyone else’s. For example one of your photos might get five comments and 10 social media shares, but then you talk to a friend who just had five thousand visitors to his blog. Whose blog is more successful? The answer is…they both are.
Success depends entirely on how you define it, and thankfully the internet is big enough for millions of photo blogs to coexist. Congratulate your friend, and ask to see the photo that was so popular. Don’t make your blog’s success a competition, because and as long as you are happy with how things are going, then that’s the only thing that matters.
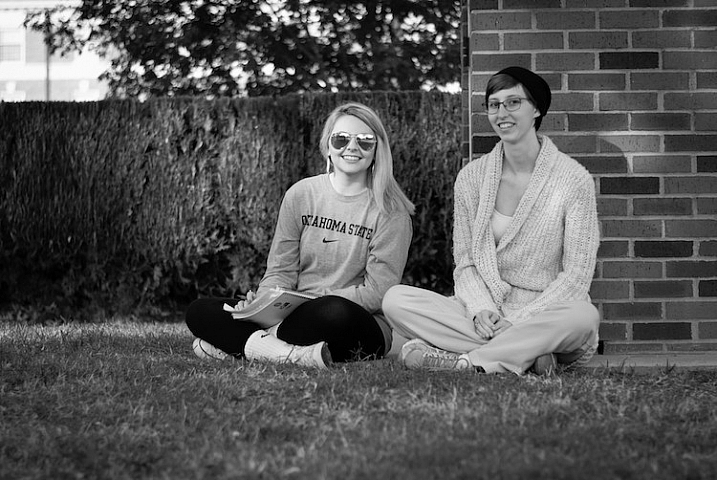
This photo had a great deal of personal meaning to me, but it generated very little traffic, and almost no comments. If my success criteria was only quantifiable through numbers I would have been let down, but instead the sheer act of taking this photo, forced me out of my comfort zone, and made me try something new. Because of that I considered this one of my better images, even though raw numbers might say otherwise.
Ignore the numbers
Visitor statistics can be so exciting, but they can also lead you down the path to the blogging dark side. It can be fun to log in to your account dashboard, and see that a recent picture generated 200 visitors, but those numbers don’t mean anything, if they don’t translate to reader engagement. Imagine building a store and getting hundreds of people to come see your wares, but having every one of them leave without making a purchase. Not only would your store be a failure, but you would quite likely be disappointed on a deeply personal level.
As a photo blogger you need to strive for quality over quantity, and look for ways to build a loyal following, not just try to increase raw visitor statistics. You might get a nice feeling seeing one of your photos get hundreds or thousands of views, but what happens when a different (or far better) picture you post gets only a couple dozen views? Visitor traffic is a fickle mistress, and if you pin your blogging hopes and dreams on simply making the numbers go up, you could very well be setting yourself up for a painful failure.
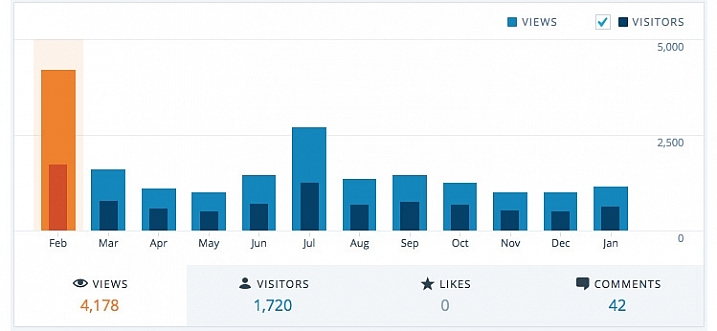
February 2015 was a big month for my blog, but the numbers have gone down dramatically ever since. Since my success criteria is not measured in raw numbers this drop in traffic makes no difference to me, but if numbers are your goal then you could very well end up chasing a white whale that can never be captured.
I used to run a movie and TV review website, and wrote an article about the now-defunct show, “Man versus Food” on The Travel Channel. Somehow the host of the show found out about the article, tweeted it to his followers, and that single article generated more traffic than anything else we had ever posted. The problem was that those visitors did not stick around, and within a few weeks we were back to the same relatively low numbers we always had. At the time I figured blogging success meant getting sky-high traffic numbers, and when those numbers did not pan out I thought we had failed.
When I started my Weekly Fifty photo blog, I took an entirely different route and tried hard to ignore numbers about visitor statistics, and have been much happier as a result. I do my blog because it helps me learn and grow as a photographer, and I get a great deal of personal satisfaction out of it. I appreciate the continual challenge it offers. In short, I’m a happy and successful small-time photo blogger, because I don’t let numbers and statistics define what success means to me.
This is by far the worst photo I have ever posted on my blog and it’s almost painful to look at it now. But early on in my blog, I had no idea what I was doing, and it was only through taking lots of bad pictures that I learned how to make a good image. Though this picture is kind of embarrassing, it served a valuable purpose both on my blog, and for me as a photographer.
Do you have a photo blog, or are you thinking about starting one? I’d love to hear any tips you would like to share, and will try to answer any questions you might have as well. Leave your thoughts in the comments section below and I’ll do my best to engage with you, the dPS readers, so you feel valued and keep coming back to our site. 
googletag.cmd.push(function() {
tablet_slots.push( googletag.defineSlot( “/1005424/_dPSv4_tab-all-article-bottom_(300×250)”, [300, 250], “pb-ad-78623” ).addService( googletag.pubads() ) ); } );
googletag.cmd.push(function() {
mobile_slots.push( googletag.defineSlot( “/1005424/_dPSv4_mob-all-article-bottom_(300×250)”, [300, 250], “pb-ad-78158” ).addService( googletag.pubads() ) ); } );
The post Tips to Help You Start a Successful Photo Blog by Simon Ringsmuth appeared first on Digital Photography School.

Digital Photography School


You must be logged in to post a comment.