RSS
 

Posts Tagged ‘Photo’

Palette offers physical controllers for your photo editing software

22 Sep

In hall 4 at Photokina we had the chance to take a closer look at Palette’s system of customizable physical controllers for software, which started out as a crowdfunding project but have been available in retail for some time now. The system consists of a core unit with a small display and a range of buttons, dials and sliders that all come with a sturdy aluminum housing and attach to each other magnetically. 

Palette can me made to work with any software but predefined setups are available for Adobe Photohop, Lightroom and other photo and video editing applications. You can switch between functions using buttons, or adjust parameters such as digital exposure compensation, contrast or hue with sliders or dials. Your personal profile can be created in the Palette app. Multiple profiles are supported for different users or workflows and the Palette application can be set to automatically switch profiles when the application focus on your computer changes. The Palette starter kit is available for $ 199 on the Palette website.

Articles: Digital Photography Review (dpreview.com)

 
Comments Off on Palette offers physical controllers for your photo editing software

Posted in Uncategorized


How to Process a Black and White Landscape Photo Using Lightroom

20 Sep

The process of converting a color landscape photo into a black and white image using Lightroom goes beyond changing the treatment to black and white. That’s just the start. From there you have to tweak and refine, using all tools that Lightroom gives you, to craft an image that matches the vision you carry in your mind.

Black & white landscape in Lightroom

A good way of showing you how this works is to take you step by step through the process that I use when converting a landscape photo to black and white in Lightroom. You’ll see the techniques that I use. and more importantly, the reasoning behind them. This should give you the insight you need to use these tools on your own images.

1. Make sure you have a good image for black and white

The first step is to make sure that you are working with a photo that suits a black and white treatment. Good black and white photos have strong composition that make use of texture, line and tonal contrast.

It’s a good idea to convert only your best landscape photos to black and white. It will take you some time to convert a photo, so why waste it on anything less than your best work?

2. Prepare the color photo

First, open your photo in Lightroom’s Develop module. Then, I do two things before converting a color landscape photo to black and white.

  1. Use the Spot Removal tool to get rid of any dust spots.
  2. Set White Balance to Auto so that the color balance of the photo is more or less neutral. Photos with strong color casts are harder to successfully convert to black and white.

If you are converting a photo that you have already processed in color it’s a good idea to make a Virtual Copy and work on that. This way you don’t lose the work you have done on the original color version.

Black & white landscape in Lightroom

Here’s the color photo that I am going to convert to black and white.

3. Analyze your photo

This takes practice and becomes easier the more you convert photos to black and white. The idea is to make some big picture decisions about what you want to achieve with your conversion. With my photo I can see that:

  • The sky is too bright, and I would like to make it darker.
  • The distant cliffs have beautiful texture that I would like to bring out
  • So do the grass and stones in the foreground.
  • The sea and sky are smooth, creating a visual contrast against the heavily textured parts of the photo.
  • There is good tonal contrast between the grass and stones in the foreground.

This analysis helps me set some goals for the conversion.

4. Convert the image to black and white

There are three ways to convert the photo to black and white using Lightroom. They all do the same thing, so it doesn’t matter which of these methods you use:

  1. Set Treatment to Black & White in the Basic Panel.
  2. Use the keyboard shortcut; V .
  3. Click on B&W in the HSL/Color/B&W panel.

The conversion is likely to look quite flat. That’s okay – it’s easy to add some contrast.

Black & white landscape in Lightroom

Now go to the B&W tab in the HSL / Color / B&W panel. It will look like one of the these two examples below depending on your Preference settings in Lightroom:

Black & white landscape in Lightroom

If you go to the Presets tab in Preferences (see below) you’ll see a tick box titled Apply auto mix when first converting to black and white. If this is unchecked, all the sliders will be zeroed, as in the screenshot on the left (above). If it is ticked, Lightroom takes a guess at what settings to use to make a good conversion and you’ll see something like the screenshot on the right (above).

Black & white landscape in Lightroom

My preference is to leave the box unticked.

When I convert the image to black and white I go to the HSL / Color / B&W panel and click the Auto button at the bottom of the B&W tab. If I like the result, I leave it there. If I don’t, I use the undo command (Ctrl-Z on a PC, Cmd-Z on a Mac) to undo it.

In this case, I liked the result of pressing the Auto button, so I left the settings as they were. I rarely do any work more than this in the HSL / Color / B&W panel.

Black & white landscape in Lightroom

5. Basic panel adjustments

Now it’s time to make some global adjustments in the Basic panel. Global adjustments are those that apply to the entire image.

The image is flat so the first step is to increase contrast.

Going back to the analysis I did earlier, I can see that I want to emphasize the textures in the photo. Clarity is the ideal tool for this. Increasing Clarity also increases contrast. You should adjust both Clarity and Contrast sliders to get the best overall effect, without overdoing it. You can also use the Highlights and Shadows sliders to adjust the brightness of the lightest and darkest tones in the image individually.

In the end I set Contrast to +40, Clarity to +60, Shadows to -13 and Highlights to -49. Remember that every image is different, and that these settings only apply to this one.

Black & white landscape in Lightroom

6. Make local adjustments.

Now it’s time to make some local adjustments. Local adjustments are those that just affect part of the image. Lightroom gives you three tools to do this – the Radial filter, the Graduated filter and the Adjustment Brush.

I want to make the sky darker in this photo, so I will do that with a Graduated filter. This screenshot shows the location of the Graduated filter (the area affected by the local adjustment is shown in red).

Black & white landscape in Lightroom

I used the brush to erase part of the Graduated filter so that the sea and cliffs weren’t affected.

Black & white landscape in Lightroom

I set Exposure to -0.70, Contrast to -100 and Highlights to -100. Again, the settings required depend on your photo.

My aim here was to make the clouds darker and reduce the contrast so that they appeared smoother. The contrast in this image is in the cliffs, the sea and the foreground, not the sky. Less contrast in the sky means that it won’t compete with those areas for attention.

Black & white landscape in Lightroom

The next local adjustment is on the cliffs in the background. I used the Adjustment Brush for this. Here’s the area affected by the local adjustment (shown in red again).

Black & white landscape in Lightroom

I set Clarity to +86 and Shadows to +16.

Black & white landscape in Lightroom

You may remember that in my analysis I decided that I wanted to make the foreground darker to emphasize the tonal contrast between the grass and the rocks. I’m going to use the Adjustment Brush for this as well.

First, I added an Adjustment Brush to make the grass darker. Here’s the area affected (shown in red).

Black & white landscape in Lightroom

I set Highlights to -64, Shadows to -48.

Black & white landscape in Lightroom

That left a light patch in the bottom left corner, and a dark patch under the stone in the center. I used the Adjustment Brush two more times, to make the light patch darker and the dark bit lighter, creating a more even tone across the bottom of the image.

Then I used the Adjustment Brush on the stones, with a Clarity adjustment to bring out the texture. Below is the result of all those adjustments.

Black & white landscape in Lightroom

Next I used the Adjustment Brush again and selected the sea and the sky.

Black & white landscape in Lightroom

Then I set Contrast to -41 and Clarity to -25. The idea was to remove some of the contrast and texture from these areas, to emphasize the smoothness and lack of texture and set up a stronger visual contrast against the heavily textured cliffs and foreground.

Black & white landscape in Lightroom

That’s it. The final image could certainly be refined a little further, but it’s important to pick a point at which to stop so that you don’t spend too much time on the conversion. Where this point is depends on how much of a perfectionist you are, and how much time you are willing to devote to a single image.

Here’s the initial black and white conversion and the final result together so you can see the difference more clearly.

Black & white landscape in Lightroom

Original color image.

Black & white landscape in Lightroom

First version of black and white conversion.

Black & white landscape in Lightroom

Final image.

There are lots of ways you can convert landscape photos to black and white in Lightroom. I’ve only touched on the topic here, so if you have anything to add please let us know in the comments.


Mastering Lightroom

If you want to know more about processing black & white photo in Lightroom then please check out my ebook Mastering Lightroom: Book Three – Black & White.

googletag.cmd.push(function() {
tablet_slots.push( googletag.defineSlot( “/1005424/_dPSv4_tab-all-article-bottom_(300×250)”, [300, 250], “pb-ad-78623” ).addService( googletag.pubads() ) ); } );

googletag.cmd.push(function() {
mobile_slots.push( googletag.defineSlot( “/1005424/_dPSv4_mob-all-article-bottom_(300×250)”, [300, 250], “pb-ad-78158” ).addService( googletag.pubads() ) ); } );

The post How to Process a Black and White Landscape Photo Using Lightroom by Andrew S. Gibson appeared first on Digital Photography School.


Digital Photography School

 
Comments Off on How to Process a Black and White Landscape Photo Using Lightroom

Posted in Photography


6 Tips for Planning the Perfect Landscape Photo Shoot

15 Sep

How many times have you shown your pictures to someone and said, ”You should have seen that sunset in person to understand how magic it was!” We can make many excuses as to why the photo doesn’t look the same, complaining about our equipment, settings or post-production, but let’s face reality, maybe there was something wrong with our landscape photo!

Before you open Photoshop, and even before you press the shutter button, you need to plan the kind of image you want to create. Planning plays a key role in landscape photography. Here are some things that are useful to think about if you want to capture the perfect light and transmit some feelings with your images.

Tip 1: Check the weather forecast

landscape photography

Calton Hill – Edinburgh, Scotland

Landscape photography is one of the most difficult genres, or at least among the most unpredictable, as you don’t have any control over the weather at the scene.

What kind of atmosphere do you want to create with your image? The weather can completely transform a landscape, so think carefully about what mood you want to evoke. If you want to create a bright, cheerful image you might already know that a blue sky with fluffy white clouds would be better than a flat blue sky, or even worse a grey one.

So, before you drive for two hours and you arrive to see is a dull landscape, use the only weapon at your disposal: the weather forecast.

Tip 2: Choose the right time of the day and year

The perfect weather condition alone is useless without proper light. In landscape photography, the light is given by the position of the sun in the sky in relation to your subject. Fortunately, this is something more predictable than the weather. Calculate where the sun will be at particular times of day, and it will be easier for you to foresee how the scene will be illuminated. Again, think about the atmosphere you want to create. Light and peaceful? Dark and moody? Are there any particular landmarks you want to highlight? The answer to these questions will inform where you want your light to be, and consequently what time of day to shoot.

landscape photograph Groningen, Netherlands

Groningen, Netherlands

Bear in mind that the sun’s position doesn’t change only during the day, but also throughout the year. As a result, in one year there are many different lighting conditions for the same place. It would be a shame not to use them to your advantage. You can use many websites and apps for this; the one that I use the most is PhotoPills, which is very well outlined in this article.

Tip 3: Be inspired by other photographers

When you plan your holiday, after booking the tickets and the hotel, you may buy a travel guide with detailed information about the location. Like where to go and what to eat, to make sure you won’t miss anything. Or you might just ask some friends who have been there before. In both cases, you’re relying on someone who went there before you, and who therefore knows what’s worthwhile to visit, or what’s a good typical (local) dish to try.

Even if you can’t do exactly the same thing with photography, you can get pretty close, thanks to the multitude of photography websites and social networks full of pictures from all over the world. The ones I personally use most of the time are; Google Images, 500px, Instagram, Flickr, and Pinterest. Obviously, the list doesn’t end here.

Feel free to use whatever sites you want, as long as you do it. It doesn’t matter if the picture isn’t the best quality, after all, you don’t want to copy it, but you’re just looking for some inspiration

landscape photograph Zaanse Schaans, Netherlands

Zaanse Schaans, Netherlands

Tip 4: Enjoy the place and get familiar with it

When arriving somewhere, especially if it’s for the first time, it’s really tempting to take your camera and shoot whatever you see! This isn’t wrong in itself, but remember you’ll probably take dozens of nice pictures and lose the opportunity to take that single outstanding one. Because when the moment comes you’ll be tired of taking other pictures, or even worse, the battery is dead. (By the way, do you have a spare battery, don’t you?)

It’s better to be patient and spend more time exploring your location and the surrounding area. This way you are more likely to discover some interesting spots, hopefully different from the classic ones. You can use your smartphone for your normal tourist pictures, so don’t worry about anything but composition. This way, you can enjoy the place where you are, instead of spending all the time behind your camera. After all, landscape photography should be the happy ending of a good day outside, not the only reason for being there.

landscape photograph Land’s end - Cornwall, England

Land’s end – Cornwall, England

Tip 5: Use both golden and blue hours wisely

I’m sure you already know what the golden hour is: the time of the day around dawn and dusk when the sun gives its best warm light and long soft shadows. Hence the adjective golden. Many photographers, including me for a while, consider it as solely the right moment for obtaining good photos. This is wrong, because there is another one, called blue hour, which occurs just before the golden hour at sunrise, and just after sunset.

As you can imagine from the name, its particularity is in the blue colour of the sky, not warm anymore and not totally dark like in the middle of the night. It is very effective for urban landscapes, because it emphasizes artificial lights that wouldn’t be as visible during the golden hour. Furthermore, since the sky is not totally dark, you’ll have a better contrast with the warmer colours of the city, which will add drama to your picture.

landscape photography Manarola - Liguria, Italy

Manarola – Liguria, Italy

Tip 6: Take location related issues into account

So, you’ve planned your shoot by choosing the right day, with good weather and explored the place properly. Is that all?

Almost… There’s still something to be considered and it depends on the place. For example, in the case that you want to photograph a coastline, you will need to consider tides. It can be useful for composition purposes, but most importantly it’s for your personal safety. Tides in the ocean are really rapid and wide, and in some cases, it could be difficult (if not impossible) to escape from the waves if you decided to shoot from the rocks along the shore, with a rocky wall behind you.

In the case of very famous landmarks, a common issue is that it will be full of other photographers and tourists that want the same shot as you. This can obviously create problems for your composition, or you won’t have enough space for your tripod. So, try to be in that place before it gets too busy. This not only reduces the risk of finding other photographers who have decided to photograph from your same spot, it also permits you to slow down and avoid making mistakes.

landscape photography London, England

London, England

Conclusions

When I started taking pictures several years ago, I didn’t have anything in my mind other than to take pictures of what I liked. But looking at other photographer’s work I realized that I was missing something. In my opinion, proper planning is the most important thing that I could have learned.

Obviously learning new techniques is useful, but it’s the most obvious. Planning is often underestimated, but it can really help you to go somewhere already having a picture in mind. If this isn’t the case, remember again: landscape photography is just the happy ending, you can still enjoy the place!

Do you have any other tips for planning your landscape photography shoots? I’d love if you shared them in the comments below as well as your images.

googletag.cmd.push(function() {
tablet_slots.push( googletag.defineSlot( “/1005424/_dPSv4_tab-all-article-bottom_(300×250)”, [300, 250], “pb-ad-78623” ).addService( googletag.pubads() ) ); } );

googletag.cmd.push(function() {
mobile_slots.push( googletag.defineSlot( “/1005424/_dPSv4_mob-all-article-bottom_(300×250)”, [300, 250], “pb-ad-78158” ).addService( googletag.pubads() ) ); } );

The post 6 Tips for Planning the Perfect Landscape Photo Shoot by Luigi Trevisi appeared first on Digital Photography School.


Digital Photography School

 
Comments Off on 6 Tips for Planning the Perfect Landscape Photo Shoot

Posted in Photography


Facebook Moments app adds support for full-resolution photo storage

13 Sep

Facebook Moments, a private photo-sharing mobile app, has been updated with support for full-resolution images. Previously, Facebook Moments didn’t store the full-res version of users’ images, and makes it possible now when a user ‘favorites’ an image within 30 days of it being uploaded or shared.

In addition to adding full-res image support, Facebook also now makes it possible to share a Moments photo album with others (regardless of whether they’re on the platform) using a web link. Those who receive the link to the private album can then join it and, if they’d like, add their own images to the collection. The web link can be accessed via the album’s menu by choosing ‘Share link.’

Facebook Moments is available for both iOS and Android.

Via: TechCrunch

Articles: Digital Photography Review (dpreview.com)

 
Comments Off on Facebook Moments app adds support for full-resolution photo storage

Posted in Uncategorized


Nikon offers ¥500,000 and D5 for its 100th Anniversary prize in annual photo competition

08 Sep

Nikon has announced the opening of the 36th Nikon Photo Contest and is giving away cash as well as a collection of top end DSLR cameras to winners. As the company is celebrating its 100th anniversary it has introduced a special category, the prize for which is ¥500,000 (approx $ 4900) and a Nikon D5 with the AF-S Nikkor 24-70mm F2.8E ED VR lens. A further category in addition to the usual Open section is designed for photographers under the age of 30.

The Grand prize will be a D5 with AF-S Nikkor 24-70mm F2.8E ED VR, while the most popular entry will win a D810 with the same lens. The first prize for each category is the same D810 kit, while 21 second prizes will be awarded of D500 bodies with AF-S DX NIKKOR 16-80mm F2.8-4E ED VR lenses. A total of 35 D5500 bodies will be given away to 3rd placed entries along with a AF-S DX Nikkor 18-55mm F3.5-5.6G VR II each.

The theme for the 100th Anniversary category is ‘Celebration’, and entrance is via a single image that must have been taken on Nikon equipment. The Next Generation category, for under 30s, and the Open category have the theme ‘Future’ and require two to five images per entry or a video of six to 180 seconds. Any brand of camera may be used for these categories.

Entry is free and works may be submitted between 17th October 2016 and 27th January 2017. For more information see the Nikon Photo Contest website.

Press release

Call for entries for Nikon Photo Contest 2016-2017

Neville Brody inaugurated as Lead Judge and two new categories introduced

Nikon is pleased to announce that entries for the Nikon Photo Contest 2016-2017 will be accepted between October 17, 2016 and January 27, 2017.

One of the world’s largest international photo contests since its inception in 1969, the 36th Nikon Photo Contest sees the addition of two new categories. The ‘Nikon 100th Anniversary’ category celebrates Nikon’s upcoming 100th birthday in 2017, and the ‘Next Generation’ category, for anyone under the age of 30, looks to encourage the talent of the next generation of photographers.

World renowned graphic designer and art director, Neville Brody, has been chosen as Lead Judge due to his huge influence on artists, including photographers, both young and old. He says of his role, “The Nikon Photo Contest is recognised globally as a key place to discover new and rising talent, searching out rich, imaginative power and inspiration. As Lead Judge, I feel it is my responsibility to continue this great tradition by selecting works that represent new ideas and superior quality. I am excited to see just how participants express their wonderful ideas and creativity through the works they submit.”

The Nikon Photo Contest 2016-2017 photography and video categories will accept entries recorded with any digital device, including smart devices*, and video entries with a length of six to 180 seconds.

The winners of the Nikon Photo Contest 2016-2017 will be announced in July 2017, with an awards ceremony in Japan, home of Nikon Corporation.

Articles: Digital Photography Review (dpreview.com)

 
Comments Off on Nikon offers ¥500,000 and D5 for its 100th Anniversary prize in annual photo competition

Posted in Uncategorized


Polaroid LED photo studio color box light offers portable, low-heat lighting

03 Sep

A new Polaroid-branded LED photo studio color box light has been introduced: a 907g / 2lb lightweight offering with an attachable handgrip, remote control and quiet operation easy-press buttons. Information including the color temperature, brightness and mode, as well as battery life, are displayed on an integrated LCD.

The new color box light is designed to be highly portable with support for both handheld and tripod usage; it can also be connected to other photo boxes for larger projects. According to Polaroid, the light features 600 LEDs and can achieve up to a 93% efficiency. 

The Polaroid LED photo studio color box light is available from Amazon now for $ 120.

Articles: Digital Photography Review (dpreview.com)

 
Comments Off on Polaroid LED photo studio color box light offers portable, low-heat lighting

Posted in Uncategorized


Image Editing Software Overview – On1 Photo 10

31 Aug

Since the advent of digital photography there has been one program that has been the penultimate of all image editing – Adobe Photoshop. There is no denying that it is powerful, but many find it confusing and hard to learn. Another aspect that some people aren’t sure about is the new subscription based ownership. So for many, another solution to the predicament is On1 Photo 10. It’s a program that is not that expensive, and can do most of what the majority of photographers want.

leannecole-on1-enhanced003

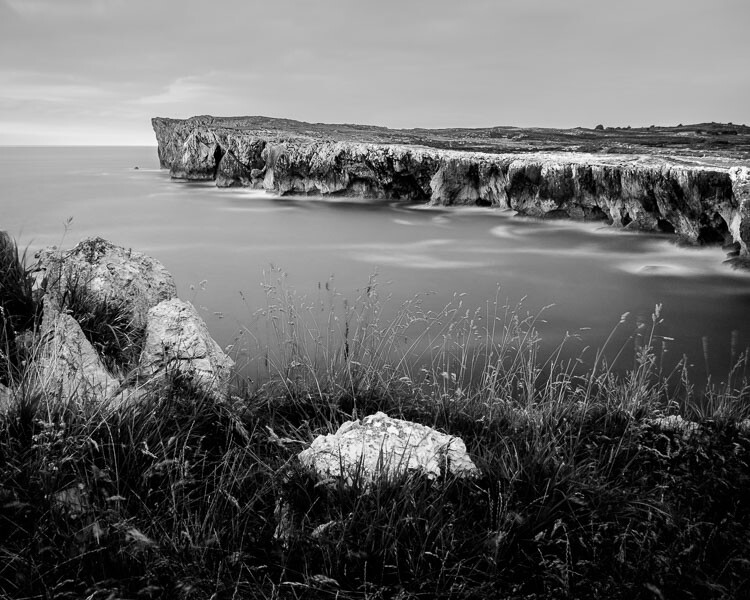
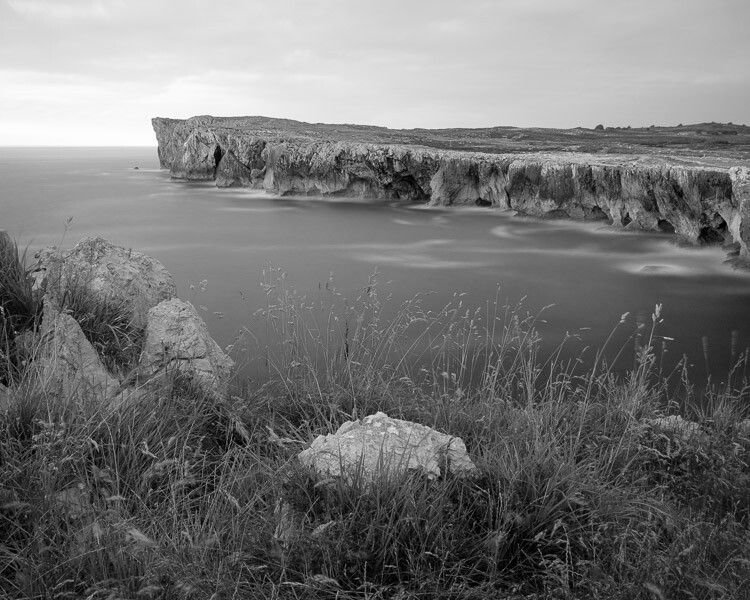
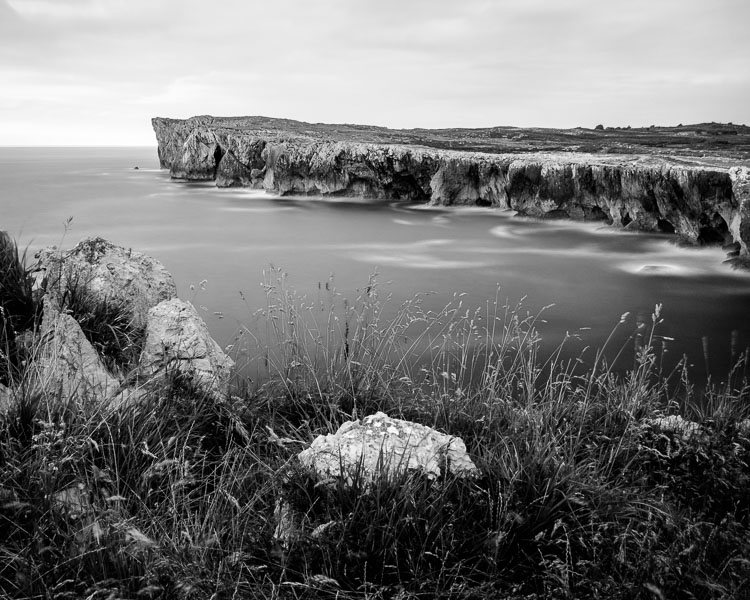
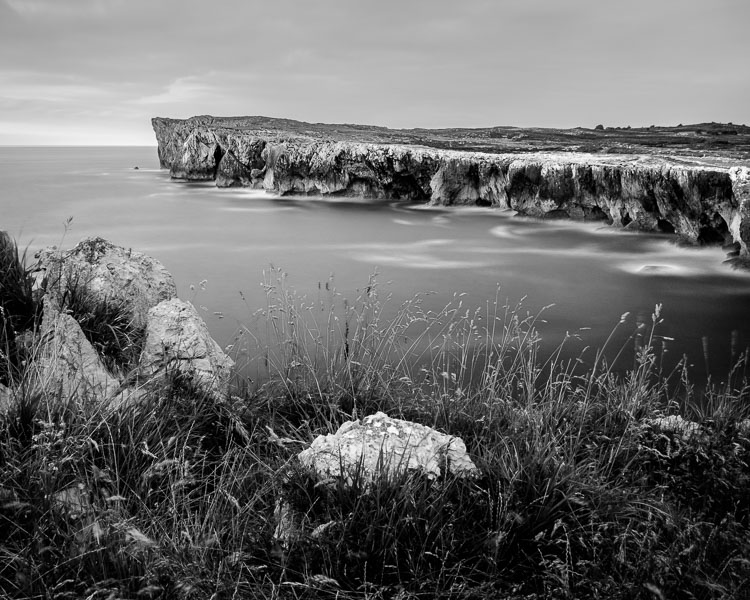
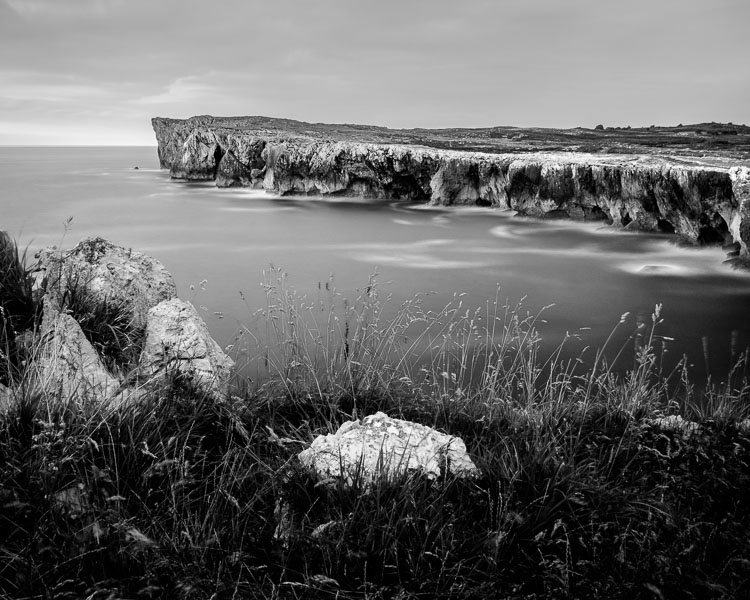
Image processed with the Enhance Module in On1 Photo 10

Overview of On1 Photo 10

The On1 Photo 10 editing software has been around for some time, and you may know it more as plugins for Lightroom and Photoshop. However, recently it has been given a new look, and it is now also a standalone program. This means you don’t need another program to be able to use it. You can download it and do all your editing within its confines.

When you open On1 Photo 10, it looks a bit like Lightroom, but that is about it. Locating all the tools is different, but not so different that you can’t find things. When you begin using On1, a window pops up with several videos to teach you how to use it. It is advisable that you watch them and learn. They are not very long, but they are packed with useful information.

On the right side of the panel there are a series of modules that you can edit your photos in. Each one is specific and gives you different options.

Browse Module

In the Browse section you can look at your photos and catalogue them, decide where you want them, and upload them to Cloud storage facilities like Dropbox, Google Drive, and OneDrive. It is similar to Bridge in Photoshop or the Library Module in Lightroom. You can make the images larger, so you can get a better look at them and decide which ones you want to work on.

When you want to start editing, the other modules are there for you to use.

leannecole-on1-browse-folder

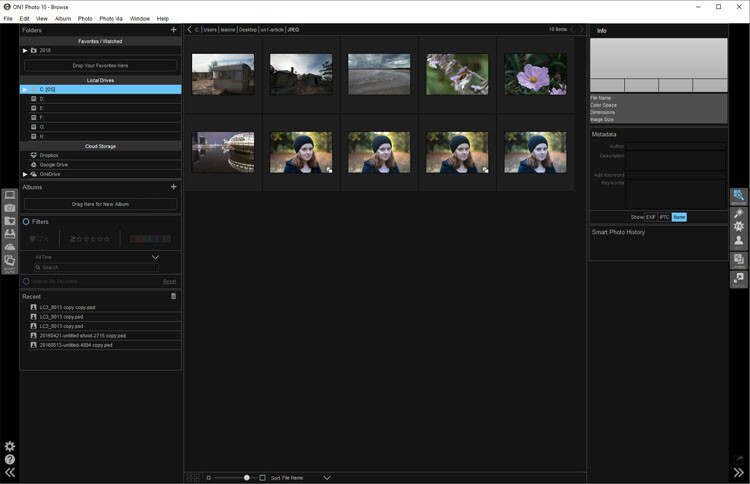
Browse Module, here you can view your photos and move them around.

Enhance Module

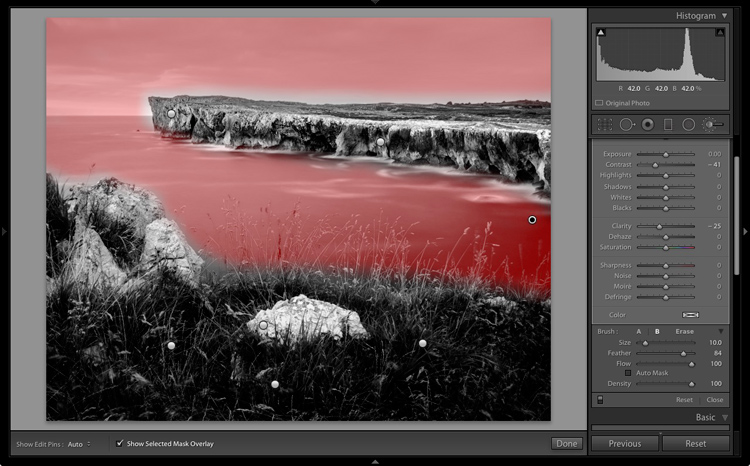
When you open your photo into the Enhance module you can do some basic editing, for example: changing the exposure, adjusting whites, black, shadows, and highlights. It will allow you to fix the white balance and help with noise reduction. This section is where you get your image ready for further work. It is like the preparation area before you go on to do the real work.

Similar to Lightroom, On1 works in a non-destructive manner. If you don’t understand that, it means nothing you do to your image is permanent. If you do something to it and don’t like it, you can go back and reverse the change. When you are just learning photo editing, it is good to work with software that allows you to work this way, without having to worry about ruining your image.

leannecole-on1-enhance-folder

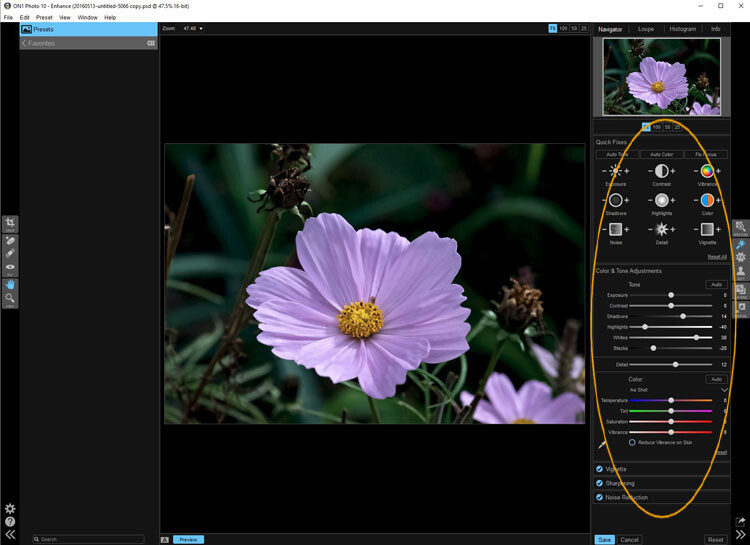
The Enhance Module allows you to do some basic editing to your images.
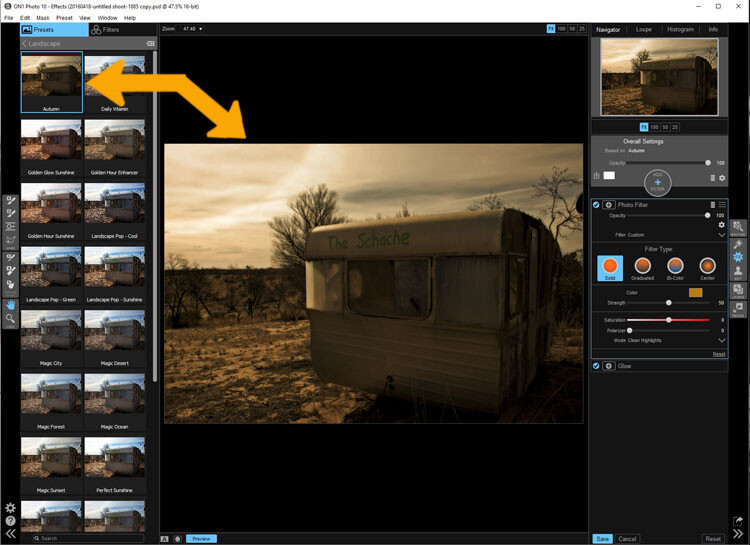
Effects Module

In Effects, you can add filters and presets to your photos. There is a large variety of them, and each one has several options within. You have the option of creating your own and saving them (just as in Lightroom), which is very helpful if you want to use the same one a lot.

There is a difference between presets and filters. On1 explains that presets do multiple effects, while the filters have only one. When using any of them you can make adjustments so it is as strong as you like, or they can be made to have less effect. You get to be the judge of how you want the final result to look.

leannecole-on1-effects-module-1

In the Effects Module you can apply presets and filters to your images.

leannecole-on1-effects-module-2

You can see what the presets or filters will do to your image, if you click the grid you will get a larger of view of each option.

leannecole-on1-effects-module-3

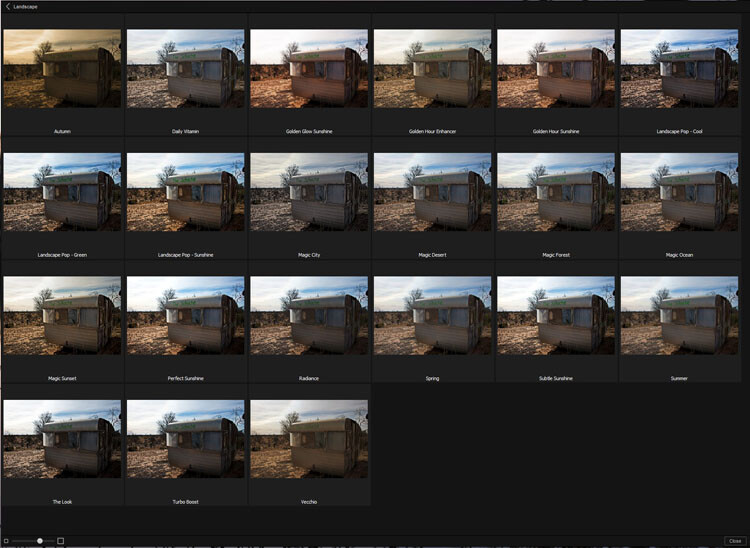
You can see what each preset or filter will do and when you decide which one to use, just click on it.

leannecole-on1-effects-module-4

On1 will then apply it to your image.

Portrait Module

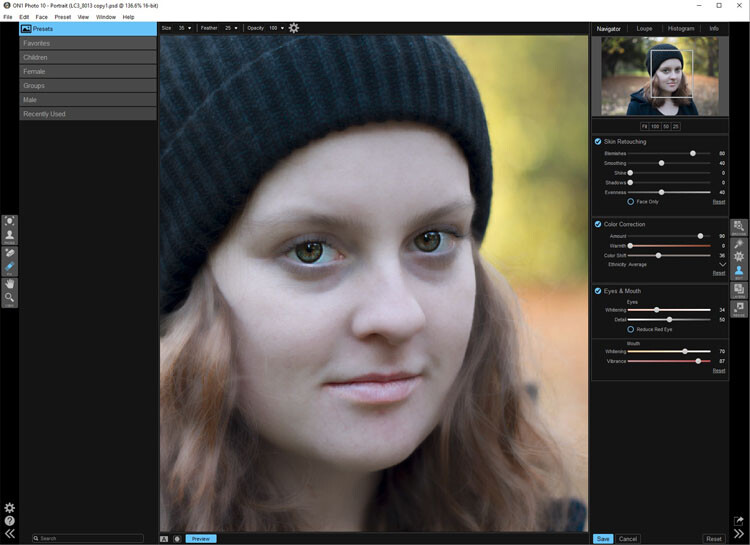
Portrait module is possibly is the hardest one to use. For people who photograph portraits on a regular basis, though, it may seem more intuitive. You have to work out faces, and point out the eyes and mouth to the program. Then it will whiten the eyes, and make the lips lighter. You also have the option of going back over everything and readjusting the settings. While whitening the eyes can be nice, if it is done too much it looks very strange.

leannecole-on1-portrait-module-1

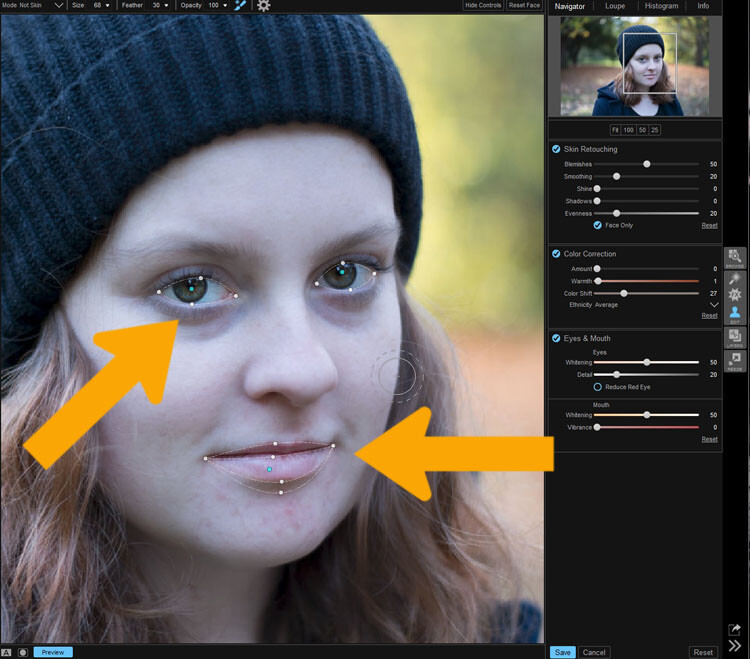
On1 allows you to do specific work to faces, and asks you to highlight the eyes and mouth so it can to its thing.

leannecole-on1-portrait-module-2

You can work on the skin and other parts of the face as well.

Layers Module

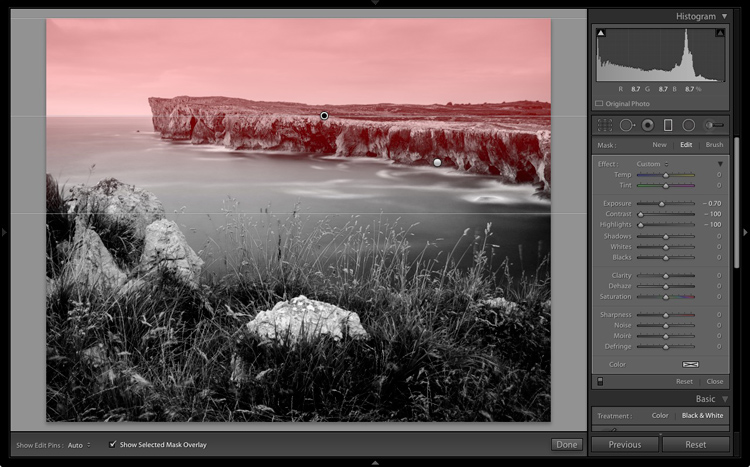
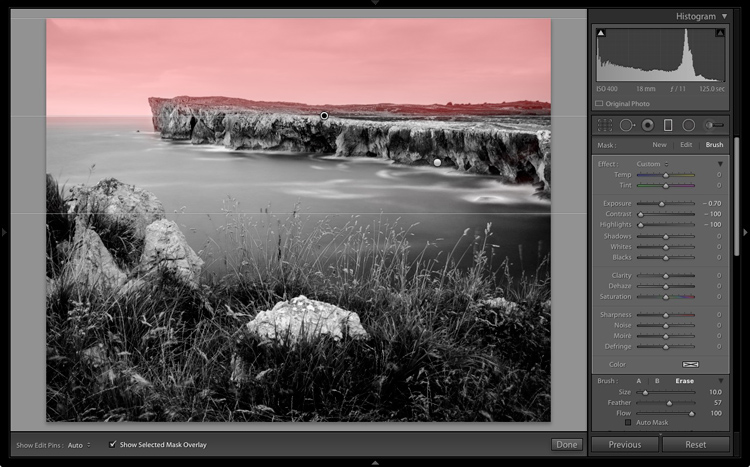
On1 Photo 10 also has the ability to work in layers, so if you like working with texture overlays and replacing skies, you will like this module. It makes these very easy to do, especially the former.

The program comes with a number of textures, backdrops, and borders. You could quite easily just use what it provides, but it also has a section where you can add your own. So, you can upload any textures you have collected and apply them to your images.

As with most sections in On1, you can adjust, and then decide how strong the layer will be. There are blending options and tools are available if you want to remove part of it too.

leannecole-on1-layers-module-1

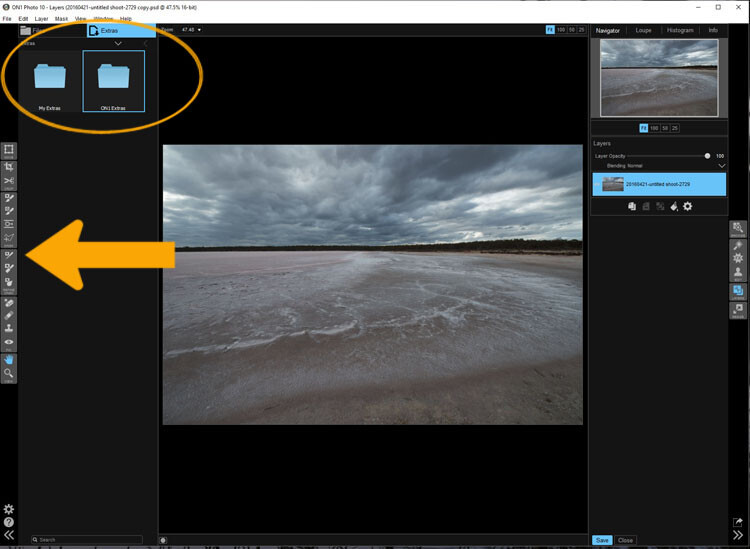
The Layer Module lets you work in layers, there are also some tools on the left that allow you to do some specific processes.

leannecole-on1-layers-module-2

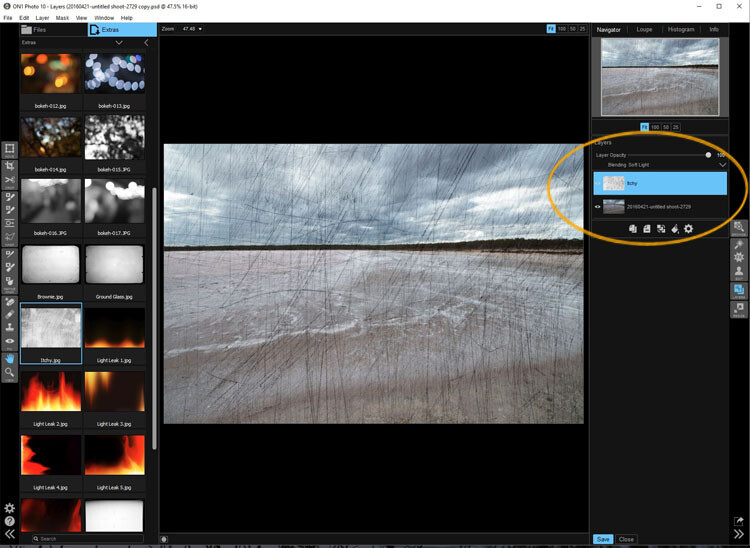
You can apply textures.

leannecole-on1-layers-module-3

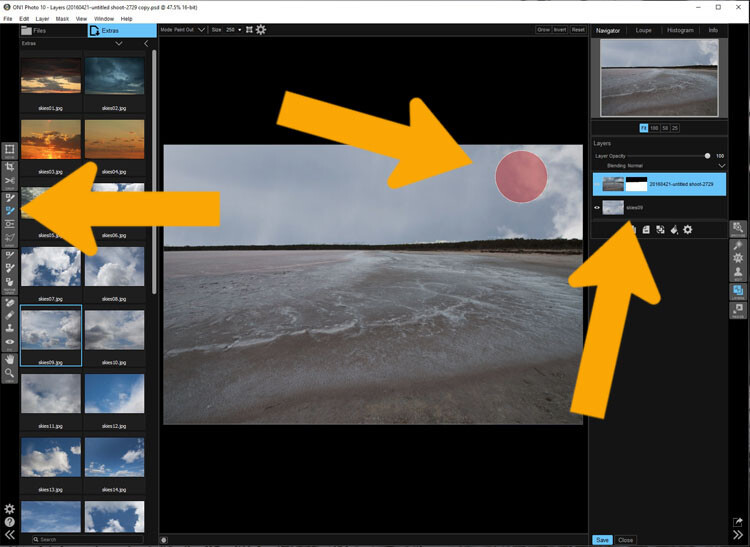
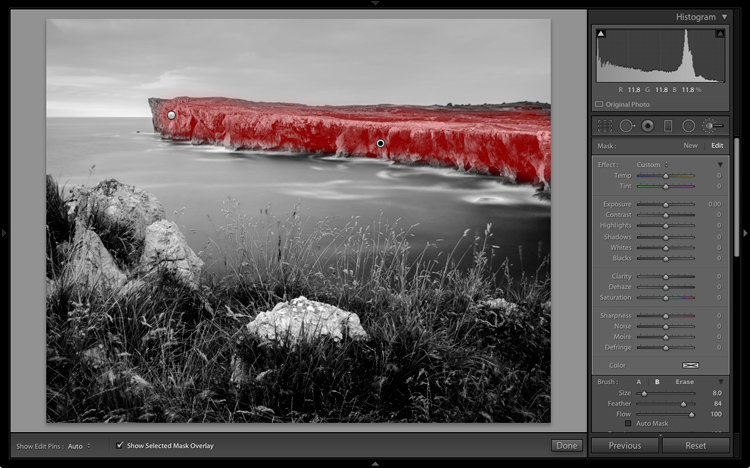
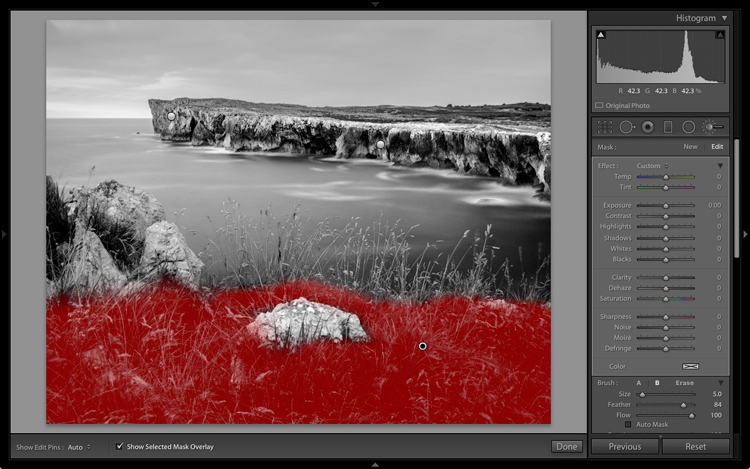
Or you can replace a sky, which is very easy with the masked brush tool.

Resize Module

Figuring out how to resize an image is easy, and fairly straight forward. It is a task that many people usually find difficult. I often see people putting up large images on the internet because they don’t know how to make them smaller. On1 has a separate module where you can make them  the size you want. If you want to resize it for something special, there are options available for that as well. There are no excuses now for loading images that are too big.

Who would use On1 Photo 10?

If you like plugins and seeing the different effects on your images, you will love this software.  It is perfect for someone who is just starting out, and looking for software that is simple and easy to use. Many of the other programs can get you bogged down because of how complicated they are, On1 has great online help and there are a number of videos available to help you work through it.

Experience using On1 Photo 10

I have to admit that while I know how to use many different types of editing software, I had to find some video tutorials to help me find my way around. On1. It is something that you should always do when learning new products, it can help you find the correct way to use them. Fortunately, On1 has a lot of tutorials available to help you learn how to use it.

It could just be my computer, or the size of my files, but I had trouble with the program crashing or freezing. I have a PC and am using Windows 10, so it may not be compatible. I have sent an email to the developers in hope of finding out what keeps causing that. There is however, a 60 day trial version available, which is far more than most other software products. So you can find out if it will work for you or not.

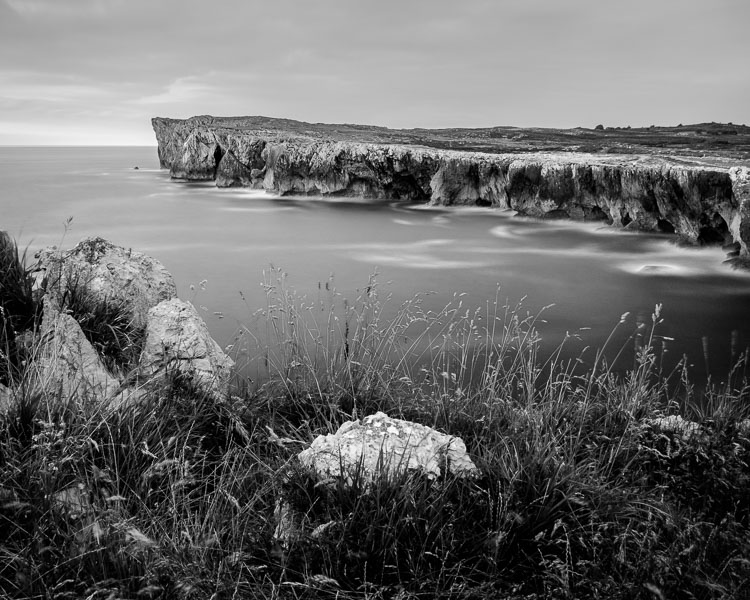
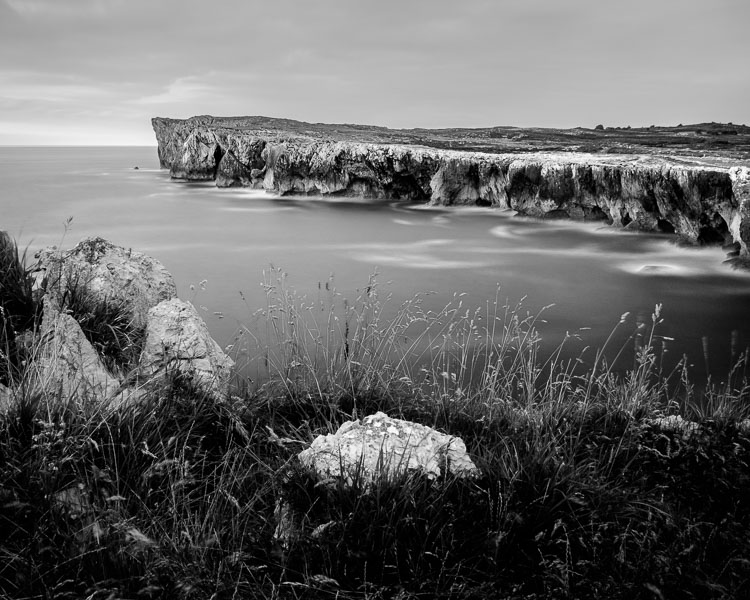
The program does have a tendency to blow out the highlights. In Photoshop you can often fix them, but On1 blows them out even more, and it seems like you are unable to do anything about it. However, it only happens when using RAW images, if you convert them to JPEG it doesn’t appear to happen. Though, it will teach you to be careful with them.

leannecole-on1-highlights-001

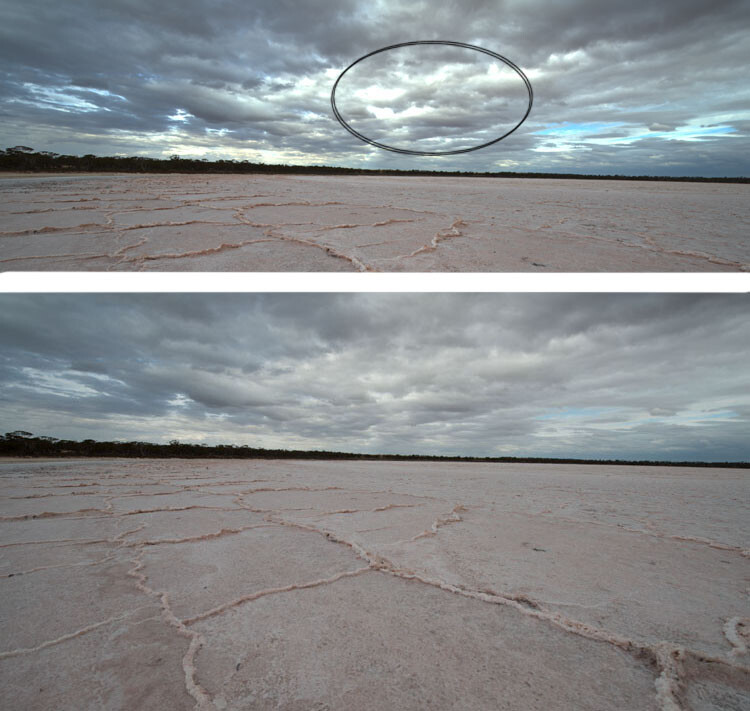
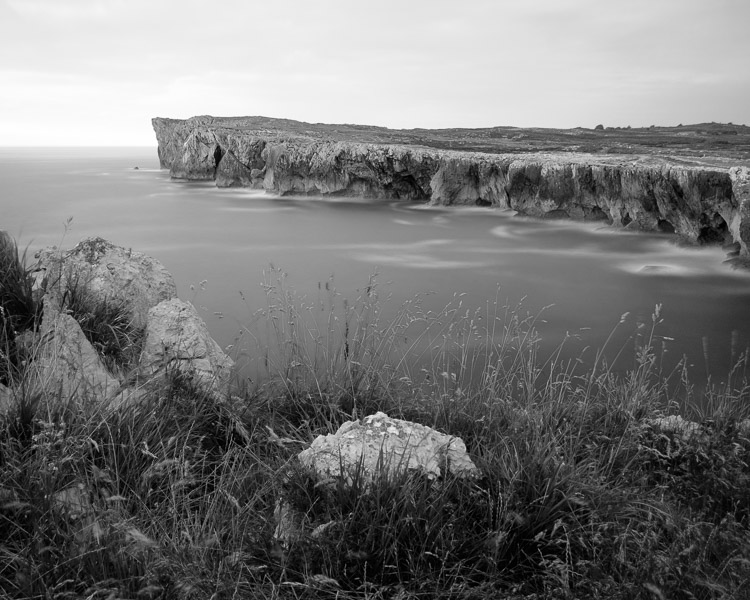
You can see with the top image, which was a RAW file how the highlights have been blown out, but it has not happened in the jpeg file.

Every time you open an image it asks if you want to edit a copy or the original. When you start you may find that every time you open the image you are creating another copy of it. Take care, and perhaps once you have that first copy, just work on that one.

leannecole-on1-opening-an-image

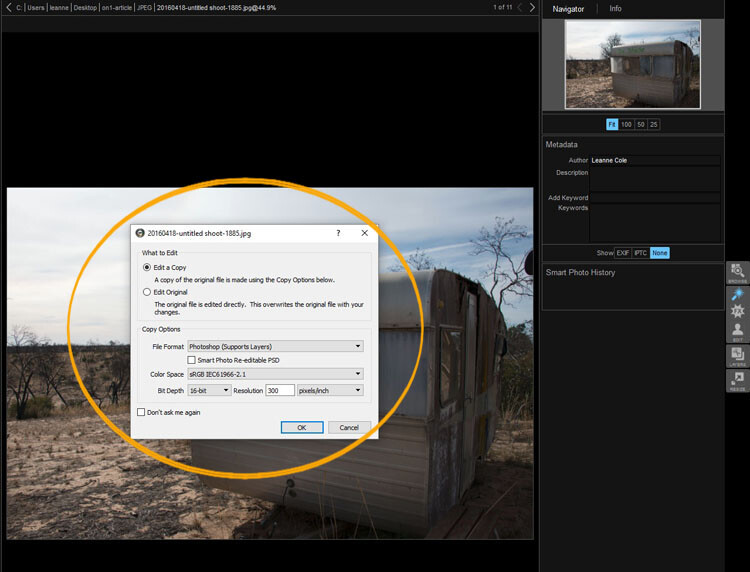
Read the windows as they open up, and make sure you are aware of what you are doing.

Overall

On1 Photo 10 is a good program, and those interested in doing only basic editing will find it very useful. Those that love the grunge look and adding textures will also enjoy using it. It likely won’t replace Photoshop, but for beginners and people who love using plugins, it’s a great option.

Have you tried it? What are your thoughts?

googletag.cmd.push(function() {
tablet_slots.push( googletag.defineSlot( “/1005424/_dPSv4_tab-all-article-bottom_(300×250)”, [300, 250], “pb-ad-78623” ).addService( googletag.pubads() ) ); } );

googletag.cmd.push(function() {
mobile_slots.push( googletag.defineSlot( “/1005424/_dPSv4_mob-all-article-bottom_(300×250)”, [300, 250], “pb-ad-78158” ).addService( googletag.pubads() ) ); } );

The post Image Editing Software Overview – On1 Photo 10 by Leanne Cole appeared first on Digital Photography School.


Digital Photography School

 
Comments Off on Image Editing Software Overview – On1 Photo 10

Posted in Photography


‘The Darkroom’ bar for photographers to offer a photo studio, functional darkroom… and booze

27 Aug
via Google Street View

A new bar called ‘The Darkroom’ is planned for construction on Florida Ave. in Washington D.C., according to a local news report, and it’ll cater specifically to photographers. The bar’s nature was revealed in a liquor license application submitted to the Alcoholic Beverage Administration in D.C.

According to the application, ‘The Darkroom’ will include a functional darkroom, photo studio, bar, and art gallery. The application also indicates the bar would be used to host classes, lectures, screenings and art shows. Those classes would be ‘designed to preserve the history and explore the future of the medium.’ The individual who filed the application, however, hasn’t issued any comments on the plan.

Via: PetaPixel

Articles: Digital Photography Review (dpreview.com)

 
Comments Off on ‘The Darkroom’ bar for photographers to offer a photo studio, functional darkroom… and booze

Posted in Uncategorized


Review: Simple Booth Event Edition photo booth app

20 Aug

Simple Booth Event Edition iOS App
$ 60/£45 | www.simplebooth.com 

Photo booths are a pretty popular item to have at your event these days. Weddings, parties, fundraisers – you’ll find a photo booth at many of them. From a simple camera on a tripod with a remote to fancier automated systems that take multiple images and print instantly, people seem to love being able to control their own image making. Could it be the result of selfie-obsession on steroids? Or is it nostalgia for the chemical-photography based photo booths of our past? Either way, people are fascinated by them. Because of this, having the ability to set up your own booth could make you the star of your office holiday party, PTA fundraiser, or child’s birthday.

Into that popularity steps Simple Booth. Simple Booth is an iOS app designed to place all of the software you need to take, layout, share and print photo booth images into the hardware of your iOS device. There are four versions of the app with varying capabilities (one for the iPhone and three for the iPad): iPhone, Event Edition, Pro Edition 2, and Enterprise. Simple Booth Event Edition is the version I focus on in this article. It is the best choice for a photo enthusiast who wants to set up a photo booth. The iPhone version is pretty limited and while the Pro and Enterprise versions offer a number of additional options, they are probably overkill for anyone who isn’t running a photo booth business.

What does Simple Booth do?

When you start the Simple Booth app, you are presented with a setup screen with a number of options for how the app will work and your images to be laid out. You can choose 2/3/4 image photostrips for the classic booth style. For a more modern look, there are also a number of other multi image options in square or rectangular layouts. You have are options for setting background color, auto cropping, custom logos, and even Instagram-style film effects. You can also give your users the ability to crop, change the layout, and apply effects once the photos are taken. Though, to be honest, this doesn’t lend itself to the quick in-and-out pace of photo booths and I would suggest leaving that option off. I tend to feel the same way about the “retake” option, it encourages picky people to monopolize the booth trying to get the perfect photos.

For output, you can set up a printer (more on that option below), send to various social media services, email, or sync to dropbox. You can also tell the app to save each individual image taken to the camera roll as well as saving the photostrips. Honestly, the print option is the winner here. The social media options require people to mess around logging into their accounts, thus taking up time in the booth when others are waiting, and the email has to use the iOS mail app. Now, if you have an extra iPad handy, you can use Simple Booth’s free companion app Live Booth Lite to create an “out of the booth” interface for people to use for emailing, sharing, and even printing. In order to connect with any of the social or output options, you will need to have access to an active wifi network. One odd thing for a photo app in this day and age is that there is no Instagram sharing option. The Simple Booth crew explains that this is because Instagram doesn’t offer an API that would enable uploading. You can choose to use either the front or rear camera on the iPad but there is no option to use an external camera. In all honesty, the front-facing camera is the one you are going to want to use. Using the rear camera has advantages as far as resolution and image quality, but it means that someone has to stand there operating the booth because users will not be able to touch the screen to do so themselves. And if you are having someone standing there, you might as well have them take the photos with a real camera. Part of the allure of a photo booth is that it can operate unattended. 

Once you have decided on your initial settings, you put the app into booth mode, and it’s ready to go. Users cannot get back to the settings page and muck things up. Okay, well that isn’t completely true, if they think to double tap the home button and shut down the app, then restart it, they could get to the settings. But that is why you will probably want to use Guided Access to limit the iPad to just running Simple Booth.

From the user POV, the app is really quite simple. Clear “tap to start booth” and “look here” messages instruct them on what to do. A visible countdown timer and beeps mark the pace between the images being taken. Once complete, the photostrip appears on screen with the various edit/print/sharing options. If anything can be described as foolproof in the digital age, at least as user interface for the end user, Simple Booth is pretty darn foolproof.

What equipment will you need? 

At the very least, you will need an iPad. The newer iPads with improved cameras will have better resolution and low light performance. But just about any recent vintage iPad will work. A tripod and mount capable of holding your iPad will make interacting with the app much easier for your subjects and safer for your iPad. You’ll need a neutral backdrop of some sort, though a plain wall could be used as well. And you will probably want some lights. Unless you are outdoors in open shade on a bright day, you will likely find ambient light to be too dim for the iPad’s camera. This is one area where having the ability to use a DSLR would be an improvement, both for the improved low light performance and ability to connect to strobes. But as is, you can solve the problem with something as simple as a couple clip on fluorescent work lights.

Using a printer…

While the social media sharing features are handy in this day and age, having a printer on site is really the way to go with a photo booth. You increase the smile and fun quotient 1000% when someone is able to walk away from the booth with an image in their hand. While an inkjet printer will work, as any event photographer can tell you, a dye-sublimation printer is the way to go in this situation. The speed and toughness that dye-sub prints can offer over inkjets is significant in an event environment. 

When looking at dye-sublimation printers, you have options on either end of the market, and not much in between. Both offer excellent prints, but at vastly different prices. At the one end is the Canon Selphy series of printers. At around $ 100, the compact Selphy 1200 won’t break the bank. With wifi connectivity and AirPrint, connecting to iOS devices is easy. Print speed is a somewhat slow 47 seconds and it can only hold 18 sheets at a time. Finally, print prices are a fairly inexpensive $ 0.28 cents per 4×6.

At the other end of the market is the $ 1000 DNP DS620A. Designed for the high volume, high speed needs of event photography printing, the DS620A prints a 4×6 in as little as 8.3 seconds and can print up to 400 images without needing the paper roll replaced. The dye transfer is all done internally and the image only pops out once it is completely done. This makes it perfect for an unmanned both, you can set the DS620A up and leave it running all night. Print prices for a 4×6 work out to $ 0.14 a piece.

Inkjet or dye-sublimation connecting Simple Booth to a printer needs to be done in one of two ways. If you have an AirPrint compatible printer, like the Canon Selphy 1200, the app can connect directly to the printer as long as both are on the same Wi-Fi network. If you have a printer that isn’t AirPrint compatible, such as the DNP DS620A, you’ll need to connect it to a computer and run an app to make it available via AirPrint. I used Printopia, a dead simple $ 20 utility app that works perfectly for sharing a printer with your iOS devices. 

How does it work in the real world?

While I was working on this review, my son received an invitation to a classmate’s birthday party. So, I offered to bring along a Simple Booth setup and printer (in this case, a DS620A) for the kids to play with. Partially, I was just helping a dad-buddy put on a party. But I also wanted a chance to see how Simple Booth worked in real life with people who had never played with it before. Would 6-8 year olds be interested in something as retro as a photo booth? Would they have trouble operating it? Would the printer jam or run out of paper? 

Since this was a sunny summertime party, I had been planning to just set up a backdrop and tripod in some open shade and let the kids have at it. But my friend is a carpenter and decided at the last minute that he wanted to knock together a real “booth”. A few trips to the hardware store later and we had a low rent copy of an old school photo booth. It was nothing fancy, but the ipad was mounted and the printer delivered the print through a slot into the grubby over-sugared hands of the party goers. 

Did it work? It couldn’t have worked better. Being an old-man tech-nerd, I insisted on showing the first group how to do it. But with much eye-rolling, they made it clear that I might as well have been teaching them to drink a glass of water. They had no problem understanding how to make it work. The DNP DS620A printer was outstanding for this sort of use. Having a print in their hands in less than 10 seconds was pretty exciting for the kids and knowing that I could go hundreds of prints without having to reload the printer was pretty relaxing for me. The kids piled in and out of the printer in group after group. They giggled, laughed and loved it completely and all went home with handfuls of photo strips.

What’s the bottom line?

Simple Booth is a pretty amazingly full featured solution to creating a photo booth out of gear that many photographers already own. It is simple enough for children or technophobes to use, but offers enough options to allow customization of layout and operation.

At $ 59.99, it is likely more expensive than most any other iOS app that you own. That said, when you consider what you are getting and what it would cost you to figure out a way to do it without Simple Booth, it starts to look like a bargain. Perhaps more importantly, the proof is in the pudding. Even our hastily knocked together photo booth was a huge hit with the kids at the party – plenty of smiles and laughs and threats of tantrums if I didn’t print out duplicates for the kids in the group shots.

Tired of bringing meatloaf to your local block party every year? Bring Simple Booth and a printer instead and watch yourself turn into the neighborhood hero. 

What we liked:

  • Easy to set up
  • Customizable layouts
  • Pretty fool-proof in operation
  • Saves individual images as well as the “photo booth strips”
  • Print, email, social media integration

What we didn’t like:

  • iPad rear camera offers limited resolution and quality, using higher resolution front camera eliminates the viewing screen
  • No options for flash lighting, must use constant lights
  • While inexpensive for a photo booth, somewhat expensive for an app

Rating

Articles: Digital Photography Review (dpreview.com)

 
Comments Off on Review: Simple Booth Event Edition photo booth app

Posted in Uncategorized


DPReview celebrates World Photo Day with our favorite shots of 2016

20 Aug

World Photo Day celebrates the Daguerreotype process, which the French government released to the public on August 19th, 1839. The World Photo Day project started in 2009 and encourages users all over the world to share their pictures online.

To celebrate, we took a look back at all our sample galleries from 2016 and cherry-picked some of our favorite shots. Within this gallery you’ll find a wide range of gear represented as well as images from everyone on staff. And when your done looking through be sure to grab your camera and spend some time out shooting, because World Photo Day only comes along once a year.

Articles: Digital Photography Review (dpreview.com)

 
Comments Off on DPReview celebrates World Photo Day with our favorite shots of 2016

Posted in Uncategorized