RSS
 

Posts Tagged ‘Photo’

How I Processed This Photo Using Only Lightroom

24 Nov

An advantage of using the Raw format is that it gives you a tremendous amount of freedom when it comes to processing. This, combined with Lightroom’s powerful processing engine, opens up lots of possibilities for the creative photographer. I’d like to show you how I processed a Raw file using only Lightroom.

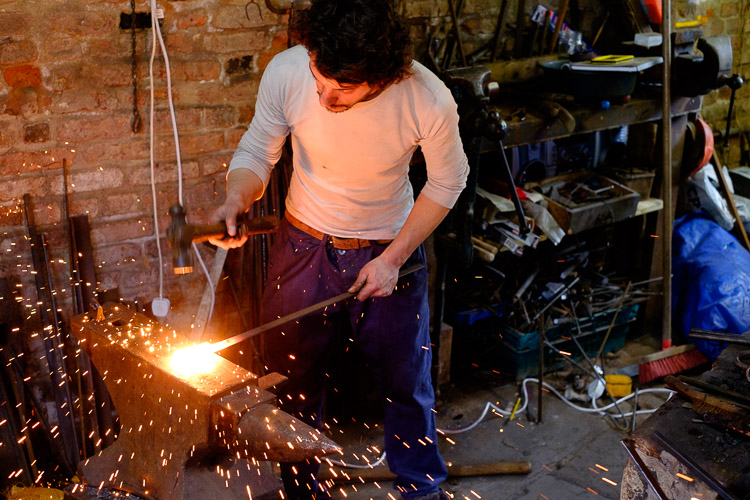
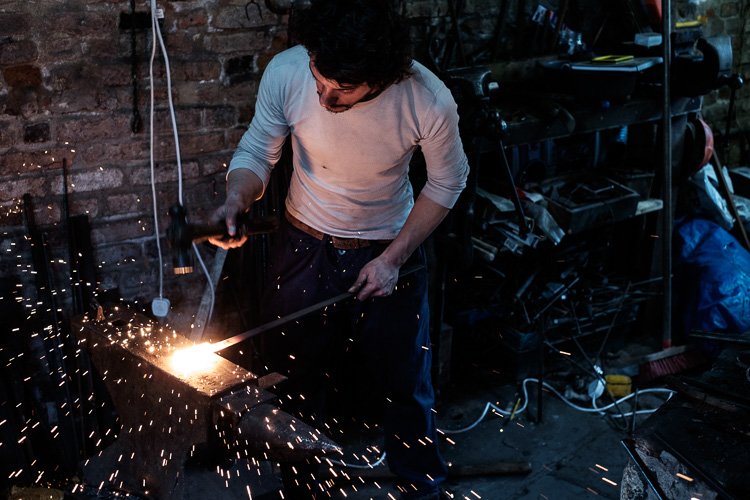
Photoshop users will also be able to follow along with most of it, as Adobe Camera Raw shares many of Lightroom’s sliders and functions. This is the original Raw file, as it came out of the camera.

Lightroom processing

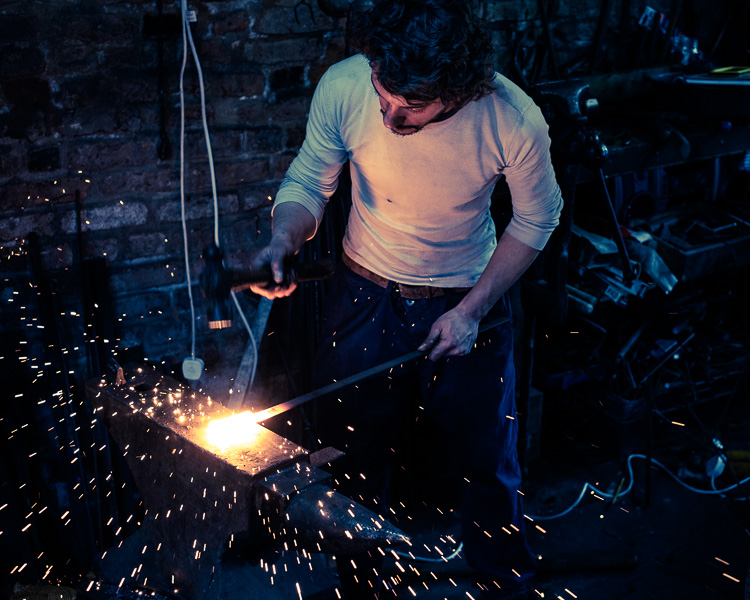
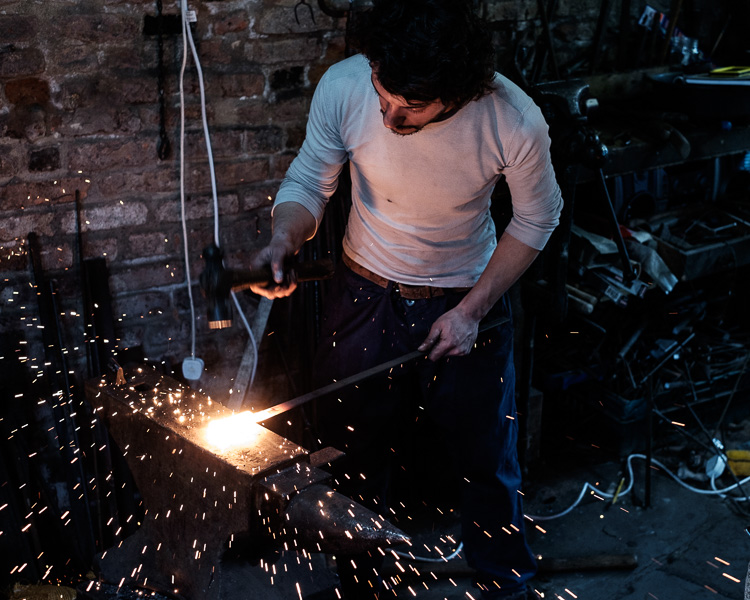
And here’s the finished result after post-processing.

Lightroom processing

The story behind the image

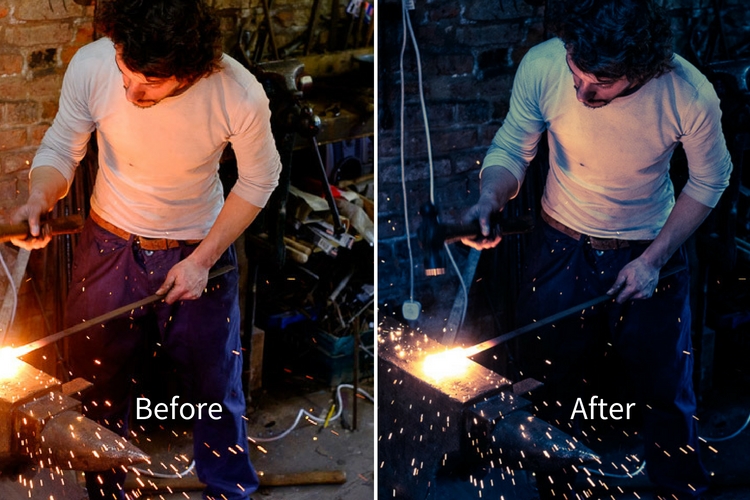
As you can see there’s quite a difference between the before and after images. But before we look at how I achieved this in Lightroom I’d like to share the back story of the photo. This is important because it guided the way that I decided to process it.

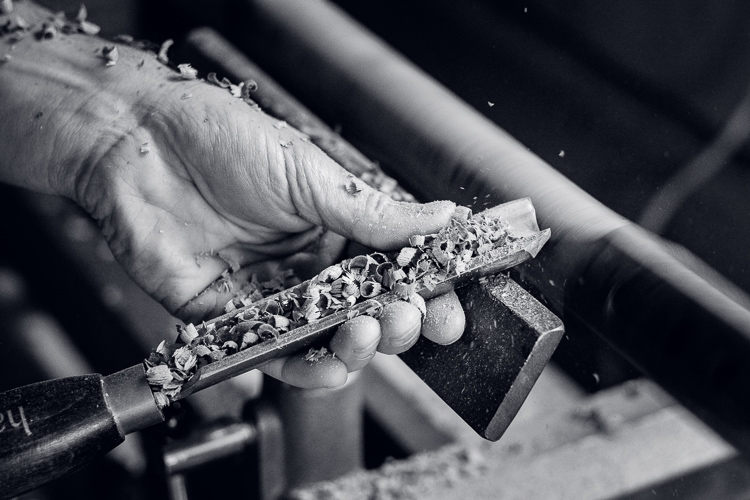
I took the photo in a blacksmith’s forge in the English town of Spalding earlier this year. The forge is remarkable because they use working practices that date back over a hundred years. It’s open to the public and they have demonstrations where you can take photos. The forge is small and you can get quite close to the blacksmith, which allows you to take intimate portraits like this one.

The light was coming from windows in front of the blacksmith and behind him, as well as from the hot piece of metal he is hammering. There was also overhead fluorescent lighting. The end result is that the light is fairly flat and boring, which is something I wanted to change in Lightroom.

A blacksmith’s forge should be lit by a combination of cool natural light and the fiery orange glow from the fires, not fluorescent light. I wanted mysterious shadows in the photo, not every detail visible. Points like these are important because they help you work with a destination in mind, rather than aimlessly pushing sliders around to see what happens.

lightroom-before-after

First steps – color corrections

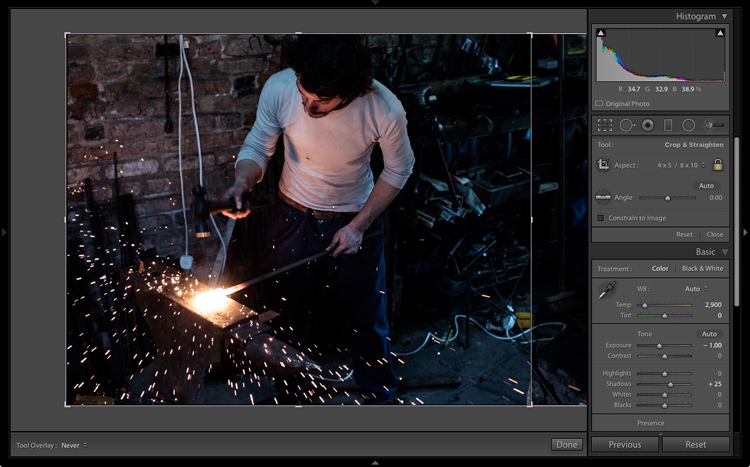
The first steps involve getting the colors right, as this affects the look of the photo and everything you do from this point forward. The most important setting is in the Camera Calibration panel. A lot of people gloss over this panel as if it’s not so important. This isn’t helped by its placement at the bottom of the right-hand side in Lightroom’s Develop module.

When I took the photo I had the color profile set to Velvia, which gives high contrast and strong, saturated colors on my Fujifilm X-T1. It doesn’t matter what your color profile settings are on your camera if you’re shooting Raw as you can change them in Lightroom. I wanted softer, more subtle colors, so I changed the setting to Classic Chrome.

Note: This setting is only available on some Fujifilm cameras. The settings you see in the Camera Calibration panel depend on your camera model.

Next, I went to the Basic panel and set the White Balance to Auto. This tells Lightroom to decide how to set the color temperature to give the image neutral colors. How successful Lightroom is at this depends on the content of your photo. If you have mixed lighting sources, as this photo does, even Lightroom’s powerful algorithms aren’t going to give you anything other than an educated guess. It’s not possible to get rid of all color casts with mixed lighting.

Regardless, Auto White Balance gave me a good starting point. This is what the photo looks like so far. You can see it’s already quite different from the starting image which was quite orange.

Lightroom processing

Auto White Balance applied.

Tonal adjustments

The next step was to start making the transition from an image that is too bright to one that is dark and moody.

I did this by setting the Exposure slider to -1.0. This made the shadows too dark, so I brightened them by setting the Shadows slider to +25. I also set Clarity to +31 to bring out the gritty textures in the scene. See my settings below:

Lightroom processing

As you can see now that the image is darker the blacksmith’s face is lit by the glow from the hot metal he is working with. This was lost in the original.

Lightroom processing

Tonal adjustments and Clarity applied.

Cropping to remove distractions

Now I can see that the photo has a major problem. There is too much empty space on the right-hand side, and the blue plastic is a major distraction. In hindsight, the composition would have been better if I had placed the blacksmith in the center of the frame. However, we can compensate for that by cropping the image.

I activated the Crop Overlay (keyboard shortcut R), set the Aspect to 4×5 / 8×10, and cropped the image. This cuts out the distractions on the right-hand side and brings the attention back to the blacksmith.

Lightroom processing

Lightroom processing

This is the result after the image has been cropped.

Refining the image with local adjustments

So far the adjustments made have all been global. That is that Lightroom applies them equally to the entire image. Now it’s time to refine the tonal values with some local adjustments.

I started by adding a slight vignette using the Post-Crop Vignetting tool in the Effects panel. This darkened the corners slightly.

Lightroom processing

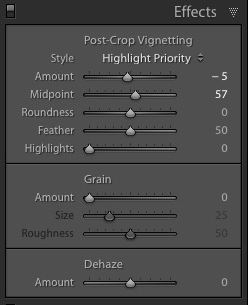
Next, I decided that I wanted to make the background even darker. This is going back to the earlier decision to make the image dark and moody as if the blacksmith is working in a much darker environment.

I added three Graduated filters to darken the edges. The screenshots below show the placement of the filters and the settings used.

Lightroom processing

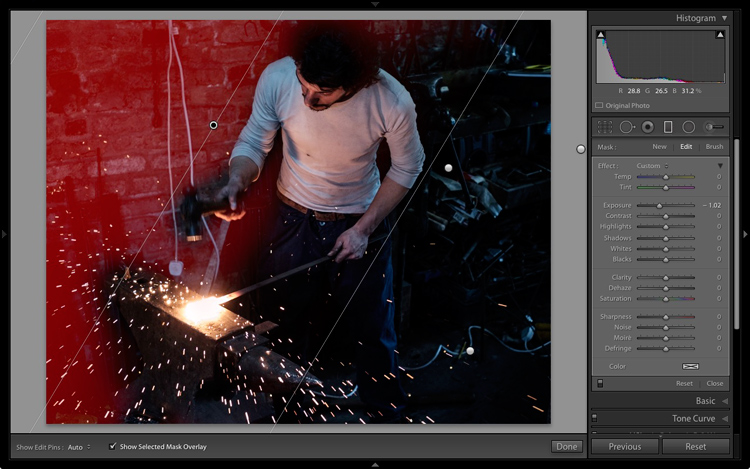
Graduated Filter #1 applied on the upper left of the image.

Lightroom processing

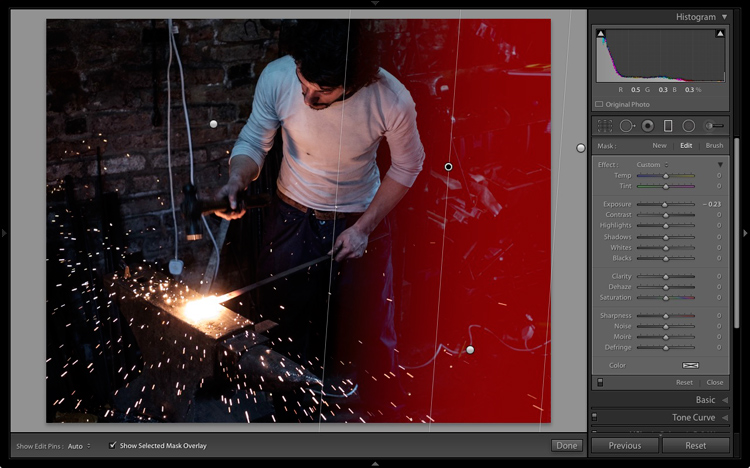
Graduated Filter #2 applied on the right side of the image.

Lightroom processing

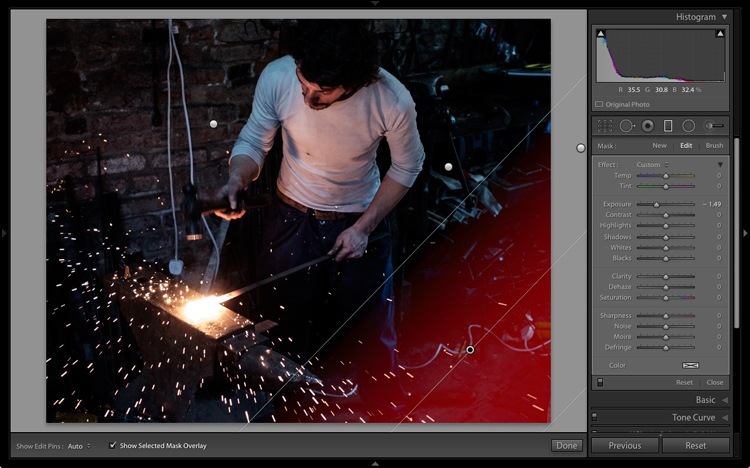
Graduated Filter #3 applied on the lower right corner of the image.

Then I used an Adjustment Brush and moved the Shadows slider right to make the blacksmith’s hair lighter and bring out the detail.

Lightroom processing

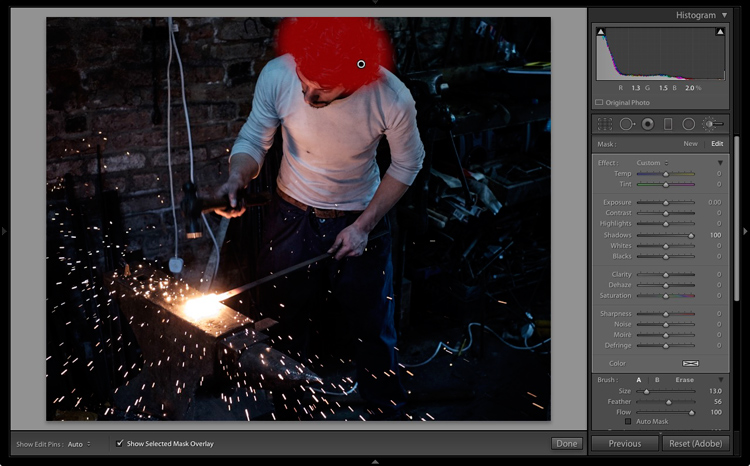
Adjustment Brush applied to his hair to bring out detail.

This is what the image looks like now with these adjustments.

Lightroom processing

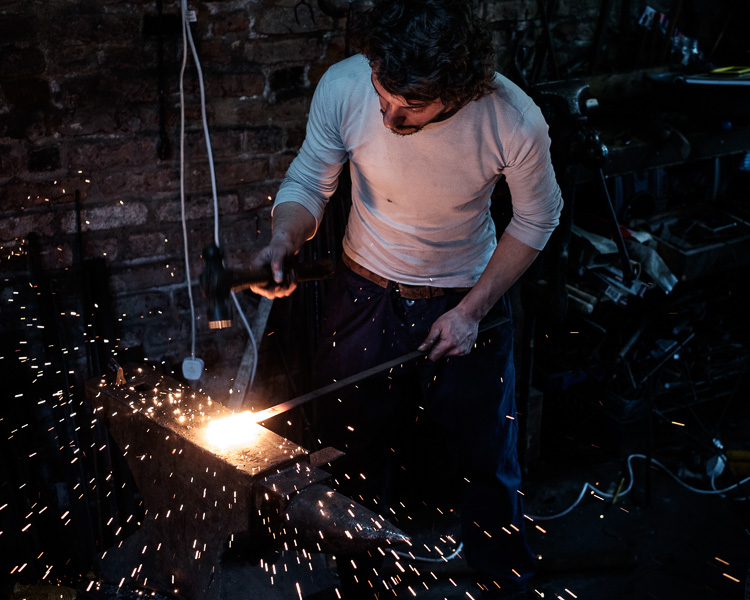
After local adjustments have been applied.

Split toning for color grading

Lightroom processing
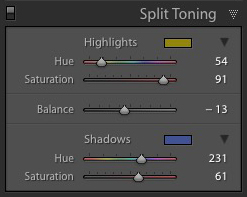
Finally, I decided that the mood could be further enhanced with a split tone applied: blue to the shadows and an orange tone in the highlights.

The idea was to emphasize the difference in color temperature between the orange light from the hot metal and sparks, and the background, which in my imagination is lit by daylight (but in reality was also lit by fluorescent light). I did that in the Split Toning panel with these settings.

Here is the final result.

Lightroom processing

Final image after split toning applied.

Final thoughts

As you can see, even though the final image looks remarkably different from the starting Raw file, the steps involved in the processing were quite simple. It didn’t take long to get from the starting point to the end photo. This is mostly because I had a firm idea of what I wanted as the end result before I started processing the file.

If you have any questions or thoughts to share about the processing I did on this image then please let me know in the comments.


If you’d like to learn more about processing your photos in Lightroom then please check out my ebook Mastering Lightroom: Book Two – The Develop Module.

googletag.cmd.push(function() {
tablet_slots.push( googletag.defineSlot( “/1005424/_dPSv4_tab-all-article-bottom_(300×250)”, [300, 250], “pb-ad-78623” ).addService( googletag.pubads() ) ); } );

googletag.cmd.push(function() {
mobile_slots.push( googletag.defineSlot( “/1005424/_dPSv4_mob-all-article-bottom_(300×250)”, [300, 250], “pb-ad-78158” ).addService( googletag.pubads() ) ); } );

The post How I Processed This Photo Using Only Lightroom by Andrew S. Gibson appeared first on Digital Photography School.


Digital Photography School

 
Comments Off on How I Processed This Photo Using Only Lightroom

Posted in Photography


Affinity Photo beta now available for Windows

11 Nov

Following the launch of a Mac version in summer 2015, Serif has announced the availability of Affinity Photo for Windows beta. This version of the software has been in development for several months, and though the final Windows version hasn’t yet been released, anyone can download the beta now and try it out for free. As with any beta application, however, users should expect to encounter bugs.

Affinity Photo is an image editing program from Serif that was originally launched only for macOS. The company bills its software as a much cheaper but no less robust alternative to Adobe Photoshop. The Windows beta was scheduled to launch earlier this summer, but was delayed for reasons that are unclear. Those who download the beta will be the first users to try the following features, which will be available in Affinity Photo version 1.5 for Mac next month:

  • HDR merge
  • Focus stacking
  • Macros
  • Tone mapping
  • Batch processing
  • 360 degree image editing

Though the beta version is free, Serif plans to offer the finalized Affinity Photo for Windows at the same $ 49.99 USD price point as the Mac version. Beta users who encounter bugs are encouraged to report them in the software’s related forum.

Articles: Digital Photography Review (dpreview.com)

 
Comments Off on Affinity Photo beta now available for Windows

Posted in Uncategorized


Photographer’s Dress Code – What to Wear to a Photo Shoot

10 Nov

As a budding photographer, one of the biggest questions that will eventually come to mind is, “What should I wear to a photo shoot? Is there a photographer’s dress code?” The answer varies widely depending on the type of photo shoot you’re conducting, the specific client you’re working with, your overall style and brand as a photographer, and the culture of the region where you’re shooting.

A portrait photographer, for example, may have more flexibility in how he or she dresses compared to a corporate event photographer. Similarly, a photographer shooting in the West Coast of America will likely be able to dress more casually than an East Coast photographer. All variations aside, here are some general photographer dress code guidelines to start off with.

Michael Broad

By Michael Broad

1. Invest in a solid, comfortable pair of shoes

Regardless of what kind of photo shoot you’ll be conducting, start with shoes. Consider that you’ll likely be standing for hours on end, so comfort and ergonomics are key. Also, think about the terrain you might encounter during your shoot, and the seasonal weather. Will there be grassy fields, sandy shores, or other outdoor elements you might be venturing into to get unique angles? If so, shoes that can take a light beating and still look good will be of utmost importance.

As a female photographer who shoots mainly for corporate clients, I generally opt for black leather flats during the warm season, black leather boots for colder weather, or dressy black leather sneakers for extra long shoots with outdoor elements. In any case, it’s generally a good idea to stay away from sandals, high heels, and flip flops.

Laura Thorne

By Laura Thorne

2. Cover up

As a creative photographer in constant search of creative angles, consider the possible physical maneuvers such as bending, stooping, and squatting that you might be pulling off during a shoot. Dress accordingly, making sure to wear an outfit that will allow you to be physically flexible without giving your clients an eyeful, or worse yet, causing a wardrobe malfunction. Ladies, this means avoiding low-cut tops, ultra short skirts and dresses, and skimpy outfits. At the very least, bring a blazer or sweater to cover up. Gentlemen, don’t forget a belt and a longer shirt that can be tucked in.

3. Dress in all black

This is a contestable point, as it can also be argued that dressing according to your brand is a better strategy. However, it’s a general rule of thumb that wearing all black is best for being as invisible as possible at a photo shoot. That way you won’t stand out and take attention away from the main photo subject. Not to mention, dressing in all black makes you look more official, like a staff member which can potentially be helpful in navigating around a venue.

Personally, I opt for the all-black rule for all of my photo shoots, simply because it’s one less thing to worry about when I have a pre-assembled uniform to fall back on. For me, this uniform consists of mixing and matching from the following selection; one pair of black skinny jeans, one pair of black slacks, a black leather belt, several button-down black blouses, several black polo shirts, and a black blazer. Whenever possible, I also try to buy my black clothing in lightweight, moisture resistant fabrics rather than cotton, to avoid sweat absorption.

what-to-wear-as-a-photographer-01

4. Add a personal touch

Some photographers might contest the above point of dressing in all black with the argument that it’s important to dress according to your brand. This is something I definitely believe in as well, but having brand elements infused in your style of dress can also be done while still wearing all black. As an example, I always make sure to wear a few pieces of statement jewelry to accent my outfit and also serve as a conversation starter. I have a couple pairs of unique earrings, necklaces, and watches that almost always attract comments or questions, but they are also subtle in size so they don’t stand out too much.

Another idea is to custom order black clothing that has your logo on it, such as a polo shirt with a subtle branding element. A photography colleague of mine has done this with huge success as it further reinforces his brand, while also making him look and appear more official at photo shoots.

what-to-wear-as-a-photographer-01

5. When in doubt, ask

If you’re truly stumped on what to wear to a photo shoot, ask your client if they have any preferences. This is likely less important if you’re doing an intimate portrait session, but for event photographers, in particular, it never hurts to ask the client. I once had a corporate photography client who forgot to send over their two-page document detailing their dress code for photographers, which I would never have received had I not asked. At the very least, it’s important to find out if the dress code for your shoot is formal, semi-formal, or casual, and what exactly those terms mean to the client.

Jpellgen

By jpellgen

Over to you

To some photographers, what you wear to a photo shoot may not seem like a big deal. But I firmly believe how you dress is a reflection of your brand, so considering every element of your outfit is crucial.

What do you wear when you’re conducting photo shoots? Let me know in the comments below!

googletag.cmd.push(function() {
tablet_slots.push( googletag.defineSlot( “/1005424/_dPSv4_tab-all-article-bottom_(300×250)”, [300, 250], “pb-ad-78623” ).addService( googletag.pubads() ) ); } );

googletag.cmd.push(function() {
mobile_slots.push( googletag.defineSlot( “/1005424/_dPSv4_mob-all-article-bottom_(300×250)”, [300, 250], “pb-ad-78158” ).addService( googletag.pubads() ) ); } );

The post Photographer’s Dress Code – What to Wear to a Photo Shoot by Suzi Pratt appeared first on Digital Photography School.


Digital Photography School

 
Comments Off on Photographer’s Dress Code – What to Wear to a Photo Shoot

Posted in Photography


6 Tips for How to Build a Story and Shoot a Photo Project

04 Nov

I’m a strong believer that setting yourself photo projects is the best way to improve your photography skills. Projects give you focus and help you build a cohesive body of work. A photo project can last for years, and set a theme that helps you find new people and subjects to photograph.

Of course, you may be wondering what sort of project you could set yourself that would achieve these aims. A project can be simple, like photographing flowers in your back yard, or it can be more complex, such as travelling to a foreign country and photographing the people you find there.

storytelling-projects-22

Getting ideas for a photo project

You’ll find lots of inspiration at websites like Feature Shoot that regularly publish photo projects.

I’m going to give you some advice on tackling a project by giving you some examples from a project that I undertook to photograph artists and craftspeople. I have learned a number of things from this project.

Here are some of the most important:

  • Meeting new people and learning about their crafts is interesting. I like meeting and talking to new people and learning about their lives. The brief window I have during the shoot is a chance to connect and talk about art and creativity, as well as the work of the artist or craftsperson. Some of those people have become friends. This project has rewarded me on a personal level as well as on a photographic one.
  • It helps me find something interesting to photograph. For example, 18 months ago I spent three days in Raglan, a small town on the west coast of New Zealand’s North Island. Before I went, I contacted two local craftspeople and asked if I could drop by and take some photos. Both said yes – and I made my most interesting photos on the trip during those two shoots.
  • The project grows by itself. I send photos to the people I photograph, then ask them if they know of anybody else who may be interested. These personal introductions and recommendations help me find new artists and craftspeople to photograph.
  • My portraiture skills have improved. Practice makes perfect, and every shoot means I get a little better at this documentary style of portraiture.

Here’s a portrait I made of artist Chris Meek, one of the artists I photographed in Raglan. We had a great conversation about art, creativity, and life. I’d never have had this experience if I hadn’t embarked on the project.

storytelling-projects-20

So, once you’ve decided on a project, how do you make it a success? These ideas will help.

1. Shoot a variety of images

This is important because it adds interest and variety to the photos you get from the shoot. But I’d like to add a proviso, because I think in general there are two ways to approach a project shoot.

Firstly, is to concentrate all your resources on getting one great photo. The second is to create a set of varied photos that collectively give a better interpretation and tell a story.

My suggestion is to combine these two approaches. Aim to create a variety of photos, but give each photo your best effort. In other words, when you see the possibility of an image, give it your full attention and make it as good as you can before you move on to the next.

storytelling-projects-17

How do you create variety? Here are two ways:

1. Vary your viewpoint. Get closer to your subject, or farther away. Take photos from below, or from above. Of course, the best viewpoint depends a lot on the subject of your project, the light, and the lenses you are using. But the key is to always be thinking about how you can add variety by moving around and taking photos from different angles.

2. Take scene setting shots and close-ups. You could start with a scene-setting photo that captures everything, then move on and create a variety of photos from closer viewpoints showing details.

This works well for projects like mine, where you can take a photo of the artist or craftsperson at work in their studio, along with a series of tighter images and close-ups that show them at work. In this example, you can also take photos of the product the craftsperson makes as well as photos of the craftsperson themselves.

These two photos show Todd, a flute maker, working in his garage. Both were taken with the same lens, but I got a lot closer to make the second image.

Story telling and doing a creative photo project

This also applies to more static subjects like landscapes. If you have a landscape related project, you can create variety with photos that show the entire scene, mixed with some that show close-ups of details that you noticed within the scene.

2. Tell a story

It’s often hard to a story with a single image, but it’s much easier with a sequence of photos because you can show different aspects of the same story in each one.

For example, with my photos of craftsmen I like to show images taken at different stages of the creation process. Put together they show how a certain item was made. That’s the story. These three photos show different stages in the creation of an artwork by Chris Meek.

storytelling-projects-6

storytelling-projects-5 storytelling-projects-7

You can also tell a story by paying attention to detail. While taking photos of Eoin, a glass blower, I noticed that his hands gave away a lot about his profession. So I made sure that I took photos like this, that shows the dirt on his hands and the tattoo on his thumb.

Story telling and doing a creative photo project

3. Find commonalities that link the photos

While photo stories need variety amongst the images to create interest, it is helpful if the photos are also linked in some way. For example, you could process all the photos from a shoot in black and white. Or they could be processed in a similar style, perhaps by using the same Lightroom Develop Preset as the basis for the processing.

Or, if you have a project that involves portraits, you could use light to link the photos. Using the same lighting setup for each portrait is one way to to do that.

These photos of Jasmin, a weaver who makes hats, are linked by the lighting and the processing. Each is lit by natural light coming through a window in her home, and given the same color treatment in Lightroom.

storytelling-projects-9

storytelling-projects-21

4. Show genuine interest in people

If your project involves people it is important to be genuinely interested in them and what they are doing. Let’s say, for example, you undertake a project taking portraits of surfers. You’ll get the best results if you are genuinely interested in surfing and enjoy talking with surfers.

It’s all about authenticity. If you’re genuinely interested in people, you will have plenty in common and find it easy to talk with them. But, if you’re not, then you won’t make the connection that is essential for good portraiture.

5. Give it time

Give your projects time to evolve and mature. For example, if you have a project photographing your local landscape, giving it time lets you create a series of photos that show the variation created by weather and seasons. Showing the changes that happen over a period of time is also another way of telling a story.

6. Compare and evolve

The reason why projects are such a good learning experience is because they give you the opportunity to compare your current work with your earlier photos. You will see how your ideas and techniques have evolved over time. You’ll also benefit by building a body of work and learning to edit a portfolio by selecting the strong images that work together.

Story telling and doing a creative photo project

Your turn

Have you undertaken any photography projects? Did they help you become a better photographer? Please share your thoughts and project in the comments below.


The Creative Image

If you found this article interesting then please download my free ebook, The Creative Image for 10 brilliant ideas for creative photography projects you can do.

googletag.cmd.push(function() {
tablet_slots.push( googletag.defineSlot( “/1005424/_dPSv4_tab-all-article-bottom_(300×250)”, [300, 250], “pb-ad-78623” ).addService( googletag.pubads() ) ); } );

googletag.cmd.push(function() {
mobile_slots.push( googletag.defineSlot( “/1005424/_dPSv4_mob-all-article-bottom_(300×250)”, [300, 250], “pb-ad-78158” ).addService( googletag.pubads() ) ); } );

The post 6 Tips for How to Build a Story and Shoot a Photo Project by Andrew S. Gibson appeared first on Digital Photography School.


Digital Photography School

 
Comments Off on 6 Tips for How to Build a Story and Shoot a Photo Project

Posted in Photography


How to Capture a Ghost (in a Photo) in 3-ish Ways

27 Oct

As Halloween Approaches, you’re probably noticing more ghosts around.

They can be quite camera-shy and tricky to photograph, so we’re here to show you how.

Shhhh, now lean in close for this part.

*whispers* We haven’t actually managed to photograph a real ghost, but we’re pretty good at faking it using just our phone. Read along to learn just how we do it.

But only if you don’t scare too easily. *ghost sounds* OoooOooOOoOooo!
(…)
Read the rest of How to Capture a Ghost (in a Photo) in 3-ish Ways (290 words)


© laurel for Photojojo, 2016. |
Permalink |
No comment |
Add to
del.icio.us

Post tags:


Photojojo

 
Comments Off on How to Capture a Ghost (in a Photo) in 3-ish Ways

Posted in Equipment


7 Tips for Attending a Photo Walk

26 Oct

As a photographer, you might have noticed that photo walks are all the rage these days. Whether it’s an event run through meetup.com or eventbrite.com, or a more involved workshop from a teacher that you follow, photo walks are one of the best ways to see a place and to improve your photography.

nyc-photowalk-750px-14

NYC photo walk featuring dPS Managing Editor Darlene as my guest (I’m in the front row with the hat, she’s in blue with a hat on my right).

Classroom and reading time are very important for improving, but nothing can replace the act of learning while you are out there photographing. This is where all the things you’ve learned come together and finally stick in your head. It is also the most fun way to learn.

So if you haven’t already, I suggest that you start seeking photo walks out, and here are some tips to help when you do.

1. Use them as an excuse to meet other photographers

Photo Walk

One of the main advantages to photo walks is that you are surrounded by like-minded people with similar passions. I don’t know about you, but most of my family and friends from growing up are not very into photography. So I try to find new photography friends whenever I can, but it can be tough to do that. Photo walks solve this problem.

Introduce yourself, exchange information, and talk about possibly going out to shoot again. You can take your favorite few people from each walk and start building an awesome network of photographers to go out shooting with in the future.

If you have questions, by all means, ask the organizers of the walk, but also see what the other people attending think. This is a chance to learn from many unique perspectives. Photography is a subject where there can be many correct, but differing answers to a question or problem, and it’s good to hear multiple opinions.

2. Watch what other people are photographing

Photo Walk

You are there to have fun and learn, and sometimes a great way to learn in this environment is to watch the other photographers and see what they are attracted to. Just from teaching on photo walks for the last five years, I have found so many new interesting ways to capture the city by watching my students. I have walked down certain blocks hundreds of times and then suddenly someone will capture it in a way that I had never thought of. It is an incredible way to learn.

3. Shoot on your own occasionally

New York Photo Walk

That being said, mix it up and take some time to break off and shoot on your own. You have the advantage here to learn from so many others, but at the same time you want to capture your own, unique photographs, and you need some quiet to do that. Step away a handful of times during the walk, but make sure not to get lost or slow down the group. After that, you can reengage with everyone else.

4. Get out of your comfort zone

New York Photo Walk

This is a chance to do something you are not used to doing. If you are a street photographer and are on a street photography meet up, of course, that is what you will be focusing on. But if you are a landscape photographer, consider doing some street photography, and if you are a street photographer, consider trying more landscapes. Do some portraiture. Improve your lighting. There are photo walks for nearly everything.

Seek out photo walks that will cover your interests and others that will challenge them. Everyone has their likes and dislikes, but this is a great chance to seek new perspectives and to round out your abilities.

5. Learn about the area beforehand

Photo Walk, New York City

Some photo walk leaders will talk about the history of the neighborhood, while others will strictly focus on the photography. Both are great ways of running workshops, but history is very important to photography. It helps to inform what you are shooting and to improve your awareness of the place.

Take some time on your own to read up about the area. Learn about the history, and explore the work of photographers that frequent those areas. Come prepared with this knowledge and it will make your day even that much more successful. This knowledge is not only inspiring but it will improve your ability to notice those special moments that create a magnificent photograph. In addition, some of the other walk attendees may find this knowledge fascinating as well.

6. Organize one yourself

Photo Walk

As you continue to attend photo walks, build your network of local photographer friends and start shooting with them regularly. Once you all get to know each other this could become a very close group of friends. Keep in touch, build friendships, attend gallery events together, and share your work and ideas.

Having a close group that all know you and your work is the best way to get a proper critique. If you just ask anybody or share your work on the web, you never know what the person’s perspective is who is giving you the critique. Usually, they just say “beautiful!” With a close group, that perspective will grow between all of you and these friends will not be afraid to tell you when they do not like something.

7. Do not get run over by cars or bikes

Photo Walk, New York City

This is the hardest part of my job, so please help me and the other photo walk leaders out. When you are in a new place, photographing in a new way, or surrounded by competing stimuli and photographers walking around, your situational awareness can become distracted. People with their lens to their eye can suddenly walk backward into the street trying to get the correct perspective, but with no awareness of where they are and the dangers that could hurt them.

Always be careful and look before you make a sudden stop or a move sideways or backward. If you are using a tripod on the sidewalk or street, be careful about the tripod legs. Make sure they are no wider than the width of your body so that bikers won’t trip on them riding by you.

With a one-on-one workshop, I can do a good job at making sure people don’t make unwelcomed moves on the street, but with a large group it is out of my ability, so please watch out for both yourself and your fellow photo walkers.

Conclusion

Have you participated in any photo walks? Please share your experience and tips for them below.

Now go out and find some photo walks!

googletag.cmd.push(function() {
tablet_slots.push( googletag.defineSlot( “/1005424/_dPSv4_tab-all-article-bottom_(300×250)”, [300, 250], “pb-ad-78623” ).addService( googletag.pubads() ) ); } );

googletag.cmd.push(function() {
mobile_slots.push( googletag.defineSlot( “/1005424/_dPSv4_mob-all-article-bottom_(300×250)”, [300, 250], “pb-ad-78158” ).addService( googletag.pubads() ) ); } );

The post 7 Tips for Attending a Photo Walk by James Maher appeared first on Digital Photography School.


Digital Photography School

 
Comments Off on 7 Tips for Attending a Photo Walk

Posted in Photography


Macphun announces Luminar photo editing app for Mac

20 Oct

Macphun, the company behind Aurora HDR, has announced Luminar, an all-in-one photo editing app for Mac. The photo editor was designed for users of all skill levels, and includes a user interface that can be tailored to each user’s specific needs.

Luminar includes a variety of tools for processing images, including native Raw processing, more than 35 photo filter sets including Photo Filter Emulation and Cross-Processing, presets, layers, brushes and masking, spot healing, noise reduction and ‘personalized darkrooms’ called Workspaces. Macphun also mentions a sky replacement tool to tease some of the other more advanced features the software will offer.

Macphun says it will open Luminar to pre-orders on November 2 with the official launch scheduled for November 17. New customers will pay $ 59, while existing customers will be charged less at $ 49. Those who pre-order the software will receive an exclusive video series dubbed Photography Essentials and Marketing Guide for Photographers by Will Burrad-Lucas.

Via: Macphun Blog

Articles: Digital Photography Review (dpreview.com)

 
Comments Off on Macphun announces Luminar photo editing app for Mac

Posted in Uncategorized


Lenses and photo trips offered for top prize in Zeiss Photography Awards

12 Oct
Tamina-Florentine Zuch won the 2016 ZEISS Photography Award with a project about the railway system in India

German lens manufacturer Zeiss has put up a top prize that includes €12,000 of its lenses and €3000 towards a photographic excursion for the winner of the 2017 Zeiss Photography Award. In its second year, the award is made in conjunction with the World Photography Organization and is presented as a part of the Sony World Photography Awards program. Entrants are required to submit a collection of five to ten related images on the theme of ‘Seeing Beyond – Meaningful Places’ for a chance to win the single prize.

The competition opens today and will close on 7th February 2017, with the winner being announced on the 14th March. The prize winner will be taken to London to the WPO awards ceremony in April and the winning series of images will form a part of the Sony World Photography Awards exhibition held at Somerset House in that city.

For more information visit the Zeiss website.

Press release:

ZEISS Photography Award 2017

Pushing the limits of creativity.
The ZEISS Photography Award is a highly prestigious international photo competition run jointly by ZEISS and the World Photography Organisation (WPO). “Our lenses enable photographers to achieve superior imaging quality, and the ZEISS Photography Award is an expression of our dedication to premium-quality photography,” says Dr. Winfried Scherle, Executive Vice President and Head of the Consumer Optics business group at ZEISS.

The motto “Seeing beyond – meaningful places” will also be used for the 2017 competition and accorded greater artistic significance. Photographers therefore have the chance to use their creative flair to lend unique places a special meaning and express this through their medium.

The goal is to push the limits of creativity and grow as photographers. They could be places with a particular historical or future value, or perhaps places that exude adventure, the wonders of nature or depict a journey to a faraway place.

“The lenses are mere tools – the real value of the images is down to the photographers and their flair for creativity.”
Dr. Winfried Scherle

Submissions
All those who wish to take part in the ZEISS Photography Award 2017 are invited to submit a series of 5 to 10 photos complete with descriptions. Entries can be submitted between 11 October 2016 and 7 February 2017. The jury is looking for photos that reflect different perspectives as well as free interpretations of the terms “meaning” and “place.”

Further information on the submissions for 2017 can be found here.

Jury
All entries will come under scrutiny from a jury composed of leading lights from the world of photography. The jury for the ZEISS Photography Award 2017 comprises 3 members. Their goal is to assess the photographic skill and artistic flair of the participants.

  • Claire Richardson, Lonely Planet
  • Sarah Toplis, The Space, WPO Academy Member
  • Jürgen Schadeberg Dr.(h.c.), Photographer, WPO Academy Member

Prize
At the end of the submission phase, a shortlist of photographers vying for the ZEISS Photography Award 2017 will be published and a winner will be selected. Inclusion on the shortlist is a great honor in itself. The winner will be announced on 14 March 2017.

The winner of the ZEISS Photography Award 2017 will receive ZEISS camera lenses of their own choosing to a value of €12,000, as well as €3,000 to put towards a photo trip. He/she will attend a gala dinner in London on 20 April 2017 and their photos will be showcased at the Sony World Photography Award Exhibition at Somerset House in London. All flight and hotel expenses for the gala dinner in London will be covered. The winner will also get the chance to work with ZEISS on an individual basis.
Key dates

All the important dates for the ZEISS Photography Award 2017 are listed below:

11 October 2016 : Competition open for submissions
7 February 2017: Competition closed for submissions
28 February 2017: Shortlist published
14 March 2017: Winner announced
20 April 2017: Gala dinner in London
21 April to 7 May 2017: Winner’s photos exhibited at Somerset House in London

Further information is available on the website of the World Photography Organization

Articles: Digital Photography Review (dpreview.com)

 
Comments Off on Lenses and photo trips offered for top prize in Zeiss Photography Awards

Posted in Uncategorized


PhotoPlus Expo 2016 to offer 22 photo walks covering roster of topics

08 Oct

PhotoPlus Expo 2016 will offer attendees a total of 22 photo walks over a three-day span, giving them the opportunity to learn different skills and gain experience from top educators and photographers, including Me Ra Koh, Jen Rozenbaum, Michael Grecco, Brooke Shaden and Matt Kloskowski. The Photo Walk tours are scheduled to take place before and after Expo hours on October 19 through October 21 in New York City.

The full photo walk lineup:

OCTOBER 19 – 4:00PM – 6:00PM

“Make Every Woman Look Amazing” (PW01) Sold Out
Jen Rozenbaum
Learn how Jen Rozenbaum uses her eight points of posing to make any — and every — woman look amazing. Then, put what you learned into action to create your own “shamelessly feminine” portraits.

“Portraits Unplugged: Under and On the High Line” (PW02) Sold Out
Bobbi Lane / Lee Varis
Join photographers Bobbi Lane and Lee Varis for this photo walk around New York’s famed High Line. The key to successful natural light portraits is learning to “see” and find the light, then successfully place your subject in the light for the mood of the image. Lane and Varis will show participants how to scout for light and will demonstrate porch lighting and backlighting, the use of reflectors and diffusers, and how to make any location work once you have found the appropriate light. Models will be used throughout the session.

OCTOBER 20 – 8:00AM – 10:00AM

“On-Location Portraiture” (PW03)
Miguel Quiles (Sponsored by Sony)
Sony Artisan Miguel Quiles will demonstrate the process of shooting dynamic portraits on location, how to find the best locations, pose the subject and offer guidelines using both available light and off-camera flash. The shoot will include live models and offer a great opportunity to walk away with some amazing photos and invaluable tips.

“Capture the Action with Small Flash” (PW04)
Tony Gale (Sponsored by Sony)
Join Sony Artisan Tony Gale in a unique hands-on experience on the streets of New York City as he shows participants how to enhance their action photography with a small flash. Participants will learn how and why to use flash outdoors, how to use multiple small flash units to capture action, how and when to use high-speed sync, and much more.

“My Way, Your Way: Two Unique Perspectives on Off-Camera Flash” (PW05)
Moshe Zusman/Vanessa Joy (Sponsored by Adorama, Profoto, Miller’s Lab)
Moshe Zusman and Vanessa Joy will demonstrate their unique perspectives on off-camera flash. Start with timeless OCF lighting and posing scenarios with Joy and learning how to switch them up for more edge and drama with Zusman. Learn how to give your clients the best of both worlds quickly and easily while boosting studio sales and client satisfaction.

“The Art of Noticing” (PW06)
David Carol
The streets of major metropolitan cities are fast paced and chaotic. Our job as photographers is to organize the chaos—to be aware and to compose our images within the ebb and flow of humanity. The skills to photograph the subtleties of life can always be learned and improved. David Carol’s class will teach participants how to find your style and present your photographic point of view to the world.

“Fairytales on the Streets of NYC” (PW07) Sold Out
Brooke Shaden (sponsored by WHCC and X-Rite)
Art can be created anywhere, even in the alleyways of NYC. Join Shaden as she discusses ways of masking the hectic and visually distracting streets to create timeless pieces of art that will utilize set design, compositing and storytelling. By using painterly techniques as well as the square format, traditional photographic properties are replaced by other worldly elements.

OCTOBER 20 – 4:30PM – 6:30PM

“Urban Landscapes—Light, Shadows and Utilizing Architectural Shadows” (PW08)
Michael Grecco (sponsored by Panasonic)
Michael will show participants how to hunt for light, manage shadow and use the great architectural background of the city to shoot your own urban landscapes. Michael will walk through some of his favorite New York spots known for their dynamic design, and illustrate how to strategically shoot from the magic hour and into darkness.

“Lite Lighting with Speedlites: The Power of Creative Lighting on Location” (PW09)
Rocco Ancora
Rocco will share his techniques in the art of lighting with Speedlights and remote flash set-ups. This Photo Walk is ideal for the photographer wanting to finesse their off-camera flash techniques and further develop their lighting skills. Models will be provided throughout the Photo Walk.

“Making Great Portraits on Location” (PW10) Sold Out
Scott Kelby (Sponsored by Lexar)
Join Scott Kelby, Lexar Elite Photographer and author of the book Light It, Shoot It, Retouch It, on the streets of New York City for a hands-on Photo Walk that will teach participants how to make amazing portraits on location. Participants will learn the secrets to making natural light work for you—how to harness it, tame it, and balance it with flash—to add more depth and dimension to your location portraits. Working with two New York City-based models, participants will have an opportunity to put what they learned into immediate practice.

“Become a Family of Photo Detectives” (Parents & Kids Photo Walk) (PW11)
Me Ra Koh (Sponsored by Sony)
Bring your child and experience a special, new photo adventure with Disney Jr. host, Me Ra Koh, The Photo Mom. She will teach parents and children alike how to find great light, capture action, hunt for defining details to tell a story, and use ordinary shapes and lines to create extraordinary photos. Sign up for this fun, creative, hands-on session that you and your child will never forget (children must be at least 4 years old).

“NYC from Above: “A Unique Way to Capture the Most Photographed City” (PW12) Sold Out
Vivienne Gucwa (Sponsored by Sony)
Join travel photographer, best-selling author and Sony Artisan Vivienne Gucwa for a different type of Photo Walk that will take you to the rooftops of NYC. In this Photo Walk, attendees will learn how to use ‘view from above’ angles to capture unique perspectives of an urban landscape and how to use changing light to enhance your work.

OCTOBER 21 – 8:00AM – 10:00AM

“Love the Process” (PW13)
David Carol
For David Carol, the most important aspect of street photography is noticing the world around him and showing the viewer something he or she may not have noticed themselves. During this informative and inspiring photo walk, Carol will show you his process and teach you to love it as much as he does. You’ll learn how to harness the environment at-hand to focus on and expand your unique vision for making thought-provoking imagery. Come learn how to be process-oriented rather than results-oriented.

“Landscapes in the City” (PW14)
Matt Kloskowski (Sponsored by Sony)
Join Sony Artisan Matt Kloskowski for a hands-on photo walk that combines creative landscape photography with the urban city setting. Participants will learn about a variety of useful and creative techniques including long exposure photos, using apps to enhance shooting, ND Filters and Polarizers, shooting into the sun, when to use HDR techniques, and much more.

“Learning Headshots: In Front and Behind the Camera” (PW15)
Lori Patrick
Anyone can use a good headshot these days. In a preliminary discussion, Lori Patrick will share insights on finding clients, conduct a posing demo and discuss client intention. Learn about posing, expression, crop, usage, delivery and more. Attendees will practice in pairs, producing headshots of each other, with Lori available as coach.

“Make Every Woman Look Amazing” (PW16)
Jen Rozenbaum
Encore performance from Wednesday, October 19.

“Authentic Street Photography with your iPhone (PW17)
Robert Herman
Join Robert Herman, author of The Phone Book (Schiffer Books), a new monograph shot entirely with the iPhone and the Hipstamatic app, during a photo walk in a neighborhood near Penn Station. If you are interested in making more authentic pictures on the street, the iPhone is the camera for you. And now, with the release of the iPhone 6 and 6S with a 12MP file, the image quality is superb. Learn the techniques Herman used to make the great pictures that led to the publication of The Phone Book.

OCTOBER 21 – 4:30PM – 6:30PM

Lucky Shots: The Zen of Street Photography (PW18)
Doug Menuez
As the old saying goes, “luck favors the prepared.” On this Photo Walk, Doug Menuez will share how he combines his documentary techniques with a deliberate Zen mindfulness that allows him to enter a zone of hyper-awareness and concentration. He’ll also share his philosophy about respecting his subjects, discussing the fine line between telling their stories and exploiting them. Then, he’ll discuss choosing the right equipment and technical issues. Street photography brings a special kind of joy that involves embracing the mystery of life, especially in New York City.

“Beautiful Portrait in Unattractive Environments: No Flash, No Reflectors. Just Natural Light!” (PW19)
Peter Coulson
Peter Coulson will teach you how he finds the perfect lighting in any outdoor location. Participants will spend this hands-on photo walk learning how to see and use natural light, without any reflectors or flash.

“Adding Light to Your Environmental Portrait” (PW20)
Ira Block (Sponsored by Sony)
Environmental portraits are a powerful way to tell a story. Join Sony Artisan of Imagery and National Geographic photographer Ira Block as he teaches participants how to interact with their subjects to make them feel comfortable, relaxed and expressive. He will also discuss how to find locations that compliment and define your subjects controlling the light by adding reflectors, strobes, LEDs, candles or even flashlights.

“NYC Skyline and Hoboken Photo Walk” (PW21)
Katrin Eismann (Sponsored by Sony)
Join Sony Artisan, Katrin Eismann on a ferry ride to Hoboken, New Jersey, to photograph the NYC skyline and wander the parks and neighborhoods of the mile-square city. Participants will explore the tree-lined Stevens Institute of Technology campus, discover quaint streets lined with Brownstones, and wonder at the historical Hoboken Railroad Terminal. Participants will learn how to create unique images in the everyday environment by shifting perspectives, how to shoot during changing light, and tips for low-light shooting.

“The Sensational Portrait on Location” (PW22)
Joel Grimes (Sponsored by Canon)
Learn how to create dramatic portraits on location, using portable battery powered strobes. As an advertising photographer, Joel Grimes has been “strobing” subjects on location for over 30 years. Follow him out in the field as he demonstrates how to mix both strobe and ambient light, overpowering the sun; achieving shallow depth-of-field focus using ND filters while still using strobes and so much more.

Articles: Digital Photography Review (dpreview.com)

 
Comments Off on PhotoPlus Expo 2016 to offer 22 photo walks covering roster of topics

Posted in Uncategorized


Creative Live’s Photo Week starts tomorrow

26 Sep

Now that Photokina is over and we are impatiently waiting for the latest cameras and gear to ship, it’s a perfect time to hone up on our photography skills. Luckily, our friends at Creative Live are hosting their annual Photo Week this week, September 26 – 29.

Photo Week 2016 is four days of photo education, brought to you through 24 live classes taught by top photographers and educators. It is geared toward people who are comfortable with the basics of photography and are looking to expand their knowledge base into more advanced techniques.

Some of the classes we are really looking forward to include Brandon Stanton (the photographer behind the popular photo blog Humans of New York) discussing how his experiences have shaped his work as a storyteller, Vincent Laforet sharing ideas for how to move your business from stills to video, Jared Platt giving tips on a whole range of post-processing topics, and Chase Jarvis opening up about his experiences in the photo industry.

As with all Creative Live classes, you can watch the live classes online for free. If watching the live class won’t fit into your schedule, you can purchase on-demand access so that you can watch it on your own time. The price for the entire week (including all 24 classes) is normally US $ 499, but they are offering it for US $ 199 for a limited time.

But there’s more! DPReview readers can use the discount code ‘DPR10‘ to receive 10% off of any Creative Live class through December 31, 2016.

Check out the Photo Week schedule to see what’s available. What looks interesting to you?

Articles: Digital Photography Review (dpreview.com)

 
Comments Off on Creative Live’s Photo Week starts tomorrow

Posted in Uncategorized