RSS
 

Posts Tagged ‘Part’

So You’re Going to Shoot A Wedding: Part 2 of 3 [Day Of]

13 Aug

If you want to know how to photograph a wedding, there are ton of books on the subject but the truth is nothing is going to be a greater lesson than just doing it.  This series is not about what shots to take or how to shoot.  It’s about being a lone ranger vendor with no roadmap. Read Part 1 on the topic of Preparation here.

It’s Game Day folks.  Your pockets are jammed packed with spare batteries, CF cards, and gum.  You’re rested and ready.  You’re a vision of both professionalism and cool comfort.  You’re terrified out of your mind that you’re going to mess up, but no one else can even sense that.

Now what?

IMG_1868b

The Art of Bossy Invisibility

This is the finest line you will walk all day: staying out of the way, but being right in the middle of everything.  One of the first things I do when I get started at the ceremony site is to chat with the officiant.  At that point, I have (hopefully) already met with the bride and groom and have a feel for if they are the type that want great pictures even if it means me shoving my way in, or if they would prefer that it’s a fun night for all of their people and no one even noticed that they had a photographer there.  

The officiant may have some very specific thoughts on this too.  Either they don’t care a bit and feel the couple are in charge, or they may ask you to stay out of the center isle, refrain from obviously standing during seated moments, and similar during the ceremony.  It’s the hardest part of the whole day—you are there to do a job, but you also don’t want to be known as the pushy portfolio-building photographer who couldn’t take a hint.  

At least 50 times a wedding I have to silently ask myself if the potential shot is amazing enough to risk being intrusive.  Sometimes the answer is yes and sometimes it’s no.  And sometimes I make a bad choice and I find myself obnoxiously close or I miss a great shot.  The sun  still always rises the next day though.

IMG_0101b

Shoot THEIR wedding, not Yours

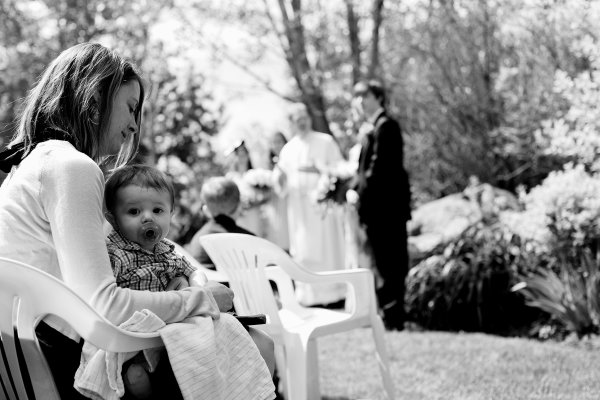
I’m a huge flirt.  And I don’t discriminate with this at all—men, women, kids, babies, dogs, whatever.  And while it maybe hasn’t made my dating life simple, it’s been great for my career and getting people  to feel comfortable and look happy quickly and easily.  

When this baby started making eyes at me with drool dripping, I forgot where I was for a second and thought, how fun is this shot—this baby oblivious to the union of souls happening mere yards away and instead diggin’ on me.  The problem with this shot is that, cute as it may be, there is nothing the couple—my clients—are likely to do with it.  They may not even know for sure who that baby is for all I know.  They hired me for pictures of them, important moments, and candid situations.  Not evidence of me flirting with a baby.  

Stay true to your style—it’s what you were hired for.  But always in the back of your mind remember that the end result will be what the couple didn’t get to see, what they didn’t remember, and what they will treasure for a lifetime.

IMG_0779b_color

Don’t Miss the Moments

This is the greatest fear of every wedding photographer; that something will happen and they will miss the kiss.  Or the moment when the groom sees his bride for the first time.  Or the entire first dance because they somehow got locked in the bathroom and no one could hear them banging on the door, screaming to be let out.  (That last one is maybe just my own fear.)  

Worrying won’t get you anywhere.  Odds are, you’re not going to miss the big moments.  What is more possible though is that by being on high alert every second for hours on end, you’ll miss some sweet little situations that could be an image no one expected, yet a perfect capture.  Try to be there as an observer that isn’t stressed about seeing every little thing happen.  You’re going to miss some stuff.  But you’re going to see a lot more than anyone else there.  It’s the most interesting backstage pass—enjoy the VIP status and use it wisely.

 weddingarticle

Shoot The Whole Story

Often couples in an attempt to cut costs, will push back the arrival time of the photographer or ask for ceremony and portrait shots and nothing else.  This is understandable: wedding photography is expensive.  I personally feel it’s the worst corner to cut with the exception maybe of tossing a giant cubic zirconium in platinum, but this is tough to explain to cost-conscience couples.  

If this is a wedding you are shooting that in any way will become a part of your wedding portfolio, go above and beyond and shoot even what’s not asked of you.  To only shoot the ceremony or portraits, leaves you with little to show for your effort and nothing that’s enough to impress the next couple you may try to book.  This may cost you time you didn’t account for or aren’t getting paid for, but it will come back to you in the long run when you have a wedding in it’s entirety as part of your portfolio.  It’s also just plain ol’ good experience.

 IMG_2935b

Make the Retail Shots Meaningful

I am convinced that those bouquet shots that photographers go to so much trouble to shoot at every possible different angle go completely to waste and I’m staying convinced of that until the day I walk into someone’s home and see a 16×24 gallery wrap canvas featuring a rose bouquet, laying casually on the alter as if by magic.  Flowers are expensive—I get that.  And every bride has likely been putting the occasionally thought into what color daisies her bridal bouquet is going to include since she was in the 4th grade.  But there’s better stuff to document, I promise.  Sure, take a pretty flower picture—why not.  

Digital is cheap and you likely will have a little down time while people are shoving chicken picatta into their faces (because, promise me, you will never, ever shoot people eating.  Don’t be that photographer.) But look for the details that are meaningful.  Instead of putting the rings somewhere weird and artsy, zoom in close and shoot that shiny new ring on their hand when they aren’t looking.  When it’s casually on their grooms face and they are enjoy a small moment.  Photograph the details that will be important years later.

And if you do get locked in the bathroom, don’t panic.  I have to hold on to the belief that a missing wedding photographer isn’t something that goes unnoticed for long.

Post originally from: Digital Photography Tips.

Check out our more Photography Tips at Photography Tips for Beginners, Portrait Photography Tips and Wedding Photography Tips.

So You’re Going to Shoot A Wedding: Part 2 of 3 [Day Of]


Digital Photography School

 
Comments Off on So You’re Going to Shoot A Wedding: Part 2 of 3 [Day Of]

Posted in Photography


Is that a Workshop, Tour or Seminar [Part II]

09 Aug

In our previous post on this topic we learned that the photo workshop is primarily a teaching venue, with a very structured curriculum leading to measureable outcomes. The keynote teacher and/or assistant instructors should be available upon demand and continuously be pushing, cajoling and exciting you to advance your skill set.  The workshop is all about learning.

The photo tour was borne as a hybrid from the conventional tour business that blossomed in the 1970’s.  While travelling tourists enjoyed the convenience of having another labour over the details of accommodation, meals and destinations, many tour administrators recognized a need to cater to niche markets that included an array of interests and hobbies. Specialized tours were developed to meet all types of sundry from participating in archaeological digs to experiencing the daily life of Zulu tribes. Somewhere in the middle was the hobbyist photographer whose key interest was in photographing the A to Z’s of the planet, and having someone else attend to all the details.

So what should we be aware of when researching for the right fit in a tour company?


A good tour company should have an itinerary and support staff that puts you front-and-centre with the attractions and characters at the right time of day to maximize your photo opportunities.

A good tour company should have an itinerary and support staff that puts you front-and-centre with the attractions and characters at the right time of day to maximize your photo opportunities.

Almost all photo tours that pique an interest involve travel to some remote location, usually out of country and more often than not to another continent.  While Canadians might like to travel to Asia, for example, many Asians like to travel to Canada.  Common wisdom would suggest that an Albertan could probably put together a more complete tour package of the Canadian Rockies than an administrator in Shanghai, for example. Conversely, that same Shanghai administrator should be more thorough in developing a week long traverse of the Great Wall of China than our friend from Jasper.

This is not to suggest that non-nationals cannot, and do not, provide great experiences to other countries – many do, but, many more do not.  It is essential you review their credentials to gain informed insight with the administrator’s familiarity of the geography being visited.

Most importantly, ensure the itinerary has been developed with the photographer in mind.  Many tour operators simply don’t understand that photographers want to have the option of being on location no less than 30 minutes prior to sunrise. Likewise, how can we be enjoying dinner when the mother of all sunsets is happening just beyond our spreads of Peking Duck or prime Alberta beef.

Review that itinerary as you might research the merits of a particular car purchase. Relentlessly research the web for everything you can locate about the company, this particular destination, the tour leader, language interpreters if necessary, accommodations, meals and dietary concerns, maximum number of participants, modes of transportation and are they certified and insured, any mobility concerns you might have, sleeping arrangements, and so on.

Is the tour leader a photographer from whom you think you could have fun? Is that photographer also known to freely share his insights, vision and passion to craft? Many tour companies only hire the well known photographer as an aid to marketing and selling the tour.  Did the photographer have any input toward the tour development and itinerary?  How many times has this company and/or tour leader been to these destinations; what is their familiarity with local customs and traditions?

Be wary of the quasi-photographer who is developing and leading a tour to a new destination. More often than not he is only looking to make a few bucks to augment his own cost of adding that destination as another notch in his prize belt. By the same token there are photographers who offer fabulous small group excursions, just be wary and use the telephone to interview this photographer/leader.

The photo tour is all about the experience – be that destination, cultural, or a myriad of other experiences and interests. The photographer- leader might offer an evening or two of presentations, and maybe some informal one-on-one time while out enjoying the sites, but bear in mind the photo tour is not about tutelage but experience.

With good research and due diligence you can ensure that a photo tour meets your expectations and helps fulfill the most important mandate: having fun.  Always remember, if you are having fun you are doing it right!

Part III — the seminar.

Post originally from: Digital Photography Tips.

Check out our more Photography Tips at Photography Tips for Beginners, Portrait Photography Tips and Wedding Photography Tips.

Is that a Workshop, Tour or Seminar [Part II]


Digital Photography School

 
Comments Off on Is that a Workshop, Tour or Seminar [Part II]

Posted in Photography


Is that a Workshop, Tour or Seminar [Part I]

05 Aug

There is a modern day aphorism:  Those that can – do. Those that can’t – teach.  I believe, however, the later part of the phrase should be amended to read “Those who can’t – shouldn’t.”

A majority of photographers working today as professionals ply their trade in the commercial, wedding and portrait disciplines. There are also countless photographers who have historically made images of landscape and nature pictures – the kind of stuff we all love to do. These image makers would typically place their material with a stock photo agency to license their work on their behalf. Unfortunately this business model has been collapsing over the past five, or so, years and will likely continue.

The by-product of this collapse in landscape and nature picture sales has translated to a deluge of photography workshops, tours and seminars.  Many of these instructor-photographers bring impeccable skills and talents to the table; unfortunately an even greater number bring little more than platitudes and promises.

The novice photographer will have to do some research to learn what firm offers something worthy of your hard earned cash.  You will have to sift through a lot of chafe to find the nice gems, fortunately they do exist.

Is the intensity of a workshop what you seek, or perhaps the enjoyment of a tour or the diversity of a seminar? Hopefully this little primer will help steer you in the right direction by explaining the differences and offering some suggestions to ensure you get the right fit for what you are seeking, and at the right skill level.

The workshop offers the opportunity to try out all the gear you might own with good critique from the instructor.

The workshop offers the opportunity to try out all the gear you might own with good critique from the instructor.

A workshop is first and foremost a teaching venue.  It will in all likelihood be based from a single location where you will eat, live and breathe photography.  A secondary consideration is the actual location, the physical presence to facilitate the theme of the workshop.

The better workshops usually come with a systematic structure: early morning shoot, late morning lecture, early afternoon lecture or critique session and late evening shoot. The shooting sessions will usually always concentrate on the topic presented at the day’s lecture session(s). By the end of the workshop you should have received sufficient lectures, personal evaluation of your efforts, and an overdose of encouragement to meet the objectives outlined. The course syllabus should be available for your study in advance of enrolment.

Before you do enrol, research to see who the lead instructor will be as well as the supporting teachers, and whether that lead is on site or just loaning their name. Does that leader come with a pedigree that includes accomplishment in their chosen field through innovative techniques, or writing of their findings in books or magazine articles? Are they continuously exploring their own vision, and what is their reputation from previous students?  Contact those testimonial writers personally – they could be just friends of the workshop leader.

One of the very first clues you might have whether the workshop is for you is by asking the question: “Will the instructor be making photographs during the workshop?”  If the answer is yes, you might want to consider moving to another workshop that interests you. The logic being, how is it possible for the instructor to teach and offer guidance if they are concentrating on looking through their own viewfinder?  You, the student, should have their attention; the instructor can take pictures on their time – you have already bought and paid for that time.

Most importantly, is the lead instructor an instructor or a teacher? As ridiculous as this might sound, almost anyone can stand in front of a small audience and regurgitate from a prepared lesson plan. A teacher, on the other hand, has that inner quality of being able to instil a desire to learn, of generating an excitement enabling students to be part of a process, promoting confidence and self-esteem all while offering constructive criticism without the student ever knowing. A teacher has a true passion in their chosen art, the art of sharing.  Their enthusiasm is contagious.

Next up: What is the photo tour?

Post originally from: Digital Photography Tips.

Check out our more Photography Tips at Photography Tips for Beginners, Portrait Photography Tips and Wedding Photography Tips.

Is that a Workshop, Tour or Seminar [Part I]


Digital Photography School

 
Comments Off on Is that a Workshop, Tour or Seminar [Part I]

Posted in Photography


Posing Guide for Photographing Women: 7 More Poses to Get You 21 Different Photos [Part III]

20 Jul

A post by Kaspars Grinvalds from Posing App.

This is the third article in the series. You may want to look at the previous ones here: 7 standing poses [Part I] and 7 sitting poses [Part II].

Let’s move on with 7 lying down poses for women. And again I’ll briefly try to describe the process, how I tried to slightly adjust these poses in order to get three different photos for each pose.

Pose 1

Pose1

Very simple pose to start with. After getting the model into initial position, ask her to raise the upper body as high as she comfortably can.

7poses3 1

Photo 1: The first picture is the result of recreating this simple pose. Notice that you should shoot from very low angle, nearly from the ground level.

Photo 2: With such a basic pose as this one, you always have different options to variate – different hand placements, head tilts, eye directions and face expressions. In this shot the only difference is hand placement and slightly lowered upper body.

Photo 3: And I continued by asking the model to lower down even more. Notice that tighter crop is also a nice option to differentiate your shots.

Pose 2

Pose2

Very similar pose as the first one, but this angle is better for including longer model’s body line in the frame. And notice that one of the model’s legs is bent in the knee. This helps to raise her bum up for a better looking body shape.

7poses3 2

Photo 4: If you compare this shot with the first one, you will notice that it is nearly the same pose, but the changed angle gives different look to the image.

Photo 5: And again I continued with different hand placement. Note that hand doesn’t support the head, it actually doesn’t support anything, it’s just placed in the hair.

Photo 6: And one more hand placement variation and tighter cropping.

Pose 3

Pose3

Another very similar pose to the previous ones, the main difference again is the shooting angle – right from the front. At this point the model hasn’t even moved from the initial position, it’s the photographer who moves gradually around her.

7poses3 3

Photo 7: Here the model already started to repeat the gestures from earlier shots. Don’t be afraid to take these nearly similar poses as these minor variations might be invaluable when selecting the final choice of images in post production.

Photo 8: The variations with both hands stretched in front.

Photo 9: And close-up crop again, but this time with the eyes closed.

Pose 4

Pose4

We continued with the next easy and straightforward lying down pose.

7poses3 4

Photo 10: An easy to describe and really easy to execute pose.

Photo 11: Again, only couple of options to change here. Arms could be connected under the breast line as in this example. The arms could also be stretched back behind the head for another variation.

Photo 12: And in this photo the model tried to achieve kind of dreamy look with eyes closed and hands placed asymmetrically.

Pose 5

Pose5

Lying down very low. Works very good as well for close-up portrait shots.

7poses3 5

Photo 13: As my model was lying on the sandy beach, I asked her to support the head on the hand, but in other settings the head might as well touch the ground.

Photo 14: Here I asked the model to raise the head higher and keep the hands placed asymmetrically.

Photo 15: And the next variation was sleeping pose with eyes closed.

Pose 6

Pose6

Lying down on the side. Couple of points to check. The left leg is crossed over the right. The left arm is rested on the hip and partly hidden behind the body. The right hand is placed under the head but it supports it with only the tips of the fingers. If the model’s head would be fully supported by the hand the pose would just indicate tiredness.

7poses3 6

Photo 16: Following the previously described instructions, the model easily recreated the sample pose.

Photo 17: Here basically only the right hand’s placement is different. And placing it down on the ground instantly raises her upper body higher.

Photo 18: From there she straightened the supporting hand and raised the body even more higher.

Pose 7

Pose7

And finally a bit more demanding pose. The biggest challenge for the model is to keep an air of relaxation. Ask her to fold her head back as far as possible while slightly facing it to the camera. And this posture for sure works best with eyes closed.

7poses3 7

Photo 19: If the model can manage to look relaxed, the results will be rewarding.

Photo 20: This pose is a nice variation to the previous one as it’s far more simple for the model to recreate.

Photo 21: And here I asked the model to raise higher up and took the shot from above.

So, together with the previous articles – 7 standing poses [Part I] and 7 sitting poses [Part II] – you now have lots of poses to choose from. For more variation and a more dynamic result I would suggest to choose a few from each article and mix them in a single shoot. You will very soon discover that even a small number of starting poses is more than enough to have a great, productive session.

All of these illustrations and many more posing samples are available on Posing App for your mobile devices.

Kaspars Grinvalds is a photographer working and living in Riga, Latvia. He is the author of Posing App where more poses and tips about people photography are available.

Post originally from: Digital Photography Tips.

Check out our more Photography Tips at Photography Tips for Beginners, Portrait Photography Tips and Wedding Photography Tips.

Posing Guide for Photographing Women: 7 More Poses to Get You 21 Different Photos [Part III]


Digital Photography School

 
Comments Off on Posing Guide for Photographing Women: 7 More Poses to Get You 21 Different Photos [Part III]

Posted in Photography


So You’re Going to Shoot A Wedding: Part 1 of 3 [Preparation]

06 Jul

About 5 seconds after I purchased my first professional camera, long before I hung a shingle or had any idea of what I was doing, the requests to shoot weddings came flooding in. Because let’s face it; someone’s always getting married. And your cousin’s dentist’s cleaning lady’s daughter would love a deal. And you are maybe just the photographer to give her one.

There are thousands of opinions regarding if non-wedding photographers should ever even consider taking a stab at shooting a wedding– free, favor, or otherwise. For the purpose of this article (and my sanity) we aren’t going to touch the politics of that with a 10 foot pole. Instead, we are going to assume that for whatever reason, you are shooting your first or near first wedding, like, tomorrow and you need a little reassurance that going ahead and shooting it as planned is a better idea than attempting to break your leg on purpose so you can be hospitalized and therefore legitimately unable to work. (The recovery time for this is longer than you would think. I’ve looked into it.) Here are 5 tips for the preparation of said wedding/non-purpose-leg-breaking.

PHOTO ONE 1

Value Yourself

Never, ever, ever shoot a wedding for free. I know it’s tempting. Maybe you’ve never shot one before and you feel awkward about charging. Or maybe it’s your brother/sister/neighbor/dry-cleaner’s wedding. Still, absolutely no.

Here’s why: these pictures, even if they aren’t of the caliber of work you hope to produce in the future, have worth. Great, amazing worth. A worth that is only increased when they aren’t just handed over for nothing in exchange. Now, in the right situation, I do a TON of work for cheap or trade and always have. But there has to be an energy exchange of some kind.

Work for trade, work for the slightest possible fee to cover your time and equipment rental or wear, but don’t work for free. Never, ever.

You don’t want to work with people who would expect you to and they don’t want to work with someone who doesn’t value their abilities. No matter how new you are to photography, you are right now reading an article on a website all about photography. That says that you have enough interest to research it, and I’m willing to bet, enough skill to pull it off.

PHOTO TWO 1

Prepare Yourself

I’m pretty high energy. I inhale coffee like it’s air and have to constantly remember to slow down when I talk. And walk. And drive. (Though that one probably doesn’t have much to do with caffeine.) Even so nothing lays me out like shooting a wedding. I don’t care if I have two assistants and the kindest, easiest, and most photogenic couple on the planet; it’s still exhausting.

Plan nothing the day before, and nothing the day after. The night before, sleep like it’s your job. Ice your eyeballs. If you’re into that kind of thing. You will likely be carrying twice as much equipment as normal, working five times as long, and running around like a toddler that mistook Red Bull for apple juice. No matter if you accepted actual compensation for this job or not—you owe yourself and the resulting images the best possible set-up. Day of, that set-up is comfortable shoes, a shirt that gives you renewed faith in human kind, and your lucky underwear. Or whatever. 

PHOTO THREE 1

Have a plan…..and Faith

Most brides have been told by wedding planners, magazines, and overzealous soon-to-be mother-in-laws that they need to provide their photographer with a “shot list”. If you can avoid this upfront, do. Instead tell them that you plan on taking all the typical and expected shots you can and if they want to provide you with a short list of requested special shots that you may not think of on your own, they are welcome to. You may not know that it’s very important to the bride that all of her uncles fifth removed on her father’s side get a picture together.

But you darn well know that she wants a shot of the kiss, a shot of the wedding party, a shot of cute flower girls doing cute flower girl things, and all the other standard shots that these lists tell brides they need to ask for. If they have a few simple unusual requests, this list goes in your pocket and is all you need. Everything else will happen as it’s supposed to, when it’s supposed to, and if you worry about it, you’ll just miss the cute flower girls doing cute flower girl things.

PHOTO FOUR

Bring the Right Equipment (and it’s Not what you Think)

Pack a lunch, water, and easy to eat snacks. I’m not even kidding. I know what you are thinking right now—but they will have food there! Yes, they will. But the logistics of you and said food meeting up for a little break time rendezvous are extremely complicated. Trust me.

Also, you’ll want gum, Advil, and safety pins.

Correction: someone will want these things. It may be you. It may not be. But everyone will assume you are packing minty freshness, pain relief, and an emergency dress fix, so you may as well pleasantly surprise them.

Finally, and this may seem a bit excessive to some but I am nothing if not a bit excessive; I bring an entire change of clothes. A lesson learned after a waitress carrying a tray of full wine glasses and I collided at the very beginning of a reception. I got to spend the rest of the evening smelling like a winery and everyone else got to wonder why the photographer had already hit the free bar when they hadn’t even gotten to the front of the buffet line yet.

PHOTO FIVE 1

Do you have an Exit Buddy?

Whether you have an assistant or not, you need a friend. A go-to. A pal. A person on the inside.  A free Girl Friday, if you will. I don’t know who that person is. Right now, you don’t know who that person is. But it will be obvious who it’s supposed to be and you will find them early on. And you will latch on to them in a way that will have you trading BFF necklace halves by the end of the night.

This person is going to explain who is who to you. Help you out when cousin Johnny is begging for your number and you still have 3 hours of dodging him while trying to remain professional.

This person knows who is giving the toast, every bridesmaid’s name, and will happily fetch you bouquets when you have everything set-up for the perfect shot but everyone forgot their bouquets in the bathroom. It’s a bridesmaid, an aunt, an unofficial wedding planner, a step-sister, or maybe just a knowledgeable family member that is only there for the free food.

And to help you, it turns out.

Post originally from: Digital Photography Tips.

Check out our more Photography Tips at Photography Tips for Beginners, Portrait Photography Tips and Wedding Photography Tips.

So You’re Going to Shoot A Wedding: Part 1 of 3 [Preparation]


Digital Photography School

 
Comments Off on So You’re Going to Shoot A Wedding: Part 1 of 3 [Preparation]

Posted in Photography


Vivian Maier – The Secret Nanny Street Photographer: BBC Documentary Part 1

02 Jul

We’ve posted about the remarkable story of Vivian Maier in the past here on dPS. Vivian was a nanny who worked in a number of families – none of which knew she had a secret life of a street photographer.

Over the years she took over 100,000 images between the late 1940′s through to the 1990s – showing them to nobody but storing them in a storage locker which was only discovered after her death when the contents were auctioned without really knowing what treasure was in the negatives and slides in it.

Her images have now been catalogued and a documentary is being made by the owner of the photographs after a kickstarted project.

This week the BBC released part 1 of a documentary on Vivians story. Part 2 shouldn’t be too far off but in the mean time – grab a drink and settle down to watch Vivians story.

Post originally from: Digital Photography Tips.

Check out our more Photography Tips at Photography Tips for Beginners, Portrait Photography Tips and Wedding Photography Tips.

Vivian Maier – The Secret Nanny Street Photographer: BBC Documentary Part 1


Digital Photography School

 
Comments Off on Vivian Maier – The Secret Nanny Street Photographer: BBC Documentary Part 1

Posted in Photography


Take Part in the dPS Reader Survey and Go in the Draw to Win $1000 For New Camera Gear

01 Jul

Our goal here at dPS is to constantly be improving our site to make it more useful to our growing readership. As part of that we’ll be rolling out a brand new dPS design (including a new Mobile design) in the coming weeks – but we don’t want to stop at that!

As part of our efforts to make dPS more useful to you we’d love you to take 5 minutes to complete a quick reader survey that we’ve put together.

As a little bonus incentive to participate we’re also going to give a prize of $ 1000 towards new camera gear, software or even a computer to one respondent who completes the survey before midnight on July 12 (US Eastern time)!

Participate in this reader survey here.

Your Privacy is Assured: While we ask for your email address in the survey in order to know who to send the prize to if you win we do not tie your responses to that email address and will never share your email address with any third party or use it for any other purpose than to notify you if you win the prize.

Thanks for helping us to keep improving dPS. Keep an eye open for a brand new dPS design in the coming weeks.

Post originally from: Digital Photography Tips.

Check out our more Photography Tips at Photography Tips for Beginners, Portrait Photography Tips and Wedding Photography Tips.

Take Part in the dPS Reader Survey and Go in the Draw to Win $ 1000 For New Camera Gear


Digital Photography School

 
Comments Off on Take Part in the dPS Reader Survey and Go in the Draw to Win $1000 For New Camera Gear

Posted in Photography


Posing Guide for Photographing Women: 7 More Poses to Get You 21 Different Photos [Part II]

21 Jun

A post by Kaspars Grinvalds from Posing App.

If you haven’t read the first article in this series, I would kindly recommend you to start with Posing Guide for Photographing Women: 7 Poses to Get You 21 Different Photos – Part I where we started with 7 standing poses.

Let’s continue this time with 7 sitting poses for female subjects and their possible variations in order to get at least three different shots for each pose.

Pose 1

Pose1

Nice and simple pose to start with. Ask your model to sit comfortably with knees placed together. One hand relaxed on the knees while the other hand placed near the neck. And remind her to straighten the spine.

7poses2 1

Photo 1 – This basic starting point provides you with many different choices to continue with. But in the very beginning you may want to just test different shooting angles and heights and check what works best for your model.

Photo 2 – After I got the first shot similar to the sample, I asked the model to lower both arms and rest them on the knees.

Photo 3 – And finally I returned to the initial pose and took a close-up portrait shot.

Pose 2

Pose2

Another easy pose with hands placed together between the legs. Notice that arms should not be completely straightened, rather slightly bend at the elbows. Also in the sample pose it is illustrated that toes should be straightened in order to raise the knees slightly up.

7poses2 2

Photo 4 – The model easily recreated the sample pose and we could move on with some variations.

Photo 5 – This shot is exactly the same pose just taken from a side. Minor change but already different result.

Photo 6 – And again one more close-up portrait shot but this time the model is looking down her own body.

Pose 3

Pose3

Another very simple pose with one leg crossed over the other. And I have to say here that including the legs in the frame can be challenging because it doesn’t work with all body types. If your model is curvy, consider framing closer comps (for example as in photos with the previous pose).

7poses2 3

Photo 7 – My model was with slim body type, nice legs and stylish shoes, so I chose to go for a full height frame.

Photo 8 – In exactly the same manner as with the previous sample I simply took this shot from a different angle. The model didn’t change anything, just turned her head to the camera.

Photo 9 – After that we repeated the already tested posture with one hand close to the neck. This hand movement is a very nice variation and works in many posing scenarios.

Pose 4

Pose4

This pose however is even more demanding than the previous one because it is all about the legs and thus there is no point of cropping them out. And nice shoes are a must.

7poses2 4

Photo 10 – Recreating it isn’t hard as the pose is fun and creates nice and playful mood to the photo.

Photo 11 – Here the model is looking down and kind of fixes her shoe. Very subtle changes but completely different photo.

Photo 12 – And once again the same pose but taken from a side creates one more variation.

Pose 5

Pose5

Simple and easy pose for the model sitting on the ground. And to my mind, in contrast to the previous on the chair poses, sitting on the ground works better barefoot.

7poses2 5

Photo 13 – The pose is kind of very natural and is easy to recreate. And as a result the model looks really relaxed.

Photo 14 – After recreating the initial pose, different hand placement options are available. Here for example the model raised them and connected on the knee.

Photo 15 – Only two minor adjustments to the initial pose were made here. Putting one hand up in the hair and slightly curving upper body part to the side. This also lowers the raised knee. The result is another friendly and natural looking pose.

Pose 6

Pose6

Another easy sitting on the ground pose. Very suitable for different close-up portrait shots.

7poses2 6

Photo 16 – While sitting in the initial pose try making two different versions with only the front arm and then with both arms raised on the knees. Both versions works well.

Photo 17 – A slight hand placement variation. This variation works very well for tight crops.

Photo 18 – And don’t be afraid to be spontaneous from time to time. This photo was just an improvisation on the go while sitting in the initial pose.

Pose 7

Pose7

And finally I purposely chose also one simple portrait pose for the sitting samples. Despite the fact that only face is visible in the frame, it’s more comfortable for the model to recreate it while being seated.

7poses2 7

Photo 19 – Here I tried to illustrate the previous statement and showed the sitting position. You may visualize how it would work cropped only around the face.

Photo 20 – Keeping the “portrait with hands around the face” concept in mind, try different variations by moving hands around and making different head tilts.

Photo 21 – In order to achieve the most natural postures in the image ask the model to really move hands around. In this particular example she moved her hand through her hair and I made several shots and afterwards chose the best hand position.

So, this was a process of using 7 sample poses as the starting point to create 21 different photos. I encourage you to try this approach to posing your subjects in a similar workflow and most probably you will find your own and even better ways to achieve some great results.

All of these illustrations and many more posing samples are available on Posing App for your mobile devices.

Kaspars Grinvalds is a photographer working and living in Riga, Latvia. He is the author of Posing App where more poses and tips about people photography are available.

Post originally from: Digital Photography Tips.

Check out our more Photography Tips at Photography Tips for Beginners, Portrait Photography Tips and Wedding Photography Tips.

Posing Guide for Photographing Women: 7 More Poses to Get You 21 Different Photos [Part II]


Digital Photography School

 
Comments Off on Posing Guide for Photographing Women: 7 More Poses to Get You 21 Different Photos [Part II]

Posted in Photography


10 June, 2013 – Vision Part 3

10 Jun

We have just published Alain Briot’s latest essay, Vision and The Artists Statement – Part 3.


I returned from Western Australia yesterday after two days of almost continious travel. Whew. Four airports, five movies, two novels, and at least a half dozen indescribable airplane meals. But, no delays, no lost bags, and no drama, so lot’s to be thankful for.

Kevin is still there, taking care of winding things up, and shipping all the Phase gear back to Denmark. He’ll be home by Thursday.


Adobe started shipping Lightroom 5 today. We filmed our Lightroom 5 Tutorial Update a few weeks ago and it is now in the final editing stages. It will be ready shortly and will have compehensive tutorials on all of the new features in LR5.

Watch for a special promotional price soon.


 "Yes I downloaded the videos. THEY ARE AWESOME!!! 
I learned so much I 
think my brain is going to explode.


The Luminous Landscape – What’s New

 
Comments Off on 10 June, 2013 – Vision Part 3

Posted in News


Software technique: Photoshop Gradient Tool: Part 2 – Adjusting Images

27 May

CompositeWithAdjustments_2.jpg

In the second, concluding article of his 2-part tutorial explaining Photoshop’s Gradient tool, Jean Miele explains how to use linear, reflected and radial gradients in layer masks to improve your digital photographs. In this article Jean takes us through four clear, easy steps, and also includes more tips for making the most out of gradients in both Photoshop and Lightroom. Click through for links to the article. 

News: Digital Photography Review (dpreview.com)

 
Comments Off on Software technique: Photoshop Gradient Tool: Part 2 – Adjusting Images

Posted in Uncategorized