RSS
 

Posts Tagged ‘Natural’

Natural Style Newborn Photos: The Way I Like to Remember Them

03 Feb

246

Why natural lifestyle newborn photography?

There are lots of different styles of photography when it comes to capturing a newborn baby. Some people love to use lots of props, and introduce many fun things into every photo. Some are experts at posing the baby in unique and whimsical positions.

Although I can appreciate all the different styles, I prefer to capture a newborn baby the way that I remember my three newborns. My kids are almost all grown up now, and it’s hard to remember exactly what they were like when they were brand new. Every once in awhile, I have sweet memories of how they were once upon a time. The sweet smell of a newborn’s head. The skinny knees stretching out. The reflex grasp of those tiny fingers. The perfect little toes and wrinkly feet. The million different expressions that could keep me entertained for hours. The soft cheek, and even the peeling skin that inevitably showed up for a little while.

These are the things I remember. These are the memories I cherish. These are the moments I try to preserve with my camera with natural newborn photos.

187

Keep it real

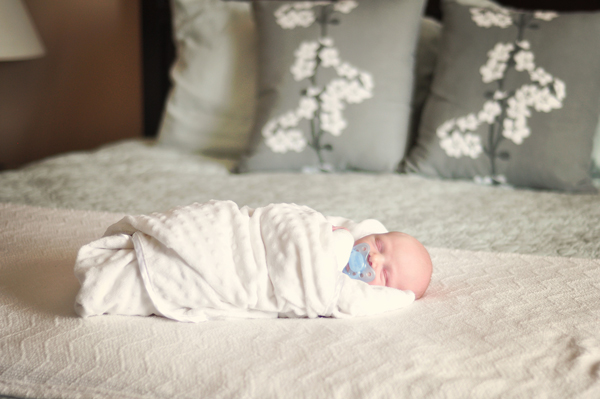
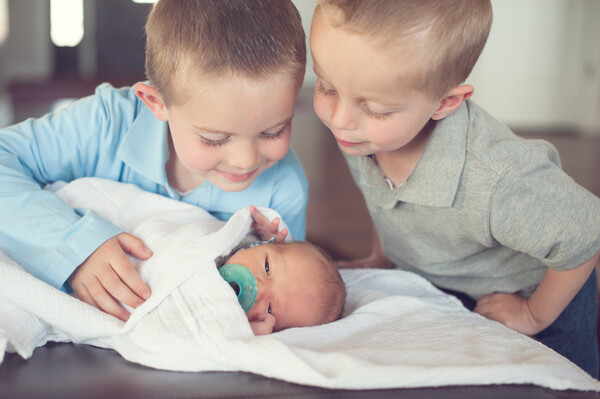
One of the wonderful things about photographing babies more naturally, is that you can let so many ideas of perfection go. If your baby loves a pacifier, photograph him with a pacifier. If she’s having a fussy day, grab a few crying photos. It’s okay, because it’s life. Real life. We’re not trying to create an illusion that the baby is something other than who he is, that very moment.

Be patient and flexible when photographing newborns, and leave lots of time to stop for feeding, burping, or changing a diaper. If your goal is to just capture baby as she is, you don’t have to be as worried about getting a whole session in within the two week old time period. It’s okay if baby isn’t quite as moldable if you aren’t trying to mold them into anything in particular. Since we’re just keeping it real, you can be more relaxed. Shoot another day if the first day you try just doesn’t work out. Also, you don’t have to stress out about keeping the baby sleepy the whole time. If he’s asleep, photograph him that way. If she’s wide awake, capture those eyes. It doesn’t matter.

167

Get the details

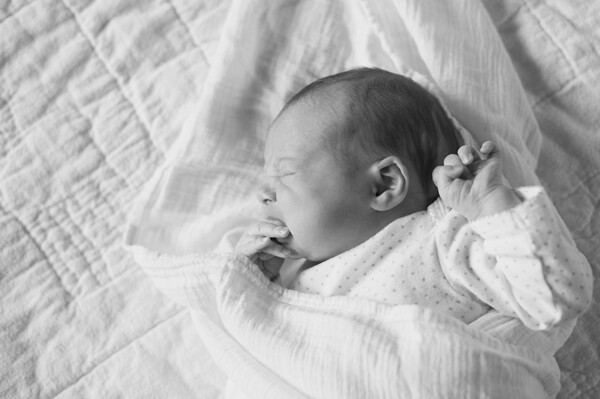
I love to photograph little details. I can’t hold a newborn without pulling her socks off to have a peek at her feet. That means that I can’t photograph a newborn without getting a few shots of those perfect little baby feet, either. Find the little details you love, and capture them. Feet, hands, ears, knees, hair; everything is cuter in miniature. It’s a good idea to capture hands and feet with mom or dad’s hands holding them too, because it will help the parents remember exactly how small they were.

Don’t wait for a perfect expression. Those wrinkly foreheads, big yawns, hungry mouths, pouty lips, and even those sad cries can be perfect photo opportunities. Baby faces are fascinating!

171

Shoot wide open

I like to use a pretty wide aperture when I photograph these details. If you can shoot at around f/2, give or take, those details will be the star of the photo. You won’t be distracted by other things, and the part you want to highlight will look especially sharp. Shooting wide open is a good idea when you are capturing other newborn moments, like baby’s bath, putting socks or a hat on, swaddling, or anything that you want the focus to be on or a particular action.

Be careful when you are shooting with a depth of field this shallow that your focus is EXACTLY where you want it, and that you don’t move after you lock in your focus. A slight movement from you or the baby could put your photo completely out of focus, and ruin what you are trying to achieve.

For more help shooting indoors with a wide aperture, you can read my article on Indoor Portraits Using Natural Light.

180bw

Capture baby’s world

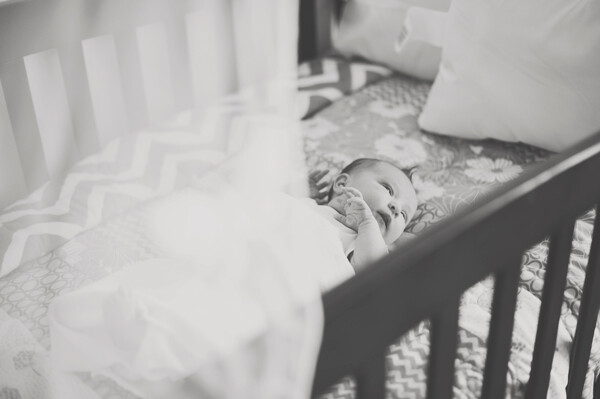
You might want to get some photos of your sweet newborn in her carefully decorated crib or nursery. If there’s a rocking chair that he loves to be held in, photograph mom or dad rocking the baby. One of my favorite memories with my babies was getting them out of their crib in the morning, or after nap time. They always seemed so happy to see me, and they looked so sweet and small in those big cribs. I wish I had photos to help me remember those times in better detail. Think of baby’s little world, and photograph him in the places he spends a lot of time in.

You could also take photos of the little things that are part of life with a baby, without the baby in the photo. Stacks of diapers, rubber ducks, teeny shoes, bottles, pacifiers, etc. can be photographed to remember what life was like when your house was overtaken by baby things.

169

Show the love

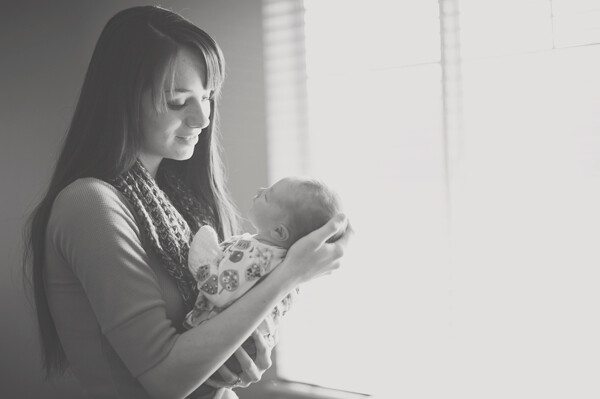
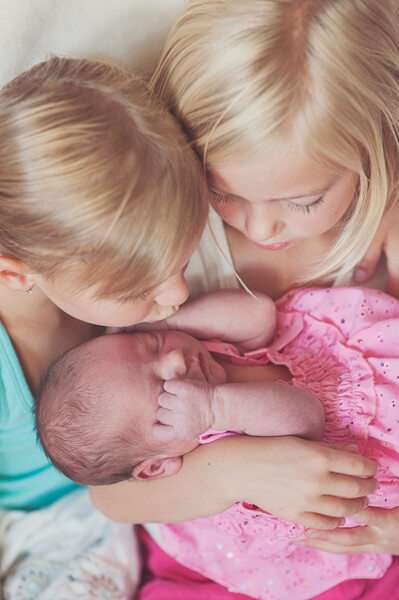
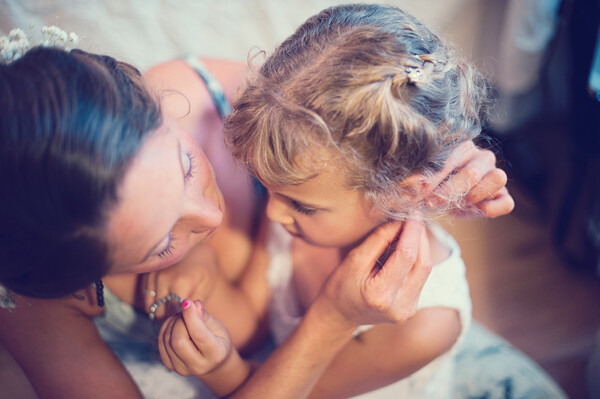
Don’t forget to capture how the rest of the family feels about the new baby. Photograph sister’s look of adoration. Photograph brother’s fascination with baby’s little toes. Photograph mom’s absolute love for her tiny new being. Photograph dad’s proud protectiveness, and contrasting rough, big hands.

177

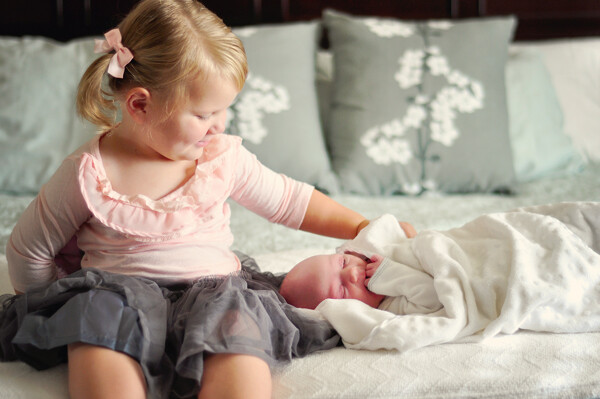
Sometimes the relationships the family has with the new baby are my very favorite thing to photograph. The love and bonding that happens so quickly with a new baby in the house is an amazing thing, and those special moments are so important to preserve.

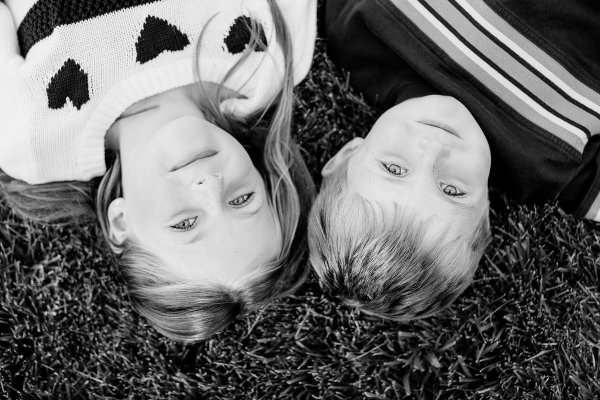
Be careful with young siblings that you keep the newborn safe as you are photographing them. You can capture their natural reactions to the baby while still keeping the baby safe. Let them sit near their little brother or sister if they’re too young to hold the baby. They can pat him, or lightly kiss him on the head. If you have a young child hold the baby, make sure someone is standing right outside the frame to take the baby as soon as little sister is “done”, because sometimes that can happen very suddenly.

188bw

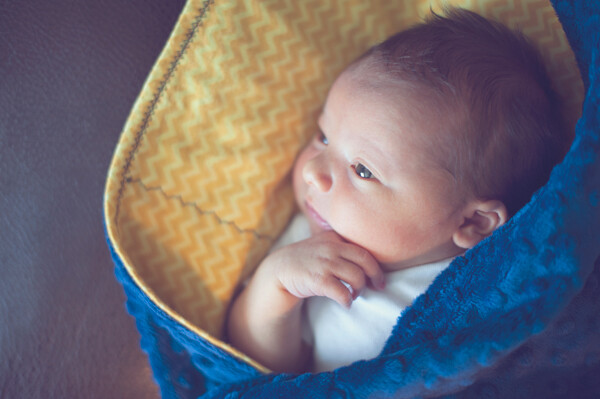
If you’ve always thought that baby photos had to be perfectly posed and creatively propped, give lifestyle newborn photography a chance. Try photographing a new baby swaddled in a blanket. See if you can capture a bunch of funny expressions, or capture “a day in the life” of the newborn. You may decide that these natural, real life photos are your favorite after all.

googletag.cmd.push(function() {
tablet_slots.push( googletag.defineSlot( “/1005424/_dPSv4_tab-all-article-bottom_(300×250)”, [300, 250], “pb-ad-78623” ).addService( googletag.pubads() ) ); } );

googletag.cmd.push(function() {
mobile_slots.push( googletag.defineSlot( “/1005424/_dPSv4_mob-all-article-bottom_(300×250)”, [300, 250], “pb-ad-78158” ).addService( googletag.pubads() ) ); } );

The post Natural Style Newborn Photos: The Way I Like to Remember Them by Melinda Smith appeared first on Digital Photography School.


Digital Photography School

 
Comments Off on Natural Style Newborn Photos: The Way I Like to Remember Them

Posted in Photography


Restaurant Menu Food Photography Using Natural Light

22 Dec

There are many ways to approach food and drink photography, from big budget shoots with food stylists and complicated lighting setups, to low budget natural lighting setups. For a formal restaurant photo shoot, which setup would you choose? I’ve had successes doing both types of photo shoots, but in this particular example, I’ll show you super low budget ways to pull off professional, tasty-looking food photos appropriate for a menu.

restaurant photography tutorial natural lighting

Client Brief

Based in Seattle, this client is an American restaurant going in a new direction with the hiring of a new chef and his decision to revamp the menu into one with distinctive Southern and Creole flavor.  This client reached out in need of 10-20 menu photos for use in their press release announcing the rebranding efforts. I had photographed their interiors previously and knew that the multi-room restaurant and bar was vintage themed with diverse backgrounds, patterns, and lighting schemes throughout the restaurant. Based on the budgeted resources for this shoot, I decided against making it a big production with a food stylist and opted for a low budget approach.

Planned Setup

Initially, I planned a simple lighting setup using a Canon 580 EX-II Speedlite, a shoot-through umbrella, Pocket Wizards, and a compact Manfrotto 5001B Nano light stand. This is my favorite relatively compact and affordable lighting setup for everything from quick portraits to food and drink photography. However, I realized when I got onsite that I was missing a crucial piece of my setup: the flash and umbrella mounting adapter, meaning I had no way of connecting my flash and umbrella to the lighting stand. Oops…time to improvise!

Actual Setup

Since I had photographed the interiors of the venue before and knew that there were two areas that had copious natural lighting: the bar area near the front entrance with huge floor to ceiling windows, and a large room with glass panels for a ceiling. Luckily, it was a typical cloudy day in Seattle, so there was nice diffused natural light flowing through the ceiling, making these two areas the perfect spot for food and drink photography without any flash or external lighting.

In terms of gear, I shot all of these photos with a Canon 6D camera and a 24-70mm f/2.8 lens. I also used the 580 EXII Speedlite on occasion when I needed some fill light.

Composing and Shooting

I photograph a lot of restaurant interiors and as a result I’ve learned that there is a lot of thought and strategy that goes into the design of the space. As a result, I like to find distinct elements of the restaurant to fuse into the food photos that I create. This does two things: 1) it highlights unique features that a designer or architect spent a lot of time working on, and 2) incorporating aspects unique to the restaurant places the dishes in different atmospheres, thus creating more diverse imagery.

Photos at the Bar

Cocktail photography

I started off with two appetizer and cocktail dishes, photographing them at the bar that was naturally lit by the huge floor to ceiling window. The white granite bar top was a nice contrast to the warm colors of the food and drinks. I shot this first image at f/4 to keep the main elements of the glass and bowl of nuts mostly in focus. The first few shots looked like they were missing some depth, so on a whim I moved the pairing in front of a bowl of citrus fruits placed at the bar. The color and placement of the fruits ended up being nice complimenting elements, contributing to the image below.

restaurant photography tutorial natural lighting

This second dish that was shot at the bar was presented on a super long wooden cutting board. It was actually too long for such a small appetizer, and I solved this problem by zooming in to the image and shooting at f/3.2 to keep the focus on the main element: the chunky shrimp remoulade topping the bread!

remoulade photography

Photos in the Dining Area

Percy's in Ballard, Seattle, WA

Another intriguing section of the restaurant that offered nice, albeit darker, lighting was the dining area. Featuring an illuminated mirror behind circular booth seats and a light colored wooden table, this was a great space to utilize for cocktail shots. This particular beverage was shot at f/2.8 to keep the glass and its elements in focus and give a nice blur of the mirror background.

FINAL-Cocktail

Photos on the Patio

FINAL-Percys 01

Finally, the bulk of the food and drink photos I shot were taken in the aforementioned covered patio area in the back. As you can see from the images below, the space has a huge glass ceiling, brick walls, long colored picnic tables, and a nicely textured wooden floor panels. All of these elements made for great textures and backgrounds for shooting each dish in a variety of settings.

Final-Kale

Salads can be a bit tricky to shoot because there can be so many competing elements to focus on. In the case of this kale salad, I chose an aperture of f/5.6 to make sure more parts of the salad were in focus other than the shredded cheese and mustard seeds.

Final-Chicken

The winning dish of them all was this epic made-from-scratch fried chicken entree with rice and beans. Again, lots of different parts of this dish competing for attention, so I used an aperture of f/8 to make sure the most important parts were clearly in focus.

Wrap Up

Overall, this photo shoot of 10 dishes, each paired with cocktails took me about two hours to photograph. I had a bit of a challenge by forgetting one key piece of my lighting kit, but was able to improvise thanks to copious natural lighting and using my handy 580 EXII Speedlite. All photos received light post-processing treatment and were turned over the next day for the client.

What do you think? Is a lighting kit essential for professional food photography, or is natural lighting the way to go?

googletag.cmd.push(function() {
tablet_slots.push( googletag.defineSlot( “/1005424/_dPSv4_tab-all-article-bottom_(300×250)”, [300, 250], “pb-ad-78623” ).addService( googletag.pubads() ) ); } );

googletag.cmd.push(function() {
mobile_slots.push( googletag.defineSlot( “/1005424/_dPSv4_mob-all-article-bottom_(300×250)”, [300, 250], “pb-ad-78158” ).addService( googletag.pubads() ) ); } );

The post Restaurant Menu Food Photography Using Natural Light by Suzi Pratt appeared first on Digital Photography School.


Digital Photography School

 
Comments Off on Restaurant Menu Food Photography Using Natural Light

Posted in Photography


Deal 5: Your Guide to Natural Light Photography for $7 (65% off)

17 Dec

On the 5th day of Christmas dPS gave to me… another amazing $ 7 eBook and bundle option!

Yesterday saw our servers pushed to their limit with a $ 7 USD eBook deal so today we’ve decided to roll our best selling eBooks of all time at that sweet price of… $ 7.

That eBook is…

Natural Light: Mastering a Photographer’s Most Powerful Tool by renowned travel photographer Mitchell Kanashkevich.

NewImage

Natural Light is one of the best guides on the market written specifically with beginner to intermediate photographers in mind. Written in easy to understand language, this eBook will certainly help you improve the quality of your photographs… using nature’s free gift to photographers – sunlight!

Today it is yours for just $ 7 – 65% off!

Bundle Mitchell’s 3 Ebooks for $ 19

Want more? Mitchell has written 3 great eBooks for dPS so today if you’d like to explore his full library you can pick up them all for just $ 19 USD.

Mitchell bundle

The bundle includes:

  1. Natural Light: Mastering a Photographers Most Powerful Tool
  2. Transcending Travel: a Guide to Captivating Travel Photography
  3. Captivating Color: A Guide to Dramatic Color Photography
  4. Mitchell’s eBooks are perfect for the beginner just starting out or a more intermediate photographer looking for a refresher. They are beautifully illustrated and full of great practical advice.

    As with all of our eBooks they come with a 60 day money back satisfaction guarantee.

    These 3 eBooks have a RRP of $ 60 but today they’re available for $ 19 (68% off).

    As with all our deals – this one lasts just 24 hours. Grab this one here today.

googletag.cmd.push(function() {
tablet_slots.push( googletag.defineSlot( “/1005424/_dPSv4_tab-all-article-bottom_(300×250)”, [300, 250], “pb-ad-78623” ).addService( googletag.pubads() ) ); } );

googletag.cmd.push(function() {
mobile_slots.push( googletag.defineSlot( “/1005424/_dPSv4_mob-all-article-bottom_(300×250)”, [300, 250], “pb-ad-78158” ).addService( googletag.pubads() ) ); } );

The post Deal 5: Your Guide to Natural Light Photography for $ 7 (65% off) by Darren Rowse appeared first on Digital Photography School.


Digital Photography School

 
Comments Off on Deal 5: Your Guide to Natural Light Photography for $7 (65% off)

Posted in Photography


Go Au Naturel: Shooting Portrait in Natural Light

08 Dec

When I first bought my little Canon AE1 back in 1993 and started shooting, I couldn’t afford a flash. I shot everything in natural light, and I think I made every mistake known to mankind, so for those who would like to learn from my mistakes, this one’s for you!! Backlight When I was a little girl, my mother would Continue Reading

The post Go Au Naturel: Shooting Portrait in Natural Light appeared first on Photodoto.


Photodoto

 
Comments Off on Go Au Naturel: Shooting Portrait in Natural Light

Posted in Photography


5 Tips to Help You Take More Natural Looking Portraits

05 Dec

Writing for dPS has afforded me several opportunities, the best one being getting to converse with photographers – hobbyists to professionals and everything in between – from all over the world.

lynseymattingly3

Each time an article I write is published, I get the loveliest emails and comments, and I do my very best to respond to each of them. The question I get most often is one I ask other photographers all the time: How do you make your pictures look like……..that? The question may be worded differently, but ultimately it is the same:

  • How do you get your colors to pop?
  • What lens do you use?
  • How come the people all look so happy/comfortable/natural in your pictures?
  • What’s your editing process?

When we ask another photographer these questions, we are all asking the same thing: How do you make your pictures look like that?

When an image grabs you – makes you take an extra second to look at, to admire it, or to wonder if your own images look that great, (or throws you into a jealous rage over picture envy (please tell me I’m not the only one) – it’s as though the photographer has such a defined style, their entire message comes across in that one photo staring back at you. Since my style is candid portraiture, or lifestyle photography, or whatever the latest buzzword is we are calling it now, my subjects’ expressions and poses are what I typically get asked about most. Or maybe that’s just the only part I can explain very well, as the science and equipment piece of it is just not my cup of tea.

lynseymattingly8

So here are the five things I say and do during a portrait shoot that I feel make the biggest difference in the comfort level of my clients, and ultimately is the reason I occasionally strike gold. It’s these things that are the answer to how I make my pictures look like that.

#1 Explain the process

Before I take a single picture – whether my subjects are nine or 90 years old – I tell them exactly what to expect from the session, and what I expect from them. It nearly always goes like this: “I’m going to take some pictures. I’m going to take some pictures of just the kids, some pictures of just Mom and Dad, and some pictures of everybody. You can smile if you want to smile, but you don’t have to if you don’t want to, and at the end I’m going to give you a little prize.” This short little introduction often immediately puts my clients at ease and I am able to set the tone of the whole shoot based on their response.

lynseymattingly6

If I am photographing kids, I always sit down on the ground so I am closer to their level, but I say this exact thing to children and adults alike. Yes, I carry around lollipops. My gear bag has an entire area just for that, and people I have photographed before know it. A lollipop is a tiny treat and while it’s fun and funny, though not usually a huge motivator for teenagers and certain adults, you’d be surprised how far it gets me. Obviously for most, it’s not the prize itself, but rather that I am acknowledging that this is going to be a bit of work, and it’s going to have an end point. It’s an offering to them, silently asking for them to go all-in for photos and perhaps have a little patience with me.

Also important is that I tell them they don’t have to smile. I don’t want anyone smiling because they think they have to – smiles out of obligation makes for terrible pictures. I want them to smile because we are having so much fun, they do it instinctively.

lynseymattingly1

#2 Strive for interaction and reactions, not poses and smiles

If I have to choose between a picture of every face looking at me, smiling, or one of a family looking and laughing at each other, I will chose the latter every day and twice on Sunday. It is my personal and professional belief that 50 years from now, those images of people being themselves with their loved ones will be much more treasured than portrait studio shots that only show everyone together. I do my best to set-up a moment and let my subjects take it where they want. I can’t declare their reaction to something, so therefore I set the tone for funny or serious, or as I would say to a child: a loud picture or a quiet picture. I see myself as a third wheel on a great date – I’m along for the ride, I just happen to be photographing it.

lynseymattingly5

#3 Shoot everything

I am a massive over-shooter. I carry more memory to a quick portrait shoot than some photographers would pack for a day-long wedding. Changing a card mid-shoot is completely normal for me. This no doubt adds to the backend of my process, as I have so much more to sort through, but this means I can feel confident enough to guarantee my clients a minimum number of images. This also means, I very rarely have a client ask: “Did you get it?”.

I shoot looking through the viewfinder, and not. I line up the shot and then peek my head out so my subjects aren’t just staring at a black box. I make funny faces. I have a fake sneeze that can get even the most serious of baby giggling and that requires several sneezes, shots, and me not having a camera affixed to my face. I shoot an average ratio of one to 30. Meaning for every 30 images I shoot, one of them will get edited and delivered to the clients.

This would be terrible if I shot film. To be honest sometimes it’s a little overwhelming the first time I upload all of the images from a shoot. Often it’s even a lesson in self-loathing, wondering how on earth I will ever get through them, and why do I do this to myself every – single – time. In the end, it always works out. Plus, I always have the images I was hoping I caught.

lynseymattingly9

#4 Be a giant cheerleader during a shoot

I am a giant cheerleader during a shoot, to the point that it’s a bit eye-roll-inducing. If it’s dark and gloomy out, I show-up saying this is what we call perfect, even, light! If it’s bright and sunny, and miserably hot? What a perfect day for photos!

Every single thing my clients do during a photo session is perfect and if it’s not, I tell them I’m going to fix it. I want my clients on the other side of that lens to feel beautiful, and like they are doing a perfect job. Having them feel awkward, or be in poses or positions that feel unflattering, will make for bad pictures. Being told that they are doing a great job and that the pictures are coming out perfectly, gives clients the confidence to be themselves. I’m their friend during a shoot – kids and adults alike. And if I’m not behaving in a way that people would want to hang-out with me when I am not taking photos, why would they want to hang-out with me when I am?

lynseymattingly7

#5 Know you are just a piece of the process

I don’t want to get all cheesy on you or anything, but I don’t feel like any picture I have taken of someone is mine. The photo belongs to the person in it, and whomever they chose to share it with. I don’t do any printing. When someone pays for a photography session with me, they get the high resolution images as jpg files, and a release to print and use them as they would like. I honestly feel like this creates a comfort level that I didn’t see when I used to offer prints only. They know they are going to get the best of what I shoot and they aren’t going to have to pick a favorite for an expensive enlargement. They know there isn’t going to be a hard sale in a few weeks where we look at everything together. I don’t put watermarks on my images ever and I encourage them to share their pictures on social media. In fact, I often share their pictures on social media.

lynseymattingly2

Here’s why: if they didn’t hire me, show-up, look great, have fun, etc., I wouldn’t have the pictures to show in the first place. I’m only a piece of any picture I’ve ever taken. You may argue, what if someone steals your images? To do what? Claim them as their own? I have never run into a situation where that would truly hurt me. If there is a wild rampage of stealing other photographer’s images out there and mine are being stolen, I would honestly be a little flattered. That means they’re good! I’ve already been paid for my work. Though I would never use an image where my client hasn’t signed a release allowing my use, I don’t see how getting my images out there is anything but free advertising. I want my clients to love their photos so much they print them all in large sizes to hang up for their friends to see. I want them to talk about how fun the shoot was, how happy they are to get all of the images, and how they will hire me again and again. Those people know who took the pictures, and that’s all that really matters.

How do you help clients feel comfortable during a photo shoot? Share your comments and suggestions with us below.

googletag.cmd.push(function() {
mobile_slots.push( googletag.defineSlot( “/1005424/_dPSv4_mob-all-article-bottom_(300×250)”, [300, 250], “pb-ad-78158” ).addService( googletag.pubads() ) );
} );

The post 5 Tips to Help You Take More Natural Looking Portraits by Lynsey Mattingly appeared first on Digital Photography School.


Digital Photography School

 
Comments Off on 5 Tips to Help You Take More Natural Looking Portraits

Posted in Photography


Natural History Museum announces Wildlife Photographer of the Year 2014 winners

25 Oct

The Natural History Museum has announced winners of its 2014 Wildlife Photographer of the Year competition. This year’s winning photos document all manner of creatures, from a pride of lions in the Serengeti, to a yellow scorpion in the northeast of Spain. The competition recognizes both adult and youth winners and awards the top photo with £10,000 and a trophy. See gallery

Articles: Digital Photography Review (dpreview.com)

 
Comments Off on Natural History Museum announces Wildlife Photographer of the Year 2014 winners

Posted in Uncategorized


5 Tips for Photography Using Natural Light Indoors

14 Oct

Indoor Portraits Using Backlight Window Light

You would probably love to have ideal lighting conditions for every shoot, especially if you are strictly an outdoor, natural light photographer. However there are many situations when the lighting is not ideal. Think winter, rain or even harsh midday sun. Sometimes you are stuck indoors, or your client wants to have a photoshoot inside their home. When used correctly, natural light indoors can be just as pleasing as outdoor lighting and can also provide opportunity for some creative portraiture with contrast, shadows, and drama. Here are some tips to get the most out of your photography using natural light shoot.

#1 Know your environment and know the light

Like any situation, do your research before you start photographing indoors. Many times the direction of the house, the position of the windows, along with the time of year plays an important part in the amount of light coming through. Is your house North-South facing or East-West? What are sunrise and sunset times where you live, or where you are going to be photographing? Does the room have a sunroof that lets in additional light? Light also changes depending on the time of day.  As light changes, so does the color of light. This directly affect the white balance (WB) of the image. If your camera has the ability to shoot in RAW use it, as white balance can then be adjusted in post-processing. If you really want to get it right in camera, experiment with the Kelvin scale.

When planning a shoot in your home, take several shots the day before to analyze what time is best for the light.  Sometimes this is not possible especially if you are going to a client’s home or photographing a venue. But this is where a little prep work goes a long way. Don’t be afraid to ask these questions or even google the venue to check it out online.

Indoor Portraits Using Window Light From the Side Angle Memorable Jaunts

#2 Know how to use window light to your advantage

One of the best sources of natural light indoors are windows. Learn how to use them to your advantage. In general, the closer you are to the window, the more light you will have to use and work with. Where you place your subject in relation to the window light will affect the image dramatically. There are three different scenarios for using window light:

  • Sidelight with the window: Here the subject is parallel or at a slight angle, to the window. Depending on the time of day and amount of light, this may yield images that have more contrast especially with midday sun streaming through the window.
  • Backlit by the window: Here the subject is sitting with their back to the window facing the photographer. You will need to meter for the subject and blowout the highlights to properly expose the image for the person. The other option is to expose for the highlights, as in the window and get an indoor silhouette. You can also use a reflector to pop light back onto the subject’s face.
  • Front lit by the window: Here the subject is directly facing the window, you are between the window and your subject. This type of lighting position produces the most even light of all the three.

Indoor Portraits Using Window Light From a Back Angle Memorable Jaunts

Indoor Portraits Using Window Light From the Front Angle Memorable Jaunts

#3 Know your settings and equipment

Remember your exposure triangle; the relationship between ISO, f-stop (aperture) and shutter speed. This plays an important role in indoor photography. Choosing a fast enough shutter speed will eliminate any camera shake if you are not using a tripod. Choosing a wide aperture (low f-stop number) will provide a shallow depth of field and blur out the background (particularly useful if there is some clutter around the house). Choosing a larger ISO provides more light; particularly useful if there isn’t much natural light coming indoors. Most of the newer DSLRs have a large range of ISO and handle high ISOs really well. Plus there are tools to help reduce noise in the image during post-processing if you want a less grainy look.

#4 Use open hallways, doors, or even the garage to emulate a situation of open shade

If for some reason you are not able to use window light to illuminate the subject (due to inaccessibility to a window ), you can use open hallways, doorways or even a garage to emulate a situation of open shade. Have the subject sit close to the edge of the doorway and face the light.

Indoor Portraits Using Open Shade From A Garage Memorable Jaunts

#5 Know when to use a reflector and a diffuser

A reflector and diffuser are great tools to use for indoor portraits. A diffuser softens the window light just like a white curtain or blinds. It is particularly useful for windows that have harsh midday sun streaming through. A reflector used in conjunction with window light, can add just the right amount of light bounce-back to dramatically improve your indoor portraits (especially for sideand backlit images).

Indoor Portraits Using Diffusers and Reflectors to bounce light back Memorable Jaunts
The next time the weather gods decide to ruin all your perfectly laid out plans to have an outdoor, natural light, photoshoot, don’t rush to reschedule your session. Try and experiment with natural light indoors and diversify your portfolio. If you want to use other forms of indoor lighting check out the article from the dPS archives on creating indoor portraits without flash.

For another dPS writer’s tips for using natural light read Melinda Smith’s Tips For Great Indoor Portraits Using Natural Light.

Do you have any other tips for using natural light indoors? Please share those and your images in the comments section.

The post 5 Tips for Photography Using Natural Light Indoors by Karthika Gupta appeared first on Digital Photography School.


Digital Photography School

 
Comments Off on 5 Tips for Photography Using Natural Light Indoors

Posted in Photography


Tips For Great Indoor Portraits Using Natural Light

05 Oct

192

You don’t have to have an amazing dedicated photography studio to get great shots indoors. Most homes have at least one or two spots that work just fine. You don’t have to have a lot of additional equipment, in fact, these tips will help you take indoor photos with just your camera and natural window light (and even incandescent light in a pinch).180

Seek the best light

Take a tour of the home you are going to shoot in to scout out the best light. I’ve done newborn sessions in a kitchen multiple times because that’s where the light was best. Often times bedrooms are little havens of sunshine as well. It might not be the room with the prettiest furniture, but that’s okay. Light is most important to me, and the other things in the room are secondary.

Eliminate clutter or simplify

Once you’ve found some nice light, do all that you can to eliminate clutter in the area you are going to shoot. Move distracting objects if possible; it’s much easier to move them before you shoot than to try to take them out later in post-processing. If you can’t avoid clutter, try getting in close to your subject.

200

Shooting in low light

Most of the time I shoot indoors with my 50mm f/1.4 lens on a full-frame body (try a 35mm lens on an APS-C or cropped sensor). It gives me enough space to get everything in the photo that I want, and gives me the ability to open the aperture wide enough to take photos in poorly lit rooms, if needed. Other lenses can work just as well, depending on what you are trying to achieve, but this is the lens that I have found has the most versatility for my indoor shooting.

You will often need to push the ISO higher if you don’t have a lot of natural light coming in. I prefer some noise, or grain, to the look of a flash, so this doesn’t bother me too much. Ideally you’ll want to shoot on days with plenty of sunlight, and a time of day when you have plenty of light indoors. This isn’t the situation to shoot in the golden hour, right before sunset. You might want to try late morning or early afternoon for more natural light.

185

Direction of light is important to create mood

When you are shooting with natural window light, pay attention to the direction the light is coming in, just as you would when shooting outdoors with the sun. You can have a beautiful hazy backlit photo, or a dimensional dramatic side-lit photo, or a flattering crisp photo lit directly from the front. Decide what mood you’d like in your photo, and also pay attention to the space you have to maneuver, and any clutter that may be in the background. 451

Mixed lighting situations

Sometimes you have to just work with what you’ve got. If you’re forced to shoot with incandescent lighting, you can still get some meaningful photos. Try not to have incandescent lighting and natural window lighting fighting to light your subject at the same time. It usually creates a crazy white balance issue, and it’s hard to make right, unless you just convert the photo to black and white. I’ll usually turn overhead lighting off, unless there is absolutely not enough light without it, or I’m shooting in a situation where I don’t have control over where the action happens.

456

Fitting it all in the shot

At times I have had to be very creative to get everything in the photo that I need to include. You can always use a wider angle lens, but that can distort things, and you might not want that look. I’ve stood on counter tops in the kitchen, on beds (watch out for ceiling fans-I’ve had a couple of close calls when I wasn’t paying attention), and wedged myself behind furniture. Anything for a good shot, right?

183

Finally

One last tip: Sometimes you may not be sure exactly where the best spot is for the lighting you’re hoping for. Don’t be afraid to experiment, and move your subject around until you’re happy with the way everything looks. If I have a newborn on a blanket, it’s a simple thing to rotate the blanket around until I like the way the light rests on his face.

Don’t be afraid to get your camera out indoors! With some practice and experimentation, you’ll find lots of ways to make great photos without any extra equipment.

171


The post Tips For Great Indoor Portraits Using Natural Light by Melinda Smith appeared first on Digital Photography School.


Digital Photography School

 
Comments Off on Tips For Great Indoor Portraits Using Natural Light

Posted in Photography


Luminosity Masks Versus HDR Software For Creating Natural Looking HDR Images

27 Aug

Jimmy’s Luminosity Masks Tutorials – Art of Digital Blending Course For Photoshop is on sale now at 15% off over at SnapnDeals. Only until September 6th, grab it now!

If you type the term ‘HDR’ into google images you’ll very quickly see why HDR photography has a bad reputation. While we all differ in our tastes, in recent years, those strongly saturated, blurry and noisy HDRs have fallen out of fashion, even amongst HDR photographers.

Pink seascape

Luminosity Masks Versus HDR Software For Creating Natural Looking HDR Images

The goal, among many, is now a clean HDR look. HDR programs are attempting to tidy up their processes to meet the needs of the demanding HDR photographer. However, a large number of photographers are beginning to take the blending process into their own hands, and produced beautifully balanced HDRs using luminosity masks, probably the cleanest alternative to HDR software.

In fact, luminosity masking has become an exciting buzz-term in the world of digital photography, and there’s good reason for that.

If you’re new to luminosity mask exposure blending, you can see a beginner’s tutorial on dPS in my previous article: Exposure Blending Using Luminosity Masks Tutorial

In this article we’ll take a look at the benefits and challenges of luminosity masks versus HDR software.

Benefits of Luminosity Masks

1. Image quality

We’ve all seen over-saturated, noisy, messy, HDR images. One guaranteed way to avoid the poor image quality we normally associate with HDR is to manually blend your exposures in Photoshop using luminosity masks.

When exposure blending with luminosity masks, you’re working only with the RAW files to restore highlights and shadows. You do not affect any other part of the image. In other words, your final blended image will be, more or less, exactly the same image quality as your RAW files.

You do not affect any colour changes, you retain absolute sharpness, you don’t flare up noise (which means you can shoot at a much higher ISO), and you will not exaggerate chromatic aberration.

This is the major reason why so many are turning to luminosity masking to create natural, balanced HDRs.

Chilean sunset

Sunset at Puerto Natales, Chile

2. Complete control over what we blend

Artists of any genre fight for complete control over their ability to express themselves. And so it is in photography. One of the problems with using HDR software is that we have very little control over the blending process.

We rely on an algorithm to choose which areas to blend with which exposures. Then we’re given some sliders to adjust. Although this gives us greater control over the process, it isn’t giving us 100% control.

Through luminosity masking, we begin with a base exposure, and we then decide for ourselves which exposures we wish to use in the blending process, and which areas we wish to adjust, and at what opacity.

The image below is a good example of how you can make very precise changes with luminosity masks.

Hong Kong Light Trails

Hong Kong Light Trails

This image is made up of 11 exposures; six of which were used for the light trails, four were used for exposure blending, and one was used as the base exposure. You can learn how to create light trails like this here: How To Add Dramatic Car Trails To Your Photos In Photoshop

Below you’ll see the RAW file used for the base exposure.

HK Light Trails

Base Exposure

The only highlights I wanted to control in the image were the street lights, and even then I still wanted them to be bright. Through bright lights like this night cityscapes are able to give off a lot of energy and dynamism.

I very gently blended in three darker exposures to gain a little bit of control in those areas, without darkening them too much. If I ran my exposures through an HDR program, all of the highlights in the image would have been affected to some degree, which is exactly what I didn’t want.

For the darker areas, I only wanted to bring back information in one area, the side building to the right, which is noticeably dark. I used an exposure two stops brighter and, with luminosity masks, I easily painted details back into this area.

#3. No more halos and fewer ghosts

Halos simply don’t exist in luminosity mask exposure blending if you’ve done it correctly.

As for ghosts, you will rarely encounter a moving object that is difficult to blend. Since you use a base exposure, which will be done for most of your images, and simply reduce specific highlights and shadows, there shouldn’t be any ghosting.

The only challenge you may have, which is also a challenge when using HDR software, is if you have moving leaves on trees, for example, between exposures. Then the blending process is a little bit trickier.

#4. Become a better photographer

Mesa arch

Mesa Arch, Before and After Exposure Blending With Luminosity Masks

In my early days I was a die hard tone mapper. I’d approach a scene and think, “this would be a cool HDR subject”. I’d fire off some brackets and take them into Photomatix when I got home. I had a predefined routine of what to do, what result I wanted, and how to get there. I had tunnel vision.

When I began exploring luminosity masks, everything changed. I began to read a scene, not as an HDR subject, but in terms of its unique beauty and mood. I started to grasp more fully the use of light in controlling mood, whereas previously I was simply relying on getting the ‘HDR effect’ each time.

Rather than shooting off a set of automatic brackets, for a complex scene I will often bracket manually, changing the aperture, ISO and shutter speed to capture different elements of the scene. Then I’ll blend in each of the elements to hopefully get the best out of that scene.

In the Hong Kong Light Trails image above, the base exposures and brighter exposures, the light trails, and the darker exposures were all shot manually with different settings to achieve different effects.

It is through using luminosity masks, and taking my imagery into my own hands, that I have pushed myself in the field to achieve more.

#5. Combine with other HDR processes

One of the beautiful things about luminosity masks is that you can combine them with other exposure blending methods to complete the blending process. 32-bit processing is becoming an interesting way of blending exposures cleanly, but we are a long way off before the process is good enough and our monitors can handle true 32-bit files.

However, we can overcome the limitations of 32-bit processing by combining it with luminosity mask exposure blending. The tutorial below will show you exactly what I mean. The video is taken directly from the Art of Digital Blending course:

Challenges with Luminosity Masks

HDR software is simpler

Luminosity masks require more patience and a steeper learning curve than HDR software. The concept takes a little bit of time to get used to, and it will certainly challenge you to re-learn a few things.

While HDR software will take all of the leg-work out of it for you, luminosity masks require you to really think about your exposures and deepen your workflow.

Luminosity Masks don’t work on every occasion

Every now and then you’ll come across an image where luminosity masks won’t create a smooth blend between exposures. This happens because there isn’t enough contrast between the areas you wish to blend and the areas you don’t wish to affect.

In which case, using 32-bit processing or HDR software would be a good alternative.

Luminosity masks work in 8-bit mode

Like all live selections in Photoshop, luminosity masks work in 8-bit mode. They don’t affect the bit depth of your image, so if you’re working at 16 bits that won’t change. But there may be a chance of posterization in some cases.

A quote from Photoshop staff on the Adobe forum claims:

“The selection mask is 8 bits, regardless of the document precision. That fact has no affect on the precision of the image.

No, it won’t change the image or cause future posterization — the image data is still the same precision as it always was.”

So while this shouldn’t be an issue, it is something to be aware of.

Hong kong the peak view

Conclusion

HDR images don’t have to be messy, garish and overdone. There are many ways to cleanly blend exposures to create a beautifully natural and balanced HDR. Having luminosity masks in your arsenal, will give your workflow a superb cutting edge, that can quite literally change your imagery over night.

It will require a little bit of extra work on your part, but often the best things in life do.

Jimmy’s Luminosity Masks Tutorials – Art of Digital Blending Course For Photoshop is on sale now at 15% off over at SnapnDeals. Only until September 6th, grab it now!

  • Getting Real with HDR – a Step by Step Tutorial for Realistic Looking HDR
  • Is the Death of HDR Photography Coming?

The post Luminosity Masks Versus HDR Software For Creating Natural Looking HDR Images by Jimmy McIntyre appeared first on Digital Photography School.


Digital Photography School

 
Comments Off on Luminosity Masks Versus HDR Software For Creating Natural Looking HDR Images

Posted in Photography


American Museum of Natural History photo archive now online

05 May

f08cfd833923561f6ee5271a56aae948.jpg

The American Museum of Natural History Research Library announced it has digitized and made available online its entire collection of more than 7,000 historical photographs. This massive archive was previously difficult to access, especially for those not in proximity to New York City. According to the Museum, its goal was to create digital representatives of the original photographs that maintained their integrity. They scanned the negatives whenever possible and scanned prints only when there were no negatives. Learn more

News: Digital Photography Review (dpreview.com)

 
Comments Off on American Museum of Natural History photo archive now online

Posted in Uncategorized