RSS
 

Posts Tagged ‘Natural’

5 Reasons for Doing Natural Light Portraits

15 Apr

Natural light portrait

With all the attention given to the art and craft of shooting portraits using flash, you could be forgiven for thinking that this is the only way to take a portrait. The truth is that while fashionable Speedlites get all the attention, there are photographers working almost entirely in natural light and creating beautiful portraits without a softbox or light stand in sight.

One of the most prolific is Eduardo Izq, a photographer based in the United States who has built an impressive portfolio of natural light portraits taken using local models and dancers. Eduardo takes natural light portraiture to an extreme, often photographing his models without make-up. He may not be creating beauty portraits in the conventional sense, but by concentrating on character he is capturing portraits that are beautiful in a deeper, more fundamental way.

Please take some time to look at Eduardo’s website, you will learn a lot from it. For another insight into his work you can also read my interview with Eduardo about his ballerina portraits.

Intrigued? Here are five more reasons why you should take some natural light portraits:

1. It teaches you about light

To get the best out of natural light you need to become an observer of light. How does the quality, and quantity, of light change where you live from hour to hour, and season to season? How is the light affected by weather and the location? To take good natural light portraits you need to work in the most flattering light, and that usually means finding the shade or going out and taking portraits at the end of the day during the golden hour and twilight (my article The Magic of Natural Light: Twilight will help). Doing so will help you appreciate the quality of light in your area. This knowledge will also help you in other areas of photography.

2. Light is linked to location

As you become more aware of light you will come to see that the quality of light is linked to location and season. When you take a portrait of somebody outside, the light provides a link between the subject and the place they are in, tying the two together. Light, location and subject are entwined: it was only possible to take a photo of that person in that place with that type of light at one particular time. It’s almost impossible to reproduce the effect afterwards – the uniqueness of the light becomes part of the image. That is something different (not necessarily better, just different) from the effect of using flash, which is easily reproduced.

Natural light portrait

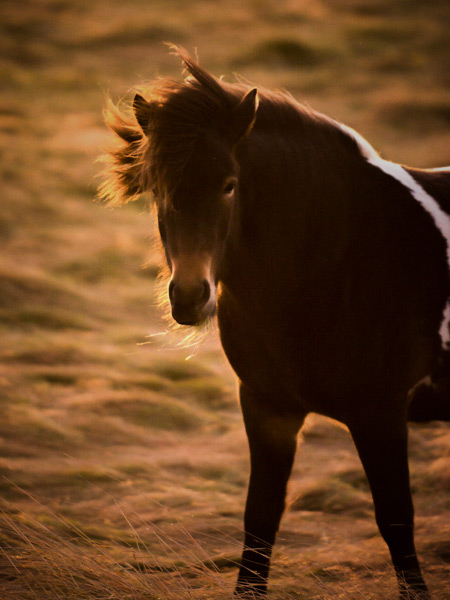
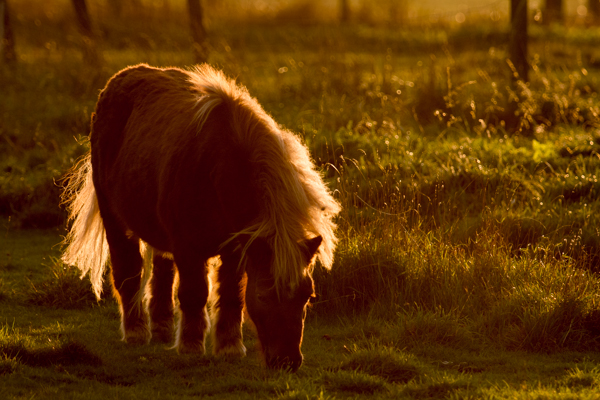
The soft light of the setting sun links the portrait of the woman with her horse to the location. Both are lit by the same light, a type of light that occurs naturally in this location in certain conditions at the right time of year.

3. Natural light is simple

Natural light portrait

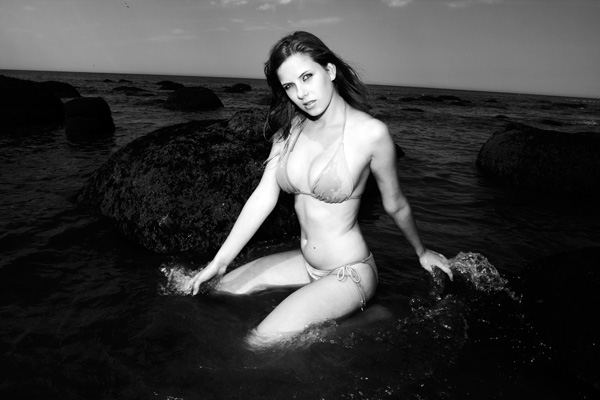
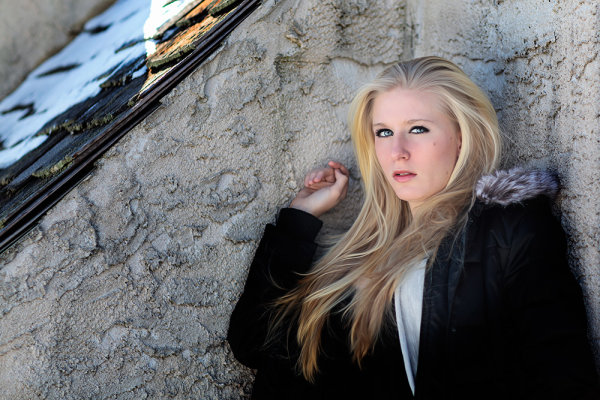
Natural light is also ideal for black and white portraits. Here the light is shaped by the archways on the right.

Flash is not complicated for everybody, but it takes time to master and that can get in the way when you are starting out. One of my friends told me a story about a portrait shoot that went wrong. She modelled for a photographer who was working outdoors, and he spent so long setting his lights up and measuring the light that the shoot never really got going. She wasn’t happy with the results and I guess neither was the photographer.

Natural light is different because it is simple. In fact, I often go on a portrait shoot with just one camera and a single lens. This simple approach to equipment lets you concentrate on composition, lighting, and building rapport with your subject. Another benefit is that it is quick and easy to move from one place to another if you don’t have much gear. It is much more difficult if you have flash because you also need to move the extra equipment.

4. Your relationship with the model is critical

The number one thing that determines the success of your portraits is your relation with your subjects. Building rapport is essential, especially if you’ve never worked with your model before. Simplifying your approach means that you have more time to concentrate on building the relationship. This is essential. Your model’s pose and expression are the prime factors that determine the success of the portrait.

A portrait shoot is a collaboration, two people working together to create a beautiful image. If you ignore your model at the expense of setting up lights, the results will suffer. It takes real skill to be able to set up your lights quickly and effectively, while building a relationship with your subject. That can come later. If you start off with natural light, it gives you time to learn how to build rapport, and you can introduce flash at a later stage. Master one skill at a time.

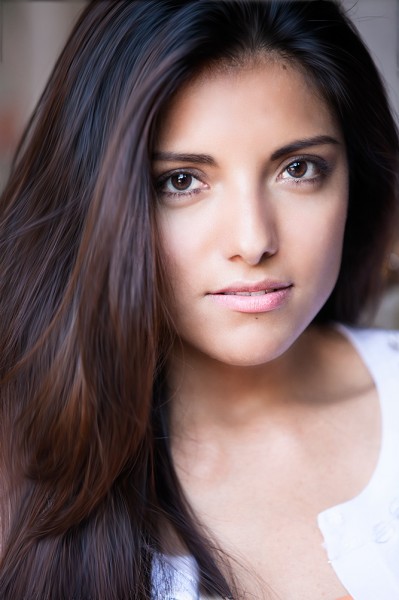
5. Natural light is beautiful

Natural light portrait

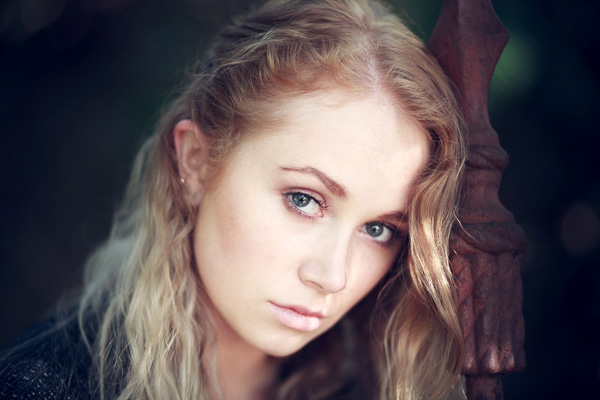
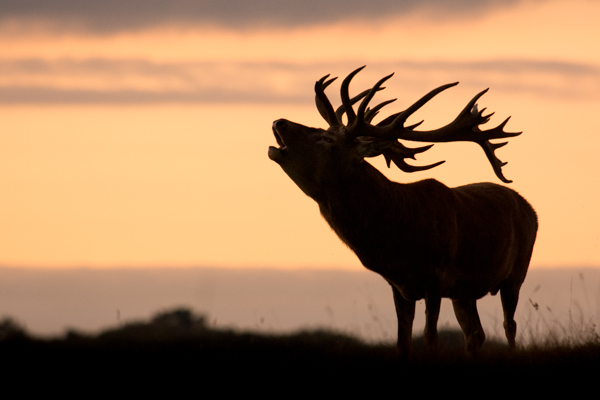
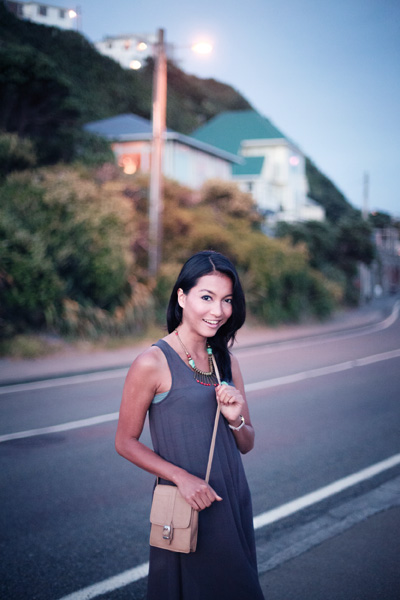
The subject of this portrait is lit by the extremely soft red light that appears briefly after the sun has set.

It’s hard to beat the beauty of natural light at its best. The photo to the right is a good example. We were taking portraits at the beach at the end of the day and the light became more and more magical as the sun disappeared over the horizon. For a few short minutes we experienced the beautiful red afterglow of the sunset, and I used it to take the last few portraits of the session. Moments like this don’t come often, but the results are worth it. Shooting in light that is beautiful, yet fleeting and difficult to find, elevates your portraits to another level.

Your turn

What is your experience of shooting portraits in natural light? Do you prefer to take the simple approach to equipment and lighting? Can you recommend any portrait photographers who work in natural light? Let us know in the comments.


The Natural Portrait ebookThe Natural Portrait

My ebook The Natural Portrait teaches you how to take beautiful portraits in natural light. This 240 page ebook, published by Craft & Vision, takes you through the entire process of natural light portrait photography through from finding a model, deciding where to shoot, working with natural light and post-processing your images. Click the link to learn more or buy.

The post 5 Reasons for Doing Natural Light Portraits by Andrew S. Gibson appeared first on Digital Photography School.


Digital Photography School

 
Comments Off on 5 Reasons for Doing Natural Light Portraits

Posted in Photography


Understanding and Working With Natural Light to Get Stellar Pictures Every Time

24 Mar

Understanding the different forms of light is one of the keys to achieving good photographs, as photography is all about light. For most photographers, the most available light, the one that is free, is natural light. To learn how to get the most of natural light requires a lot of observing and practicing, but once you understand how to work Continue Reading

The post Understanding and Working With Natural Light to Get Stellar Pictures Every Time appeared first on Photodoto.


Photodoto

 
Comments Off on Understanding and Working With Natural Light to Get Stellar Pictures Every Time

Posted in Photography


Don’t Miss The Big Picture Natural World Photography Competition

17 Mar


Big Picture Natural World Photography Competition

One of the best science museums in the world and a local favorite of mine here in San Francisco,  the California Academy of Science is in the final stretch of their Natural World Photography Competition. Winners have their photographs exhibited at the museum and are eligible to win a grand prize of $ 5000. Categories include “Land Mammals”, “Birds”, “Insects, Reptiles, Marine Mammals, Fish and Amphibians”, “Waterscapes, Landscapes and Plant Life” and “Conservation Imagery”. I should also note that the terms of the competition are  photographer friendly.

If you want to enter do so by the deadline of March 31st, 2014. Don’t miss it.

Enter the Big Picture Natural World Photography Competition

Also…

The contest is sponsored by the late Calumet, but from my conversation with the organizers there is no impact to prizes.

Have fun and good luck with your entries!

Copyright Jim M. Goldstein, All Rights Reserved

Don’t Miss The Big Picture Natural World Photography Competition

The post Don’t Miss The Big Picture Natural World Photography Competition appeared first on JMG-Galleries – Landscape, Nature & Travel Photography.


Related Stories

  • Don’t Miss The Big Picture Natural World Photography Competition – Enclosure
  • In Defense of Pretty Pictures – Enclosure
  • In Defense of Pretty Pictures
Feed Ads by FeedBlitz
powered by ad choices


JMG-Galleries

 
Comments Off on Don’t Miss The Big Picture Natural World Photography Competition

Posted in Equipment


Manipulating Natural Light in Wildlife Photography

08 Jan


back-light-wildlife-photography-1-edit

An Icelandic pony, shot against a setting sun

When photographing wildlife, the sun is one of the most useful tools that enables you to create something different or add impact to your images.  By taking control of your position relative to your subject, and to the sun, you can manipulate the available light to your advantage.

Favourable times of day for wildlife photography are at the beginning and end of the day when the sun is low in the sky.  This often coincides with periods of heightened activity of many animals, but also with a warmer directional light from the sun being lower in the sky.  When the sun is low in this way, it lends itself to a number of key natural lighting techniques.

side lighting wildlife photography

A side lit brown hare (Lepus europaeus)

Side lighting

You can naturally side light your subject by keeping the sun at approximately 90 degrees to the direction that you are facing.  The sunlight will then be lighting your subject from the side which can result in a greater sense of shape, form, and texture from the contrast between the soft light and shadows across the subject.

side lighting wildlife photography

Side lit grey seals (Halichoerus grypus) courting at sunrise

It can add a sense of three dimensionality that full-on front lighting cannot do, and because of the soft nature of the light, the highlights and shadows are not too intense and can be easily captured.

side lighting wildlife photography

A bellowing red deer stag (Cervus elaphus) with light from the side

Back lighting

One of the first tips you often hear when starting in photography is not to shoot into the sun. However, by doing just that you can create striking images.  By positioning yourself so that your subject is directly between you and the sun, you can capture a strong backlit outline of your subject that is almost like a halo of light.  This works best when there are fur or feathers to capture the light, and it is preferable that the outline of your subject is easily recognizable.

back lighting wildlife photography

The hair of this pony create a golden outline when backlit by the low sun

Exposing for backlit subjects can be difficult, as you will be dealing with areas of extreme brightness and shadow. It is best to ensure you retain detail in the highlights (as that will be forming the main detail of the image) by manually underexposing.

Silhouettes

Silhouettes are another way of capturing the strong outline of your subject, but in this instance it is achieved by shooting your subject against a bright background, often the sky.  Just after the sun has gone down is a great time for this technique.  There can often be far more colour in the sky once the sun is below the horizon, and the sky will still be bright enough to easily cast your subject into silhouette.

One tip for shooting wildlife silhouettes is that sometimes it can be good to ensure you retain some detail in the shadows, for example an eye. This can help retain some interest in the large area of black, and to keep a connection between the subject and the viewer.  If you want to do this, you will need to ensure that you do not underexpose the subject too far, such that the shadow detail is lost, to give you flexibility during post-processing.

silhouette wildlife photography

A silhouette of a red deer stag (Cervus elaphus) is an instantly identifiable form against a sunset sky

To conclude

It can be difficult to motivate yourself to get up for sunrise or to be out photographing at sunset, but those times of day give you much more flexibility to use the natural light as a powerful tool in your wildlife photography.  By understanding how the position of the sun relative to you or your subject will influence the final image, you can create images that aren’t possible at other times of day.

So get out there and see how you can use natural light to make you images stand out!

Further reading on wildlife photography:

  • How Low Can you Go? An Illustration of Camera Angle for Wildlife Photography
  • Making Sharper Wildlife Photographs – [Part 1 of 2]
  • Making Sharper Wildlife Photographs – [Part 2 of 2]
  • 5  Big Tips to add Impact and Variety to your Wildlife Images

The post Manipulating Natural Light in Wildlife Photography by Elliot Hook appeared first on Digital Photography School.


Digital Photography School

 
Comments Off on Manipulating Natural Light in Wildlife Photography

Posted in Photography


Day 1 of 12 Days of Christmas… Get our Natural Light eBook for $7

13 Dec

Welcome to Day 1 of the 12 Days of Christmas Sale where we’re about to release 12 days of mind-blowing photography deals for you!

Day 1: Two Amazing Deals on dPS eBooks

The countdown to Christmas 2013 begins today with 2 great deals on eBooks by award-winning travel photographer Mitchell Kanashkevich.

Working with natural light and colors to create enchanting travel photography is Mitchell’s main game.  In his 3 beautifully presented eBooks, Mitchell shares practical advice, information and tips on how anyone can create beautiful travel imagery by simply harnessing the power of natural light and color.

Deal 1:  Natural Light eBook – just $ 7 Today Only!

day1Single

Natural Light is a powerful ally for every photographer.  Mitchell’s eBook reveals his top tips for mastering the dynamic nature of natural light to create striking photography. The best part is – you don’t need to buy any extra equipment! Mitchell’s tips and information can be applied to any brand of camera, including your smartphone.

Mitchell explains essentials such as the role and power of natural light, light as a creative tool and even the philosophy behind working with light. You’ll then learn the essential technicalities of metering, exposure and using the histogram.

The eBook also helps you understanding the changing characteristics of natural light such as quality, direction and color. Learning to create sculpting, interplays and silhouettes by controlling light is also covered.

Nine detailed case studies are included, showing you step-by-step how to optimize light. You’ll be carefully guided through the process of using light to creating compelling images guaranteed to convey mood, emotion and meaning.

Natural Light is one of the best guides on the market written specifically with beginner photographers in mind.  Written in easy to understand language, this eBook will certainly help you improve the quality of your photographs… using nature’s free gift to photographers – sunlight!  

Natural Light is available for the next 24 hours for only $ 7… save yourself a massive 65% off the recommended retail price and grab this Super Single deal right now!

Deal 2:  Three eBooks for only $ 29.99! [58% off]

day1Bundle

Want more from Mitchell? Our second deal is for you and bundles all 3 of his books at a bargain price. You’ll get Natural Light, Captivating Color and Transcending Travel.

Captivating Color – inside this popular eBook Mitchell reveals his top tips on using color to spark the imagination, create stories and convey intense emotions.  You’ll learn about the way light and cool work together, as well the impact of color on visual weight and attention. Tips on post-processing and shot manipulation for maximum effect are also included.

The imagery included in the 48-page eBook beautifully illustrates the power of captivating color.  Mitchell includes stunning photographs taken throughout his travels around the world, all using color to powerfully capture the viewer’s attention.

You’ll gain access to Mitchell’s rare professional insights and experience in using color to create magic.  If you need inspiration to get your creative juices flowing and your imagination all fired up, this eBook is well and truly for you… and it’s included in our Bargain Bundle for a seriously cheap $ 29.99!

Transcending Travel – You won’t ever risk taking bad travel shots ever again – because todays Bargain Bundle also includes Mitchell’s popular ebook Transcending Travel. In this gorgeous 80- page guide, Mitchell gives you brand new tips on how to take the mesmerizing travel imagery most people DON’T know how to create!

Preparation is key – researching your trip, making the correct choices in lenses, camera body and other gear.  Every traveller knows packing light is critical; so let Mitchell help you avoid making expensive excess-weight mistakes.

You’ll also learn to communicate effectively to viewers through the basics of composition – framing, focal points and perspective. Using light to your creative advantage at any time of the day or evening, as well as flashes and reflectors, is also covered.  The eBook also walks readers through the 5 elements of making the photographic process, as well as essential information on freeze motion and blurring.

Photographing people of diverse ethnic and language backgrounds can be raise some ethical issues of which you may not be aware.  Mitchell gives you tips and advice based on years of experience working directly with people around the world – make sure you’re well informed before you go.

Landscapes, interiors, buildings and still-life shots are also covered.  You’ll be inspired to pack your bags and get going once you’ve finished reading beautifully illustrated classic…included in our Bargain Bundle for only $ 29.99.

Download now and save up to 65% OFF!

Your Day 1 deals are all easy PDF downloads you can take with you anywhere… without risking any excess baggage charges! We hope you enjoy these classics guaranteed to make your photography even more beautiful.  Stay tuned for Day 2 deals coming up next!

The post Day 1 of 12 Days of Christmas… Get our Natural Light eBook for $ 7 by Darren Rowse appeared first on Digital Photography School.


Digital Photography School

 
Comments Off on Day 1 of 12 Days of Christmas… Get our Natural Light eBook for $7

Posted in Photography


21 Inspirational Natural Light Portraits

13 Oct

21 Inspirational Natural Light Portraits

One of the most effective pieces of lighting gear ever invented is available to almost every photographer in the world… unless you’re living in a cave (and even then you might have one).

It’s the window.

Here is a collection of natural light portraits. They were all taken predominantly with natural light – in most cases at or near a window. Enjoy.

portrait

Image by Daniel Zedda

Image by Anna Gay

natural light portraits

Image by Eric Meuller

I hear many photographers asking about what lighting gear to purchase to light their portraits – but I’m a firm believer that the natural light provided by a window can often do the job as well – if not better – than any expensive gear that you might buy.

natural light portraits

Image by Meredith Farmer

natural light portraits

Image by Shandi-Lee

natural light portraits

Image by Paul Goyette

Image by John Meuller

natural light portraits window light

Image by Mr Story

natural light portraits window light

Image by Beni Ishaque Luthor

natural light portraits window light

Image by Gabriela Camerotti

natural light portraits window light

Image by The Q

natural light portraits window light

Image by Sebastiano Pitruzzello

natural light portraits window light

Image by Gabriela Camerotti

natural light portraits window light

Image by Jay Ryness

natural light portrait

Image by Raymond Larose

natural light portrait

Image by gabriele fanelli

natural light portrait

Image by Sebastiano Pitruzzello

Image by Jay Ryness

Image by Drew Herron

Image by brice hardelin

Image by Lauren Nelson

Further Natural Light Portraits Reading

We hope you enjoyed these Portraits. If you have some shots to share please do so in comments below. If you’re looking for a little inspiration – check out these links.

Understanding Natural Light Portrait Photography (tutorial)
Natural Light: Mastering a Photographers Most Powerful Tool (eBook)

Post originally from: Digital Photography Tips.

Check out our more Photography Tips at Photography Tips for Beginners, Portrait Photography Tips and Wedding Photography Tips.

21 Inspirational Natural Light Portraits

The post 21 Inspirational Natural Light Portraits by Darren Rowse appeared first on Digital Photography School.


Digital Photography School

 
Comments Off on 21 Inspirational Natural Light Portraits

Posted in Photography


Natural Light: Making the Most of Hard Light

07 Sep

Hard light

In a previous article I explored ways of taking photos in soft light. Today, I’d like to look at the opposite of that, and discuss the idea of taking photos in hard light.

In the earlier piece I wrote about matching the light to the subject. That’s an important concept to understand – especially when it comes to hard light, a type of lighting considered by many photographers to be unsuitable for most types of photography.

I’m not saying those photographers are incorrect. Hard light doesn’t suit every type of subject, and if you’re trying to take a photo in hard light that you really shouldn’t be taking, then nothing you can do is going to work. Here’s an example from the earlier article:

Hard light

The flower had to be lit by soft light for the image to work. In hard light, there was too much contrast. The light didn’t suit the subject.

What is hard light?

Hard light comes from a light source that is relatively small compared to the subject. It creates strong, clearly defined shadows.

For example, hard light is cast by the sun when it is high in the sky on a cloudless day. The light gets softer as the sun dips towards the horizon at the end of the day. If clouds appear, or the air is hazy or polluted, that may also soften the light.

If you use portable flash you will also know that the light from an unmodified flash unit is very hard. That’s because the light comes from a relatively small light source – the flash head isn’t very big. That’s why photographers use lighting modifiers with flash units, to effectively make the source of the light larger, which makes the light softer. You can read more about using portable flash here and here.

Now, let’s look at how you can make hard light work for you, with some practical examples:

Hard light

I took this photo in Burano, an island near Venice, at around 2.30pm in summer. The light was very hard. But look at the long shadows on the wall of the building. The sun was nearly overhead, and a little to the right. From that position, the light rakes over the surface of the building, picking out the texture (I also used a polarising filter to deepen the colours). Noticing scenes like this, and recognising the photo opportunity, is just a matter of training your eye to see where the light is falling.

Architecture is an ideal subject when the light is hard. If you are in a city or urban area during the middle of a sunny day, you can often take good photos of the buildings.

Convert to black and white

Photos taken in hard light are often more interesting in black and white than colour. Colour photos may look bland when illuminated by hard light from the overhead sun.

Here’s an example of long exposure photography that I took around 2pm in the afternoon. I used a nine stop neutral density filter to obtain a shutter speed of 30 seconds. It looked a little boring, so I converted it to black and white.

Hard light

Finally, here’s a photo taken at around 2.30pm in the middle of summer:

Hard light

We were on the beach and the light was very hard. There was no way that I could take a portrait using natural light alone. I used an on-camera portable flash unit (itself a hard light source) and used that to overpower the light from the sun. It acted like a powerful fill light, filling in the shadows cast by the sun. Compare that to this portrait (from my article about soft light):

Hard light

Two different types of light, two completely different effects. Bear in mind that hard light plus flash won’t be flattering to everybody, and will generally work better with men than women. Again, it comes back to the idea of matching the light to the subject.

Mastering Photography

Hard light

My latest ebook, Mastering Photography: A Beginner’s Guide to Using Digital Cameras introduces you to digital photography and helps you make the most out of your digital cameras. It covers concepts such as lighting and composition as well as the camera settings you need to master to take photos like the ones in this article.

Post originally from: Digital Photography Tips.

Check out our more Photography Tips at Photography Tips for Beginners, Portrait Photography Tips and Wedding Photography Tips.

Natural Light: Making the Most of Hard Light


Digital Photography School

 
Comments Off on Natural Light: Making the Most of Hard Light

Posted in Photography


The Magic of Natural Light: Twilight

01 Sep

The Magic of Natural Light: Twilight photo

One of my favourite times for taking photos is at twilight. Especially during the spring and summer, the seasons when the light is at its most magical at this time of evening.

I’ve always liked the idea that great photography happens on the edges. Twilight, the transition between night and day, is an edge. While the low light levels can be technically challenging, the reward in terms of quality of light are well worth it. I think of it as the ‘magic hour’. You may also see it referred to as the blue hour, a reference to the colour of the ambient light as night falls.

What is twilight?

Twilight is the time that marks the transition between day and night. It starts after the sun has set and continues until night completely falls. The quality of light during twilight can be truly beautiful, especially after a bright sunny day. The duration depends on your distance from the equator. In the tropics night falls very fast and twilight is short. Go far enough north (or south) in the summer and it can last for over an hour.

Landscape photography during twilight

One of the more obvious subjects that benefits from the quality of light at twilight is the landscape. Now, I’m sure most photographers are aware that one of the best times to photograph the landscape is during the golden hour – the hour or so before the sun sets. The sun is low in the sky and the warm, raking light it casts can bring the best out of a beautiful location.

Whenever I’m on location and see other photographers, I’m always a little surprised how early most of them leave. For the few that wait until the sun has set the reward is often an intensely beautiful, soft golden glow that gradually fades as night falls. This type of light is especially beautiful if you are by the sea or a lake as the water reflects the light. The opening photo is a good example of that.

The Magic of Natural Light: Twilight photo

There are two approaches to taking landscape photos in low light. One is to use a high ISO setting and shoot with the camera hand-held. I took the photo above at 1600 ISO shortly after sunset.

The Magic of Natural Light: Twilight photo

To take full advantage of the beautiful light during twilight though you will need to use low ISOs (better image quality) and consequently slow shutter speeds. You’ll need a tripod to support the camera and a cable release or remote control to fire the camera without touching it (the self-timer will do in a pinch). The advantage of this approach is that you can use the slow shutter speeds to create blur. This works particularly well when there is water in the scene, as in the photo above.

Portrait photography

The Magic of Natural Light: Twilight photo

I also like twilight for portrait photography. It’s not without challenges, but if you can overcome those you’ll be rewarded with some beautiful portraits taken in unusual conditions where many photographers wouldn’t bother taking photos.

The best way to take advantage of the twilight for portraits is to arrive with your model before sunset to take advantage of the late afternoon light. Explain to your model that the light is best at this time of day, and they will be rewarded with some beautiful images. Then, just as in landscape photography, you can keep shooting after the sun has set until the light fades or the magic disappears. Unlike landscape photography though it’s not practical to use a tripod, so you will need to set a high ISO and use the wide aperture settings of your lenses.

When it comes to lenses, primes are best because the wide maximum apertures let you shoot for longer. For example, if you have a kit lens, the maximum aperture at the telephoto end (focal length usually around 55mm) is f5.6. If you have a 50mm prime lens, the maximum aperture will be at least f1.8. That’s a three stop difference.

You will also need to set a high ISO. It’s a good idea to test out your camera beforehand using different high ISO settings to see how high you’re willing to go before the deterioration in image quality is more than you’re happy with. On my EOS 5D Mark II, for example, I’m quite happy to shoot at 3200 and sometimes even 6400, especially if I can expose to the right to maximise image quality. If you have a newer camera, especially full-frame, you might even be able to go higher. If your camera is older your limit will probably be lower. It’s a personal decision that only you can make.

The photo above was taken using ISO 6400 and an aperture of f1.4. It was nearly dark, much darker than it looks in the image. The lights behind the model are a good indication of this.

The Magic of Natural Light: Twilight photo

Another approach is to use a tripod to support the camera and a portable flash to illuminate your model. If your model keeps still during the long exposure, there will be very little blur. This portrait was taken with a shutter speed of two seconds. This technique allows you to keep shooting during twilight when there is very little light.

Mastering Photography

The Magic of Natural Light: Twilight photo

My latest ebook, Mastering Photography: A Beginner’s Guide to Using Digital Cameras introduces you to digital photography and helps you make the most out of your digital cameras. It covers concepts such as lighting and composition as well as the camera settings you need to master to take photos like the ones in this article.

Post originally from: Digital Photography Tips.

Check out our more Photography Tips at Photography Tips for Beginners, Portrait Photography Tips and Wedding Photography Tips.

The Magic of Natural Light: Twilight


Digital Photography School

 
Comments Off on The Magic of Natural Light: Twilight

Posted in Photography


Natural Light Portraits: Made In The Shade

30 Aug

One of the easiest ways to start shooting portraits is to use natural light.  There’s no added expense of buying speedlites or strobes, or even continuous lighting. You don’t have to decide where to put the lights, because let’s face it, nature has decided for you.  There are still challenges however, and those challenges must be overcome to successfully pull off a natural light portrait.  One of the biggest challenges is what to do when the natural light just is not pleasing.  Maybe it’s midday sun and the light is too harsh, or maybe it’s later in the day and direct sun is shining right in your subject’s eyes. In my post “Sun Too Harsh? Modify it!”, I discussed ways to use reflectors and scrims to modify natural light to get a more pleasing look.

This image was taken on a bright sunny winter day, with snow on the ground. I didn't have a reflector- the snow helped with that thankfully.  But the sun was too harsh to put her directly in it.  The solution was to go behind one of the nearby buildings and use that softer light to illuminate her face. EOS 5D Mark II, Ef 85mm f/1.2L II. 1/2000 at f/2.2, ISO 160.

This image was taken on a bright sunny winter day, with snow on the ground. I didn’t have a reflector- the snow helped with that thankfully. But the sun was too harsh to put her directly in it. The solution was to go behind one of the nearby buildings and use that softer light to illuminate her face. EOS 5D Mark II, Ef 85mm f/1.2L II. 1/2000 at f/2.2, ISO 160.

But what happens if you don’t have a reflector or a scrim? Well then you have it made in the shade! Find some shade, and you’ll find some soft, indirect lighting that can help you create beautiful portraits.   Look for a large tree with overhanging branches. Or a doorway. Or an overpass of some kind.  Anything that gets you out of direct sun, and into indirect light. It does you no good if there’s no light getting to your subject, but once you find a place with indirect lighting, you’re all set.

Here, the subject was positioned under the overhang of a train station.  Because it was an open overhang, the background is lit brightly, creating more depth. EOS-1D X, EF 85mm f/1.2L II. 1/1000, f/2.8 at ISO 640.

Here, the subject was positioned under the overhang of a train station. Because it was an open overhang, the background is lit brightly, creating more depth. EOS-1D X, EF 85mm f/1.2L II. 1/1000, f/2.8 at ISO 640.

The light will be soft and even- and very pleasing.  The background will likely go a little darker depending on where you found your shade, be it under a tree, where it might be brighter, or in a doorway or behind a building. Look around, see what you can make happen. And just because your subject is facing out towards the light, doesn’t mean you need to be.  Walk around your subject- get that soft light hitting from the side, as well as the front. Just keep your subject positioned so the light is hitting the mask of the face, including the eyes. Just because the light is not pleasing doesn’t mean all is lost. Sometimes, all you need to do is find some shade.

This shot was taken in Central Park in New York City, near Strawberry Fields.  There is a walking path that goes under a large footbridge, creating a tunnel. The day was a typical summer day, bright and hot. The sun was far too harsh. We moved to the opening of the tunnel and I let the light wash in on her face.  I turned her slightly so the light came from the side a bit, creating some shadow on the left side of her face. EOS 5D Mark II, EF 70-200 f/2.8L IS II. ISO 800, 1/250, f/2.8.

This shot was taken in Central Park in New York City, near Strawberry Fields. There is a walking path that goes under a large footbridge, creating a tunnel. The day was a typical summer day, bright and hot. The sun was far too harsh. We moved to the opening of the tunnel and I let the light wash in on her face. I turned her slightly so the light came from the side a bit, creating some shadow on the left side of her face. EOS 5D Mark II, EF 70-200 f/2.8L IS II. ISO 800, 1/250, f/2.8.

Post originally from: Digital Photography Tips.

Check out our more Photography Tips at Photography Tips for Beginners, Portrait Photography Tips and Wedding Photography Tips.

Natural Light Portraits: Made In The Shade


Digital Photography School

 
Comments Off on Natural Light Portraits: Made In The Shade

Posted in Photography


Natural Lighting: Grow Your Own Glow-in-the-Dark Plants

10 Jun

[ By WebUrbanist in Conceptual & Futuristic & Technology. ]

glowing plant synthetic biology

Imagine the possibilities: cities illuminated at night not with carbon dioxide-producing energy sources, but with real glow-in-the-dark trees that light up streets and sidewalks alike.

glowing plant use cases

What started as a Glowing Plant campaign to raise just sixty-five thousand dollars has now ended with ten times that much in funding, all toward one purpose: naturally-glowing, biologically engineered plant life. The seed funding, in both senses, has been secured.

Glowing plants are not new, but crowd-funding the research and gene splicing,  aiming for sustained bioluminescence, and distributing the resulting plants all push into new (and apparently fertile) territories. The project team will start small, with household plants including glowing roses, and work up from there.

glowing plant how to

Concerned critics, however, have also noted that such ground-up, grass-roots synthetic biology experiments come with risks – including releasing new and untested plant strains into the wild.

glowing plants history process

With recommendations coming in from folks with Harvard to Singularity University on their resume, ranging to endorsements from known names including Cory Doctrow of BoingBoing, one hopes this team has their house in order. Still, even if the researchers in this case are careful and responsible, who is to say the next project of this type will be devoid of danger?

Share on Facebook


[ By WebUrbanist in Conceptual & Futuristic & Technology. ]

[ WebUrbanist | Archives | Galleries | Privacy | TOS ]


WebUrbanist

 
Comments Off on Natural Lighting: Grow Your Own Glow-in-the-Dark Plants

Posted in Creativity