RSS
 

Posts Tagged ‘Natural’

A Journey From Novice to Natural Light Portrait Photographer

01 Mar

I’m here to share my photography journey that started few years ago as a novice, to where I stand today. As am amateur or hobby photographer, you may relate.

The journey from novice to advanced photographer

About two years ago, I bought an entry level DSLR, to use it as an expensive point and shoot camera. The camera decided the fate of most of my pictures. On innumerable occasions, the pictures were blurry, under or overexposed, and were of poor quality.

The urge to work on my photography skills blossomed, when I was blessed with a little girl. An utmost desire to take only the best pictures of my angel, had taken roots in me. As you may also do, I started searching the internet fervently, for ways to capture the best shots.
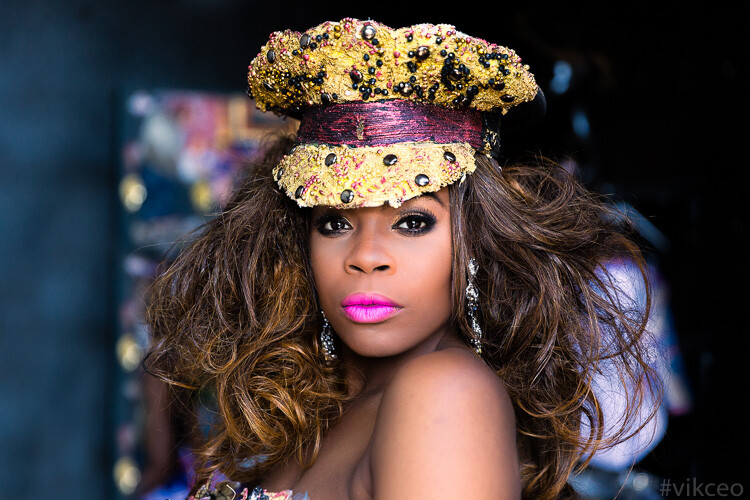
Dps fb ca viks photogrphy

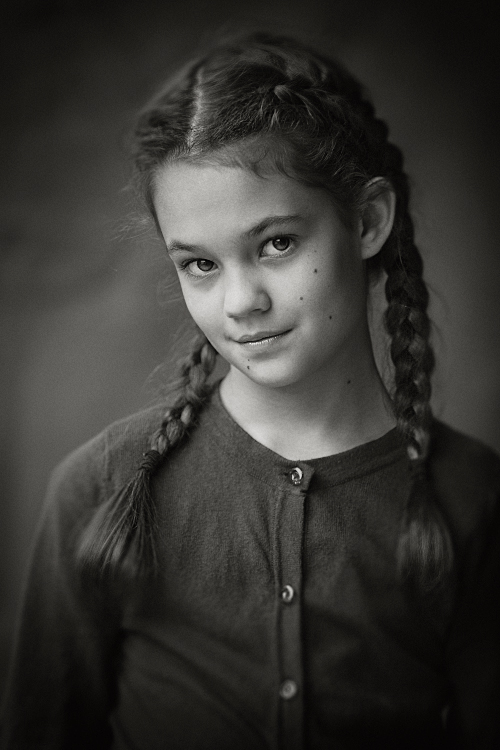
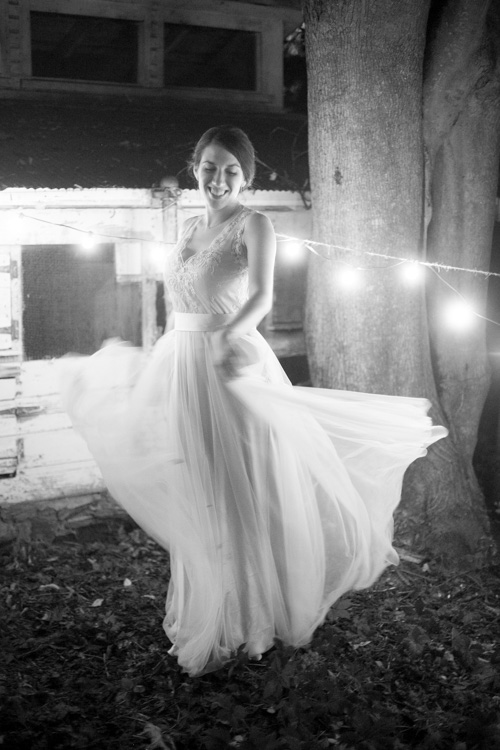
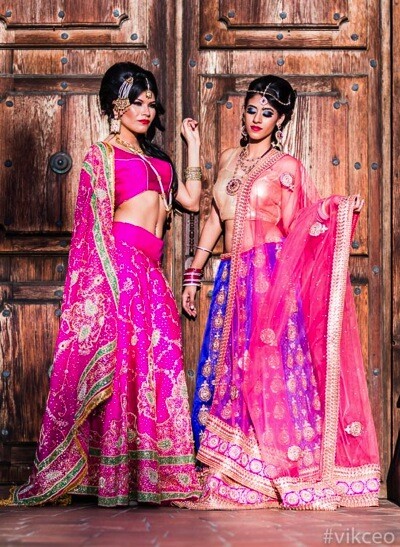
This is the kind of natural light photography I do now, but that’s not where I started. Read on to find out how I got here, and you can too.

I realized, other than going through basic photography tutorials on YouTube, the thing that helped me the most was Flickr’s discussion groups. It has large community of knowledgeable professionals, and semi-professionals, who love to take a look at your picture and provide valuable feedback. Positive suggestions and encouragement I received on the forums, helped me to experiment further, and escape out of automatic mode. If you are in the same mode as I was two years ago, I strongly recommend getting feedback for your photos, through the online forums.

Moving out of auto mode and kit lens limitations

The very first step towards improvement for me, was shifting to Aperture Priority (Av/A) mode. Initially, pictures were blurry even in Av mode, but I could see that inside my home, my kit lens at f/4.5, ISO 6400, was still unable to shoot faster than 1/30th of a second. Such a slow shutter speed caused the motion blur. Shooting outdoors normally helped me to avoid blurry pictures, but I was not sure why my images didn’t have a blurry background like I saw online. Eventually, I understood the limitations of my kit lens, in not being able to shoot at a larger f-stop, to achieve shallower depth of field.
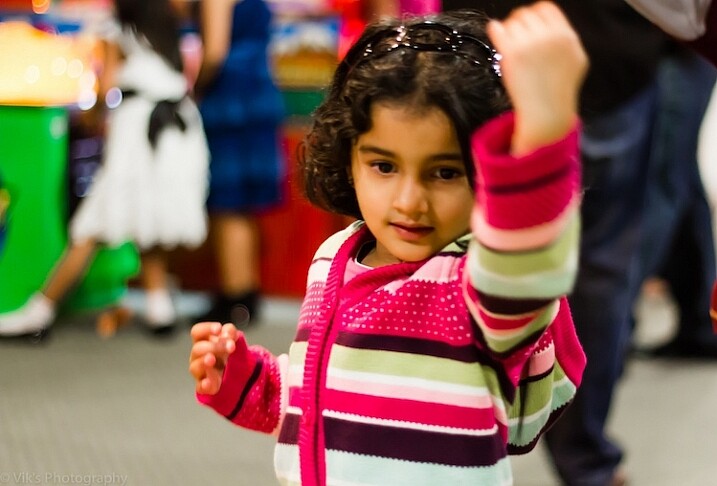
500px Photo ID: 53404702 -

This image is very noisy, focus is on her dress rather eyes/face, the out of focus raised hand actually distracts the viewer a lot.

One thing I would realize after many months of shooting, is that the exposure triangle (aperture, shutter speed and ISO) is easy to comprehend theoretically, but really hard to apply in the field. I went out for a shoot almost every day, and started experimenting with aperture and shutter speed to get a more desired shot. On returning home, I always got an impression I should have used a different aperture or shutter speed for a better shot. The ability to learn through your mistakes is a major milestone in your journey.

Branching out

Once you are bit confident in your understanding of the basics, you start enjoying it – which is what I experienced. I started devoting time to reading topics such as composition, photography tips, and subscribed to sites like Digital Photography School. Another thing that helped me a lot, was connecting to local events and activity pages via Facebook. I started showing up at many local events and offering free photography to the organizers.

The experience of shooting events was quite chaotic and challenging, especially when there were far more people posing in front of the camera, and many arbitrary things happening – kids running around, or folks dancing to tunes of the festivities. Every such shoot gave me lot more insight into concepts of understanding concepts like plane of focus, controlling focus points, exposure compensation, tips to hand hold the camera firmly, etc.

One of my early event photos. The face and overall image is poorly lit and the face looks orange. Overall image is noisy and the eyes are not in focus. The person behind her is very distracting.

One of my early event photos. The face and overall image is poorly lit, and the face looks orange. Overall, the image is noisy, and the eyes are not in focus. The person behind her is very distracting.

Upgrading gear

It’s very easy to get overwhelmed when reading about, or watching, the type of gear that pros are using in the field. My advice would be to start with minimum possible gear, and upgrade only when you clearly understand the limitations of your existing gear. Be it body, lens, tripod, or anything. After understanding that I couldn’t shoot with very low noise in ambient light during evenings, or achieve huge shallow DOF with my canon T3i and a kit lens, I moved up to a 6D after few months, and bought a prime lens. Though I love to shoot 100% natural light, I added a flash to my gearbox as well, to use as a fill light in some situations.

Here are few things I learned so far, that you can also apply in your photography. Then I will move on to what kind of work I produce these days, and some explanation about how the results are achieved.

Understand the basics:

Read a lot about aperture, shutter speed, ISO, and other beginner tutorials. Apply them as much as you can. These concepts are simple but take a lot of hands-on practice to start making some sense.
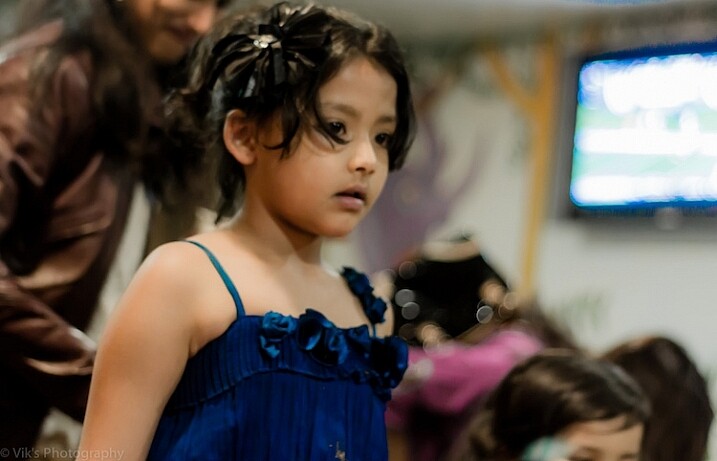
Very noisy, Focus is on the shoulder, a very bright area in the background is a huge distraction, very messy environment.

Very noisy, Focus is on the shoulder, a very bright area in the background is a huge distraction, very messy environment.

Participate:

Do share your everyday shots and learning, to online discussion groups and forums, without worrying about the quality of your work. Google knows a lot. Give it a try by typing the question the way you would ask someone in person. Once you get some clue, make sure to try it out, to experiment and confirm your understanding. As I said earlier, do volunteer photography for local charity or non profit, etc., as that is a sure way to learn, and it is much more fun.

Avoid GAS (Gear Acquisition Syndrome):

Avoid the mindset that you cannot do good photography without expensive gear. In the beginning, your cheapest camera is enough to get you started. Photography is not 100% driven by expensive gear. There are way many areas to catch up like composition, understanding of light, angle of shooting, etc. Learn the basics and how to use the gear you have first.

Shoot, shoot and shoot:

There is no shortcut to get good at photography. You have to keep shooting to learn, and learn more to confirm your understanding and get better.

Understand Light:
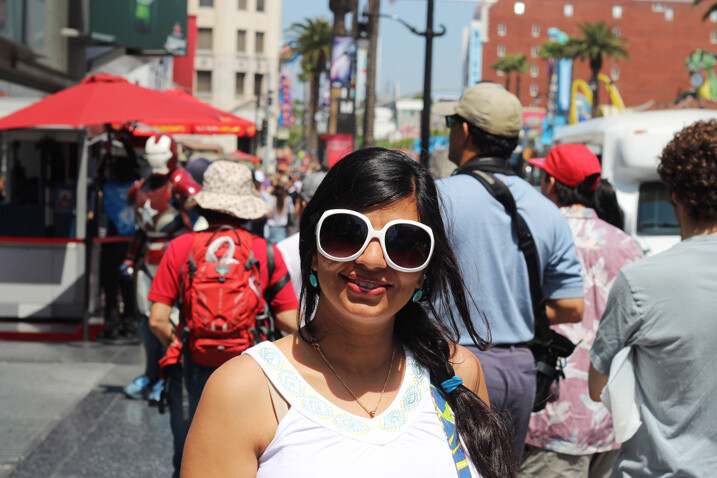
Taken in the middle of the day when sun was overhead with caring about harsh shadows. From composition point of view the image has a very busy background and viewer will be completely distracted at other elements of the image.

Taken in the middle of the day, without caring about harsh shadows when sun was overhead. From a composition point of view, the image has a very busy background and viewer will be completely distracted by other elements of the image.

It doesn’t matter what genre of photography you shoot; you need a firm understanding of light. This is a key ingredient for a good picture. So, read about the direction and quality of light, and how it affects the shape, size, shadows, and contour of objects it falls upon.

Master your camera:

This tip is especially important if you aim to shoot events, happening at fast pace like kids photography, birds, action, sports, etc. You will really miss opportunities if you are unable to change settings quickly on the fly, without looking at the controls.

Go Manual:

This needs to be your ultimate destination in terms of shooting modes. It’s true that 80% or more time you may be happy with Av mode, but ideally you should have no hesitation in switching to the manual mode in a blink.

Depth of Field:

Technically, in simple terms, aperture controls the depth of field. However, this is the area that took me the longest time to get a good grip on. It’s very hard to stop the desire to shoot at f/1.2, if you own a lens capable of that. However, lenses are not the sharpest at so small f-numbers, plus the depth of field is so thin, that it could be unusable if you are not at the right distance from the subject.
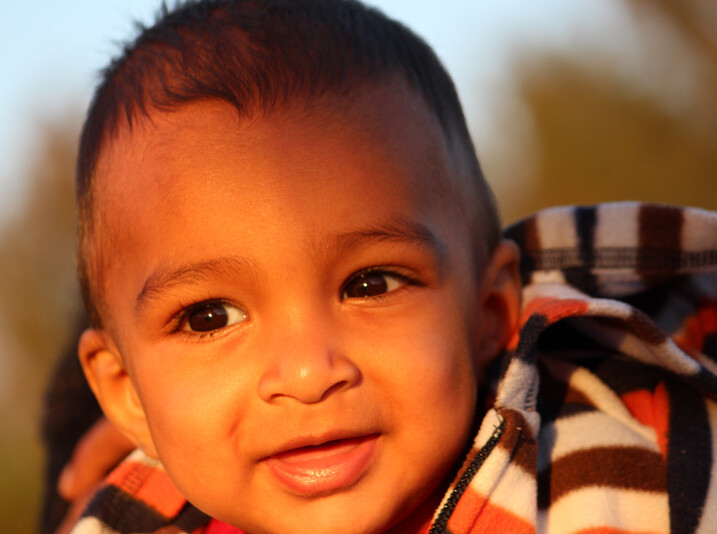
Though there is a nice catch light but looking at the distance it has been shot the f stop should have been chosen higher. The face is not completely in focus and the image does not appeal the viewer. The subject should have been moved a bit to get rid of uneven shadows.

Though there is a nice catch light, but looking closer, it has been shot with an f-stop that should have been higher. The face is not completely in focus, and the image does not appeal the viewer. The subject should have been moved a bit, to get rid of uneven shadows on his face.

Positioning the Subject:

Another key point I have seen even very mature photographers lacking, is realizing the importance of where you should ask the subject to stand. Key mistakes are: placing subject in front of a very busy background, having undesired points of interest in the frame, a brighter large light source behind the subject, etc.

I hope you find the above tips useful. In the final part, I would like to show some images, and a bit about my thoughts on post-processing. All the below images have been published in one or the other magazine.
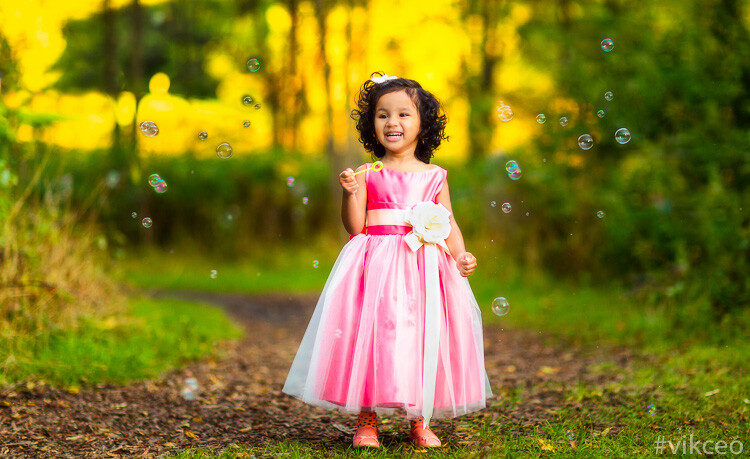
Dps fb ca viks photogrphy 5

85mm, f/1.6, 1/1600, ISO 800

Location: Milwaukee, WI. This was taken at golden hour, with the sun facing the subject. The trees with some fall colors, are very far behind her.
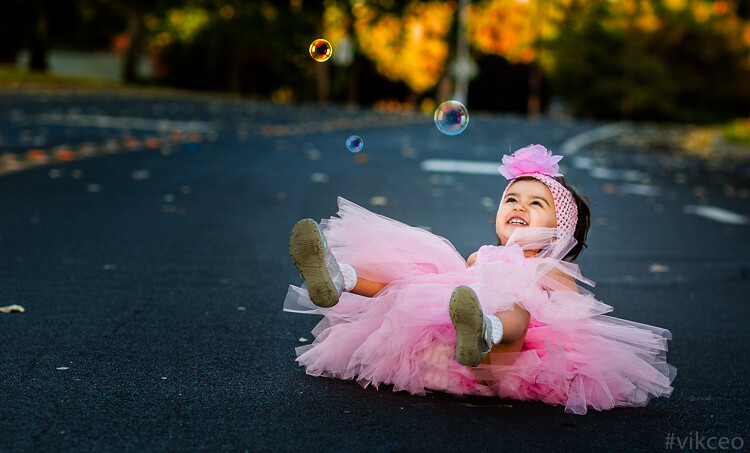
Dps fb ca viks photogrphy 3

85mm, f/3.2, 1/400, ISO 400

Location: Redwood Shores, CA. This was taken at golden hour with sun facing her. The intensity of the light was low, as only partial light was passing through the tree. It was shot from above at about a 45-degree angle.

Dps fb ca viks photogrphy

70mm, f/2.8, 1/320, ISO 800

Location: Los Angeles, CA. This was taken in the middle of the day, in an apartment, where model was facing window light.
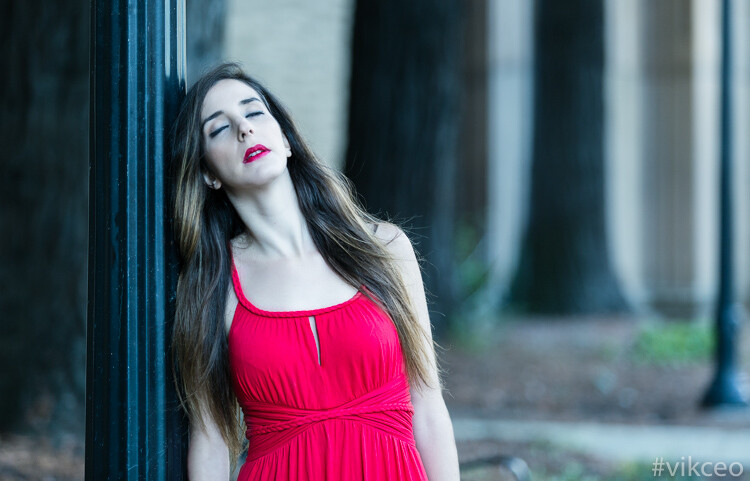
Dps fb ca viks photogrphy 6

135mm, f/2.8, 1/400, ISO 400

Location: Palace of fine arts, CA. Taken in the middle of the day, where plenty of ambient light was available. Behind the subject is a little darker area, due to trees and pillars. I positioned her at a spot where light was just right to avoid on her face which were too dark.
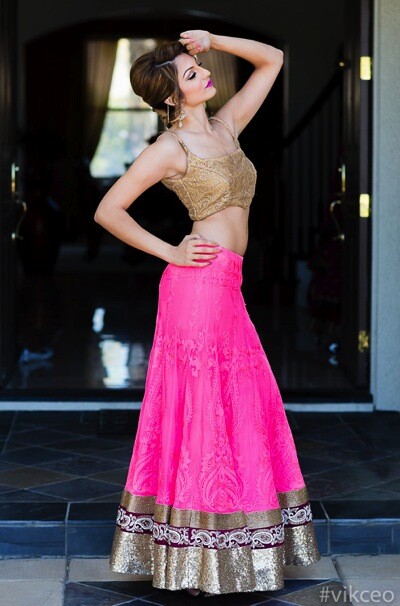
Dps fb ca viks photogrphy 484

85mm, f/1.8, 1/6400, ISO 100

Location: Fremont, CA. Again taken during golden hour, with a bit of shade from the door structure.
Dps fb ca viks photogrphy 4

85mm, f/2.8, 1/2000, ISO 800

Location: San Jose, CA. Taken in the middle of the day, using the shade from the ceiling above the model, and avoiding sunlight falling directly her.

Importance of Post-Production:

As a beginner you will surely hear or read a lot something similar to these statements, “I love straight out of camera pictures” or “I hate editing pictures”. However, I have found that you can delay getting into the post-processing of images, but cannot avoid it.

The extent you go to post-processing an image, is totally a different debate. Some do it to enhance the existing elements of an image, and others do it to make it into a totally different image. I am in the first category, and spend time doing things that improves the overall image appeal.

For beginners, I would advise that you stay away from it until you are comfortable with your gear and the basic concepts of photography. Always aim to get the image right in the camera.

The first step for post-processing, you can start with Adobe Lightroom, which is a great piece of software to enhance your images. Spend time in achieving mastery with Lightroom, and, once you understand its limitations, then start exploring Adobe Photoshop on a need only basis. In my typical workflow, all the images go through Lightroom, then for some final touches in Photoshop.

Your journey

So where are you in your photography journey? Did you just pick up a camera and can relate to my early experiences? Have you been practicing for a while? What is your experience, please share in the comments below.

Author Bio

Vik (Vivek) Kumar is a photographer and a software engineer. Hi started his photography a couple of years ago as an amateur landscape photographer. The hobby became serious portrait photography fun. His images are used by reputed hotel brands like Hyatt. He has been published numerous times in various fashion magazines like ICON, PUMP, Surreal Beauty Magazine, etc. See more of his work on his website or on his Instagram profile. His landscape photography work can be explored on 500px.

googletag.cmd.push(function() {
tablet_slots.push( googletag.defineSlot( “/1005424/_dPSv4_tab-all-article-bottom_(300×250)”, [300, 250], “pb-ad-78623” ).addService( googletag.pubads() ) ); } );

googletag.cmd.push(function() {
mobile_slots.push( googletag.defineSlot( “/1005424/_dPSv4_mob-all-article-bottom_(300×250)”, [300, 250], “pb-ad-78158” ).addService( googletag.pubads() ) ); } );

The post A Journey From Novice to Natural Light Portrait Photographer by Vik Kumar appeared first on Digital Photography School.
Digital Photography School

 
Comments Off on A Journey From Novice to Natural Light Portrait Photographer

Posted in Photography


Understanding Natural Light Part 3: Direction of Light

21 Jan

Light has different qualities, and by understanding those differences and using them in your favour, you can become a better image maker.

In two previous articles I covered:

  • Understanding Natural Light Part 1: Quality of Light
  • Understanding Natural Light Part 2: Color of Light

Mix1
In this third chapter, you will learn:

  • How to control the direction of natural light in the field.
  • How to understand the different effects the direction of light will have on your portraits. How to mix light colors to create depth.
  • A few advanced techniques, like using reflectors or flags.
  • How to practice using exercises.

Please note that as a portrait photographer, I will be discussing portraits, and using them as examples. However, this knowledge applies to any kind of photography.

Working with natural light does not mean compromising

Most people will tell you that while working with artificial lighting will allow you to fully control the lighting situation in your shooting, working exclusively with natural light will limit your ability to control the lighting to almost zero. In my opinion, this false assumption is leading many photographers to mediocre images. Stating that the lighting is poor, because “that’s how it was” when they made the photo, is not acceptable.

So, the first step in controlling natural light is to carefully plan your time of the shoot. In the preview articles, we have discussed how the quality and color of light are affected by time, and weather, during the day. Now, let’s understand how the direction of light will change throughout the day, and how it will affect the lighting situation in our portraits.

Frontal lighting

Frontal lighting refers to light which comes directly in front of your subject (the light source is behind you and the camera). The situation is possible or when your subject is facing the light source (for example face directed to a setting or a rising sun). Another possibility is with reflected light. Like in this image, Dialsiz was standing in the shade, but in front of her was a bright sunny wall, reflecting the sunlight directly on her face.

1b

Pros: Frontal lighting will usually illuminate your subject’s face evenly, without any shadows. It will create an aesthetic and balanced look, which is why this setup is very popular in fashion and beauty shoots.

Cons: The lack of shadows will create a lack and depth and drama.

45 degree lighting

As the name suggests, this refers to a situation where the light comes from an angle of 45 degrees from the nose of your subject. This is extremely popular lighting setup in portrait photography, which is sometimes called Rembrandt lighting. It can be easily achievable with side light coming from a rising or setting sun, or by positioning your subject at a 45 degree angle to a window.

26b

Pros: in this lighting setup, you will note how the light illuminates your subject’s face gradually. Creating a gradual shadow, and in our two dimensional art form, shadows usually mean depth and volume. That is the reason this setup is so appealing in the eyes of most viewers.

Cons: The dramatic effect of shadowing parts of the subject’s face might not be suitable for your visual story.

90 degree lighting

As the name suggests, this refers to a situation where the light comes from an angle of 90 degrees from the nose of your subject. It can be achievable with side light coming from a rising or a setting sun or by positioning your subject at a 90 degree angle to a window.

F11A1636

42


Pros: Extremely dramatic effect, which is almost impossible to ignore.

Cons: This dramatic lighting setup can be a little over dramatic, and with the right subject, this lighting can be scary! It all depends of course, on what you want to evoke in your visual story.

Backlighting

This refers to a situation where the light comes from behind your subject, and in front of you.

IMG 9185b

Pros: Backlight will create highlights in the contours of your subject, and unlike with frontal lighting, this will create a sense of depth, and a clear separation between the subject and the background. Unless the light source is very dim and fully covered by your subject’s body, working with backlight will force you to be creating with your photography, as it will make the exposure a bit more difficult. This is where switching from the automatic mode can be handy. While overexposing can be good for creating a burned out background or a lens flare, underexposure will usually result in a nice silhouette (as above)

Cons: As mentioned, this one is a bit more advanced to handle, and will mostly require switching out of your camera’s automatic mode, but again, a great opportunity for some creative photography.

Light from above

This refers to a situation where the light comes from directly above your subject, like during midday.

F11A0035b


Pros: This interrogation room style lighting setup will not be flattering to most faces. Light coming from above will result in deep shadows on your subject’s face, making the forehead shadow the eyes, and making the nose shadow the chin. However, it can be used as a way of creating a very dramatic image. Oscar-winning Cinematographer Gordon Hugh Willis, did a groundbreaking work in Francis Ford Coppola’s movie, The Godfather, with the combination of underexposing and positioning the lighting source above the actors’ faces. He managed to support the dark and mysterious sense of this movie, with the audience was unable to see most eyes throughout the movie.

Cons: As mentioned, when handled right, this lighting setup, can lead to great and creative results. Otherwise, you subject will look like he or she is going to answer some tough questions.

Controlling natural light

Basic: in the simplest form, controlling natural light is first in the planning. Choose the right time to be outside, or take your subject indoors to use the soft light coming from a window.

Advanced: You can control natural light almost like controlling artificial lighting, with the help of reflectors or/and flags.

Reflectors are used to bounce light into the subject’s face. For example, if you are dealing with light coming from above, you can overcome the problem of dark eyes by illumining them using a reflector. It can also lighten the dark side of the face, if needed, in the case of lighting from a 45 or 90 degree angle.

F11A1258b 1

2
You can see the reflection of the reflector used to bounce light back into this man’s face.

A flag is usually a piece of black fabric that can be used to block unwanted light and create shadows (shadows mean a sense of depth remember?) on the subject’s face. To use a flag properly, you will need somebody or something that can hold it. That is the way I use all kind of flags in the field. I have used my hat (which I was holding in my left hand) to shadow an overexposed forehead numerous times, or using the help of an innocent bystander that was asked to stand in one spot for a moment, to create a shadow when needed.

Exercise #1:

Christmas (or just after it) is the best time to ask for a favor. Bring your favorite friend, family member, or pet, and position it in front of a window. While moving your subject, practice the concepts of frontal, back, 90 degree and 45 degree lighting setups. Examine the images, and get a deeper understating of how light direction will affect your portrait.

Exercise #2:

Reflectors are effective and fun to use. You can buy yourself a reflector, or prepare one with a small piece of cardboard and a simple aluminum foil.

googletag.cmd.push(function() {
tablet_slots.push( googletag.defineSlot( “/1005424/_dPSv4_tab-all-article-bottom_(300×250)”, [300, 250], “pb-ad-78623” ).addService( googletag.pubads() ) ); } );

googletag.cmd.push(function() {
mobile_slots.push( googletag.defineSlot( “/1005424/_dPSv4_mob-all-article-bottom_(300×250)”, [300, 250], “pb-ad-78158” ).addService( googletag.pubads() ) ); } );

The post Understanding Natural Light Part 3: Direction of Light by Oded Wagenstein appeared first on Digital Photography School.

Digital Photography School

 
Comments Off on Understanding Natural Light Part 3: Direction of Light

Posted in Photography


Discover the Secrets of Natural Light Photography With This 70% Off Deal

13 Dec

As we announced yesterday – today is Day 1 in our 12 Deals of Christmas dPS – and we’re kicking things off with fantastic deals on or popular Natural Light eBooks.

You can pick either one up for $ 7 (65% off) or grab them both for an even more amazing price of just $ 12 USD (a 70% saving).

PicMonkey Collage

The eBooks are:

  • Natural Light: Mastering a Photographer’s Most Powerful Tool – by travel photographer Mitchell Kanashkevich
  • Life in Natural Light: The Ultimate Guide Guide for Photographers – by family photographer Rachel Devine

These eBooks are normally $ 19.99 – today only either one is $ 7 USD!

Both of these beautifully illustrated and informative eBooks tackle this vitally important topic for photographers from different perspectives but together they make a beautiful little bundle of learning for just $ 12 (70% off).

Taking beautiful photos using nothing but the light around you can often seem as difficult as using the Jedi Mind Trick to get the people in your lens to sit still. But these two books will help you see your photography in… well…. a whole new light.

We could go on about these eBooks all day but this deal only lasts 24 hours so head to our 12 Days of Christmas Page and grab yours before this deal is over.

googletag.cmd.push(function() {
tablet_slots.push( googletag.defineSlot( “/1005424/_dPSv4_tab-all-article-bottom_(300×250)”, [300, 250], “pb-ad-78623” ).addService( googletag.pubads() ) ); } );

googletag.cmd.push(function() {
mobile_slots.push( googletag.defineSlot( “/1005424/_dPSv4_mob-all-article-bottom_(300×250)”, [300, 250], “pb-ad-78158” ).addService( googletag.pubads() ) ); } );

The post Discover the Secrets of Natural Light Photography With This 70% Off Deal by Darren Rowse appeared first on Digital Photography School.

Digital Photography School

 
Comments Off on Discover the Secrets of Natural Light Photography With This 70% Off Deal

Posted in Photography


5 Tips to Help You Take More Natural Looking Portraits

09 Nov

You’ve probably seen those beautiful portraits where couples are embracing, and laughing naturally off-camera, or two children are skipping up the beautiful country lane-way, bathed in the most perfect light. Everything in the image looks flawless, yet it still seems like the photographer just happened to be walking past at the exact right moment to capture the perfect shot.

So why is it when I try and capture those perfect candid moments someone always has their eyes closed, hair is covering half of their face, or the lighting is wrong, or worse still an unsuspecting passerby in bright pink sweat pants walks through the background of the shot.

Lifestyle 2

In this image I gave each model one action to repeat over and over, to achieve a natural candid feel. (The Footy Show cast – image courtesy Nine Network Australia)

Getting realistic and natural looking shots can be really tricky. If I set up the shot, and try and direct certain poses and reactions, the shots can look really stiff and contrived. If I try and get people to laugh on cue, it tends to look fake.

I can always leave it to chance in the hope that the people I’m working with do something worth photographing but this isn’t always an option. So what’s the best way to get people to look natural on camera? Here are my five favorite and most successful techniques to help you take more natural looking portraits:

1. Check your mood

People tend to mirror, and reflect the mood of the photographer, so if you are having a bad day or feeling grumpy, then your models are going to pick up on that vibe. If you want happy and excited looking expressions, then you need to have that vibe yourself. If you are not feeling it before the shoot, for whatever reason (stuff happens right?) then do whatever it takes to put yourself in a good mood. Listen to a funny podcast on the commute in, call a friend who makes you laugh, read funny stuff. Eat half a jar of Nutella (don’t judge me).

WW14 192

2. If you want people to laugh genuinely, then give them something to laugh about

I’m constantly wisecracking through the shoot, and ever ready to capture the expressions as the joke hits. The best way to do this is to set up your models in the position you want them, start with serious poses, and then throw in a funny remark between frames.

You don’t even need to be that funny for this technique to work. You only really need two or three good jokes, or lines, that will crack a group of people up. I’ve been using the same lines for years and they still work. The important part is that you make them your own, and it’s something you would say, or feel comfortable saying.

3. Laugh with people

GB MEL14 750 Lifestyle 3

To get this image of the Dalton family (above) I actually just started laughing with them. Laughing with your models is infectious. I felt a bit embarrassed doing it at the start, but soon discovered it was totally worth the genuine laughs, and reactions I got. (The Dalton Family/Foxtel)

Another great trick to make models laugh is I actually ask my models to laugh, and will start laughing with them. This always starts out really awkward, everyone laughs uncomfortably, and at first they are laughing at me. But, after a while, everyone is laughing with me, and I’m always able to capture some genuine and beautiful laughing shots.

4. Give each person something to repeat

Lifestyle 4

In this image, I gave each of the girls a specific action and eye-line, while they walked toward my camera. The client wanted a fun, positive, natural-looking shot. If this sort of image is left to chance, all the girls end up looking in the same direction, or have the wrong facial expression.

Try and give everyone in the group a set of actions to repeat as you shoot. This makes it easier to control the group, and keep the shape of the shot you are trying to get. I find I have greater success when I give each model only one action to repeat, and a direction to look toward.

An example of the direction I gave for the girls walking above would be:

  • Girl A (use their real names or course!): Walk towards me, look into the camera and smile at me like you’ve just seen your best friend
  • Girl B: Walk towards camera and smile over at girl A
  • Girl C: Tell a story, and gesture with your hands and look over at girl B
  • Girl D: Laugh to yourself and walk towards camera

5. Keep talking, coaxing, encouraging, directing

People perceive silence from a photographer as a sign that you are unhappy with what they are doing.

PPTS Women 0035 PPTS Men 0026W

What’s your favorite technique for getting natural looking portraits? Do you have any great tricks we could all try? I’d love to hear about them. Please share any others in the comments below as well as your images of natural looking portraits you’re proud of.

googletag.cmd.push(function() {
tablet_slots.push( googletag.defineSlot( “/1005424/_dPSv4_tab-all-article-bottom_(300×250)”, [300, 250], “pb-ad-78623” ).addService( googletag.pubads() ) ); } );

googletag.cmd.push(function() {
mobile_slots.push( googletag.defineSlot( “/1005424/_dPSv4_mob-all-article-bottom_(300×250)”, [300, 250], “pb-ad-78158” ).addService( googletag.pubads() ) ); } );

The post 5 Tips to Help You Take More Natural Looking Portraits by Gina Milicia appeared first on Digital Photography School.

Digital Photography School

 
Comments Off on 5 Tips to Help You Take More Natural Looking Portraits

Posted in Photography


Understanding Natural Light Part 2: Color of Light

04 Nov

Light has different Properties, and by understanding those differences and using them in your favor, you can become a better image maker.

Gold1

Golden light of late day, mixed with cool light in the shadows.

Chapter Two: Understanding color in natural light

In this chapter, we will:

  • Explore how color can affect the viewer’s emotional response.
  • Understand how the color of natural light changes throughout the day.
  • Learn how to mix light colors to create depth.
  • Practice using exercises.

Please note that as a portrait photographer, I will be discussing portraits and using them as examples. However, this knowledge applies to any type of photography.

Color as a visual storytelling element

What we perceive as color is actually our brain’s interpretation of light reflected off objects and transmitted to the brain via our optic nerves. Under the field of color psychology, a range of studies have shown that colors can deeply affect how we experience the world around us, from the taste of the food we eat, to how we respond to new brand packaging on supermarket shelves. Colors affect how we feel, and this is precisely why understanding color is so important to you as a photographer.

There are many ways you can control or change the colors in your images, such as by editing, with the use of filters, or adjusting the White Balance. But as we are here to discuss natural light, so let us delve deeper into understanding how to create an emotional response by using the right color of natural light.

Mix2

Because color is an amorphous concept (we all see colors slightly differently), there is a standard way to define color tone; this is called color temperature. We will not discuss the technical definition of color temperature for two reasons: first, it will make you very sleepy and second, it will not make your photos better. The important thing to know about color temperature is that it is a standard that is measured in degrees of Kelvin (now you understand what the “K” symbol means in your White Balance menu). Color temperatures below 4000K are considered warm (red and yellow) and color temperatures above 4000K are considered cool (blue).

Plan your shooting time

In the previous article, Understanding Natural Light Part 1: Quality of Light, you learned to forget the concept of good or bad lighting, and think in terms of suitable or less suitable. It is your responsibility to shoot under the most suitable light for the visual story you wish to create, and this concept applies to the color of light as well. Now, let’s get familiar with how the color of the light changes throughout the day.

Blue Light (about 11000K)

Blue light

  • When: Before sunrise and after sunset.
  • Common emotional effect: Glum and mysterious, with a sense of coldness.
  • Take it to the next level: If you are in an urban environment, try mixing the natural blue light with the artificial orange light from street lamps to create an amazing color combination and depth (which will be later explained).
  • Please note: Due to the low level of light during this time of day, pay close attention to your shutter speed to avoid blurry images.

Golden Light (about 3500K)

  • When: It depends on your location on earth, but golden light is usually around sunrise and sunset.
  • Common emotional effect: Praised by photographers as the golden or magic hours, with soft, pastel-like warm colors of red and yellow. Portraits and landscape images will seem almost magical.
  • Take it to the next level: By standing higher than your subject, shooting from an angle of 45 degrees, you can achive a wonderful catch light (a spark of light in the eyes of the subject) due to the reflection of the sky in the subject’s eyes. (see image below)
  • Please note: As with any type of magic, you need to be swift and efficient. Plan your daily schedule carefully. For example, if you want to shoot during the golden light of sunrise, you must get up early. Very early.

Gold2

Midday Light (between 5000-6500K)

  • When: It depends on your location on earth, but usually from one hour after sunrise until one hour before sunset.
  • Common emotional effect: This light seems neutral in color to the eye, even though it’s considered a cold color in terms of Kelvin degrees. The contrasts caused by midday light will amplify objects’ colors. So, vibrant objects will seem even more vibrant and vice versa.
  • Please note: You can enjoy the amplifying benefits of midday light without the harshness if you place your subject indoors near a window.

Mid day

Cloudy Day (about 7000K)

  • When: When the sky is heavily overcast.
  • Common emotional effect: Similar to that of blue light with a glum, winter-like feeling, but stronger and brighter, allowing you to work with faster shutter speeds.
  • Please note: The biggest benefit of working on a cloudy day is the continuity of color tone throughout the day. This means there’s less pressure on you to work as fast as possible, as you would need to do at other times of the day, like the golden hours.

Clouds1

Mixing colors

You can achieve very satisfying results by mixing cold with warm color tones. For example, by placing warmer colors in the foreground and colder colors in the background, you can add volume and depth to make an interesting image.

You can do this by either working during the border of two periods of the day, or by mixing natural and artificial light.

Working during the border of two time frames

For example, if you choose to shoot at dusk, which I heard National Geographic photographer William Albert Allard refer to as the “The time between dogs and wolves”, you can combine the warm colors of the golden light, with the cold colors of the blue light. Here is an examples:

Mix1

Mixing natural and artificial light

If you choose to mix light sources, the sky’s the limit. In this image: on one side (camera left), this lady was illuminated with the warm orange light of the shop’s light bulbs and on the other, with the blue cold light of a cloudy day (camera right).

Mix3

Or in this image where I mixed the warm natural light of fire with the blue artificial light from the projector in the background.

Mix4

Exercise #1: Study other photographer’s work

Search the web and gather 20 images from your favorite photographer. Analyze his or her color choices:

  • Are there themes or common colors choices?
  • What is the light source: natural or artificial?
  • Are there specific time frames when this photographer works (golden hour, midday, etc.)?

Exercise #2: Shoot with the wrong White Balance

To make it short, White Balance is how you help your digital camera create a more accurate representation of the colors in your image. By telling your camera the lighting conditions (cloudy, sunny, flash, etc.) you help the camera adjust to neutralize the color balance in the image.

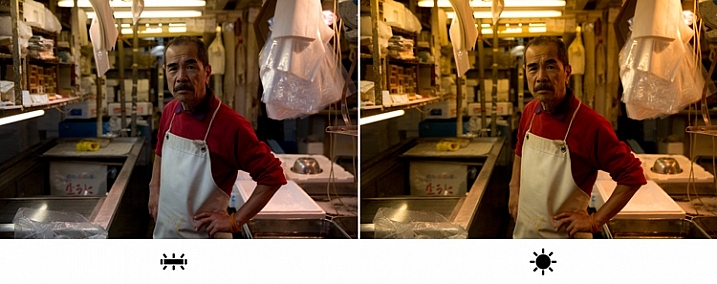
For this exercise, I will ask you to go to the White Balance menu in your camera and shoot with the wrong setting. For example, if it’s a sunny day, choose the Cloudy setting, which will make your photo look much warmer. Or shoot in the Tungsten or Incandescent setting to make it really cool.

F11A9441

I took this image in Tokyo’s Fish Market, under the white light of Fluorescent. On the left image, I went for the Fluorescent white balance preset, which is indeed more faithful to the original lighting situation in the market. But, on the right image, I selected the “wrong” white balance ( daylight preset), which made the image much warmer, in color and feel. Which one is better in your opinion?

If you are shooting in the RAW image format as opposed to JPEG, the White Balance setting is not that relevant, as you can easily change it in post-processing. This is one of the characteristics of RAW files. But this exercise allows you to understand how, by intentionally changing the image’s color tone, you can create different and interesting emotional effects using color.

The author would like to thank Nicholas Orloff for his assistance in writing this article.

googletag.cmd.push(function() {
tablet_slots.push( googletag.defineSlot( “/1005424/_dPSv4_tab-all-article-bottom_(300×250)”, [300, 250], “pb-ad-78623” ).addService( googletag.pubads() ) ); } );

googletag.cmd.push(function() {
mobile_slots.push( googletag.defineSlot( “/1005424/_dPSv4_mob-all-article-bottom_(300×250)”, [300, 250], “pb-ad-78158” ).addService( googletag.pubads() ) ); } );

The post Understanding Natural Light Part 2: Color of Light by Oded Wagenstein appeared first on Digital Photography School.

Digital Photography School

 
Comments Off on Understanding Natural Light Part 2: Color of Light

Posted in Photography


Understanding Natural Light Part 1: Quality of Light

14 Oct

Light has different qualities, and by understanding those differences and using them in your favor, you can become a better image maker. From my point of view, the best place to start improving your ability to work with light is by learning its most basic form, which is natural light.

quality of light - soft light portrait

Therefore, this article is the first of a series that will focus on understanding how to work with natural light. We will:

  • Explore the difference between harsh (hard) and soft lighting and each of their pros and cons.
  • Understand how to use color to serve the visual story we want to portray.
  • Learn how the direction and intensity of light affects the final image.

Even if you are a studio photographer, who wishes to work exclusively with strobes and flash, this article is crucial for you. If you manage to understand how to work with natural light, this knowledge can be later applied to any genre or style of photography. As a portrait photographer, in my explanation and examples, I will focus on working with natural light in portraits. However, as mentioned, once you understand the concept, this can be applied to any genre or subject.

George Eastman, the American entrepreneur that founded Kodak (and who probably knew a thing or two about photography), said, “Embrace light. Admire it. Love it. However, above all, know light. Know it for all you are worth, and you will know the key to photography.”

What do you think that Mr. Eastman meant by “know light. Know it for all you are worth.”? From my point of view, he meant that as photographers, light is our raw material. It is like letters to the writer and notes to the musician, and as photographers, we must understand how this raw material works and behaves under different conditions.

quality of light - soft light

Quality of light – Understanding hard and soft light

In this first chapter we will:

  • Understand the differences between soft and hard (or harsh) light.
  • Explore the concept of “Good Light” versus “Bad Light.”
  • Learn about common challenges faced when working with natural light, and how to overcome them.
  • Suggest exercises that you can use to practice the explained concepts and techniques.

Soft lighting

Soft light is characterized by low levels of light, lack of shadows, a small and gentle difference between dark and bright areas.

soft lighting

Soft lighting situation is characterized by the lack of shadows and (as you can see in this image), cold hues during cloudy weather, which fit the greens and blues in this situation.

When does it happen? Depends on the weather and your location on the globe (it won’t happen at the North Pole, during winter), but you will usually encounter a soft lighting situation, at the edges of the day (also referred to the Golden Hours), just after sunrise and just before sunset (how much time before and after, is again dependent on your location). Besides the edges of the day, you can find soft lighting conditions under a cloudy or overcast sky.

Challenges: Soft light is not suitable for every portrait, it all depends on what you wish to evoke (in terms of emotion and mood) in your image, as I will describe later. Another issue is the level of light, which may be too low. So, it is very important that you pay attention to your shutter speed and increase it manually, to avoid blurriness.

Hard/harsh lighting

Hard light is characterized by strong levels of light, long and deep shadows, a big difference between dark and bright areas (high dynamic range). Because of contrast, harsh light will strengthen the current situation in the field, in terms of color. Saturated and rich colors will seem even more intense, and dull colors will seem even more so.

hard or harsh lighting

In harsh light, there is a huge contrast between the dark and bright areas in the image and details might get too bright or too dark – but this is perfectly fine!

When do you have hard light? It also depends on the weather and location, but usually, you can encounter harsh lighting situations during the day, about two hours after sunrise, until one hour before sunset (middle of the day).

Challenges: the main problem with the harsh lighting is the huge difference between the dark and bright areas (also known as contrast). Contrary to our sophisticated eyes, the camera is (still) not able to cope with this difference. So, the result will be the loss of details in your image, as they become too bright or too dark. For example, you might get a great exposure on your subject while losing detail in the background or vice versa.

Some photographers mistakenly think that this condition (the loss of details) is due to an error they made in operating their camera. So, the first step to the solution is to understand the problem. If you are shooting under harsh light, that lost of details is something that you cannot change (unless you use flash or post-process the image), because it is due to the contrast between the dark and the bright areas. So, changing the aperture, shutter or ISO, won’t help correct it.

“The artist vocation is to send light into the human heart.” – Robert Schumann

Forget about “good” lighting

Due to the challenges I have mentioned, most photographers avoid shooting under harsh lighting condition. They prefer to work under soft lighting, which is usually referred to as more pleasing to the eyes. However, it is not always the right choice for your portrait.

hard lighting

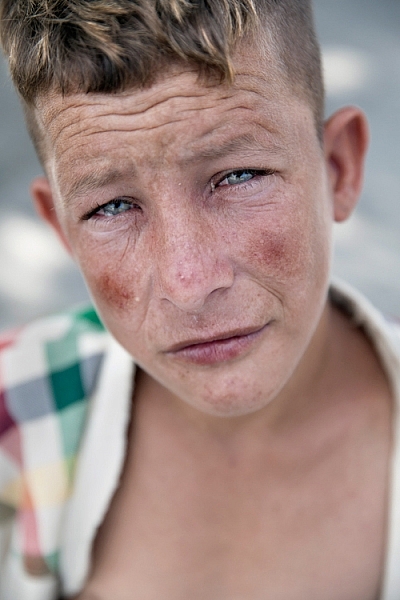
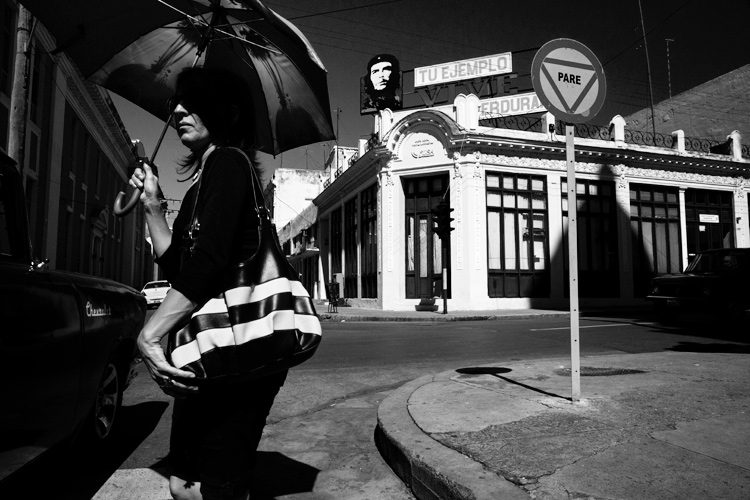
That day in the streets of Havana was extremely hot. So, I used the harsh light to evoke that sense.

The thing to remember is that you want to match the light to the visual story you want the portrait to tell. As we just learned, each lighting condition has its own qualities and characteristics. While the soft light from a setting sun might be best for a romantic couple’s photoshoot, it may be less suitable for a portrait of a hardworking man outdoors. Let’s stop using the concepts of good and bad lighting, and start thinking in terms of more suitable, or less suitable lighting.

Planning

To work under the most suitable lighting conditions, you should plan for it instead of just wishing for it. Check the weather forecast, as well as the sunrise and sunset times. For example, if you need soft lighting for your project, you should know exactly where to be, and what to do around sunrise and sunset every day. Do not waste even a minute on sleeping when there is suitable light out there.

1. Matching the time of day to desired mood – You should choose the most suitable time to go out and work, according to your desired results.

2. Matching the visual story to the given lighting conditions – I often choose the visual story, according to the available light given to me on location.

soft light

Flexibility

Sometimes even with careful planning, the weather changes and therefore, so does the natural lighting condition. That’s what happened to me when I was working on an assignment in southern Thailand. In a place known for pristine beaches and postcard-like islands, the mighty monsoon decided to make an appearance and show everyone who’s boss. At first I was afraid that I wouldn’t be able to provide the images that I had in mind to my editor.

However, I know one thing for sure: you cannot fight the light. So I changed my plans and headed to the small village of the Chao Leh (Sea Gypsies) community. This visit (which ultimately became a seven-year project), allowed me to discover a different, much less touristy side, of that area. I discovered a story about a struggling community of sea drifters, that never fully recovered from the tsunami of 2004.

soft light be flexible

The Chao Leh (Sea Gypsies) community in southern Thailand. The stormy weather, with its soft, low, blue-colored light gave the images a sense of “cold winter,” which was a perfect match to the feeling I wanted to evoke in that story.

A few days later, the clouds gave way to the sun and I was back to my original shooting list. When I sent the images back to my editor, she was thrilled with the new direction and decided to run a full story about this community.

“What makes photography a strange invention is that its primary raw materials are light and time.” – John Berger

In conclusion, do not limit yourself to working exclusively under soft light, as both harsh and soft light summon great challenges and opportunities. As a visual storyteller, aim to always try and match the story you are trying to tell, to the light you are using, to bring that visual story to your viewers. The key element is planning, with a bit of flexibility, and some room for serendipity.

Practice working with quality of light

Exercise #1 – using over exposure compensation while working with a harsh light condition.
  • Time: A sunny afternoon.
  • Location: Any outdoor location – from your backyard to the local park.
  • Step one: Place your favorite model (it can be a friend, a family member, your partner, or a beloved dog) under the midday sun.
  • Step two: Take a moment to understand how the light illuminates your subject’s face. Do you notice the high contrast between dark and bright areas (lit forehead versus dark eyes)?
  • Step three: Work in Aperture Priority mode (A in Nikon and AV in Canon), and use exposure compensation (overexpose), until you manage to bring more light to your subject’s eyes. Don’t panic, as you will probably burn out (lose details) the background, and parts of the subject’s face. It is okay. This exercise is about being able to stop reviewing your images through the histogram tool and highlight alerts, and start thinking in terms of story, and if that story is working or not.
hard light portrait

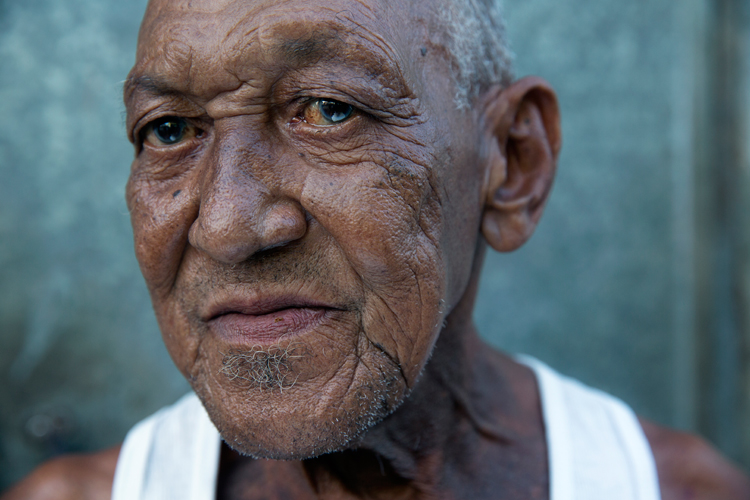
Harsh light helped me to create a sense of “roughness” in this portrait, which I felt that support the visual story I wanted to tell.

Exercise #2 – switch to black and white while working under soft light conditions.
  • Time: A cloudy day or the edges of the day.
  • Location: Any outdoor location – from your backyard to the local park.
  • Step one: Approach a stranger and ask his or her permission for a portrait. Perhaps you can send the final image by email as a token of appreciation.
  • Step two: Switch to Monochrome mode, which is black and white photography (under Picture Style in Canon and Picture Control in Nikon).
  • Step three: Take a close-up portrait (torso and face only). Note how the light gradually illuminates the subject’s face, creating soft pockets of shadows that evoke a sense of depth.

black and white in soft light

The author would like to thank Nicholas Orloff for his assistance in writing this article.

googletag.cmd.push(function() {
tablet_slots.push( googletag.defineSlot( “/1005424/_dPSv4_tab-all-article-bottom_(300×250)”, [300, 250], “pb-ad-78623” ).addService( googletag.pubads() ) ); } );

googletag.cmd.push(function() {
mobile_slots.push( googletag.defineSlot( “/1005424/_dPSv4_mob-all-article-bottom_(300×250)”, [300, 250], “pb-ad-78158” ).addService( googletag.pubads() ) ); } );

The post Understanding Natural Light Part 1: Quality of Light by Oded Wagenstein appeared first on Digital Photography School.

Digital Photography School

 
Comments Off on Understanding Natural Light Part 1: Quality of Light

Posted in Photography


6 Tips for Taking Better Natural Light Classic Portraits

10 Sep

On now until September 22nd (2015) over on Snapndeals – 20% OFF Wayne’s eBooK – Portrait Tips and Techniques: Natural Light Black & White Portraiture. Grab it before the deal expires.

DPS STUDY 1

RETHINKING NATURAL LIGHT

Many photographers choose to use natural light as their chosen style, almost as a badge of honour. Natural light is a wonderful source, providing ease of use and flattering light to your subjects, but you should be using it the same way as you would studio lights. You need to create light and shade that will add emotion or mood, not flat lighting that gives no shape, texture or mood. Hopefully these tips will help you on a path to refining your natural light classic portraits.

#1 – FINDING QUALITY LIGHT AND SHADOWS

First, find good quality light – preferably open shade, as this offers soft flattering light and is lower in contrast. Avoid the sun as your main light as it will cause harsh shadows and squinting, which is undesirable for quality portraits.

Open shade can be found under awnings, the edge of trees or buildings, and inside doorways or windows, for example. In these images the girls are positioned approximately 1.5 metres (5 feet) inside the doorway of an old timber shed.

Look for the shadows; they are equally important. Shadows subtract the light and create shape and mood.

After you have established your location, check the background. Even if you have found the perfect, open shaded location, make sure the background isn’t too contrasty with sunlit areas. These can be visually distracting, so try and select uncluttered backgrounds that are lower in contrast and darker than the subject’s face. This will allow the face to project forward by being the lightest tone against the background (all the images in this article demonstrate this).

DPS STUDY 2

#2 – FIND THE DIRECTION OF LIGHT

Once you have found good quality of light, check its direction. You want the light to come across your subject’s face at approximately 45 degrees to the nose, and from a higher angle. That height should also be at around 45 degrees, as a basic starting point.

You can check the catchlight positioning by looking at the eyes; there should be one in both eyes at around 10-11 or 1-2 o’clock. (This depends on the side of the face that is being lit and the structure of the eye sockets). Deep-set eyes will need a slightly lower light source. You should also notice the nose shadow to be at around 45 degrees.

To lower the catchlights you need to change the angle of your subject’s head by tilting more or less. Even moving the subject further away from the edge of an overhang will lower the angle of the light. It’s the opposite of being in a studio where you can move the lights. Natural light is fixed and requires you to move the subject and/or camera to achieve good lighting.

DPS STUDY 3

#4 – EYES ARE WINDOWS TO THE SOUL

Catchlights are very important in portraiture. They not only guide you where the light is coming from, but also create a sense of depth. TIP: no catchlights = NO photo. When there are no catchlights, there will be minimal, if any, texture and colour in the eyes. Always study the eyes for guidance.

#5 – SIMPLE POSING

The portraits here are the basic classic style, looking into the camera. It’s usually more flattering to angle the shoulders away from the camera, again 45 degrees is a handy starting point. Leaning the bodies and heads toward each other gives an emotional connection. Upright or leaning away would show detachment from each other.

It’s also a good practice to have the noses turned slightly away from the camera, particularly with adults. Noses that point directly at the camera will look broader in many cases, particularly when combined with flat lighting. With kids, it’s not as critical and good lighting will create better shape.

Arms and hands need to be posed simply so as not to draw attention. In images #1 and #2 above (top of article), the lower arms are bent downwards and the hands clasped softly. Things you should avoid are open fingers, particularly draped over a shoulder, as this can make a portrait busy and untidy. Elbows bent at 90 degrees should also be avoided. Here’s a simple mantra to remember when it comes to posing people’s heads, arms, legs, hands, hips, shoulders, etc:

IF IT BENDS – BEND IT. IF IT CURVES – CURVE IT. IF IT TWISTS – TWIST IT.

Applying this will help you avoid static poses.

DPS STUDY 4

DPS STUDY 5

#6 – EXPRESSION

Above all else, expression is the most important element in a portrait. In most cases, a poorly lit and posed portrait with a beautiful expression will trump a technically perfect portrait with an average expression in most cases, but this is no reason to pursue a path of mediocrity.

Expression is a personal thing. A moody, soulful style is my preference, but your sessions should always include various expressions such as laughing, smiling, pensive, etc. To achieve this soulful style you can’t be jumping around in a hyperactive mood expecting soulful looks. The best approach is a more Zen-like style, quietly giving direction. These classic style portraits produce beautiful open eyes, relaxed facial muscles, and true shape to the lips. Truly timeless, heart and soul portraits, but it all takes PRACTICE.

DPS STUDY 6

SUMMARY

  • Treat natural light photography the same as studio lighting.
  • Find quality soft light.
  • Look for shadows to create shape and mood.
  • Place your subject at 45 degrees to the light as a starting point.
  • The light source is fixed, so move your subject and camera to reduce the height of the light in the eyes.
  • Check for catchlights in the eyes.
  • Simplify your posing.
  • Soft expressions work best for classic low-key portraits.

SPECIAL NOTES

With each of these images, other angles of the face (2/3 face and profile) can be achieved by simply moving the camera position. Although the pose and light would remain the same, you may have to adjust the head tilts slightly and check your backgrounds.

Clothing colours also play a big part with quality portraits. Darker clothing works best for low-key portraits. Your eyes should be drawn to the brightest tone in the portrait, therefore, light-coloured clothing would be visually distracting.

On now until September 22nd (2015) over on Snapndeals – 20% OFF Wayne’s eBooK – Portrait Tips and Techniques: Natural Light Black & White Portraiture. Grab it before the deal expires.


googletag.cmd.push(function() {
tablet_slots.push( googletag.defineSlot( “/1005424/_dPSv4_tab-all-article-bottom_(300×250)”, [300, 250], “pb-ad-78623” ).addService( googletag.pubads() ) ); } );

googletag.cmd.push(function() {
mobile_slots.push( googletag.defineSlot( “/1005424/_dPSv4_mob-all-article-bottom_(300×250)”, [300, 250], “pb-ad-78158” ).addService( googletag.pubads() ) ); } );

The post 6 Tips for Taking Better Natural Light Classic Portraits by Wayne Radford appeared first on Digital Photography School.

Digital Photography School

 
Comments Off on 6 Tips for Taking Better Natural Light Classic Portraits

Posted in Photography


3 Steps to Photoshop Retouching for Natural Looking Portraits

26 Jul

In the world of photography, editing and retouching are just as important as the imagery itself. Every image that you see published has been through its fair share of post-processing before it is seen by the public. If photographers didn’t retouch their images, it would be like a painter presenting his sketches instead of the finished painting.

portrait retouching techniques

With the fast moving technology of today, extraordinary images are everywhere, every day. Even with perfect lighting, and preparation work, a final image always receives some post-production attention. The trick to post-processing is to make it look as if it hasn’t been retouched at all, or as I call it, “refreshed”.

With the endless possibilities of Photoshop retouching techniques available, how do you know what tools to use when, and why? In this article, you will learn professional photoshop tricks that work for any portrait, any time. This is a simple recipe to give your subjects a naturally refreshed look, letting their genuine beauty shine, while keeping the integrity of their expressions, their features, and the clarity of the digital image itself.

Key Steps in the Refreshing Process

  1. Evaluate
  2. Eliminate
  3. Reduce
  4. Repeat

The specific tools and techniques discussed here are tried and tested with over 10 years of retouching experience. It is best to experiment with these concepts, and with practice, develop your own style of retouching.

This process has been designed as a routine that will eventually create habits in your mind, train your eyes to see the details more clearly, and create an overall efficient and effective retouching process. The goal is to spend less time in front of the computer and more time behind the lens (where the real magic takes place).

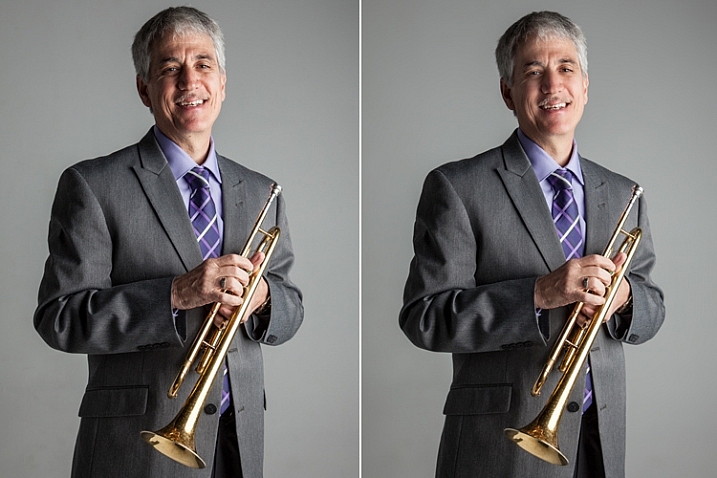
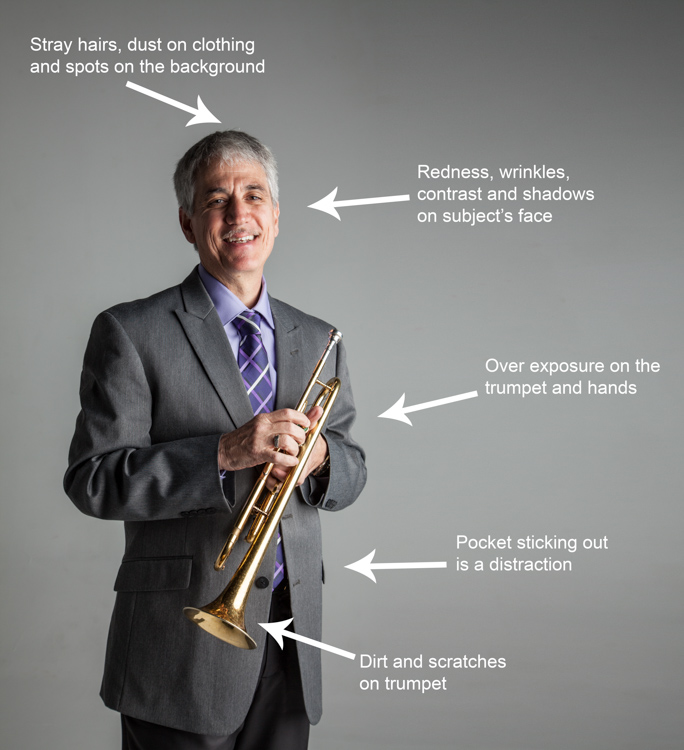
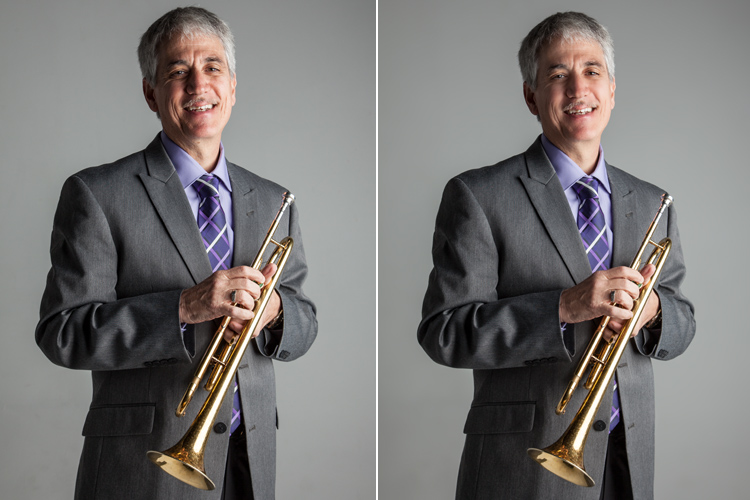
Let’s look at each one of these steps in order. We will use a studio image of a musician as the example throughout this article.

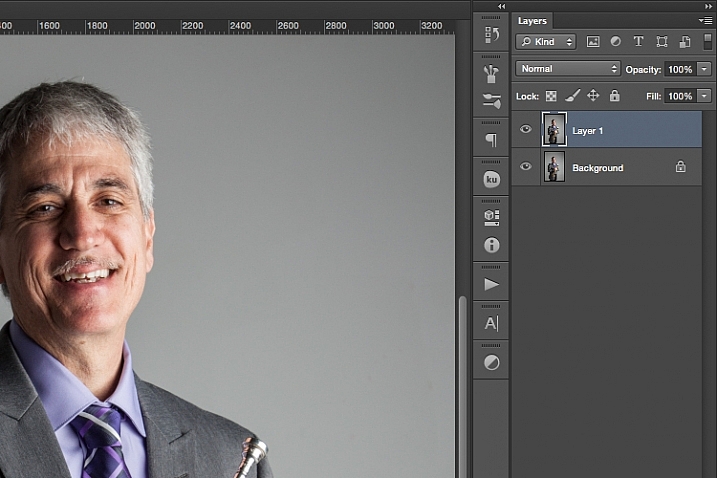
A great tip to keep in mind during this entire process is that with each new step, or even sub-steps, it is best to duplicate your layer before beginning to use the next tool. This way you are creating a back-up of each step for you to return to, if you notice that you are retouching too much on any particular step. It also allows you to see the progression of your workflow in Photoshop.

portrait retouching techniques

Step One: Evaluate

Immediately analyze the image you are about to retouch. How is the lighting? How do the subjects look? What is going on in the background?

When you see the areas of the image that will need your attention ahead of time, you can quickly assess what you will want to accomplish with the retouching process. This is the beginning of training your eye to seek out the details, and look at your image differently, than when you first took the shot.

Look at your image as if it’s not a photograph of a person, but instead consider that it is just shapes, colors, and light. Identify where the light is coming from and how it is affecting the subject.

In this example, the direction of the light is causing more definition, creating harsh shadows across the subject. This was done intentionally to give a more characterized, artistic portrait for this musician.

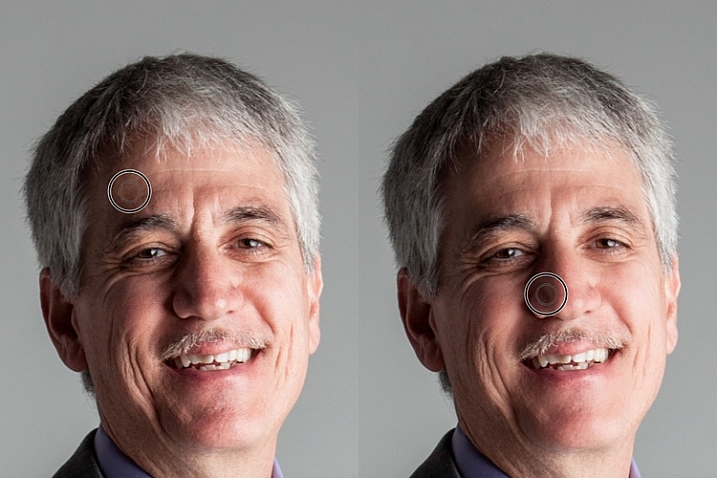
However, its effect can be overpowering at times and cause distraction to the viewer. This is noticeable in the darker shadows around his right eye, and the highlights shining across the left side of his face.

portrait retouching techniques
Here are some additional elements to be aware of.

  • Different textures: The subject is an older man wearing a suit and playing an instrument. All of these textures are different and will require various tools and techniques when the retouching process happens in those areas.
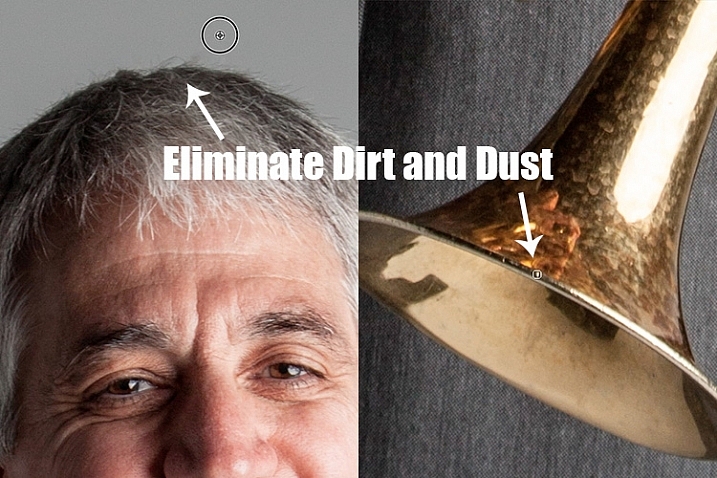
  • Zoom in close: As with any image, zooming in close will allow us to see any skin imperfections, dirt, dust, or scratches that you will want to eliminate all together.
  • Make judgements on distracting elements: There are some parts of the image that could stay or be eliminated, it becomes your choice as the retoucher. What is a distraction? What is a part of the purpose of the image? For instance, the scratches on the trumpet and the left side pocket sticking out could potentially be distractions, but maybe this client would like them to stay.

Once you identify the elements that need attention, decide if each will be removed altogether, or if it needs to be reduced. For instance, the stray hair and the dust on his jacket need to be removed, but the redness and wrinkles are only to be reduced, not eliminated completely. This difference is important for the next steps in the process. So ask yourself, will it be eliminated or reduced?

Step Two: Eliminate

Once you have made your initial evaluation of the image, you can begin the elimination process. This includes but is not limited to: dust, dirt, scratches, pimples, food in teeth, and anything else that doesn’t belong. Zoom in and examine your image up close. Think of each area as shapes and color, allowing yourself to be as accurate as possible when removing these details.

For this first elimination step, it is best to use the spot healing brush, the healing brush tool, the spot tool, the patch tool, and/or any other tool that completely removes things. Don’t rely on just one. Learning how each tool works different will help you use a combination of these removal tools effectively, and efficiently.

For instance, the clone stamp tool copies exactly what you click. The healing brush blends the color and texture of what you click on, with the area you want to fix. The spot healing brush is a genius tool. It has its own way of deciding if you want to blend the area you click on, or remove the unusual pixels within that area (like a stray hair against a solid background).

portrait retouching techniques

The more you make effects to a digital image, the more destructive you can be to the clarity of the final file. Using these tools is crucial to the integrity of the image. If you can click it away in less than a few clicks, then this is the time to do it.

Once the “spots” are removed, you can focus your attention on reducing or “refreshing” the imperfections we all know we have, but don’t want to notice in the permanence of a photograph.

Step Three: Reduce

This is where your artistic eye, and attention to detail come into play. Pimples go away, dust and dirt are just distractions, but our wrinkles, smile lines, scars and facial expressions are the details that make each of us unique. Those are the things you will focus on in this stage of the “refreshing” process.

Every subject you see in an image has great qualities that they might not be confident about accentuating. It is your job as the retoucher to keep not just the integrity of the digital image, but the integrity of the special moment and the emotional expressions that have been captured in that image.

For this reason, this second step is crucial. Train yourself to pay attention to the details, the purpose of the image, and the personality of your subject. If you are retouching a very smiley bride who laughed a lot, you don’t want to remove her laugh lines, but you do want to reduce the shadows and shine as her makeup wears off and the night wears on.

In this specific example of the musician, the character lighting has created great contrast that add to the personality of the subject. But in some areas it over accentuates his wrinkles by creating deep shadows and harsh highlights of overexposure.

The Best Trick in Portrait Retouching

portrait retouching techniques

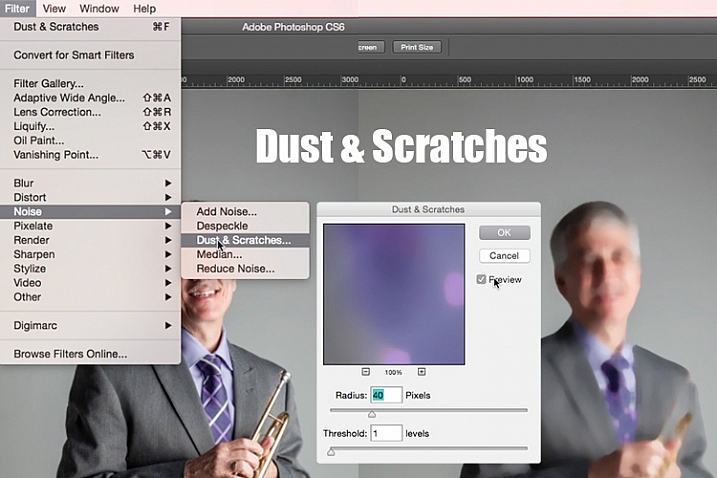
Duplicate your layer after completing step one. With this new top layer highlighted, select from the main photoshop menu: Filter > Noise > Dust & Scratches. A window will pop-up with settings options, and you will notice the image behind that window now shows a preview of this filter effect.

In the Dust & Scratches window, change your Radius to 40px and Threshold to 1. Experiment with these settings and see what works best for your images.

Once you have applied the Dust & Scratches filter (on the top, duplicated layer), you will notice how it blurs the image. But, this is not like using the blur tool. The method that this filter uses specifically identifies differences between pixels and their surrounding area. The Radius is what removes the “dust” and the Threshold is what brings back the details. Dissimilar pixels are modified to achieve a balance between sharpening and hiding defects.

The Dust & Scratches filter provides a more powerful way to remove noise from an image than any other noise removal tool. This is key to keeping the integrity of the textures, color, and overall feel of the digital image as you see it in print or on a screen.

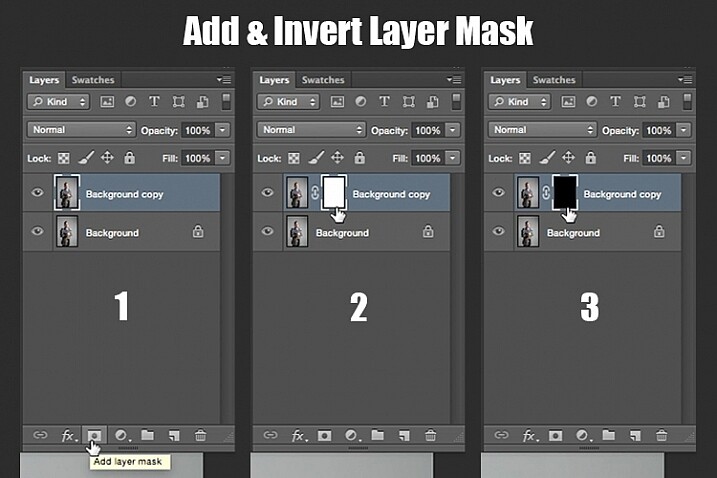
Now that you have a layer with the right effect applied, you are going to add a layer mask to this newly altered layer, and invert the mask. Do this by clicking the icon “Add layer mask” at the bottom of your layers panel. Notice the layer mask shows up as a white box next to your highlighted top layer. Now invert this layer mask by holding the command button and clicking the letter, “i”. This will now change the layer mask to black and bring the original image come back into view.

portrait retouching techniques

Step 1: duplicate the layer
Step 2: add a layer mask
Step 3: invert the mask so it is black

You can see how the image looks unaffected by the Dust & Scratches filter. Really, it is just hidden under the layer mask. Now you can paint back into the areas where you want to reveal the Dust & Scratches filter. The trick is to do this precisely, and not too much.

Select your brush tool (keyboard shortcut is B). Making sure the layer mask is selected (not the layer – square brackets will show around the mask when it is selected like shown above), noticing its color is black, paint with the color white to bring back the Dust & Scratches filter effect.

The key to using the brush tool on an inverted layer mask is to experiment with the brush opacity strength. When focusing on the skin areas, start by brushing back at only 30% opacity. Remember, you can always brush back over an area again more or less by toggling back and forth between painting with black or white. Painting with white will reveal the effect, while painting with black with hide it.

Steer clear of teeth, lips, eyes, nostrils, ear folds, and edges like the jaw line and hair lines during this time. These areas have specific edges and textures that are important to the overall image.

Once you have completed the skin areas, you can smooth the background. Change the opacity to 100% to completely smooth out this solid color background. This only works on solid backgrounds that are seamless. Using the brush at 100% will remove any dust spots that show up from the camera lens, or dirt that is actually on the studio backdrop.

portrait retouching techniques

Tips to Keep in Mind During This Step

  1. In general, keep your brush below 50% when painting the effect on skin. This allows more than 50% of the original textures and features to still be noticeable. If you paint more than 50% in these areas, you will see a putty-like effect starting to take over, causing your image to be more retouched than refreshed.
  2. Using the bracket keys on the keyboard [ and ], frequently change the size of your brush as you paint. Keep your brush hardness at 0 unless absolutely necessary. This allows you to move in and around smaller and larger areas of the skin and background with more efficiency and accuracy.
  3. The zoom tool is your best friend during this part of the refreshing process. Remember, instead of thinking of this image as a portrait, consider that you are just seeing shapes, color, and light. Zoom in close and pay attention to the changes you are creating. Force yourself to go too far with some brush strokes so that you know the limit. When you have gone too far, just toggle back to painting with black (set your opacity to 100%) and remove that last brush stroke all the way before beginning again (or use Command+Z to undo the last step).
  4. Be careful around fingers and edges of arms and legs where there are small curved areas. If you paint near these edges the Dust & Scratches will run over the edge and remove the curved areas all together, altering the look of elbows, fingers, shoulders, ankles and knees.
  5. Men can have beards and tend to have rougher looking skin than women. Be careful not to soften too much on a man’s skin. The same goes for grandparents.
  6. With babies and children, who have much smaller features, it is important to be aware of the shadow areas that you paint over. If you change the shape of their skin too much, it will no longer look like them. This is particularly important around the nose, eyes and mouth – their tiniest features.

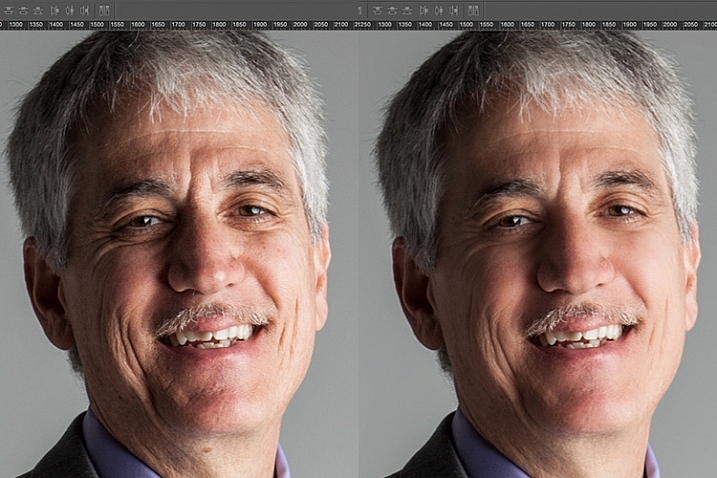
Here is the before and after of the Dust & Scratches filter effect on the musician’s face:

portrait retouching techniques

Notice the softening of the skin and reduction of the shadows in the wrinkles, yet he still looks untouched with most of the original texture still visible.

Now that you have completed the most important task of this post processing technique, it is time to repeat the steps from the beginning. Start again by evaluating the image as a whole. Notice any other areas that need attention. Remember to duplicate the top layer once you have completed any step in the process. Allow yourself to duplicate your layers as many times as you want. It’s always a safe bet.

Next, eliminate. This is your chance to eliminate any larger parts of the image that take more time. Elements to consider removing are:

  • Some (not all) of the scratches across the trumpet.
  • His left-side jacket pocket.

After eliminating for the final time, move on to step three again. In this case, instead of using Dust & Scratches as your reduction tool, you can use other popular items in the toolbox. Tools to consider using are the Healing and Spot Brushes, Dodge and Burn, and Sharpen and Saturate/Desaturate.

photoshop brushes for portrait retouching

Eliminate then Reduce – Repeat.

First, don’t forget to duplicate your layer before starting this step! If you don’t duplicate, this step will not work.

To lighten the shadowed area of the musician’s right eye, the Dodge Tool used at 50% on shadows would look too overly processed. But by allowing it to be over done on this newly duplicated top layer, you can then reduce the opacity of the layer to bring back the layer underneath at 50% or more. Now the over processed shadows look naturally lighter than the original.

This technique is great for all the tools mentioned above. The Sharpen tool can be used on eyes and jewelry. The Healing and Spot tools can be used for under eyes, and shadows that need a bit more attention. Desaturate and Dodge tools can be combined to whiten teeth. Anytime you want to reduce using these tools, just remember to duplicate the layer; make your changes, then reduce the opacity of that newly affected layer until the effect looks natural.

At this point in the retouching process, you have walked through each step of the process twice. It is time evaluate your finished image. This is where all those duplicated layers comes in handy. Keeping the top most layer turned on and the bottom original layer on, turn off every layer in between. Then zoom-in to 100% (accurate view of pixels), and click on and off of your top layer to see all the changes you have made.

If necessary make any other slight adjustments, like cropping to the correct size, then save your image. It’s best to always save the Photoshop layered copy (save as a PSD file) as well as a flattened JPG file, in the quality size you want.

We all know photoshop is full of endless possibilities, and we all love to learn. If you have other techniques that are great for “refreshing” your portraits, please share.

As with all things in life, this process takes practice to perfect. With practice you will gain accuracy, efficiency and train your eyes to see your images (before and after post-processing) in a whole new light, giving you better control over the look and feel of your retouched portraits.

portrait retouching techniques

Remember, as you learn and grow as a photographer, the goal is to always create your best images in the camera, and not just assume that you can just fix it in post. Keep this in mind, and with every click of the shutter you will become a better photographer, and spend less time in front of the computer.

Of course, you will always edit and retouch your very best images. When you do sit down to do so, now you will have a whole new range of techniques you can apply.

googletag.cmd.push(function() {
tablet_slots.push( googletag.defineSlot( “/1005424/_dPSv4_tab-all-article-bottom_(300×250)”, [300, 250], “pb-ad-78623” ).addService( googletag.pubads() ) ); } );

googletag.cmd.push(function() {
mobile_slots.push( googletag.defineSlot( “/1005424/_dPSv4_mob-all-article-bottom_(300×250)”, [300, 250], “pb-ad-78158” ).addService( googletag.pubads() ) ); } );

The post 3 Steps to Photoshop Retouching for Natural Looking Portraits by Danielle Werner appeared first on Digital Photography School.

Digital Photography School

 
Comments Off on 3 Steps to Photoshop Retouching for Natural Looking Portraits

Posted in Photography


Natural Versus Artificial Light: Which Do You Prefer Working With?

16 Jul

Many photographers at one point or another are faced with this question; is it better to use natural or artificial light when taking photos? There is definitely not a right or wrong answer, although as a photographer, you’re sure to have your own strong opinions. In this article, we’ll review the key differences between natural and artificial lighting sources, as well as the pros and cons of using them.

Defining Natural and Artificial Light

To begin, let’s clarify the definitions of natural and artificial lighting. To keep things simple, natural lighting can also be thought of as available light, such as that produced by the sun or the moon. Artificial lighting is produced via another source, such as a studio strobe, speedlight, LED light, your camera’s pop-up flash, or even a streetlight or lamp.

Natural light2

Benefits of Using Natural Light

The biggest benefits of using natural lighting is that it is free, abundant, and very easy to find. There’s no need to make huge investments in lighting equipment to find gorgeous natural light to pull off brilliant shots. All you need is a camera and some sun or moonlight, and you can begin shooting immediately! If you ever choose to upgrade your natural lighting approach, the tools of the trade are also very cheap, consisting mainly of reflectors and diffusers to bounce or manipulate the available light. Due to the ease of use and acquisition of natural lighting, it’s generally recommended that beginning photographers start experimenting with natural light before introducing artificial light to help understand how light works.

Cons of Using Natural Light

While natural lighting is abundant and easy to incorporate into photography, it can be challenging for the simple fact that sunlight varies greatly. Depending on location, season, weather, and time of the day, natural lighting can produce differing colors and contrast in your images. For example, midday sun tends to produce neutral white colors and extremely high contrast, while golden hours of sunrise and sunset have very warm colors and medium contrast. Thus, the look you’re going for will determine the time and location of your photo shoot, unless you harness additional tools such as reflectors, diffusers, and lens filters.

Natural light1

Benefits of Using Artificial Light

If you’re a fan of being able to manipulate and control every aspect of your photo shoot, artificial light will better suit your needs. Since artificial lighting has little to do with natural sources, it is a ceaseless light source that is available at any time of the day, meaning you don’t necessarily have to plan your photo shoot around the weather, or availability of sunlight. Depending on the artificial light source you choose, sunlight or even moonlight can be replicated, creating images that appear to have been shot with natural light, but at a time of your choosing.

While artificial light may have a reputation for sounding complicated and expensive, there’s a wide range of lighting gadgets available for photographers; ranging from cheap DIY solutions to top-of-the-line professional grade strobes, and lots of options in between. Some lights can have tricky settings, but many are relatively straightforward, especially continuous lighting sources such as LED lights that have simple dimming switches.

Off camera flash portrait photography

Off-camera flash portrait photography

Cons of Using Artificial Light

Even though artificial light sources offer you more control over photo shoots, it comes with the burden of needing more gear, and time to set it all up. Unlike the sun, artificial lighting costs money, even if you opt for DIY solutions such as candles or desk lamps. Professional grade artificial lighting sources will also need to be held in place with light stands, and possibly even modified with umbrellas, beauty dishes, and soft boxes.

Depending on the photo you have in mind, you may need multiple artificial light sources to balance your image out. There are also other accessories needed such as batteries or power cables and plugs, and you’ll need a dedicated studio or space to set your lights up. Long story short, artificial lighting can adds lots of extra moving parts to your photo shoot, that cost additional time and money, not to mention require lots of practice.

When to use Natural or Artificial Lighting?

What type of lighting you use will ultimately come down to your personal preference and experience as a photographer, as well as your budget and the ideal image you’re trying to create. Artificial lighting typically takes some time and practice to begin using properly; whereas natural lighting is much easier to get started with from the get-go. There are of course exceptions to these rules, but generally natural lighting is usually easiest to use for documentary, street, or run-and-gun photography when you don’t have a lot of time to set up a controlled photo shoot. On the flip side, artificial lighting is usually preferred for commercial, product, and fashion photography when there’s both a budget, and ample resources to create the photo.

Off camera flash portrait photography

Which do You Prefer?

As noted earlier, there are very strong opinions for and against using natural and artificial lighting for photography. Which camp do you fall into, and why?

googletag.cmd.push(function() {
tablet_slots.push( googletag.defineSlot( “/1005424/_dPSv4_tab-all-article-bottom_(300×250)”, [300, 250], “pb-ad-78623” ).addService( googletag.pubads() ) ); } );

googletag.cmd.push(function() {
mobile_slots.push( googletag.defineSlot( “/1005424/_dPSv4_mob-all-article-bottom_(300×250)”, [300, 250], “pb-ad-78158” ).addService( googletag.pubads() ) ); } );

The post Natural Versus Artificial Light: Which Do You Prefer Working With? by Suzi Pratt appeared first on Digital Photography School.

Digital Photography School

 
Comments Off on Natural Versus Artificial Light: Which Do You Prefer Working With?

Posted in Photography


10 Fantastic Natural Wedding Posing Tips

16 Jun

It’s been a long time since the 80s and 90s formal wedding portraits in studios, that have given wedding photography a bad name in some circles. Nowadays there are really amazing wedding photographers creating images that look like art and capture true emotion, not staged photos. If you are thinking about getting into wedding photography or want an insiders look at how some of that beautiful, natural wedding posing is created, here are 10 tips to help keep it real.

1. Stay in Touch

There is something very intimate and powerful about seeing people touching. This might seem obvious to you, but I think a mistake can be made by leaving space between couples or groups. Tell your groups “Get real close- don’t be afraid of each other!” Or something silly like “Pretend you like each other!” with a big smile on your face. With the groomsmen, I love getting them in a line for something formal, and then telling everyone to “Harass the groom!”

digitalphotographyschool-1-6

Standard photo of groomsmen.

digitalphotographyschool-1-7

Look at the difference in a photo when you have people connecting physically. It doesn’t always have to be romantic to get a great photo.

digitalphotographyschool-1-9

Telling the bridesmaids to get as close as possible, and then lean towards me, gets them connecting physically with each other and elicits natural smiles.

2. Walk Away and Come Back

This is my go to wedding posing instruction for most brides and grooms. I tell them to “Walk away, talk about what you’re going to do tomorrow.” Then after a few good shots I tell them to “Come back.” It’s the easiest thing for them to do, they aren’t thinking about themselves or me because I’m far enough away, and it looks natural because it is natural.

digitalphotographyschool-1-10

digitalphotographyschool-2-3

digitalphotographyschool-1-11
digitalphotographyschool-1-12

3. Look at Your Shoes

This is a fun one that I’ve discovered makes for a very pretty glamour shot with the brides. Often I’ll see them look over their side at their shoes or the bottom of their dress, and the moment always seems fresh and natural and pretty, especially showcasing their profile. If they aren’t doing that naturally, you can always say “Look over your shoulder at your shoes.” Be ready to click in a moment!

digitalphotographyschool-1-13

digitalphotographyschool-1-14

4. Button Up

There are some great natural wedding posing moments with the groom as he is getting ready. As the title suggests, tell the groom to unbutton and button his jacket up. Or put on his cufflinks. Or adjust his bowtie/tie. This gives him something to do, the moment looks natural and masculine, and if you are near some nice window light, you’ve got your money shot.

digitalphotographyschool-1-17

digitalphotographyschool-1-21

5. Help the Groom Get Ready

This also involves the groom, but is a slight variant on the last tip. Have the groom’s father or best man (or anyone, really) help adjust something on the groom. Ideally his bowtie, tie, or boutonniere. If they aren’t doing it already, ask a groomsman if he can “make sure the groom’s tie is on right.” This creates a natural moment that looks great, and also involves tip #1, Stay in Touch.

digitalphotographyschool-1-18

digitalphotographyschool-1-20

6. Spin

If the bride has got the dress, use it! With the right personality and dress combination, you can bring out your bride’s inner child with this fun wedding posing tip. Ask her to spin! Slow down your shutter speed for a fun movement photo.

digitalphotographyschool-1-22

7. Something with Personality!

I like doing this during photos with the wedding party. I typically will take a photo with the groom and each of his groomsmen separately, and the bride and each of her bridesmaids separately. To make it fun for them (and if the group seems like the type to do it) after each standard photo I’ll tell them to give me “something with personality!” This is typically what comes out, completely on their own:

digitalphotographyschool-1-24

digitalphotographyschool-1-52

digitalphotographyschool-1-25

digitalphotographyschool-2-5

There are always lots of laughs during this time, and everyone enjoys something that could potentially be a bit tedious.

8. Look Away, Look at Me

Good portrait photographers know there is a fleeting moment that occurs half a second before a person focuses their vision on something. It’s a completely natural moment that is entirely unselfconscious. The person is busy deciding where to look and in that moment they are truly themselves, unaware of the camera or how they look. Take advantage of that moment. You can create this moment by telling your bride or groom to “look away…now look at me”, then *snap* you’ve got it.

digitalphotographyschool-2-6

digitalphotographyschool-1-54

Bonus – looking away is also a nice photo moment that is unselfconscious.

9. Compliment

Don’t be afraid to compliment your brides – or their mothers, sisters, grandmothers, etc. – this one is mainly for the ladies. I use this wedding posing tip at the beginning of the day, usually when makeup is being applied. Nothing brings out a natural smile like a genuine compliment. “You look amazing!” “So beautiful.” I’ve heard married guys say they have a hard time doing this, but it doesn’t have to be creepy and I’m never overstepping any boundaries when I tell someone I think they look fantastic. Doing this turns a bored getting-makeup-done look, into a lovely smile.

digitalphotographyschool-1-55

digitalphotographyschool-1-56

digitalphotographyschool-1-57

10. The Almost Kiss

A little secret in the wedding photography industry is something called the “almost kiss.” This is used to create fantastic natural wedding posing. Kisses are fine but can sometimes be sloppy, maybe too intimate, and they give it all away. You can create palpable tension by telling a bride and groom to “get close for a kiss, but you are not allowed to kiss. Don’t do it!” This creates the best photo moments ever. In the end, give them what they want and let them kiss.
digitalphotographyschool-1-15

digitalphotographyschool-1-16

Hopefully some of these tips have given you some inspiring ideas! Feel free to add your own awesome natural wedding posing tips in the comments below. I know there are many more great ways to make your wedding photos fantastic. Thanks for reading- Phil

googletag.cmd.push(function() {
tablet_slots.push( googletag.defineSlot( “/1005424/_dPSv4_tab-all-article-bottom_(300×250)”, [300, 250], “pb-ad-78623” ).addService( googletag.pubads() ) ); } );

googletag.cmd.push(function() {
mobile_slots.push( googletag.defineSlot( “/1005424/_dPSv4_mob-all-article-bottom_(300×250)”, [300, 250], “pb-ad-78158” ).addService( googletag.pubads() ) ); } );

The post 10 Fantastic Natural Wedding Posing Tips by Phillip Van Nostrand appeared first on Digital Photography School.
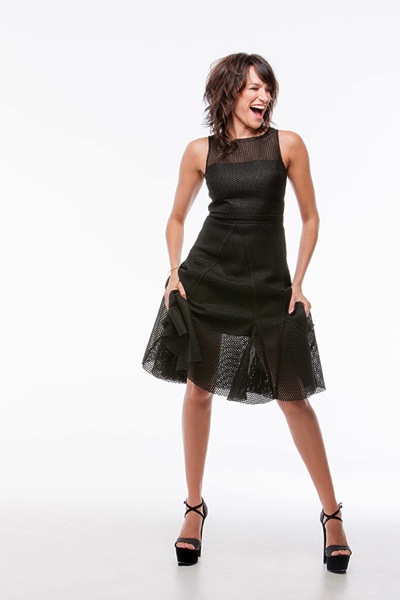

Digital Photography School

 
Comments Off on 10 Fantastic Natural Wedding Posing Tips

Posted in Photography