RSS
 

Posts Tagged ‘Natural’

4 Tips to Leverage Natural Light Using Just your Camera and One Lens

29 Nov

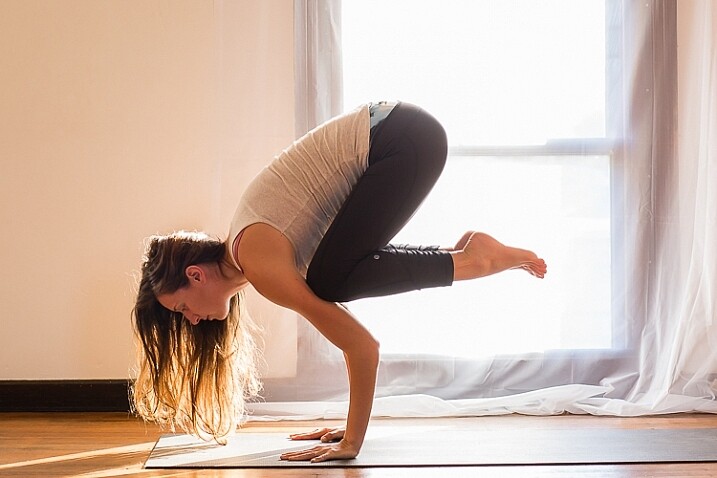
In photography light is everything. Without light, whether that be artificial or natural, there is no photography. The problem is that sometimes there is just too much or too little, and in both cases, artificial light may need to be added. But what if you don’t have any artificial light available to you? And what if all you have is literally a camera with a lens and nothing else? This article focuses on how you can leverage natural light using just one lens and working without a reflector or a speedlight.

#1 Position your subject in relation to the light

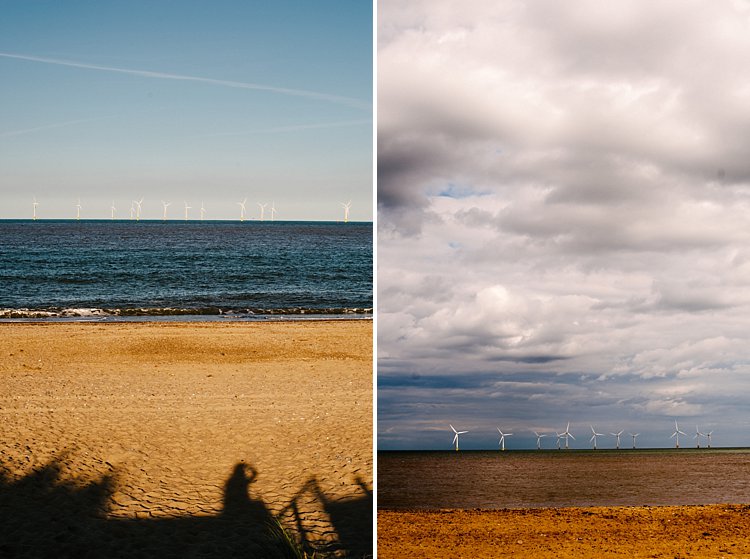
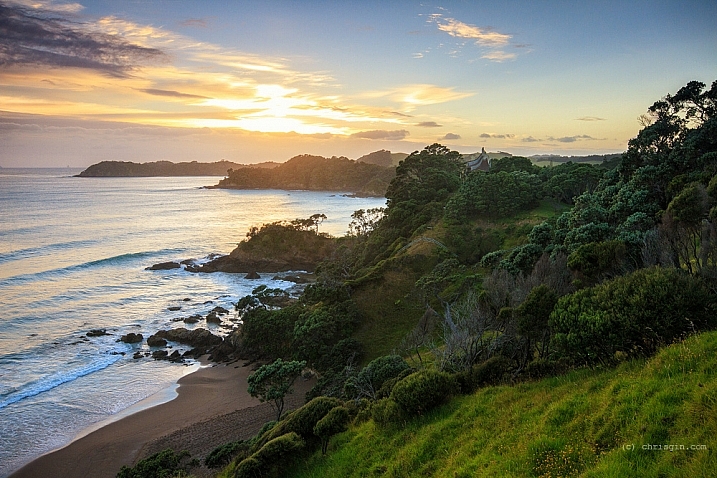
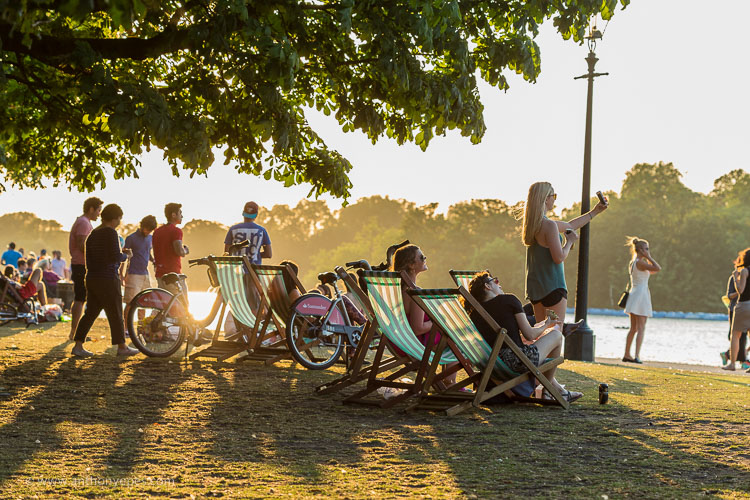
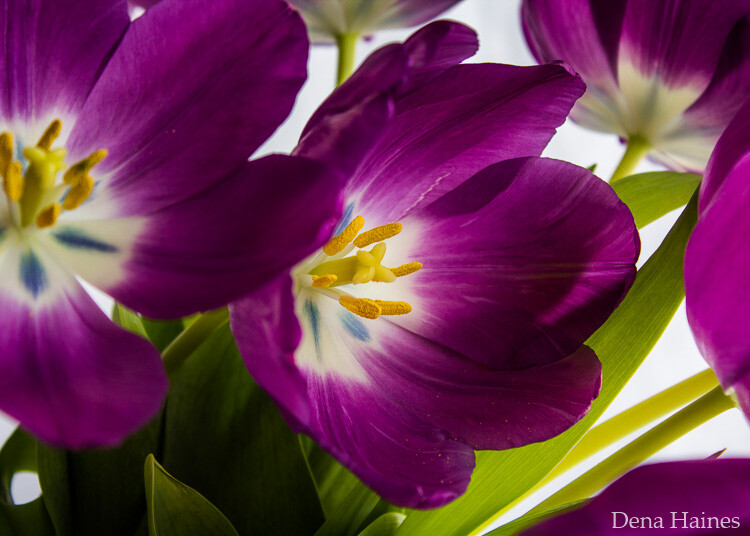
Let’s take a look at these photos below. It was a very sunny day and I wanted to capture the blueness of the sky and the sea as well as the people in the shots. I had a D700 which has a base ISO of 200 and the 50mm 1.4 lens. I have provided the settings below for each photo.

creative-ways-available-light-with-the-50mm_0000

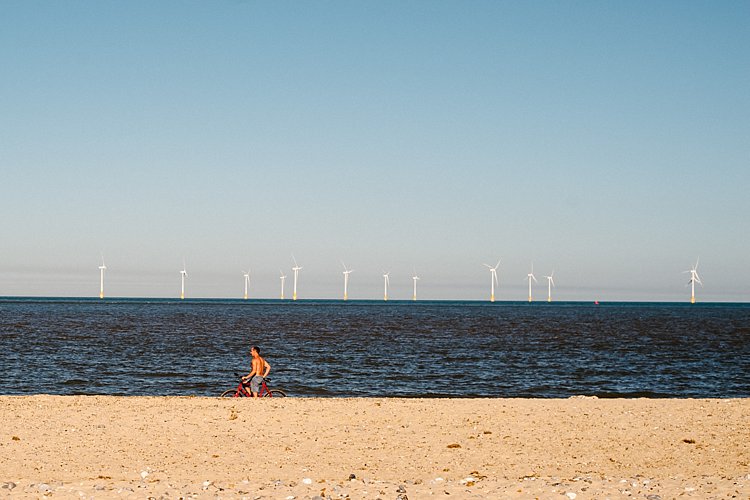
f/5.6 ISO 200, 1/2000th

creative-ways-available-light-with-the-50mm_0000

f/5.6 ISO 200, 1/1250th

creative-ways-available-light-with-the-50mm_0000

f/6.3 ISO 200, 1/2000th

These settings are okay on a very sunny day if you shoot with the sun positioned behind you shining towards your subject. In this case the sea and sky, which also illuminated the people that I wanted to be in the photo.

Lighting position

While these photos are fine, there are a few issues. First, put simply, when this is the lighting position, anyone, and any camera can take these types of photos. You can shoot in automatic mode and the photos would look the same. Mobile phones nowadays can take even more amazing photos in this situation where there is a huge amount of light hitting the subject and the background directly.

I love these types of photos for travel photography, high contrast shots and snapshots that would make me remember such scenes. But if I am after portraits, would I hire a professional photographer who would give me photos that anyone can take? Definitely not! Sure, the occasional lifestyle snapshot in this lighting is acceptable such as this one directly below shot at f/2.5 ISO 200, 1/2500th. But I would not want proper portraits of my family to be taken in this lighting situation.

creative-ways-available-light-with-the-50mm_0000

creative-ways-available-light-with-the-50mm_0000

creative-ways-available-light-with-the-50mm_0000

Harsh shadows

The second issue is the harsh shadows. As a professional photographer, this would never be my lighting position for people or portraits. Even if the sun was coming in at a side-angle, undiffused sunlight directly hitting the subject still produces harsh shadows and hotspots. I would prefer for the sun to be behind the subjects, also known as backlighting, rather than directly in front of them.

If your intention is to take nicely lit portraits with a background that is not blown out, for backlighting to work, you would need to have a big enough flash or reflector to illuminate your subject to avoid silhouettes. Conversely, you can simply expose for your subject but you will have to blow out (overexpose) the background. Therefore, you end up with a white sky rather than a blue sky.

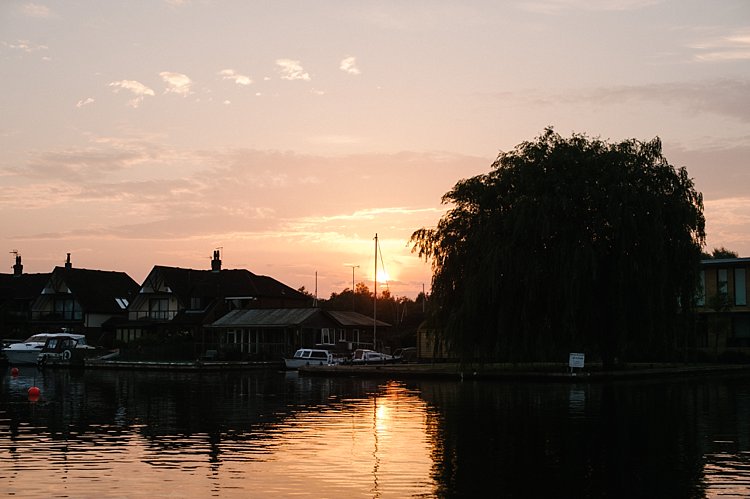
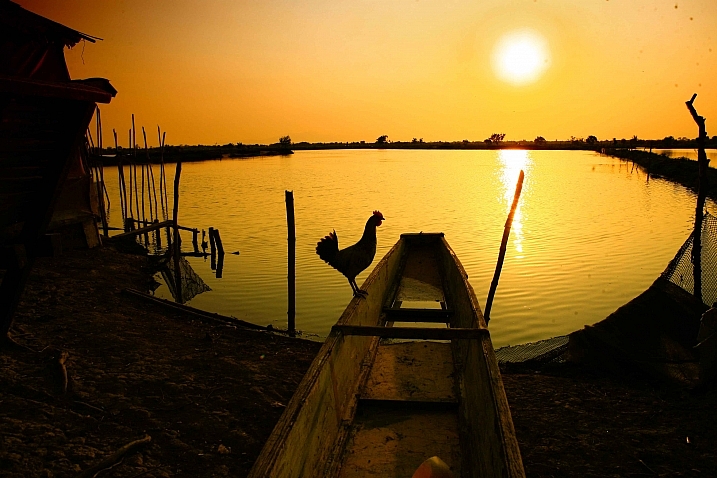
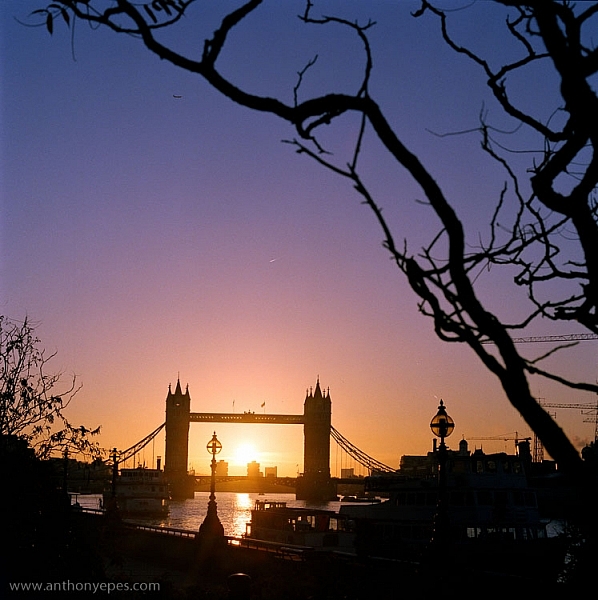
An example of backlighting is this sunset photo below. The houses and the boats were not illuminated. I was too far away for my pop-up flash to be of any help, and I didn’t have a tripod for a long exposure and smaller aperture. But I still wanted to capture some of the soft sky color along with the sunset. Balancing the exposure was tricky and I ended up shooting this image with the following settings; f/5, ISO 200, 1/320th. While the ambient light of the sunset was captured, the other elements in the photo were too dark and ended up almost like silhouettes.

creative-ways-available-light-with-the-50mm_0000

What if you have nothing else but a camera and lens with you? You do not want all your photos to be silhouettes when shooting backlit, or too dark when shooting in the shade. So what you can do is leverage your surroundings by positioning your subject carefully in relation to the light. If you have to shoot backlit portraits in a situation similar to above, shoot an intentional silhouette or use your flash for fill light (more on this below).

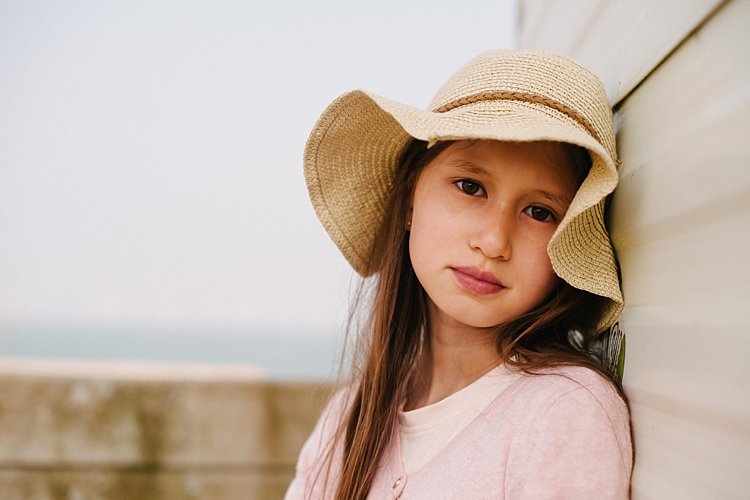
If you’re doing portraits where you want to focus on well-exposed faces, avoid positioning your subject where they are facing the sun which results in harsh light and shadows. On a very sunny day, you may want to wait for the golden hour – the time shortly after sunrise or before sunset –  when the sun is much lower on the horizon and the light is much softer. This yields a light that is much more flattering for portraits. If it is a bright but overcast day, the clouds act as a huge diffuser and the shadows are not as harsh so it is easier to photograph portraits in those conditions.

#2 Look for ideal light

Ideal light is often indirect, reflected, or subtractive light. This can take various forms:

  • Indirect lighting can be the soft diffused light coming from a window.
  • Reflected light can be that bouncing off a white floor, wall, bright sand, or from white or light-colored clothing you are wearing.
  • Subtractive light can be achieved by blocking the light with a diffuser, umbrella or a flag (any flat black object large enough to block any direct light hitting your subject).
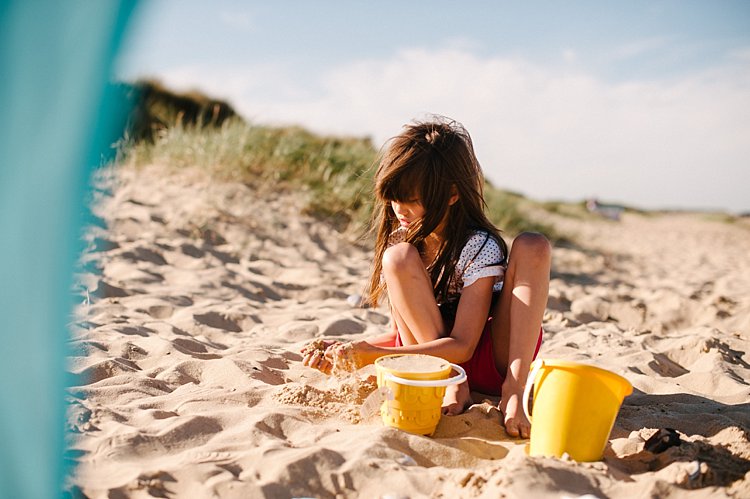
Get out of the sun

As this article does not involve any equipment other than your camera and lens, instead of blocking the light, I positioned my subject in the shade. So that instead of subtracting light from my subject, I subtracted my subject from the light and put her in the shade.

In this example below, it was a very bright day and I did not want any direct light falling on my daughter’s face. I put her completely in the shade but deliberately next to the caravan wall which was light beige. There is some reflected light from the side that helps illuminate her face and the generally shadowed area we were in.

creative-ways-available-light-with-the-50mm_0000

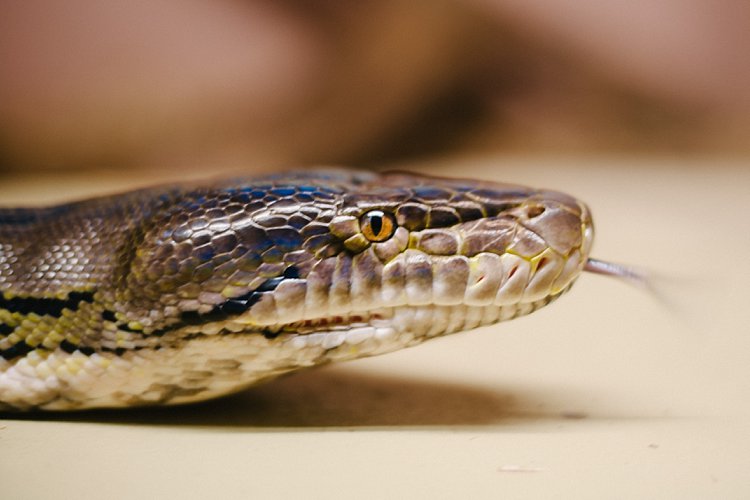
In this photo below taken in the zoo, there was no natural light at all. A fluorescent light illuminated the box where the snake was. You can see this white light reflected on the top part of the snake’s eye (catchlight). I waited for the snake to get into this position and used the light which was bouncing from the ceiling onto him to get this shot.

creative-ways-available-light-with-the-50mm_0000

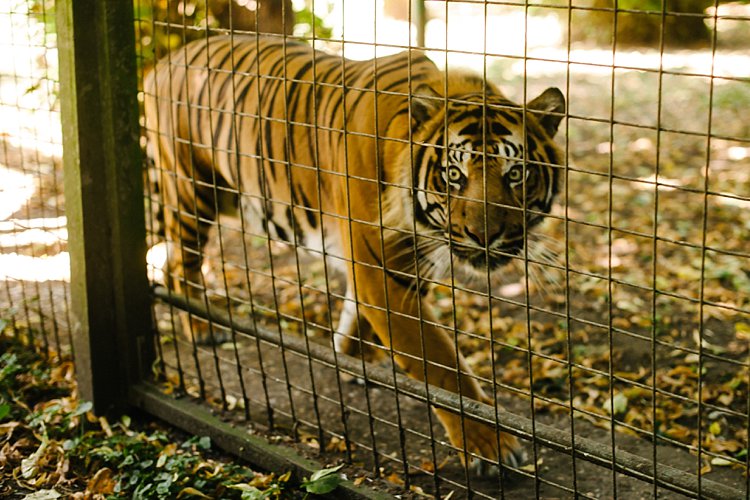
In this photo below, there was no ideal light! We were in a pretty darkly shaded area and the enclosure was mottled with spots of sun and shade. I positioned myself where I knew I could catch a good close up of the tiger in complete shade and waited for it to pass by.  The contrast between the light and shade was so strong that had I taken the photo of the tiger with his body in half sun and half shade, it would not have come out well at all.

creative-ways-available-light-with-the-50mm_0000

#3 Use your pop-up flash as fill light

Now I know that photographers are sometimes funny (and snobby) about using the camera’s built-in pop-up flash. I am one of those photographers, with good reasons. The camera’s pop-up flash blasts light directly onto your subject. It gives you a rather flat and unflattering light with a harsh shadow around the jaw and head to boot. Unless your intention is to shoot like this such as some fashion houses do (and they do it so professionally by the way), then this is a no-no in portrait photography. Ideally, you want the light bounced and angled – anything but aimed directly from the camera toward the subject.

However, I do use my pop-up flash quite a bit! In fact, I use it when I don’t have a flash gun (speedlight) and I’m shooting backlit, especially when the sun is strong. And I have no qualms using it as a direct light in this situation because the camera’s flash is not strong enough to overpower the sun anyway. So the most you get out of it is a little bit of fill light.

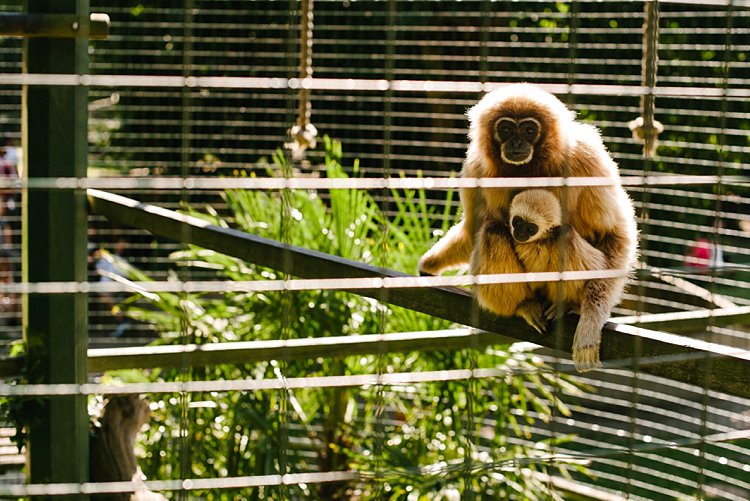
Take this photo of the monkeys below. Had I not used my pop-up flash, there would have been no detail captured on the monkey’s face at all. The sun was too powerful that the pop-up flash could never have flattened the face and created harsh shadows anyway, and I was also too far away from the monkeys for that to happen.

creative-ways-available-light-with-the-50mm_0000

Using the pop-up flash is a fast and easy way to add light. Just be mindful of the caveats and be circumspect when using it.

#4 Try long exposures to capture natural light

Shutter speed has everything to do with ambient light regardless of whether you are doing long exposures or using on-camera, off-camera, or pop-up flash. In fact, with regards to the latter three, flash exposure is completely unaffected by shutter speed.

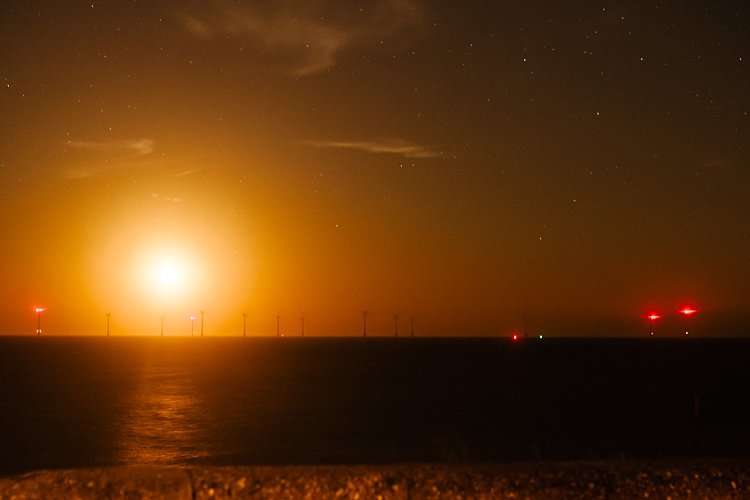
With long exposures, you can take photos even when very little light is available. You need a tripod, or something steady and flat to rest your camera on like a table or chair, and you’re good to go. So why would you want to slow down your shutter speed and when must you do it? Do it when you want to capture the ambient light.

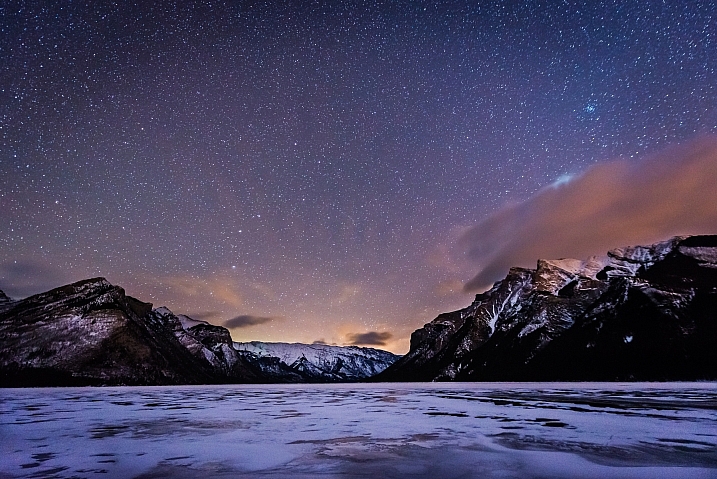
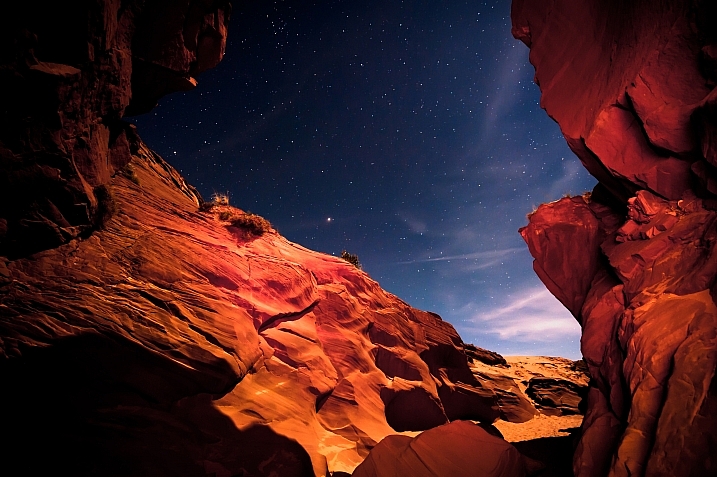
Armed with just a 50mm and the camera placed on a steady surface, I slowed my shutter speed right down to a few seconds using the bulb setting. I may have captured the moon rising but the sky is pitch black and not enough ambient light was captured. My shutter speed might have been slow but not slow enough. Ambient light was very crucial here because there were stars in the sky.

creative-ways-available-light-with-the-50mm_0000

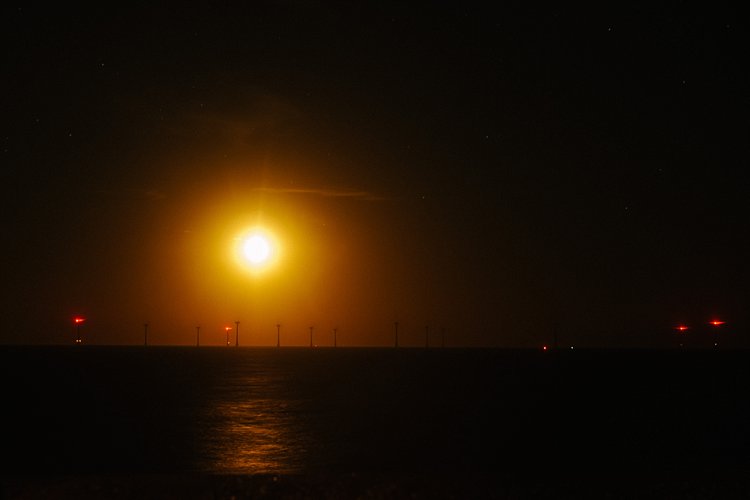
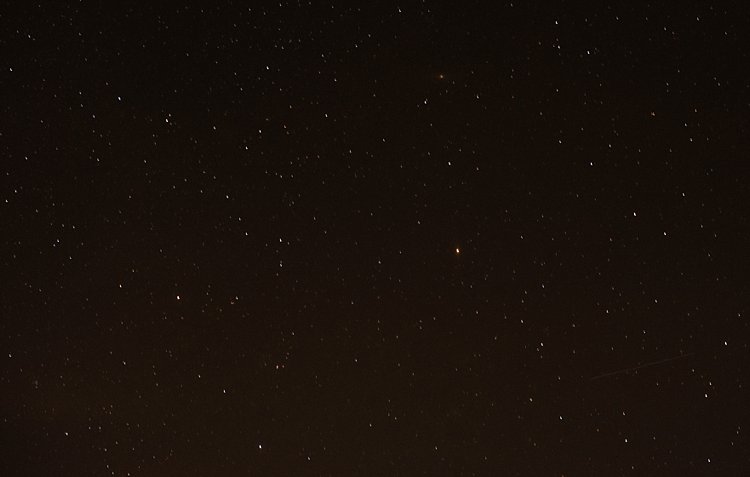
In contrast to the above, the photo below is the same scene photographed with a much slower shutter speed so that the stars are visible.

creative-ways-available-light-with-the-50mm_0000

Even with just the 50mm you can photograph the starry sky such as below. However, don’t go over 10 seconds as you would then start capturing the star trails.

creative-ways-available-light-with-the-50mm_0000

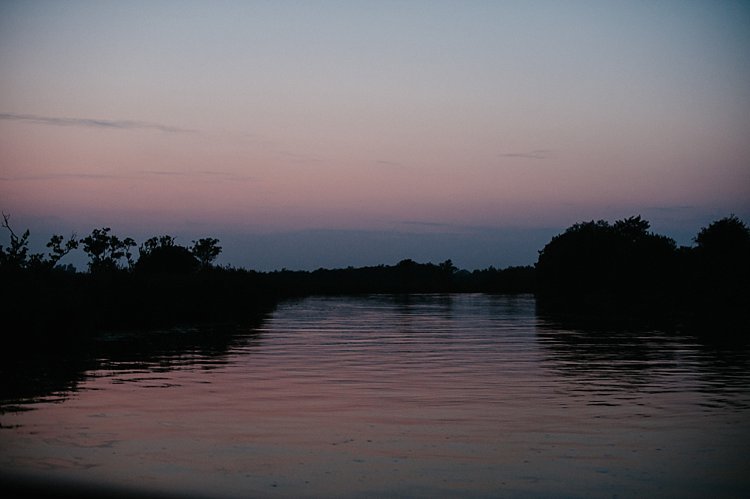
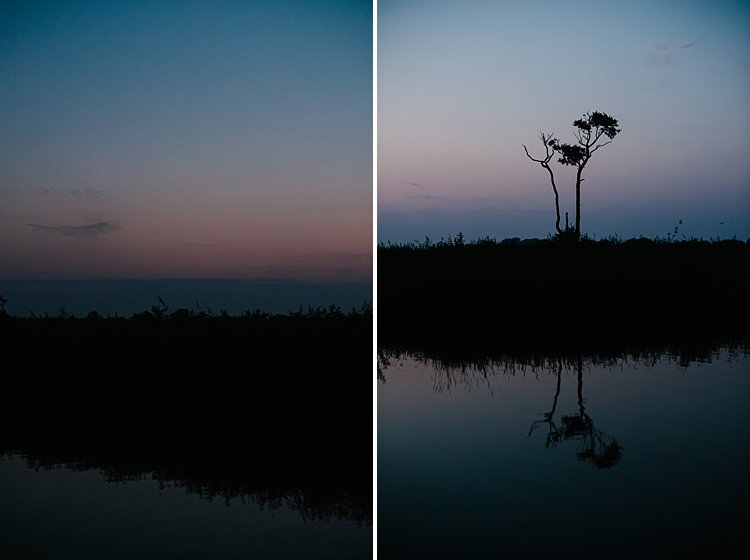
Using shutter speed wisely and skillfully is a great tool for capturing mood, color, and ambient light, even when there is very little of it. There is some light you don’t ever want to kill such as the soft evening light just after sunset. These photos were taken simply with a camera with a 50mm lens at a slow shutter speed, a wide aperture, and a fairly high ISO (as I was on a slow moving boat). These images were shot at;  f/2.5, ISO 2500, 1/100th. A faster shutter speed would have killed this light and rendered the sky pitch black. Too slow I would have run the risk of blurry photos due to the moving boat.

creative-ways-available-light-with-the-50mm_0000

creative-ways-available-light-with-the-50mm_0000

creative-ways-available-light-with-the-50mm_0000

creative-ways-available-light-with-the-50mm_0000

googletag.cmd.push(function() {
tablet_slots.push( googletag.defineSlot( “/1005424/_dPSv4_tab-all-article-bottom_(300×250)”, [300, 250], “pb-ad-78623” ).addService( googletag.pubads() ) ); } );

googletag.cmd.push(function() {
mobile_slots.push( googletag.defineSlot( “/1005424/_dPSv4_mob-all-article-bottom_(300×250)”, [300, 250], “pb-ad-78158” ).addService( googletag.pubads() ) ); } );

The post 4 Tips to Leverage Natural Light Using Just your Camera and One Lens by Lily Sawyer appeared first on Digital Photography School.


Digital Photography School

 
Comments Off on 4 Tips to Leverage Natural Light Using Just your Camera and One Lens

Posted in Photography


How to Use 1 Natural Light Setup to Create 3 Different Portrait Looks

22 Sep

As a portrait photographer, the majority of my work is shot on location. This can be outdoors or in my clients’ homes or places of business. I mostly shoot using natural light and have become adept at finding the best light source in any location as well as creating backgrounds that won’t interfere with the subjects. In this tutorial, I want to show you an easy, natural light portrait setup you can recreate in your own home. Simply by repositioning yourself and your model, you can create three distinctly different portraits from this one setup.

one natural light setup - 3 looks

No special lighting or fancy equipment is needed, and the techniques are straightforward and easy to master. Experiment to create different looks using various backdrops such as plain walls or sheets, or different outfits for your subject. You can also get different effects by changing your lens, distance to the subject, and experimenting with different apertures.

Equipment

Below is a list of the items I have used for this setup and suggested substitutes:

  • SHEER CURTAIN or FABRIC: You can buy a sheer curtain or length of fabric from any fabric or haberdashery store. I picked this one up from the clearance table at my local Spotlight store (Australia) for under $ 20.
Image showing basic natural light portrait setup using a white cloth

A white sheer curtain or large sheet of sheer fabric will filter the window light.

  • REFLECTOR: I have a circular, five-way reflector that follows me everywhere. Each side has a different colour; white, silver, gold, and black, plus a diffuser. It folds into a neat little disc, is lightweight, and can be thrown into the back of my car. You will get endless use out of a portable reflector, and at around $ 30 from Amazon, it’s a worthwhile investment. However, if you don’t want to rush out and buy a reflector (or wait for your order to arrive before you start shooting) a large piece of white card, polystyrene, or foam board, will work equally well.
Image showing basic natural light portrait set-up with a reflector

This reflector was a great investment at around $ 30. It is lightweight and folds up compact to the size of a dinner plate.

  • BACKDROP CLAMPS: another Ebay or Amazon purchase, my backdrop clamps come in packs of 12 for under $ 20. These are infinitely useful for creating makeshift studios. In this instance, I used them to attach the sheer curtain to the rolled-up window blind. You can also use masking tape to stick the curtain directly onto the window, or use heavy-duty stationery clips.
clamps can be helpful for a natural light portrait setup

Backdrop clamps can be purchased inexpensively from Ebay or Amazon and similar.

Lens

My favourite portraiture lens is the Canon EF 85mm f/1.8, but you can use a 50mm, a 100mm – whatever works in the space you have. A tighter space will require a shorter focal length.

Basic portrait setup

Look for a window or glass door with a good strong light source coming through, so that you can shoot at the lowest possible ISO. If the window has a sheer curtain, pull it across to filter the light. If there is no curtain, you can attach a piece of sheer fabric to the window using the backdrop clamps or masking tape.

As you can see, the setup couldn’t be simpler. This is the corner of my living room, with sliding glass doors to the left of the shot. The strong afternoon light is filtered with a sheer curtain clipped to the bottom of the roller blinds. I have closed the curtains in the adjoining room to create a dark background for my subject. If your room layout doesn’t allow this, you can hang a sheet or large piece of coloured fabric behind your subject, or just use a plain wall.

natural light portrait setup background

The setup couldn’t be simpler.

As you can see in the setup below, I brought my model forward (away from the open door behind her). This is to ensure she has good light on her face, and that there is sufficient distance between her and the room behind her to make sure it is completely out of focus. In this pull-back shot, you can see some detail in the room behind her. However, in the first pair of portraits, further along, you can see no background detail. The room behind looks like a studio backdrop.

Add a reflector

If you are going to use a reflector, you’ll need someone to hold it for you. If there is no-one to help, try propping it on a chair. Let your creative photographer’s brain get to work and figure out a creative solution.

natural light portrait setup reflector and assistant

You’ll need an extra person to hold the reflector – in this case, my husband!

Portrait #1: side lighting and a reflector

This is my most-used natural light setup. Side lighting contours and shapes the face, and is flattering for most subjects. If your subject is male, or if you want to create a moodier portrait, you can try moving the reflector further away from your model or removing it altogether. This creates more contrast by increasing shadow on one side of the face.

Your model can sit, stand, or even lie on the floor if the window is low enough. How you position your model’s face and body is up to you. To recreate the look below, your model’s face needs to be at a 90° angle to the main light source (the window). Her body turns 45º away from you. The door behind my model is opened and I darkened the background room to minimize distracting elements. Position the reflector on the shadowed side of her face, to bounce the light back and fill in the shadows

In the photos below, the image on the left is shot without a reflector. The one on the right is shot with a reflector. The effect in this example is subtle because the light in this room is already balanced somewhat by small, high windows on the opposite wall to the main window. In the photo on the right, you can see how the reflector brightens the face and fills in the shadows, particularly the under-eye shadow of her left eye. It also brings out more detail and highlights in her hair and improves separation from the background.

natural light portrait setup with and without reflector

Left (no reflector): ISO 320, f/4, 1/200th. Right (with reflector): ISO 320, f/4, 1/320th.

Portrait #2: shooting into the backlight

I love this technique for photographing women and girls. It creates soft, non-directional  lighting on the face, so is flattering to every age group. And the backlighting creates a gorgeous halo around the hair. This works especially well if the model wears her hair out, or wears a dress with some sheer elements – think darling little girls in fairy costumes and tutus!

Technique for backlighting

Using the same window setup as before, your model sits or stands with her back to the window. Position the reflector in front of her, bouncing the light back into her face. Your light meter will try to read the light coming from the window, and will underexpose your model’s face. You can obtain the correct exposure by getting in close to her face to set your exposure. You might also bracket your exposures and check the back of the camera until you’re happy with the result (review the histogram but note that the background area may show clipping – that’s okay). To get the exposure right on the face, you will lose detail in the background, which is the idea!

natural light portrait setup backlighting

ISO 320, f/4, 1/160th

The photo below is a yoga instructor posing in front of a window on the floor of her studio. The backlighting is beautiful through her hair, and the warm tones of the timber floor reflect back on her skin to give her a golden hue. The lighting technique is identical to the previous photo. But in this photo, I have allowed the curtain and window to be visible as I think it adds something to the scene.

natural light portrait setup backlighting

ISO 500, f/5, 1/80th.

Portrait #3: shooting with front-on light

For this set-up, the sheer curtain remains in place. Your model faces the window, and you position yourself between your model and the window. If you are taking a wider shot than the example below, you may be able to bounce light into the back of her hair with a reflector.

Frontal lighting removes virtually every shadow on the face. It brings out detail and colour in the eyes, and can be quite striking with the right subject. However, this technique is not for everyone. It can give the face a flat, two-dimensional appearance, and if the light source is too strong, your subject will squint. This lighting tends to highlight every imperfection, which is fine if your subject happens to be young and gorgeous. But, it can be too harsh for a mature model, or someone with a lot of blemishes.

Examples of front lighting

The photo below of a young girl snuggled into a faux-fur hood has been enduringly popular on my social media sites. It was shot using this lighting technique in warm, late-afternoon light.

natural light portrait setup front lighting

ISO 400, f/4.5, 1/200th.

The photo below of my daughter, sun-kissed after a day at the beach, was photographed with front-on lighting. As we were  on vacation and I didn’t have my usual bag of tricks at hand, I didn’t use a sheer curtain to filter the light. As you can see, the highlights are more pronounced than those in the first photo, but the effect is similar.

natural light portrait setup front lighting

ISO 250, f/3.5, 1/125th.

Now it’s your turn

I’d love to hear how you get on trying this setup at home. Please post any questions, comments or examples of your portraits in the comments section below.

Don’t forget, there is also our dPS Facebook Group, which you can join to share your photos and get a critique from other dPS readers.

googletag.cmd.push(function() {
tablet_slots.push( googletag.defineSlot( “/1005424/_dPSv4_tab-all-article-bottom_(300×250)”, [300, 250], “pb-ad-78623” ).addService( googletag.pubads() ) ); } );

googletag.cmd.push(function() {
mobile_slots.push( googletag.defineSlot( “/1005424/_dPSv4_mob-all-article-bottom_(300×250)”, [300, 250], “pb-ad-78158” ).addService( googletag.pubads() ) ); } );

The post How to Use 1 Natural Light Setup to Create 3 Different Portrait Looks by Karen Quist appeared first on Digital Photography School.


Digital Photography School

 
Comments Off on How to Use 1 Natural Light Setup to Create 3 Different Portrait Looks

Posted in Photography


How to Shoot Real Estate Photography Using Natural Light

14 Aug

There’s something about the way sunlight illuminates a room. The light pours over surfaces, metal fixtures gleam, wood detail shines, and the edges of furniture upholstery glows. Natural shadows produced by different objects convey a sense of depth. A naturally-lit image gives you a feel for what it would be like to see the space in person.

1 dining

The following will give you a basic understanding of equipment needs, how to manage contrast and mixed lighting in a room, and HDR shooting techniques to get you started doing real estate photography using natural light.

Equipment

Shooting with natural light has the benefit of a short equipment list. A camera, tripod, and wide angle lens is all you need.

  • Camera: A DSLR with auto-bracketing will increase your shooting speed and ease.
  • Tripod: Your tripod should be sturdy enough that your camera will stay put if you need to manually adjust camera settings, while shooting a series of bracketed images.
  • Wide Angle Lens (with lens hood): For cropped sensor cameras, the Tokina 11-16mm is a fantastic choice for real estate photography. The Canon 10-22mm is also a great option. You’ll be able to handle just about any real estate shooting situation with either of these aspherical lenses. For full frame cameras you’ll want a lens in the 16-35mm range. A lens hood is necessary to prevent lens flare.
  • Not required, but definitely a bonus: Circular Polarizer. In addition to deepening blue skies, a circular polarizer can be very helpful in reducing glare on windows, foliage and pool surfaces.

Sunlight on the exterior

A sunny day is the best canvas for your exterior shots. Try to schedule your shoot during a time of day when the sun will be shining on the front of the house. Ask your client (or check Google Maps) to see which direction the house faces. You want capture the front exterior in its best light, as it’s almost always used as the featured image for the property’s listing.

2 exterior sun darlene

If it’s not possible to shoot the exterior in sunlight, don’t fret. Shooting HDR (explained later on) will help perk up a shady exterior.

851 Cabrillo Ave 05 Exterior print

4036 Baldwin Lane 01 ExteriorFront

Camera position within a room

There’s usually one ideal spot in a room, to position your camera to showcase the best angle. A room’s best angle usually shows:

  1. As much of the room as possible.
  2. The most aesthetically pleasing furniture and/or architectural elements.

For the natural light photographer, finding that spot depends on two things: available space, and window brightness.

Most importantly, you need to pick a space you can physically occupy. For smaller houses and rooms, quite often your only choice is the doorway, as it is likely to be the only spot where you can fit behind the tripod, and still squeeze enough of the room into your shot. Capturing three walls in your shot will give the viewer a better idea of the size and space of the room.

Rooms large enough to offer more than one shooting location often have windows lacking shades or blinds. Pick a spot in which extremely bright windows are angled more than 45 degrees away from center of your lens’ field of view. Doing so will help you avoid a high-contrast shooting situations and potential lens flare, which will in turn reduce your time spent in post-production.

4 side light

The shooting location for this image placed the bright window at a 90-degree angle to the lens, minimizing contrast, as well as producing a pleasantly side-lit scene. An out of frame kitchen window, provided supplemental light from the right.

5 low contrast window

This room’s patio doors looked directly onto a foliage-covered hillside, resulting in a reduced contrast between interior and exterior, and less work required in post-production.

Working with windows

The windows in smaller rooms, such as bedrooms and bathrooms (in which your shooting position is limited) usually have blinds or shades. If the windows are bright, consider closing them at least partially, to reduce contrast between the interior and exterior – especially if the view outside is not an additional selling point for the house. This cuts down on the overall contrast of the scene, while still illuminating the room. It also prevents direct light from hitting your lens, minimizing flare and ghosting.

6 bed shades

Blinds are angled at 45 degree to cut down on scene contrast.

7 living partial

Blinds on the brightest window are partially closed, whereas the patio door blinds were left open.

Shooting HDR

Natural light can create beautiful images, but they do require some extra work in post-production. Rarely can a single exposure handle the range of contrast produced by an interior space with windows. HDR techniques will help remedy shadowy corners and bright windows, properly exposing all parts of the space.

8 bed no hdr

From a single exposure.

9 bed hdr

HDR composite created with nice bracketed images.

To create an HDR image, you’ll need to shoot a series of bracketed images. Tiny rooms without any windows, such as washrooms and closets, usually require three images bracketed by 1-1.5 stops. In most rooms 5-7 images will do the trick. High-contrast spaces containing bright interior lighting and/or windows, may require nine bracketed images. For rooms with exterior views, sometimes HDR programs have difficulty rendering the contrast, no matter how many bracketed images you shoot, and the composite starts to look unnatural.

In general, it’s difficult to achieve a natural look within an image that contains a room with a view. For finer control over this interior/exterior blending process, consider shooting an image to expose for the view out the window, then using Photoshop to mask the view into the HDR composite image of the room.

10 view hdr

HDR composite image.

11 view hdr+extra image
HDR composite with an additional image exposed for the view masked into the windows with Photoshop (above). Even though the change is subtle, the potentially distracting overexposed window scene is now closer to proper levels, making it easier for the viewer’s eye to move from the interior to exterior, and back again.

Mixed lighting inside

One of the difficulties of working with natural light, is dealing with mixed lighting situations. If enough light is coming in through the windows, you can choose to leave interior lights off, resulting in a single daylight color temperature throughout the image. Leaving interior lights off works especially well when window light is sufficiently illuminating the room, the light fixtures themselves aren’t in the frame, and the palette of the room is mostly white.

12 bath sunlight only

Lights off in this bathroom resulted in a fresh and clean look.

13 bed sunlight only

The window light was so abundant in this bedroom that turning the interior lights on could have arguably made the scene look unnatural.

14 living sunlight only

The interior lights were kept off to avoid mixing tungsten with daylight for this shot. Turning them on wouldn’t have added much illumination, as the sunlight was quite bright on its own.

If the room isn’t bathed in sunlight, or contains light fixtures like pendants or chandeliers that should be on display, make sure to turn them on. You’ll end up with multiple color casts that will require correction later, but there’s a point at which simplifying the lighting just to speed up post-production, starts to undermine the ambiance of the room.

15 living mixed

Mixed lighting in the living room above, and the bedroom below, required a significant amount of color correction in production, but resulted in more inviting and warmer looking spaces.

16 bedroom mixed

You can reduce your color correcting time by masking in the lights, the same way you would the view outside a window. Shoot the room with the lights off, then with the lights on. Create two HDR composites of each lighting situation, then mask in the illuminated lights. This works well with fixtures that don’t provide much illumination but should be seen turned on.

17 dining chandelier off

HDR composite with chandelier off.

18 dining chandelier on

HDR composite with the illuminated chandelier masked in with Photoshop.

Conclusion

Shooting real estate with only sunlight and interior lighting lends a beautiful, natural aesthetic to your images. When setting out, remember:

  • A wide angle lens is a must-have, along with camera and tripod.
  • Shoot the exterior bathed in sunlight, if possible.
  • Avoid shooting directly into extremely bright windows.
  • Adjust shades and blinds to control contrast within a room.
  • Decide how to deal with mixed lighting, and shoot different variations to give yourself plenty of options in post-production later.

Please post your questions and share your real estate photos in the comments below.

googletag.cmd.push(function() {
tablet_slots.push( googletag.defineSlot( “/1005424/_dPSv4_tab-all-article-bottom_(300×250)”, [300, 250], “pb-ad-78623” ).addService( googletag.pubads() ) ); } );

googletag.cmd.push(function() {
mobile_slots.push( googletag.defineSlot( “/1005424/_dPSv4_mob-all-article-bottom_(300×250)”, [300, 250], “pb-ad-78158” ).addService( googletag.pubads() ) ); } );

The post How to Shoot Real Estate Photography Using Natural Light by Lauren Schroeder appeared first on Digital Photography School.


Digital Photography School

 
Comments Off on How to Shoot Real Estate Photography Using Natural Light

Posted in Photography


Tips for Taking More Natural Engagement Portraits

25 Jul

Engagement portrait sessions can be awkward especially for couples who are expected to display their affection publicly and worse, in front of the camera. Often they feel uneasy and don’t know what to do, let alone how to pose. Left to their own devices, especially if they feel they are not naturals in front of the camera, the probability is that they won’t love their photos at the end of the session. They will look back at the session with regret.

3-tips-natural-engagement-sessions_0000

3-tips-natural-engagement-sessions_0002

Your job as the photographer is to avoid the above at all costs. Your main goal is for them up be thrilled with their photos, and delighted with the experience.

The benefits of engagement portraits are many. The couple able to practice in front if the camera before their big day, so they can throw off their inhibitions. But also, and more importantly, it builds trust with you, so that on the day if the wedding they won’t even have to think about how to look good in their photos. Instead they can concentrate on being with their guests and family, and enjoy their day.

3 Tips for natural engagement sessions

3 Tips for natural engagement sessions

Here are my top three tips in making your engagement session a breeze for your couples.

#1 Prepare them

Before the session, send them a guide offering tips on what to wear, what to bring, and how to decide on location. Assure them it’s going to be lighthearted and fun, and that it’s totally okay to laugh at themselves and be silly. Assure them that their photos will look natural, and that you have some secret tips for that to happen.

In the guide I give my couple I ask them to wear layers if it’s winter or autumn, then depending on the weather we can take a layer off and have another look. If there is a changing room nearby then they can bring extra outfits.

3 Tips for natural engagement sessions

I encourage them to choose a couple of props that they both love, be that a picnic basket with a bottle of bubbly, balloons, bikes, books, etc. The aim is to make them feel at ease, using things that they already love and which come naturally to them. Some couples can’t easily think of props. I always suggest a bunch of flowers – they’re timeless and will suit any style.

3 Tips for natural engagement sessions

Regarding locations, suggest choosing something meaningful to them. It could he their rendezvous spot when they were dating, where they got engaged, a spot they both have a great fondness for, or where something memorable happened.

Couples also appreciate if you ask them for their preferences to style, colors, and look. It makes them feel listened to and assures them you are open to their ideas.

3 Tips for natural engagement sessions

3 Tips for natural engagement sessions

#2 Direct them

This may seem opposite to the idea of candid shots and natural-looking photos, but let me tell you a secret. After having photographed numerous engagement sessions in eight years, I can tell you that natural shots are often posed. That’s right they are. Your job is to make the final image look natural, and to do whatever it takes to make that look happen.

Couples don’t know where to place their hands, where to put their weight and how to stand, what to do with their arms, where to look, what expressions to have on their faces, etc. Basically, compositions that look good and natural in front if the camera, even if that were to be a photo where they aren’t looking at the camera, and expressions that you elicit and draw out of them.

3 Tips for natural engagement sessions

3-tips-natural-engagement-sessions_0010
When I direct couples I give them 3 rules:

1. Connection – There always has to be a connection between them, be that a physical one where parts of their bodies are touching, or a non physical one such as gazing at each other, laughing at a shared joke, or thinking of a shared memory. Connections matter and show. The authenticity of your image rests on the depth and strength of the connection between the subjects.

3-tips-natural-engagement-sessions_0017

2. Angles – Try to pose them at angles where you always see a bit of their faces instead of the back of their heads, unless your intention is to capture them from behind. Avoid straight lines, unless that again is your intention. I generally ask them to stand in a V position, at an angle instead of square on, with their weight on one leg so everything isn’t too even, or with a little body twist (for women) for some shape. Get men to not put their full hands in their pockets, just the thumbs instead, otherwise they look like cut off limbs up to their wrists.

Look for triangular and irregular compositions rather than straight and square. This adds interesting lines and dynamic to your images compared to a very flat and static look.

3. Laugh instead of talk – Two things to always avoid: taking photos mid-talk and mid-eat. Instead of talking to each other, ask them to laugh at each other’s silliness, and at how awkward they are feeling. That usually gets them laughing naturally. Getting them to think of special memories always puts a smile on their faces. This is not to say all the photos you take must be smiling ones, but this tip works every time. Laughter makes them warm up and shake off their inhibitions. Always a good trick!

3-tips-natural-engagement-sessions_0012

3-tips-natural-engagement-sessions_0011

#3 Encourage activity

This is where the props come in. An activity breaks the ice instantly, takes their focus off any awkwardness they may be feeling, creates an experience for them, and sets the scene for a memorable shoot.

Activities include having a picnic, popping a bottle of champagne, going on a bike ride, playing the guitar, reading books, having coffee at a favorite cafe or drinks in a favorite pub, going for a stroll by the sea, horse-riding, browsing flea markets, etc. If they can’t think of an activity, as mentioned above, having a bunch of flowers to hold always help. You can focus on posing them in ways that look natural, and making sure that they connect emotionally with lots of laughter and fun moments, like running and jumping, that don’t require props or any special preparation.

If you have a couple who are up for a shoot under any conditions – that’s awesome. You can capture unique photos in extraordinary weather conditions, like during a blizzard in the photos below, or perhaps freezing raindrops using flash, or in a downpour. The possibilities are endless!

3-tips-natural-engagement-sessions_0012

3-tips-natural-engagement-sessions_0012

I hope you find these tips helpful. Do share in the comments below if you have any more tips to add to the list.

googletag.cmd.push(function() {
tablet_slots.push( googletag.defineSlot( “/1005424/_dPSv4_tab-all-article-bottom_(300×250)”, [300, 250], “pb-ad-78623” ).addService( googletag.pubads() ) ); } );

googletag.cmd.push(function() {
mobile_slots.push( googletag.defineSlot( “/1005424/_dPSv4_mob-all-article-bottom_(300×250)”, [300, 250], “pb-ad-78158” ).addService( googletag.pubads() ) ); } );

The post Tips for Taking More Natural Engagement Portraits by Lily Sawyer appeared first on Digital Photography School.


Digital Photography School

 
Comments Off on Tips for Taking More Natural Engagement Portraits

Posted in Photography


How To Retouch Skin And Still Look Natural

20 Jul

Skin Retouching for Dummies


Hey FashionPhotographyBlog.com readers. Retouching… A LOT of people have asked for it so here it is:


When it comes to retouching skin, it’s really quite simple. In fact, you can do it in two simple steps. However, it’s also really quite time consuming. Take your time and don’t rush through it. Following these few simple steps will pay off in the end!


Whatever you do: DON’T BLUR YOUR SUBJECT’S SKIN! Skin is full of texture – keep it that way. Eliminating pores is an obvious sign of someone who doesn’t know what they’re doing. Study your face in the mirror. Texture changes as you move throughout the face and body, be conscious of this when retouching skin.


Don’t blur your subject’s skin! Skin is full of texture – Keep it that way #fpblog
Click To Tweet


(Remember: It always helps to have a good makeup artist and start with an even base of foundation. A good makeup artist can drastically cut down your time spent retouching skin in Photoshop.)


How To Retouch Skin


First things first, NEVER-EVER work directly on your background layer. This is an extremely bad habit most people have. This is considered destructive. Once you work directly on your background layer, there is no going back. Whereas, if you work on layers independent from your background layer, you can always delete them and start from scratch.


1. Select your image and open it up in Photoshop.


retouching_skin_original_imageOriginal, untouched image


2. Start by removing blemishes. To do this, I typically switch between the Healing Brush and the Clone Stamp.


The Healing Brush (band-aid tool) works by merging texture, color and luminosity from the sample area to the destination area.


The Clone Stamp (stamp) takes the information from the sample area and moves it to the destination area (no automatic blending in of texture, color and luminosity.)


retouching_skin_heal_patch_clone_stamp


Create a new, empty layer and at the top change the setting from “Current Layer” to “Current & Below.”


To remove blemishes and wrinkles, make the brush size just a bit larger than the size of the blemish. To select a source point, hold down “Option” (Mac) or “Alt” (PC) and click, then paint over the blemish to remove it. The healing brush tends to spread out a bit so it works best by using a harder brush rather than a softer brush.


BE CAREFUL* When healing, many people have a tendency to pull source areas from right next to the destination area. Doing this will create repetitions in texture. This is a major no-no. Repetitions in texture make it known that the image has been manipulated. It’s a sign of an amateur. If you see this, take a step back and try again. Are there naturally occurring patterns? Break them up. Keep your hand light – a heavy hand is also a sign of an amateur and leaves your subject looking unnatural. 


retouching_skin_after_healing_cloningAfter Healing/Cloning


2. Next up: Dodge and Burn! Dodging and Burning is the process of manipulating tone in order to even out blotches in skin. This is fantastic for (painstakingly) taking out goosebumps or evening out the blotches most people have on their skin.


Dodging and Burning is derived from a darkroom process. Dodging is lightning of tones and burning is the darkening of tones. By dodging and burning simultaneously, you’re able to even out tones and create smooth, perfect looking skin.


To begin, create a new layer set “mode” to “soft light” and select “fill with 50% grey.”


retouching skin photoshop new options

New layer options: Mode: Soft Light, Select “Fill with 50% grey”


Using the Dodge/Burn tool (J) you can choose which tones to work with – highlights, midtones or shadows. I typically start with midtones and then work my way around the image switching between midtones, highlights and shadows. Keep your exposure low. I usually work around 9%. Start small and you can gradually build your way up. 


Continuously switch between Dodge and Burn – an easy way to do this is to hold down the “Option” key. If you’re dodging midtones at an exposure of 9% and hold down the “option” key, you’ll burn midtones at 9% as long as the option key is held down. Essentially, it gives you the opposite tool of what you’re working on, however whatever settings you already have chosen (midtone/shadow/highlight and exposure) will remain the same.


*Dodging and Burning can be tricky! Until you train your eyes to see the difference between tones, it’s really easy to over-do your dodging and burning. In order to help you better see the differences in tone, you can create a guide to help train your eyes! To do this, create a “Hue/Saturation” adjustment layer and desaturate the image. Then, create a new “Curve” adjustment layer and make a deep curve. This will separate the tones and make it easier to see where you need to dodge and where you need to burn.


retouching_skin_photoshop_eye_guide_d&b_curveEye Guide: Deep Curve


retouching skin eye guide help before dodge and burnretouching_skin_eye_guide_help_before_dodge_and_burnWith Eye Guide on: Before Dodging and Burning. Notice the blotchy patches.


retouching_skin_eye_guide_help_after_dodge_and_burnWith Eye Guide on: After Dodging and Burning. Notice the smooth transitions between tones.


retouching_skin_eye_guide_help_after_dodging_and_burningAfter Dodging & Burning


Over-do it? That’s okay. Lower the opacity of your layer until it looks right. This is the beauty of working on a layer independent from your background layer.


3. After Healing, Dodging and Burning, now is time for color! ALWAYS be careful of where you place your color layers. For those just starting out, it’s best to do color last. If you manipulate color before you retouch, make sure your color layers stay on top of all the retouching layers you create.  IF YOU RETOUCH ON TOP OF COLOR MANIPULATIONS, YOU CAN’T UNDO THE COLOR. 


If you retouch on top of color manipulations, you can’t undo the color #fpblog
Click To Tweet


If you decide you don’t like the color and try to remove or change it, you’ll have to re-do all of your retouching work. Since the healing layer is set to “current and below” it is pulling color and texture from the layers below it (this would include your color layers). When you delete the color layer, the color remains in the areas which have been healed or cloned above it, leaving you with a mess that looks like this:


retouching_skin_on_top_color_manipulationsImage that has had retouching done on-top of color manipulations. The colour manipulations were removed resulting in an unusable mess!


So, those just starting out with this method of skin retouching, play it safe and work with color last.


retouching_final_skin_retouch_with_color_appliedFinal skin retouching with color applied


So – as a reminder, the order you retouch skin:

1. Heal/Clone – Remove wrinkles and blemishes

2. Dodge/Burn – Even out skin tone

3. Manipulate Color


Stay as organized as possible! It helps to make a group for retouching and a group for color to keep everything straight.

retouching_skin_layers_from_completed_retouched_imageLayers from completed retouched image (pictured above)


Good luck! Remember to take your time and practice. It takes a long time to be able to really see what you’re doing. Train your eye and you’ll be able to pick apart tones and see imperfections in skin more easily. Feel free to share your retouching here in the comments for feedback and critique!


And remember, if you have any questions, feel free to ask!


Alana


retouching_skin_animation


IMAGE SOURCE:

Feature image and images 1-12: courtesy of Alana Tyler Slutsky


Fashion Photography Blog

 
Comments Off on How To Retouch Skin And Still Look Natural

Posted in Uncategorized


27 Serene Images of the Natural World

15 Jul

This week we are doing a series of articles to help you do better nature photography. See previous articles here:

  • 3 Habits Every Outdoor Photographer Should Develop to Avoid Missing Shots
  • 5 Tips for Better Nature Photography

So here are some examples of some shots of nature to give you some ideas, or just to make you feel refreshed like a walk in the woods.

Nutmeg66

By nutmeg66

Matoff

By Matoff

Dave Edens

By Dave Edens

Anderson Mancini

By Anderson Mancini

Moyan Brenn

By Moyan Brenn

Daniel Sallai

By Daniel Sallai

Moyan Brenn

By Moyan Brenn

Susanne Nilsson

By Susanne Nilsson

M.shattock

By m.shattock

Md. Al Amin

By Md. Al Amin

Chris Gin

By Chris Gin

ELKayPics / Lutz Koch

By eLKayPics / Lutz Koch

Jack Haskell

By Jack Haskell

Hehaden

By hehaden

W. Visser

By W. Visser

Jeff Power

By Jeff Power

U.S. Department Of The Interior

By U.S. Department of the Interior

Richard Walker

By Richard Walker

Christopher Michel

By Christopher Michel

Shutter Fotos

By Shutter Fotos

Neil Howard

By Neil Howard

Jason Carpenter

By Jason Carpenter

Sri Dhanush K

By Sri Dhanush K

Massmo Relsig

By Massmo Relsig

Images By John 'K'

By Images by John ‘K’

Ravas51

By ravas51

Lenny K Photography

By Lenny K Photography

googletag.cmd.push(function() {
tablet_slots.push( googletag.defineSlot( “/1005424/_dPSv4_tab-all-article-bottom_(300×250)”, [300, 250], “pb-ad-78623” ).addService( googletag.pubads() ) ); } );

googletag.cmd.push(function() {
mobile_slots.push( googletag.defineSlot( “/1005424/_dPSv4_mob-all-article-bottom_(300×250)”, [300, 250], “pb-ad-78158” ).addService( googletag.pubads() ) ); } );

The post 27 Serene Images of the Natural World by Darlene Hildebrandt appeared first on Digital Photography School.


Digital Photography School

 
Comments Off on 27 Serene Images of the Natural World

Posted in Photography


Tips for Using Natural Framing to Improve Your Composition

14 Jul

To help you compose more exciting and beautiful photographs, there are certain key composition techniques that you can use. Natural framing is one that is widely known, but needs careful and thoughtful application. Using framing can create extremely impressive and elegant images when done right. Here are some tips to help you.

natural-framing-tips--10

Natural framing is when you use an element within your image to frame the subject. This draws the eye into the photo and highlights the actual subject.

This internal frame can be constructed using a multitude of things you’ll find anywhere – branches, archways, tunnels, door frames etc., as well as things that aren’t solid like light, shadows, rain, fog, etc. – it doesn’t matter what you use.

Framing is a technique to use sparingly – but when it’s totally right, it looks natural. So few people use it well that if you can master it, you can create some fantastic shots.

natural-framing-tips--2
Why you should use natural framing:

  • It easily draws your viewer’s eye into the photo and emphasizes the subject.
  • It isolates and separates your subject from what’s around it.
  • It brings a sense of order and structure to a photo – and the eye loves order.

When to use natural framing

  • To obscure boring sky (my favourite).
  • To add depth to an image – especially when the item acting as the frame is not in focus.
  • To bring contrasting elements into the photo without detracting from the subject.
  • To create structure.
  • To create a feeling of a self-contained image, particularly if you are photographing something quite ordinary and simple, a frame will help give depth to the subject.

natural-framing-tips--12

Traditionally the frame should be distinctly separate from the subject, so that it’s not confusing to the eye. But I will also show you where I haven’t done that, and the photo still works. I will show you both how to use this technique as well as where else you can take it – how to let it inspire you to develop your images.

Rules are made to followed, bent and broken

Like anything that is considered a technique or rule, people can feel very passionately for or against their use.

“Consulting the rules of composition before taking a photograph, is like consulting the laws of gravity before going for a walk.” Edward Weston

But for me, it comes down to not using any of the rules so much, that your photos end up all looking the same. Don’t let rules keep you stuck in a box. They are a great springboard for your photography, or a way to help refresh your vision, so that you start composing in a different way.

natural-framing-15

When I was starting out, I worked hard to get really familiar with the key compositional techniques, but then after a while, once I’d embedded them, I started to develop my own way of using these techniques, my own style.

I also encourage you to think of all these techniques and rules as opportunities to see and learn to organise the elements within your photos differently. In my workshops I’ve noticed that one of hardest things for people is to break the world down into elements, and then learn how to organise these elements to create striking compositions.

Natural framing isn’t an add-on

Natural framing is one of the harder rules to pull off well. I think many people use it to make a boring landscape or scene more interesting. But to me, if your subject is boring, no technique is going to liven it up. Framing should be used as an additional interesting element – not as an overlay to a mundane scene (just search: “natural framing” on Google images and you’ll see what I mean).

natural-framing-tips--3

I find natural framing is most interesting when used in the loosest possible interpretation. It has to be employed in a way that enhances the photo, and feels like it is a natural part of the composition.

“There is no better time to crop a bad composition than just before you press the shutter release.” Bryan Peterson

With those caveats – now it’s time to relax, have fun, and play with it!

Creating your frame

natural-framing-20

You don’t need to have a frame around all four sides of your photo for it to work – in fact I’d encourage you not to do that. I think more often than not, it looks more natural and pleasing to the eye for the frame to take up just two or three sides of the image. But like every recommendation – use your own personal judgement.

The photo above of Battersea Power station is probably one of my most traditional interpretations of natural framing. I have framed the building with the branches and leaves at the top, and the outline of a fence at the bottom. Two important things to point out in this photo:

  • When the frame is out of focus it create a sense of depth to the image.
  • The frame can be made from different elements: I’ve used two different elements but their colour is the same, and they are both interesting shapes – so they have some common qualities.

Obscuring boring sky

natural-framing-tips--7

In the photo above, I wanted to capture the shiny dome and the rising sun. But that wasn’t enough to make an interesting photo. There was some pretty endless sky, so I added a silhouette of the bare branches above. I seem to use a lot of tree branches in my natural framing compositions. In this case, I love how they create this beautiful, wild, chaotic pattern, above the very clean and shiny dome. Then I’ve added this little almost tuft of leaves below, which balances the photo out.

I love using framing elements that have great texture – again they add depth. Just remember to keep it well organized and clear so people can see what you are trying to do. This photo is really about the simple contrasting shapes – and by using natural framing it creates a nicely ordered photo, constructed from the available elements.

natural-framing-17

So once you’ve got a grasp of the concept you can start using the technique in other ways – have fun!

You are in control of how the viewer sees the image

Naturally framing is a very good way to remember that you are in control of how the viewer’s eye will go around the image. It doesn’t matter how big the photo is, the eye won’t see the complete image all at once. The eye will be drawn to one part and then move around the image depending on where the elements are placed. Your job as a photographer is to direct the eye.

natural-framing-tips--4

Here the subject is St Paul’s Cathedral, bang in the centre of the image. But all around it there are buildings, streets, cars, etc. When you first see the image, all of that other detail bleeds into one, creating a natural frame for the cathedral. But then gradually you start to see the details, so the image becomes something quite different.

This photo is a good example of how you can use framing to create order to a very busy scene, and give the viewer a way into the photo. It’s also a good example of how your eye moves around an image.

The one-sided frame

It is possible to do a one-sided frame, and it works! Below, even though the foliage is only running along the bottom, it creates a great grounding effect, and pushes the eye up toward the moon and the Statue of Liberty. Therefore, in my book, it adheres to the principal of drawing your eye towards the real subject of the photo. This isn’t even a strong line that’s creating the framing element – it’s simply the power of suggestion.

natural-framing-tips--6
In the photo below you’ll see some framing which is going across the corner of the photo. So it’s still drawing your eye to the subject – which is the rising sun and Tower Bridge – but it’s quite subtle. I would perhaps suggest that the bottom elements are creating a second framing element, grounding the photo, and framing the sun. What do you think?

natural-framing-tips--8

When I am shooting photos with big sky – which is favourite subject of mine – what I often do is shoot when small objects appear in the sky, like above. If you look closely you can see a very small plane. Or sometimes a tiny bird appears, or some other random object. People often ask me why I don’t Photoshop it out because it can look like a piece of dust or a mistake, but I love these little surprising elements. It’s great if there can be tiny details that create layers of interest in your shots, so your viewers don’t see everything all at once. (Or as Henri Cartier-Bresson said, “The little, human detail can become a Leitmotiv.”)

Here is another photo that is truly on the edge of being framing. But I think it shows how you can play with the idea (and there is nothing more fun than playing with all these different concepts and ideas, and making them your own).

Greeting Shadows

I looked at this photo and thought – wow, I’ve framed the image of the shadows of the people with the surrounding dark shadow. It is doing what natural framing tells us to – which is use a frame to draw attention to the real subject of the photo, so I think it fits.

Use multiple frames within one image

I am a little bit obsessed with photographing things I find on the street. I love photographing very ordinary things – like chewing gum or lines on the road, disconnecting them from their wider context, and just playing with their shapes. This is also another way to help train you to practice breaking the world down into elements, so that you can then start to organize them in a more constructive way.

You can go further still by making the frame within your image just a part of the image, and not the whole thing. It could even be just a suggestion of a frame, like I did here.

natural-framing-tips--5

I love using very simple backgrounds with strong colours for my portraits. This is because firstly, I want the background to not distract from subject, so a simple background is usually best. The camera can’t easily recreate the layers that we see with our awesome 3D eyes. So if, for example, you put a subject in front of a crowd, you will get a flat image without depth.

Homeless World Cup Hasselblad Portraits

Plus, I like to have the colour and texture of the background really fit with the subject – maybe with their clothes, their posture, their expression, etc. This photo is a good example of my philosophy on this point.

Now back to framing! One key reason the photo above works is the added dimension of some framing. Yes, again not a totally traditional use of it, but you can see that the yellow arch shape and the blue strips either side are adding some great structure and form to the image. You’ve also got a sense of them confining the subject, which gives a nice balance to his strong, proud posture. That feeling of being confined is something you can do well with natural framing, and adds a curious feeling to the photo (since the posture of the subject is so proud and strong, you can’t imagine him being confined, right?).

Everything within your frame has a message

natural-framing-19

As the photographer, you need to make sure that everything you put in the frame is saying something that you want it to – that the elements are all working together to form the idea and feeling that you seek. If you don’t know what that’s supposed to be – just ask yourself:

  • What am I feeling here?
  • What is interesting to me in this scene?
  • Why is this important?

It’s these feelings that you will be communicating through your images, if you’ve done it well and created a strong photograph.

In the image below I framed the Shard, with buildings on the side and a fence along the bottom. There is a risk that it could all have blended in together, but that bright blue sky has created a natural space around the subject.

natural-framing-tips--1

If this is all feeling like a bit too much, don’t worry, as it all becomes instinctive after a while. As a final note, I like this thought from Henri Cartier-Bresson:

“You just have to live and life will give you pictures.”

It’s a great way to live.

I’d love to know what you think of natural framing – do you use this technique? What do you think of the examples I’ve given here? Have you been inspired to try this out if you’ve never used it before? If you have any photos you’d like to post here I’d love to see them.

googletag.cmd.push(function() {
tablet_slots.push( googletag.defineSlot( “/1005424/_dPSv4_tab-all-article-bottom_(300×250)”, [300, 250], “pb-ad-78623” ).addService( googletag.pubads() ) ); } );

googletag.cmd.push(function() {
mobile_slots.push( googletag.defineSlot( “/1005424/_dPSv4_mob-all-article-bottom_(300×250)”, [300, 250], “pb-ad-78158” ).addService( googletag.pubads() ) ); } );

The post Tips for Using Natural Framing to Improve Your Composition by Anthony Epes appeared first on Digital Photography School.


Digital Photography School

 
Comments Off on Tips for Using Natural Framing to Improve Your Composition

Posted in Photography


Natural Light Versus Artificial Light: Which is Better?

06 Jun

Light is the backbone of photography. Without light, there are no photos. After all, the word photo means light. However, which type of lighting is best: natural or artificial? There are a lot of proponents for either camp, but this article will try and dissect the argument from both perspectives, and give you a chance to add your opinion at the end.

Natural Light

natural-light-versus-artificial-light-2689

The arguments in favor of natural light are many, which means it’s not difficult to see why it is attractive to many photographers.

The pros of natural light

Cost

Natural light costs nothing to make use of; there are plenty of gadgets and accessories available, such as reflectors and diffusers, that do help to maximize results, but even without them, it is easy enough to get beautiful results using natural light, without spending any money. This apparent lack of a financial entry barrier makes it much easier for most photographers to immediately assume a preference for natural lighting.

Learning Curve

natural-light-versus-artificial-light-0729

Learning how to see, manipulate and utilize light, whether natural or artificial, is the most critical skill set for a photographer to learn. Fortunately, these break down into many individual skills that can be learned one at a time. In terms of natural light, a lot of these skills are easy to learn and put into practice. For example, you can read a tutorial on using an area open shade to diffuse and soften the light, then put it into immediate practice ten minutes later.

Another thing to keep in mind here is that cameras are designed for use in natural light first. So, a new photographer working their way through the technical basics of their camera, such as metering, aperture and shutter speed, is almost certainly learning with natural light, thereby improving both their camera and lighting skills simultaneously.

Semantics

This point may seem a bit strange, but I have seen it crop up in various conversations, and it does affect some people’s perceptions. We live in a world that is currently obsessed with the word natural. It seems difficult to go more than five minutes without seeing words like organic, all-natural and free from. Of course, most of this applies to food and health products, but the mindset and lifestyle that go with it have become so expansive, that it has seeped into all manner of other aspects in our lives. Whether or not you buy into that sort of thing, try to ask yourself what sounds better and more appealing: natural or artificial? This may not seem rational in terms of photography (an inorganic, mechanical medium), but the appeal is more of an emotional one, and more often than not, emotion trumps rationale.

The biggest concern here is one of marketing. A photographer who refers to themselves as a natural light photographer may very well simply be attempting to appeal to the quite large demographic that holds value over that kind of thing.

The cons of natural light

natural-light-versus-artificial-light-0962While natural light has its advantages, it is not without its own set of shortcomings.

Unpredictability

While the sun is a near constant during daylight hours, the availability of light is only one factor that needs to be taken into account. Clouds and other weather conditions are just a couple examples of things that will alter specific qualities of the light you are trying to work with. Softness, intensity, and color can all change in a split second at the whim of mother nature. If you are attempting to work towards a specific goal, these changes can be a nightmare.

Night

After sunset, what do you do if you’re in a situation where you still want (or need) to take photographs. If you’re relying solely on natural light, the answer is: not a whole lot. Many photographers have no problem with this limitation; however, try to imagine what you can achieve with just another hour or two a day working towards your photography.

Environment

natural-light-versus-artificial-light-2691

Aside from its effect on light, shooting outdoors means you are at the constant mercy of the weather. Cold temperatures, rain, snow, and wind can all make for some uncomfortable experiences for both you and your subjects or clients.

If you’re photographing in areas open to the public, you may be subject to the whims of passers-by. This can lead to an unwelcome audience, or even worse, hecklers. Believe me when I relate, that nothing kills the general mood of a session for both the subject and the photographer faster than excessive and undue attention from strangers.

These environmental problems can often be solved by finding an indoor location and using window light. While the effects of weather and other people are gone, this solution is not without its own limitations. Window light, while often beautiful for photography, can be quite dim and may require slower shutter speeds than you might like for portrait photography. A lack of space is also a common problem when shooting indoors.

Artificial light

natural-light-versus-artificial-light-3213

Like natural light, artificial light, whether strobes, flashguns or continuous lighting, has its own set of advantages and shortcomings.

The pros of artificial light

Convenience

By owning an artificial lighting solution, you have the means to take photographs at any time day or night, indoors or out, and the weather has no effect on you. If for some reason you want to do food photography at midnight, by all means, go for it.

If you own a set of flashguns (speedlights), they are not only convenient, but portable as well, and can be taken just about anywhere and set up with ease.

Versatility

With studio strobes and the like, the sheer number of ways that they can be used for a vast array of creative results is their strongest selling point. These range from simple one light setups that mimic natural light, to complicated setups with seven or more lights.

Control

Another great strength of studio lighting is the control it offers you over your final photograph. By controlling every bit of light in your scene, artificial lighting negates the unpredictability that you get with natural light. If you want a particular look or mood, all that you have to do is set up the lights, and take photos until you have your results. There’s no worry that a cloud will move in and block your light.

Reliability

natural-light-versus-artificial-light-4689

Apart from removing the environmental issues associated with natural light, studio strobes and flashguns are quite reliable. Most models in the moderate price range, and above, are very well made. This means that the power output, as well as color output, is consistent every time it fires. This a huge advantage over the fast changing conditions of natural light.

The cons of artificial light

Cost

natural-light-versus-artificial-light-4563
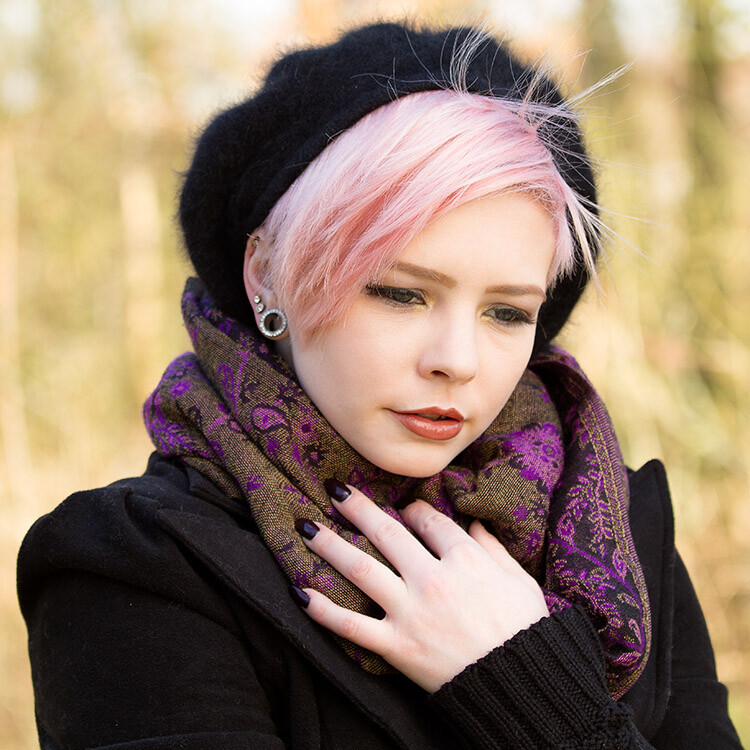
Probably the most off-putting aspect of studio lighting is cost. It doesn’t matter whether you choose studio strobes, flashguns (speedlights), or continuous lighting; decent quality lighting equipment does not come cheap and a good set, along with modifiers, can easily cost over $ 1000. With natural light being a free and capable resource, it’s easy to understand why so many photographers steer clear of artificial lighting.

Learning Curve

Another initial disadvantage of studio lighting is the amount of knowledge you have to gain, in order to start using it. It’s very possible to accidentally take a beautifully lit photo in natural light. With artificial light, that’s next to impossible.

A lot of photographers, me included, would probably gladly tell you how atrocious their first attempts with studio lighting were. To get good results, you have to spend an enormous amount of time reading and practicing. This involves things like new aspects of aperture and shutter speed in relation to flash, qualities of light, effects of modifiers and the dreaded inverse square law.

So, which is better?

In my opinion? Neither and both are better.

It depends on the job at hand. Both are just tools to be used at each photographer’s discretion. After all, nobody walks into a newly built house and waxes lyrical about the type of hammers that were used. Good photography is good photography, no matter how it was made. If something screams out to be lit with natural light, then natural light is better. Likewise with artificial light.

Each method is capable of stunning results and I would rather have a full toolkit to use for every opportunity, than miss out on something because I restricted myself from using the right tool for the job.


Editor’s Note: This is one of a series of articles this week that are Open for Discussion. We want to get the conversation going, hear your voice and opinions, and talk about some possibly controversial topics in photography.

Give us your thoughts below on the article above on natural versus artificial, and watch for more discussion topics this week.

See all the recent discussion topics here:

  • 7 Commonly Accepted Photography Beliefs Debunked
  • Is HDR dead? Some dPS Writer’s Thoughts on this Controversial Topic
  • How to Find your Personal Photographic Style
  • Why You May be Failing to Reach Your Potential as a Photographer
  • To Process or Not To Process? Let’s Discuss
  • How much do you process your images? – a dPS POLL
  • Does the Camera Matter? SLR versus Mirrorless versus Smartphone

googletag.cmd.push(function() {
tablet_slots.push( googletag.defineSlot( “/1005424/_dPSv4_tab-all-article-bottom_(300×250)”, [300, 250], “pb-ad-78623” ).addService( googletag.pubads() ) ); } );

googletag.cmd.push(function() {
mobile_slots.push( googletag.defineSlot( “/1005424/_dPSv4_mob-all-article-bottom_(300×250)”, [300, 250], “pb-ad-78158” ).addService( googletag.pubads() ) ); } );

The post Natural Light Versus Artificial Light: Which is Better? by John McIntire appeared first on Digital Photography School.


Digital Photography School

 
Comments Off on Natural Light Versus Artificial Light: Which is Better?

Posted in Photography


How to Create Catch Lights in Your Natural Light Portraits

19 May

What is a catch light, and why you should have it in your portraits?

A very popular technique in portraiture – a catch light is a spark of light in your subject’s eyes. This spark will help you to draw your viewer’s attention to your subject’s eyes, making them full of life and, well, sparkling.

04
For this portrait, I made recently in Cienfuegos, Cuba, I used the light from the setting sun to create a catch light, even without having the subject looking up.

How to create a catch light in portraits?

To create a catch light, all you need is a source of bright light to reflect in your subject’s eyes. This source can be artificial, like a flash, or natural, like sunlight. In this article, I will focus on creating catch light in portraits using natural light.

Creating a catch light – indoor

To create a catch light in an indoor location, all you need to do is to make sure there is a visible source of light, which will be reflected in your subject’s eyes.

Position your subject near an open window or door, during daylight, and make sure there is a direct line between the source of light and the subject, without blocking objects like furniture. Your subject does not have to look directly into the source, as it might be too dazzling or uncomfortable. The important thing is that the light source must be visible as a reflection in the subject’s eyes.

01

I met the lovely Nagina at her home in a small village of Roma people, outside Bukhara, Uzbekistan. Although she was only 10; she was very busy caring for her small brothers, along with few other neighbors’ children. She asked me to take her photo, and I was drawn to her gaze right away, choosing to go for a close-up portrait. The house was completely dark, except a large window, which was position at a 45-degree angle to her face, which created that catch light in her eyes.

Good to know: The closer your subject is to the light source (open window or door) the larger and more dominant the spark of catch light will seem.

Taking it to the next level: Think carefully about the location of your subject to the light source, as that will not only affect the size and visibility of the catchlight in the subject’s eyes, it will also control the entire Illumination of the subject’s face. To read more about how the direction of light will affect your portrait, check out: Understanding Natural Light Part 3: Direction of Light.

Creating a catch light – outdoors

For achieving the best results in an outdoor shooting, all you need to do is aim your subject to look at the largest light source – the sky. DO NOT instruct the subject to gaze at the sun, even for a brief moment, as it can lead to pain and damage to his or her eyes.

If you do not want to stage your subject, or if there is a language barrier, a great technique of aiming your subject’s gaze up, is by simply positioning yourself a bit above your subject. While they gaze it your lens, the sky (behind you) will reflect in their eyes. This is why I photograph many of my outdoor portraits at an angle, which is a bit higher than my subject.

Mordecai is Jewish Orthodox, from the old city of Jerusalem. I was very surprised that he agreed to be photographed, even with joy. To give a spark to those amazing eyes I told him to look into my lens, while I positioned myself slightly higher than him, and the lovely skies of holy Jerusalem were reflected in his eyes.

02

Good to know: On a sunny day, I recommend positioning your subject in the shade, as gazing at sunny skies might be uncomfortable.

Taking it to the next level: If you want it or not, it is almost sure that apart from that spark of light, your own image (the photographer) will also be visible in the subject’s eyes. You can turn this fact into a creative portrait (of your subject) and a self-portrait (of yourself) in the same frame. Just do not forget to move the camera a bit, to let your face be visible. You can also use this technique for less narcissistic reasons, as with really tight close-up, as almost anything in front of your subject’s face will be reflected in his eyes. It is a wonderful technique for making a landscape shot, or an image of an iconic place, with a twist.

Creating a catch light – while using a reflector

Using reflectors in portrait photography is a wonderful technique (a more in-depth explanation about using reflectors in portrait photography, in this article: Reflectors: Your Secret Weapon for Amazing Portrait Photography), that can help you to create catch lights in almost any situation, indoor or outdoor, sunny or cloudy.

Not only do reflectors allow you to create that spark of catch light almost anywhere; but they will allow you much more control, over the intensity, color, and direction of that spark.

A pocket size silver reflector was the best tool for the job for this portrait, photographed in a very hot afternoon in Armenia.

03

Good to know: Reflectors come in many sizes and colors. For the best results, use a small pocket-sized silver reflector. Why? Because you do not need anything larger or heavier. Those small reflectors are the perfect weapon of choice, for creating a catch light in close-up portraits. Position the reflector just under the chin of your subject. You can hold the reflector with your left hand, or ask the subject to hold it.

Taking it to the next level: Although using a silver reflector will give you the most notable catch light, you can add warmth to the portrait by using a golden one, which will result in a golden catch light.

A mix of shade, slightly higher camera angle, and gaze upward toward the sky, helped create the catch light in these portraits photographed in India and Israel.

05

See how the eyes are alive in their portraits? The catch lights help add the sparkle you see there, and without them the portraits wouldn’t feel as alive, vibrant.

Now it’s your turn, show me your portraits with great catchlights. Please share in the comments below.

googletag.cmd.push(function() {
tablet_slots.push( googletag.defineSlot( “/1005424/_dPSv4_tab-all-article-bottom_(300×250)”, [300, 250], “pb-ad-78623” ).addService( googletag.pubads() ) ); } );

googletag.cmd.push(function() {
mobile_slots.push( googletag.defineSlot( “/1005424/_dPSv4_mob-all-article-bottom_(300×250)”, [300, 250], “pb-ad-78158” ).addService( googletag.pubads() ) ); } );

The post How to Create Catch Lights in Your Natural Light Portraits by Oded Wagenstein appeared first on Digital Photography School.


Digital Photography School

 
Comments Off on How to Create Catch Lights in Your Natural Light Portraits

Posted in Photography


12 Tips For Indoor Natural Light Photography

05 Apr

Feeling frustrated with indoor photography?

Harsh shadows and weird skin tones are common problems. In this article, you’ll learn how to improve your indoor photography.

natural light photography indoors

8 tips for indoor natural light photography

Working with natural light indoors can be a little tricky. These beginner tips will help you create beautiful photos using natural light.

1. It’s all about the windows and doors

You’ll want to get to know the light that comes through them. Sometimes it floods the room softly. Other times it beams in, bouncing off the walls and floor.

Soft light will add a soft glow, and harsh light will give a dramatic or moody look.

indoor natural light photography tips 2

Take note of what kind of light enters each room throughout the day.

The color of light also changes during the day. It has a warmer look at sunrise and sunset. During midday, it has a cooler or neutral color. Use this to add different effects to your photos.

2. Turn off the lights

Natural light doesn’t like competition. Electric lights can affect your white balance. This is because the color of light varies with the source. Skin tones can look odd when artificial light mixes with natural light. The easiest way to fix this problem is by turning off all electric lights.

3. Shoot in Aperture Priority mode

In Aperture Priority mode, you choose the aperture. With indoor natural light photography, you need to let in as much light as possible. To do that, you’ll want a wide open aperture. The lower your aperture number (f-stop), the wider your aperture is open.

When you use a wide aperture, your depth of field will be shallow. So your subject will be in focus, while your background is left soft and blurry. This adds a beautiful effect to portraits and product shots.

indoor natural light photography

For portraits, an aperture of around f/5 or f/6 will keep the entire face in focus. Focus on the eyes for best results.

Note: Also shooting in RAW is better than JPEG for indoor natural light. RAW files give you a lot more to work with when editing.

aperture priority for indoor natural light photos

Aperture Priority is marked with either an AV (Canon cameras, pictured above) or an A (Nikon cameras). To adjust the setting, you’ll turn the small dial (pictured on the right).

4. Choose your White Balance

To get good white balance take your camera out of Auto White Balance (AWB). The button for changing white balance is usually marked with a WB somewhere on the back of the camera (or use your Canon Quick menu if you shoot that brand).

For proper skin tones choose Daylight (the one with the picture of the little sun). This will give good results, not too blue and not too yellow. If you want to warm things up a little, choose Cloudy. This will add more yellow. Try a shot with Daylight, then one with Cloudy, and see which looks right or which you prefer.

You can adjust your White Balance while editing (if you shoot in RAW) but getting it right while shooting makes editing easier.

5. Use a light catching backdrop

A backdrop will help catch the light and bounce it back on your subject.

light catching backdrop for natural light photography

In the above image, the white material helps to cradle the light around the flowers.

catch natural light with a backdrop

This backdrop is made with a freestanding collapsible clothes rack and a long piece of white material. I love how easy it is to set up and move around.

6. Use a light box

A light box will create a similar effect as the backdrop, but it will help control the light even more.

use a natural light light box for indoor photos

I made this light box out of Lego and used the same piece of white material pictured in tip #5.

tips for natural light photos

 7. Use a reflector

A reflector is used to bounce natural light back on your subject.

use a reflector for natural light photography

tips for indoor natural light photography

For these shots, I used a reflector and the backdrop. My daughter was sitting with her left side facing the window. She was holding the reflector in her right hand, which helped lighten the shadows.

8. Use a mirror

A mirror is another great way to control natural light. Hang a mirror in the window. I used a large suction cup with a hook to hang the mirror.

indoor natural light photography tips

Have your model look in the mirror. As you take your shot make sure your reflection is not in the mirror. It can take some patience to get the angles and reflections under control, but it’s worth it.

I used a small handheld mirror for this shot. A larger mirror would require less cropping.

tips for indoor natural light photos

9. Tidy up

There are often things lying around the house, especially if you have kids. This clutter can be distracting in a photograph. It’s worth taking a couple minutes to tidy up before you start shooting.

In a small space, a backdrop can serve a double purpose. It will control light and create a blind to background clutter. It can help make a small space more workable. For most of the photos in this article, I pushed our sofa and table into the middle of our living room, so I could set up in front of our largest window. Without the backdrop, this location wouldn’t work.

natural light photography indoors 2

10. Place your subject close to the window

Place your subject a foot or two away from the light source. This way you’ll make the best use of the natural light, and avoid the harsh contracts that can be created by being too close to the window/door. Try backlit, side lit, and full light by having your model face different angles to the window. 

11. Use the curtains

Use curtains or blinds to help diffuse harsh light. When the sun is beaming into the room, the light can blow out your photos. Pulling the curtains can soften the light and help with proper exposure. If the curtains are not suitable, you could use a sheer piece of material to hang over existing curtain rods.

12. Shoot reflective objects

Natural light can turn the most common thing (like the moisture on the window pictured below) into something beautiful.

natural light on glass objects

natural light on reflective objects

natural light through water on the window

Have fun playing around with reflective objects and natural light. I love the way light creates reflections and glistens on shiny/iridescent objects.

You’ve got to love it

It’s easy to love indoor natural light photography.

The setup is inexpensive, portable, and easy; and you can create beautiful photos no matter the weather or time of day. Don’t forget to have fun, and let that inner beauty shine through.

have fun with natural light

Your turn

Let me know how your experimenting goes by commenting below. I can’t wait to see what you create. Please share your photos as well.

googletag.cmd.push(function() {
tablet_slots.push( googletag.defineSlot( “/1005424/_dPSv4_tab-all-article-bottom_(300×250)”, [300, 250], “pb-ad-78623” ).addService( googletag.pubads() ) ); } );

googletag.cmd.push(function() {
mobile_slots.push( googletag.defineSlot( “/1005424/_dPSv4_mob-all-article-bottom_(300×250)”, [300, 250], “pb-ad-78158” ).addService( googletag.pubads() ) ); } );

The post 12 Tips For Indoor Natural Light Photography by Dena Haines appeared first on Digital Photography School.


Digital Photography School

 
Comments Off on 12 Tips For Indoor Natural Light Photography

Posted in Photography