[ By Steph in Boutique & Art Hotels & Travel. ]

Waterfalls stream down the sides of mountain-shaped, moss-covered structures, while white horses gallivant in front of castles that look like they were ripped right out of a book of fairytales. These 15 hotels are among the most magical places to stay anywhere in the world, from ancient palaces in India to gleaming ice hotels in Quebec. While some are a peek at how the 1% live, others are surprisingly affordable.
Magic Mountain Hotel, Chile


If elves took up residence in Hobbiton, this is what their homes would look like. The mountain-shaped structure is dotted with arched windows and obscured with lush greenery. Waterfalls stream down the sides to drench the moss, ferns and flowers. Located within the remote Huilo-Huilo Biological Reserve, the hotel requires an adventurous spirit to even access, but it’s well worth the effort. Nearly everything is constructed from locally, sustainably sourced wood.
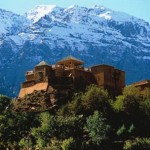
Neemrana Fort Palace, India

A 15th-century palace built into the hillside in India is now a five-star, 55-bedroom hotel with kingly views over the nearby village. Neemrana Fort Palace is full of authentic decor from periods throughout India’s history and contains displays that educate guests about the palace’s fascinating past. Though rooms here start at just £50 per night, guests are given the royal treatment, with options including poolside spa treatments and hot balloon rides over the valley.
Fairytale Hotel in Belgium


Sleep in a surreal medieval-style chamber within a massive wooden Trojan Horse at Belgium’s La Balade des Gnomes Hotel. This bizarre retreat boasts ten unique rooms sculpted with the natural earthen building material known as cob to create all sorts of curved custom surfaces. The horse is just one of the hotel’s suites – others include a troll’s lair and a Macquarie Island room with a boat-shaped bed.
Crazy House Hotel, Dalat, Vietnam


The aptly named Crazy House Hotel in Vietnam began as the private residence of architect Hang Viet Nga, who clearly let her imagination run wild in creating an organically shaped structure reminiscent of the Barcelona ouvre of Antoni Gaudi. Made from the base of a dead tree, the house is full of ladders leading into hidden nooks and through tight tunnels. Rooms cost as little as $ 22 USD per night.
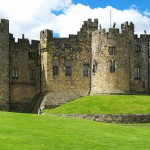
Thorngrove Manor Hotel, Adelaide, Australia

The Thorngrove Manor Hotel could easily double as a princess castle at Disneyland, it’s so picturesque. Located in Adelaide, Australia, the castle-like structure looks centuries-old but was actually built in 1994 as part of a vineyard. Though all the rooms are together in one building, there are no common spaces, and couples staying there never need to see other guests.
Next Page – Click Below to Read More:
Fairytale Inn 15 Of The Worlds Most Magical Hotels
Want More? Click for Great Related Content on WebUrbanist:
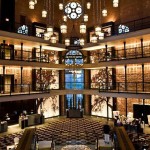
8 Remarkable Palace, Fort & Castle Hotels Around the World
Imagine curling up in front of an 800 year old fireplace where a king once rested (or was arrested!). Sleep well in your own piece of world history.
Click Here to Read More »»
Like a King: 15 (More!) Spectacular Castle & Palace Hotels
These 15 exquisite castle hotels offer us regular folks the chance to live like kings and queens; all it takes is a reservation and a few extra dollars.
Click Here to Read More »»
5 Real Jail Hotels: Comfortable Cells to Nightmarish Slammers
A prison is probably the last place on Earth most of us would want to spend the night, right? What if we told you some people pay for the privilege?
Click Here to Read More »»
![]()


[ By Steph in Boutique & Art Hotels & Travel. ]
[ WebUrbanist | Archives | Galleries | Privacy | TOS ]


 To continue on our week of the Best of dPS, today we’ll look at some general topics. We’ve already looked at the Top Landscape articles from 2013, All About Gear, and yesterday we had the Portrait Tutorial Feast. So we’ve covered some of the specific topics that you love to read about. But what if you just want to brush up on some basic camera settings or composition? Then, check out:


You must be logged in to post a comment.