RSS
 

Posts Tagged ‘More’

More detail on Samsung Galaxy S10 triple camera setup revealed

14 Aug

Last week, Samsung revealed its latest high-end smartphone, the Galaxy Note 9. The Note 9’s camera hardware is identical to last year’s Galaxy S9 Plus dual-camera, but we’ve already seen rumors of the 2019 Galaxy S10 Plus featuring a triple-camera.

Next year’s flagship is likely to be the first smartphone to combine a super-wide-angle and a tele-lens with the primary camera. The super-wide-angle is expected to come with a 123-degree angle of view, and the tele lens with a 3x magnification, offering a wider zoom range than any other smartphone.

Today a report from South Korean publication ET News has provided more detail on the Galaxy S10 camera specifications and if the sources can be trusted all three cameras will come with a different sensor resolution. The main camera will offer a 16MP pixel count, the telephoto camera captures 13MP images and the wide angle is expected to feature a 12MP sensor.

…it’s likely that the output image size will be the same, no matter the zoom setting

Samsung is likely going to merge image data from all three sensors to leverage the combined sensor surface for improved light gathering, and provide a stepless zoom experience. Therefore, it’s likely that the output image size will be the same, no matter the zoom setting. That said, as usual we can’t know for sure at this point.

The ET News report contains another interesting piece of information: While Samsung initially planned to implement the triple camera only in one model of the Galaxy S10 series, the company’s plans changed and there will now be two triple-camera models. Hopefully this should increase the chances of a triple-camera model becoming available at a (halfway) affordable price point.

Articles: Digital Photography Review (dpreview.com)

 
Comments Off on More detail on Samsung Galaxy S10 triple camera setup revealed

Posted in Uncategorized


Five (More) Uncomfortable Truths About Photography

02 Aug

One of my first articles here at DPS was entitled 5 Uncomfortable Truths About Photography. I wrote it as a reality check to myself, and for you, the readers of DPS. Our beloved art of photography has a dark side, and it’s important to recognize this. In the couple of years since I penned that piece, a few more negatives about our art have occurred to me, so I figured it was time for Part II.

#1 – Bad Weather is Good Weather

cloudy view of mountains from a small plane - Five (More) Uncomfortable Truths About Photography

I’ve recently returned from leading a wilderness trip in Alaska’s Northwest Arctic. My group and I spent 11 days canoeing on a very remote and wild river. For the first three days, the weather absolutely sucked and it was glorious. But then the sun came out and it all went downhill from there.

When it comes to outdoor photography, the bluebird days we hope for as hikers, paddlers, cyclists, and explorers, are not ideal. Bright blue skies do not create drama. They don’t catch the evening light, and they don’t roil and boil in textures of deep blues and grays.

Now a good storm, that’s dramatic!

rocky outcrop and cloudy sky - Five (More) Uncomfortable Truths About Photography

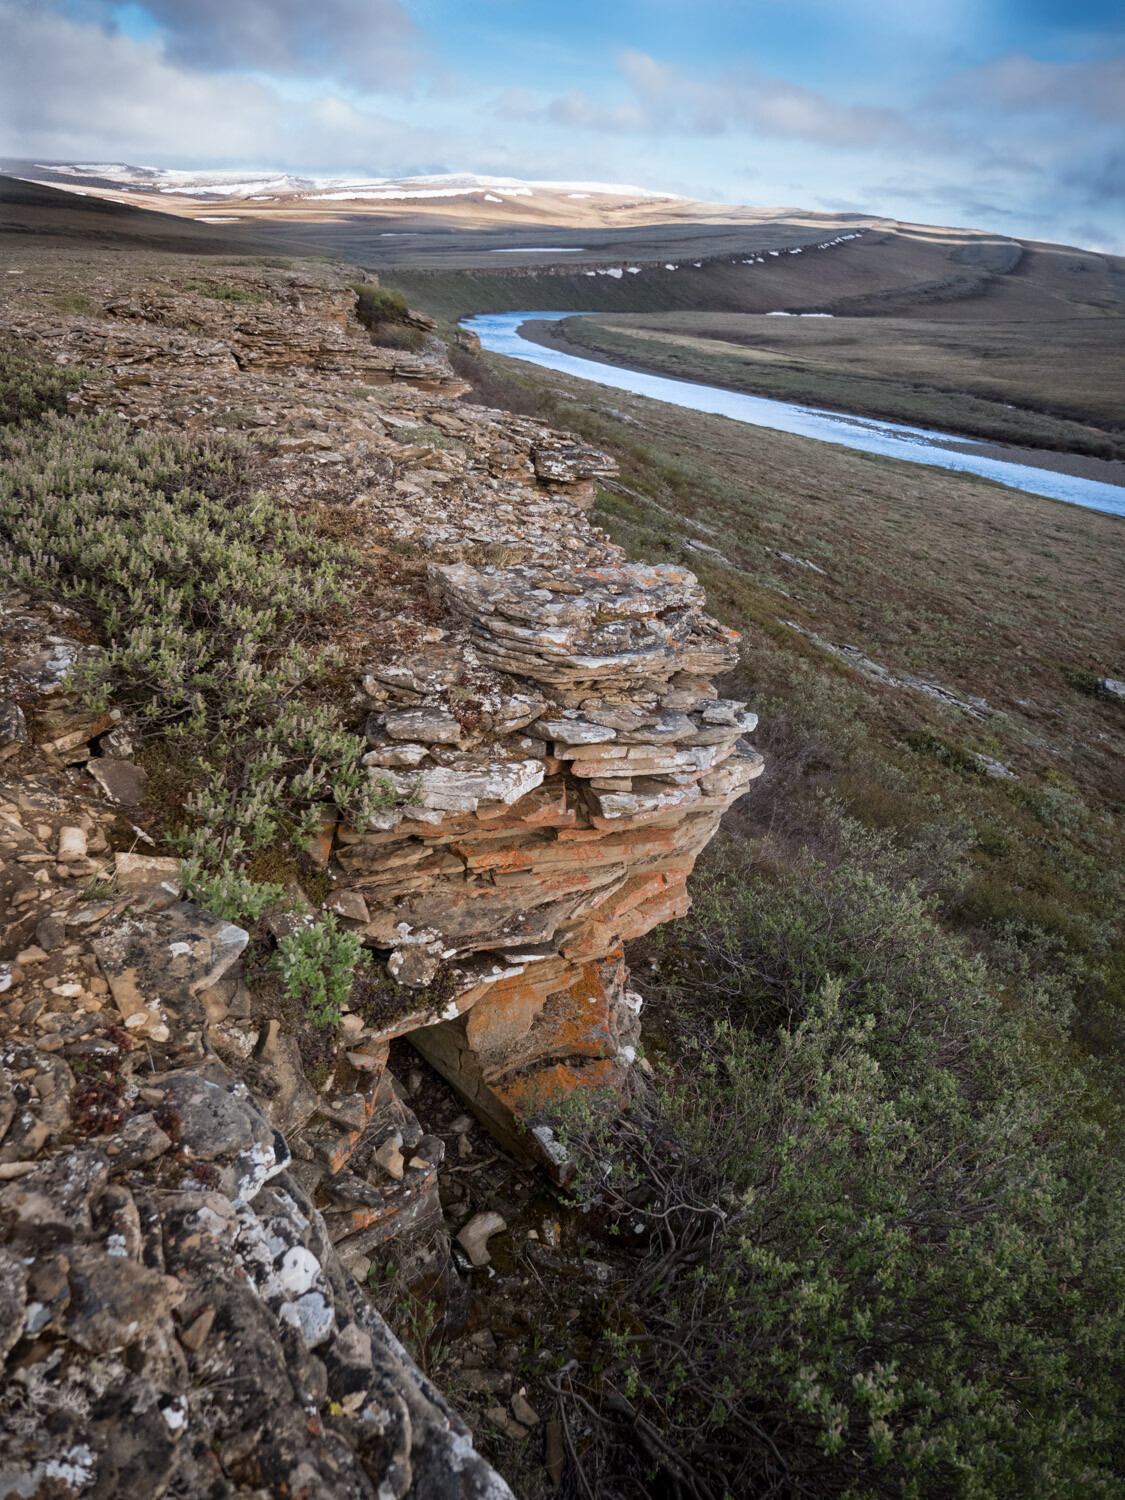
Without the moody skies here, the warm tones in the rock would be either absent or much less compelling.

Our small bush plane slipped in beneath low clouds, barely clearing the pass over the mountains. We landed in a mix of blowing snow, sun patches, and a cold north wind. Photographically speaking it was perfect weather; a constantly shifting drama unfolding across the landscape.

For a few cold and blustery days it was perfect, and my best images of the trip were made during that time. But, on the fourth day, the wind shifted and blew out the clouds and snow, leaving behind a bluebird sky, warm temps, and sunshine. It definitely could have been better for photography.

Five (More) Uncomfortable Truths About Photography - blustery day

This image and the one below were made 24 hours apart but from very nearly the same location. This brooding, moody, stormy weather is far superior to the more generic, nice-day image below.

brighter day blue sky - Five (More) Uncomfortable Truths About Photography

The moral of the story is that the best weather for being outdoors is often boring when it comes to photography. So be brave, and step outside even when it’s snowing sideways.

#2 – Lens Snobbery is Real

Five (More) Uncomfortable Truths About Photography - bird in a tree singing

A Swainson’s Thrush singing in my yard in Fairbanks, Alaska. This image is one I could never have captured with my old 500mm f/4 simply because I simply would not have been carrying it while walking my dog.

A few months ago I made the heart-wrenching decision to sell off my beloved Canon 500mm f4L IS lens. It was a hard decision. That big hunk of glass and metal had been with me a for a few years, traveled around the world with me, and made some of my best images. But, its size, heft, and cumbersome, tripod-requiring handling was getting in the way.

I’ve replaced it with a much smaller Olympus 300mm f4 PRO for the micro 4/3rds system (giving me a 600mm f4 equivalent at a third of the size). And here is the uncomfortable part – the quality of the Olympus lens is equal to that of the Canon and I don’t miss the bigger, more expensive Canon lens at all. Not one little bit.

Except (and to be honest I have a hard time admitting this) when I’m around other photographers. As a bonafide professional shooter, the big lens felt like a badge of honor. It’s a bogus badge for sure because the size of your lens has nothing to do with performance or image quality. Yet I felt like I needed that big glass to be taken seriously as a pro.

Five (More) Uncomfortable Truths About Photography - portrait shot of a raven

I don’t think the bokeh or sharpness of my Olympus 300mm f4 falls short in any way when I compare it to larger, far more expensive lenses like my old 500mm f4.

The compact mirrorless 4/3rds system does not stand out the way the big gear did, and in groups of photographers, I noticed my gear (and me) being brushed over.

The great irony is that my long lens work has improved dramatically with the purchase of the new gear. Its small size is easy to transport, so it is always with me when it matters. I now walk the dog with a 600mm f4 equivalent for heaven’s sake! It’s there when I need it and the results have been excellent.

Time to put the snobbery aside and let the images speak for themselves.

#3 – Your big DSLR is Unnecessary

Five (More) Uncomfortable Truths About Photography - animals running on a ridge

Yesterday, while wandering around my local farmer’s market, I saw a photographer shooting with the exact same Canon professional level DSLR I owned until a few months ago. My god, it looked huge!

You see, I’ve recently switched from Canon to Lumix (for general shooting and wildlife) and Sony for night work and high-resolution landscape imagery. Both of these two mirrorless systems cast a tiny shadow compared to the hulking DSLRs of my past life.

In this day and age, the difference in quality and performance between a big DSLR and a light and compact mirrorless is precisely zilch. The big camera may make you stand out in a crowd (see #2 above), but it won’t make better images.

#4 – Creativity is More Important Than You Think

northern lights over a mountain - Five (More) Uncomfortable Truths About Photography

Part of creativity is knowing when to grab a shot. Rather than pausing when the headlights of a big truck fell across this mountainside, I experimented with an exposure.

Look across the pages of any photo website or magazine and you’ll see gobs of articles and tutorials about camera settings, focus techniques, equipment, exposure, and post-processing. But likely you’ll find very few about the creative process of image making.

I know why. These types of articles are popular because they offer simple, actionable things to learn that can improve your images quickly. Don’t get me wrong, these things are super important to know. But all the settings, equipment, and post-processing tips are merely tools in your toolbox, not the final product.

sunset over a forest and hills - Five (More) Uncomfortable Truths About Photography

Eventually, every serious photographer reaches a point where they know all they really need to know about their camera and computer programs, and then what…? They either realize that that photography is more than a technical craft and they begin looking at it from a creative perspective, or they don’t, and they stall out.

Learning the technical details is easy compared to actually finding and composing images in the field. Good photography is not formulaic, and how do you learn something that doesn’t use a formula for success? You work at it, a lot. It’s hard and uncomfortable. That’s how.

#5 – Money is Better Spent on Travel than Gear

northern lights over a mountain scene - Five (More) Uncomfortable Truths About Photography

For much less than the price of a new pro-level camera body, you could go photograph something like this.

Got a few hundred bucks to blow on gear? Don’t. Take that few hundred bucks and take a few days and go somewhere awesome instead. Unless you really need it, your extra money is better spent on going somewhere really cool to make images, and not on cameras, lenses, bags, filters, and flashes.

I can just about promise you that you’ll get more and better images by a few days of travel to photograph wildlife, or landscapes, or the northern lights, or some new city than you will by spending the same amount on a new piece of kit.

sun burst over trees in Africa - Five (More) Uncomfortable Truths About Photography

A trip to Africa last year re-inspired me in a way a bunch of new gear never could.

A new telephoto lens or camera could cost you thousands of dollars. If you have functional camera gear, and you are looking at something new just because it’s all bright and shiny, take a moment to reconsider. Could those thousands be spent traveling somewhere new and unique? Some place to photograph a landscape or phenomenon you’ve always dreamed of shooting?

We make images by exploring our world. Without that exploration, all the fancy new gear in the world is worthless. Just as importantly, you’ll get the experience and joy of travel, and that is truly priceless.

Conclusion

night campfire scene - Five (More) Uncomfortable Truths About Photography

Look, photography is messy and expensive. I suggest you embrace the mess and reassess the expense. Go outside when the weather sucks and see what you find. Remember that the performance of your gear is what matters not the brand or the size, and know that creativity is hard but it’s the only way to advance your photography. Photography takes work.

Lastly, think about how you spend your money. Old glass and old cameras often work just fine, and are capable of producing excellent images. Maybe you should hold onto that gear for a while longer and spend some of that extra money to go somewhere new. Travel, you’ll find, is an excellent strategy for making great photos.

It’s an uncomfortable photographic world out there. So it’s time to accept it, and go make something beautiful.

The post Five (More) Uncomfortable Truths About Photography appeared first on Digital Photography School.


Digital Photography School

 
Comments Off on Five (More) Uncomfortable Truths About Photography

Posted in Photography


Keep tabs on your Canon’s shutter count (and more) with EOS Inspector 2

24 Jul

Amazingly, there’s no built-in method to finding out how many shutter actuations your Canon DSLR has amassed. Thankfully though, there are third-party solutions to help get the job done.

One such solution is the recently-updated EOS Inspector 2, a MacOS app that’s improved upon the original version of EOS Inspector, which itself was a successor to the original ShutterCount app — all of which are created by independent Russian developer Konstantin Pavlikhin.

EOS Inspector 2 details the shutter actuations of 65 Canon cameras — a list of which you can find here — including Live View shots with supported cameras. The app also details the serial number, batter charge level, remaining shots estimate, and the installed firmware version.

To help you gauge how much longer you can expect your camera’s shutter to function, EOS Inspector 2 also shows the expected shutter life for your camera. It’s also possible to change the metadata fields the camera applies to images, including owners name, author, and copyright.

EOS Inspector 2 is currently available in the Mac App Store for an introductory price of $ 2.99. If you’re upgrading from the original EOS Inspector app, the update is free.

Articles: Digital Photography Review (dpreview.com)

 
Comments Off on Keep tabs on your Canon’s shutter count (and more) with EOS Inspector 2

Posted in Uncategorized


Leica Noctilux-M 75mm F1.25 ASPH: more fun than a Nissan Versa

24 Jul

Leica: the crazy diamond of the photography world. In an industry increasingly dominated by dull moments, it’s always nice to see a company consistently doing something brightly, colorfully different. Even when – or maybe especially when – that company appears so gleefully unconcerned with what their peers (it doesn’t quite make sense to say competitors) are up to in the meantime.

Noctilux-M F1.25 75mm ASPH key specifications

  • Leica M mount
  • Manual focus
  • Maximum magnification ratio: 1:8.8
  • Minimum focus: 0.85m
  • Optical construction: nine elements in six groups (two aspherical)
  • 67mm filter thread
  • Built-in extending hood
  • Length / Diameter: 91mm x 74mm (3.6 x 2.9in)
  • Weight: 1.05 kg (2.33 lb)

Only Leica could have made the Noctilux-M F1.25 75mm ASPH – a manual focus prime lens that weighs more than a kilo and costs as much as a new car (no, really). Inevitably, a lot of the responses to our coverage of this lens so far (and indeed of pretty much all Leica hardware) focus on the price, but at this point, this mode of criticism misses the point. Yes, Leica stuff is expensive. It always has been. Sure, there are cheaper alternatives, and there always have been – see also: organic avocados, brand-name printer ink, fancy chocolate (you know the stuff by the self checkouts, in the fancy gold paper that mum likes, with the sea salt) and cars that aren’t the Nissan Versa.

Using the 75mm F1.25 on the Leica M10

The 75mm Noctilux is not an everyday kind of a lens. Designed for use with the company’s digital rangefinder cameras, for starters there’s the small matter of its focal length. 75mm has always been a bit of a weird fit for Leica’s rangefinders, occupying an awkward position between the long-established standard 50mm and 90mm focal lengths. Mounting a 75mm lens on a Leica rangefinder brings up the 50mm framelines, with 75mm indicated roughly by a dotted rectangle just inside them.

Personally, I’m so used to ignoring the inner dotted lines when shooting with a 50mm that un-ignoring them when I actually want to shoot at 75mm is surprisingly difficult. Then again, I try to get into my apartment using my car keys at least once a week, so maybe you shouldn’t take anything I say too seriously.

All of Leica’s rangefinder cameras since the M4-P of 1980 have included 75mm framelines, indicated by broken lines inside the main (outer) 50mm framelines. As you can see, the massive 75mm F1.25 blocks a large portion of the frame. This view shows the maximum occlusion, which occurs at the minimum focus distance of 0.85m, with the built-in hood extended.

And then there’s the issue of viewfinder blockage. Regardless of the focus or hood position, as you can see from the picture above (taken through the viewfinder of an M10) the 75mm F1.25 obscures a very large portion of the frame, almost as far as the focusing patch. This is one of the reasons why Leica recommends the 75mm F1.25 should be used in live view mode, and preferably with the aid of the optional electronic viewfinders available for recent M-series digital cameras.

$ (document).ready(function() { SampleGalleryV2({“containerId”:”embeddedSampleGallery_9665775212″,”galleryId”:”9665775212″,”isEmbeddedWidget”:true,”selectedImageIndex”:0,”isMobile”:false}) });

The other reason for using live view is focus accuracy. You can have the best technique in the world, but nailing focus on a short telephoto prime wide open at F1.25, with a rangefinder, isn’t easy. I did try Leica’s 2X screw-in magnifier, but it didn’t help my hit-rate much (and obviously it had no effect on the substantial viewfinder blockage).

Shot in relatively dim conditions, I selected F2 for this portrait because I was having so much difficulty getting accurate focus at F1.25 using live view on a Leica M10. Critical focus is acceptable here, but it’s still a hair away from where I was aiming.

Leica M10 | ISO 800 | 1/250 sec | F2

Focus peaking and magnified live view don’t guarantee accurate focus, but they certainly make it easier. Even with these aids, however, the razor-thin depth of field and the sheer bulk of the lens both work against the rangefinder shooter. When taking photographs hand-held, it’s difficult to support the weight of the lens without shifting the focus ring. I’ve found that this often forces me into a loop of focus checking, recomposing, focus checking again, recomposing again (etc.). Especially when shooting portraits, the potential for slight subject movement adds yet another variable, and leads to yet more focus checking, recomposing, and checking again…

The Leica 75mm F1.25 weighs more than a kilo and its wide diameter mean that the M10 can’t lie flat on its base with the lens attached. For these reasons the lens has its own tripod mount.

Disabling automatic live view magnification helps avoid the need for constant recomposing, but the secret to accurate focus on an M10 with the 75mm F1.25 is bracketing: shoot a lot of photos, and bracket focus as you go. When you get a sharp result, trust me – the extra effort will have been worth it. Things are easier if you set up on a tripod, and the heavyweight 75mm Noctilux actually has its own tripod screw in the base, to avoid putting too much strain on the camera’s lens mount.

Using the 75mm F1.25 on the Leica SL

Despite being a native M-mount lens, the 75mm F1.25 handles very nicely on the SL. Arguably, in fact, it’s more pleasant to use on the larger, chunkier camera. Obviously the combination is heavier but the weight is better distributed, making the whole package feel balanced and notably less front-heavy than it does on the lighter (and grip-less) M10. Crucially, the SL’s large handgrip means that you don’t need to support the Noctilux’s weight entirely from the lens itself, which makes it less likely that you’ll accidentally nudge the focus or aperture rings when composing a shot.

On the Leica SL, things get a bit easier, partly thanks to the substantial grip and DSLR-style handing of the larger camera. This portrait was shot hand-held at F1.25.

Leica SL | ISO 100 | 1/4000 sec | F1.25

The SL’s viewfinder makes for a better framing and focusing experience too, by virtue of the SL’s full-time live view and more DSLR-styled ergonomics. Leica’s M to L adapter is relatively slim, doesn’t add much extra weight and communicates the 6-bit code from the lens to the camera body just as it would on a digital M-mount camera.

Image quality

As far as the results are concerned, hopefully our gallery of sample images speak for themselves. Contrast across the frame is high and sharpness at F1.25 is pretty stunning. Longitudinal chromatic aberration is present if you go looking for it in areas where focus is just falling-off, (around the edges of my subject’s sunglasses in this shot is about as bad as it gets) but it’s generally inoffensive, and the bokeh at wide apertures is (I happen to think) delightful.

Shot wide open on a Leica M10, this portrait demonstrates the 75mm Noctilux’s key selling-points: creamy smooth bokeh, great sharpness and razor-thin depth of field. There’s a hint of longitudinal chromatic aberration in our subject’s hair as it goes out of focus, but it’s far from objectionable.

Photo by Wenmei Hill.

Leica M10 | ISO 100 | 1/350 sec | F1.25

While accurate focus at F1.25 is a challenge, the incredibly thin depth of field opens up creative possibilities foreclosed by the older, slower, but generally more practical 75mm F2 Summicron. You could shoot the Noctilux at F8 but what would be the point? If you’re prepared to pay this much for a lens you’ll probably want to shoot it wide open.

Leica Noctilux-M 75mm F1.25 ASPH real-world samples

$ (document).ready(function() { SampleGalleryV2({“containerId”:”embeddedSampleGallery_5242743195″,”galleryId”:”5242743195″,”isEmbeddedWidget”:true,”selectedImageIndex”:0,”isMobile”:false}) });

Personally, I don’t gravitate to medium telephoto lenses. I tend to shoot mostly at 35mm, often at 28mm, and sometimes at 50mm. I have a 90mm, which mostly (weirdly) gets used for landscapes and urban details. Using the 75mm F1.25 hasn’t converted me to that focal length by any means, but its rendition is so unique that while I might not have enjoyed some of the experience of shooting with it, I do feel that the results go some way to justifying the awkward handling.

Ultimately, the 75mm Noctilux won’t be made in large numbers and it won’t be owned by many people. It isn’t a magic lens – there are plenty of excellent alternatives available for much less money, albeit of course for other systems. Leicaland is a different country, and one that will remain foreign for most photographers. But hey – it’s a fun place to visit, from time to time. Plus ça change, as the Germans don’t say.

Regardless, it would be unfair to dismiss the Noctilux as a ‘stunt’ lens that exists only to show off the expertise of Leica’s optical and mechanical engineering. It’s more than that – and it’s priced accordingly.

Articles: Digital Photography Review (dpreview.com)

 
Comments Off on Leica Noctilux-M 75mm F1.25 ASPH: more fun than a Nissan Versa

Posted in Uncategorized


More powerful notebooks from Apple in the MacBook Pro line

14 Jul

Apple has updated its MacBook Pro series of notebooks with 15in and 13in models that are claimed to be better for intense image and video editing. The company says the new models are the most advanced ever, and that they feature 8th generation Intel Core processors for faster performance. The 15in model runs 70% faster than its predecessor with its new 6-core processor, while the 13in model sports a 4-core processor that makes it twice as fast as the previous generation.

The 15in model’s memory boosted to 32GB and can accommodate a 4TB SSD card for storage. The 13in model can cope with 2TB of SSD. Both models offer a 500-nit Retina screen that Apple says is the best MacBook display to date, and which is compatible with the P3 wide gamut color space.

The new MacBook Pro models will cost $ 1799 and $ 2399. For more information see the Apple website.

Press release

Apple updates MacBook Pro with faster performance and new features for pros

Now Featuring Up to 6-Core Processors and 32GB of Memory, True Tone Display and the Apple T2 Chip

The new 13-inch and 15-inch MacBook Pro models with Touch Bar deliver more power to pro users.

Cupertino, California — Apple today updated MacBook Pro with faster performance and new pro features, making it the most advanced Mac notebook ever. The new MacBook Pro models with Touch Bar feature 8th-generation Intel Core processors, with 6-core on the 15-inch model for up to 70 percent faster performance and quad-core on the 13-inch model for up to two times faster performance — ideal for manipulating large data sets, performing complex simulations, creating multi-track audio projects or doing advanced image processing or film editing.

Already the most popular notebook for developers around the world, the new MacBook Pro can compile code faster and run multiple virtual machines and test environments easier than before. Additional updates include support for up to 32GB of memory, a True Tone display and an improved third-generation keyboard for quieter typing. And with its powerful Radeon Pro graphics, large Force Touch trackpad, revolutionary Touch Bar and Touch ID, dynamic stereo speakers, quiet Apple-designed cooling system and Thunderbolt 3 for data transfer, charging and connecting up to two 5K displays or four external GPUs, it’s the ultimate pro notebook.

MacBook Pro now delivers faster performance for complex simulations and data manipulation.

“The latest generation MacBook Pro is the fastest and most powerful notebook we’ve ever made,” said Philip Schiller, Apple’s senior vice president of Worldwide Marketing. “Now with 8th-generation 6-core processors, up to 32GB of system memory, up to 4TB of super fast SSD storage, new True Tone technology in its Retina display and Touch Bar, the Apple T2 chip for enhanced security and a third-generation quieter keyboard packed into its thin and light aluminum design with all-day battery life, it’s the best notebook for pro users.”
Faster, More Powerful Pro Notebook Computing

With the new MacBook Pro, developers can compile code faster and more easily run multiple virtual machines and test environments.

The new MacBook Pro is now faster and more powerful, with 8th-generation 6-core Intel Core processors on the 15-inch MacBook Pro for up to 70 percent faster performance and 8th-generation quad-core Intel Core processors on the 13-inch model for performance that’s up to twice as fast.1 With the option to add up to 32GB of memory on the 15-inch MacBook Pro, users can run more apps simultaneously or load larger files into memory. And with up to a 2TB SSD on the 13-inch model and up to a 4TB SSD on the 15-inch, MacBook Pro gives customers the flexibility to work with large asset libraries and projects wherever they go.

Best Mac notebook display ever now features True Tone technology for a more natural viewing experience.

With 500 nits of brightness and support for the P3 wide color gamut, the Retina display on MacBook Pro is the best Mac notebook display ever. Now with True Tone technology, the display and Touch Bar deliver a more natural viewing experience for design and editing workflows, as well as everyday tasks like browsing the web and writing email.

Apple T2 Chip Delivers Enhanced Security and “Hey Siri” on Mac

Also new to MacBook Pro is the Apple T2 chip, first introduced in iMac Pro. With the Apple T2 chip, MacBook Pro now delivers enhanced system security with support for secure boot and on-the-fly encrypted storage, and also brings “Hey Siri” to the Mac for the first time.

15-Inch MacBook Pro Highlights

  • 6-core Intel Core i7 and Core i9 processors up to 2.9 GHz with Turbo Boost up to 4.8 GHz
  • Up to 32GB of DDR4 memory
  • Powerful Radeon Pro discrete graphics with 4GB of video memory in every configuration
  • Up to 4TB of SSD storage2
  • True Tone display technology
  • Apple T2 Chip
  • Touch Bar and Touch ID

13-Inch MacBook Pro Highlights

  • Quad-core Intel Core i5 and i7 processors up to 2.7 GHz with Turbo Boost up to 4.5 GHz and double the eDRAM
  • Intel Iris Plus integrated graphics 655 with 128MB of eDRAM
  • Up to 2TB of SSD storage2
  • True Tone display technology
  • Apple T2 Chip
  • Touch Bar and Touch ID

Back to School with MacBook Pro

The new MacBook Pro is also part of Apple’s Back to School promotion starting today and available to college students, their parents, faculty and staff through the Apple Education Store. The promotion includes a pair of qualifying Beats headphones with the purchase of any eligible Mac or iPad Pro for college, as well as education pricing on Mac, iPad Pro, AppleCare, select accessories and more.

New Leather Sleeves for MacBook Pro

New MacBook Pro leather sleeves now available in Saddle Brown, Midnight Blue and Black.
First introduced with MacBook, Apple leather sleeves are now available for the 13-inch and 15-inch MacBook Pro in Saddle Brown, Midnight Blue and, for the first time, Black. Designed with high-quality leather and a soft microfiber lining for extra protection, the sleeves are a perfect complement to MacBook Pro for users on the go.

macOS Mojave Coming This Fall

This fall, MacBook Pro can be updated with macOS Mojave, the latest version of the world’s most advanced desktop operating system, with new features inspired by pros but designed for everyone. In macOS Mojave, a new Dark Mode transforms the desktop with a dramatic new look that puts the focus on user content. The new Stacks feature organizes messy desktops by automatically stacking files into neat groups. Familiar iOS apps, including News, Stocks, Voice Memos and Home, are now available on the Mac for the first time. FaceTime now adds support for group calling, and the Mac App Store gets a full redesign featuring rich editorial content and the addition of apps from top developers, including Microsoft and Adobe.

Pricing and Availability

Starting at $ 1,799 and $ 2,399 respectively, the updated 13-inch MacBook Pro models with Touch Bar and 15-inch MacBook Pro models with Touch Bar are available today through apple.com and in select Apple retail stores and Apple Authorized Resellers later this week. Additional technical specifications, configure-to-order options and accessories are available online at apple.com/mac.

Articles: Digital Photography Review (dpreview.com)

 
Comments Off on More powerful notebooks from Apple in the MacBook Pro line

Posted in Uncategorized


More information released on Yongnuo YN 50mm F1.4 II

02 Jun

Yongnuo has unveiled a new version of its 50mm F1.4 lens – the upcoming YN 50mm F1.4 II. The new model follows an update to the company’s 50mm F1.8 offering (predictably called the 50mm F1.8 II), giving photographers a new and inexpensive alternative to Canon’s venerable EF 50mm F1.4.

Yongnuo’s new lens features a USB port for firmware updates, support for live view focusing, electromagnetic aperture, and a new external design. The company emphasizes the 50mm F1.4 II’s bokeh capabilities.

The YN 50mm F1.4 II features 9 elements in 7 groups, electromagnetic aperture with support for M/Av/Tv/P/B modes, gold-plated contacts and a metal mount, glass optics with a multilayer coating for better light transmission with controlled glares/ghosting, as well as both manual and auto focus, a focus distance indictor, and the same DC motor drive system found in the original model.

The Hong Kong company detailed the new lens on its website, but pricing and availability have yet to be announced.

Via: PhotoRumors

Articles: Digital Photography Review (dpreview.com)

 
Comments Off on More information released on Yongnuo YN 50mm F1.4 II

Posted in Uncategorized


8 Ways to Create More Dramatic Flower Photos

27 May

Do you think flower photography is boring? Or even too easy and obvious? I mean, of course, when you point your camera at a pretty flower you’re going to get a pretty photograph. Right?

But a subject that you feel is boring and easy is actually the perfect one to challenge yourself with. Can you make a flower image that is creative and dramatic somehow?

Here are a few ideas to get you started making more dramatic flower photos.

1. Dramatic light

Often flower photos are made under soft lighting conditions, either in the shade or on an overcast day. This is because of the soft and delicate nature of a flower which lends itself to that type of light.

But it doesn’t have to be that way. For a more dramatic image, try to find a flower that has direct light on it and shade behind it. High contrast scenes feel more dramatic and your flower will stand out against a darker background.

Flowers in the Light - 8 Ways to Create More Dramatic Flower Photos

2. Change your perspective

Most flower photos are made from a perspective looking right into the open flower. Try other perspectives for more interesting compositions. You can look at the flower from above, from the side, or from underneath.

To make the image below, my camera was on the ground looking directly up at the flower. Because the sky was so much brighter than the flower, it created a more high-key type of image with light shining through the petals making them appear to glow.

Looking Up flower - 8 Ways to Create More Dramatic Flower Photos

When I made the next image, I was interested in the lines created by the petals of a dahlia the size of a dinner plate. Most photos would include the whole flower, but I only included a small portion of the huge flower taken from a side angle.

Giant Dahlia - 8 Ways to Create More Dramatic Flower Photos

3. Focus through

In one of my favorite techniques for flower photography, I use a telephoto lens and focus on a flower that is around five feet away. Then I position the lens so that another flower is right in front of it. Because the close flower is extremely out of focus, it creates a soft area of color in front of the main subject.

This is especially effective if you can find two flowers that are complementary colors (opposite) on the color wheel.

Focus Through Poppy - 8 Ways to Create More Dramatic Flower Photos

4. Let the wind blow

One of the most frustrating things you encounter when photographing flowers is wind. A little bit of wind you can handle with a faster shutter speed, but sometimes the wind is just too much and your flower is blowing all over the place.

When this happens, just go with the flow! Instead of trying to get a sharp image, go with a slow shutter speed and capture the motion of the flower moving in front of your lens.

Flowers in the Wind- 8 Ways to Create More Dramatic Flower Photos

5. Environmental portrait

Most flower photos contain only the flower with no context. But you can also make an environmental portrait that shows the flower and its surrounding environment, like the one below.

Storm Flowers - 8 Ways to Create More Dramatic Flower Photos

6. Echo

Another of my favorite techniques I refer to as an echo. For your main subject, find a flower that has another virtually identical flower behind it. Use a shallow depth of field and focus on your main subject letting the flower behind fall out of focus. This creates a sort of echo of the main subject.

Yellow flowers - 8 Ways to Create More Dramatic Flower Photos

7. Less than perfect flowers

When photographing flowers, most photographers search for perfect specimens to be the main subject. But perhaps more interesting subjects are the less than perfect flowers. They can be dead flowers, ones with flaws, or even flowers that have fallen over.

In the image below, I was attracted to the raindrops that were on the side of this fallen tulip. Flowers with raindrops are not uncommon, but the tulip on its side is a bit more unusual.

Fallen Tulip - 8 Ways to Create More Dramatic Flower Photos

8. Emphasize edges in post-processing

You can also introduce effects in post-processing to make unique and dramatic flower photos. Try experimenting with textures or edge effects.

For the image below, I added an edge effect in post-processing to draw the viewer’s attention to the shape of the petals.

pink Dahlia - 8 Ways to Create More Dramatic Flower Photos

What else can you think of? Flower photography doesn’t have to be boring or predictable. In fact, any subject that you find boring and predictable is a challenge waiting for you to unleash your own unique perspective. How do you make more dramatic flower photos?

The post 8 Ways to Create More Dramatic Flower Photos appeared first on Digital Photography School.


Digital Photography School

 
Comments Off on 8 Ways to Create More Dramatic Flower Photos

Posted in Photography


HP unveils DesignJet Z6 and Z9+: faster, more efficient large-format photo printers

25 May

During the FESPA Global Print Expo in Berlin last week, HP unveiled two new DesignJet Z Series large-format printers: the DesignJet Z6 and Z9+. Both models will be available in 24-inch and 44-inch formats with onboard vertical trimmers, new HP Pixel Control color technology, and a redesigned poster application.

According to HP, the new Z Series printers are able to print 2.5 times faster than the DesignJet Z3200 Photo Printer while utilizing fewer inks, the end result being improved performance and reduced costs. The company claims these new large-format printers offer the “fastest printing capabilities available on the market today.”

The DesignJet Z6 printer is designed specifically for Geographical Information Systems (GIS) users and creators, as well as anyone else in need of water- and fade-resistant large-format prints. The Z9+ model, meanwhile, is targeted at consumers and retailers in need of “amazing photographic quality prints.”

$ (document).ready(function() { SampleGalleryV2({“containerId”:”embeddedSampleGallery_3777761186″,”galleryId”:”3777761186″,”isEmbeddedWidget”:true,”selectedImageIndex”:0,”isMobile”:false}) });

HP explains that its Pixel Control technology coupled with HP Nozzle Architecture (HDNA) results in true-to-color prints made using nine instead of 12 inks; there’s also support for HP Professional PANTONE Emulation. Other features include dual drop technology, HP Secure Boot and JetAdvantage Security, and HP PrintOS for remote printer management.

HP plans to release the DesignJet Z6, Z6x10, and Z9+ large-format printers on June 1st, with the larger 44-inch models with dual roll and the vertical trimmer not arriving until around July 1st. The company didn’t specify which markets the printers will launch in, or how much they will cost when they do.

Press Release

HP Launches State-of-the-Art Large Format Photo Printers

BERLIN, May 15, 2018 – HP Inc. unveiled its new DesignJet Z Printer series at FESPA Global Print Expo to showcase innovative large format technologies offering amazing image quality and fast, simple output for print service providers (PSPs), retailers, and creatives to deliver beautiful photos, impactful graphics and technical applications.

The market for large photo merchandising grew seven percent in 20171 with nearly 1.3 trillion photos taken in the same year2. The demand for simplicity and unrivaled photo quality is growing, fueling the need for printing solutions that remove bottlenecks and increase time savings.

The new HP DesignJet Z6 and Z9+ Printer series is designed to easily maximize printing performance for amazing photo output. By tightly integrating the materials, hardware, and software together, the new printers offer amazing photo quality and print permanence with fewer inks to simplify manageability and reduce costs. New vertical trimmer is featured on select models to optimize output in addition to other innovative technologies for rapid high-quality production from professional photo quality prints to retailer signage. The result is printing 2.5 times faster3 and post-production 20 percent faster4.

“The new DesignJet Z Printer series radically enhances the customer experience and reinvents printing possibilities for both professional photo and signage to ignite business growth and adapt to future needs,” said Guayente Sanmartin, General Manager and Global Head, HP Large Format Design Printing, HP Inc. “We thoughtfully designed the new printers to deliver impressive photo quality without compromising time resources and output speeds with the new vertical trimmer and innovative color technologies.”

The DesignJet Z Printer series will debut at FESPA 2018 at HP Booth 3.2 C20.

Simple and fast output for high-quality vibrant photos

HP DesignJet Z Printer series, both available in 24- and 44-inch formats, are built to give PSPs a competitive edge by enabling the fastest printing capabilities available on the market today. As an industry first, the HP DesignJet Z6 and Z9+offer a premium option with onboard vertical trimmer for fast and efficient production. New color technology, HP Pixel Control, now for the first time manages colors in a truly digital way to help customers embrace new opportunities for color-rich and dynamic printing.

For print service providers who rely on amazing professional photographic quality prints, the HP DesignJet Z9+ printer allows for a broad range of graphics and technical applications.

The DesignJet Z6 Printer series is designed for Geographical Information Systems (GIS) creators and users, print service providers, and retailers who require a simple to use solution for high-quality technical and graphics applications with water/fade resistance. The new print series is designed to handle even the most complex files with powerful processing architectures and the Adobe PDF Print Engine.

Specific technologies and features include:

  • HP Pixel Control: Achieve true-to-color prints and an expanded color gamut with RGB HP Vivid Photo Inks, featuring chromatic red, chromatic green, and chromatic blue, the i1 embedded spectrophotometer5 and HP Pixel Control. HP Pixel Control is truly digital color pipeline designed for outstanding, consistent image quality delivered by controlling every print-ready pixel. Combining HP HDNA with HP Pixel Control, users get amazing image quality with just nine inks versus 12 compared to the previous generation HP DesignJet. The new printers also offer HP Professional PANTONE Emulation to match Brand identity colors.
  • Dual drop technology: Produce prints with clear details and high-contrast color with dual drop technology powered by HP Nozzle Architecture (HDNA) and high-definition printheads. The HP DesignJet Z9+ features an upgradable configuration for a higher gloss output6.
  • Tools to create: Simplify large format printing with a redesigned poster application in the HP Applications Center7, which also includes Adobe Stock, Unsplash, Vecteezy, and Pattern Design, offers customers access to the necessary tools for creating beautiful, original signs, and posters. The HP Applications Center also embeds augmented reality (AR) technology to ignite the creation of more meaningful and engaging content for print.
  • Indoor and Outdoor Durability: Create prints with highly-stable pigment HP Vivid Photo Inks that provide water-resistant, fade-resistant prints8 for long-term indoor display and, when printed on suitable water-resistant media, outdoor display. HP Vivid Photo Inks gives PSPs the assurance that the prints they make for their customers will last as long as possible.
  • Security: Take advantage of the industry’s most secure printers with HP Secure Boot, whitelisting, authentication solutions, and HP JetAdvantage Security manager to safeguard printers and data for enterprise and government.
  • HP PrintOS: Remotely manage the print production environment from anywhere at any time with HP PrintOS now offered on the HP DesignJet Z Printer series.

HP is also announcing enhanced HP DesignJet Z6x10 Printers for a better user and output experience. Boasting a new fresh design, the new printers have new labeling indicating the printer colors to simplify ease-of-use. The printers have new printheads and Chromatic Red Ink formulation to deliver sharp detail and precise line quality. Optimized fast and normal print modes for heavyweight coated, polypropylene and canvas to speed-up production and enhance image quality. Lastly, the new printers will have 500 GB HDD with more virtual memory to process complex and graphic intensive prints.

HP offers a wide variety of innovative media including the new:

  • HP Recycled Satin Canvas is a 17.4 mil (443 micron), 370 gsm crack-resistant canvas for HP aqueous inks, made from 100% recycled water bottles making it the first of its kind in the HP Wide Format Media Portfolio.
  • HP Everyday Blockout Display Film with a unique construction of three layers of polypropylene, polyester, and polypropylene film for an added suppleness and superior lay-flat properties. HP Everyday Blockout Display film is a thicker film compared to 100 percent polyester, costs less, and has a coating for dual ink technology.

Follow HP Graphics on Facebook, Twitter, YouTube and LinkedIn.

Availability9

The HP DesignJet Z6, Z6x10, and Z9+ Printers are expected to be available on June 1, 2018. The 44-inch HP DesignJet Z6 and Z9+ with dual roll and vertical trimmer are expected to be available on July 1, 2018.


1. Source: Photo Merchandising report from Infotrend

2. Source: New York Times

3. Based on internal HP testing April 2018, tests done on mechanical printing time. Up to 2.5 times faster printing compared to the HP DesignJet Z3200 Photo Printer series. May vary depending on print mode and media type.

4. Vertical trimmer and dual rolls included with the HP DesignJet Z9?dr 44-in PostScript® Printer with V-Trimmer only. Up to 20% reduction in post-processing labor time based on internal HP testing compared to HP DesignJet Z9?dr series printers without built-in vertical trimmer.

5. Embedded in the HP DesignJet Z9? Printer series is an i1 spectrophotometer from X-Rite. Close collaboration between HP and X-Rite ensures a reliable solution that’s been thoroughly tested to meet customer demands for ease, quality, and dependability.

6. Based on internal HP testing April 2018, tests on mechanical printing time, comparing to HP DesignJet Z9? series printers without gloss enhancer. HP Gloss Enhancer can be used on photo paper, except for matte-finish papers. Optional upgrade available second half 2018.

7. Requires an HP Applications Center account, Internet connection, and connected Internet-capable device. For more information, see http://www.hpapplicationscenter.com.

8. Performance may vary based on writing system differences. Print permanence estimates by HP Image Permanence Lab based on the same formulation of HP Vivid Photo Inks used with the HP DesignJet Z6200 Photo Production Printer, using 6 inks. Water resistance performance varies based on printer and print profile. Water resistance testing by HP Image Permanence Lab on a range of HP media and follows ISO 18935 method. Display permanence rating for interior displays/away from direct sunlight by HP Image Permanence Lab on a range of HP media. For more information, see http://www.HPLFMedia.com/printpermanence.

9. Pricing and availability subject to change.

Articles: Digital Photography Review (dpreview.com)

 
Comments Off on HP unveils DesignJet Z6 and Z9+: faster, more efficient large-format photo printers

Posted in Uncategorized


Nisi shares more details on its full-frame cine lenses and launches Mist filter range

19 May

In a bid to clear up online speculation, surprise entrant to the full-frame cinema lens market Nisi has answered some questions about its relationship with brands marketing lenses very similar to its own recently-announced F3 series.

NiSi F3 Cinema Lenses

The company says that it owns the designs of its own lenses as it ‘took ownership’ of them from the ‘now dead’ Bokkeh Bokkelux project. Nisi also claims that it has made changes to the original optical and mechanical designs of the series to make the lenses more reliable, the assembly more accurate, and to reduce their overall weight. Nisi goes on to explain that it is a partner of cinema equipment company Kinefinity, and that it manufactures the brand’s Mavo Prime range of full-frame lenses.

The release doesn’t say it directly, but this is clearly a move that aims to end claims that Nisi is just copying existing lenses and marketing them under a different name.

Further details of the lenses have also been released, including that the five officially announced will be joined by 18mm and 135mm focal lengths in the second half of 2018. We should also expect a ‘new and innovative design for an optical accessory’ in the near future.

As the lenses will cover 46.5mm sensors, the F3 series will be compatible with ARRI Alexia LF, Red Monstro VV, Panavision DXL2, SONY Venice and Canon C700FF cameras (as well as ‘future’ models). Service centers are being established in Europe, USA and South Asia.

Allure Mist Filters

Nisi has also introduced a new series of filters to its cinema range. The Allure Mist filters will come in white and black versions and are designed to soften contrast in movie footage. The white version pulls back highlights and reduces the appearance of skin blemishes, while the black version diminishes the effect of flare and creates a misty atmosphere.

They will be available in 4×5.65in and 6.6×6.6in sizes and can be pre-ordered now

A comparison of the effects of the Allure Mist filters, with the Black Mist on the left and the White Mist on the right. Click to enlarge the view

And here’s a demo of the filters in ‘action’:

For more information visit the Nisi website.

Press Releases:

Five Fundamental Facts about the NiSI F3 Range of Full-Frame Prime Cine Lenses (and other news)

Since the announcement of the NiSi F3 range of full-frame lenses, NiSi’s headquarters have been inundated with questions and queries. In order to address some of these, we have compiled a list of answers around five key subjects. Read on for more, and to discover news in our announcement of the new NiSi Allure Mist Black/White Filters

1. Where does the name F3 come from?

The ‘F’ in F3 stands for ‘Full-Frame’. The lenses are all designed for full frame cameras and are extremely versatile, coming complete with PL, Canon EF and Sony E-Mounts. Mounts for other systems will need to be purchased separately, although NiSi will provide shims to ensure consistent filmmaking.

The number ‘3’ simply means ‘third generation’ and also refers to the range’s three key design characteristics, i.e. high resolution, low dispersion and retro flare.

2. What exactly is the relationship between the NiSi F3 range and Bokkelux?

Let’s be clear; the F3 prime lenses belong solely to NiSi since the company took ownership from Bokkelux. Since this time, NiSi are pleased to report that numerous improvements have been made and, being based on the original Bokkelux design, NiSi’s optical and mechanical design engineering experts have re-optimised some key elements to deliver the excellent new range.

These include:

  • Improved accuracy with assembly and improved supply chain for the optical elements
  • Improved physical attributes, i.e. the weight and calibre of the lenses have been improved with reliability and user assurance being of primary importance
  • Along with these significant improvements, NiSi has developed a new and innovative design for an optical accessory for F3 range. Once this is completed, we will release information, but you can be assured that it will meet the unique needs for many filmmakers.

3. OK, so what about the relationship between the NiSi F3, Kinefinity and Mavo Prime?

That’s simple, really. Kinefinity is partner of NiSi. Our specialist engineers have modified the industrial design for the Mavo Prime while retaining the same performance and quality. The new F3 range and Mavo Primes are manufactured exclusively by NiSi.

4. Will the NiSi F3 Primes come with both imperial and metric markings?

Absolutely. Markings will be in feet and metres.

5. What are the details for the F3 sales warranty policy and can we expect additions to the focal lengths this year?

NiSi is currently in the process of setting up special service centres, specifically for sales warranties. Bases will be in Europe, North America and in South Asia. We will make further announcements about the details of the certified sales warranty suppliers after the third quarter. You can expect to see 18mm and 135mm primes coming to light in the second half of this year.

F3 Lens Range Highlights – (a recap):

  • Covers Full-Frame Format
  • PL Mount/Canon EF Mount/Sony E-Mount
  • T2.0-T22 Click-less Aperture Range
  • Ultra Low Dispersion
  • High Resolution
  • Retro Cinema Style Housing
  • 12-Blade Iris
  • Same physical attributes across the lens range
  • Geared Focus and Iris Control Rings
  • Pure Performance in Film

Launching in 25mm T2.1, 35mm T2.0, 50mm T2.0, 75mm T2.0 and 100mm CF T2.0 formats, the new range of premium lenses from NiSi debuted during NAB 2018, which took place between the 7th -12th April in Las Vegas.

Compatibility

The new F3 prime lenses cover full-frame format which is compatible with ARRI Alexia LF, Red Monstro VV, Panavision DXL2, SONY Venice and Canon C700FF, along with ‘future-proofing’ for other cameras that we will see arriving in the future. They cover 46.5mm format sensors, allowing filmmakers full creative control, opening up a wide range of cinematic possibilities.

Pure Performance in Film

The new F3 lenses offer filmmakers advanced resolution and perfect dispersion control, image contrast and flare; all optimised by their stylish, retro housing.

The entire F3 series of lenses share the same physical attributes, allowing for the simple and time-efficient fitting of lens accessories, along with the native ‘Sensed presence’ technology, which provides users with the ability to shoot with a beautiful bokeh. The native apochromatic optical design results in excellent ratio/axial dispersion performance, giving a pure and natural colour, with almost no purple/green fringing within focus and in bokeh.

NEW: NiSi Announces Allure Mist Black/White Filters

Allure Mist White – Highlights:

* Reduces highlights and lowers contrast* Softens wrinkles and blemishes

Allure Mist Black – Highlights:

* Reduces overall flare and contrast* Produces mist effect

To coincide with the exciting launch of F3 full-frame prime cine lenses, NiSi has also released Allure Mist White/Black and anamorphic filters; adding to their already burgeoning range of cinema filters.

Available in sizes 4×5.65”, 6.6×6.6”, the new filters will further assist filmmakers to capture their intended artistic expression with every shoot.

Preorders for individual filters available from May 7th 2018

Special kit launch

Along with individual lenses, NiSi has announced that all lenses will be available as a specially designed F3 kit, which will include a complete set of lenses, from 25-100mm, along with a NiSi 4×5.65 Allure Mist white 1/4 filter, a NiSi 4×5.65 Allure Mist Black 1/4 filter and a NiSi 4×5.65 Polarizer, all packaged in a tough NiSi hardshell case.

Articles: Digital Photography Review (dpreview.com)

 
Comments Off on Nisi shares more details on its full-frame cine lenses and launches Mist filter range

Posted in Uncategorized


More Lessons from the Masters of Photography: Edward Weston

15 May

In any art form, we have those who seem to transcend the medium itself. Those who by their very accomplishments earn the respect and admiration of those who view their work. We call these esteemed individuals “Masters”. In photography, there great names that we hold high because their photographs move us on some emotional, nearly spiritual plain. We see these people as masters of photography not simply because of their level of technical skill but how their application of those skills makes us feel. At the same time, we strive to reach that same level of proficiency.

In this installment of Lessons from the Masters of Photography, we are going to examine the work of Edward Weston. We will look at the photographs and also the man to see what valuable lessons they can teach us about photography.

Edward Weston

Edward Weston - masters of photography

Edward Weston by Fred Archer- 1915

Weston was born in Highland Park, IL on March 24th, 1886. He began photography at the relatively young age of 16 when he was given a No. 2 Bulls-Eye camera by his father. The camera used 3 ½ inch roll film and Weston used the incredible little box to make photographs around Chicago where he spent a large portion of his childhood.

After moving to California in 1906, he worked as a surveyor and began working in photography essentially as a “door-to-door” photographer. A couple of years later, Weston would return to Illinois to attend the Illinois College of Photography where he became proficient in darkroom and camera techniques. Finally, in 1911, he opened his first studio in Tropico, California. The rest, as they say, is history.

Edward West went on to become one of the most dominating forces in the world of photography and is now considered by many to be one of the first great American photo makers. His work ranges from landscapes to fine art nudes and still life. In this article, we’re going to look at a few of the many lessons you can learn from the great Ed Weston, one of the Masters of Photography.

There are no Rules

How many times have you stopped yourself from placing a horizon dead center in a composition because it isn’t generally considered correct? Have you worn out the Rule of Thirds?

Do you always want to retain detail in the shadows each and every time? If you ever don’t make a photo in a certain way because it isn’t the “correct way”, then you are limiting yourself and your work…and Ed Weston would likely agree with me.

More Lessons from the Masters of Photography: Edward Weston - man looking up on a forest of tall trees

Weston believed there were no set “rules” to composition, He saw photography as a progression in self expression and would photograph the scene or subject based on what he felt, not necessarily based on any set rules.

When you photograph, always remember that while there a few technical constraints the majority of the creative side of your photograph is completely up to you. Be like Edward Weston and don’t hold back just because what you want to do is unique.

Beauty is Everywhere

If you look at some of Weston’s most celebrated works, you’ll see that they consist of everyday items that you might have in your home right this second; lettuce, sea shells, even a toilet. In fact, what is considered to be one of his most famous photographs is nothing more than a bell pepper.

More Lessons from the Masters of Photography: Edward Weston - pepper #30

Pepper #30 by Edward Weston, 1930/Image courtesy Sotheby’s

Weston made the everyday commonality of objects disappear. One of my favorite quotes by him is as follows:

“This then: to photograph a rock, have it look like a rock, but be more than a rock. Significant presentation – not interpretation.”

What’s Weston telling us here? Is he just being overly dramatic as some of us photographers tend to be (as my hand slowly raises)? Or is he saying that we should see the things around us not only as what they are but also what they could be?

sand dunes - More Lessons from the Masters of Photography: Edward Weston

Dunes, Oceano By Edward Weston, 1936

Beauty and therefore photographic material surrounds us all. Don’t overlook something because it appears simple. Instead, attempt to see its beauty photographically and learn to use your camera to show that quality in your work.

Use Simple Techniques in a Grand Way

Something I found surprising as I learned more about Weston is that most of (if not all) of his photographs were contact prints. This means that the negative is placed directly on top of or in very close contact with the printing paper. A contact print is the same size as the negative it is birthed from and in the case of Weston that was usually 8×10 inches.

silhouette of a camera on a tripod - More Lessons from the Masters of Photography: Edward Weston

Can you imagine that? All these great photographs were printed with extremely simple methods using nothing more than a negative, a piece of paper sandwiched in a wooden box, and light. The magic happened when Weston would add in the most important thing of all; his immense skill.

You see, Weston might have used simple tools, but the way in which he used them made all the difference. In your photography, never forget that amazing things can come very very simple means. The important thing is learning how to use the tools you do have expertly. Don’t believe me? That Pepper #30 from earlier…it was shot in a tin funnel on Weston’s kitchen table.

Some Final Thoughts on Edward Weston

I realize as I close out this article that it is March 24th, Edward Weston’s birthday. Oddly fitting as I think back on the legacy and lessons he left us to help better ourselves as photographers.

Weston was a master of making the simple profound. He used simple techniques and wasn’t afraid to bend the accepted “rules” in order to get the photography he saw fit. As you continue on your photographic journey I urge you to learn more about Edward Weston and his wonderful work as you discover more ways to become a better photo maker.

Read other dPS articles on the masters of photography here:

  • More Lessons from the Photography Masters: David Burnett and Vivian Maier
  • Lessons from the Masters: Robert Capa and Jerry Uelsmann
  • Cartier-Bresson and Stieglitz – Study the Masters of Photography to Become a Better Photographer
  • Masters of Photography: Bruce Davidson, Master of the Subway
  • Masters of Photography – Yousuf Karsh Portrait Photographer
  • Masters of Photography – Ansel Adams
  • Photography Lessons I Learned Growing Up Around Ansel Adams

The post More Lessons from the Masters of Photography: Edward Weston appeared first on Digital Photography School.


Digital Photography School

 
Comments Off on More Lessons from the Masters of Photography: Edward Weston

Posted in Photography