RSS
 

Posts Tagged ‘module’

5 Lightroom Develop Module Secrets Revealed

16 Jan

5-lightroom-develop-module-secrets-revealed

When you’re new to Lightroom, some features of the program aren’t immediately apparent, or easily discoverable. In this article I’ll introduce you to five Lightroom Develop module secrets that will help you get more out of photo editing in Lightroom.

#1 Smarter Virtual Copies

Often when you’re working in Lightroom you’ll edit an image to look one way, and then decide you’d like to try to edit it in a different way – without losing your work. The trouble is, that once an image has been edited, any virtual copy that you create will use the current look of the image as its starting point. So the first entry in the History Panel will be the creation of the Virtual Copy and you can’t, using the History Panel, wind the photo back to how it looked out of the camera.

You can, however, use the Reset button at the foot of the right panel of the Develop module. Click Reset to reset your new Virtual Copy, so it is the original out of camera image with all edits removed. Of course, the edits will remain on your original image (just the Virtual copy will be reset).

reset a virtual copy to the original image state in Lightroom
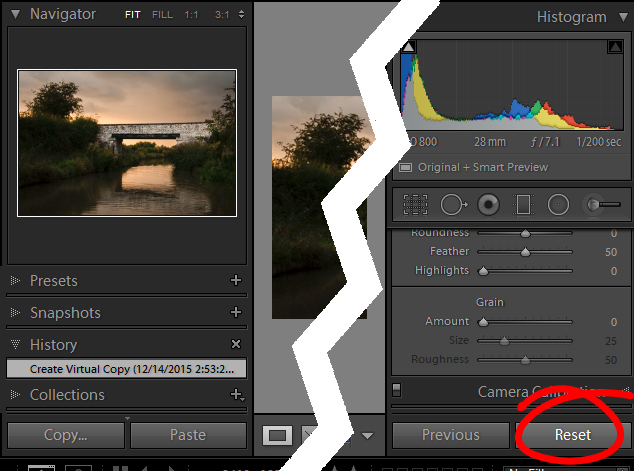
So far, so good. But what if you want to create a Virtual Copy that starts partway through the editing process? Well, that can be done too. Start with the original image, open the History Panel on the left, and click on the entry which shows the image looking as you want for your virtual copy. Note that the most recent edit is at the top of the History panel.

make a virtual copy from a partially edited image in Lightroom

Notice the History panel is opened, and a state other than the current one is chosen to make the Virtual Copy.

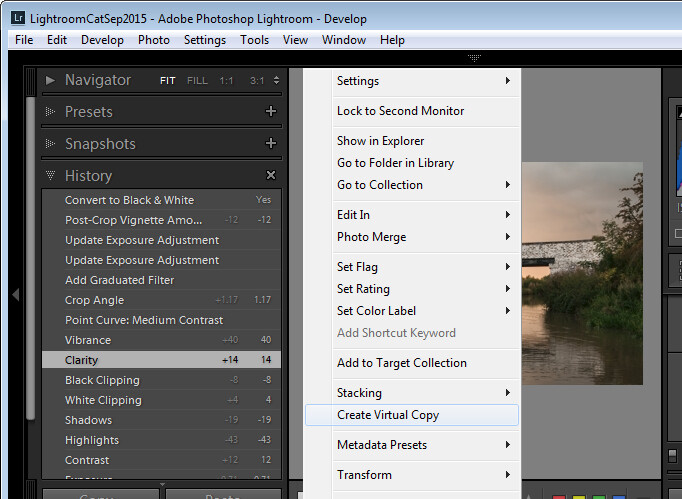
Now right click the image and choose Create Virtual Copy – Lightroom will create a new virtual copy and switch to it. Immediately after you do this, click back on the image that you made the copy from – the original image – and in the History Panel, click the topmost entry. This reinstates your edits to the original image, back to your last edit. It’s important to do this before you start working on the new Virtual copy as it is easy to forget to perform this step and, in doing so, you may lose your edits if you subsequently make changes to the original image.

#2 Comparing Before and After

In Lightroom you can compare the before and after editing state for an image by clicking on the image in the Develop module and pressing the backslash key on your keyboard (\). Press once to see the Before state and once again to return to the current edited state of the image.

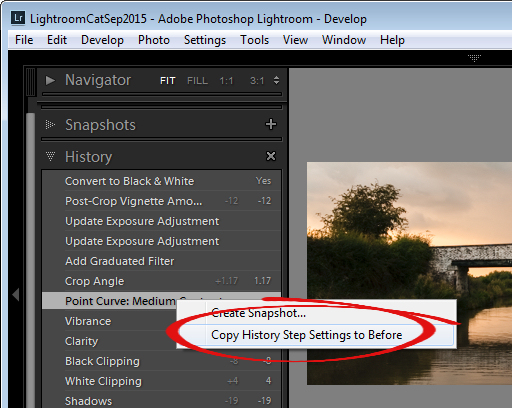
So far, so good. But what if you want to compare the current edited state with an earlier edited state – not with the original out of camera image? You can do this if you open the History panel, then right click the entry in the History list that you want to compare with the current state of the image – you can choose any of the states in the list. From the popup menu choose Copy History Step Settings to Before. Now when you press the Backslash key to compare the before and after, you’ll be comparing a previous state but not the original out of camera image.

change the starting point for a before/after comparison in Lightroom

#3 Reverse Engineer Presets

A Lightroom preset is a set of slider settings that have been saved in such a way that they can be applied to any image, at any time. That said, there is nothing that can be applied using a preset that you cannot also apply manually to an image, by using the tools in the Develop module. This means that Presets contain valuable information for editing images which you can discover by reverse engineering them. So, if you like a preset that ships with Lightroom, or if you have downloaded and installed other presets that you like, use the process that follows to learn how they work.

Start with an image that is in its original out of camera state, and apply the preset to the image. Now look through the settings in the Develop module panels on the right to see what adjustments have been made to the image.

To see if there are any Graduated Filter or Radial Filter adjustments included in the preset, click the Graduated Filter tool, set the Show Edit Pins setting to Always and see if any pins appear on the image. If so, click to see where they have been applied and what their settings are. Repeat this step with the Radial Filter to see if any radial filter adjustments have been made to the image. As presets cannot contain Adjustment Brush edits there’s no point in checking that tool.

reverse engineer a preset in Lightroom

It’s best to study presets without first making any changes to your image, except for applying the preset. This way you will know that all the edits that have been applied to the image are part of the preset, and none of them are your own edits.

#4 The Alt Key works nearly everywhere

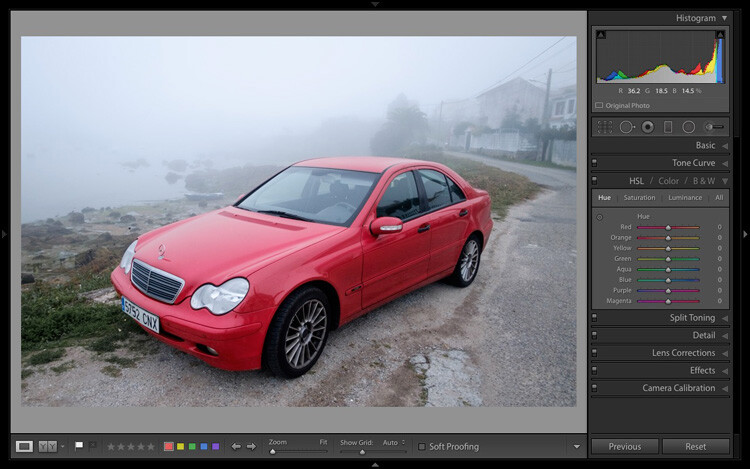
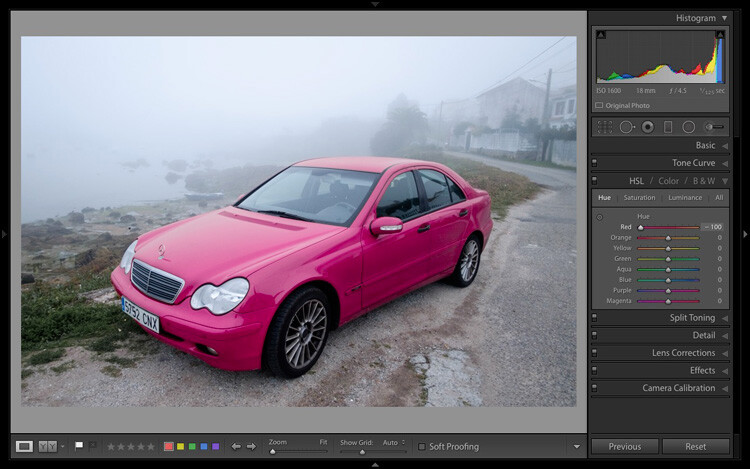
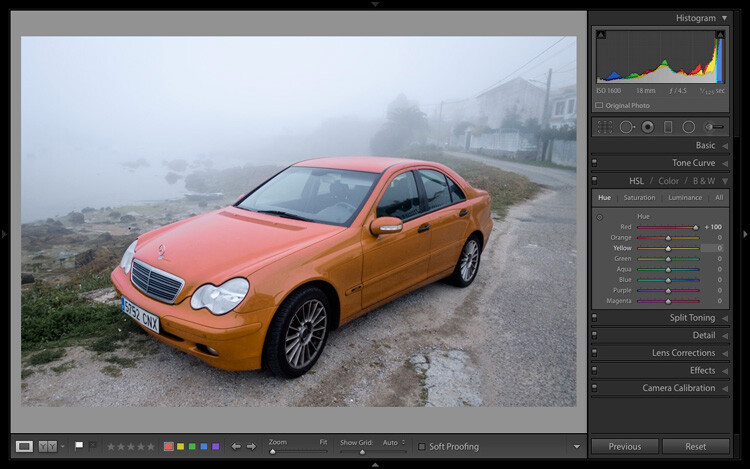
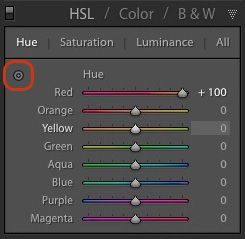
The Alt key is the biggest hidden secret keystroke in Lightroom. When you press it, various things appear on the screen that previously were not visible. For example, in the Basic panel you can use the Alt key to display Reset Tone and Reset Presence options. The Exposure, Whites, Blacks and Split Toning sliders all display visual feedback when you hold the Alt key while adjusting them. So too do the sliders in the Sharpening panel. To learn more about using the Alt key in the Lightroom Develop module, check out this post: Lightroom Tips for the Develop Module – the magic Alt key.

alt key provides visual feedback for many sliders in Lightroom

#5 Keyboard Adjustments

If you find it difficult to adjust the sliders in Lightroom using your mouse, then try adjusting them using the keyboard instead. To do this, click on a slider to target it and then use the left and right arrow keys to adjust the slider in small increments. To move in larger increments hold the Shift key as you press the arrow keys. You will find that the Up and Down arrow keys work identically to the Left and Right arrow keys.

adjust Lightroom sliders using the arrow keys

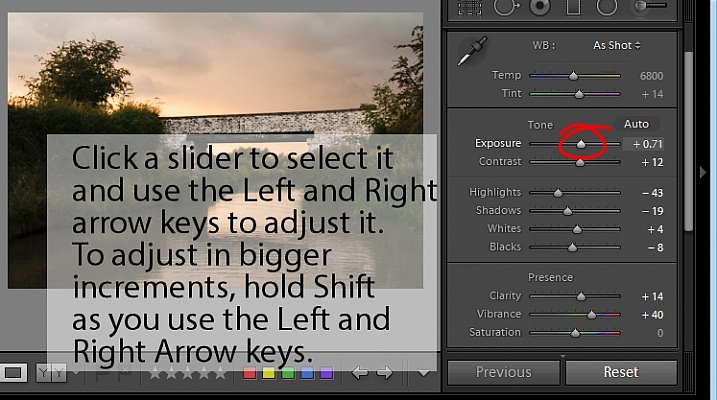
If you want to continue to use the sliders to make your adjustments, but you find that they travel too fast for you to get an accurate adjustment, hold the Shift key as you drag on a slider. This slows its movement down and makes it easier for you to make small adjustments. You can also click on the numeric value that a slider is currently set to and use the Up and Down arrow keys to adjust the value in small increments.

To reset a slider – double click its name and it will return to its default value for that type of image.

Watch the video

Here is a video version of this article so you can follow along as I walk you through each point.

googletag.cmd.push(function() {
tablet_slots.push( googletag.defineSlot( “/1005424/_dPSv4_tab-all-article-bottom_(300×250)”, [300, 250], “pb-ad-78623” ).addService( googletag.pubads() ) ); } );

googletag.cmd.push(function() {
mobile_slots.push( googletag.defineSlot( “/1005424/_dPSv4_mob-all-article-bottom_(300×250)”, [300, 250], “pb-ad-78158” ).addService( googletag.pubads() ) ); } );

The post 5 Lightroom Develop Module Secrets Revealed by Helen Bradley appeared first on Digital Photography School.


Digital Photography School

 
Comments Off on 5 Lightroom Develop Module Secrets Revealed

Posted in Photography


5 Essential Things You Need to Know About the Lightroom Library Module

16 Dec

Essential things Lightroom

For those of you who have been following my Lightroom articles I thought it would be fun to test your knowledge. We’ll start with the Lightroom Library module because the work you do here, lays the foundation for everything you do inside Lightroom. Master the Library module and you’ll be well on your way to becoming an expert on the entire program.

Ready? Let’s start with what is probably the most important thing of all – backing up your Catalog.

1. How to back up your Catalog

This is really important. Your Lightroom Catalog is absolutely essential because it’s where Lightroom stores every piece of information it has about your photos. Not only does this include the location of your photos (i.e., where they are saved on your hard drive) but any metadata associated with them (from camera settings to keywords), Lightroom specific information (such as which Collections a photo belongs to) and any edits you have made in the Develop module. Yes, these are all stored in the Catalog.

How much of a disaster would it be if you lost all this data? I’m sure it would be a major loss. That’s why it’s so important that you back up your Catalog regularly. You should also back it up to an external hard drive, not to an internal one, in case your computer is lost or stolen.

You can check your back up settings by going to Lightroom > Catalog Settings. Click the General tab – Back up catalog should be set to Every Time Lightroom Exits as shown below.

Essential things to know about Lightroom

Connect the external hard drive on which you back up your Catalog, then exit Lightroom. Before Lightroom closes down, it displays the Back Up Catalog window. The Backup Folder setting should point to a folder on your external hard drive. If it doesn’t, click Choose and change it now.

Essential things to know about Lightroom

When you exit Lightroom is the only time you will see this popup box, and the only place you can change where it saves the backup of your catalog.

Make sure the Test integrity before backing up and Optimize catalog after backing up boxes are ticked. When you’re done click the Back up button. Lightroom will save a backup of your Catalog to your external hard drive before closing. This may take some time, especially for a large Catalog, so be patient.

Some important things to note about Catalog backups:

  • You only need to keep the last two or three backups. You can delete older ones to free up hard drive space.
  • If you have Lightroom 6 or Lightroom CC the backed up Catalogs are compressed, saving hard drive space.
  • You should always back up your Lightroom Catalog to a different hard drive than the one the main Catalog is stored on. That way, if your main hard drive fails, the backed up Catalog is safe.
  • Once a month (or more often if you like) copy the latest backup to Dropbox, Google Drive or another cloud storage solution. This is to protect you in case you lose both your computer and your external hard drive to theft or fire. The location and name of your Lightroom Catalog are recorded in Catalog Settings.

Essential things to know about Lightroom

2. How to back up your photos

This is important to mention because I want to make sure you understand that your photos are not stored inside Lightroom, or in the Catalog. Your photos are saved on your hard drive (or drives) and you need to back them up yourself. It is your responsibility – Lightroom doesn’t do it for you.

There are many ways of backing up photos, you need to find the method that works best for you. However I’m sure it will help if I share my method. Feel free to use, adapt or ignore it.

  • Create a folder called Raw. All your Raw files are stored in there (I shoot everything in Raw – you could simply call your folder something like Photos if you shoot a mixture of Raw and JPEG).
  • In that folder create a new folder for every year you take photos.

essential things about Lightroom

  • In each of those folders, create 12 folders, one for every month of the year.

essential things about Lightroom

  • Whenever you import photos into Lightroom, select the correct destination folder depending on the month and year the photos were taken.
  • Place each shoot into a folder of its own. You can either give it a name or organize the folders by date.

essential things about Lightroom

This system works because it’s easy to see whether your Raw files are backed up. Want to back up all your Raw files to another hard drive? Just copy the Raw folder. Want to see whether you’ve backed up all the photos you’ve taken this month? It’s easy to do so with this system.

By the way, I keep my Raw files backed up to four different external hard drives, one of which is stored off-site. That way, if one of the hard drives fails, I have three other copies.

3. How to set up File Handling in Catalog Settings

The File Handling settings are important because they help you strike a balance between optimizing Lightroom’s performance speed, and using hard drive space.

The first thing you need to look at is the total size of the cache. This tells you how much hard drive space your previews take up. For example, looking at mine (see below) I can see my Lightroom previews are currently taking up 28GB.

Essential things to know about Lightroom

It’s important to keep some of your hard drive free (at least 10%, but preferably more) otherwise Lightroom will slow down (as will everything else your computer does). If you are running out of hard drive space, come and have a look here to see if your preview files are too large.

There are two steps to keeping your previews file under control.

1. Make sure Lightroom is generating the optimum size Standard Previews. These are used to display your photos in Loupe View and don’t need to be any larger than your monitor’s resolution.

If you have Lightroom 6 or Lightroom CC you can set the size to Auto. Lightroom will calculate the optimum size for you. In Lightroom 5 or earlier pick the size that best matches your monitor’s resolution.

Set Preview Quality to Medium – it gives you the best balance between quality and size.

Essential things to know about Lightroom

2. Set Automatically Discard 1:1 Previews to After 30 Days. You need 1:1 previews for zooming in to photos, and working on them in the Develop module. However, they are very large. If you generated 1:1 previews for every photo in your Catalog, and never deleted them, you would eventually run out of hard drive space. To be honest, it doesn’t really matter which setting you choose here as long as it’s not set to Never. You can always regenerate discarded 1:1 previews if you need them again later.

4. How to search for images

One of the benefits of building the Lightroom architecture on a database is that it is easy to search your photos. You do this in the Filter Bar, which is displayed above the Content Window in Grid View (press ‘\’ on the keyboard if you don’t see it).

There are three types of searches:

  1. Text: Search keywords, filenames, titles, captions, etc., for text sequences.
  2. Attribute: Filter by flag, star rating, colour label or file kind (master photo, virtual copy, or video).
  3. Metadata: Search by date, camera, lens, camera setting (ISO, shutter speed, aperture, etc.), aspect ratio or any of the dozen or so search options listed there.

Have a play with these options to see how it works. Just bear in mind that Lightroom is searching the selected folders or Collections, not your entire Catalog when you do so (select All Photographs to search your entire library).

Essential things to know about Lightroom

5. How to use Collections

Collections are virtual Folders, which you use to organize your images. Folders are limited because a single photo can only be stored in one Folder at a time. The same photo can be stored in as many Collections as you like, making Collections the easiest, and most flexible, way to organize your photos.

An example of this is a photo taken of a person called Jenny in Rome in November 2015. The photo can only be stored in one Folder, but it can be added to a Collection called Jenny, another one called Rome, another called 2015 – in fact as many as you need.

Your folders should be set up to make backing up easy (see earlier point). Your Collections should be used to organize your photos. My article Use Lightroom Collection to Improve your Workflow will help you with this.

Your turn

Of course, this list is not exhaustive, but I’d like to hear your thoughts as well. What do you think is essential to know about the Library module? Do you have any questions about the points raised in this article? Please let me know in the comments below.


The Mastering Lightroom CollectionMastering Lightroom ebook bundle

My Mastering Lightroom ebooks are a complete guide to using Lightroom’s Library and Develop modules. Written for Lightroom 4, 5, 6 and CC  they  show you how to import and organise your images, use Collections, creatively edit your photos and how to work in black and white.

googletag.cmd.push(function() {
tablet_slots.push( googletag.defineSlot( “/1005424/_dPSv4_tab-all-article-bottom_(300×250)”, [300, 250], “pb-ad-78623” ).addService( googletag.pubads() ) ); } );

googletag.cmd.push(function() {
mobile_slots.push( googletag.defineSlot( “/1005424/_dPSv4_mob-all-article-bottom_(300×250)”, [300, 250], “pb-ad-78158” ).addService( googletag.pubads() ) ); } );

The post 5 Essential Things You Need to Know About the Lightroom Library Module by Andrew S. Gibson appeared first on Digital Photography School.


Digital Photography School

 
Comments Off on 5 Essential Things You Need to Know About the Lightroom Library Module

Posted in Photography


Sony Europe introduces a68 SLT with 79-point AF module

07 Nov

Sony Europe has announced a new Alpha-mount camera, the a68. High on its list of features is a 79-point phase detect ‘4D FOCUS’ AF module likely borrowed from the a77 II. With a 24MP APS-C sensor and Sony’s translucent mirror technology, the camera is capable of 8 fps shooting with AF tracking. Read more

Articles: Digital Photography Review (dpreview.com)

 
Comments Off on Sony Europe introduces a68 SLT with 79-point AF module

Posted in Uncategorized


Next Steps to Getting Started in the Lightroom Develop Module

21 Oct

Lightroom Develop module

A previous article showed you how to get started in Lightroom’s Develop module by using the Camera Calibration, Lens Corrections and the Basic panels.

In this article you’ll learn how to use the remaining right-hand panels in the Lightroom Develop module:

  • Tone Curve panel
  • HSL / Color / B&W panel
  • Split Toning panel
  • Detail panel
  • Effects panel

This guide is aimed at photographers who are new to Lightroom, so it doesn’t cover every aspect – just the important things you need to know if you’re just getting started with it.

It is quite possible that you won’t have to touch any of the panels listed above when processing a photo. Many photos can be developed in Lightroom just by using the Camera Calibration, Lens Correction and Basic panels, plus local adjustments. But the panels mentioned above will help you be more creative with your processing, especially when it comes to working with colour and tone.

The Tone Curve panel

One purpose of the Tone Curve panel is to give you another way of applying the same tonal adjustments that you can make with the Basic panel sliders. If you’re accustomed to using curves in Photoshop, the Tone Curve panel gives you the option of doing the same in Lightroom in addition to, or instead of, using the Basic panel sliders.

This is what you will see when you open the Tone Curve panel for the first time.

Lightroom Develop module

This is the RGB curve. Adjusting this curve affects the brightness values, but not the colours, of the photo.

You can move the curve upwards (as shown below) to make the image lighter. To do so, left-click once on the midpoint of the curve to add an adjustment point. Then click and drag the adjustment point to move it up, and change the shape of the curve.

Lightroom Develop module

You can also move it downwards to make the image darker.

Lightroom Develop module

You can create an S-curve like this to increase contrast (add a second adjustment point first).

Lightroom Develop module

You can create the matte look with a curve like this. Add an adjustment point near the bottom of the curve then lift the left-side up. This makes the darkest tones in the photo dark grey rather than black, imitating the look of a print made on matte paper.

Lightroom Develop module

Notice the lower left point is not touching the bottom, this creates a matte look.

You can return to the original straight tone curve at any time by going to the Point Curve menu and selecting Linear.

Colour curves

Underneath the Tone Curve is a menu that lets you select the Red, Green, or Blue tone curves individually. These curves affect each of the color channels in the photo respectively. The blue curve is shown below.

Lightroom Develop module

More options

If you click the icon in the bottom right-hand corner of the Tone Curve panel (circled above) the panel opens up to reveal four sliders, called Highlights, Lights, Darks and Shadows (see below).

Lightroom Develop module

These sliders give you another way to make adjustments to the tone curve. When you move one of the sliders, the corresponding region of the tone curve is highlighted, so you can see which tones are affected.

The illustration below shows what happens when you move the Highlights slider. The top right of the tone curve is marked in grey. This part of the curve changes when you move the Highlights slider.

Lightroom Develop module

You can click and drag on a single adjustment point (but not multiple points) to change the shape of the curve. The sliders change value as you adjust the curve. The diagram below shows the effect a simple S-curve has on the sliders.

Lightroom Develop module

Double click on any slider heading to reset that slider to zero. That covers the basics of curves. You can learn more advanced techniques by reading our article Lightroom’s Tone Curve Explained.

HSL / Color / B&W

The HSL / Color / B&W panel is for adjusting colour values. It is also for converting photos to black and white. This is beyond the scope of this article, but you can learn more by reading my article How to Convert Photos to Black and White in Lightroom.

The HSL / Color / B&W panel is divided into three tabs. The HSL and Color tabs are the ones you need for making adjustments to colour. They contain the same sliders, just arranged in a different order. The screen shots below are taken from the HSL panel.

The Saturation and Vibrance sliders in the Basic panel affect all the colours in the photo. The HSL and Color tabs allow you to target individual hues without affecting others. You can target a specific colour and change the following:

  • Hue
  • Saturation
  • Luminance

Adjusting Hue replaces the selected colour with an adjacent colour on the colour wheel. For example, you can target red tones and make them more magenta (pink tone) or orange. Or you could target blue tones and make them aqua or purple.

You don’t need a colour wheel to see how colours are affected by the Hue sliders. You can just look at the eight Hue sliders. For example, the Red slider (top in the diagram below) is coloured magenta to the left and orange to the right. Moving the slider in those directions changes red colours in the photo to either magenta or orange.

Lightroom Develop module

The easiest way to see how this works is to try it. The examples below show the effect that moving the Red slider to -100 and +100 (the strongest available settings) have on the image.

Lightroom Develop module

No adjustment.

Lightroom Develop module

Red -100.

Lightroom Develop module

Red +100

The Saturation and Luminance sliders work in a similar way. Saturation adjusts the saturation (intensity) of specific colours, and Luminance adjusts the brightness.

Targeted Adjustment Tool

The Targeted Adjustment Tool gives you an even more precise way of adjusting colour values. To use it, click on the Targeted Adjustment Tool icon in the HSL / Color / B&W panel (circled below).

Lightroom Develop module

Then move the cursor over the colour (area) in the photo you want to adjust. Click and hold the left mouse button, while you drag the mouse downwards to reduce the Saturation or Luminance of the colours underneath the cursor, or adjust the hue.

Move the mouse upwards to increase the saturation or luminance, or adjust the hue in the opposite direction. Lightroom analyzes the colours underneath the cursor and moves the sliders in the HSL / Color / B&W panel accordingly. All similar colors in the image will be affected.

For example, in the following photo I activated the Targeted Adjustment Tool, then clicked on the car’s paintwork and dragged the mouse downwards to reduce the Saturation. Lightroom adjusted both the Red and Orange sliders, showing that the red paintwork is comprised of those two colours. This is more accurate result than only moving the Red slider.

Lightroom Develop module

The Targeted Adjustment Tool is a useful tool that appears in other Develop module panels.

Read my article Mastering Color in Lightroom using the HSL tab to learn more about the HSL / Color / B&W panel.

The Split Toning panel

The Split Toning panel is for toning photos. While this is a technique traditionally associated with black and white photography, you can also use it with colour. If you’re a beginner, split toning is a little advanced for you at this stage, so I’ll direct those of you who are interested to articles that cover it in detail.

How to Split Tone Black and White Photos in Lightroom shows you how it’s done with black and white photography.

How to Create a Vintage Look using Lightroom shows you how to split tone colour photos (it also covers tone curves and Lightroom Develop Presets)

The Detail panel

The Detail panel is for adjusting the default image sharpness and noise reduction settings. For beginners it is simplest not to touch these. You won’t need to do so until you are a more advanced user.

Those of your curious to learn more can read our articles Learn How to Use the Sharpening Tools in Lightroom and How to Do Noise Reduction in Lightroom.

The Effects module

Use the Effects module to apply a creative vignette, add grain or (new in Lightroom CC only) add or remove atmospheric haze.

Vignetting lets you darken (or lighten) the edges of your photo, gently guiding the viewer’s eye towards the centre. Many images, especially portraits, can be improved by adding a subtle dark vignette. Here’s an example:

Lightroom Develop module

You may have to look closely to see it as the effect is subtle, but the portrait on the right has a vignette. It is most obvious in the bottom right corner.

These are the settings used to create this vignette:

Lightroom Develop module

  • Move the Amount slider left to darken the edges of the image, or to the right to lighten them.
  • Move the Midpoint slider left to make the area covered by the vignette larger, or right to make it smaller.
  • Move the Roundness slider left to make the vignette squarer, or right to make it more circular.
  • Move the Feather slider left to make the edge of the vignette harder (a more defined end and beginning of it), or right to make the edge softer (graduates slower from dark to light).
  • Move the Highlights slider right to preserve any highlights present in the area covered by the vignette.

Tip: The easiest way to see what these sliders do is to set Amount to -100. Then move the other sliders to see what effect they have.

Use the Grain sliders to add grain to your photos. This is only useful if you would like to emulate the look of photos taken with film. Move the Amount slider right to add grain (there is no grain at the zero setting) and then use the Size and Roughness sliders to adjust the size and appearance of the grain. This before and after image shows the effect of increasing Grain to 100, the maximum setting:

Lightroom Develop module

Dehaze is a new slider that is only available in Lightroom CC. Use it to reduce atmospheric haze caused by flare, mist, or pollution. You can also use it to increase haze – a good example of this is with photos taken in foggy conditions.

Lightroom Develop module

Photo taken in foggy conditions. Dehaze set to zero (the default).

Lightroom Develop module

Dehaze set to -10 to increase effect of fog.

Lightroom Develop module

Dehaze set to +30 to decrease effect of fog.

I’ll show you how to build on the work done in the right-hand panels by making local adjustments in my next article. In the meantime, if you have any questions about the techniques in this article, please let me know in the comments.


The Mastering Lightroom CollectionMastering Lightroom ebooks

My Mastering Lightroom ebooks will help you get the most out of Lightroom. They cover every aspect of the software from the Library module through to creating beautiful images in the Develop module. Click the link to learn more or buy.

googletag.cmd.push(function() {
tablet_slots.push( googletag.defineSlot( “/1005424/_dPSv4_tab-all-article-bottom_(300×250)”, [300, 250], “pb-ad-78623” ).addService( googletag.pubads() ) ); } );

googletag.cmd.push(function() {
mobile_slots.push( googletag.defineSlot( “/1005424/_dPSv4_mob-all-article-bottom_(300×250)”, [300, 250], “pb-ad-78158” ).addService( googletag.pubads() ) ); } );

The post Next Steps to Getting Started in the Lightroom Develop Module by Andrew S. Gibson appeared first on Digital Photography School.


Digital Photography School

 
Comments Off on Next Steps to Getting Started in the Lightroom Develop Module

Posted in Photography


Steps for Getting Started in the Lightroom Develop Module

14 Oct

Lightroom Develop module

If you have read my earlier articles about Lightroom you will already understand how it differs from Photoshop and how it uses a database to organize your photos as well as process them.

Lightroom has evolved into a powerful raw processor, and it is now possible to process most of your images in it. You only need to use other software (such as Photoshop or a plug-in) when you reach the limits of what Lightroom can do.

Raw processing takes place in the Lightroom Develop module. If you haven’t used Lightroom before you may find the Develop module layout confusing, especially if you are used to pixel editing software like Photoshop. Lightroom has no layers or blending modes, and there is no real set order in which to do things. But don’t worry if it makes little sense at first – this article will help you come to grips with the basics, and make a start on processing your raw images.

Note that you can also use Lightroom to process JPEG and TIFF files, although some of the options Lightroom gives you differ slightly. I have used raw files in this article.

The Lightroom Develop Module

To start, go to the Library module and select the photo you want to process. Click on Develop in the Module Picker, or press D on the keyboard, to open the image in the Develop module.

The Develop module is split into sections. There are panels on the left, some more on the right, and the Content Window in the middle, where the photo you are currently working on is displayed. Just like the Library module, you also have the Module Picker at the top and the Filmstrip at the bottom.

Lightroom Develop module

You may have noticed that there is no Folders panel (left side) in the Develop module. This is Adobe’s way of encouraging you to use Collections. So if you are not doing so already, now is time to get in the habit.

We don’t need the Module Picker, left-hand panels, or Filmstrip for this article, so when you’re ready click on the white arrows at the edges of the screen to hide them.

Your screen should look something like this, with the right-hand panels and the histogram available on the right, and the photo you are working on occupying the rest of the screen.

Lightroom Develop module

If you do not see the toolbar below your image hit T on your keyboard to show/hide it.

The right-hand panels contain most of the tools that Lightroom has for processing raw files. Today we are going to look at three of these:

Lightroom Develop module
  • Camera Calibration panel
  • Lens Corrections panel
  • Basic panel

These panels are important because they are the foundation of the processing work you do on an image.

The Camera Calibration panel

The Camera Calibration panel is the ideal starting point for processing an image. When you come here you are looking for two important settings.

Process: Should be set to 2012 (Current), which is set by default.

Lightroom Develop moduleProfile: Should be set for the most appropriate setting for your photo. The options you see here depend on the camera used to take the photo. All cameras have profiles that you set to determine the treatment of the image. Each manufacturer has different names for this setting (for example, Canon calls it Picture Style, Nikon Picture Control and Fujifilm Film Simulation).

Lightroom should show you most of the settings you have available on your camera plus another one called Adobe Standard. Your job is to pick the profile that is most suited to your photo.

I’ll assume you know your own camera settings well enough to do so. If there’s any doubt, just move through the available options and pick the one that has the most suitable effect. In this case I selected Camera Velvia/Vivid to bring out the strong colours in the photo.

Ignore the colour sliders in the Camera Calibration panel for now, they are for advanced users.

The Lens Correction panel

There are a lot of things you can do in the Lens Correction panel, but to get started you only need two:

#1 – Enable Profile

Lightroom Develop module

Note that this screen shot is from a photo taken with a Canon camera.

Click Profile and tick the Enable Profile Corrections box. Select your lens using the menus underneath. Lightroom contains profiles for most commonly used lenses (the full list is available here).

Set the Distortion slider to 100 (the default). Lightroom uses the selected profile to remove any barrel or pincushion distortion caused by the lens.

The default for the Vignetting slider is 100. This lightens the edges of the photo to compensate for the vignetting effect caused by using your lens at wide apertures. You may wish to include the vignetting for aesthetic reasons – in which case move the slider left until you get the effect you want.

Some Raw files, such as those created by most Fujifilm cameras, have an embedded profile that Lightroom uses to correct barrel and pincushion distortion. If this is the case, and you are using Lightroom 6 or Lightroom CC, then the message Built-in Lens Profile applied is displayed at the bottom of the panel. If you see this message, don’t tick the Enable Profile Corrections box. Lightroom doesn’t have a profile for your lens and you won’t be able to find it.

Lightroom Develop module

In earlier versions of Lightroom the Built-in Lens Profile applied message isn’t displayed, even if your Raw file has a built-in profile. If you can’t find your lens in the list, it’s probably because:

a. The lens is so old Adobe hasn’t got around to profiling it yet.

b. The lens is so new that Adobe hasn’t had chance to profile it yet (updates with new lens profiles are released periodically).

c. The camera used embeds the lens profile into the Raw file, and Lightroom uses it automatically. This is most common with mirrorless cameras.

#2 Remove Chromatic Aberration

Click on Color and tick the Remove Chromatic Aberration box. This tells Lightroom to remove any chromatic aberrations caused by the lens.

Lightroom Develop module

The sliders underneath are for removing purple and green fringing. They are zeroed by default, and for the moment we will leave them there, as they are a topic for another article.

The Basic panel

The Basic panel is where you adjust the color and tonal values of your image. These sliders can make a dramatic difference to the appearance of your photo, and there are times when you won’t need to touch any of the other panels in the Develop module.

The White Balance sliders

If you’re not sure what White Balance is then read our article Demystifying White Balance, but really all you need to know here is that you move the Temp slider left to make the image cooler (add a blue cast or remove an orange cast) or move it right to make the image warmer (add an orange cast or remove a blue cast).

Lightroom Develop moduleAlternatively, you can use the WB presets: As Shot, Daylight, and so on (note: those options only appear when you are processing a Raw file). I selected Daylight for this image for a fairly neutral colour balance.

The Tint slider is for removing green and magenta colour casts. These are usually caused by artificial lighting such as fluorescent lights.

If none of the above options seem to work then activate the eyedropper tool by clicking on the eyedropper icon and click a neutral grey or white area in the photo. Lightroom analyzes the pixels underneath the cursor and adjusts the White Balance accordingly to remove any color cast and make it neutral.

What is the purpose of White Balance? The answer depends on what you want to do with the image. There are three basic options.

  1. Create an image with neutral colour: In this case you are trying to eliminate any colour casts present in the image.
  2. Create an image with a warm colour cast: This is something you might do with a landscape photo taken during the golden hour or a portrait (where warm tones are more flattering) to the subject.
  3. Create an image with a cool colour cast: This is something you might do if you want to impart a cold feel to the image. This would suit a landscape taken in winter, for example.

Think about your intent when you adjust White Balance. Once you know what you want to do, you can adjust the sliders to suit.

Lightroom Develop moduleWhite Balance is all about color and there are two more sliders at the bottom of the Basic panel that assist with controlling colour, they are called Vibrance and Saturation. Move these sliders left to reduce the color intensity, or right to increase it.

The Saturation slider affects all hues equally, whereas the Vibrance slider has a greater effect on weaker colours than it does on stronger ones. Play around with them on a few different images to get the hang of how they work.

Be careful with both sliders – they are usually used to desaturate colour rather than increase it (which can look false). For this photo I have left them both at zero.

The Tonal Sliders

Lightroom Develop moduleThe following sliders affect tones, and are used for adjusting brightness and contrast. Feel free to press the Auto button to see what Lightroom thinks you should do with your photo.

The Exposure slider

This slider is very simple – move it right to make the photo brighter or left to make it darker.

The Contrast slider

Again, a simple slider to use. Move it right to increase contrast, or left to decrease it.

The Highlights and Shadows sliders

Whereas the Exposure and Contrast sliders affect every tone in the photo, the Highlights sliders affects only the lightest tones and the Shadows slider affects only the darkest tones.

Move the Highlights slider right to make light tones lighter, or left to make them darker. Move the Shadows slider right to make the dark tones lighter, or left to make them darker.

Note: you may have notice sliders left makes your image lighter, sliders right makes it darker.

Again, the best way to learn how these sliders work is to play with them. Move them around and observe the effect they have on the histogram (displayed at the top of the right-hand panels), and the appearance of the image itself.

Don’t worry if you’re not sure how to read the histogram. It deserves an article to itself and I will write one shortly.

The Whites and Black sliders

You don’t have to worry too much about these sliders when you are just starting out. You can either leave them at the default setting of zero or let Lightroom work out what the settings should be.

To set the Whites slider automatically, hold the Shift key down and double-click on the word Whites. Do the same to set the Black slider automatically, hold the Shift key down and double-click the word Blacks.

If the slider settings don’t change when you do so, that means that zero is the ideal setting.

The Clarity slider

The Clarity slider affects something called mid-tone contrast. In simple terms, moving the Clarity slider right emphasizes texture, and moving it left removes texture by softening the image. Many photos benefit from a subtle increase in Clarity (between +10 and +20). Black and white photos, of which texture is often an important part, can benefit from greater adjustments.

Play around with the Clarity slider on different photos to see what effect it has. Resist the temptation to make your photos pop by moving it too far to the right – it may seem like a good idea at the time but the result will simply hurt your eyes.

My article Four Ways to Improve Your Photos with the Clarity Slider in Lightroom explores the topic in more detail.

These are the Basic panel settings I settled on for this photo. Every image is different, but at least it gives you an idea.

Lightroom Develop module

This is how the photo looks so far. Not very exciting, I admit, but that’s because so far we’ve been doing mainly preparation work. The real excitement comes when you add local adjustments or convert the photo to black and white. Lightroom Develop module

I’ll show you what the other right-hand panels do in my next article. In the meantime, if you have any questions about processes explored in this one, please let me know in the comments.


The Mastering Lightroom CollectionMastering Lightroom ebooks

My Mastering Lightroom ebooks will help you get the most out of Lightroom. They cover every aspect of the software from the Library module through to creating beautiful images in the Develop module. Click the link to learn more or buy.

googletag.cmd.push(function() {
tablet_slots.push( googletag.defineSlot( “/1005424/_dPSv4_tab-all-article-bottom_(300×250)”, [300, 250], “pb-ad-78623” ).addService( googletag.pubads() ) ); } );

googletag.cmd.push(function() {
mobile_slots.push( googletag.defineSlot( “/1005424/_dPSv4_mob-all-article-bottom_(300×250)”, [300, 250], “pb-ad-78158” ).addService( googletag.pubads() ) ); } );

The post Steps for Getting Started in the Lightroom Develop Module by Andrew S. Gibson appeared first on Digital Photography School.


Digital Photography School

 
Comments Off on Steps for Getting Started in the Lightroom Develop Module

Posted in Photography


Two Useful Lightroom Print Module Custom Layouts

14 Aug

On sale now at Snapndeals: August 11-25th get 20% OFF Andrew’s ebooks – Mastering Lightroom Complete Collection: Lightroom 6 & CC Update. 

With a little imagination and know-how you can use the Lightroom Print module to create amazing layouts, which in turn you can use to create prints, postcards or even business cards. I’m going to give you a couple of examples, which you can copy or adapt to your own requirements. Let them inspire you to come up with your own creative designs!

Custom Layout #1: Single Image / Contact Sheet

This is the first custom layout we are going to create. It uses the Single Image / Contact Sheet Layout Style. With this Layout Style, each selected photo in the Collection is added to the layout just once, in the order that they appear.

Lightroom Print module

1. Maximize template

Go to the Template Browser panel in the Lightroom Print module and select the Maximize Size template. This simple template is an ideal starting point for creating your own layouts.

Note: I started with paper size set to A4 (click the Page Setup button to set paper size and orientation). If your paper size is different, you will require different measurements to those used here. The same applies if your page bleed area, which depends on the printer model, is different.

Lightroom Print module

2. Save Print

Before you go any further, click the Create Saved Print button. The Create Print window appears. Give the print a name, and make sure the Include only used photos box is unticked. Click Create, and Lightroom creates a new Collection called a Print Collection (marked by a printer icon in the Collections panel) containing the photos in the original Collection. Now it’s impossible for you to lose your work – you can leave and come back to the Print Collection at any time.

Lightroom Print module

3. Set up the page layout

Go to the Layout panel and under Page Grid; set Rows to 2 and Columns to 3. Only selected photos appear in the layout, so in the Filmstrip, select the photos that you want to appear, clicking and dragging to rearrange the order if necessary. Note: If you select more than six images, Lightroom creates a second page to automatically fit them onto.

Adjust the Margins, Cell Spacing and Cell Size settings to add space between the photos and create the style you see below. The layout is shown both with the guides on and off (tick/untick the Show Guides box in the Guides panel) for clarity. Remember to centre the photos between the grey border representing the page bleed area, not the page itself.

Lightroom Print module

This screenshot shows the layout with Guides enabled. Note the page bleed area around the edge (shown in grey) and the black lines showing the dimensions of the Photo Cells.

Lightroom Print module

The layout is much easier to see with the Guides turned off.

The idea is to keep the spaces between the photos as even as possible (or as close as you can get according to the restrictions of your selected paper size). The settings I used are shown below, but yours may differ if you are using a different paper size, or if your photos have a different aspect ratio.

Lightroom Print module

4. Set up the Identity Plate

Go to the Page panel and tick the Identity Plate box. Click the white arrow icon (down facing one) and choose a Styled Text Identity Plate to go at the bottom of the layout – if you don’t have a suitable one already, you can create a new one by selecting Edit from the menu. Tick the Override Color box and click the rectangle to the right of it to select a colour for the Identity Plate text.

Lightroom Print module

5. Set size of identity plate to match two columns

If possible, resize the Identity Plate so it is the same width as the last two columns. As long as the text doesn’t look too large or too small (you’ll have to exercise your own judgement), aligning it with the photos this way adds a professional touch to the design.

Lightroom Print module

Custom Layout #2: Custom Package

The Print module contains nine templates that work with the Custom Package Layout Style. This Layout Style is like the Single Image / Contact Sheet Layout Style, except that it lets you add the same image to a page more than once, and also overlap photos.

Another difference between the Custom Package Layout Style and the others, is that Lightroom doesn’t add photos automatically to the layout. Instead, you add them yourself by clicking and dragging them from the Filmstrip. This makes it easy to move photos around without having to rearrange them in the Filmstrip, and to add the same photo to a page more than once.

1. Select the Custom Overlap x3 template

Go to the Template Browser panel and select the Custom Overlap x 3 template. Don’t forget to click the Save Print button to create a new Print Collection.

Lightroom Print module

2. Add the photos by dragging and dropping them

Unlike the previous example the template doesn’t automatically populate with selected images. Instead, you have to click and drag photos from the Filmstrip. Here’s how it looks with photos added.

Lightroom Print module

3. Resize images to suit

The overlapping images are less than ideal, but unlike the Single Image / Contact Sheet Layout Style used in the first example, you can drag and resize the Photo Cells to something that suits you. You can adjust the size of the Photo Cells precisely in the Cells panel (and add new ones), and keep them aligned by going to the Rulers, Grids & Guides panel and setting Grid Snap to Grid.

Right-click on a Photo Cell and select Send to Front to bring it on top of the others.

You can also add a Styled Text Identity Plate the same way as in the first example. A little tweaking enabled me to come up with the following design.

Lightroom Print module

Hopefully these examples will show you just how flexible the layouts in the Print module are when you take the time to explore the possibilities. But did you know that you can also create triptychs and calendars quite easily in the Print module? The following articles show you how to do it.

  • How to Create a 2015 Calendar in the Lightroom Print Module
  • How to Make a Triptych in Lightroom

The Mastering Lightroom CollectionMastering Lightroom ebooks

On sale now at Snapndeals: August 11-25th get 20% OFF Andrew’s ebooks – Mastering Lightroom Complete Collection: Lightroom 6 & CC Update. 

googletag.cmd.push(function() {
tablet_slots.push( googletag.defineSlot( “/1005424/_dPSv4_tab-all-article-bottom_(300×250)”, [300, 250], “pb-ad-78623” ).addService( googletag.pubads() ) ); } );

googletag.cmd.push(function() {
mobile_slots.push( googletag.defineSlot( “/1005424/_dPSv4_mob-all-article-bottom_(300×250)”, [300, 250], “pb-ad-78158” ).addService( googletag.pubads() ) ); } );

The post Two Useful Lightroom Print Module Custom Layouts by Andrew S. Gibson appeared first on Digital Photography School.


Digital Photography School

 
Comments Off on Two Useful Lightroom Print Module Custom Layouts

Posted in Photography


How to Create a 2015 Calendar in the Lightroom Print Module

23 Dec

Create a calendar in the Lightroom Print module

The Lightroom Print module is a great tool for creating print layouts, but one thing it is not designed to do is make calendars (hopefully Adobe will introduce this feature in future versions of Lightroom). Luckily, in spite of that it is not too difficult to create a calendar once you know how, and you are prepared to put the work in to create the month and day parts of the calendar.

Or – you can let someone else do all the hard work. That somebody is photographer Ed Weaver, who has created some Print module calendar templates that anybody can download from his website for free.

Ed updates the templates every year, and has recently added templates for 2015. There are two versions, one with the week starting on Sunday, and the other with it starting on Monday. Just select the one that is appropriate for your part of the world (the links are at the bottom of the web page) and download the files.

The download includes a set of calendar graphics and Lightroom Print Templates, along with instructions. All you have to do is import the calendar images into the Lightroom Catalog and add the Print Templates to the Print module. It only takes a few minutes and you’re ready to go.

Creating a calendar

Follow these instructions to make your first calendar using Ed’s templates.

1. Open the folder containing the templates you want to use. Import the JPEGs into Lightroom. There are two JPEGs for every month in 2015, one with large numbers, the other with small numbers (see below), giving 24 in total.

Create a calendar in the Lightroom Print module

2. Go to the Library module and create a Collection for the calendar. Add both the calendar JPEGs you just imported plus any photos you may wish to use in the calendar.

Create a calendar in the Lightroom Print module

3. Go to Lightroom’s Print module, then select Print > New Template Folder from the menu. Give the folder an appropriate name (i.e. 2015 Calendar). Right-click on the folder name and select Import. Navigate to the folder where Ed’s calendar templates are stored, select them all and click the Import button.

Create a calendar in the Lightroom Print module

4. Open the Template Folder you just created. There are ten templates to choose from. When you click on a template, Lightroom displays it in the Content window (see below). The templates use the Custom Package layout style, which means that Lightroom doesn’t add photos to the layout automatically. Instead, you have to do it yourself by dragging the photos from the Filmstrip.

Create a calendar in the Lightroom Print module

5. Drag photos and calendar templates as needed from the Filmstrip to create your calendar. With this template, you need just one of each.

Create a calendar in the Lightroom Print module

6. Click the Create Saved Print button in the top right corner of the Content window (see below). Give the print a name in the Create Print window and click the Create button. Lightroom creates a Print Collection (marked by a printer icon in the Collections panel) containing only the images used in the print. Now you can leave the Print module and return to your print at any time without losing any changes.

Create a calendar in the Lightroom Print module

7. Repeat for the rest of the months in the year, and you have a complete calendar.

Here are some examples using some of the other templates:

Create a calendar in the Lightroom Print module


Create a calendar in the Lightroom Print module


Create a calendar in the Lightroom Print module

Modifying template files

Ed’s templates are great, but there is no easy way to change the colours, fonts, or any other aspect of the design of the JPEG files, at least not in Lightroom. If you want to change the style, you should open the files in Photoshop or Photoshop Elements. Using layers, it is relatively straightforward to replace the font Ed used with that of your own choice, or change the colours. Of course, you could also start completely from scratch and create your calendar files to use with Ed’s templates.

Changing background colour

Create a calendar in the Lightroom Print module

You can change the background colour of the calendar from its default white by going to the Page panel and ticking the Page Background Color box. Click the swatch on the right to choose a colour. Just bear in mind that adding a background colour uses more ink if you print the calendar on an inkjet printer.

Create a calendar in the Lightroom Print module


Mastering Lightroom: Book Five – The Other Modules ebook coverMastering Lightroom: Book Five – The Other Modules

My new ebook Mastering Lightroom: Book Five – The Other Modules shows you how to use Lightroom’s powerful features to create fun and interesting projects using the Map, Book, Slide show, Print and Web modules. Whether it’s geotagging, putting together a photo book, printing your best photos or creating web galleries all the information (and inspiration) you require is right here.


googletag.cmd.push(function() {
tablet_slots.push( googletag.defineSlot( “/1005424/_dPSv4_tab-all-article-bottom_(300×250)”, [300, 250], “pb-ad-78623” ).addService( googletag.pubads() ) ); } );

googletag.cmd.push(function() {
mobile_slots.push( googletag.defineSlot( “/1005424/_dPSv4_mob-all-article-bottom_(300×250)”, [300, 250], “pb-ad-78158” ).addService( googletag.pubads() ) ); } );

The post How to Create a 2015 Calendar in the Lightroom Print Module by Andrew S. Gibson appeared first on Digital Photography School.


Digital Photography School

 
Comments Off on How to Create a 2015 Calendar in the Lightroom Print Module

Posted in Photography


How to Use the Filter in Lightroom’s Library Module

26 Sep

Once you enable the filter in Lightroom’s library module, you are able to search your images in three ways – text, attributes and metadata. To activate the filter bar, the keyboard shortcut is backslash (\). The filter bar will be activated and displayed on top of the workspace (see the screenshot below), only if you press the backslash key in the Library module. If you press the same backslash key in Develop, you will be see the before version of the selected image, provided you have made some corrections to your image.

Lightroom FilterBar None 01

Filter by text

The first option, Text mode allows you to search your images by the images’ text fields, from title, caption, keywords, searchable metadata, searchable IPTC, searchable EXIF, to any searchable plugin field. The field box comes as a drop down menu, where you can pick the text your search should be based upon.

Lightroom FilterBar Text 02

In the next box you can pick either one of the following parameters – contains all, contains, contains words, or doesn’t contain. You can select starts with or ends with as well. In the last box you can enter your text, the text which you want your search should be based upon.

Searchable Contains all

Filter by image attributes

The next option to filter is based upon the Image attributes. This section is further divided into flag status, ratings, color ratings and kind of file. In flag status, you can either pick flagged, unflagged, or rejected ones as well as a combination of two of those choices by clicking the flag symbols. Once you filter your images, the selected ones will be highlighted in white (use Ctrl/Cmd+A to select all).

Lightroom FilterBar Attribute 03

Filter by rating

Lightroom FilterBar Rating 03a

The next option in this section is star rating; you can filter photographs based on the number ratings you have applied to them. You can click the third star if you want to filter the photographs which have three stars exactly. You can also select less than or greater than by clicking the greater than symbol (>), where you will be prompted to select one of the following:

Greater than

Filter by color label

The next option in this section is filter by color label; you might have applied color labels based on your own methods of flagging images. For example green for web upload, red for yet to process, or something like that. Imagine you want to view only the red ones which you wish to process now. You can do that by clicking the red color box alone or you can add yellow along with it by clicking that box as well. In this way you can combine all the color labels, or only the ones you want. If one color label is selected, that particular box will be brighter than the other, which means it is active.

Color filter

Filter by kind of file

The last option in this sub-section is to filter by kind; which in this instance means the kind of file. In Lightroom you can have three kinds of files; master image files, virtual copies, and video files. If you want only the virtual copies you can select that particular icon alone. Like the other filters here, you can also combine more than one choice.

Filter by metadata

The most powerful option to filter your photographs is by metadata – the options are endless.

Lightroom FilterBar Metadata 04

You have the option to filter your photographs by all of the metadata in your files, you can get an idea by looking at the screenshot above. You can combine multiple metadata together to work for you by adding more filter columns. Click the right side of the title for an option to add more columns with other criteria. Click the filter title itself to change it to something else. In the screenshot, I have clicked the title Label; and you can see the pull-down menu of options that appeared.

Lightroom FilterBar Metadata 05

Miscellaneous other filtering tips

The filtered photographs based on your criteria will be instantly displayed on the below workspace. You can also combine multiple filter sections from Text to Attributes to Metadata or all together, the options are almost endless.

You can create presets if you have a particular way of filtering your photographs, provided you have managed your library in that way. Have you noticed the lock symbol on the right end of the filter bar? The drop down menu next to the lock symbol has an option to save your search as a preset, so next time you just have to select that preset. Easy right?

Save filter

The lock symbol at the right end of the filter bar will lock the filter criteria (if you click it) and the same filter can be applied to all your collections or folders one by one as you select the folders and collections.

Lightroom-FilterBar-Metadata-05a

I hope this article helps you work smarter with Lightroom and saves you lots of time and resources.

Cheers and happy photographing.

The post How to Use the Filter in Lightroom’s Library Module by Navan Viswa appeared first on Digital Photography School.


Digital Photography School

 
Comments Off on How to Use the Filter in Lightroom’s Library Module

Posted in Photography


Olympus shows ‘Open Platform’ Micro Four Thirds camera module

16 Sep

Olympus is using Photokina to show a prototype ‘Open Platform’ camera module. Developed with the MIT Media Lab, the module is a Micro Four Thirds compatible unit that can be controlled from a smart device. Like Sony’s QX series, the Olympus has its own shutter button but it also offers a hotshoe an is built around a more open software platform to allow developers to create apps to control it.

Articles: Digital Photography Review (dpreview.com)

 
Comments Off on Olympus shows ‘Open Platform’ Micro Four Thirds camera module

Posted in Uncategorized


Four Under-Used Tools in Lightroom’s Lens Correction Module

30 Aug

hacking photography, mike newton, architecture,

Almost every lens changes the way your image looks by warping it in some way. Each lens can create barrel distortion, vignetting at big apertures, chromatic aberration, and more.

Some lenses have more distortion than others. Let’s look at four tools in Lightroom’s lens correction module that are a lifesaver

1. The easy button – lens profile corrections in one click

Before lens corrections:

lens corrections, lightroom

Brick wall at 16mm, f/2.8, ISO 1250. You can see the ‘bulge’ in the middle because the horizontal lines are not parallel. Also notice the dark corner vignetting from shooting wide open at f/2.8

After one-click lens correction:

hacking photography, brick wall, lens correction, barrel distortion

Same settings as above but with lens profile correction applied. Note the parallel horizontal lines and no more dark corners.

I shot this wall on a 16-35mm f/2.8 lens at f/2.8 to illustrate the ‘bulge’ in the middle and vignetted corners. These are distortions from the Canon 16-35mm f/2.8L II lens.lightroom 5 lens profile corrections,

Lightroom is already loaded with profile corrections for this specific lens! Just click “enable profile corrections” in the “Profile” section of the Lens Correction module and Lightroom will fix the distortion for the lens you used!

Finding your lens profiles on older versions of Lightroom

As Lightroom keeps rolling out newer versions, it rolls out profiles from newly released lenses. If you are using Lightroom 3 from 2010 but have a lens that hit the market in 2012, Lightroom won’t have it in there.

You can go download Adobe Lens Profile Creator to look up your lenses, grab their profiles, and manually add them to Lightroom.

I use the profile corrections on almost all of my images

Unless you have a very specific reason to manually deal with it, I suggest that you just use Lightroom’s built-in profile corrections most of the time.

While you can certainly change all these lens corrections manually, in most cases it makes more sense to let Lightroom do the hard work for you.

2. The vertical slider

Pizzeria Mozza San Diego, architecture photography, keystoning, hacking photography

The problem

I photographed this shot above for a commercial builder. Notice how the building in the back is falling over, and the one in front has vertical lines that aren’t parallel? Rather than repeat this excellent DPS article (Why are my Buildings Falling Over? A Short Guide to Perspective Distortion and Correction in Photography) that describes why this happens, I’ll show you how to correct it.

The solution

I pull the vertical slider to the left until the lines are parallel.

hacking photography, architecture photography, pizzeria mozza, lens correction, lightroom 5

Crop it

Notice anything weird? When you shift the vertical axis you lose some of the image. Architecture photographers use tilt-shift lenses to correct this in camera without losing any of the image.

Since I didn’t have one at the time, I corrected it in Lightroom by cropping the white part out.

tilt-shift, hacking photography,

3. The horizontal slider

Sometimes you might be in a hurry and shoot a photo that needs to be slightly shifted horizontally in post. I did this during a fashion shoot.

Hacking Photography, model, horizontal shift

The problem

I took the photograph without realizing I was slightly positioned to the side of the wall vs. straight on. If you look closely, you can see the line where the wall hits the ground, and that it slightly angles from bottom left to top right.

The solution

Using the horizontal slider and shifting it slightly to the right will tilt this photo so the right side appears to come closer to the viewer and the left side moves further away from the viewer. The result is that now the photo is perfectly square with the wall and the line along the bottom is level.

hacking photography, lens corrections

4. Vignette slider

The problem

When shooting at big apertures most lenses create some form of vignette, meaning dark corners in the photo. Sometimes these can be attractive, but sometimes you don’t want them.

I shot this photo at f/1.8. Do you see the dark corners? I want to remove those.

hacking photography

The solution

Simply pull the vignette slider in the Lens Correction manual module to the right to reduce a vignette.

vignette, hackingphotography.com

Vignettes are a matter of personal preference. I don’t think the first photo looks bad with the vignette, I just wanted it without it. You can use the vignette slider to create or enhance a vignette by pulling the slider to the left.

Pro tip: if you’ve cropped the image at all, you will want to use the post-crop vignetting tool in the “effects” dialog box. The vignette slider in the lens corrections module affects the original image size, regardless if you’ve cropped it.

If you want to see these tools in action, check out the video below:

I hope you found this helpful – happy editing!

The post Four Under-Used Tools in Lightroom’s Lens Correction Module by Mike Newton appeared first on Digital Photography School.


Digital Photography School

 
Comments Off on Four Under-Used Tools in Lightroom’s Lens Correction Module

Posted in Photography