RSS
 

Posts Tagged ‘module’

Market report provides interesting insights into camera module industry

07 Nov
Graph: Yole Développement

Market research & strategy consulting company Yole Développement has just released its “Camera Module Industry Market and Technology Trends 2017″ report, and the document includes a number of interesting findings and forecasts that photographers, specially those interested in smartphone photography, should pay attention to.

According to the report, the market for cameras in mobile devices is still the main driver of the camera module industry that reached $ 23.4 Billion in 2016 and is projected to reach $ 46.8 Billion by 2022.

The researchers at Yole Développement also found the manufacturers of autofocus and optical image stabilization systems had to adapt to the large production volumes and low cost requirements of the smartphone makers. This has resulted in a restructuring effort and a move of production capacity from Japan and Korea to China and Vietnam. Companies like New Shiko and TDK have been able to benefit the most from these developments.

In the sub-markets for image sensors and lens sets, the quasi-monopolies of Sony and Largan are about to end as the competition is quickly catching up in terms of technology. Module makers, like market leaders LG Innotek, are hugely dependent on customer loyalty as the loss of a large customer could potentially result in a collapse of the company.

The report also finds that the average cost for mobile camera modules has remained relatively constant. However, with high-end AF- and stabilization systems and and active alignment now being much more commonplace, complexity has increased disproportionally. The current total cost of camera module per phone is pretty much proportional to the number of cameras installed—two cameras cost the manufacturers $ 16, three cameras around $ 24, and those implementing four cameras in their devices have to calculate with a cost of more than $ 30 per handset.

Articles: Digital Photography Review (dpreview.com)

 
Comments Off on Market report provides interesting insights into camera module industry

Posted in Uncategorized


DJI launches Zenmuse X7 Super 35mm camera module with Raw video capture

12 Oct

$ (document).ready(function() { SampleGalleryV2({“containerId”:”embeddedSampleGallery_8541344997″,”galleryId”:”8541344997″,”isEmbeddedWidget”:true,”standalone”:false,”selectedImageIndex”:0,”startInCommentsView”:false,”isMobile”:false}) });

DJI has launched the Zenmuse X7, a Raw video capable Super 35 camera module. The camera/gimbal system which mounts to the company’s drones features a new, proprietary lens mount.

The camera can shoot 6K CinemaDNG Raw or 5.2K Apple ProRes footage at up to 30p or 3.9K CinemaDNG and 2.7K ProRes at up to 59.94p. The company claims 14 stops of dynamic range but, like all video manufacturers, doesn’t specify how this is assessed.

It uses the new “DJI Cinema Color System” based around a D-Log Curve and D-Gamut RGB color space.

The camera includes two exposure modes, one that varies amplification gain and an “EI” mode that always uses minimal amplification (~base ISO) with metadata tags to denote the intended final brightness, to preserve DR. This is increasingly common practice in the video sphere but has yet to make its way across to stills photography.

The previous model (the Zenmuse X5) was based around a Micro Four Thirds mount and came with a distinctly Panasonic-like 15mm F1.7 lens. Instead the Zenmuse X7 is based around the company’s own ‘DL’ mount.

Alongside the camera, the company is releasing 16mm, 24mm, 35mm and 50mm F2.8 lenses, the longest three of which will include mechanical shutters. The carbon fiber bodied lenses will cost $ 1,299 each, with the exception of the 50mm, which is $ 100 cheaper, though a camera bundled with all four lenses will cost just $ 4,299.

The camera on its own will cost around $ 2699 and will be available from November.

Press Release:

DJI Reveals Zenmuse X7, The World’s First Super 35 Digital Film Camera Optimized for Professional Aerial Cinematography

October 11, 2017 – DJI, the world’s leader in civilian drones and aerial imaging technology, today introduced the Zenmuse X7, the world’s first Super 35 digital film camera optimized for professional aerial cinematography. Designed to work seamlessly with the DJI Inspire 2 drone, the Zenmuse X7 delivers superior image quality, interchangeable lenses, and a new DJI Cinema Color System for post-production to give film and video professionals more creative freedom.

“The Zenmuse X7 offers everything professional content creators need to make their aerial footage as stunning and vivid as they demand,” said Paul Pan, Senior Product Manager at DJI. “From the large Super 35 sensor to a new mount, lenses, and color system, the Zenmuse X7 gives cinematographers and professional photographers an unmatched set of tools that work seamlessly with the DJI Inspire 2 drone to capture high-quality footage that is easily integrated into projects shot with industry-leading handheld cameras.”

Greater Expressive Freedom

The Zenmuse X7 is equipped with a Super 35 video sensor featuring 14 stops of dynamic range for more detail in low-light conditions. Its low-noise image capture enhances grading flexibility by preserving details in both highlight and dark areas while enabling a shallow cinematic depth of field.

To meet the rigorous requirements of filmmakers and television production professionals, the Zenmuse X7 captures the highest image resolutions ever for an integrated drone camera. It is capable of shooting 6K CinemaDNG RAW or 5.2K Apple ProRes at up to 30 FPS, as well as 3.9K CinemaDNG RAW or 2.7K ProRes at up to 59.94 FPS to integrate seamlessly into industry-standard post-production workflows.

Enhanced Imaging Potential

The Zenmuse X7 uses a dedicated aerial mount system, the DJI DL-Mount, featuring an ultra-short flange focal distance to carry prime lenses optimally. Available with focal lengths of 16 mm, 24 mm, 35 mm, and 50 mm, each lens has a maximum aperture of F/2.8 and is crafted out of carbon fiber, making them durable and lightweight for high-performance aerial cinematography with the DJI Inspire 2 drone.

To allow for advanced setting adjustment and fine-tuning, the 16mm lens is equipped with a built-in ND 4 filter, and the 24 mm, 35 mm, and 50 mm lenses feature a mechanical shutter.

Higher Flexibility in Post-Production

DJI has also introduced a new DJI Cinema Color System (DCCS) making the Zenmuse X7 an asset on every film set for movies, TV series, commercials, documentaries, and more.

“For the Zenmuse X7, we took our color science to the next level,” continued Pan. “We consulted the world leading authorities in color science, Technicolor. With their guidance, our engineers developed an optimized gamma curve for the X7 allowing more latitude without sacrificing image quality.”

DCCS features a new D-Log Curve and D-Gamut RGB color space to give more flexibility and color options during the post-production process. The D-Log further extends the dynamic range, while the D-Gamut RGB color space preserves more color information to support the most demanding filmmaking scenarios, providing accurate color for quick and easy post-processing.

The new EI Mode mimics the way a film camera works to help cinematographers capture as much information as possible in every scene while balancing the dynamic range and noise with different log curves for more flexibility during the post-production process.

The Zenmuse X7 gimbal system weighs just 631 grams with the 16 mm lens. The DJI Inspire 2 has a flight time of up to 23 minutes with the Zenmuse X7. For more info about the Zenmuse X7, visit www.dji.com/zenmuse-x7.

Price and Availability

The Zenmuse X7 camera is priced at $ 2,699 USD. The 16 mm, 24 mm and 35 mm lenses will be available for $ 1,299 each, and the 50 mm for $ 1,199. Customers can purchase the Zenmuse X7 prime lens combo including all 4 lenses for $ 4,299. The Zenmuse X7 will start shipping in early November 2017 from store.dji.com, in DJI Flagship Stores and through DJI Authorized Dealers worldwide.

DJI Care Refresh will be available for the Zenmuse X7 camera gimbal system as well as for the Inspire 2 drone. For more info, visit www.dji.com/service/djicare-refresh.

Articles: Digital Photography Review (dpreview.com)

 
Comments Off on DJI launches Zenmuse X7 Super 35mm camera module with Raw video capture

Posted in Uncategorized


Tutorial – How to Use the Lightroom Map Module

25 May

The Lightroom Map Module lets you add your photos to a map so you can search and organize them by location. It’s quite a cool feature, so let’s take a look at the best ways to make use of it.

1. Using the Lightroom Map module if your camera has built-in GPS

Photos taken with a camera or mobile that has built-in GPS are the easiest to work with in the Lightroom Map module. As long as GPS is enabled, the camera saves the exact location an image was shot in the photo’s EXIF data. Lightroom reads the data when you import the photos and automatically adds them to the map.

For example, I made this photo using an iPhone SE.

Lightroom map module

Lightroom automatically reads the GPS coordinates embedded in the photo’s EXIF data. The yellow square marks the spot where the photo in the filmstrip was taken.

Lightroom map module

Note: Lightroom uses Google maps and an internet connection is required for the Map module to work.

2. If you have a secondary GPS unit

Some camera manufacturers make GPS units that you can connect to the camera body. If you have one of these it does exactly the same as a built-in GPS unit. It embeds the camera’s coordinates in the EXIF data of your images. That data is then read by Lightroom when you import the photos.

3. If you have an app or sports device that records your movements in a GPS file

Most mobile phones have built-in GPS. You can download apps that record your route and let you export that information in a GPS tracklog (extension type .gpx) file that you can import into Lightroom. Some fitness devices like sports watches and fitness bands have the same functionality.

The effectiveness of this depends on how often the app or device records your location. If your camera has built-in GPS, for example, the location of the camera is always recorded accurately as the camera takes a GPS reading when you press the shutter.

When you use an app to do so, the app doesn’t record your location continuously. Instead, it takes a reading every few seconds. This creates a set of dots that can be joined together to show your approximate route. It’s how apps that record walking routes or running times work. That means that you can’t rely on this method for pinpoint precision, but it does help you with an approximate location.

The screenshot below shows a series of photos taken on a Canon camera that does not have GPS. The location information came from a .gpx file generated by a tracking app on my phone.

Lightroom map module

4. If your camera doesn’t have GPS but your mobile phone does

Here’s an easy method to add GPS data to your photos if you have a mobile phone with built-in GPS. All you have to do, whenever you take a photo with your camera, is remember to take an additional photo with your mobile phone. You can import these into Lightroom and add them to the same Collection. Once you have done so, simply drag the photos taken with your camera, those without GPS data, to the locations on the map indicated by the photos that do have GPS data (those taken with your phone).

Here’s a landscape photo I took in northern Spain.

Lightroom map module

Here’s another that I took with my mobile phone.

Lightroom map module

This screenshot shows exactly where I took the photo with my mobile phone.

Lightroom map module

The other photo in the Collection was made with my Fujifilm X-T1 camera, which doesn’t have GPS. I added location data to the Fuji image by dragging it onto the icon representing the location of the photo taken with my mobile phone at the same spot. The yellow icon now displays the number 2 to indicate that there are two photos in that location with the same GPS coordinates, as seen in the Lightroom Map Module below.

Lightroom map module

Lightroom automatically adds the GPS coordinates to the photo’s EXIF data.

Lightroom map module

This method requires the most effort and relies on you to remember to take a photo with your phone whenever you take one with your camera. This isn’t always practical and is most suited for landscape photography, where you have the time to take an additional photo with a mobile phone.

Conclusion

The Lightroom Map module is an often under-utilized but surprisingly useful tool. Using these ideas you can add Gcoordinatestes to any photo, even those taken by a camera without GPS. In years to come, you can find out exactly where your photos were taken, even if you can’t remember. It makes revisiting your favorite locations a much easier and more enjoyable task.

Do you have any questions about the Lightroom Map Module? Please let me know in the comments below.


Would you like to learn about Lightroom’s under-appreciated features? Then check out my Mastering Lightrooom ebooks and start getting more out of Lightroom now.

The post Tutorial – How to Use the Lightroom Map Module by Andrew S. Gibson appeared first on Digital Photography School.


Digital Photography School

 
Comments Off on Tutorial – How to Use the Lightroom Map Module

Posted in Photography


4 of the Most Important Elements of the Lightroom Library Module

11 Oct

When I read through photography forums or talk to other photographers the topic of image editors often comes up. People give various opinions and thoughts about which one they prefer. Photoshop, Lightroom, Apple Photos, Capture One, GIMP, and a host of other options from companies like ON1 and MacPhun are all capable of doing various types of small and large edits to your images.

However, one advantage Lightroom has over some other programs is that it not only lets you edit your pictures but categorize them, sort them, tag them, even compare different pictures to see which one you prefer. All this happens in the Library module which is a key part of Lightroom’s workflow. It is essential to understand the Lightroom Library module if you want to get the most out of this program.

The Library module. No late fees here, just lots of ways to manage your images.

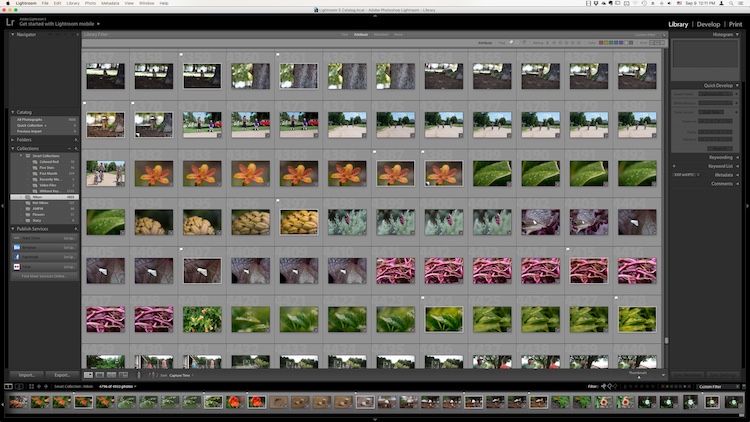
The Library module. No late fees here (library pun), just lots of ways to manage your images.

While the Library module does many different things, to get an understanding of the basics it’s good to narrow your focus down a bit. There are a few key areas of the photographer’s workflow that are served by this part of Lightroom; organizing, sorting and viewing…with a dash of editing thrown in just for fun. Let’s look at each one by one.

Organization of images in Lightroom

One aspect of Lightroom that is often misunderstood is how it handles your actual picture files, whether JPG, RAW, DNG, or any other format. Contrary to what some people think, it doesn’t actually do anything with your files whether you are categorizing them, sorting them, or editing them. Wherever your pictures are stored on your computer, that is precisely where they will remain when you import them into Lightroom. What you can do, however, is use the Library module to organize and manage your pictures within the program itself. The best way to do this is to put your pictures into what’s known as Collections, or virtual folders that contain sets of images.

Collections are a powerful and efficient method of sorting and organizing your pictures in Lightroom, while leaving them fully intact and untouched on your hard drive.

Collections are a powerful and efficient method of sorting and organizing your pictures in Lightroom while leaving them fully intact and untouched on your hard drive.

How Lightroom sees your pictures

When you import your pictures into Lightroom you are essentially just telling Lightroom where to look for the images that are sitting on your hard drive. Remember back in the days of using the card catalog in a public library? The books weren’t stored in the massive grids of tiny filing cabinet drawers. But those thousands of little cards did tell you where to locate each book as well as a bit of information about each one. That’s sort of how the Collections feature works in the Library module. You can use it to create virtual filing cabinets to organize the images on your hard drive without actually moving, renaming, or otherwise altering your original images.

For example, let’s say you shoot a wedding for your friends Jim and Pam Halpert and come back to your computer with over a thousand images to edit. You can copy all their images to your computer into one folder, and then use Collections in Lightroom to organize them in a way that makes sense to you. Then you can create a Collection Set called “Halpert Wedding” and then within that create additional collections such as “Ceremony,” “Reception,” and “Candids.” Because you are not actually moving the images into different folders on your computer or duplicating the actual picture files, you can put the same picture into multiple collections. You could have the same shot of Jim’s buddy Dwight in both the Reception and Candids folder.

This picture of a periwinkle flower could go into a collection called "Flowers," another one called "Nature," and another one with only pictures of periwinkles. All at the same time.

This picture of a periwinkle flower could go into a collection called “Flowers,” another one called “Nature,” and another one with only pictures of periwinkles. All at the same time.
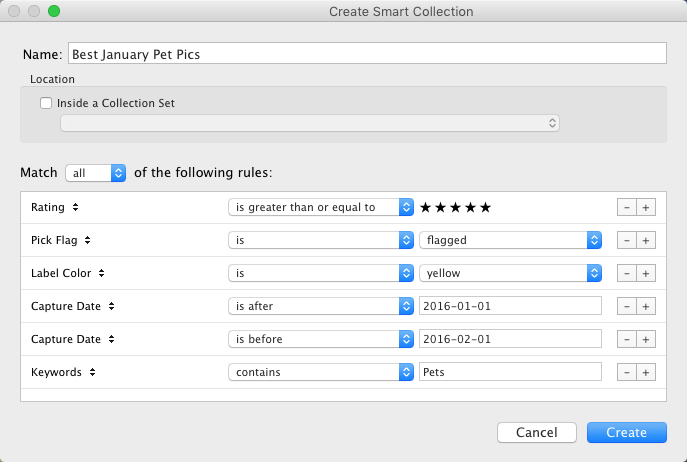
Smart Collections

While Collections themselves are quite flexible, you can go a step further by utilizing Smart Collections which is a way of automatically putting pictures in various collections based on criteria that you specify. There are a staggering number of criteria at your disposal, and you can choose whether the Smart Collection should meet any, all, or none of them. These collections are updated dynamically so as soon as a picture in your Library meets the specifications for a given Smart Collection it is automatically inserted into that Collection.

lightroom-library-module-smart-collection


Collections remain one of the hallmark features of the Library module and serve to make Lightroom far more versatile than other programs that simply let you edit your pictures. They work hand-in-hand with the many sorting options as well to give you even greater control over your images.

Sorting images in Lightroom

Have you ever gone through your closet and wished that you could snap your fingers and instantly see all your red shirts, tan pants, or gym shorts that still fit? Better yet, what about immediately seeing only the red shirts you actually like? The Library module allows you to do just that. With the click of a button or press of a keystroke, you can hone and filter your images to see precisely the ones you want, then easily reset everything back the way it was. Pressing the “\” key (while in the Library module), or going to “View > Show Filter Bar” brings up a bar at the top of your screen that allows you to dynamically sort your images based on criteria you specify at will.

lightroom-library-module-filter-bar

Using the filter bar tools

The Filter Bar lets you sort by criteria such as whether photos are marked as Picks or Rejects, have a color or star rating, or are associated with specific keywords. Click any of the icons in the Filter Bar to see the results in real-time, and your images will be immediately pared down to reflect the criteria you want.

To remove any of the filtering criteria just click the button again and Lightroom turns it off. You can also change the type of filtering by clicking the “Text/Attribute/Metadata” options in the middle of the top of your screen which will give you additional parameters. If you don’t want to constantly turn the Filter Bar on and off there is also a persistent mini Filter Bar at the bottom of your screen with many of the options as the full-featured one. I use these filters constantly to sort through my images and find the ones I need for any given project.

Using Keywords to sort your images

lightroom-library-module-keywords

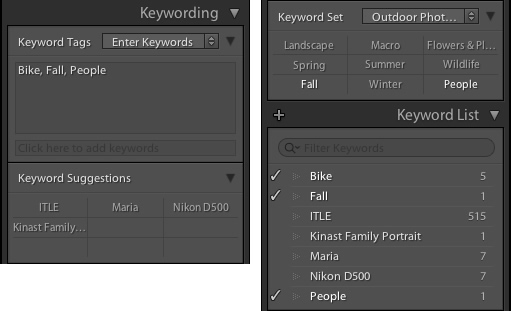
Keywords are a handy way to add sorting criteria to your photos.

The Keywords feature is another aspect of Lightroom that allows you to sort through your images. On the right side of the Library module is a panel that you can use to assign keywords to images such as “Birthday,” “Nature”, “Summer”, “Uncle Mike”, or any other words you want. To assign a keyword, or multiple keywords, to a picture, just start typing them in the Keyword box or select them from the Keyword Suggestions or Keyword Bank frames. To assign keywords to multiple images at the same time, select them first and then enter your keywords in the box.

Whether you have dozens, hundreds, or thousands of pictures to sort, the options in the Library module can help.

Whether you have dozens, hundreds, or thousands of pictures to sort, the options in the Library module can help.

Viewing images in the Library module

As your photo collection grows larger it’s essential that you have a way to actually view and manage all of the images. Thankfully Lightroom has a robust system in place to let you do exactly that. Of course, you can use collections and sorting criteria, but you also have some useful tools at your disposal to actually view the pictures too. The icons at the bottom-left of your screen let you change between four different views; Grid, Loupe, Compare, and Survey.

View modes

Click Grid to see a bird’s-eye view of all the pictures in the Collection you are currently viewing. Use the Thumbnail slider in the bottom-right (if it’s not visible tap the T key to hide/show the tools bar) to change the size of the thumbnails depending on your preference.

Grid, Loupe, Compare, and Survey let you view your pictures in useful and creative ways.

Grid, Loupe, Compare, and Survey let you view your pictures in useful and creative ways.

Loupe is a term borrowed from the days of developing pictures in a darkroom. It refers to the small glass viewer, sort of like a magnifying glass without a handle, that a technician would use to see a given image in greater detail. Click the Loupe view to see one image at a time and then click anywhere on the image with your cursor (which has now turned into a magnifying glass with a + inside) to zoom in closer. Hold [alt] or [option] on a Mac to click and zoom out, and use the zoom level options in the top-left corner of your screen to change the magnification level. This is particularly useful if you want to check if a given picture is sharp and in focus.

Compare and Survey view modes are related in that they let you see two or more pictures at a time in order to choose the one you prefer. These modes are especially handy if you have multiple similar images, such as after a portrait session, and are trying to pick the best one out of a bunch.

I had about two dozen nearly identical shots, but Lightroom's view and sorting options helped me find just the photographic needle in the memory card haystack.

I had about two dozen nearly identical shots, but Lightroom’s view and sorting options helped me find just the photographic needle in the memory card haystack.

Quick Develop in the Library module

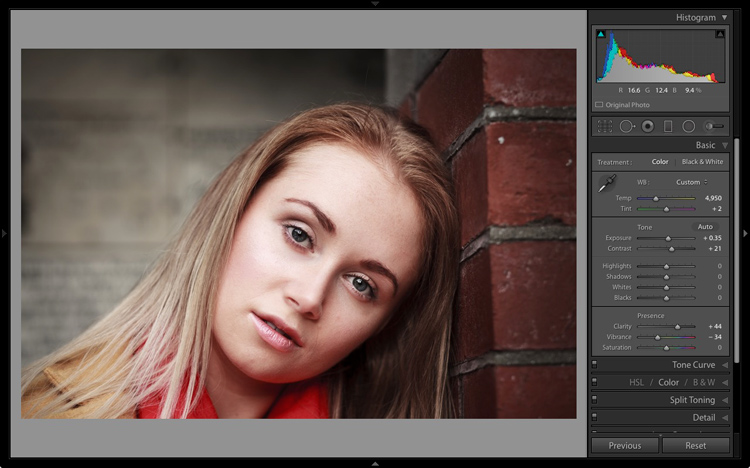
I like to think of the Library’s Quick Develop options as extra credit for a class assignment. They are an added touch that lets you do a bit of editing with your pictures without going to the full-fledged Develop module, and will often give you just the right amount of editing that a picture needs. Nestled on the right-hand side of the Library module is a little toolbar called Quick Develop which does exactly what you might think. It allows you to quickly and easily adjust a few essential parameters such as White Balance, Exposure, Highlights, Shadows, and a few other settings.

lightroom-library-module-quick-develop

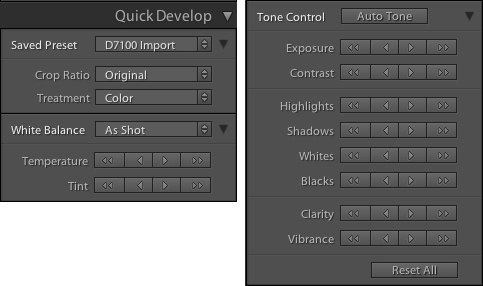
Clicking on the single arrow for any given parameter adjusts things just a little bit. While clicking the double arrow adjusts things a lot. For example, the single right-facing arrow for Exposure will increase the value by 1/3 stop, whereas the double arrows will increase the value by a full stop. You don’t get anywhere near the fine-grain control that you do in the actual Develop module, but if you need to quickly make some basic edits to an image you might find Quick Develop to be quite handy.

lightroom-library-module-rainbow

Conclusion

These four elements aren’t all that the Library module has to offer, but learning them will give you plenty to work with as you begin to expand your knowledge of this powerful program. Do you have any favorite tips you’d like to share? Are there features you think I missed that others should know about? Please leave your thoughts in the comments below.

googletag.cmd.push(function() {
tablet_slots.push( googletag.defineSlot( “/1005424/_dPSv4_tab-all-article-bottom_(300×250)”, [300, 250], “pb-ad-78623” ).addService( googletag.pubads() ) ); } );

googletag.cmd.push(function() {
mobile_slots.push( googletag.defineSlot( “/1005424/_dPSv4_mob-all-article-bottom_(300×250)”, [300, 250], “pb-ad-78158” ).addService( googletag.pubads() ) ); } );

The post 4 of the Most Important Elements of the Lightroom Library Module by Simon Ringsmuth appeared first on Digital Photography School.


Digital Photography School

 
Comments Off on 4 of the Most Important Elements of the Lightroom Library Module

Posted in Photography


Lenovo announces Hasselblad True Zoom camera module for Moto Z smartphones

04 Sep

Lenovo offers a range of detachable smartphone accessory modules, called Moto Mods, for its Moto Z series smartphones. So far a power pack, a speaker and a mini-projector have been available. Now the company has launched a new addition at IFA in Berlin that is especially interesting to mobile photographers: the Hasselblad True Zoom.

As its name suggests the True Zoom camera module was developed in cooperation with Swedish camera maker Hasselblad, and with its 10x zoom lens and Xenon flash it converts any Moto Z device into a connected travel zoom camera. Like the other Moto Mods, the True Zoom is attached to the smartphone via magnetic force and can be used instantly – no need to restart the device or pair the phone. Communication between the devices takes place via a range of electronic contact pins.

The True Zoom’s body is made from a plastic material. Inside, images are captured on a 12MP 1/2.3″ CMOS sensor with a 1.55 um pixel size. The zoom lens offers an equivalent range of 25-250mm and a F3.5-6.5 aperture. Optical image stabilization is on board as well, and the module can record 1080p Full-HD video.

Currently compatible smartphone models are the Lenovo Moto Z, Moto Z Force and the just-announced Moto Z Play mid-range phone that comes with a 16MP camera, 5.5″ 1080p AMOLED display and a Qualcomm Snapdragon 625 octa-core processor. We have had the chance to test the Hasselblad True Zoom on a Moto Z Force for a few days – you can read about our experience with the module in our hands-on review.

The Hasselblad True Zoom will ship globally in September and will cost $ 299/€299, or $ 249.99 from Verizon in the US.

Lenovo’s Moto Mod range includes a power pack, a speaker, a projector and now the new Hasselblad True Zoom camera module.

Hasselblad True Zoom Moto Mod key specifications:

  • 12MP 1/2.3″ CMOS sensor with 
  • 25-250mm equivalent 10x zoom lens
  • 12MP
  • F3.5-6.5 aperture
  • ISO 100 to 3200
  • 1080p video
  • 2 built-in microphones
  • Physical two-stage shutter button and zoom lever
  • Xenon flash
  • 145g

Articles: Digital Photography Review (dpreview.com)

 
Comments Off on Lenovo announces Hasselblad True Zoom camera module for Moto Z smartphones

Posted in Uncategorized


Hasselblad rumored to be working on 10x zoom camera module for Moto Z phones

05 Aug

The Lenovo Moto Z and Moto Z Force smartphones have a unique feature: they accept accessory modules, so-called Moto Mods, which attach to their back plates magnetically and via 16 connection pins. At launch, Lenovo showed the InstaShare projector, a JBL Soundboost 6 Watt speaker and a 2220 mAh battery pack, but unfortunately the previously rumored camera module did not materialize. 

However, now hellomotoHK found information on the Chinese microblogging site Weibo that might indicate that Hasselblad is working on a Moto Z camera module with, a 10x zoom lens, physical shutter button and zoom lever, Xenon flash and Raw capability. Unfortunately, no information on sensor size and resolution has been provided. 

With Raw capture, optical image stabilization and 13 and 21MP sensors respectively the Moto Z and Z Force are well-equipped in the camera department, but a 10x zoom lens with a potentially larger sensor than in the smartphone camera modules would definitely expand the creative potential of the devices. It’s impossible to know how much truth is in this rumor, especially given that the image is just a rendering, but we certainly hope Hasselblad and Lenovo will let us know soon.

Articles: Digital Photography Review (dpreview.com)

 
Comments Off on Hasselblad rumored to be working on 10x zoom camera module for Moto Z phones

Posted in Uncategorized


The 6 Most Important Things You Need to Know about Lightroom’s Develop Module

15 May

Lightroom is powerful, but it’s also complex and has a steep learning curve. If you feel overwhelmed by all the options, there’s great value in taking a simple approach and learning to use the tools that are most useful first. Leave the more advanced features until you have more experience.

With that in mind, I’ve put together this list of the six most important things you need to know about Lightroom’s Develop module. Learn these and you will be well on the way to Lightroom mastery.

1. Backup your catalog regularly

This is the most crucial thing to set up, as everything you do to your photos in the Develop module (not to mention metadata changes like Collections, flags and keywords) is stored in the catalog. It would be a disaster to lose your catalog (and consequently all your hard work) to hard drive failure, so you need to make sure that Lightroom is backing it up regularly to an external hard drive.

To do so, go to:

  • For Windows users: Edit > Catalog Settings > Back up catalog
  • For Mac users: Lightroom > Catalog Settings > Back up catalog

I have mine set to: Every time Lightroom exits – some photographers find that Once a week, when exiting Lightroom is enough.

When you exit Lightroom, a dialog window appears that shows you where Lightroom is going to save the backup Catalog. Click Choose to change the location if you need to. Note: this is the only time you can select the destination where the backup will be saved.

Make sure the Test integrity before backing up and Optimize catalog after backing up boxes are both ticked. This slows down the back up process, but it’s worth it because it helps ensure that your catalog remains free from corruption, and is optimized for speed.

Lightroom Develop module

Please note: The Catalog doesn’t contain any of your photos. Backing up your Catalog doesn’t back up your photos, only the information that Lightroom contains about them. Photo backups need to be managed separately.

2. Profile is the most important setting in the Develop module

The Profile menu is tucked away in the Camera Calibration panel, at the bottom of the right-hand panels in the Develop module. The default profile setting is Adobe Standard (circled below). This profile was created specifically for your camera by Adobe. Pick that one for accurate colors.

You will also find the color profile settings specific to your camera (Landscape, Portrait, and so on). You can pick one of these if you prefer the look to Adobe Standard.

Lightroom Develop module

The profile affects both color and contrast, so from a practical point of view it’s important to select the right one, before you start adjusting contrast and white balance in the Basic panel. Get the profile right, and it makes all subsequent processing steps much easier. Get it wrong, and it makes them more difficult.

For example, if you apply a profile intended for landscape photos to a portrait, then you could end up with over-saturated colors and unnatural skin tones. Then you might try and fix that by playing with the Basic panel sliders or other color controls. This approach rarely works, it’s far better to select the most appropriate profile from the start.

These two photos show the difference between the Adobe Standard and Velvia profiles on a Fujifilm X-T1 camera. The Velvia profile saturates colors, the Adobe Standard profile looks more natural.

Lightroom Develop module

3. Use Lens Corrections to correct distortion and eliminate chromatic aberrations

No lens is perfect, and most have at least a little distortion and chromatic aberration. One of the benefits of digital photography is that you can eliminate these in the processing stage, so they are not the problem they once were. Go to the Basic tab in the Lens Correction panel, select Enable Profile Corrections and Remove Chromatic Aberration in order to do so.

Lightroom Develop module

This comparison shows the result on a photo taken with a zoom lens producing barrel distortion.

Lightroom Develop module

Lightroom Develop module

4. You can carry out 80% of your processing in the Basic panel

Once you have selected a Profile, and applied Lens Corrections, you can go to the Basic panel to start making any adjustments required to the photo’s brightness, contrast, and color.

The sliders in the Basic panel are extremely powerful. Take the time to get to know what each one does, and how the settings affect your images. Once you get the hang of these sliders it’s quite possible that you can do all of your global adjustments (those that affect the entire image) here, and not have to touch the Tone Curve or HSL / Color / B&W panels at all.

This photo is a good example. Virtually all the processing was done in the Basic panel, made possible by selecting the most appropriate profile first. The only additional thing I did was add a vignette using the Effects panel.

Lightroom Develop module

My article Steps for Getting Started in the Lightroom Develop Module goes into this in more detail.

5. Learn to use local adjustments wisely

It wasn’t so long ago that many professional photographers would send their negatives to master printers who used dodging, burning, and other fancy darkroom techniques, to create a far better print than the photographer ever could. These local adjustments – those applied to only part of the image, rather than all of it – are often vital for bringing the best out of your Raw files in Lightroom.

Lightroom has three tools for making local adjustments – the Adjustment Brush, Radial Filter and Graduated Filter. They allow you to selectively adjust brightness, contrast, and other tone and color settings. Each tool has its own idiosyncrasies, so take the time to get to know each one in turn.

This example shows the difference that local adjustments make. I used a combination of all three of Lightroom’s tools to turn the image on the left, into the one on the right.

Lightroom Develop module

6. Don’t overlook the Clarity slider

The Clarity slider is extremely useful as both a local, and global adjustment. It’s primary use is to enhance texture, and it does so by increasing edge contrast (the spots where dark and light areas meet). You do have to be careful not to overuse it, but judicious applications of texture enhancement can help bring the best out of any photo. Clarity is also an ideal tool for enhancing black and white images, which often rely on texture to add impact.

The following photos show the effect of adding Clarity. I used the Radial filter to apply Clarity to the Buddha heads to bring out the texture.

Lightroom Develop module

Lightroom Develop module

These six items are not a comprehensive list of what you can do in Lightroom’s Develop module, but they will certainly get you started, and simplify the process of learning to use it.

What do you think are the most important tools to master in the Develop module? Do you agree with my selection? Please let me know in the comments below. And if you want to learn more about Lightroom then please check out my Mastering Lightroom ebooks.

googletag.cmd.push(function() {
tablet_slots.push( googletag.defineSlot( “/1005424/_dPSv4_tab-all-article-bottom_(300×250)”, [300, 250], “pb-ad-78623” ).addService( googletag.pubads() ) ); } );

googletag.cmd.push(function() {
mobile_slots.push( googletag.defineSlot( “/1005424/_dPSv4_mob-all-article-bottom_(300×250)”, [300, 250], “pb-ad-78158” ).addService( googletag.pubads() ) ); } );

The post The 6 Most Important Things You Need to Know about Lightroom’s Develop Module by Andrew S. Gibson appeared first on Digital Photography School.


Digital Photography School

 
Comments Off on The 6 Most Important Things You Need to Know about Lightroom’s Develop Module

Posted in Photography


Huawei launches Honor V8 with 12MP dual-camera module

11 May

Huawei has announced the V8, the new flagship in the Chinese manufacturer’s Honor series of devices. Consumers can choose from different display and processor options but the camera module is the same on all variants. The Honor V8 features a dual-camera setup that looks very similar in terms of specifications to the one found on the Huawei P9, but has to make do without the P9’s Leica branding.

Both 12MP sensors come with a 1.76-micron pixel-size and are coupled with a 6-element lens with F2.2 aperture. There is also a dual-LED flash and the AF-system is laser-assisted. As on the P9, the front camera offers an 8MP sensor and F2.4 aperture. 

In terms of display resolution customers get to choose from Full-HD or Quad-HD but all displays measure 5.7-inches and come with 2.5HD curved glass. The Android 6.0 operating system with Huawei EMUI 4.1 skin is powered by an octa-Core Kirin 950 or 955 chipset. RAM is 4GB on all models but the model with the higher-resolution screen comes with 64GB of storage while the Full-HD variant has to make do with 32GB.

Energy on all models is provided by a 3,500mAh battery that is charged via a USB Type-C connector. In China the Full-HD base model will retail for approximately $ 350 while to the top-end version with QHD-screen and 64GB storage will set you back approximately $ 439.

Via: GSM Arena

Articles: Digital Photography Review (dpreview.com)

 
Comments Off on Huawei launches Honor V8 with 12MP dual-camera module

Posted in Uncategorized


2 Video Tips for Using the Print Module in Lightroom

13 Mar

Julianne Kost is the premiere Adobe instructor who teaches us about both Lightroom and Photoshop. In these two videos she gives us tips for printing from Lightroom.

In this first one learn some general tips using the Print Module inside Lightroom:

The second video below is a handy tip on how to print multiple images directly to a JPG, using a the Print Module again but this time saving a file, not making a print. This is really good to know if you want to make images to share on social media, your blog or website, etc.

If you want more printing tips check out these dPS articles:

  • Image Size and Resolution Explained for Print and Onscreen
  • Two Useful Lightroom Print Module Custom Layouts
  • How to Create a 2015 Calendar in the Lightroom Print Module (you can figure out how to make one for 2016 too!)
  • Next Steps to Getting Started in the Lightroom Develop Module

googletag.cmd.push(function() {
tablet_slots.push( googletag.defineSlot( “/1005424/_dPSv4_tab-all-article-bottom_(300×250)”, [300, 250], “pb-ad-78623” ).addService( googletag.pubads() ) ); } );

googletag.cmd.push(function() {
mobile_slots.push( googletag.defineSlot( “/1005424/_dPSv4_mob-all-article-bottom_(300×250)”, [300, 250], “pb-ad-78158” ).addService( googletag.pubads() ) ); } );

The post 2 Video Tips for Using the Print Module in Lightroom by Darlene Hildebrandt appeared first on Digital Photography School.


Digital Photography School

 
Comments Off on 2 Video Tips for Using the Print Module in Lightroom

Posted in Photography


Apple patent describes use of curved image sensor to design small camera module

29 Jan

A patent was recently granted to Apple describing how a spherical image sensor can be used to design a very compact camera module. The sensor is spherically curved and eliminates the need to correct for curvature of field, meaning a simpler, brighter and ultimately smaller lens design can be used. Read more

Articles: Digital Photography Review (dpreview.com)

 
Comments Off on Apple patent describes use of curved image sensor to design small camera module

Posted in Uncategorized