RSS
 

Posts Tagged ‘mode’

Shooting In Manual Mode: The Starter Kit [Infographic]

25 Oct

I was hanging out in one of my blogging groups the other day, and people were discussing things they wanted to do to improve their photography. One thing that popped up a few times was switching to manual mode, and how daunting that seemed. I am here to tell you that I thought the same thing until I actually went Continue Reading

The post Shooting In Manual Mode: The Starter Kit [Infographic] appeared first on Photodoto.


Photodoto

 
Comments Off on Shooting In Manual Mode: The Starter Kit [Infographic]

Posted in Photography


How to use Program Mode to set Your ISO

07 Sep

When I’m teaching my photography classes, the students and I are often neck deep into discussions of the exposure triangle; shutter speed, aperture size and sensor sensitivity (ISO). You can find great discussions and explanations of the triangle here on the dPS. I’d like to dissect the ISO corner of the issue, and give you a simple technique you can use to set the ISO to the best value for the situation. Understanding ISO is one thing but setting it correctly on the fly is another.

Exposure triangle

An equilateral triangle represents a well-exposed image. If any corner is too long, (slower shutter speed for example) the image would be brighter. If the corner is short, the image would be darker.

First a definition of ISO:

ISO is an acronym for International Organization for Standardization. It is a group that sets all sorts of standards for science and industry, but the meaning of ISO for photographers with digital cameras, is that it places a numerical value on the sensitivity of the camera’s imaging component, the sensor. Often compared to the film sensitivity rating called ASA (originally developed by the American Standards Association).

ISO is often seen as numbers ranging from 100 to 6400 and higher. The lowest number your camera presents is the lowest sensitivity setting; the highest number is the most sensitive. So, you can use the ISO settings to help you shoot in a variety of situations; bright and dark. Often you are taught to boost the ISO when conditions get dark but the opposite might be true depending upon your intent.

You are also told that high ISO settings degrade the quality of the image in the form of digital noise. Noise is a visual distortion of specks of light. Some is colored, and some just looks grainy. It is a similar look to the grain we would see in film negatives of higher ASA’s. Noise is worse in the shadows and appears more with higher ISO settings. This is true but the degradation of the image is gradual, and you can sometimes use ISO numbers that are quite high and get great, usable images.

ISO setting in menu

Select ISO sensitivity in the menu, via the Info screen, or sometimes with a dedicated button.

You probably came to understand the concept of ISO as part of the exposure triangle, and then immediately asked, “What ISO should I set?” Hmmm, something is missing in the explanation!

Here are some tips for setting ISO:

First for tripod shooting, set your ISO to the lowest (thus highest quality) setting. There won’t be any camera shake if you practice good technique and your images will have the highest quality. This will hold true unless you need a shorter shutter speed for other reasons. If that is true, keep reading and use the handheld technique.

When shooting handheld, you need to balance the quality you are getting with the ISO setting versus the shutter speed that you can use to get a sharp shot, with no camera movement. For example, if you have your ISO at 100 and you need 1/10th of a second to expose the shot properly, you are going to have some camera movement, and your image will not be sharp.

Follow these steps:

  1. Make sure your camera is not set to Auto ISO.
  2. Set your camera’s exposure mode to Program (not Auto). Even if you need Shutter or Aperture Priority, set it to Program first.
  3. Next, note your present ISO setting.
  4. Now half press the shutter button to wake it up and point it around your shooting environment. Try several different directions. Maybe you are in a restaurant; point it at the tables, at a group of people, down the bar, etc.
  5. All the while, watch your camera’s information display. You can look through the viewfinder for the information, or turn on your INFO display on the back LCD display. As the camera’s meter evaluates all the different shots it will adjust the shutter speed. Program tries to keep both aperture and shutter settings in the normal ranges. Take mental note of those shutter speeds.
    ISO on Info screen

    Here the shutter speed is showing 1/3rd of a second. This is way too slow for handheld photography.

    Shutter apeture in viewfinder

    1/2 of a second shutter time as seen through the viewfinder.

  6. Your camera will go sleep in a few seconds if you don’t wake it up occasionally by half-pressing the shutter button. Let it focus, as that will give you a more accurate reading.
  7. If you are seeing shutter speeds that are slower than 1/60th or 1/80th of a second, then the ISO needs to be bumped to a higher number. Most people cannot hand hold a camera, and obtain sharp photos, at longer than 1/60th of a second. You need good solid technique to do hand hold at those speeds. NOTE: 1/60th is being used here as a typical situation that includes a lens with up to 55mm of zoom. If you are going to zoom further, see the note below on focal lengths.
  8. If your shutter speeds are really fast, (1/1000th or 1/2000th) then you can safely drop the ISO to a higher quality setting (lower ISO number).
  9. Keep repeating the above steps until you see shutter speeds that you are comfortable with using, for the image you intend to make. Now you have your ISO set correctly for handheld photography in your current location, lighting conditions, and focal length.
Camera shake example

An example of camera shake. Note the exposure information. This was taken with the lens zoomed to 62mm (93mm equivalent on a cropped sensor). 1/160th of a second would have been better, which I could have gotten with an ISO of 400 rather than 200.

Focal length makes a difference

The focal length of your lens makes a difference as well. The directions above assume you are using a lens that is typical to entry-level DSLR setups. For example the typical kit lens is a 18-55mm zoom. If you are using a longer zoom, say 200mm, then the slowest shutter speed you can hand hold is much shorter. The widely accepted rule states: one over the focal length (so 1/200th of a second in the above mentioned situation) is the longest shutter speed that you can hand hold for a sharp, no-shake image.

However, this is an old rule that was based on 35mm film (and it applies to full frame digital sensor cameras). Many digital cameras have a crop factor, or multiplier effect, for focal length because their sensor is smaller. Yours might be 1.5x, 1.6x or even 2.0x – check your camera’s manual to be sure. Assuming a 1.5x multiplier for a 200mm zoom shot, you would need 1.5 x 200 = 300, so 1/300th of a second is your slowest shutter speed for an image that has no camera shake blur.

What about Shutter and Aperture Priority?

At this point you may be thinking that you actually need Shutter or Aperture priority – that is fine. But now you know the ISO range that will work. Perhaps ISO 400 was where you ended up, and the meter was telling you that the shutter speed of 1/200 was going to work. Now you can switch to the mode you want. Let’s say you need Shutter priority to stop some subject movement. Set your camera to Shutter priority, let’s say a shutter speed of 1/400th of a second, and repeat the process of aiming at some possible compositions. If your camera starts blinking the aperture, you will know your setting is out of range. It is telling you the aperture cannot be opened any wider, so you’ll know you need to increase the ISO to use that shutter speed.

For Aperture priority, set the aperture you need for a desired depth of field and use the camera’s meter to evaluate the scenes as described above. If the shutter speed starts goes below your maximum for the lens you’ll know your settings are out of range. Then you will need to bump up the ISO.

What about Vibration Reduction?

Sometimes called Image Stabilization, this is technology that might be built into your lens or camera. It can allow you to shoot at speeds longer than normally recommended, since it counteracts the movement you introduce into the camera. Take the marketing information about how many stops longer you can shoot with a grain of salt. Do your own tests with your equipment, with your best steady technique. I find that most people can learn to get two extra stops of shutter speed latitude. So, in our scenarios above you could shoot at 1/15th and 1/50th of a second respectively.

VR button

Vibration Reduction switch on a Nikon lens.

Try this process for a while with the Program mode to get comfortable, then you can use all of the exposure modes to set your ISO quickly and correctly. As your experience grows you will set your ISO quickly with intelligent estimates. You will never have to guess about your ISO again.

No camera shake

A higher ISO (3200) made little difference in quality here. The shutter speed of 1/250th assured a no-shake image and was fast enough to stop any subject motion.

The post How to use Program Mode to set Your ISO by Steve Gandy appeared first on Digital Photography School.


Digital Photography School

 
Comments Off on How to use Program Mode to set Your ISO

Posted in Photography


Why Aperture Priority Mode Isn’t Always the Best Choice

03 Jul

There are a lot of common mistakes to make in photography, but possibly the most frequent is to shoot in Aperture Priority mode when it’s not the best choice.

There are many situations where shooting in Aperture Priority is ideal, such as when you are using a tripod and your shutter speed does not matter, when you are in strong sunlight, when you are shooting a scene with a wide-angle lens and nothing is moving, or when you want a very shallow depth of field for aesthetic purposes.

However, in most other situations it is beneficial to shoot in Shutter Priority mode (or manual mode).

Lamborghini, SoHo

Lamborghini, SoHo – Shutter Speed priority can be much more effective for Street Photography, where spontaneous shots occur frequently, and freezing motion is very important.

I see this problem most often when people are traveling. They will stick their camera on Aperture Priority for the entire day, forgetting that the light sometimes will not be strong enough to yield a shutter speed fast enough to offset camera shake or to freeze moving subjects, particularly if their lens aperture does not go below f/4 or f/3.5.

The result is that they will come home and many of their images will be blurry, when they didn’t have to be.

Your shutter speed is the first line of defense for creating a sharp image. The rule of thumb is that the shutter speed should be at least one over the focal length of the lens to offset handheld camera shake. I like to add a little extra speed to that to be safe, so if you are shooting at 50mm on a full frame camera, I would keep the shutter speed at least at 1/80th. On a cropped sensor however, such as an APS-C camera, a 50mm might be the equivalent of an 80mm view, so I would shoot at least at 1/100th of a second.

You can see, especially if you are using a telephoto focal length, how quickly and easily your shutter speed can go below this threshold when on Aperture Priority and not in strong, direct light.

Plaza Hotel

The Birds and Plaza Hotel. A spontaneous shot on Shutter Priority at 1/500th and ISO 800.  On Aperture Priority there is a much stronger chance that I would have yielded too slow of a shutter speed, especially since it was overcast and late in the day.

When there are moving subjects in a scene such as people, 1/320th or 1/250th is often a good shutter speed to freeze their motion. So when traveling, I use 1/320th as my baseline shutter speed and will lower it for the situations where there is no motion or when the light is extremely low. This guarantees that no matter what I capture, it will be sharp, including the spontaneous moments. Often, because I shoot this way and prefer to also shoot with an aperture of f/8 or above, I will raise the ISO to 800, 1600, or even 3200 in areas with very low light. This will add more grain/noise to the image, but especially on the newer digital cameras you will quickly notice that the technical quality and sharpness of your images will actually be improved, despite this grain.

Now you might be saying that you are able to shoot in Aperture Priority mode (or Manual mode) all of the time and can pay attention to the corresponding shutter speeds so you never have a problem. That’s great, and in that case, please keep shooting in Aperture Priority. I do not want to stop you from shooting in a way that works well for you. If you know your camera settings well then you can effectively shoot in any situation with any of these modes.

However, I teach a good amount of students and I would guess that about 80 percent of them come in shooting in Aperture Priority. Then, when I look at their photos, for a good portion of these students, way too many of their photos turn out blurry, or have some sharpness issues. They will pay attention to their aperture but then zoom for a shot and not notice that the shutter speed is lower than their focal length, or not notice that is too low to freeze the motion of a subject. I find that switching them over to Shutter Priority for these situations puts the shutter speed in their mind first and then they can pay attention to the corresponding aperture to achieve the largest depth of field possible (if you are purposely looking to create a shot with a shallow depth of field, then Aperture Priority would be ideal.)

Particularly for travel photography in cities or in areas with people, often when I explain to students to try photographing around 1/320th of a second and a higher ISO, they quickly remark about how much sharper their photos become.

Give it a try and see if yours do too.

The post Why Aperture Priority Mode Isn’t Always the Best Choice by James Maher appeared first on Digital Photography School.


Digital Photography School

 
Comments Off on Why Aperture Priority Mode Isn’t Always the Best Choice

Posted in Photography


Pocket movie maker? We examine the Sony RX100 III’s video mode

02 Jun

RX100-III_Right-1200.png

The Sony Cyber-shot RX100 III may have photographers drooling over its fast lens and pop-up electronic viewfinder, but it gains some serious video-related updates too. It now features full sensor readout for higher image quality (as previously seen on the RX10), and also supports the XAVC S codec which allows higher bit-rates. In the latest update to our First Impressions Review, we take a detailed look at its movie mode. Click through to read all about it.

News: Digital Photography Review (dpreview.com)

 
Comments Off on Pocket movie maker? We examine the Sony RX100 III’s video mode

Posted in Uncategorized


How to Avoid Blurry Photos by Choosing the Right Autofocus Mode

09 Apr

Sometimes the light is perfect, the moment is right, but when you get home you find out that your photo is blurry. Arrgh!

Why are your pictures blurry? One obvious reason might be that your camera isn’t focused properly. Today’s cameras and autofocus lenses can help you quickly take sharp images in a wide variety of situations, provided you choose the right autofocus mode.

Here are some questions to help you diagnose any situation and choose the correct auto focus setting

autofocus modes

Photo by Lynford Morton

Are you using the Auto-area autofocus or Single-point autofocus selection?

Who gets to decide your focus point? That’s the question you are deciding with this option. In an Auto-area autofocus, your camera decides what it should use as your focal point. It usually decides based on what looks most prominent in the viewfinder or closest to the camera. This might work when your subject is obvious and there are no potential distractions.

For more control, choose a Single-point autofocus setting. That mode allows you to choose your specific auto focus point (check your camera’s manual if you aren’t sure how to do this). After all, only you, not your camera, knows where you want to place your subject.

Is your subject moving?

Most DSLR cameras give you four basic options for autofocus settings: single, continuous, auto or manual. To help you choose the right option, ask yourself, “Is my subject moving?”

No, my subject is not moving

autofocus modes

Photo by Lynford Morton

If your subject is not moving, choose “AF-S” for Nikon or “One Shot” for Canon. This mode locks in your focus based on the distance to your subject. As long as your subject stays at that distance, your photo will be in focus. Your subject has to be stationary for this mode to work. In fact, your camera will not take the photo if your subject is moving (or it cannot lock focus).

This mode also allows you to recompose. Let’s say the autofocus point is in the center of the frame, but you want your subject on one side or the other. Keep depressing your shutter button slightly, and focus remains sharp on your subject. Then you can move the camera slightly left or right, recomposing with your subject out of the center of the frame.

Yes, my subject is moving

By Amsterdamized

If your subject is moving, use continuous autofocus (AF-C for Nikon or AI Servo for Canon). In this mode, you place your autofocus point over your subject, and focus continues to adjust while you hold down the shutter button, keeping your subject in focus as it moves.

For example, if someone is riding a bicycle, place the AF point on your subject and slightly depress the shutter. As long as you are pressing the shutter, the autofocus will continually adjust to your subject, keeping them in focus as they move. When you are ready to take the photo, depress the shutter completely, and the camera will focus on your subject for a sharp image.

No, my subject isn’t moving, but it might

A third option merges the functionality of the single autofocus and continuous autofocus. This hybrid mode, (AF-A for Nikon or AI Focus for Canon), starts out as a single auto focus. Your camera won’t focus until you lock in on a stationary subject. Once you have your subject in focus, you can take the photo as you would in a traditional single auto focus mode.

If your subject starts moving, however, the autofocus releases and continues to track your moving subject. It gives you the best of both worlds. One note of caution, I have noticed at times, if you recompose a stationary object quickly in AF-A mode, the camera can be fooled into thinking the subject is moving and release the autofocus.

My autofocus just isn’t getting it right

You always have the option of turning off the autofocus function and choosing the Manual setting. If your camera is having trouble detecting your focus point, it might be more efficient to focus the camera yourself.

How about the opposite situation? You turned off your autofocus by accident? Every now and then, when your camera can’t seem to focus, and you don’t hear the motor searching back and forth, check to see if you selected Manual autofocus by accident. This can happen more frequently than you might think.

Other issues to consider

What if you set up your autofocus properly, and the lens still won’t focus? Try these considerations:

  • You might be too close. Try backing away. If you are too near the subject, it might prevent the camera from focusing properly.
  • Your subject might not have enough contrast. Your image needs to have some contrast for many autofocus systems to work. If you try to photograph a solid sheet of white or any single color, most autofocus systems will struggle. Why? The camera compares adjacent pixels and when one is different, it uses that point to determine its focus. If it can’t find any contrast, it can’t focus.
  • You might have an extremely shallow depth of field. In this case, your autofocus is working, but the depth of field is so shallow, it is hard to tell that your subject is in focus.
  • You have camera shake. When you depress the shutter, you move the camera. If the shutter speed is too slow, the camera picks up that movement, and it looks like a blurry photo. Make sure your shutter speed is faster than the equivalent of your focal length. For instance, if you are zoomed to 100mm, your shutter speed should be 1/100th of a second or faster to avoid camera shake.

Why is your picture blurry? If the answer is in your autofocus, your fix could be as simple as choosing the right setting.

Do you have any other autofocus tips or comments you’d like to share? Please do so below.

More tips on sharper images and focus modes:

  • 5 Tips for Getting Sharper Images
  • Understand Exposure in Under 10 Minutes
  • Making Sharper Wildlife Photographs – [Part 1 of 2]
  • Making Sharper Wildlife Photographs – [Part 2 of 2]

The post How to Avoid Blurry Photos by Choosing the Right Autofocus Mode by Lynford Morton appeared first on Digital Photography School.


Digital Photography School

 
Comments Off on How to Avoid Blurry Photos by Choosing the Right Autofocus Mode

Posted in Photography


Luxi Makes Manual Mode Easy

07 Apr

Extra photos for bloggers: 1, 2, 3

Don’t let Otto any where near your DSLR! He sorta shoots for an ok exposure … Did we say Otto? We meant Auto. Auto Mode.

Luxi is here to help! This li’l gizmo will turn your iPhone into a light meter, help you master manual mode and banish that “Otto” fool forever.

Luxi makes manual mode easy by measuring the exact light falling onto your subject and telling you just what settings to use.

Luxi’s diffusing dome turns you iPhone into an incident light meter that is more precise than the reflective meter inside your camera and is less spendy than traditional meters.

Learn More About Luxi
$ 30 at the Photojojo Shop


© laurel for Photojojo, 2014. |
Permalink |
No comment |
Add to
del.icio.us

Post tags:


Photojojo

 
Comments Off on Luxi Makes Manual Mode Easy

Posted in Equipment


Olympus patent hints at selective exposure in ‘Live Time’ mode

15 Mar

2014_39116_fig05.png

Earlier this week, Japanese patent blog Egami reported that Olympus has patented a technology that would allow the photographer to selectively adjust exposure of different scene areas during an exposure. This might allow for a more balanced exposure of scenes where cameras might normally struggle. Click through for an explanation of what we think the patent might mean for photographers. 

News: Digital Photography Review (dpreview.com)

 
Comments Off on Olympus patent hints at selective exposure in ‘Live Time’ mode

Posted in Uncategorized


iOS 7.1 brings auto HDR mode to iPhone 5S

11 Mar

4732188980.jpg

Apple has released its first major update to iOS 7. iOS 7.1 brings a host of bug fixes and refinements, including support for Apple’s CarPlay, interface and design improvements and a new Auto HDR mode to the flagship iPhone 5S. Click through to read more at connect.dpreview.com.

News: Digital Photography Review (dpreview.com)

 
Comments Off on iOS 7.1 brings auto HDR mode to iPhone 5S

Posted in Uncategorized


Pentax firmware v1.02 for K-3 allows bracketing by AA filter mode

06 Feb

shared:download-button.png

Pentax has released new firmware for its flagship K-3 DSLR, allowing users to bracket exposures by AA filter simulation mode. As a reminder, the K-3 lacks a physical anti-aliasing filter, but simulates the blurring effect via minute movement of its sensor, with two intensity levels available (three if you include ‘off’). Firmware v1.02 allows you to shoot a burst of sequential images at each AA filter level, to fine-tune the optimal balance between resolution and artifacts like moiré.

News: Digital Photography Review (dpreview.com)

 
Comments Off on Pentax firmware v1.02 for K-3 allows bracketing by AA filter mode

Posted in Uncategorized


Mastering Monochrome Mode

23 Sep

Mastering monochrome mode

Andrew S. Gibson is the author of Mastering Photography: A Beginner’s Guide to Using Digital Cameras, on offer now at Snapndeals for a limited time.

One of the benefits of digital photography that I really appreciate is the ease with which I can convert images to black and white. It was much harder back when I first became interested in photography. I remember wanting to try black and white, and print images in a darkroom, but living in a property with no spare space to build a darkroom meant that it was years before I was able to start learning to print.

Now, black and white is as accessible as switching to your camera’s monochrome mode. Some people still prefer chemical processes, but for the rest of us it means no more darkrooms and no more waiting to process film and make prints. The process is instant. That has opened up black and white photography to many more photographers, which can only be a good thing.

Use Raw

I want to make one thing clear before continuing. You will always get the best results in black and white by using the Raw format and converting your files to black in white in software like Photoshop, Lightroom or a plug-in like Silver Efex Pro 2. But there are still good reasons to switch your camera to monochrome mode for shooting in black and white. Let’s take a look at what they are.

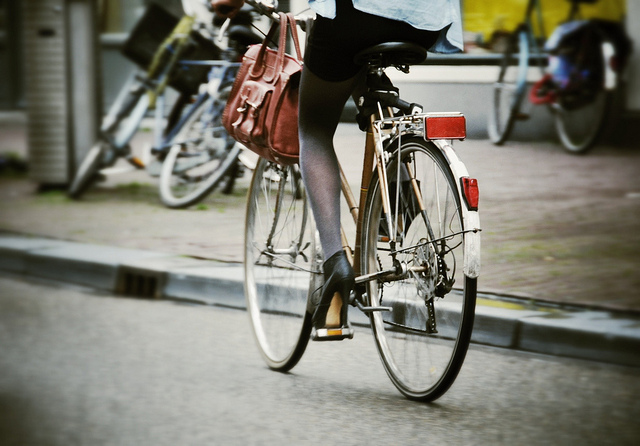
Monochrome mode helps you visualise in black and white.

Mastering monochrome mode

Seeing in black and white is an acquired skill. It takes time to learn how scenes that you are accustomed to viewing in colour translate to black and white.

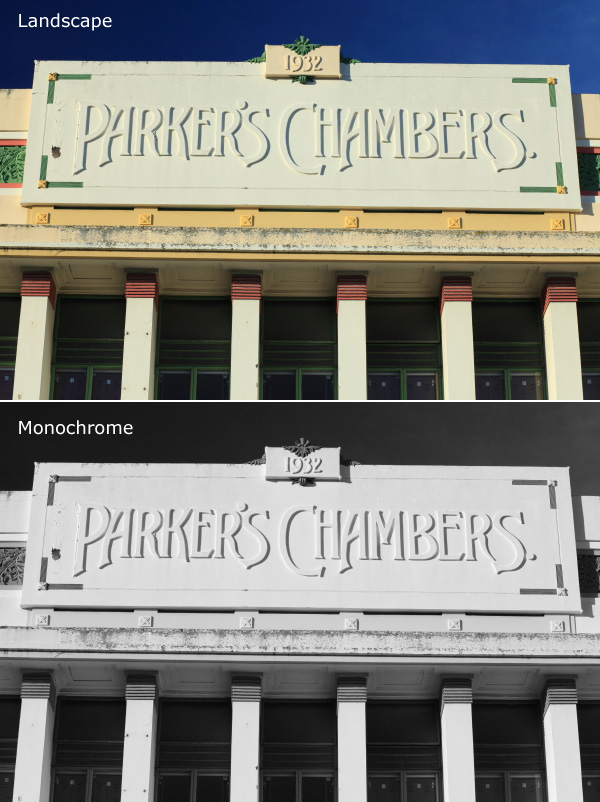
The benefit of switching to monochrome mode is that the camera displays your photos in black and white on the LCD screen. This helps you see how the scene looks in monochrome.

You can take it further by increasing the contrast or changing the colour filter settings (I’ll cover this below if you don’t know how to do this or why).

The photo above is an example. The colour version is what I would see on my camera’s screen if I set the Picture Style to Landscape. Underneath that is what I would see in monochrome mode.

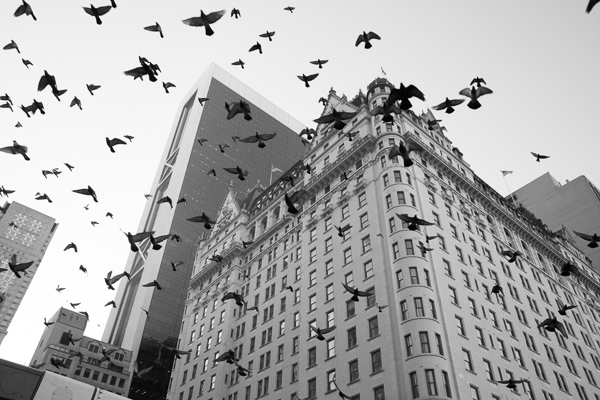
Monochrome mode helps you take better colour photos.

Mastering monochrome mode

Years ago I read an interview with David Muench in which he described his style as ‘black and white photography in colour’. That statement has always stuck with me.

What did he mean by that? Well, the basis of a good black and white image is tonal contrast – the way that light and dark tones are arranged within the composition.

David Muench’s colour photos rely as much on tonal contrast as they would if he were shooting in black and white. Tones are an important building block in the composition of his images even though he is shooting in colour.

That idea has become the basis of much of my colour photography. I believe that strong colour photography utilises tonal contrast as much as good black and white. That’s why using monochrome mode, and learning to see in black and white will make you a stronger photographer in colour too.

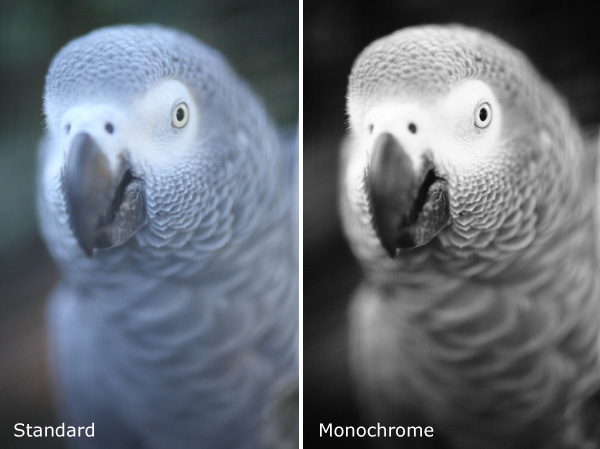
The photo above is a good example of tonal contrast. The two images show how it would look on my camera’s screen in both standard and monochrome Picture Styles. I increased contrast in the monochrome Picture Style as the light was so flat.

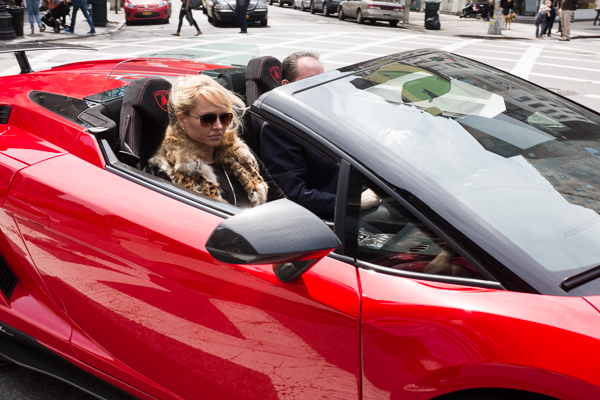
Monochrome mode helps you take better black and white portraits

Mastering monochrome mode

I find that models love to see their photos on the camera’s LCD screen during a shoot. If you want to work in black and white, switching to monochrome mode and showing your model the previews in black and white helps them get an idea of how the processed images will come out. If your model gets excited about the results he or she will work harder to create good images.

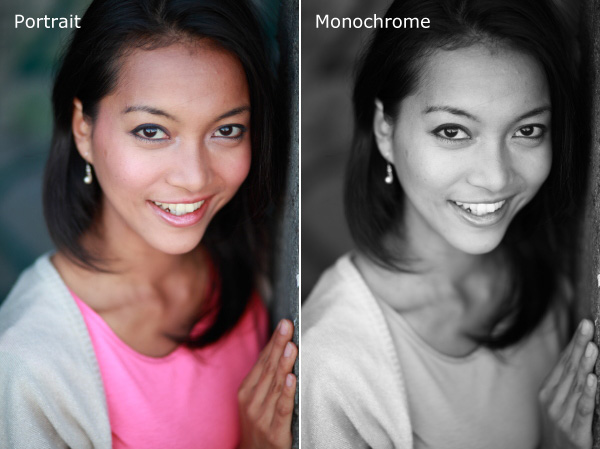
The example here shows the difference between portrait and monochrome Picture Styles (contrast increased in monochrome mode).

Monochrome mode – what you need to know

Every manufacturer approaches this differently, so check your manual, but the basic idea is the same.

These are the settings you are looking for, by manufacturer:

Canon: Picture Style
Nikon: Picture Control
Sony: Creative Style
Pentax: Custom Image
Olympus: Picture Mode
Sigma: Colour Mode
Fujifilm: Film Simulation

Look for the setting labelled Monochrome (or something similar). Once selected, you should also be able to customise it. My Canon EOS cameras have four parameters you can adjust in Monochrome mode:

Mastering monochrome mode

Sharpness

Ignore this if you’re shooting in Raw, as you can adjust sharpness when processing the image. If you’re using JPEG, be careful not to oversharpen – you can increase sharpness in Photoshop if you need to.

Contrast

The biggest concern many photographers have about using monochrome mode is that the photos often tend to look flat and consequently somewhat boring and inspired. That’s because the camera manufacturer would prefer to give you a flat black and white image by default, in order to retain highlight and shadow detail. The assumption is that you will adjust contrast in Photoshop if you need to.

However, increasing contrast in-camera gives you a better preview that can make it much easier to visualise how the scene converts to black and white. Be careful if you’re shooting JPEG, as you won’t be able to pull back any lost shadow or highlight detail in Photoshop.

But if you’re using Raw, you can set the contrast to whatever you want.

One thing to watch out for in Raw: the histogram and highlight alert are generated from the preview you see on the screen. If you increase contrast, your camera may tell you that the highlights are clipped, when the detail is actually there in the Raw file. You more you increase the contrast, the more likely this is to happen.

Filter effect

Before digital, black and white photographers would use coloured filters to alter the tones of their black and white images. Coloured filters make colours corresponding to the colour of the filter lighter, and the opposite colour on the colour wheel go darker.

For example a red filter makes red colours go lighter and blue ones (such as the sky) go darker.

This is how you could use the filters:

Red: Makes blue skies go really dark. Very dramatic, especially if you increase contrast too.

Orange: Makes blue skies go dark, but not as dark as the red filter.

Yellow: Darkens blue skies a little. Also lightens skin tones, and can be good for portraits.

Green: Makes anything green lighter. Often used to lift photos containing a lot of things that are green, such as grass or vegetation.

Mastering monochrome mode

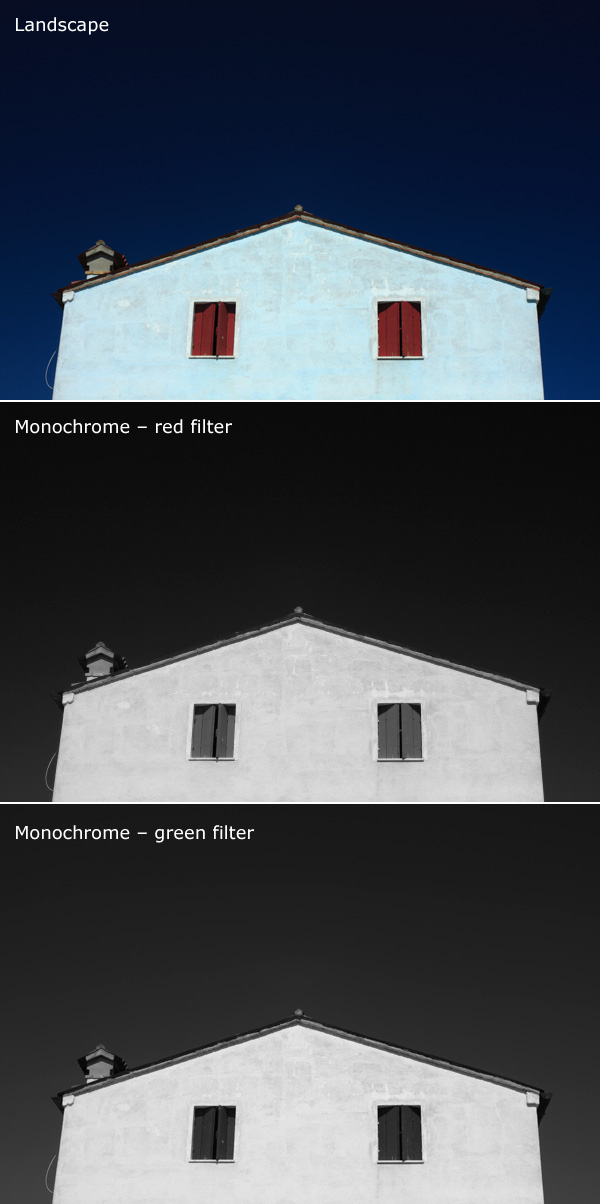
Here’s an example to help you see the effect of using coloured filters. The differences are subtle, but you will see that the sky is darker and the shutters are lighter in the version with the red filter..

Again, if you’re using JPEG select your colour filter carefully, as you can’t change it in post-processing. In Raw it doesn’t really matter, just choose the filter, if any, that gives you a good preview. You can apply any filter setting you want when you process the image.

Toning effect

On my EOS cameras the toning effects are a bit too strong to be effective. Regardless of whether you are using JPEG or Raw you can tone your photos much more efficiently in post-processing anyway. It’s probably best to leave this setting alone.

Raw vs. JPEG

Remember, if you use monochrome mode with JPEG files you will get what you see on the LCD screen – black and white images with whatever sharpening, contrast and filter effect settings you used. That may suit some photographers but I really suggest that you use Raw. That way you have a full colour image that you can process any way you like, including converting to black and white with software that gives a much better result than your camera possibly could.

Mastering Photography

Mastering monochrome mode

My latest ebook, Mastering Photography: A Beginner’s Guide to Using Digital Cameras introduces you to digital photography and helps you get the most out of your camera. It covers concepts such as lighting and composition as well as the camera settings you need to master to take photos like the ones in this article. It’s available now at Snapndeals for a special price for a limited period.

Post originally from: Digital Photography Tips.

Check out our more Photography Tips at Photography Tips for Beginners, Portrait Photography Tips and Wedding Photography Tips.

Mastering Monochrome Mode


Digital Photography School

 
Comments Off on Mastering Monochrome Mode

Posted in Photography