RSS
 

Posts Tagged ‘mode’

Ricoh adds Mermaid mode and deeper dive to Japan-only WG-40 and WG-40W

29 Sep

Ricoh has introduced a pair of underwater cameras to its WG range that feature enhanced color control for still and movie photographers. The Ricoh WG-40 and WG-40W, which are being released only in Japan at the moment, are very much like the current Ricoh WG-30 and WG-30G models, but offer a new Mermaid mode that boosts contrast and reds when used underwater. Read more

Articles: Digital Photography Review (dpreview.com)

 
Comments Off on Ricoh adds Mermaid mode and deeper dive to Japan-only WG-40 and WG-40W

Posted in Uncategorized


A Beginner’s Guide to Choosing Shooting Mode

22 Sep

Even the most seasoned veteran photographer may use a pre-programmed mode occasionally in order to concentrate immediately on a shot rather than take the time to calculate exposure and miss the opportunity for the great image. But if you are a beginner at photography or want to advance your photography skills beyond the use of Auto mode, begin by adventuring away from the green box.

When you are setting up your camera to capture an image, there are four basic results to consider: wide depth of field, shallow depth of field, motion blur or freeze motion. How do you know which mode to use to control these basics of photography? Let’s take a look.

Nikon-Canon-mode-dail

Auto (Green box)

In Auto mode, your camera will automatically set the shutter, aperture, ISO, white balance, and even the pop-up flash for you.

Advantages: This is a great option for beginners with a digital camera – but don’t become dependent on it! Only use it until you learn to take control of your camera.

Disadvantages: In certain lighting conditions the auto settings may produce undesirable images. For instance, a portrait that is heavily back-lit might just produce a silhouette. In low-light, you may end up with blurry and grainy images; also in low-light, the camera may choose to fire the flash to give more light and many camera models don’t provide a way to disable the flash if you don’t want it.

When to use: Any time you want to use your camera just as a point and shoot camera, this is your mode.

This portrait was intentional shot into the sun in Auto Mode. While the camera did a decent job with exposure, it might be a 1/2 stop under exposed. Auto exposure settings choose by the camera are 1/250th of a second at f/6.3 with ISO of 100. while the shutter speed and ISO are good, a wider aperture would have lessened the DOF and made the background less distracting.

This portrait was an intentional shot into the sun in Auto mode. While the camera did a decent job with exposure, it is a 1/2 stop under-exposed. The auto exposure settings chosen  are 1/250th of a second at f/6.3 with ISO of 100. While the shutter speed and ISO are acceptable, a wider aperture would have lessened the DOF and made the background less distracting.

Program (P)

In Program mode, your camera will automatically set the shutter speed and aperture, but will allow you to choose ISO, white balance, exposure compensation and flash options.

Advantages: This is a great next step for a beginner who wants to take a little more control of their camera and improve their images.

Disadvantages: As in Auto mode, certain lighting conditions may lead to unpredictable results, due to the partial automatic settings which leave some results to chance.

When to use: Use this mode if you want to take a good first step to ultimately taking complete control of your camera’s options.

Shutter Priority (TV – Canon) (S – Nikon)

In Shutter Priority mode, you select the shutter speed and ISO and the camera will automatically choose the proper f-stop for what it determines to be the correct exposure.

Advantages: Great for controlling freeze action and motion blurring of moving objects.

Disadvantages: In this mode you have control of your shutter speed, so you must be careful that your camera can choose an f-stop to give you a proper exposure. The type of lens you have available to use comes into play here. Most cameras can shoot at a very fast shutter speeds, but if your lens doesn’t have a large enough aperture to match that shutter speed the resulting image will be under-exposed.  For example, if you are shooting with a shutter speed of 1/4000th of a second, and the proper exposure for the speed of the subject requires an f-stop of f/2.8, but the widest opening on your lens is f/3.5, the image will be under-exposed.

When to use: Use this mode when you want to control the motion of the object you are photographing. Use a fast shutter speed if you want to freeze the motion or use a slow shutter speed if you want to blur the motion. This mode is also useful when using large mm lenses where you need to set a fast shutter speed to avoid blurred images due to camera shake.

Choosing shutter priority and setting shutter to 1/8th of a second to blur the water.

Shutter priority with a shutter to 1/8th of a second was used to blur the fast moving water.

Here are some suggested shutter speeds for Shutter Priority:

  • Freeze very fast motion – 1/3000th of a second
  • Athletes in motion – 1/500th to 1/1000th of a second
  • Birds in flight – 1/1000th to 1/2000th of a second
  • People walking – 1/250th of a second
  • Panning moving objects – 1/30th to 125th of a second
  • Blurring fast moving water – 1/8th of a second
  • Blurring slow moving water – 1/2 to 1 secondshutter

Aperture Priority (AV – Canon) (A – Nikon)

In Aperture Priority mode, you select the aperture and ISO and the camera will automatically choose the proper shutter speed for what it determines to be the correct exposure.

Advantages: Other than Manual mode (next paragraph), Aperture Priority is the most popular shooting mode photographers use, mainly because it controls what is in focus in your image. And in most cases the item you have in focus is the element that will make or break the success of your image.

Disadvantages: In low-light situations your camera may choose a very slow shutter speed that will produce a blurry image, either because of movement by the subject or camera shake.

When to use: Use this mode when you want to control the Depth of Field (DOF) of your image. The larger the aperture the more light reaches your camera’s sensor and the shallower the DOF. Reversely, the smaller the aperture the less light reaches your camera sensor and the deeper the DOF. Beware that changing your aperture will also affect your shutter speed. More light from large apertures requires a faster shutter speed and less light from small apertures requires a slower shutter speed.

Using Aperture Priority to set a larger aperture to increase DOF

Aperture Priority to set a larger aperture to increase DOF.

Here are some suggested f-stops for Aperture Priority:

  • Landscapes -f/8 or higher for more DOF
  • Portraits – Large aperture  (f/2.8) for shallow DOF to blur the background
  • Macro – f/8 or higher for more DOFaperture

Manual (M)

Manual mode allows you to change both the shutter speed and aperture settings independently from each other. No settings will be automatically set by the camera. Your camera’s built-in light meter will guide you on the exposure it determines to be correct, but you have complete control to adjust the shutter and aperture separately to get the exposure you determine to be correct for the image you are creating. Before you use the manual mode it is recommended that you have an understanding of the exposure triangle (shutter speed, aperture and ISO) and how each will affect your final image.

Advantages: This mode gives you complete creative control of the image you are capturing.

Disadvantages: While this mode has many creative advantages, you must be careful to always check the exposure with every image, especially when shooting in fast changing lighting conditions.

When to use: After you have learned to use this mode and learned the effects and results of the settings and how they work together, you will use this mode almost every time.

Here Manual mode was used to control the DOF and to use a slow shutter speed to blur the waterfalls.

In Manual mode, a small aperture was used to control the DOF while also setting a slow shutter speed to blur the motion of the waterfall.

Scene Modes

Scene mode is very similar to Auto mode. You choose the scene you are shooting and the camera will choose settings for you optimized for that scenario. Different camera models may have different scene modes, but listed here are some of the most popular:

  • Sports – Camera will increase ISO and use a fast shutter speed to capture fast action.
  • Landscape – Camera will use a small aperture to maximize the DOF; flash may also be disabled.
  • Portrait – Camera will use a large aperture to  throw the background out of focus. Some models of cameras will also use face recognition in this mode.
  • Macro – Camera will choose small aperture to give as much DOF as possible.

Advantages: As with the Program mode, these Scene modes are a beneficial starting point for beginners and will often give a better result than shooting in Auto mode.

Disadvantages: While these settings can produce desirable images at times, the results may vary and will not be reliable.

When to use: While these scene modes may be a step up from Auto mode for beginners, use these options as a starting point to learn your camera, understand its workings, and upgrade your photography skills.

Aperture-Shutter


So which mode is the best?

It is completely up to you which mode you feel most comfortable using. But if you are using the Auto, Scene or Program modes and you want to improve your photography, learning how to set exposures using the exposure triangle of shutter, aperture and ISO will help you make the best possible choices to create better images.  The two most popular modes used by professional photographers are Manual and Aperture Priority. Remember, professionals were once beginners too. Enjoy your camera experiences, no matter which mode you choose!

googletag.cmd.push(function() {
tablet_slots.push( googletag.defineSlot( “/1005424/_dPSv4_tab-all-article-bottom_(300×250)”, [300, 250], “pb-ad-78623” ).addService( googletag.pubads() ) ); } );

googletag.cmd.push(function() {
mobile_slots.push( googletag.defineSlot( “/1005424/_dPSv4_mob-all-article-bottom_(300×250)”, [300, 250], “pb-ad-78158” ).addService( googletag.pubads() ) ); } );

The post A Beginner’s Guide to Choosing Shooting Mode by Bruce Wunderlich appeared first on Digital Photography School.


Digital Photography School

 
Comments Off on A Beginner’s Guide to Choosing Shooting Mode

Posted in Photography


Bye Bye Big Brother: Airplane Mode House Severs Signals

03 Sep

[ By Steph in Conceptual & Futuristic & Technology. ]

ram house 1

The curtain of the future might filter out not just light and prying eyes but also electronic signals to give us peace and privacy of another kind. The RAM House by Genoa-based design research collaborative Space Caviar ironically looks a bit like a cage, as if you have to put yourself in time-out in order to escape from all of the texts, emails, app notifications and other distractions of modern life, but the idea of a space with an automatic ‘off switch’ is an intriguing one.

ram house 2

We’ve reached the point where the gaze of passersby is not nearly so much a privacy concern as the surveillance we’re under inside our own homes with all of the curtains closed, the designers note. “As the space of the home becomes saturated by ‘smart’ devices capable of monitoring their surroundings, the role of the domestic envelope as a shield from an external gaze becomes irrelevant: it is the home that is observing us.”

ram house 4

“The RAM House responds to this near-future scenario by proposing a space of selective electromagnetic autonomy. Wi-Fi, cellphone and other radio signals are filtered within the space’s core by various movable shields of radar-absorbent material (RAM) and faraday meshing, preventing signals from entering and – more importantly – exiting. Just as a curtain can be drawn to visual expose the domestic interior of a traditional home, panels can be slid open to allow radio waves to enter and exit, when so desired.”

ram house 3

The house itself is ultra-compact, with cabinet modules on sliding rails offering access to the office, kitchen, library and bathroom functions. When fully collapsed, the cabinets form a solid electronically shielded unit. Once you open them you allow signal traffic to flow.

ram house 6

It’s kind of frightening to think about just how exposed we are within our supposedly private spaces thanks to technology – convenience comes at a cost, and smart homes learn just about all their is to know about their occupants in order to best serve them. The RAM House is like the proverbial hut in the woods to which we can retire when we want to truly escape, while enabling us to rejoin the modern world at the flip of a switch.

Share on Facebook


[ By Steph in Conceptual & Futuristic & Technology. ]

[ WebUrbanist | Archives | Galleries | Privacy | TOS ]


WebUrbanist

 
Comments Off on Bye Bye Big Brother: Airplane Mode House Severs Signals

Posted in Creativity


Your Guide to Understanding Program Mode on Your Camera

03 Jun

Almost every DSLR or Mirrorless camera has a mode dial with a variety of letters and icons on it, some of which might seem cryptic or confusing. Usually you’ll find a green icon for Full Auto mode (usually a green A or rectangle), Full Manual mode (M), as well as Aperture Priority (A or Av) and Shutter Priority (S or Tv). Your camera might also feature scene modes such as portrait, night, or macro, and even some user-configurable modes indicated with a U1 or U2 (or C1/C2, etc.).

Somewhere on that dial is a letter that’s often left neglected, and unused by many people, even though it can be quite powerful – Program Auto (P). In my experience most people don’t use it because they don’t understand it. Is it Auto? Is it Manual? What can it do that the other modes can’t? The answer is a bit strange at first, but once you wrap your head around what the humble little P mode can do, you might find yourself using it much more than you thought.

DSC_2475

The camera mode dial operates on somewhat of a continuum. On one end you have Full Manual mode, which gives you complete control over the three elements of exposure: shutter speed, lens aperture, and ISO sensitivity. On the other end you have Full Auto mode which gives you almost no control over exposure except whether the flash turns on or not (and on some cameras, not even that much). On most cameras Full Auto will not even let you choose basic parameters like white balance and focus mode, which is fine if you just want to shoot some pictures and not worry about all the technical aspects of photography.

The other modes exist in the middle of the spectrum and give you some degree of control, while your camera handles the rest. For instance, in Aperture Priority you control the aperture and ISO, and let your camera figure out what shutter speed to use for a good overall exposure. In Shutter Priority things are reversed; you control the shutter speed and ISO, while your camera figures out what aperture to use.

program-auto-diagram

Program mode exists on the same continuum somewhere between Aperture/Shutter Priority and Full Automatic. When you initially put your camera in P mode you might notice that things look similar to Full Auto; your camera sets the aperture and shutter speed in order to get a proper exposure. One benefit you might not immediately realize is that you can set the ISO which will then remain unchanged by the camera. This is quite useful in situations where you want to intentionally use a lower ISO, such as outdoors or in bright light, or a high ISO when things are a bit darker and you prefer to not activate the flash. If nothing else, think of the Program Auto mode as an ISO Priority mode; you set the ISO and your camera figures out the shutter speed and the aperture. If that’s all you want to do, you’re set. Change the ISO (or not) and worry only about composing and framing your shots, then let your camera figure out the rest.

DSC_2624

Program Auto gave me a well-exposed picture but the result was not what I was hoping for. I wanted a smoother look for the fountain…

fountain-motion-blur

…so I quickly adjusted my shutter speed to 1/20 using the dial on my camera. Program mode kept a nice exposure while giving me the motion blur I was looking for.

If you’re willing to dig a little deeper you will find many more useful features to unlock in Program mode – far more than just giving you the ability to control the ISO. It’s kind of like the familiar Auto mode on steroids. There are many options available to you in Program that you won’t get in Full Auto, and many of these can help you get the shot you want, instead of the shot your camera thinks you want. However, as you start changing settings your camera will do its best to maintain a proper exposure. In this way Program is like the late-night infomercial version of Auto; it handles all the nitty-gritty complicated stuff for you…but wait, there’s more!

For example: if you are using Program mode while taking pictures at an indoor birthday party you can set a high ISO so you don’t need to use the flash, and your camera will choose a combination of aperture and shutter speed to get a properly-exposed photo. You can then rotate the command dial (on some cameras it might be pressing a button) to change these values if you decide you want a wider aperture or slower shutter. Essentially your camera says “Here’s what I think will be good,” and then you take over and say “Thanks bro, I’ll take it from here” as you shift the values of your shutter and aperture using the dial on your camera.

I shot this using Program Auto mode which was a great way to tweak my exposure settings on the fly with very little time to waste.

I shot this using Program Auto mode which was a great way to tweak my exposure settings on the fly with very little time to waste.

Or you might be outdoors doing some nature photography but aren’t quite sure what settings to use. So, you put your camera in Program and set the ISO to 100 in order to get as little noise as possible. Soon you might notice that your camera has selected a small aperture, and you’d like to get a bit of background blur so you quickly rotate the dial on your camera until your aperture is much wider. Your camera then automatically adjusts the shutter speed accordingly, in order to maintain a good exposure.

You can also set parameters within Program like white balance, metering mode (full/center/spot), select which focus point to use, and even tell your camera to use the flash or not. Contrast this to the Full Auto mode and you start to see the usefulness of the humble little P marker on your camera’s mode dial. At this point you might be wondering why you would want to use Program Auto instead of Aperture or Shutter Priority because those will also allow you to set the ISO, aperture, and shutter speed. Program Auto sort of functions like the best of all worlds: you can change various options if you want to, or you can just leave everything alone and let your camera figure it all out.

DSC_2641

Shooting in Program mode gave me a good overall exposure but I was not happy with the results…

microphone-spot-meter

…so I switched to spot metering, re-took the shot, and got what I wanted. Program allows for this flexibility, whereas Full Auto does not.

I must admit that even though Program mode can be quite useful I spend most of my time in Shutter or Aperture Priority along with Manual. For me Program is great to have in a pinch, but I generally prefer to make more of the decisions when shooting, instead of having my camera do the heavy lifting.

Still, it’s good to be aware of what it is, and what it can do, in case you find yourself in a situation where you don’t want to give up all control to your camera but also don’t want to do everything yourself. What’s your preferred method of shooting, and what do you like (or dislike) about using the Program Auto mode? Leave your thoughts in the comment section below.

googletag.cmd.push(function() {
tablet_slots.push( googletag.defineSlot( “/1005424/_dPSv4_tab-all-article-bottom_(300×250)”, [300, 250], “pb-ad-78623” ).addService( googletag.pubads() ) ); } );

googletag.cmd.push(function() {
mobile_slots.push( googletag.defineSlot( “/1005424/_dPSv4_mob-all-article-bottom_(300×250)”, [300, 250], “pb-ad-78158” ).addService( googletag.pubads() ) ); } );

The post Your Guide to Understanding Program Mode on Your Camera by Simon Ringsmuth appeared first on Digital Photography School.


Digital Photography School

 
Comments Off on Your Guide to Understanding Program Mode on Your Camera

Posted in Photography


Apple patent hints at super resolution camera mode

24 Apr

Olympus and Pentax have introduced cameras with sensor-shift-driven resolution modes designed to maximize the amount of information collected by their sensors. Apple has also patented a similar system, using an optical image stabilization system to create and combine multiple exposures into a higher resolution image. Read more

Articles: Digital Photography Review (dpreview.com)

 
Comments Off on Apple patent hints at super resolution camera mode

Posted in Uncategorized


Ricoh unveils Pentax K-3 II with Pixel Shift Resolution mode

23 Apr

Ricoh has just launched the Pentax K-3 II semi-pro DSLR with an improved image stabilization system that drives a new Pixel Shift Resolution feature. Retaining its predecessor’s 24MP sensor, 27-point AF system, and durable construction, the K-3 II now offers sensor-shift IS with a claimed 4.5 stops of shake reduction. Read more

Articles: Digital Photography Review (dpreview.com)

 
Comments Off on Ricoh unveils Pentax K-3 II with Pixel Shift Resolution mode

Posted in Uncategorized


Olympus announces OM-D E-M5 II with 40MP high resolution mode

05 Feb

Olympus has unveiled the OM-D E-M5 II. Picking up where its successor left off, the E-M5 II continues to offer weather sealing and 5-axis IS while adding a redesigned 16MP Four Thirds sensor and 5-axis image stabilization. The E-M5 II also boasts a 40MP high resolution shot mode, achieved by shifting the sensor in half-pixel steps and capturing eight images over a period of one second. Read more

Articles: Digital Photography Review (dpreview.com)

 
Comments Off on Olympus announces OM-D E-M5 II with 40MP high resolution mode

Posted in Uncategorized


dPS is Going into Holiday Mode

26 Dec
Wbeem

By wbeem

If you are like many of us on the dPS team you may be traveling somewhere for either Christmas or New Year’s or both. I am personally heading up north a bit to a small town called Jiquilillo here in Nicaragua. It’s a fishing village and we expect to see lots of fireworks on the beach and drink a few beverages.

Travel safe if you are taking a journey. Or if you’re sitting at home wondering what to do with your time, we’ll be taking a bit of a break or our regular article schedule. It will go like this:

From now until New Years – the best of dPS 2014

I’ll be digging through the year’s worth of articles and finding the best of the best for you. Starting off tomorrow with the hottest landscape articles of 2014 (which ones you guys liked the most) I’ll have a new topic each day with several articles for you to read or review.

Starting off 2015 – getting back into the groove slowly

After the fireworks have long since subsided we’ll get back to our regular schedule of two articles a day on January 3rd (Australia time). For the first couple days you’ll see the wrap-up of the best of series and just one post per day.

Relax, reflect and recharge

Take some time off to do the three R’s: relax, reflect on the past year, and recharge your batteries ready to the next one. It’s going to be a good one so let’s make sure we’re ready for it and firing on all cylinders. See you on the flip side (dare I date myself)!

Paul Mullett

By Paul Mullett

Sonny Abesamis

By Sonny Abesamis

googletag.cmd.push(function() {
tablet_slots.push( googletag.defineSlot( “/1005424/_dPSv4_tab-all-article-bottom_(300×250)”, [300, 250], “pb-ad-78623” ).addService( googletag.pubads() ) ); } );

googletag.cmd.push(function() {
mobile_slots.push( googletag.defineSlot( “/1005424/_dPSv4_mob-all-article-bottom_(300×250)”, [300, 250], “pb-ad-78158” ).addService( googletag.pubads() ) ); } );

The post dPS is Going into Holiday Mode by Darlene Hildebrandt appeared first on Digital Photography School.


Digital Photography School

 
Comments Off on dPS is Going into Holiday Mode

Posted in Photography


How to Learn Your Camera’s Light Meter and Master Manual Mode

23 Dec

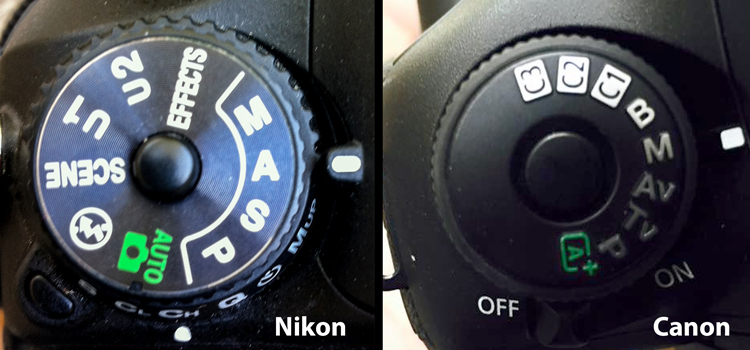
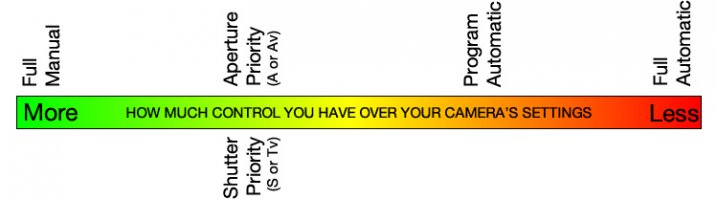
Most cameras have a few different shooting modes such as Automatic, Aperture Priority (A or Av), Shutter Priority (S or Tv), and Program. It’s not uncommon for people to take a majority of their photos in Automatic mode since it generally does a good job of getting decent results, though more advanced photographers will often use Aperture or Shutter Priority. Shooting in Manual, however, might seem intimidating and highly complex but once you understand a few basics it starts to make a lot more sense. Certainly you should have a working understanding of the three components of the exposure triangle: shutter, aperture, and ISO.

But in order to get the most out of your camera you will need to know how to use a simple, but incredibly powerful, tool that functions as the glue that binds everything together: the light meter.

purple-flowers

Nestled quietly at the bottom of your camera’s viewfinder or Live View display is a small block of lines or bullets accompanied by a few numbers. You might also have noticed a little triangle moving back and forth, or some vertical hash marks appearing and disappearing from time to time, in a fashion that seems nonsensical or completely random. If these numbers and symbols make no sense at all, don’t worry, you are not alone. It can be a bit confusing to understand the light meter at first. But once you get the fundamentals you will probably find yourself growing much more confident in understanding how photography works. Maybe you’ll even venture out of Automatic and into Manual for the sheer amount of control you are able to have over your photos.

Before I get into the nitty gritty of the light meter itself, I want you to take a look at it in relation to the other data shown in your camera’s viewfinder. Note that this diagram is highly simplified and your viewfinder might look slightly different, or include other information, but all cameras (except some point-and-shoots) include the elements shown here.

light-meter-master

In this example the camera’s shutter is set at 1/90 of a second, the lens aperture is f/4.8, and the ISO is 400. The light meter is a readout that shows whether these values are going to result in a photo that is properly exposed – that is, a photo that is neither too light or too dark. The small triangle hovering over the zero in the light meter shows that the exposure is correct, and when the shutter button is pressed the picture will look fine.  But, I’ll show you a few pictures to see what happens as the camera’s exposure settings are changed. If you want to try this yourself you will need to have your camera in Manual mode, and I would recommend reading the rest of this article with your camera at your side so you can do a bit of experimenting on your own.

For my first shot, I’ll show you a photo that is underexposed and then illustrate how the camera settings can be adjusted to get the proper exposure. The values shown on these images are exactly what I used in my camera to get these shots, and nothing has been edited or retouched in Photoshop.

landscape-under

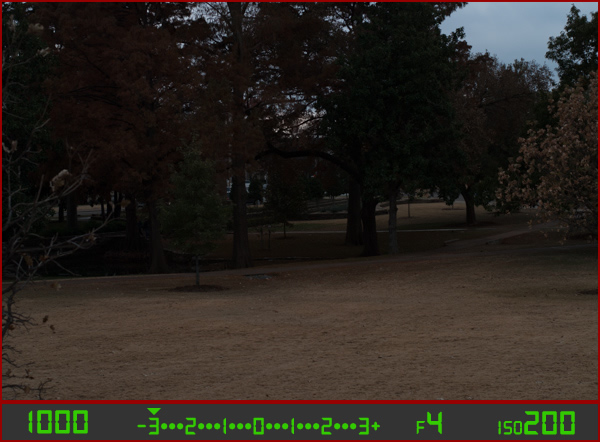
Here you can see that the shutter speed is 1/1000 of a second, the aperture of the lens is f/4, and the ISO is 200. The camera’s viewfinder displays this information along with the light meter, and note how the triangle has moved all the way over to -3 EV. (EV stands for Exposure Value, and technically this image is underexposed by three stops. Don’t worry about the technical jargon though! For now just follow along with the examples to see what happens when the exposure values are altered.

To get a properly exposed photo you are essentially trying to re-create what your eye already sees, but right now the light meter tells us that the photo will be way too dark. And indeed, the resulting photo turned out just how the light meter predicted: it’s so dark it looks like it was taken at night instead of mid-afternoon.

So what can be done to fix this? By adjusting the aperture, shutter, or ISO you can change the exposure settings with the goal of getting that little triangle to hover above the zero. Watch what happens when I change the shutter speed but I leave the aperture and ISO fixed at their present values:

landscape-over

By altering the shutter speed from 1/1000 of a second to 1/15 of a second, the photo is now too bright – exactly as the light meter said it would. It is overexposed by three stops, and the image is virtually unusable. Because the viewfinder itself does not change as the aperture, shutter, and ISO are adjusted, you have to rely on your light meter to tell you how bright or dark the image will be. And sure enough, the triangle is hovering above the +3, which tells us the photo will be too bright. Here is what a properly exposed photo looks like.

landscape-correct

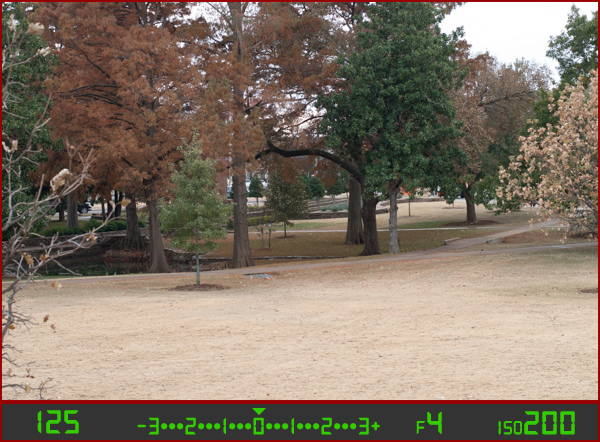
Finally, a good picture! By adjusting the shutter speed to 1/125 of a second, I was able to get the triangle to hover above the zero, which means the photo would be properly exposed. Note that there is no one correct way to do this, and a proper exposure could have also been obtained by changing the aperture or ISO instead of the shutter speed, or a combination of all three. For instance, I could have left the shutter at 1/1000 and increased the ISO to get the same result.

Why bother with all this?

At this point you might be wondering why you would want to go to all this trouble when you can put your camera in Automatic mode and it will just take care of everything. The answer lies in the fact that you, not your camera, know exactly what kind of photo you want to take. Your camera does not know whether you are shooting landscapes, portraits, sports, starry nights, kids, pets, or anything else. All it sees is how much light is coming in, and it tries to adjust the shutter, aperture, and ISO to get that triangle to hover above the zero. But if you know how to control those values yourself, you can open up vast new areas of photographic creativity that Automatic mode can never do for you.

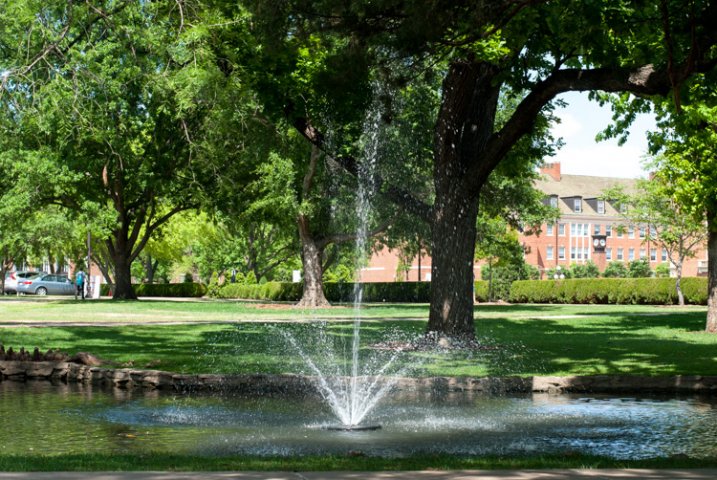
As another example, here is a picture of some berries, but again notice how it is underexposed by three stops.

berries-underesposed

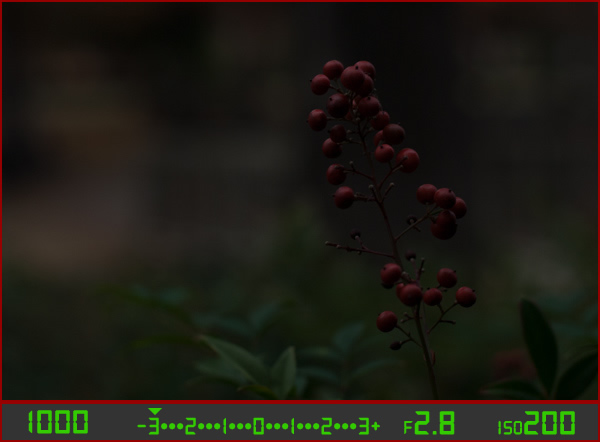
There are several settings I could adjust in order to fix this, or I could just put the camera in Automatic mode. The problem with Automatic in this case is the camera does not know that I am looking at berries. It just sees light, and would attempt to adjust the shutter, aperture, and ISO to get a proper exposure even though it might not end up with the exact type of picture I want to take.

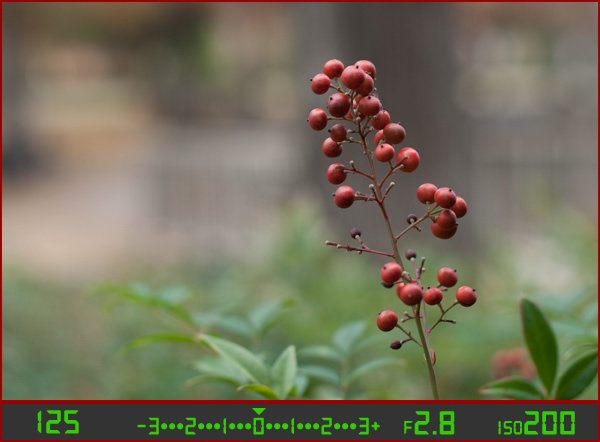
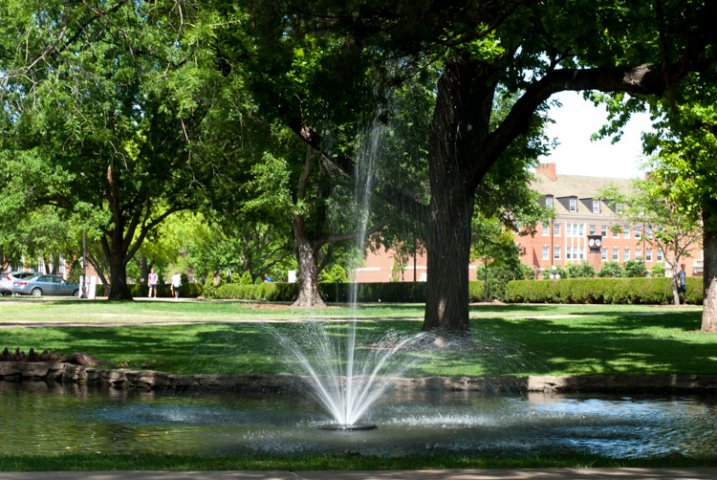
Because I shot in manual using the light meter as my guide I was able to get precisely the shot I was looking for. I knew that I wanted a shallow depth of field, which meant I should use a large aperture of f/2.8. I knew that an aperture of f/1.8 would be too wide for my taste, and a smaller value like f/4 or f/8 would not give me the nice blurry background I was hoping for. By leaving the aperture at f/2.8 and changing the shutter speed I got a properly exposed photo with a nice smooth background as you can see here:

berries-correct

But what if I had changed the other values instead? Look what happened when I left the aperture and shutter at their original values from the underexposed photo (f/2.8 and 1/1000), and raised the ISO instead:

berries-correct-high-ISO

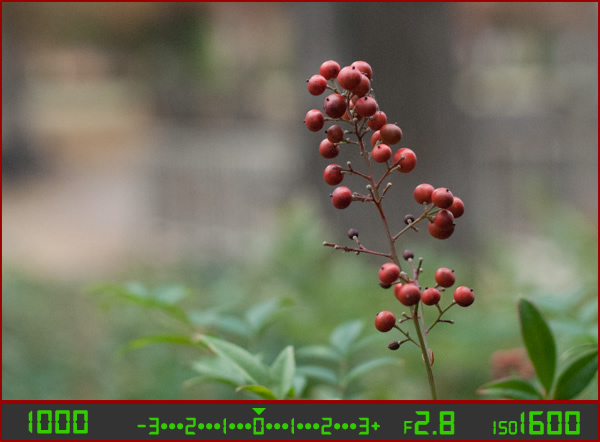
The end result is almost the same: a properly exposed photo (just like our light meter told us it would be, with the triangle hovering above the zero), but this image has much more noise and grain than the previous one. Notice how the tree in the background just behind the berries looks speckled and grainy instead of silky smooth, which is what usually happens at high ISO values. Thus, raising the ISO might not be the best way to get the image I want even though the photo itself is properly exposed.

So what about changing the aperture instead?

berries-correct-small-aperture

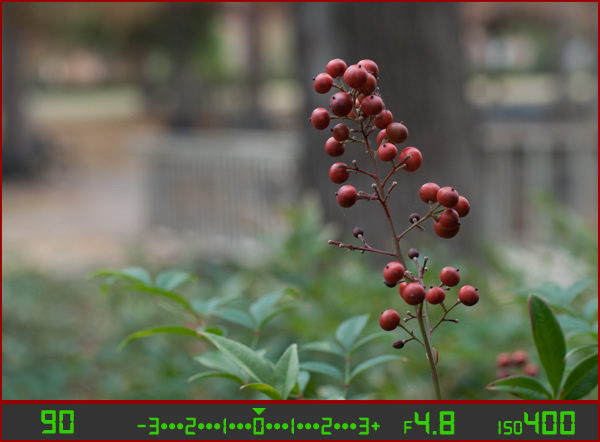
Once again the result is a photo that is properly exposed, but the depth of field is much wider – see how the background is not quite as smooth and blurry as before? Also, because the aperture was smaller I had to leave the shutter open longer at 1/90 of a second and even raise the ISO a bit in order to maintain a proper exposure.

Get the exact shot you envision

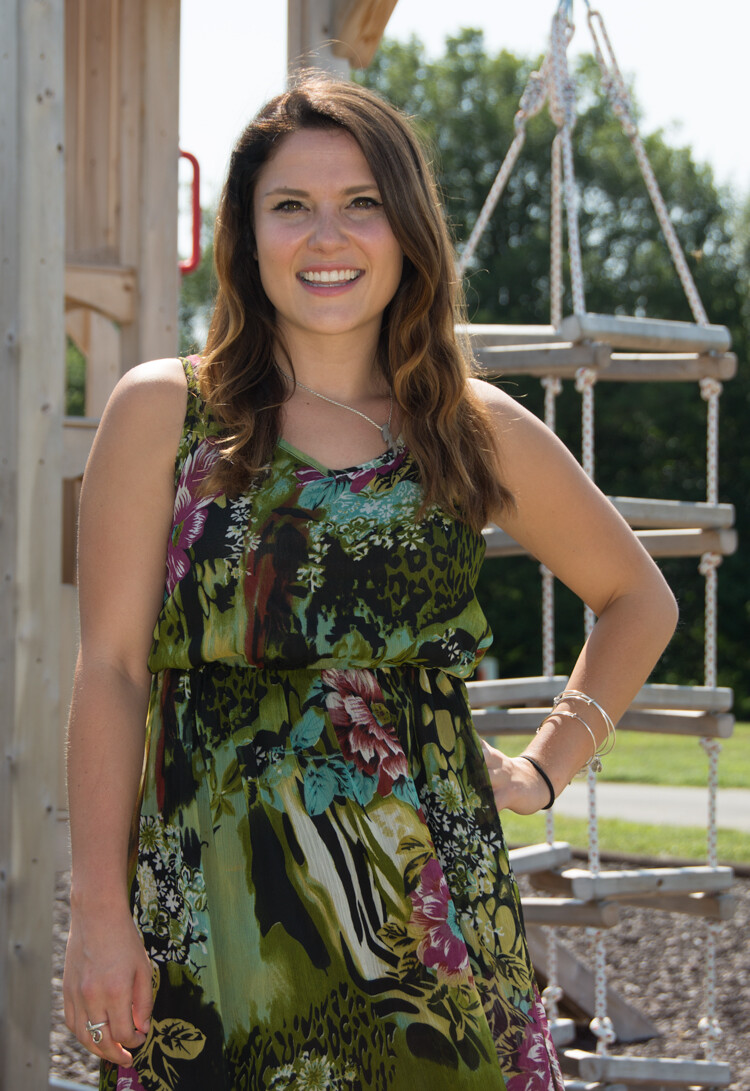
Shooting in manual and using the light meter as your guide is a good way to ensure that the image you see in your mind is exactly what you end up with when you click the shutter. If you are shooting fast-moving subjects like cars or sports, you would want to start with a fast shutter speed and adjust the other settings until you get that little triangle to hover above the zero. If you are taking portraits and want a shallow depth of field with nice blurry backgrounds, keep the aperture wide and change the shutter and ISO until the exposure is correct. It’s all about giving control back to you, the photographer, instead of letting your camera make the creative decisions for you.

construction-lights

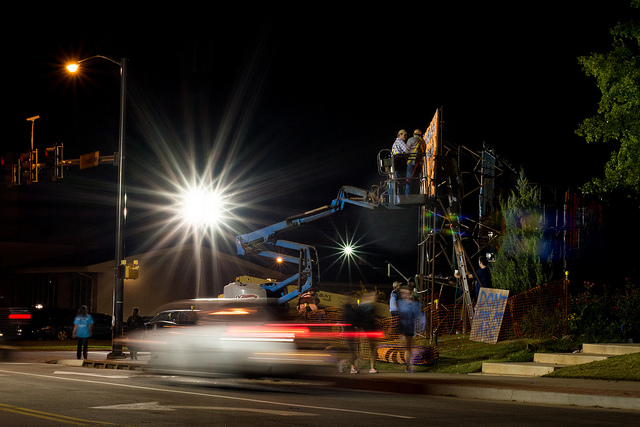
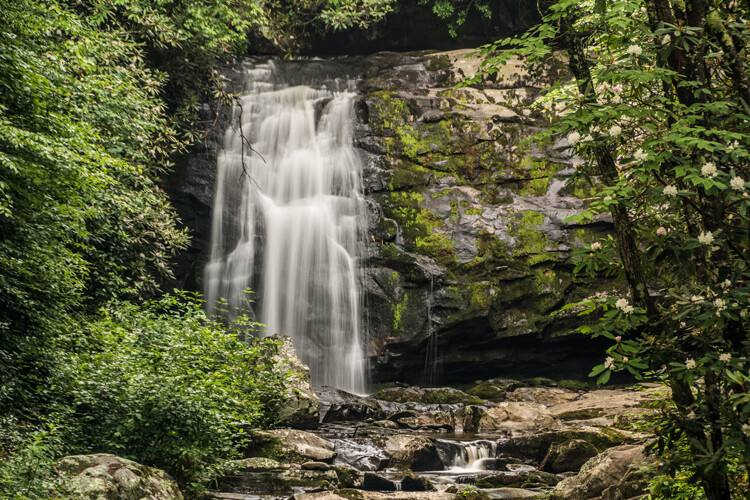
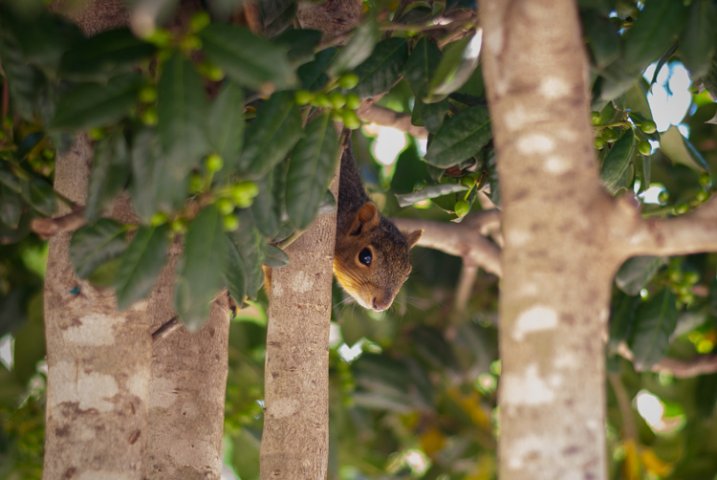
Shooting in manual was the only way to capture this photo. By reading the light meter while carefully adjusting my exposure settings I got precisely the shot I was aiming for. Camera settings: f/16, 1/3 second, ISO 800

Understanding the basics of the light meter is really just scratching the surface, though. Additional settings like your camera’s metering mode and the Exposure Lock function are even more tools you can use to take control over your photography and unlock your true artistic potential. Using manual mode and reading the light meter might seem like a complicated way to take photos, but remember that you know better than your camera what kind of picture you want to take. Once you know how to read your light meter and adjust your camera’s settings accordingly, you can open up a whole new world of creativity that has been right in front of you just waiting to be discovered.

Practice time

So now it’s your turn: grab your camera, put it in Manual mode, and hold the viewfinder up to your eye. Now start changing the aperture, shutter, and ISO values and watch what happens to the light meter. Is your image going to be overexposed? Lower the ISO, raise your shutter, tighten the aperture, or try a combination of all three. Is your image going to be underexposed? Do the exact opposite. The more practice you get, the easier it will be and soon you will feel much more comfortable shooting in a mode that might have seemed hopelessly confusing before.

Do you shoot in manual? If so, how did you get yourself off Automatic mode? Or do you actually prefer Automatic? Share your thoughts and experiences in the comments below.

googletag.cmd.push(function() {
tablet_slots.push( googletag.defineSlot( “/1005424/_dPSv4_tab-all-article-bottom_(300×250)”, [300, 250], “pb-ad-78623” ).addService( googletag.pubads() ) ); } );

googletag.cmd.push(function() {
mobile_slots.push( googletag.defineSlot( “/1005424/_dPSv4_mob-all-article-bottom_(300×250)”, [300, 250], “pb-ad-78158” ).addService( googletag.pubads() ) ); } );

The post How to Learn Your Camera’s Light Meter and Master Manual Mode by Simon Ringsmuth appeared first on Digital Photography School.


Digital Photography School

 
Comments Off on How to Learn Your Camera’s Light Meter and Master Manual Mode

Posted in Photography


Lumu smartphone light meter app updated with reflective mode

29 Nov

Even for photographers who would not even think about taking pictures with a smartphone camera, with the right accessories your phone can be a very useful photographic tool. The Lumu light meter is a great example – it plugs into the headphone socket of a smartphone and, with the help of the dedicated Lumu app, turns your smartphone into a fully-fledged light meter that can help enhance your understanding of a scene’s lighting situation. Click through to read more

Articles: Digital Photography Review (dpreview.com)

 
Comments Off on Lumu smartphone light meter app updated with reflective mode

Posted in Uncategorized