RSS
 

Posts Tagged ‘Master’

3 Newborn Posing Setups Anyone Can Master

06 Oct

newborn-posing-setup

Are you interested in trying newborn photography, but just aren’t sure where to start in terms of posing? Have you ever looked at a newborn photo and been totally unsure how the photographer set it up?

In this article, I’ll walk you through three easy newborn posing setups. We’ll start with pull-backs (behind the scenes shots) of each posing setup, along with brief instructions as to how you can recreate it at home. Then I’ll show you what the final images might look like from that setup. All three setups are simple, versatile, and I promise that absolutely anyone can master them. All three also have the benefit of being setups that you can typically use even in small spaces, which is a huge benefit if you ever shoot in clients’ homes, and don’t know what you’re walking into until you get there.

Setup #1: The Crib Mattress

newborn-posing-setup-1

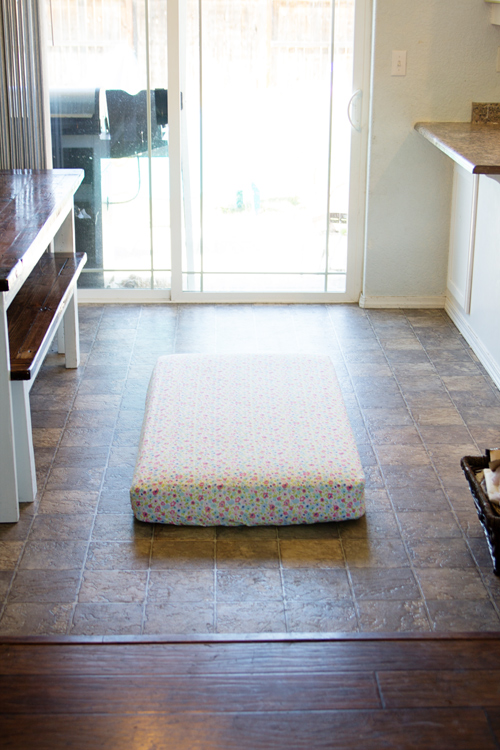
This setup really could not be any easier. Simply take a crib mattress, find a fun fitted sheet for it, and put it on the floor near a window, or sliding glass door. My preference is always to set up the crib mattress at about a 60 degree angle to the window. Sometimes the space may easily allow you to set up exactly as you would prefer, and sometimes like in the case of my very small kitchen above, it may require thinking outside the box.

For this particular session, I kept the mattress at a 90 degree angle to the window, as mom walked over and placed the sleeping baby on the mattress. Once baby was warm and settled, I sat on the floor and pivoted the mattress just enough so that I’d be able to achieve some shadows and depth in the photo.

newborn-posing-setup-2

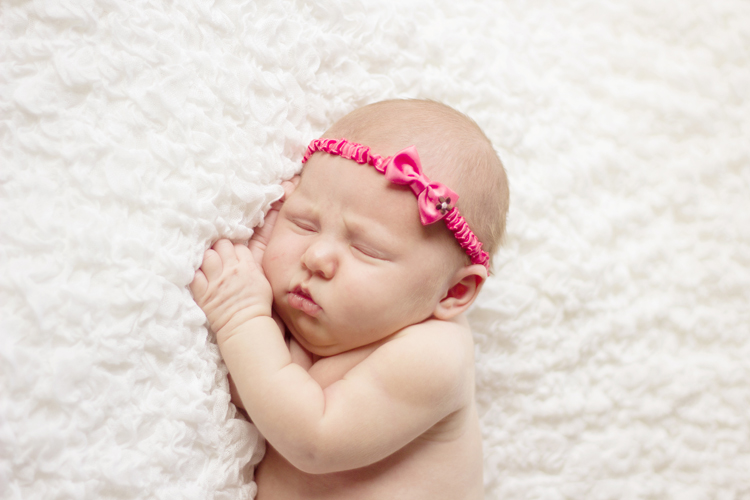
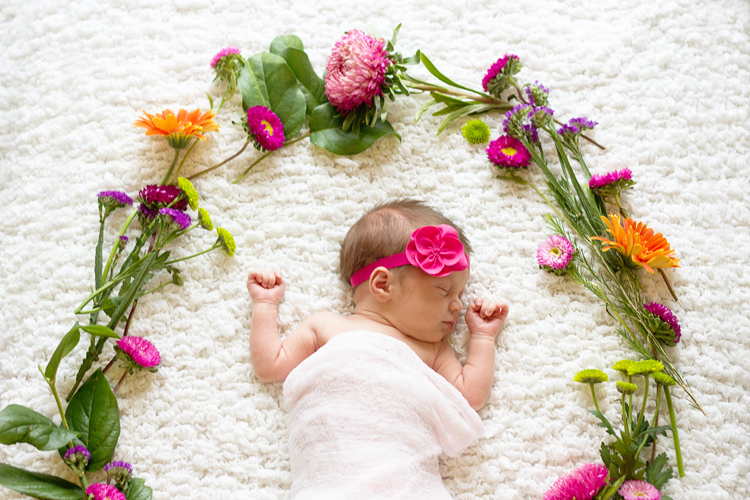
This is also the setup that I typically use whenever I am incorporating flowers, greenery, or sports equipment into the photo because it gives me a nice flat surface to work with, and it’s also low to the ground, so it’s easier to shoot from above.

newborn-posing-setup-3

Setup #2: The Black Sheet

newborn-posing-setup-4

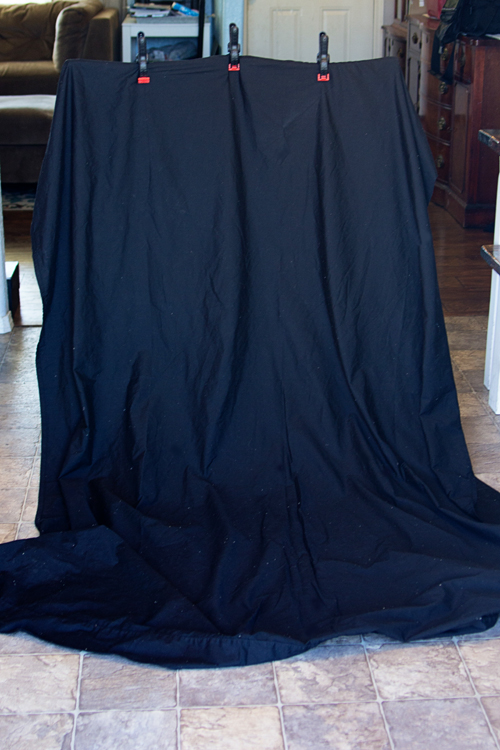
Next, try taking a twin or full sized black sheet and clamping it to the back of some chairs. I prefer to use bar stools whenever possible, but a regular high backed chair will also work. If you can’t track down a chair, simply have mom and dad hold the sheet up in the air, and let it pillow at the ground. Again, place yourself near a large window. Then you can place the baby in a basket on top of the sheet on the floor, or even have mom or dad stand in front of the sheet and hold the baby in his or her arms.

Bonus Tip: Use a lint roller on your black sheet before you start taking photos – it will save you a ton of time in post-processing!

newborn-posing-setup-6

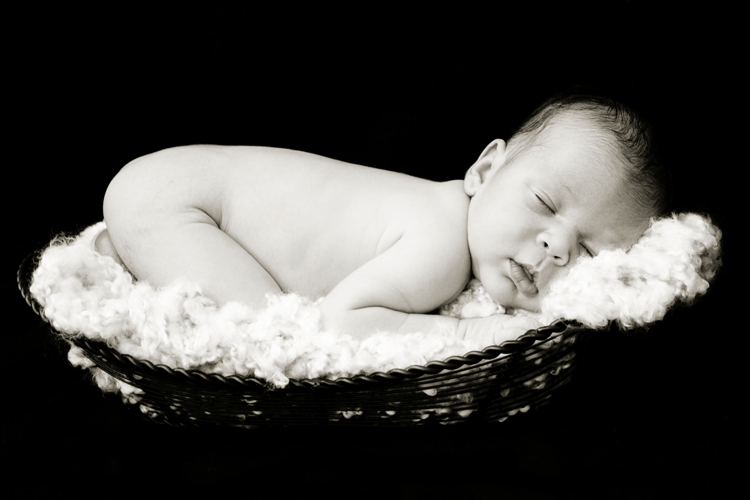
I find this particular setup to be really versatile, and it’s an easy way to create a high-contrast photo that has a more formal look, compared to the first setup which usually tends more towards lifestyle images. This setup does require a bit more time in post-processing to get that nice uniform black background, but it is absolutely worth the investment!

newborn-posing-setup-5

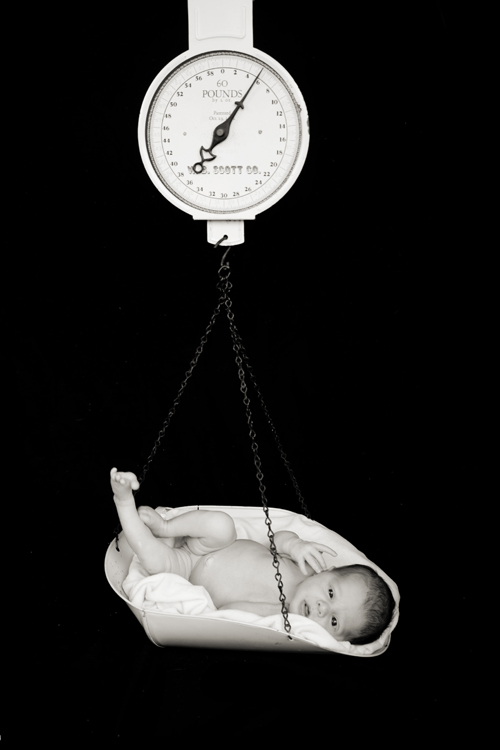
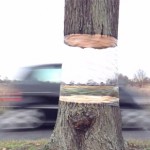
From a safety perspective, this is a great setup to use any time you want a shot where it appears that the baby is hanging in the air. In the above photo, the scale that the baby is on was actually sitting directly on the black sheet on the floor. I had grandma hold the hook of the scale taught as I took the photo.

Even as newborns, babies are wiggly and will sometimes try to shoot themselves off a prop, so I just don’t think it’s worth the risk to actually allow a newborn to hang from something in the air during a session. This particular setup is a nice alternative for parents who would like to achieve that look, while also greatly minimizing the risk involved.

Setup #3: The Beanbag

newborn-posing-setup-7

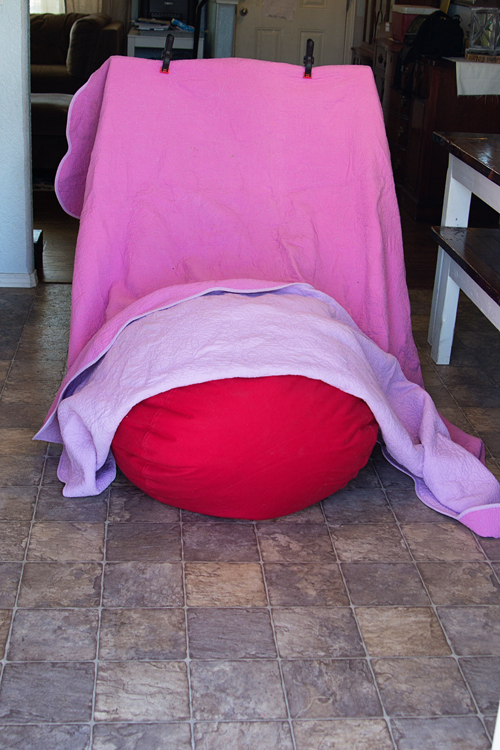
The beanbag is by far the most common approach for newborn photography. You’ll want either a beanbag specifically designed for photography, or extra “beans” to over stuff a standard beanbag. Trust me on this one! Place the beanbag on the floor and drape a large blanket over it, once again clamping to some tall-backed chairs near a light source. If you think that you’ll primarily be using this setup for a session, you can also layer multiple blankets over the beanbag before clamping.

Bonus Tip: If you layer blankets on the beanbag, I highly recommend putting diaper changing pads (or piddle pads for pets) in between each blanket on the bean bag just to be safe!

newborn-posing-setup-8

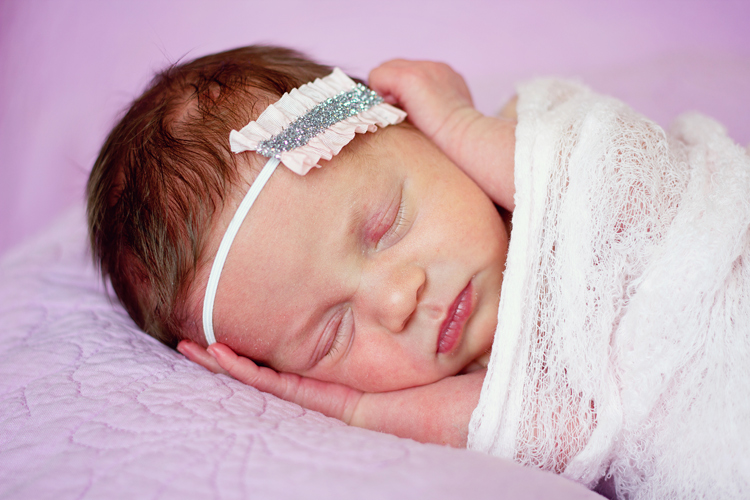
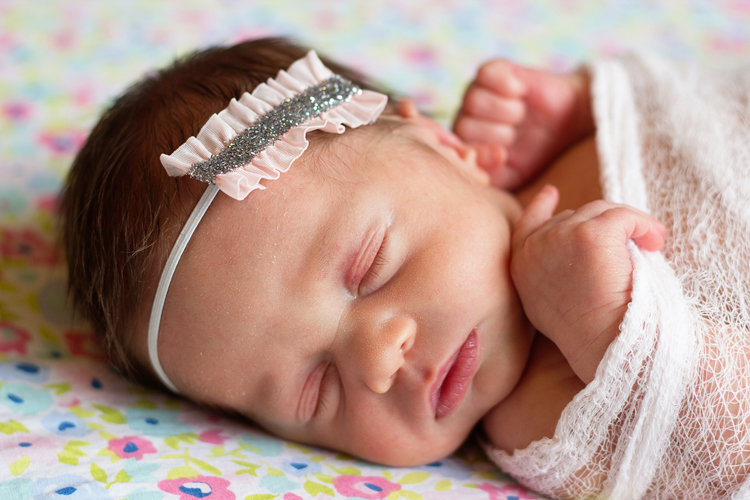
This setup is a great option if you have a baby that’s having a difficult time settling, and can be very versatile in terms of the number of photos you can achieve from just one pose. You could easily swing a portrait, closeup of fingers and/or toes, and a full-body pullback without moving the baby at all using this set.

newborn-posing-setup-9

The world of newborn photography is so nuanced, and there are so many tips, tricks, and safety precautions to know, and be aware of. This particular post is really just the tip of the iceberg, but will hopefully give you a good starting point in terms of understanding how to execute three newborn posing setups, as well as what types of images you may be able to achieve with each one.

Have you tried any of these newborn setups before? Which is your favorite? Share your images and any other posing setups you’ve used in the comments below.

googletag.cmd.push(function() {
tablet_slots.push( googletag.defineSlot( “/1005424/_dPSv4_tab-all-article-bottom_(300×250)”, [300, 250], “pb-ad-78623” ).addService( googletag.pubads() ) ); } );

googletag.cmd.push(function() {
mobile_slots.push( googletag.defineSlot( “/1005424/_dPSv4_mob-all-article-bottom_(300×250)”, [300, 250], “pb-ad-78158” ).addService( googletag.pubads() ) ); } );

The post 3 Newborn Posing Setups Anyone Can Master by Meredith Clark appeared first on Digital Photography School.


Digital Photography School

 
Comments Off on 3 Newborn Posing Setups Anyone Can Master

Posted in Photography


Tree of 40 Fruit: Fresh Interview with Nature’s Master Grafter

05 Aug

[ By WebUrbanist in Art & Sculpture & Craft. ]

tree fruit varieties

Seven years into his experiments, the living artworks of Sam Van Aken are bearing far more than just fruit, each new variant of the Tree of 40 Fruit building on experiences learned from the last. And while simply grafting forty fruits of different kinds to a single tree is impressive, his work continues to branch out. The trees have to grow for three years before he can start to reshape them, and even then only so many grafts can be added each year.

tree diagram

Van Aken’s Frankensteinian creations are an endeavor forever in progress. With increasingly refined sets of controls and directions, he has been able to go beyond simply grafting dozens of types on a single tree. Carefully diagrammed, his planned plants can be designed to bloom and bear fruit year-round and in choreographed sequences, almost like a slow-motion fireworks display or performance piece.

tree 40 fruit bloom

His individual trees are displayed around the country, reflecting the climate as well as local varieties of the different regions in which they can be found. Each provides seasonal moments of surprise to passers by, producing almonds during one month then perhaps peaches or plums (or both) in the next.

tree fruit diagram book

From National Geographic: “Sam Van Aken, an artist and professor at Syracuse University, uses ‘chip grafting’ to create trees that each bear 40 different varieties of stone fruits, or fruits with pits. The grafting process involves slicing a bit of a branch with a bud from a tree of one of the varieties and inserting it into a slit in a branch on the ‘working tree,’ then wrapping the wound with tape until it heals and the bud starts to grow into a new branch. Over several years he adds slices of branches from other varieties to the working tree.”

tree grafting process

“In the spring the ‘Tree of 40 Fruit’ has blossoms in many hues of pink and purple, and in the summer it begins to bear the fruits in sequence—Van Aken says it’s both a work of art and a time line of the varieties’ blossoming and fruiting. He’s created more than a dozen of the trees that have been planted at sites such as museums around the U.S., which he sees as a way to spread diversity on a small scale.”

Share on Facebook


[ By WebUrbanist in Art & Sculpture & Craft. ]

[ WebUrbanist | Archives | Galleries | Privacy | TOS ]


WebUrbanist

 
Comments Off on Tree of 40 Fruit: Fresh Interview with Nature’s Master Grafter

Posted in Creativity


Become a Composition Master with This Great Guide: 60% Off Today Only

03 Jul

Deal #2 in our massive Mid Year Sale has just gone live – and it’s a goodie!

Iics hero shot discount

Today only you get 60% off Photography Concentrate’s Incredibly Important Composition Skills.

For the next 24 hours and only $ 19.98 (an exclusive dPS price), you’ll get:

  • A comprehensive 225-page ebook — filled with everything you need to know to come away with a deep understanding of composition and the practical know-how to put it to good use
  • 7 bonus videos — looking at examples of theories and techniques and how they influence the look and feel of each photograph, to bring all the concepts covered together
  • A printable pocket field guide — with the most essential composition information laid out, for you to print out, fold up and slip in your camera bag

Check out the video on the Photography Concentrate site to meet Lauren, the author of this tutorial, and learn more about how Incredibly Important Composition Skills will totally transform your photography!

Composition

This deal is an unbelievable amount of value.

Especially because building your composition skills is one of the fastest and most lasting ways to transform the quality of your images.

You see, people view images in predictable ways. And when you discover these patterns, you can use them to your advantage to create photographs that best communicate your desired message.

So are you ready to become a master in composition and gain real skills that you’ll use in every single shot you take?

Head to Photography Concentrate to snap up this amazing deal!

No Risk: Your Satisfaction is Guaranteed

Your satisfaction with this deal is guaranteed. For a full 60 Days, and if you don’t feel like you have stronger composition skills you’ll get 100% of your money back with no questions asked.

googletag.cmd.push(function() {
tablet_slots.push( googletag.defineSlot( “/1005424/_dPSv4_tab-all-article-bottom_(300×250)”, [300, 250], “pb-ad-78623” ).addService( googletag.pubads() ) ); } );

googletag.cmd.push(function() {
mobile_slots.push( googletag.defineSlot( “/1005424/_dPSv4_mob-all-article-bottom_(300×250)”, [300, 250], “pb-ad-78158” ).addService( googletag.pubads() ) ); } );

The post Become a Composition Master with This Great Guide: 60% Off Today Only by Darren Rowse appeared first on Digital Photography School.


Digital Photography School

 
Comments Off on Become a Composition Master with This Great Guide: 60% Off Today Only

Posted in Photography


Street Photography: Easy To Learn, Impossible To Master

30 Mar

Of all the different fields of photography, street photography might be the most difficult. However, it’s also an area that many aspiring photographers jump into first. Street photography almost seems like the reason photography was created for in the first place. Unlike taking photos in a studio, shooting landscapes or working with models, street photography entails a bit of chaos. Continue Reading

The post Street Photography: Easy To Learn, Impossible To Master appeared first on Photodoto.


Photodoto

 
Comments Off on Street Photography: Easy To Learn, Impossible To Master

Posted in Photography


Kupo Grip Master C-Stand Review

25 Jan

I’ve been using studio lights for a couple of years now, I’ve used a few different brands with all sorts of different modifiers, from the basic softboxes that your less expensive lighting kits might come with, to my current favourite, the 2 meter Octa from Studio-Flash.com.

The one consistency with bundled lighting kits is that they mostly all come with a set of lightweight stands that, for the most part, are great and will certainly do what you need them to do when you’re starting out and they’ll get you a long way with clever use of sandbags and counterweights. But when you start using bigger, heavier modifiers on these stands, you may find it’s time to get yourself a dedicated “big” stand.

Enter stage left, Kupo Grip. (Thanks to the crew at ProTog for sourcing what I was after – also available on Amazon)

I wanted a stand that was going to take anything I’d ever use, I wanted it to be modular and easy to put up and tear down, I’m a one man show and setting up and packing down needs to be easy! (I’m not lazy, honest) so after visiting the crew out at ProTog in Melbourne, I settled on the 40″ C-Stand (C for Century, folks) with the Kupo Turtle base. The base and the upright pole come apart for easy packing and transporting.

Kupo-grip-light-stand-review-simon-pollock

They come in 20″ or 40″ and in black or silver (I went for the black option, for no real reason…)

silver_kupo_c-stand_20_inch

It isn’t always the strength (or weight) of the stand riser that gives you problems, it might be when you first get a 70cm beauty dish and put it on the front of your studio light and then find that the locking mechanism that holds the stand’s legs in place just doesn’t have the wherewithal to hold it all up. Maybe you simply need something more sturdy to hold a light and Kupo Convi Clamp (like the little beast below) or something similar like a Magic arm that you sit a Tether Tools Aero on… Anyway, you get the point – one solid workhorse of a stand has made all of these things much easier for me.

Kupo_Grip_C-Stand_Master_Review_Clamp

The other main reason I love my C-Stands is that with the legs the way they are, sticking out low to the ground and horizontally to the riser pole, you can load them up with some big heavy sandbags and use them in most any weather. If you’ve ever had even a single flash on a lightstand blow over and smash on the ground, you’re most likely nodding along right now! I have a special umbrella at home that’s kind of flat on one side – as a reminder. Use a solid stand OR bag your lightweight stands.

lightstand-smashed-brolly-on-ground

No sand bags, a lightweight stand in a light breeze… An accident waiting to happen.

As I mentioned earlier, with the ‘Turtle base’ they’re easy to pack down but obviously not as easy as a small telescopic light stand or a tripod with a long neck and you might not want to fly a whole lot with them, but when you need a heavyweight and you want innovative, maybe take a look at the Kupo Grip Master C-Stand.

Kupo Grip gear (well, my stands at least, I’ve not checked ALL of their products) comes with a two year warranty which, if you register, gets you an extra three years giving you five years warranty.

My summary, if you will… They’re priced nicely, they have a really solid build and a great finish, I can’t fault the things – that’s five big smiley stars from me.

googletag.cmd.push(function() {
tablet_slots.push( googletag.defineSlot( “/1005424/_dPSv4_tab-all-article-bottom_(300×250)”, [300, 250], “pb-ad-78623” ).addService( googletag.pubads() ) ); } );

googletag.cmd.push(function() {
mobile_slots.push( googletag.defineSlot( “/1005424/_dPSv4_mob-all-article-bottom_(300×250)”, [300, 250], “pb-ad-78158” ).addService( googletag.pubads() ) ); } );

The post Kupo Grip Master C-Stand Review by Sime appeared first on Digital Photography School.


Digital Photography School

 
Comments Off on Kupo Grip Master C-Stand Review

Posted in Photography


8 Quotes From Master Photographer Ansel Adams and How You to Apply Them to Your Photography

22 Jan

The technology of photography has been evolving at a very rapid rate. Most of our cameras are almost obsolete by the time we purchase them! But one thing about photography hasn’t changed over the years and that is the art of photography. We can learn so much about the that from the masters of yester-years. Ansel Adams was one of these great masters, best known for his iconic black and white images of the American West. Let’s review some quotes from Mr. Adams and consider how we might apply them to modern day photography.

This image was part of a digital display that ran alongside the temporary exhibition, Ansel Adams: Photography from the Mountains to the Sea on at the National Maritime Museum, Greenwich from 9 November 2012 - 28 April 2013.

This image by Bruce Wunderlich was part of a digital display that ran alongside the temporary exhibition, Ansel Adams: Photography from the Mountains to the Sea on at the National Maritime Museum, Greenwich from 9 November 2012 – 28 April 2013.

“Expressions without doctrines, my photographs are presented as ends in themselves, images of the endless moments in the world.”

You surely have heard the expression, “A picture paints a thousand words.” Ansel thought of his images as expressions of how he felt in the moment he released the shutter. These expressions require no words of explanation. He was also quoted as saying “A true photograph need not be explained, nor can it be contained in words.” Likewise, we should look for moments in the world around us worthy of a captured image, which affects us emotionally before we click the shutter.

“Twelve significant photographs in any one year is a good crop.”

It is always a good idea to keep your portfolio up-to-date. A yearly inventory of your work, examining what you captured well and what you need to improve upon will help keep you focused on your artistic expressions. Photographers with digital technology have the tools to take many more images than Adams could with film and plates, so here’s a suggestion: Perhaps the number 12 suggests aiming for one memorable image each month. Take these most significant images and create a calendar featuring your art that you can give to friends. Regardless, keep your favorite images, your “crop”, organized and ready to share.

My 2014  "crop" in my 2015 desk calendar

2014 “crop” presented in a 2015 desk calendar.

“Sometimes I do get to places just when God’s ready to have somebody click the shutter.”

One favorite story about Ansel Adams centers around the circumstances of one of his most iconic images, “Moon rise over Hernandez”. As he was driving from what was described as a very unsuccessful day of shooting in New Mexico, suddenly Ansel pulled the car off the road when he saw the now famous subject. The light was changing so quickly that he was only able to get one exposure before the light was gone. Never think a day of shooting is a waste, that iconic image might just be around the next bend.

“There are no rules for good photographs, there are only good photographs.”

In a statement for a 1932 exhibit in San Francisco, Ansel listed his two “rules” of photography:

  1. The completed image must directly reflect how the subject appeared in the camera.
  2. He had to see the finished photograph in his mind before the shutter was released.

One of the most important things Ansel Adams left with us was this principle of pre-visualization. This mental vision of what he was expecting to communicate with the images he created is what makes them so prominent even today, some three decades after his death. We see too many photographers out in today’s world just aiming and shooting, not taking the time to think about the subjects before them and how the resulting image will speak to (or not) the viewers of the image.

Using Ansel's previsionalization method, When approaching this image I immediately visualizied this image as a black and white by adding a polarzing filter I was able to make the blue sky more saturated which can in handing later during processing to create dark and contrasting sky. I also intentionally under-exposed the image to ensure that the white boards of the abandon church are not to bright, to help convey the abandon feeling of theimage.

Using Ansel’s pre-visualization method when approaching this shot, I immediately visualized this image as a black and white. By adding a polarizing filter, I was able to make the blue sky more saturated which helped later during processing to create a dark and contrasting sky. I also intentionally underexposed the image to ensure that the white boards of the run-down church would not appear too bright, to help convey the abandoned feeling.

 “Ask yourself, “Why am I seeing and feeling this? How am I growing? What am I learning?” Remember: Every coincidence is potentially meaningful. How high your awareness level is determines how much meaning you get from your world. Photography can teach you to improve your awareness level.”

What a powerful quote! “Every coincidence is potentially meaningful”. To develop the creative eye that it takes to create great photos we need to be on the constant lookout for unexpected opportunities. So, must we carry our camera at all times? How many times have you come across a great scene only to find you do not have your camera ready and available? It happens to all of us, but don’t get caught up in the fact that you don’t have your camera with you. Instead, use this opportunity to think about the shot and visualize how you would have shot it, how you would compose it, and what camera settings and filters you might have used to capture the scene. Even though you may have missed the shot, you can use this as a learning experience to be prepared in the future.

By studying the images of great photographers of the past and present we can learn how to approach our own images. This image, captured in the Canaan Valley Resort State Park in West Virginia, reminded me of Ansel's image The Tetons and Snake River.

By studying the images of great photographers of the past and present we can learn how to approach our own images. This image, captured in the Canaan Valley Resort State Park in West Virginia, reminded me of Ansel’s image The Tetons and Snake River.

 “The machine-gun approach to photography – by which many negatives are made with the hope that one will be good – is fatal to serious results.”

With the new digital age of photography it is so easy to take the “spray and pray” approach to photography, but we must learn to slow our approach and think about every piece of the image that we are capturing. One way to take a more deliberate approach with a landscape shoot is to place your camera on a tripod, which will allow you to concentrate more on the composition of your image. There are plenty of situations where the machine-gun approach to photography can be helpful, for example, action subjects such as sports or wildlife, but in other areas this approach can be fatal.

“A photograph is never finished until I burn the corners.”

Ansel considered it important to keep the viewer’s eye in the frame of his images, so he would burn (darken) any light areas near the edges of the image. These adjustments were quite time-consuming and tedious to produce in the darkroom of Adams’ era. Today, however, we can easily accomplish these steps in Photoshop or Lightroom. Be careful not to overdo it, as these changes should be made in a way that is completely imperceptible to the viewer of the image.

“I am sure the next step will be the electronic image, and I hope I shall live to see it. I trust that the creative eye will continue to function, whatever technological innovations may develop.”

Many fans of Adams’ photography ask, “Would Ansel Adams have shot digital?” This quote indicates he would have! Ansel was never overly concerned about the process of taking photos as much as he was about the creative experience and how a photograph made him feel. Ansel Adams would not only be shooting digital, but also he would be a Photoshop guru, probably working closely with Adobe to develop and improve the photographer’s experience.

Where do we go from here?

So in conclusion, has photography changed over the years? Yes, the process has changed, but the art of photography remains the same. By studying the guiding principles of great photographers of previous generations, like Ansel Adams, we can sharpen our skills to become the best photographers of our day. Please leave a comment below: What is your favorite photographer’s quote and how has it inspired you?

googletag.cmd.push(function() {
tablet_slots.push( googletag.defineSlot( “/1005424/_dPSv4_tab-all-article-bottom_(300×250)”, [300, 250], “pb-ad-78623” ).addService( googletag.pubads() ) ); } );

googletag.cmd.push(function() {
mobile_slots.push( googletag.defineSlot( “/1005424/_dPSv4_mob-all-article-bottom_(300×250)”, [300, 250], “pb-ad-78158” ).addService( googletag.pubads() ) ); } );

The post 8 Quotes From Master Photographer Ansel Adams and How You to Apply Them to Your Photography by Bruce Wunderlich appeared first on Digital Photography School.


Digital Photography School

 
Comments Off on 8 Quotes From Master Photographer Ansel Adams and How You to Apply Them to Your Photography

Posted in Photography


How to Learn Your Camera’s Light Meter and Master Manual Mode

23 Dec

Most cameras have a few different shooting modes such as Automatic, Aperture Priority (A or Av), Shutter Priority (S or Tv), and Program. It’s not uncommon for people to take a majority of their photos in Automatic mode since it generally does a good job of getting decent results, though more advanced photographers will often use Aperture or Shutter Priority. Shooting in Manual, however, might seem intimidating and highly complex but once you understand a few basics it starts to make a lot more sense. Certainly you should have a working understanding of the three components of the exposure triangle: shutter, aperture, and ISO.

But in order to get the most out of your camera you will need to know how to use a simple, but incredibly powerful, tool that functions as the glue that binds everything together: the light meter.

purple-flowers

Nestled quietly at the bottom of your camera’s viewfinder or Live View display is a small block of lines or bullets accompanied by a few numbers. You might also have noticed a little triangle moving back and forth, or some vertical hash marks appearing and disappearing from time to time, in a fashion that seems nonsensical or completely random. If these numbers and symbols make no sense at all, don’t worry, you are not alone. It can be a bit confusing to understand the light meter at first. But once you get the fundamentals you will probably find yourself growing much more confident in understanding how photography works. Maybe you’ll even venture out of Automatic and into Manual for the sheer amount of control you are able to have over your photos.

Before I get into the nitty gritty of the light meter itself, I want you to take a look at it in relation to the other data shown in your camera’s viewfinder. Note that this diagram is highly simplified and your viewfinder might look slightly different, or include other information, but all cameras (except some point-and-shoots) include the elements shown here.

light-meter-master

In this example the camera’s shutter is set at 1/90 of a second, the lens aperture is f/4.8, and the ISO is 400. The light meter is a readout that shows whether these values are going to result in a photo that is properly exposed – that is, a photo that is neither too light or too dark. The small triangle hovering over the zero in the light meter shows that the exposure is correct, and when the shutter button is pressed the picture will look fine.  But, I’ll show you a few pictures to see what happens as the camera’s exposure settings are changed. If you want to try this yourself you will need to have your camera in Manual mode, and I would recommend reading the rest of this article with your camera at your side so you can do a bit of experimenting on your own.

For my first shot, I’ll show you a photo that is underexposed and then illustrate how the camera settings can be adjusted to get the proper exposure. The values shown on these images are exactly what I used in my camera to get these shots, and nothing has been edited or retouched in Photoshop.

landscape-under

Here you can see that the shutter speed is 1/1000 of a second, the aperture of the lens is f/4, and the ISO is 200. The camera’s viewfinder displays this information along with the light meter, and note how the triangle has moved all the way over to -3 EV. (EV stands for Exposure Value, and technically this image is underexposed by three stops. Don’t worry about the technical jargon though! For now just follow along with the examples to see what happens when the exposure values are altered.

To get a properly exposed photo you are essentially trying to re-create what your eye already sees, but right now the light meter tells us that the photo will be way too dark. And indeed, the resulting photo turned out just how the light meter predicted: it’s so dark it looks like it was taken at night instead of mid-afternoon.

So what can be done to fix this? By adjusting the aperture, shutter, or ISO you can change the exposure settings with the goal of getting that little triangle to hover above the zero. Watch what happens when I change the shutter speed but I leave the aperture and ISO fixed at their present values:

landscape-over

By altering the shutter speed from 1/1000 of a second to 1/15 of a second, the photo is now too bright – exactly as the light meter said it would. It is overexposed by three stops, and the image is virtually unusable. Because the viewfinder itself does not change as the aperture, shutter, and ISO are adjusted, you have to rely on your light meter to tell you how bright or dark the image will be. And sure enough, the triangle is hovering above the +3, which tells us the photo will be too bright. Here is what a properly exposed photo looks like.

landscape-correct

Finally, a good picture! By adjusting the shutter speed to 1/125 of a second, I was able to get the triangle to hover above the zero, which means the photo would be properly exposed. Note that there is no one correct way to do this, and a proper exposure could have also been obtained by changing the aperture or ISO instead of the shutter speed, or a combination of all three. For instance, I could have left the shutter at 1/1000 and increased the ISO to get the same result.

Why bother with all this?

At this point you might be wondering why you would want to go to all this trouble when you can put your camera in Automatic mode and it will just take care of everything. The answer lies in the fact that you, not your camera, know exactly what kind of photo you want to take. Your camera does not know whether you are shooting landscapes, portraits, sports, starry nights, kids, pets, or anything else. All it sees is how much light is coming in, and it tries to adjust the shutter, aperture, and ISO to get that triangle to hover above the zero. But if you know how to control those values yourself, you can open up vast new areas of photographic creativity that Automatic mode can never do for you.

As another example, here is a picture of some berries, but again notice how it is underexposed by three stops.

berries-underesposed

There are several settings I could adjust in order to fix this, or I could just put the camera in Automatic mode. The problem with Automatic in this case is the camera does not know that I am looking at berries. It just sees light, and would attempt to adjust the shutter, aperture, and ISO to get a proper exposure even though it might not end up with the exact type of picture I want to take.

Because I shot in manual using the light meter as my guide I was able to get precisely the shot I was looking for. I knew that I wanted a shallow depth of field, which meant I should use a large aperture of f/2.8. I knew that an aperture of f/1.8 would be too wide for my taste, and a smaller value like f/4 or f/8 would not give me the nice blurry background I was hoping for. By leaving the aperture at f/2.8 and changing the shutter speed I got a properly exposed photo with a nice smooth background as you can see here:

berries-correct

But what if I had changed the other values instead? Look what happened when I left the aperture and shutter at their original values from the underexposed photo (f/2.8 and 1/1000), and raised the ISO instead:

berries-correct-high-ISO

The end result is almost the same: a properly exposed photo (just like our light meter told us it would be, with the triangle hovering above the zero), but this image has much more noise and grain than the previous one. Notice how the tree in the background just behind the berries looks speckled and grainy instead of silky smooth, which is what usually happens at high ISO values. Thus, raising the ISO might not be the best way to get the image I want even though the photo itself is properly exposed.

So what about changing the aperture instead?

berries-correct-small-aperture

Once again the result is a photo that is properly exposed, but the depth of field is much wider – see how the background is not quite as smooth and blurry as before? Also, because the aperture was smaller I had to leave the shutter open longer at 1/90 of a second and even raise the ISO a bit in order to maintain a proper exposure.

Get the exact shot you envision

Shooting in manual and using the light meter as your guide is a good way to ensure that the image you see in your mind is exactly what you end up with when you click the shutter. If you are shooting fast-moving subjects like cars or sports, you would want to start with a fast shutter speed and adjust the other settings until you get that little triangle to hover above the zero. If you are taking portraits and want a shallow depth of field with nice blurry backgrounds, keep the aperture wide and change the shutter and ISO until the exposure is correct. It’s all about giving control back to you, the photographer, instead of letting your camera make the creative decisions for you.

construction-lights

Shooting in manual was the only way to capture this photo. By reading the light meter while carefully adjusting my exposure settings I got precisely the shot I was aiming for. Camera settings: f/16, 1/3 second, ISO 800

Understanding the basics of the light meter is really just scratching the surface, though. Additional settings like your camera’s metering mode and the Exposure Lock function are even more tools you can use to take control over your photography and unlock your true artistic potential. Using manual mode and reading the light meter might seem like a complicated way to take photos, but remember that you know better than your camera what kind of picture you want to take. Once you know how to read your light meter and adjust your camera’s settings accordingly, you can open up a whole new world of creativity that has been right in front of you just waiting to be discovered.

Practice time

So now it’s your turn: grab your camera, put it in Manual mode, and hold the viewfinder up to your eye. Now start changing the aperture, shutter, and ISO values and watch what happens to the light meter. Is your image going to be overexposed? Lower the ISO, raise your shutter, tighten the aperture, or try a combination of all three. Is your image going to be underexposed? Do the exact opposite. The more practice you get, the easier it will be and soon you will feel much more comfortable shooting in a mode that might have seemed hopelessly confusing before.

Do you shoot in manual? If so, how did you get yourself off Automatic mode? Or do you actually prefer Automatic? Share your thoughts and experiences in the comments below.

googletag.cmd.push(function() {
tablet_slots.push( googletag.defineSlot( “/1005424/_dPSv4_tab-all-article-bottom_(300×250)”, [300, 250], “pb-ad-78623” ).addService( googletag.pubads() ) ); } );

googletag.cmd.push(function() {
mobile_slots.push( googletag.defineSlot( “/1005424/_dPSv4_mob-all-article-bottom_(300×250)”, [300, 250], “pb-ad-78158” ).addService( googletag.pubads() ) ); } );

The post How to Learn Your Camera’s Light Meter and Master Manual Mode by Simon Ringsmuth appeared first on Digital Photography School.


Digital Photography School

 
Comments Off on How to Learn Your Camera’s Light Meter and Master Manual Mode

Posted in Photography


Forging Fun, Not Profit: Master Copycat Fakes Out 50+ Museums

26 Aug

[ By WebUrbanist in Art & Drawing & Digital. ]

fake priest artist copycat

Mark Landis is a US artist and actor of extraordinary ability, having spent decades faking various identities and committing a kind of faux philanthropy, having donated copied artworks he creates to churches and museums for decades.

fake philanthropist copyist artist

Diagnosed schizophrenic and the subject of a new documentary film Art and Craft (preview below), Landis has not been convicted of any crime since his activities were uncovered over five years ago. Primarily, he is protected by the fact that he has never sold (only gifted) his faked paintings, drawings and watercolors.

Amazingly, it took over twenty years for anyone to work out his ruse – finally, someone noted that not only was a painting he attempted to give previously donated elsewhere, but it was even gifted under the same fake moniker.

The fakes are often painted from catalog photos or over a color-printed copy that he simply creates at a copying shop, takes home and starts working over. Meanwhile, under his real name, he has also sold original paintings for years.

priest copycat artist

No one can be entirely certain of what drives Landis, since honesty and transparency are not his strongest suits, but presumably he enjoys acting the role of a generous donor, tricking the people he dupes, and ultimately seeing his faked works on display in major museums around the United States.

priest fake art

He loves being a prolific philanthropist, real or otherwise, and claims to like his role as faux Jesuit priest as well. In the end, he notes, that it doesn’t really matter to the viewer whether the thing they are seeing is real – so what should they care if the work they see is not original?

Share on Facebook


[ By WebUrbanist in Art & Drawing & Digital. ]

[ WebUrbanist | Archives | Galleries | Privacy | TOS ]


WebUrbanist

 
Comments Off on Forging Fun, Not Profit: Master Copycat Fakes Out 50+ Museums

Posted in Creativity


Infographics 101: How to Take A Great Selfie Like a Master

09 Aug

We all know the obvious, selfies are here to stay! So why not make the best out of them? Shutterfly’s guide offers tips on how to capture a great selfie that’s worth sharing. It teaches you everything from how to find the best lighting to giving your picture that little extra oomph before posting. Follow these tips, capture your selfie, Continue Reading

The post Infographics 101: How to Take A Great Selfie Like a Master appeared first on Photodoto.


Photodoto

 
Comments Off on Infographics 101: How to Take A Great Selfie Like a Master

Posted in Photography


How to Master Your DLSR in One Afternoon a Beginner’s Guide

24 Jul

As the Editor-in-Chief of CLARITY, I believe that photography is one of the most unique forms of visual art. As a photographer, you must possess an ability to express yourself visually and also be technically proficient with the tools of your craft.

Thankfully, the technology is relatively simple to understand. Given a small amount of time, anyone can master the mechanics of their DSLR very quickly. I’m referring to the technical side of photography, or more specifically, how to use your camera.

photographybb-pentax-k7

I’m sure you’ll agree, digital SLR cameras are pretty appealing contraptions. They constantly evolve with new bells and whistles, and shiny attractive buttons and dials, but at their very essence, a camera is quite simply a box that captures and records light through a small opening. Light enters the camera and hits a sensor for a certain period of time, and that’s it. Too much light and the photo will be over-exposed (too bright). Not enough light and the photo will be under-exposed (too dark). By the end of this article, if feel stuck in Automatic Mode you will be able to break free and let your true creativity reign!

So how do you know when you have the optimal amount of light? Thankfully, when you are shooting in Manual mode, your camera has a built-in light meter to show you if your exposure is going to be too dark, too bright, or just right. You simply need to know how to control the amount of light that enters your camera, and for how long the sensor is exposed to that light.

Start Right Here – learn how to master your DSLR

There are three ways to control the amount of light that enters your camera, and all three are used to make your photograph either brighter or darker.

The Exposure Triangle

The first is the size of the opening through which light enters, called the aperture of your lens. The next is the duration of time that your camera sensor is exposed to the light, referred to as the shutter speed. The final option controls how sensitive the camera is to light, known as the ISO. These three controls all interact with one another in a give-and-take relationship, and the following “Exposure Triangle” is a great tool to help you understand the dynamics of these relationships.

Now, the trick is to balance these three options to achieve a perfect exposure. Typically, you will choose two ways of controlling how light enters the camera, and then compromise on the third. The two choices you make are solely dictated by the aesthetic you would like to achieve. Aperture size, shutter-speed, and ISO all have individual benefits, but they also produce side-effect consequences that lend an aesthetic component of their own. Let’s explore how they work in more detail.

Part One – Aperture

The size of the “hole” through which light enters your camera is called the aperture. Mechanically, the aperture is a little diaphragm inside the lens that you can widen or narrow by telling your camera what f-stop you would like to use. The f-number is a funny measurement because a small f-number (like f/2.0) equates to a wide opening, whereas a large f-number (like f/22) equates to a small opening. As you would imagine, a large opening allows more light to enter the camera resulting in a brighter photograph, and a small opening lets in less light resulting in a darker photograph. Pretty straightforward stuff so far right?

Side Effect of Aperture

The aesthetic effect of varying the aperture is that light entering a wide aperture translates into less focus between the foreground and the background in the photograph. This is how photographers blur out the backgrounds in their photos. When you want to isolate a subject by blurring out the background, you would use a wide aperture.

DOF f2 8 Dave Seeram

Light that enters through a smaller, tighter, aperture is more focused than light entering a wide aperture, and light that is more focused translates into sharper focus through the foreground-to-background depth in a photograph. So if you want everything as sharp as possible through the depth of your scene, you would want to use a narrow aperture.

DOF f16 Dave Seeram

Part Two – Shutter Speed

The shutter is basically a little curtain that opens and closes behind the aperture. It can be open for a long amount of time (like seconds, minutes, or even longer), or a short amount of time (like quick fractions of a second). As the shutter stays open longer, more light is captured by the sensor resulting in a brighter image. The shorter the shutter speed, the less light is captured resulting in a darker image.

Side Effect of Shutter Speed

The aesthetic effect here is that a fast shutter speed allows you “freeze” any motion in the scene, whereas a slower shutter speed blurs any motion. Imagine taking a photograph of a falling water droplet. If your shutter speed was set to 1/1000th of a second, the shutter is open for such a brief fraction of time that the drop would appear frozen in mid-air when photographed.

Fast ss dave seeram

Alternatively, if you set a much slower shutter-speed such as half a second, then the movement of the falling drop would be captured as a blur.

Photographybb traffictrails1

Give-and-Take

Typically, fast shutter speeds require a larger aperture for the sensor to capture enough light to produce a well-exposed photograph. Conversely, slow shutter speeds tend to require a smaller aperture to limit the amount of light coming in over the longer duration. You can see how these factors are all starting to work together.

Part Three – ISO

The third way of adjusting the overall brightness of your photograph is the ISO, which controls how sensitive the camera sensor is to light. A low ISO (like 100) results in a darker photograph, while a high ISO (like 6400) results in a brighter photograph.

Side Effect of ISO

Of course, there is a trade-off here too. The aesthetic compromise of using a higher ISO means that while you will produce a brighter image, a higher ISO also introduces more grain (or “noise”) into a digital photograph.

Usually, you will first decide upon your aperture and shutter speed based on the combination of their aesthetic effects to your vision for the final image, while aiming to keep your ISO as low as possible. If you know that you need a certain shutter speed along with a certain aperture and the resulting image is still too dark, that’s when you increase the ISO.

Generally speaking, when you’re shooting in an environment that is dark or dimly lit, you’ll want to raise the ISO to make the sensor more sensitive to light. When the lighting conditions are bright, you can keep the ISO low.

It’s all about finding a balance between these settings to achieve the best exposure. Once you decide upon one or two of these settings, the camera will require some compensation on the other.

Photographybb exposure triangle

The Exposure Triangle is a great reference to demonstrate how increasing or decreasing any one of these three settings affects the exposure of the image. This stuff can be learned quite quickly, but it’s best to experiment with these settings to see how they operate in the real world. This will help you gain a technical understanding of how to use your camera, but there’s still a long way to go with regards to making photographs that communicate. Remember, photography is a visual language. Once you learn how to use the camera, you can then learn to translate your vision into captivating photographs.

Both the technical and artistic aspects play important roles in the making of a beautiful photograph. At CLARITY, we show our readers how to quickly learn the technical side, but we go even further to teach the importance of developing your creativity. We’ll show you step-by-step techniques to making stronger photographic compositions, and what to do when you feel like your vision and results don’t line up. Join other DPS readers, and we’ll give you everything you need to know to make great photographs with ease, in any situation. Get a subscription to CLARITY on sale now at SnapnDeals.com.

SNAPNDEALS CLARITY BANNER

The post How to Master Your DLSR in One Afternoon a Beginner’s Guide by Dave Seeram appeared first on Digital Photography School.


Digital Photography School

 
Comments Off on How to Master Your DLSR in One Afternoon a Beginner’s Guide

Posted in Photography