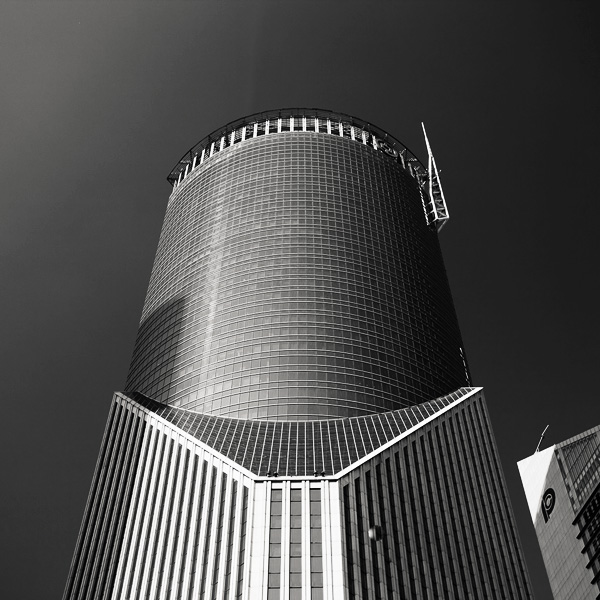
While visiting an art gallery or a photography exhibition, at times you may have noticed certain landscape photographs have extremely elongated fields of view. They seem quite impossible to have been photographed with a standard camera. If you wonder how such elongated photographs are made, you are not alone. I had my first encounter with a panoramic image of the Himalayan mountain range being displayed at Das Studios in Darjeeling, a Himalayan resort town in West Bengal, India. That photograph had a huge impact on me and it led me to searching for ways and means to photograph panoramic images.
During my initial search I figured panoramas were probably made with highly specialized cameras and lenses. But, to my surprise I found that panoramic photographs can be made with any kind of camera at your disposal. All you need is a camera, preferably one capable of shooting in Manual mode. Yes, with certain cameras and Smartphones you can get Apps for recording a panorama in a sweep but I never found the results quite satisfactory. Shooting your own panorama gives you the creative freedom and a sense of satisfaction.
How to shoot a panorama
A panorama is a combined set of individual photographs, in which two adjacent photographs have at least 20% overlapping areas. These two, or more, overlapping photographs are “stitched” with the help of software to produce extremely elongated fields of view. The overlapping is required as the software is able to understand the common areas in two adjacent photographs and hence can eliminate duplication of a scene by stitching the same into a single photograph.
Before shooting a panorama, you need to plan out well. Here is a list of guiding factors for creating your own panorama.
#1 Shoot in Manual Mode
Since a panorama is shot over a large field of view where lighting conditions can be different, it is imperative to shoot in Manual mode with Manual Focus. This will ensure all the photographs shot have an exact exposure value and focus throughout all the images. Shooting in Automatic, Program or Semi-Automatic modes (like Shutter priority or Aperture priority) will result in different exposure values for each photograph, which in turn may cause the final merged photograph to have varied exposure and color casts in different parts of the photograph.
#2 RAW or JPEG
While you generally want to shoot in RAW, it is preferable to switch to JPEG for panoramas. Shooting in RAW is absolutely fine, but since the photographs will not be edited individually (we will see this at a later stage) and to reduce shutter lag, shooting in JPEG is preferred. A word of caution – as we will be shooting in JPEG make sure the exposure values are correctly adjusted.
#3 Tripod or handheld?
If the weight of your tripod is not a factor, carrying it is always preferable. However on a bright day you can very well rely on your own hands. A steady posture, or using your camera bag or any sturdy object available to rest the camera on, will save you the weight of carrying a tripod.
#4 Horizontal or vertical
We are generally accustomed to shoot in Landscape (horizontal) mode. Shooting in Landscape is fine but the resulting panorama will be short in height, since Landscape photographs will be stitched together. Additionally, during the stitching process there will be a lot of redundant or blank areas (you will see later during the post-processing) which need to be cropped out. This will further reduce the height of the panorama. To overcome this issue you may choose to shoot the panorama in Portrait (Vertical) mode. This will help in achieving a greater image height which can be cropped out as per requirement, say for printing or aesthetics.
#5 Be fast
Be very quick in shooting since light conditions change fast. Additionally if you are shooting a cityscape, a populated beach or a scenario where there is movement, be cautious. If you are not shooting fast enough, you will find moving objects (e.g., people, cars, bikes) will be duplicated across the frames. You would not want to see the same object twice across the panorama.
# 6 Plan it out well
Stand at the selected spot and plan the number of shots in advance. This will help you in keeping a control of the number of shots rather than shooting randomly. Be sure to do a mock round without actually shooting.
When you are ready, start shooting from left to right. Make sure you have at least 20% overlapping areas in two consecutive photographs. An visual estimate will suffice. Look through your viewfinder and shoot. Do not look at the individual photographs on your LCD screen until you finish shooting. Before leaving the scene turn on the LCD screen and review the photograph series. If you are not happy, shoot again.
Stitching your panorama
The sext step is stitching your panorama. There are plenty of panoramic stitching software available on the internet. I will put a list of links to some of the best software at the end of this article. The stitching process is similar across software but as of now we will use the standard photo editing tool – Adobe Photoshop. The stitching process in Adobe Photoshop is fully automated.
Since you may have shot more than one panorama series, for the purpose of identification it would be easier to store each series in a separate folder. You may have shot in JPEG or RAW but make sure you do not edit individual photographs.
Steps to stitch a panorama:
Open Photoshop
Click File > Automate > Photomerge
“Auto” is the default Layout option. Photoshop analyzes the source images and applies either a Perspective, Cylindrical, and Spherical layout, depending on which produces a better Photomerge. Choose “Auto” if it is not selected by default.
Check “Blend Images Together”
Next Click “Browse” and locate the separate Folder where you have put in your panorama series. Select the series and click “Ok”
Depending on the number and size of the photographs, it may take a while for Adobe Photoshop to stitch together the images.
After the stitching process is completed you will find a roughly shaped panorama (with a few redundant spaces). Refer to the image above
Right click on a Layer in the Layers panel and click Merge Layers
The next step is to use the Crop Tool to trim out the redundant portions of the panorama
After the final touches you are done with your very own first panorama
Links to panorama stitching software:
AutoStitch
pTGui
Hugin
Autopano
Microsoft Image Composite Editor
If this is the first time you are creating your panorama, I would love to receive your feedback or to share your panorama in the comments below.
The post A Step By Step Guide to Making Your First Panorama Photo by Soumya Shankar Ghosal appeared first on Digital Photography School.
They say a picture is worth a thousand words. So, we did some math…
Turns out, a double exposure is worth two thousand words!
When you meld one image onto another, all of those extra words tend to run along the lines of, “Wow! Cool! Looks neat! I love it. How did you…?”
Sure, there are apps to fake double exposures and you can spend hours in photoshop or a darkroom (remember those?) creating ‘em.
But, we’re here to share two ways to make double exposures as you shoot, using reflective little Color Lens and Flash Filters and the magical Instax 90 Instant Camera.
Learn To make Double Exposures Two Ways*
*total value = 4,000 words
(…) Read the rest of Two Gizmos For Making Double Exposures (373 words)
Double Exposures: A DIY Project That Brings Friends Together With Photos! Extra photos for bloggers: 1, 2, 3 We love hanging…
How to Shoot Dreamy Double Exposure Portraits + 5 Awesomely Inspirational Photographers Haunting, dreamy, and gorgeous all at once, double exposures of…
Long Exposures + Facebook Albums = Gorgeously Layered Photos We sign in, and within 10 minutes, we’ve seen photo…
They say a picture is worth a thousand words. So, we did some math…
Turns out, a double exposure is worth two thousand words!
When you meld one image onto another, all of those extra words tend to run along the lines of, “Wow! Cool! Looks neat! I love it. How did you…?”
Sure, there are apps to fake double exposures and you can spend hours in photoshop or a darkroom (remember those?) creating ‘em.
But, we’re here to share two ways to make double exposures as you shoot, using reflective little Color Lens and Flash Filters and the magical Instax 90 Instant Camera.
Learn To make Double Exposures Two Ways*
*total value = 4,000 words
(…) Read the rest of Two Gizmos For Making Double Exposures (373 words)
How to Shoot Dreamy Double Exposure Portraits + 5 Awesomely Inspirational Photographers Haunting, dreamy, and gorgeous all at once, double exposures of…
Double Exposures: A DIY Project That Brings Friends Together With Photos! Extra photos for bloggers: 1, 2, 3 We love hanging…
Meet the Double Exposure Digi Cam! If it’s true that good things come in small packages,…
On the fifth day of Christmas dPS gave to me, the deal we know a lot of you have been waiting for …
Save 65% on our smash-hit eBook Portraits: Making The Shot
Snap up a copy here for just $ 7
Making The Shot is an amazing eBook that will help you say goodbye to dull and lifeless pictures of people forever. It’s Jam packed with 25 years of portrait photography perfection and we think it’s the best portrait photography eBook you’ll find …
And 10′s of thousands of our readers who’ve picked up a copy agree.
If people are what you’re looking at through your viewfinder, you do not want to miss this eBook at this never before offered price.
Now on one hand we’re really excited about sharing this deal – it’s the cheapest this brilliant portrait photography eBook has ever been.
… and we know you all love $ 7 eBooks!
But on the other hand we’re a little worried
… let’s hope our servers hold up!
Grab your copy of Making The Shot before the deal closes or our servers go into meltdown!
It is available right now for only $ 7 ($ 19.99RRP) for the next 24 hours only!
The post Get our ‘Making the Shot’ Portraits eBook today for $ 7 only! by Darren Rowse appeared first on Digital Photography School.
They can happen to anyone who thinks he’s a good photographer. They can even happen to a professional photographer who has had years and years of experience in the industry! What…is “they?” In this case, “they” is a reference to the absolutely worst photography errors that you don’t even know you’re making. No matter how good you are or think Continue Reading
The post The 5 Stupidest Photography Errors You Don’t Even Know You’re Making appeared first on Photodoto.
Photographers get into stock photography in order to sell their pictures and make a respectable amount of extra money. Unfortunately, this is easier said than done since so many things can get in the way. For many photographers, their experimentations with stock photography simply amount to a waste of time and effort, which is unproductive. However, setting up and editing Continue Reading
The post Making Your Stock Photography Sell Like Crazy appeared first on Photodoto.
In last week’s article about Lightroom you learnt how to use Collections and Smart Collections to organise your images. Today, I’m going to take a closer look at the Grid View (part of the Library module) and show you how to customise the display.
If you’re not in Grid view, just press the ‘G’ key. It’s a keyboard shortcut that will take you to the Grid view from any part of Lightroom.
The Grid View displays thumbnails of photos contained in the currently selected Folders, Collections or search results. Here, I used the Shift+Tab shortcut to remove the left-and right-hand panels, the filmstrip and the module picker button panels from the view:
These are the three main sections of the Grid View:
The Filter bar: marked in yellow. Press the backward slash (‘\’) key to reveal the Filter bar if you don’t see it. You can use the same key to hide it.
The Content window: marked in green. This is where Lightroom displays the image thumbnails.
The Toolbar: marked in blue. Press ‘T’ to reveal it if you don’t see it. The same key also hides the Toolbar.
The Toolbar
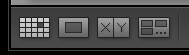
There are several items on the Toolbar of immediate interest:
These icons represent the four view modes of the Library module. From left to right they are Grid View, Loupe View, Compare View and Survey view. The Grid view icon is highlighted to indicate that it is the active view mode (I will look at the other view modes in future articles).
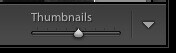
The Thumbnails slider is on the right-hand side of the Toolbar. Use it to set the size of the thumbnails in the Content window.
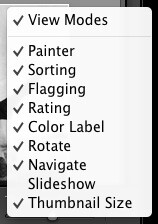
Finally, if you click the white arrow on the very right of the Toolbar, you’ll see the above menu. Each menu item corresponds to an item on the Toolbar. The ticks indicate which items are displayed on the Toolbar. Click on any of the menu items to add or remove them.
The Content window
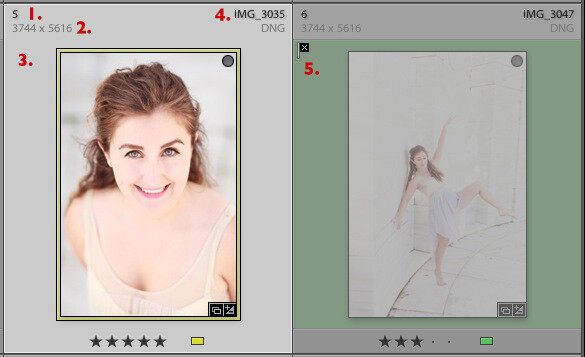
The Content window is where Lightroom displays thumbnails. Each thumbnail, plus the grey border around it, is called a cell. There are two types of display: Compact cells and Expanded cells.
Compact cells
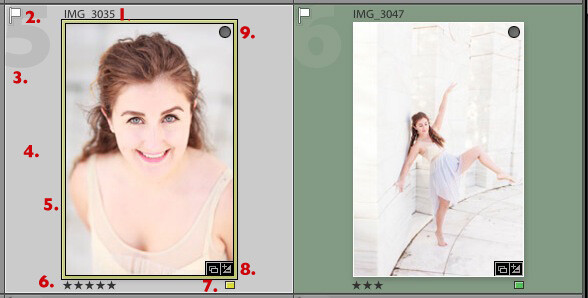
This is what the Compact cell display looks like:
I’ve numbered the important parts:
1. The filename of the photo.
2. The white flag indicates this photo has been flagged as a pick.
3. The big number 5 shows this image is the fifth in the sequence in the currently selected folders or Collections.
4. The light grey border means this photo is selected.
5. The yellow border shows that the yellow colour label has been applied to this image. This photo is selected, so Lightroom displays a thin border. If the image is not selected, Lightroom applies the colour label to the entire border. That is why the thumbnail on the right is surrounded by a thick green border.
6. These stars show that the image has a five star rating.
7. The yellow square also indicates the colour label.
8. There are two icons at the bottom right of the photo (you may see different icons depending on what you have done to the image). The icon on the left indicates that the photo has been added to at least one Collection. The icon on the right tells you that the photo has Develop adjustments.
Tip: If you hover the mouse over an icon and keep it still, Lightroom will display a label telling you what the icon means. It appears after about two seconds.
9. The grey circle in the top right indicates that the photo has been added to at least one Collection.
Tip: To see what Collections the photo has been added to right-click on the thumbnail and go to the ‘Go to Collection’ option. Click on a Collection name to open that Collection in Grid View.
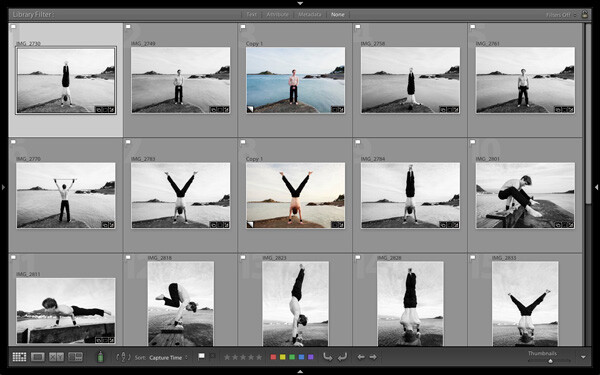
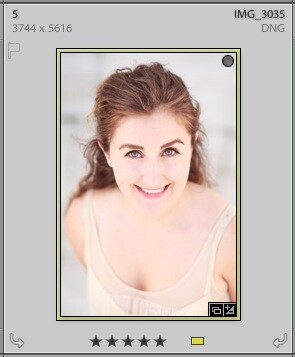
Expanded cells
Here is the Expanded cell display. The cells are larger than the Compact cells, and contain a little more information. I’ve marked the parts that are different:
1. The size of the number indicating that this is the fifth photo in the currently selected folders or Collections has changed.
2. These figures show the dimensions of the photo in pixels.
3. There is no flag here, indicating that this photo hasn’t been flagged as a pick or flagged as a reject.
4. The filename of the photo, with the file type (in this case, DNG) underneath.
5. The black flag indicates that this photo has been flagged as a reject. Lightroom fades out the thumbnail so you can see it has been rejected.
View Options
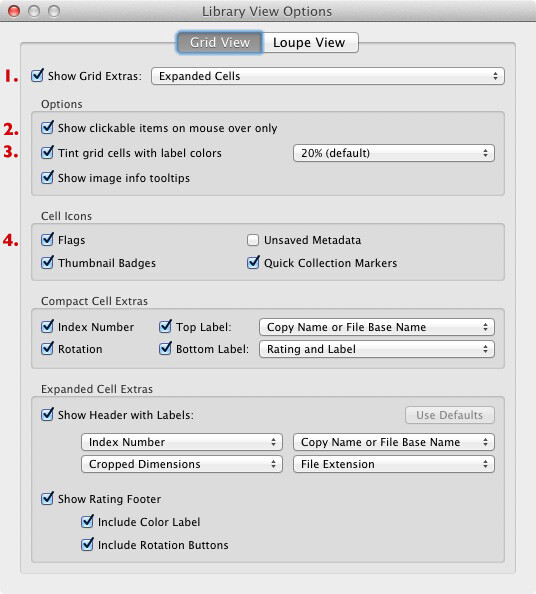
Lightroom lets you customise the layout of the cells so the display shows as much or as little as you wish. Go to View > View options (or use the keyboard shortcuts PC: Ctrl+J, Mac: Cmd+J) to bring up the Library View Options window. Again, I’ve marked some of the interesting menu options:
1. Show Grid Extras. This is where you chose between Compact Cells and Expanded Cells. Untick the Show Grid Extras box if you want to simplify your display. Doing so removes the information displayed around the thumbnails in Grid View.
2. Show clickable items on mouseover only. If you untick this box every thumbnail is displayed with arrows in the bottom corners that you click to rotate the image, and a grey flag if the image is unflagged. With this box ticked, these icons are only displayed when you move the mouse over the image:
3. If the colour labels annoy you, or you just don’t use them, untick this box to turn them off. The menu on the right lets you adjust the intensity of the colour tint.
4. The rest of the View Options let you customise what icons and information are displayed alongside the thumbnails.
Your thoughts
How do you customise Lightroom? I’d be interested to hear your thoughts, whether they are about the Grid View or another part of Lightroom. Leave a note in the comments if you have anything to share.
Mastering Lightroom Book One: The Library Module
My latest ebook Mastering Lightroom Book One: The Library Module is a complete guide to using Lightroom’s Library module to import, organise and search your photo files. You’ll learn how to tame your growing photo collection using Collections and Collection Sets, and how to save time so you can spend more time in the Develop module processing your photos.
Post originally from: Digital Photography Tips.
Check out our more Photography Tips at Photography Tips for Beginners, Portrait Photography Tips and Wedding Photography Tips.
Making Sense of Lightroom’s Grid View
The post Making Sense of Lightroom’s Grid View by Andrew Gibson appeared first on Digital Photography School.
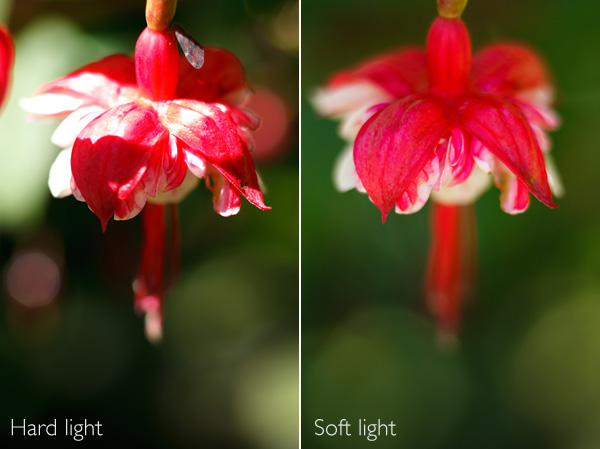
In a previous article I explored ways of taking photos in soft light. Today, I’d like to look at the opposite of that, and discuss the idea of taking photos in hard light.
In the earlier piece I wrote about matching the light to the subject. That’s an important concept to understand – especially when it comes to hard light, a type of lighting considered by many photographers to be unsuitable for most types of photography.
I’m not saying those photographers are incorrect. Hard light doesn’t suit every type of subject, and if you’re trying to take a photo in hard light that you really shouldn’t be taking, then nothing you can do is going to work. Here’s an example from the earlier article:
The flower had to be lit by soft light for the image to work. In hard light, there was too much contrast. The light didn’t suit the subject.
What is hard light?
Hard light comes from a light source that is relatively small compared to the subject. It creates strong, clearly defined shadows.
For example, hard light is cast by the sun when it is high in the sky on a cloudless day. The light gets softer as the sun dips towards the horizon at the end of the day. If clouds appear, or the air is hazy or polluted, that may also soften the light.
If you use portable flash you will also know that the light from an unmodified flash unit is very hard. That’s because the light comes from a relatively small light source – the flash head isn’t very big. That’s why photographers use lighting modifiers with flash units, to effectively make the source of the light larger, which makes the light softer. You can read more about using portable flash here and here.
Now, let’s look at how you can make hard light work for you, with some practical examples:
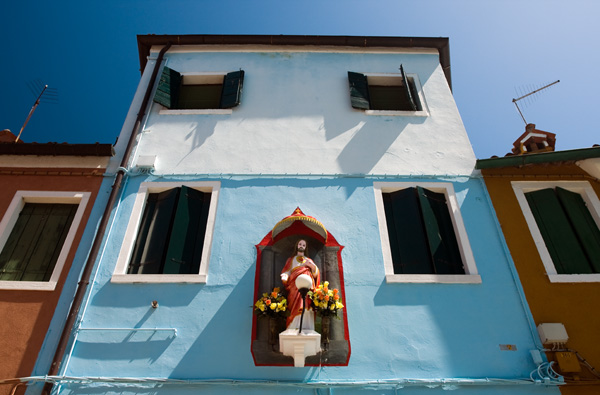
I took this photo in Burano, an island near Venice, at around 2.30pm in summer. The light was very hard. But look at the long shadows on the wall of the building. The sun was nearly overhead, and a little to the right. From that position, the light rakes over the surface of the building, picking out the texture (I also used a polarising filter to deepen the colours). Noticing scenes like this, and recognising the photo opportunity, is just a matter of training your eye to see where the light is falling.
Architecture is an ideal subject when the light is hard. If you are in a city or urban area during the middle of a sunny day, you can often take good photos of the buildings.
Convert to black and white
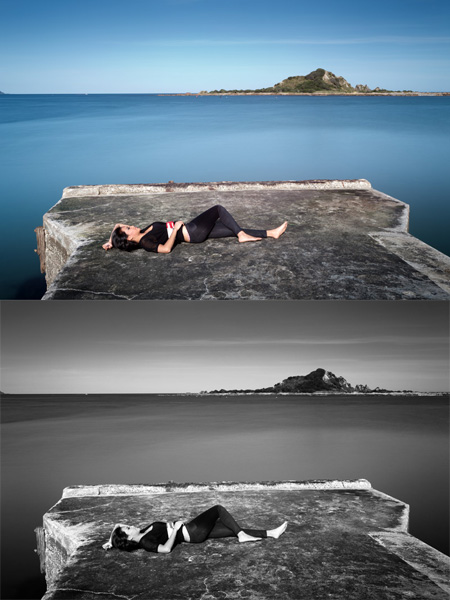
Photos taken in hard light are often more interesting in black and white than colour. Colour photos may look bland when illuminated by hard light from the overhead sun.
Here’s an example of long exposure photography that I took around 2pm in the afternoon. I used a nine stop neutral density filter to obtain a shutter speed of 30 seconds. It looked a little boring, so I converted it to black and white.
Finally, here’s a photo taken at around 2.30pm in the middle of summer:
We were on the beach and the light was very hard. There was no way that I could take a portrait using natural light alone. I used an on-camera portable flash unit (itself a hard light source) and used that to overpower the light from the sun. It acted like a powerful fill light, filling in the shadows cast by the sun. Compare that to this portrait (from my article about soft light):
Two different types of light, two completely different effects. Bear in mind that hard light plus flash won’t be flattering to everybody, and will generally work better with men than women. Again, it comes back to the idea of matching the light to the subject.
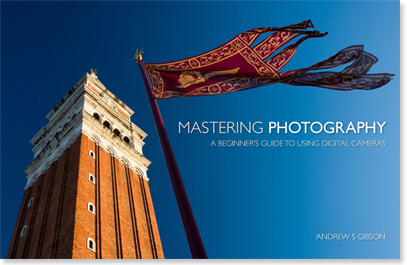
Mastering Photography
My latest ebook, Mastering Photography: A Beginner’s Guide to Using Digital Cameras introduces you to digital photography and helps you make the most out of your digital cameras. It covers concepts such as lighting and composition as well as the camera settings you need to master to take photos like the ones in this article.
Post originally from: Digital Photography Tips.
Check out our more Photography Tips at Photography Tips for Beginners, Portrait Photography Tips and Wedding Photography Tips.
When it comes to movies, editing is kind of a big deal.
Without it, we wouldn’t have twist endings. (Looking at you, M. Night.) We wouldn’t have out-of-order movies to entertain our brains (Marty McFly 4ever). We wouldn’t even have beginnings, middles, and ends!
Frankly, movies would be pretty weird and probably not very good at all without editing.
Thanks to Instagram’s 4.1 update, you can now upload videos to Instagram, meaning a whole new world of video editing has opened up!
Sound, filters, transitions, sequencing — there is so much you can do to an Instagram video before uploading it. And awesomely, you can do it all on your phone.
Consider this guide an editing workshop that’ll turn your Instagram videos into cinematic artworks served 15 seconds at a time.
10 Tips for Editing Instagram Videos
You Can Now *Upload* Vids to Instagram
Instagram must’ve read our minds with the 4.1 update because we were like Man, wish we could upload #tbt vids!
Now, you totally can. You can upload any video that’s in your phone’s library, and with a quick file transfer, you can even upload videos that are sitting on your computer (we’ll show you how in the guide below!).
Being able to upload video opens up a whole new world! It means that you can get way more precise about how you shoot and edit your videos because you can use outside apps, add sound and video effects, splice together clips, and speed up or slow down your footage.
Read on to learn how to which tools and apps are the handiest, how to optimize shooting and editing within Instagram itself, and how to make a workflow for churning out really great videos!
Pre-req reading: Check out our essential guide to Instagram video if you haven’t yet. It answers all the questions you might have about Instagram video and also give you ideas to start.
How to Get Videos onto Your Phone
Shoot it on your phone.
Shooting videos on your phone is obviously the fastest way to get videos onto your phone.. But did you know there are lots of options besides shooting within the Instagram app?
Yeah! It’s actually quite refreshing to shoot video outside the Instagram app.
You’ll pick how you shoot your video based on what you want your end-result to be like. Here are a couple options and why you’d use them:
Your phone’s native camera app.
Use this to shoot multiple clips that you can then arrange in the order you’d like in Instagram. This gives you more freedom with time and set-up because you don’t have to shoot in order like you do in the Instagram app. (Also, you don’t have to fear accidentally losing your work-in-progress while working in the app!)
A filter app.
Use this to get a different look besides the filters that Instagram offers. We dig Vintagio (Android & iOS) and 8mm (iOS). Or you can even layer filters to come up with your own feel.
An advanced video editing app.
Apps like iMovie (iOS) equip you with extra tools that give you more precise editing tools and control over sound and transitions. If you find yourself using one of these often, then you might end up shooting through these apps to make it seamless.
PRO-TIP: When you upload a rectangular video (which is what most other apps shoot in), your video will be cropped in Instagram. Instagram crops to center your video, so while you’re shooting, just envision that either side of your video will be lopped off.
Transfer files from your computer to your phone easily.
Maybe you have phone videos that you long ago saved to your computer. Maybe you have vids you shot on your DSLR. Maybe you have childhood vids transferred from old VHSs.
Whatever it is, your video’s trapped on your computer, and you need to get it to your phone so you can share its amazingness with all of your Instagram followers STAT.
The file might be too big to email to yourself and bothering with cables can be cumbersome and take time.
Here’s how to do it the e-z way:
Use an iFlash Drive to transfer files. This is a spacious drive (up to 16GB) that lets you quickly transfer files between your phone and your laptop. One end connects to your phone, the other a USB.
Use an EyeFi SD card to wirelessly send vids straight from your DSLR and onto your phone. (IT DOES THAT.) You can see how it works in the vid above!
Use an app like Dropbox (Android & iOS) or Cloud to store in internet-space and download it on whatever device you want, whenever you need it. If you have a iThingies, you can also use iCloud to sync your files across computers and devices.
Make Your Video Legit with Transitions
Instead of having your video abruptly switch from scene to scene all choppy-like, you can use transitions to give your video a more cinematic, elegant flow.
Use objects as a clever transition.
One really clever way to transition scenes is to use objects as a divider between two completely different shots. Check out the vid to the right to see how cool this effect is!
How to do it? Pan your camera horizontally across your first scene and place your transitional object at the end of it. (We used bags as our objects in the sample video above. Yours can be anything — a tree, a person, a telephone pole.) When your video pans half-way through that object, cut the scene.
Now, go to a new location for your next scene, and place the same object at the start of the new panning scene. Start shooting at the halfway mark of the object where you stopped your previous scene and end the scene halfway through the next object. Repeat for however many scenes you want to sequence together. The end result will look like one seamless pan that completely changes location between objects. That’s movie magic, baby.
PRO-TIP: Measure how far your object is away from your camera, so that you can make it consistent from one scene to the next.
BONUS IDEA: Place a piece of paper over your phone lens to give yourself a black screen between scenes. You can also pull it away and allow your camera to adjust exposure and come into focus as you’re filming — this ends up looking like a dreamy fade-in. Check out our example.
Use apps to add transitions between scenes.
Apps are great because they give us access to tools that previously only pros had. Case in point, iMovie (iOS) and WeVideo (Android & iOS) give you options for placing transitions between video scenes.
You can do a simple fade in/fade out, text (think silent movies!), and all the transition types that you never really thought about but have probably seen on TV or in movies.
Pull focus a.k.a. Changing depth of field
Pulling focus is this fancy thing cinematographers do to get movie-watchers to pay attention to a particular part of the screen or to spice up a moment with visual drama.
You’ve seen this in movies when an out-of-focus shot suddenly comes into sharp focus or when something that’s in the foreground falls out of focus and the background comes into focus instead.
Pulling focus can also mean simply keeping your subject in focus as they move within your shot.
The cool thing about all of this? You can do it on your phone! Here are two ways:
Tapping to focus.
While your phone doesn’t have much of depth of field to work with, you will still notice certain parts of your shot going in and out of focus as you move your phone. This is especially true if one subject in your shot is a lot closer to your lens than everything else in the shot.
As you move or as your subject moves, pay attention to how your focus changes, and tap your screen to keep what you want in focus nice and sharp. You might *want* something to fall out of focus, so tap a different part of your screen to get them to fall out of focus.
Using a telephoto phone lens for dramatic depth of field.
Watch the video above to see just how dramatic of a focus shift you can get with a telephoto phone lens! Because it’s telephoto, you get a nice range of depth of field. It also has a focusing ring that lets you control exactly where focus falls in your shot.
Another way to do it is by using an iPhone SLR lens mount to shoot phone photos and vids with SLR lenses. You read right — you can shoot videos using your SLR lenses mounted onto your phone.
Chopping & Sequencing Clips
The editing choices you make can really make your video stand out from the rest. Remember Memento? Yeah, those guys were nominated for best film editing at the Oscars for the super clever way they edited the story out of order. Now bookmark that in your brain, and get your tapping finger ready.
Plan your video.
When it comes to editing, the best thing you can do is to plan out what you’re going to shoot before you even start. This can be as quick as taking out 30 seconds to come up with a vision for your video in your mind.
Questions to ask yourself: What are you trying to get across in your video? What will the beginning, middle, and end be? How long should each clip be, so that you can fit your entire story into your time limit? Maybe your idea’s worth spanning over more than one Instagram post — how many?
Chopping.
Maybe your clip is too long or you want to sequence a bunch of clips together, but they don’t quite start or end the way you want them to. Go to town like a lumberjack on a tree trunk: chop. it. down.
How? Instagram lets you trim down video clips. After you load a video, hit Next. Then use the slider to shorten the video to the length you want. Move the video timeline underneath the slider to indicate exactly which part of the video you want to crop down to.
Most phones’ native camera apps also already have simple editing tools that let you shorten your video clips down just how you like them. In iOS, view a video in your library, and move the slider on each end of your video clip’s timeline to where you’d like it. Then hit the “Trim” button that appears in the top right corner.
Sequencing.
Sequencing is all about the order of your clips and how you transition between them. If your video is spur of the moment, you can edit as you shoot within Instagram by viewing your video and the going back to the previous screen to delete and add scenes.
However, if you’re shooting something more complex, there’s a disadvantage to editing together clips as you go within Instagram. You can’t rearrange the order of videos you’ve already placed into your Instagram video. So if you wanted to be able to do that and get more precise with how your clips transition and the order that they play, then you’ll want to use a video editing app like iMovie or WeVideo. If you work better on the big screen, you might even edit it on your computer and then transfer the file back to your phone.
Fast & Slow Motion
Slow motion is the raddest. Everyone and their mom knows it. While there has yet to emerge one great app that gives you the kind of slow-motion effects you see coming out of a Phantom Flex camera, there’s no harm in pushing the limits of slow-motion tools that currently exist in apps.
We were able to speed up the video above using Vintagio. Because the speed up and slow down tool only lets you change the speed a little bit, we ran the video through the app twice to speed it up doubly. You can do the same thing for slowing down your video.
Keep in mind, it won’t look as smooth as other slow motion videos because your phone just doesn’t shoot video at a high enough frame per second. Again, there’s no harm in playing with what you have, so experiment!
We haven’t found a great Android app for slowing down or speeding up video, but if you know of one, let us know.
Oh yeah, and if you’re into editing video on your desktop, Twixtor is a tool that manipulates video to make it look like it was shot at a higher frame per second than it actually was. In short, it gives you a slow motion effect without having to use an expensive slow motion camera.
Adding Music, Sound Effects, and Muting
One amazing advantage to being able to upload videos to Instagram is that you can edit sound on your videos before you post them!
Depending on what app you’re using for video editing, you can control the sound in your videos in all kinds of ways.
Here are some ideas:
Mute or lower the sound in your video
Record narration or sound effects to lay over your video
Import music from your phone’s library
If you’re wondering which apps do what, here’s a quick rundown. iMovie and Vintagio give you the ability to control volume on your video. The iMovie app in particular lets you lay over a narration or any recording that you make, as well as import music and sound effects.
Meanwhile, WeVideo doesn’t let you edit sound within the phone app, but the app syncs your video to the desktop app, which gives you sound editing options. Vintagio comes with pre-selected music that you can play over your video, too.
Filters, in Apps and By Hand
Instagram video comes with a set of squeaky new filters, but what if you’re looking for something different?
Outside apps.
8mm and Vintagio do a good job of covering specific film looks based on time period. For example, if you want a black and white ‘20s silent film look vs. a warm 70s vibe.
If those aren’t enough iMovie and WeVideo have filters, too. And if you’re into experimentation, overlap filters across apps to make your own awesome filter! You can even name it after your favorite celebrity cat.
Filters by hand.
DIY the dang thing. We’re talking hold up anything that looks like it could potentially Shooting a horror vid? Hold up some red glass over your lens.
Want to make it lo-fi? Grab some plastic to give your video dreamy vignetting.
Want to give your video a warm tint Coen brothers style? Use your sunglasses to wash your video in color. If you’re into these ideas, check out our roundup of 10 DIY Filters on the Cheap.
Dreamy lens flares.
We’ve played around with how to create intentional lens flares. Here are two fun and easy ways to do it:
1) Lens whacking is a videography technique that’s similar to free-lensing. You remove the lens from your DSLR and slightly move it away from the camera body. The purpose here is to let light hit the camera sensor to create moving light leaks, which we can attest are very pretty and –heck we’ll say it– dreamy. If you shoot on a DSLR, here’s a guide with samples.
Since phone’s don’t quite work this same way, you can still create the illusion of light leaks by having your subject backlit and letting your phone’s auto-exposure shift with the movement of your camera or your subject. This can create rays of light in your video that can look quite lovely.
2) Sprinkling water either directly on your lens or onto a clear sheet in front of your lens. Try something like a pane of glass, mylar or anything clear. Here’s our full guide on playing with water for lens effects.
360-Degree Time-lapses
Time-lapses are cool, but have you ever seen a panning time-lapse? It’s dually impressive! It’s one of those effects that stops you in your tracks because you wonder, How’d they do that?
If you’re not sure what a panning time-lapse is, it’s when your camera pans across a landscape and simultaneously shoots a time-lapse.
Two popular ways to make a panning time-lapse is by using a slider that moves your camera horizontally or by using a rotating mount that turns your camera 360-degrees.
We were able to make the 360-degree time-lapse above with a simple rotating mount called the Camalapse. You can use this mount with any camera that has a tripod thread, but we mounted our phone by pairing it with the Glif (a tripod mount for iPhones).
Just grab a time-lapse app, like Lapse-It (Android & iOS), set up how long you want to shoot your time-lapse for, twist the Camalapse (twists similar to a kitchen timer), and let ‘er go. In the end, you’ll get a rad video that all your buddies will be asking you about.
PRO-TIP: Because time-lapses are usually slow-paced, we sped ours up by running it through Vintagio’s speed-up tool two times.
STOP-MOTION & Editing Photos into Video
If you’re using the internet right now, there’s a good chance you’ve seen a stop-motion or two. Stop-motions, when well done, have the power to blow people’s minds, and that’s a good thing!
Stop-Motion Tips.
We have so many tips in our Ultimate Guide to Stop-Motion, but here are the essentials. Of utmost importance, keep your camera still. Put it on a tripod or set it somewhere where it absolutely won’t move.
Aim for consistent lighting. If this is going to take a while, shoot in a place where your light isn’t moving (i.e. the sun traveling across the sky), unless o’ course that’s what you want.
If you’re shooting and editing within Instagram, tap lightly and quickly to record, so you don’t accidentally make each clip too long. For smooth movement, each clip should be as brief as you can shoot it.
To get more precise, you can shoot individual photos for each frame in your phone’s native camera app, and then import the photos to create a video in iMovie or WeVideo. This’ll let you throw out any mess-up shots or figure out if you need to reshoot a particular part of the stop-motion.
PRO-TIP: A camera phone remote can make shooting tiny clips easier and also prevent you from accidentally moving your phone while tapping.
The Quickie Slideshow — Your Life in Instagram Flashed Before Your Eyes.
You might’ve heard about Pummelvision. It was a web app that took all of your Facebook or Flickr photos and turned them into a lightning-fast slideshow. It was like watching your life flash before your eyes! We cried, not kidding.
Everlapse is a similar idea, but it takes your most popular Instagram photos and turns them into a short reel that you can share on Instagram. We’re getting verklempt just thinking about all the memories.
Instagrammers with Vid Skillzzz
Hopefully at this point, you’ve abandoned this article and are outside shooting and maybe will not read these words until hours from now (which we’re fine with because OMG you should be out shooting!).
And if not, your brain’s about to be so full of ideas they’ll start to leak out your ears/eyeballs/face. Why will that happen? Because gathered up a list of amazing Instagram videographers for your personal inspiration.
@megancignoli — A photographer/director with a jelly-worthy talent for stop-motion. Girl’s got creativity *and* patience.
@nazfilms — A cinematographer who makes incredible experimental Instagram videos completely shot and edited on his iPhone. Watch with sound. Also, watch for his just started #flickstagramseries.
@bythebrush — A painter who needs to get into movie-making stat. Especially good for inspiration on transitions between scenes, as well as music use.
@pinot — An illustrator & animator whose animations makes us question reality.
@teresa_franco — A nurse who can wield a macro phone lens like a pro. Check out her amazing insect videos.
@mariamsitchinava — An editorial photographer who turns her stills into gorgeous filmic vignettes.
@cole_rise — While this photographer/pilot doesn’t have a lot of videos up right now, he’s one to watch.
@rokuthecat — Just because.
Related posts:
Pro-Tips for Shooting Better Instagram Videos Extra vids for bloggers: 1, 2, 3 “Well that’s weird,”…
FlipClips — Print Your Short Videos into Magical Flipbooks If you bought your digital camera in the past few…
10 Tips to Make Your Phone Photos Amazing; Plus, Our New Phoneography Blog! Phoneography is the best. No matter where you go, you’ve…
Moses Hacmon came up with one of the best photographic riddles we’ve ever heard.
How do you make a photogram of water if it’s clear? Light would just pass through it!
Moses spent years studying water and developed a photographic process that let him photograph the best part about water: its movement.
By working with a liquid film made up of nanoparticles, Moses is able to capture a moment in water’s movement. He layers this film over paper, and once water runs over it, the nanoparticles are absorbed into the paper, creating a negative image of the water’s flow.
The final image is a captivating still of the water’s twists and turns, overlaps, and shapes as it flows. You might even say you can see faces.
Moses’ most recent experiments include photographing what music looks like resonating through water. You can also help fundraise an exhibition.
More water play ideas: Aquatopiary Water Sculptures and Tim Tadder’s water wigs.
Faces of Water by Moses Hacmonvia NotCot
p.s. We’re hiring for an amazing opening at Photojojo. Apply and learn more to be our Editorial & Community Lead.
Related posts:
Aquatopiary: The Photo Trick that Sculpts Water into Shapes Extra photos for bloggers: 1, 2, 3 Bored of photographing…
Making Photos without Seeing – Blind Photographer Pete Eckert You’re ready to frame your shot. Lifting your camera to…
Project 1976: Making a Photo History of the Year You Were Born ~Have a cool photo product or site? Reach 270,000 photo…


 Extra photos for bloggers: 1, 2, 3
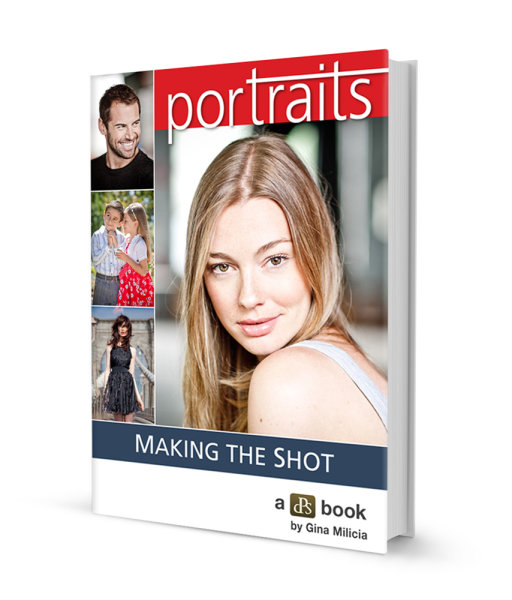 On the fifth day of Christmas dPS gave to me, the deal we know a lot of you have been waiting for …
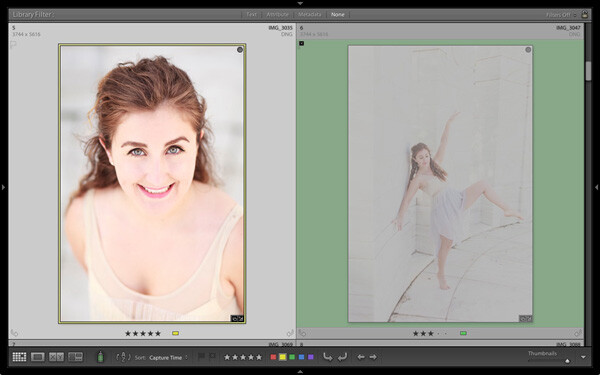


You must be logged in to post a comment.