RSS
 

Posts Tagged ‘Making’

Colour Contrast: Making the Most of Orange and Blue

29 Jun

Colour contrast: using orange and blue

One of the principles behind using colour in photography is that of using contrasting colours. To understand the concept we need to look at a colour wheel – a type of diagram used by designers to show the relationships between colours:

Colour contrast: using orange and blue

Diagram by Wikipedia contributor Jacobolus

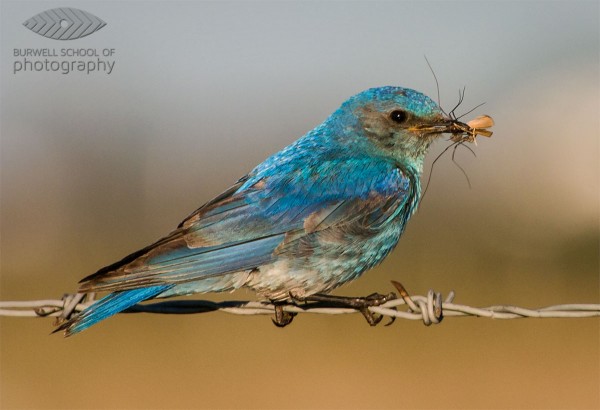
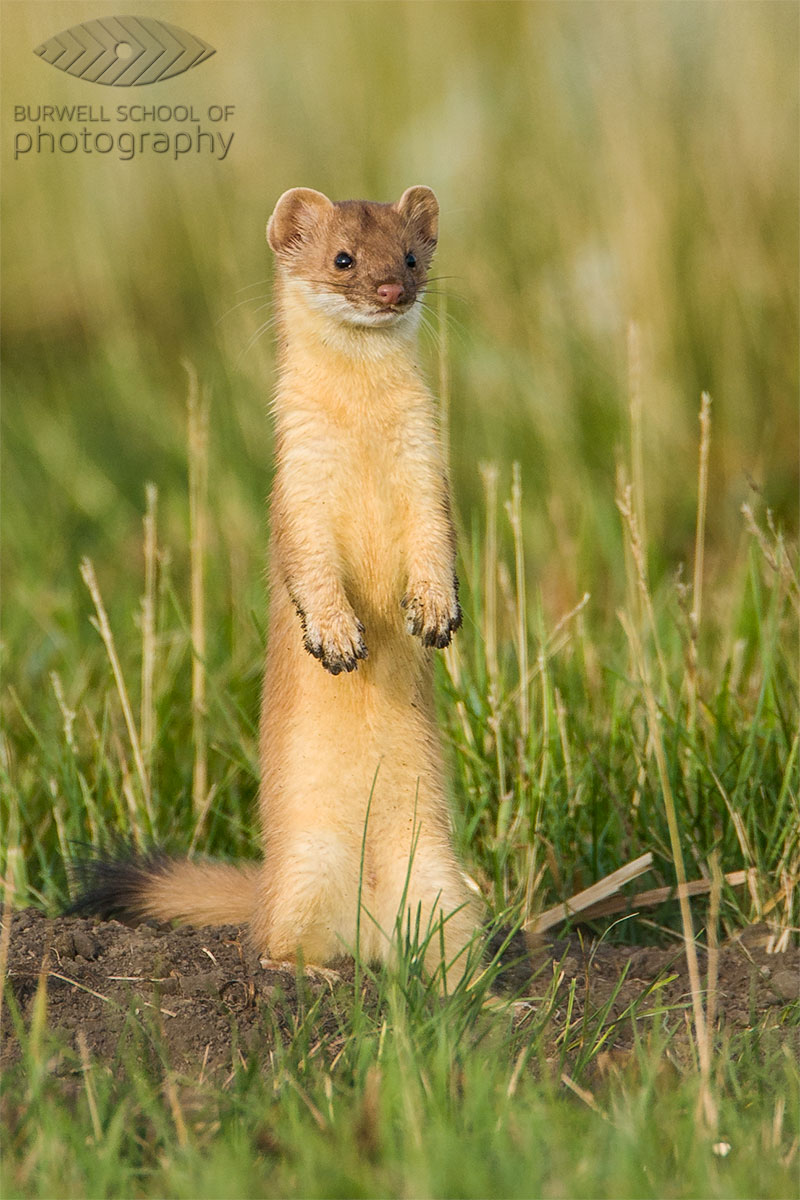
Contrasting colours are those that appear on opposite sides of the colour wheel. Today I’m going to look at two specific colours, orange and blue.

Why these two? They happen to be very useful colours to work with because they appear a lot in nature (even though you might not be aware of it). It’s all to do with the colour of the ambient light, which ranges from cool blue to warm orange, depending on the light source.

Incidentally, this is reflected by the colour temperature slider in Lightroom. One end is blue, and the other is orange:

Colour contrast: using orange and blue

Blue light

In low light, in fog or rain, or at twilight the natural colour of the light is blue. In these conditions, any photo you take has a blue colour cast.

The easiest way to see a colour cast in your photo is to set white balance to daylight. If the colour of the light is blue, then it will come out blue in your photo.

If you use auto white balance the camera will warm the photo up to compensate for the blue colour cast of the light. That’s useful sometimes, but it’s not desirable if you want to create a moody image.

Blue light is atmospheric. That’s because some colours evoke an emotional response, and blue is one of them. It is a cold colour – it connotes cold, misery, bad weather, even depression.

Colour contrast: using orange and blue

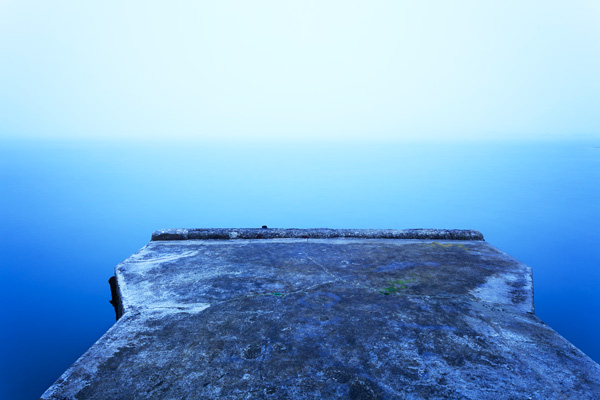
I took this photo in thick fog.The natural colour of the light is blue. The blue colour cast in this photo creates mood.

Orange light

Orange coloured light also occurs naturally. Light originating from the sun in the late afternoon, early evening or at sunset has an orange colour cast. So does light emitted by tungsten bulbs and burning flames.

Anything lit by these light sources will have a warm orange colour cast. Again, you will see it clearly if you set white balance to daylight.

Orange is another colour that evokes emotion. It is the colour of warmth and energy. It reminds us of things like the heat of summer or emotional warmth. Like blue, the psychological effect can be quite powerful.

Colour contrast: using orange and blue

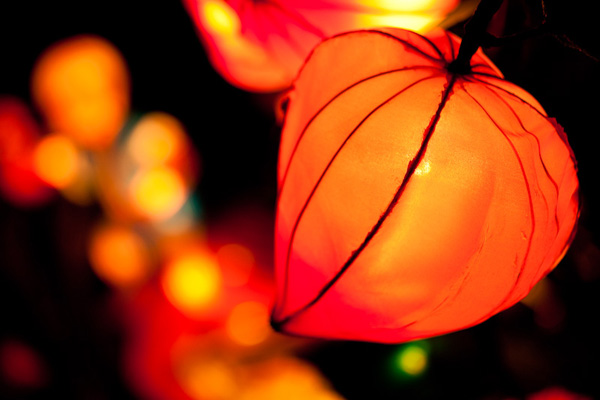
The light source in this photo is the tungsten bulbs inside the lanterns. The natural colour of this light is orange.

You can see that blue and orange are opposites in many respects. They are opposites on the colour wheel, and also in the emotions and feelings that they represent.

Combining blue and orange

One way to show contrast between two things is to place them together. There is a famous photo by Annie Leibovitz of a jockey and a basketball player, side by side (you can see it here). Placing both sportsmen side by side emphasises their respective height, and the difference in stature between them.

It’s the same with blue and orange. Include both in the same image to add to the power of this colour combination. The coldness of the blue tones emphasises the warmth of the orange ones, and vice versa. Here are a few examples:

Colour contrast: using orange and blue

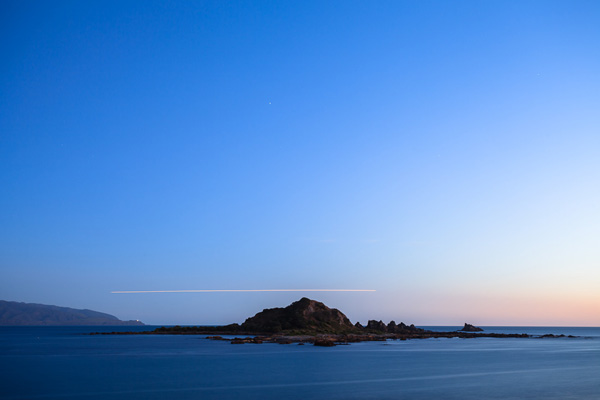
Most of the scene is lit by fading daylight, which has a natural blue colour. There is some warm light coming from the right, where the sun has set. The orange streak of light over the horizon comes from a plane flying by during the exposure.

Colour contrast: using orange and blue

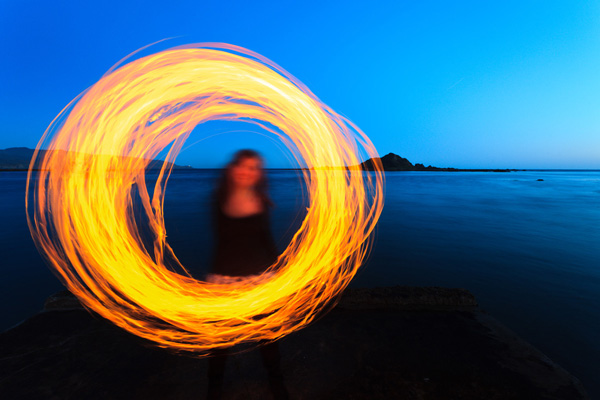
This photo was taken when it was nearly dark. The landscape is lit by the fading light, which has a natural blue colour. My model is whirling a burning object around. The light from the fire is orange.

Colour contrast: using orange and blue

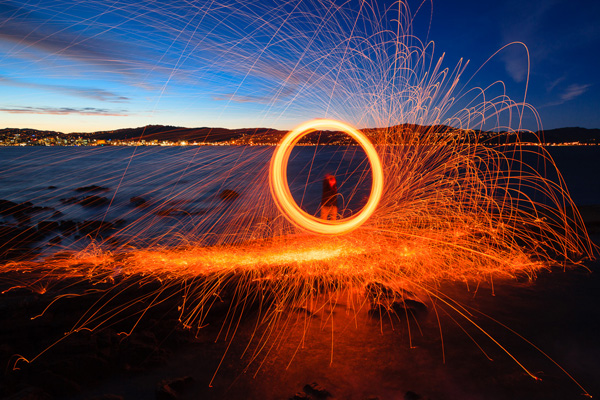
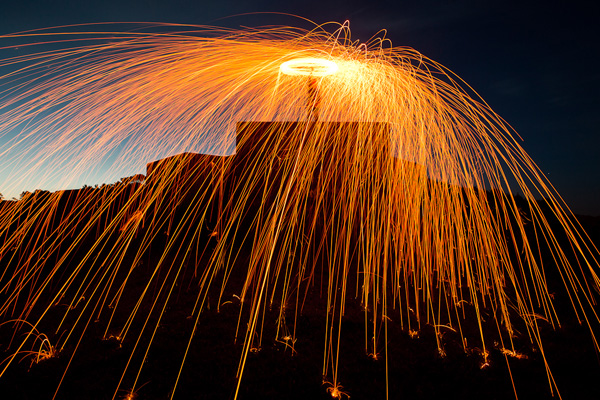
Finally, here is a photo created using the steel wool spinning technique. It’s taken at dusk, and the landscape is lit by the blue coloured light of the fading daylight. The light from the burning steel wool is orange, and so are the lights from the distant city buildings over the water.

If you want to try steel wool spinning yourself, click the link to read an article I wrote about it on my website. Please pay attention to the safety instructions in the article – steel wool spinning is potentially dangerous.

Mastering Photography

Colour contrast: using orange and blue

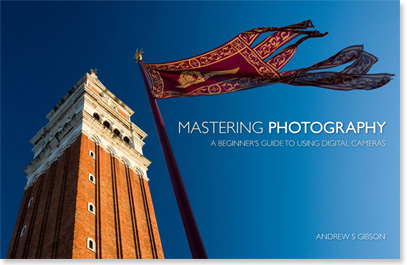
My latest ebook, Mastering Photography: A Beginner’s Guide to Using Digital Cameras introduces you to digital photography and helps you make the most out of your digital cameras. It covers concepts such as lighting and composition as well as the camera settings you need to master to take photos like the ones in this article.

By the way, the cover photo is another great example of using the orange and blue colour contrast. The building and flag are lit by the setting sun, so they have an orange colour cast. The summer sky is deep blue. You can take this sort of photo just about anywhere during the golden hour at the end of the day.

Post originally from: Digital Photography Tips.

Check out our more Photography Tips at Photography Tips for Beginners, Portrait Photography Tips and Wedding Photography Tips.

Colour Contrast: Making the Most of Orange and Blue


Digital Photography School

 
Comments Off on Colour Contrast: Making the Most of Orange and Blue

Posted in Photography


Why Aren’t Search Engines Making Better Use of Their Social Networks for Image Search?

06 Jun

One thing I’ve noticed more and more over the past few years is what a poor job traditional image search engines do vs. social networks.

By using social information around photos (likes, faves, comments, +1s, etc.), social networks typically produce much superior image search results than traditional image search.

Take this search of Coachella 2013 for example.

Screen Shot 2013-06-05 at 10.45.53 AM
Yahoo Image Search: “Coachella 2013″

Screen Shot 2013-06-05 at 10.46.24 AM
Google Image Search: “Coachella 2013″

Screen Shot 2013-06-05 at 10.47.28 AM
Flickr Image Search: “Coachella 2013″

The first image comes from Yahoo (or is it Microsoft these days, I can’t keep it all straight). It’s not very good. It shows too many images of just the lineup vs. actual fun interesting photos of the event itself.

Google’s image search results are better, but still not as good as many of the images I find on social networks.

Now I may be biased (as I shot this particular event) but I think Flickr’s search results are *far* better than either Google or Yahoo Image search.

I’m working on a project right now to photograph the 100 largest American cities. When I’m researching things to photograph in these cities I almost always go first to Flickr (because it’s the largest database of highly organized quality photos on the web). I will also look at Google+ too, sometimes. Google+ doesn’t have as many high quality images in the total database as Flickr, yet, but I find some pretty good stuff there sometimes still. Most of Flickr’s advantage here over Google+ just has to do with the fact that they are older and have more images indexed.

Lately I’ve also played around with graph search on Facebook for images — I haven’t been very impressed there at all though.

The one place I hardly ever go is to the actual Google or Yahoo image search engines — because the results are so inferior.

Here’s what I don’t get: *why* are the results at Yahoo and Google Image search inferior? Google and Yahoo have access to proprietary internal social data around photos in their social networks, why isn’t that coming through better in the signal for high quality images.

On my example search using Coachella 2013, not a single Flickr photo appears on Yahoo’s first page image search and not a single Google+ image appears on Google’s first page image search.

Shouldn’t these search engines be better mining organically and socially ranked superior content? It’s not that these engines don’t index it, they do, it’s just not ranking well.

Beyond just better image search, Google and Yahoo *should* have another significant incentive to better include their social images into image search.

All things being equal, assuming you could improve image search results, wouldn’t you want to drive more traffic to your own internal social network, rather than to some unrelated destination — and wouldn’t you want to reward the best photographers on your social network with more traffic vs. some random SEO rigged site somewhere?

Why aren’t image search engines doing a better job with social?

Another added benefit to driving image search traffic to your social network, is that the presentation there is usually better, more uniform and consistent. When I’m tempted to go further on an image from Yahoo or Google, I may end up at some odd sized photo, in some odd format. With a G+ or Flickr result I get a strong consistent image experience that I’m familiar with.

As an unrelated topic dealing with image search on Flickr — the best social image search on the web today — Flickr needs to give us the ability to block certain users from our search results. Many popular photographers will pollute image search on Flickr by falsely tagging things that are not in their popular photos, just to try to garner traffic.

Take this search on Flickr for dog for example. So many of the first page results are not photos of dogs at all. Flickr should allow us to block certain users from our search results in order to better refine them. When we block people from our search results, this should also be a signal to Flickr that this user should rank much worse in search. If users get the message that they will be penalized for purposely mistagging their photos, they will be less likely to try and game the system this way, resulting in better image search on Flickr for all of us.


Thomas Hawk Digital Connection

 
Comments Off on Why Aren’t Search Engines Making Better Use of Their Social Networks for Image Search?

Posted in Photography


Nikon under fire for making rifle scopes

04 Apr

Screen_Shot_2013-04-03_at_11.27.50_AM.png

Nikon has come under fire from animal welfare groups and some wildlife photographers over its new ‘Monarch’ line of rifle scopes, designed for game hunting. Marketed as being ‘Engineered for Safari’ Nikon claims that the new Monarch-series scopes are created ‘for those seeking dangerous game adventure on the Dark Continent’ – an archaic term for Africa. Nikon has manufactured ‘sports optics’ for many years, and is not alone (so does Pentax) but the marketing behind its newest Monarch line of scopes has caused a degree of anger. Click through for more details. 

News: Digital Photography Review (dpreview.com)

 
Comments Off on Nikon under fire for making rifle scopes

Posted in Uncategorized


Making a Photo: Infuse Yourself into your Photos

12 Mar

Delicate Arch_073109_0045(sRGB-websize)As a hobbyist, self-taught photographer, I find myself often wondering about the esoteric nature of photography and what it is exactly that separates the average photographer from the professional or even world renown photographer. Is it technical skill, creative expertise, some sort of profound psychological perspective, post-processing acumen or just plain blind luck? In reality, it is likely a combination of all these things, but recently I have become more and more interested in the more introspective nature of photography and how powerfully creative and self-expressive it can be in shaping who you are as a photographer and a person.

Recently, I read a fantastic article “5 Ways to Improve Your Photography Without Touching Your Camera,” by Richard Walker over on Lightstalking.com. When you get a chance you should definitely check it out. The article discusses the inferiority complex one gets after looking at amazing photos, once the feelings of self-doubt and negativity creep into your mind, as you ponder the fact that you could never take a photo as great as the one you are viewing. Now, I do not know about you, but this happens to me all the time. I am constantly striving to improve my technique and skill and wonder if there is some enigmatic factor that I am missing that is preventing me from really producing something magical. In fact, it has just been in the past two years that I realized the same concept that Richard Walker introduces in his article of “making a photo.” This is an important and elegant concept that we all need to learn and aptly apply to our photographic process.

Making a Photo

So what does “making a photo” mean? It means to take some time and reflect upon that which your are shooting. Think about what it is you want your photo to look like prior to taking the shot. Pre-visualize the final product and refine your composition, lighting, angle, or background. It involves planning and thought prior to pressing the shutter so that you already have your personalized interpretation in mind. This is such an important concept. I cannot even express what an epiphany this was for me and have definitely been able to see my own progression as a photographer as I have transitioned from snapping photos and started creating them. So how does one start this process?

Botanical Gardens_091209_0103(sRGB-websize)

Know Thyself – The process of artistic creation starts with yourself. You need to really analyze what makes you tick and drives your motivation to be able to express it in your photography. Are you a hopeless romantic, edgy and adventurous, calm and serene, or just downright crazy? As you can imagine each of these personality types would create a different photo based upon what they find inspiring. Really turn the microscope onto yourself and start unravelling the threads of your emotional and psychological make-up. It is truly a fascinating process and will open up and expose that creative core that is necessary to start inspiring your photography.

Likes and Dislikes – Analyze your own photographic likes and dislikes. Keep a running file folder of photos that you have seen or found that you admire or that inspire you. Group them in separate monthly folders so that you can see how your likes change as you grow as a person. More importantly, and often forgotten, you should do the same thing (although to a lesser extent) with photos that you dislike. It is critical to understand what you do not like in a photo just as much as it is to comprehend what it is you like. Somewhere between these likes and dislikes is your own vision or desired artistic niche.

Visualization – Once you have an idea of who you are and what you like, use it to transform your photographic process. When you are getting ready to take your next photo, think about the shot for a few minutes and how you want it to look after post-processing. Consider the angle you are shooting at, the depth of field, available lighting and shadow, the colors involved in the scene and the emotive glimpse of self expression that you want to portray. If you are going for sad and lonely you might want a solitary subject with lots of dramatic soft shadows and a more drab color palette. If you want edgy and adventurous you might capture some action with harsh contrast and bring out the details of the scene with a lot of contrast added in post-processing. Basically, you need to know where you are going with the shot so that you can get there in the end.

Execution – The last step is the easiest and most gratifying of them all. By this point, you have a bit of a concept and feel for your shot. Now all you have to do is make the photo. Using your pre-visualized plan, start shooting. Take a few shots and study them and see if you are getting what you want. Refine the shot. Play around with white balance a bit a see how it changes your shot. Expose for highlight in the scene or for shadow and see how it changes the mood. Work the composition some and most of all enjoy the process and make sure you are accomplishing your goal for the shot.

Moose_Jun302010_0019(sRGB-websize)

When you stop taking photos and start making them, it is definitely a gradual process. You will not notice the results right away. In fact, you will likely try it a few times and want to abandon the process as foolish cause you find yourself struggling. Just remember, it takes time, practice, persistence and most of all confidence. It is not going to happen overnight. Stay positive and keep working at it. Analyze the problems you think you are having or how your vision is not being captured by your photos. Take your time and embrace the learning process. Soon you will be looking at your photos and start seeing a few glimpses of your vision. This will progress further and further and eventually you will have that one magical defining moment where you are looking through your viewfinder and you recognize your vision, your hope, your dream, and yourself in that one perfect click of the shutter. You my friend have just made a photo!

Portland Trip-497(sRGB-websize)

Post originally from: Digital Photography Tips.

Check out our more Photography Tips at Photography Tips for Beginners, Portrait Photography Tips and Wedding Photography Tips.

Making a Photo: Infuse Yourself into your Photos


Digital Photography School

 
Comments Off on Making a Photo: Infuse Yourself into your Photos

Posted in Photography


Why Making Mistakes is Good for your Photography

12 Mar

A Guest Contribution by Draycat

It is said the longest journey starts with a single step. The unfortunate part of life is that sometimes that step will cause you to fall, or you may even find you are walking in the wrong direction. But such things are normal and natural in life, and these are often the experiences that we learn the most from. A baby will fall down many times as he/she learns to walk. The falling down is part of the process of learning to walk, and without it the baby will never learn.

It is the same for photography, from the first day you pick up a camera you will make mistakes.

  • You may spend a day shooting only to realise that your camera was on the wrong setting and instead of shooting full size RAW you’ve been shooting the smallest size jpg
  • you may leave the house with all your equipment prepared only to take the first shot and realise that you forgot to put a memory card in the camera (and find the nearest place to buy one is miles away)
  • you may take lots and lots of pictures which look good in the camera’s LCD, only to find they are all soft when you see them on your computer screen – you didn’t realise at the time because you didn’t zoom in and check on the camera’s LCD.

These are just a few of the mistakes that I have made since I’ve been shooting, and after each one I generally felt foolish and sometimes demoralised. I felt like my photographic journey had taken me no where while everyone else flew past me with their great camera skills.

But if you speak to any of the great photographers in world, present or past, they will smile and tell you that they made exactly the same mistakes, and many more besides.

They will tell you that they often learned more from their mistakes than from their successes. Often when we make mistakes we are too hard on ourselves, and beat ourselves up about how stupid we were, or how foolish we feel. This photographer or that photographer would never do such a thing, but the fact is that we all do.

The truth is that it isn’t about the mistakes you make, but rather about how you deal with those mistakes.

If you look at them and work out how they happened, what you did wrong, or what you forgot to do then it becomes a learning experience – something that will ultimately help you to be a better photographer. In a shoot I once wanted a little motion blur in a dance section.

I shot at 1/15 of a second, and on my small LCD camera screen the images looked ok. When I got home and put them on my main monitor, they were all a little too blurred. The next time I shot in a similar situation I set my camera to 1/25 of a second and made sure I got what I wanted by zooming in on the LCD on the camera, and I got exactly what I wanted. It was a learning curve and now in that situation I know exactly what to do or rather what not to do.

On the other hand, if you make a mistake and beat yourself up about it constantly it becomes something negative. It will create fear and actually stop you from moving forward. When you encounter a similar situation instead of going in there with a good idea of what not to do, you will instead do everything possible to avoid the situation altogether. Can you imagine a baby thinking ‘this walking stuff is just too difficult and falling down is painful. Who needs walking anyway, crawling is perfectly good enough. I’ll just stick to this crawling stuff in future.’

Being a good photographer is as much about learning what not to do as it is learning what to do.

Without making mistakes we could never become well rounded photographers, so the next time you make one when you shoot and you feel frustrated, walk around for a while and think about learning to walk. Then, get up, work out what you did wrong and then go and try it again.

Draycat is British photographer, teacher and writer currently based in Tokyo, Japan. See more from him at his Website on Twitter on Facebook and on Youtube.

Post originally from: Digital Photography Tips.

Check out our more Photography Tips at Photography Tips for Beginners, Portrait Photography Tips and Wedding Photography Tips.

Why Making Mistakes is Good for your Photography


Digital Photography School

 
Comments Off on Why Making Mistakes is Good for your Photography

Posted in Photography


Making Sharper Wildlife Photographs – [Part 2 of 2]

06 Mar
House Finch perched on a spruce tree branch: Canon 5D Mark II, Canon 500mm F4L IS lens, 1.4x Extender II and 2.0x Extender II @1400mm, 1/400th of a second at F10, ISO 800, Gitzo 3541 Tripod with Jobu Design BWG-Pro gimbal head

House Finch perched on a spruce tree branch: Canon 5D Mark II, Canon 500mm F4L IS lens, 1.4x Extender II and 2.0x Extender II @1400mm, 1/400th of a second at F10, ISO 800, Gitzo 3541 Tripod with Jobu Design BWG-Pro gimbal head

A contribution by Paul Burwell from Burwell School of Photography

In my last article I discussed the sort of equipment the average person might afford and use for wildlife photography. We discussed lenses and teleconverters along with tripods and monopods. This time, we’re going to look at how you use that equipment to come away with the sharpest possible images.

Tripod Heads

My first piece of advice is to learn how to use your tripod along with whichever type of tripod head you have. My recommendation for wildlife photography is to use some sort of Gimbal head like the excellent models sold by Canadian company Jobu Design.

These heads allow you to balance the lens/camera over top of the tripod while providing finger tip control. If you’re using a monopod, I’d mount the lens either directly to the monopod or use a quick release plate. At the risk of sounding like a children’s piano tacher, and not meaning to pester, but you do need to practice with this gear to become proficient. Photographic opportunities in the wild are often fleeting and you’ll need to rehearse so that when the time comes you’re making great images and not fumbling with knobs and latches.

Shutter Speeds

Another aspect of making sharp images is using a fast enough shutter speed. As a rule-of-thumb when photographing off of a tripod or monopod, you’ll want your shutter speed to come close to matching 1/2 of your focal length. This rule means that if I’m photographing at a focal length of 400mm, I’ll want to make sure that I’ve got a shutter speed of at least 1/200th of a second to make a sharp image of a stationary critter. If there’s a lot of action going on and you want to freeze the motion, shutter speeds of 1/500th of a second or quicker may be required. I’m also not afraid to use my camera’s higher ISO settings to get a higher shutter speed if required.

There is little doubt that today’s lenses with their built-in gyroscopes to help stabilize the image go a long way in letting photographers get away with slower shutter speeds than the one over the focal length rule of thumb would allow for.

Many of today’s stabilized lenses claim that they can save three or even four stops of shutter speed and still return sharp results. My experience has been that these lenses (IS for Canon users, VR for Nikon shooters, OS or some variation thereof for the rest) do make a tremendous difference and are especially useful in low light shooting conditions. Look at many of my pictures and you’ll see I’m a big beneficiary of this new technology.

Muskrat pauses while eating: Canon 1Ds Mark II, Canon 500mm F4L IS lens, 1.4x Extender II and 2.0x Extender II @1400mm, 1/500th of a second at F10, ISO 640, Saddle-shaped bean bag from vehicle window

Muskrat pauses while eating: Canon 1Ds Mark II, Canon 500mm F4L IS lens, 1.4x Extender II and 2.0x Extender II @1400mm, 1/500th of a second at F10, ISO 640, Saddle-shaped bean bag from vehicle window

The Eyes Have It…

Another trick for making sharper images comes down to the connection between the camera and your body. While it might seem to make sense to just lightly rest your eye against the camera’s viewfinder, I suggest you do the opposite. When I’m photographing using telephoto lenses, I physically push my eye as firmly as possible against the viewfinder (or in my case glasses which leaves them very greasy at the end of a photo session).

This technique allows the mass of my body to help dampen vibrations the camera might be experiencing. Next, I hold the camera with my right hand positioned to press the shutter release and make adjustments to the camera’s settings. My left hand gets draped over top of the lens. Again, we’re trying to use our body’s weight to help dampen vibrations and steady the rig as much as possible.

Now that I’ve got my camera equipment mounted on a suitably weight-rated tripod or monopod, I’ve chosen a suitable shutter speed AND I’ve positioned my body against and on the camera to ensure steadiness, all I’ve got to do is shoot away and I’m good, right?

Squeeze the Shutter Release

Not quite. The next trick is to learn how to press the shutter release. If you were a casual observer watching just my finger on the shutter release, I’d wager you’d never be able to accurately guess when I’d made a photograph. And that’s because I’ve practiced my technique to the point where, much like the way a sniper squeezes the trigger on a rifle, I can release the shutter on my camera with the same controlled almost indiscernible action.

While I’m photographing, my shutter finger never loses contact with the shutter button and I’m not so much pressing it as I am squeezing it. Remember to squeeze and never stab the shutter button. When photographing wildlife at the longer telephoto lengths, you need to keep all of your actions as smooth as possible and the way you press the shutter is a huge factor in making sharp images.

To summarize these techniques, get your camera gear supported in the best way possible, choose an appropriate shutter speed, brace your body against the equipment so that you almost become part of it and finally squeeze the shutter button with the most subtle of movements. Remember to utilize the three P’s of wildlife photograph (Practice, Practice, Practice) and you have my guarantee that you’ll be well on your way to producing sharper images.

Paul Burwell is the owner Burwell School of Photography

Post originally from: Digital Photography Tips.

Check out our more Photography Tips at Photography Tips for Beginners, Portrait Photography Tips and Wedding Photography Tips.

Making Sharper Wildlife Photographs – [Part 2 of 2]


Digital Photography School

 
Comments Off on Making Sharper Wildlife Photographs – [Part 2 of 2]

Posted in Photography


Making Sharper Wildlife Photographs – [Part 1 of 2]

03 Mar
Canon EOS Digital Rebel, Canon 100-400 F4.5-5.6L IS lens @400mm, 1/800th of a second at F8, ISO 400 - Hand held

Mountain Bluebird with prey: Canon EOS Digital Rebel, Canon 100-400 F4.5-5.6L IS lens @400mm, 1/800th of a second at F8, ISO 400 – Hand held

A contribution by Paul Burwell from Burwell School of Photography

If there is one area that seems to flummox more aspiring wildlife photographers it is the subject of making sharp images. You’d think that with today’s modern cameras and equipment that there’d be no problem going home with sharp images after each wildlife encounter. Un fortunately, that isn’t the case and I’m going to provide you with some tips and tricks to make sure you’ve got the best possible chance of making sharp images.

Lenses

One of the truisms in wildlife photography is that it is virtually impossible to have too much lens. This means it is extremely rare that the wildlife critter you are trying to photograph is too big in your viewfinder and in fact the opposite is much more common. Not everyone can afford one of the prime super-telephoto lenses that the major manufacturers produce. These lenses in the range of 300mm to 800mm can set you back anywhere between $ 5,000 and $ 11,000 respectively. Unless you’re a pro or a serious amateur with a healthy bank balance, these lenses aren’t feasible for the average user.

So, what’s a person to do? My recommendation is to purchase the largest telephoto lens you can afford. And when you’re looking at telephoto lenses, you want the biggest number of millimetres that you can afford. Common lens lengths include 200mm, 300mm and 400mm.

If you end up purchasing a zoom lens, look for one that has the shortest range possible. Why? Because in general, the more extreme the range the lens covers, the lower the quality at all those ranges. Therefore, I’d choose a lens that gives a range of 70-300mm over a lens that gives a 35-3500mm range every time. You also want to purchase the fastest lens you can afford. All lenses have a maximum aperture they can photograph at.

A lens rated at F2.8 is two stops faster than a lens rated at F5.6 and allows four times as much light to reach the camera’s sensor. Because wildlife is often photographed under challenging lighting conditions, a faster lens allows for faster shutter speeds which equals sharper images.

Long-tailed Weasel pauses outside of ground squirrel burrow: Canon EOS Digital Rebel,  Canon 500mm F4L IS, 1.4x Extender II @ 700mm, 1/500th of a second at F7.1, ISO 200 - Hand held

Long-tailed Weasel pauses outside of ground squirrel burrow: Canon EOS Digital Rebel, Canon 500mm F4L IS, 1.4x Extender II @ 700mm, 1/500th of a second at F7.1, ISO 200 – Hand held

Teleconverters/Extenders

I also recommend purchasing a teleconverter (or extender). Teleconverters are rated by the number of times they magnify your lenses range. So, if you’re using a 1.4x teleconverter on a 300mm lens, you’ve now got yourself a 420mm lens. Unfortunately, this comes at the cost of some light and so if your 300mm lens was rated at F2.8, a 1.4x teleconverter will cost you one stop of light and it will effectively become a 420mm F4.0 lens. Stay away from the two-times (2.0x) teleconverters unless you happen to own one of those multi-thousand dollar prime super-telephoto lenses we were discussing earlier.

You’ll often hear that teleconverters degrade the quality of the image and this is true, but there is a trick for overcoming this problem. The solution? Stopping down up to a full stop. If you’re not familiar with the terminology, stopping down means using a smaller aperture setting (smaller aperture == larger f-stop number).

While it is a general practice to photograph wildlife wide open (at the lenses largest opening or smallest f-stop) to separate the subject from the background, I recommend practicing with your lens/teleconverter combination to see how much you need to stop down to make sharper images. Depending on the lens I’m using, I find I need to stop down between 1/3 of a stop up to a full stop.

Support

What else can you do to get sharper images? Use some sort of support. I’ve met a few photographers who have no problem making sharp images hand-holding over 6.5kg (14 pounds) but the majority of people will make sharper images using support. Buy the highest quality tripod you can afford. Make sure the tripod is rated to support at least the amount of weight you’re going to put on it. High quality tripods can be pretty pricey but another alternative to consider that will also give your camera/lens combinations great support is a monopod.

These handy devices also provide excellent support for even the heaviest equipment and they are a lot easier to pack and move about. If you want to save some money, (and who doesn’t), consider purchasing aluminum tripods and monopods over carbon fibre. They aren’t quite as light and they get cold as heck in the winter, but they are strong and a whole lot more affordable.

So, now that you’ve got yourself the best wildlife photography equipment your pocket book will allow, stay tuned for my next column (next week) where I’ll give you the tips and tricks you’ll need to make the sharpest photographs possible.

Until then, get out there and practice, practice, practice!. Photograph ducks at the local pond or go to a dog park and capture some of the action there. Regardless of whether you are in a remote location or on your own back deck, the more familiar you are with your equipment, the better chance you’ll have of making an award winning shot.

Paul Burwell is the owner Burwell School of Photography

Post originally from: Digital Photography Tips.

Check out our more Photography Tips at Photography Tips for Beginners, Portrait Photography Tips and Wedding Photography Tips.

Making Sharper Wildlife Photographs – [Part 1 of 2]


Digital Photography School

 
Comments Off on Making Sharper Wildlife Photographs – [Part 1 of 2]

Posted in Photography


Making It: 10 (More!) Futuristic Materials That Exist Today

28 Feb

[ By Delana in Conceptual & Futuristic & Technology. ]

amazing new materials

The materials we use to create consumer products and infrastructure objects are constantly evolving as technology advances. The futuristic materials of a generation ago are commonplace today, just as the most amazing of new materials today will be completely familiar a generation from now. But right now, these 10 materials are some of the most fascinating and newsworthy substances in the world.

Gallium, the Metal that Melts in Your Hand

gallium amazing element

Although the above image looks like it’s been Photoshopped, it’s completely real. Gallium is a chemical element with such a low melting point that it turns to liquid in the human hand. It shatters like glass and breaks down other metals, but it’s non-toxic to humans.

Given its bizarre properties, gallium is understandably a favorite of scientists, science teachers and their students. The above videos show some of the most popular experiments using gallium, including one in which a spoon made of gallium melts in a cup of 85 degree (F) water.

Self-Healing Concrete for Smarter Streets

self-healing concrete

Repairing or replacing damaged concrete creates a financial and environmental burden. Smart materials which can repair themselves seem to be the future of construction technology, but most of those invented in recent years have required the addition of an outside material or stimulus to activate their healing properties. The smart concrete developed by University of Rhode Island engineering student Michelle Pelletier has microscopic capsules of a sodium silicate healing agent embedded in it. When a crack appears in the concrete, the sodium silicate acts with other components of the concrete to fix the cracks, sometimes making the structure even stronger than before.

BAM!

BAM worlds second hardest material

Like many important materials, BAM was discovered accidentally. The combination of boron, aluminum, magnesium and titanium boride was discovered in 1999 by scientists at the US Department of Energy Laboratory in Ames, Iowa while they were looking for a material that generates electricity when heated. BAM is among the hardest materials in the world, surpassed only by diamond and cubic boron nitride. But perhaps even more impressively, BAM is also incredibly slippery, outperforming even Teflon. Coating industrial machine rotors with this wonder alloy could save U.S. industries upwards of $ 179 million a year in operating costs thanks to the resulting reduction in friction.

Temperature-Reactive Tiles

Moving Colors color changing tiles

These color-changing glass tiles that are activated by temperature changes have the potential to turn every part of our world into a hypercolor dream. The tiles, made by a company called Moving Color, are already being used in showers but could also be used in kitchens, cars, appliances and cookware – just to name a few.

 What a Robust Web They Weave…

toughest biological material

It’s difficult to judge scale from the above photograph, but trust us: that is one massive spiderweb. It was made by a Darwin’s bark spider, found only on the island of Madagascar. These surprisingly small spiders (none over 2 centimeters or .78 inches have ever been observed) make some of the largest webs in the world. Even more impressive is the material of which the gigantic webs are made. The Darwin’s bark spider uses silk that is astonishingly strong: about 10 times stronger than Kevlar, in fact, making it the world’s toughest known biological material. The spider’s extraordinary natural silk is being studied so that we can someday create a human-made material that is nearly as tough.

To the Moon, ALICE!

ALICE aluminum rocket fuel

This unassuming cylinder of grey stuff could change the way we go to the moon – and beyond. It’s a new type of rocket fuel made of aluminum and ice, ingredients which earned the fuel the name ALICE. The spacecraft fuel is being developed by researchers at Purdue University as a more environmentally friendly way to send Earthly machines into space. Current methods of propelling spacecraft put an enormous amount of pollutants into the atmosphere, but ALICE is kinder to our home planet. Researchers hope that the new fuel could even be made on the moon or Mars – or anywhere else water can be found – for a manned return flight, meaning that the outbound flight would not have to carry enough fuel for the return flight.

Starlite, Star Bright…

Starlite amazing material

There is an amazing material that was invented way back in 1986 but still has not been widely used by any industry. Starlite is a plastic-like material that can withstand a nuclear blast or temperatures hotter than those on the surface of the sun. It was invented by a former hairstylist named Maurice Ward who was trying to develop an insulation material that would not emit toxic fumes in case of a fire. Instead, he came up with the miraculous Starlite – but he never commercialized his invention. Rumors about the fantastic material and its enigmatic inventor abound, but no one seems quite sure about why the material has never been put into widespread use. Sadly, we may never see Starlite reach its full potential; Ward died in 2011 and he was one of only two people on Earth who knew how Starlite is made.

Changing Phases

intelligent form changing nanomaterial

Scientists at the Technical University of Hamburg and the Institute for Metal Research in Shenyang, China use the example of cooking a breakfast egg to explain their research. The firmness of the egg can be adjusted just by changing the amount of time it is boiled. However, when an egg gets too firm, the cooking time can’t be reversed to make the egg softer again. Their research makes it possible for metals to change between hard and soft states with the touch of a button – a button that triggers an electric signal. This alone is an exciting development, but the scientific community is, as usual, looking ahead. They envision materials that can heal their cracks autonomously. They predict that in the future, “smart” metals and alloys will exist that can selectively become stronger when they sense an impact, thereby preventing damage.

Improving Your Lot in Life

filtering parking lots

Parking lots are disgusting, dirty places – largely because of the pollution inflicted by thousands of cars every day. The fluids that leak from cars onto the pavement are often washed right onto surrounding soil or nearby bodies of water. The Environmental Protection Agency wants to make parking lots a lot cleaner in the future, so they are studying an absorbent material that will soak up those vehicle fluids. Rather than being washed into the environment by rain or snow, the fluids flow through the permeable parking lot and into special collection tanks to be disposed of responsibly.

This Ship Has Sailed

aluminum foam packing material

International trading means that plenty of consumer products and materials are sent from one country to another on cargo ships. While this is an important part of global commerce, it is bad news for the environment since said cargo ships cause a huge amount of pollution. European Union researchers created a unique material meant to make super-light cargo ships possible. Aluminum foam, pictured above, is lighter than water and is very stiff. Sandwiched between two sheets of steel, the aluminum foam can withstand enormous force while allowing for an overall lighter ship and, therefore, lower fuel consumption. Tests indicate that the aluminum foam can cut down on ships’ weight by 30 percent, which could reduce CO2 emissions equivalent to 60 trucks’ worth for every super-light ship.

Share on Facebook


[ By Delana in Conceptual & Futuristic & Technology. ]

[ WebUrbanist | Archives | Galleries | Privacy | TOS ]


WebUrbanist

 
Comments Off on Making It: 10 (More!) Futuristic Materials That Exist Today

Posted in Creativity


Making of ( Angry Painter )

10 Feb

Video Rating: 1 / 5

 
Comments Off on Making of ( Angry Painter )

Posted in Nikon Videos


Panasonic discusses its GH3 and the challenge of making a high IQ compact

05 Feb

Uematsu-Inoue.jpg

CP+ 2013: Panasonic is considering which cameras it needs to appeal to the different demands for Micro Four Thirds in different countries. We spoke to Michiharu Uematsu, Special Adviser, Imaging Business Group and Yoshiyuki Inoue, Senior Engineering Planner, Marketing Group, Imaging Business Group. They explain the challenges of making and marketing a high image quality compact and suggest the GH3 won’t get focus peaking.

News: Digital Photography Review (dpreview.com)

 
Comments Off on Panasonic discusses its GH3 and the challenge of making a high IQ compact

Posted in Uncategorized