RSS
 

Posts Tagged ‘Macro’

Tips for Depth of Field Control in Macro Photography

01 Sep

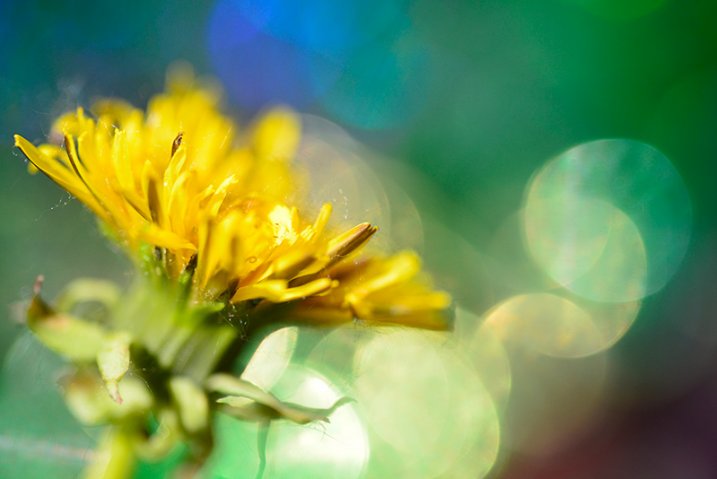
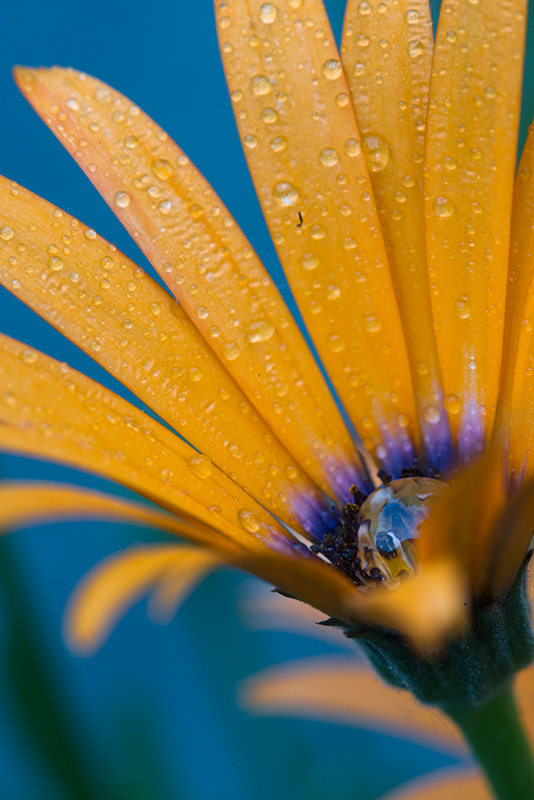
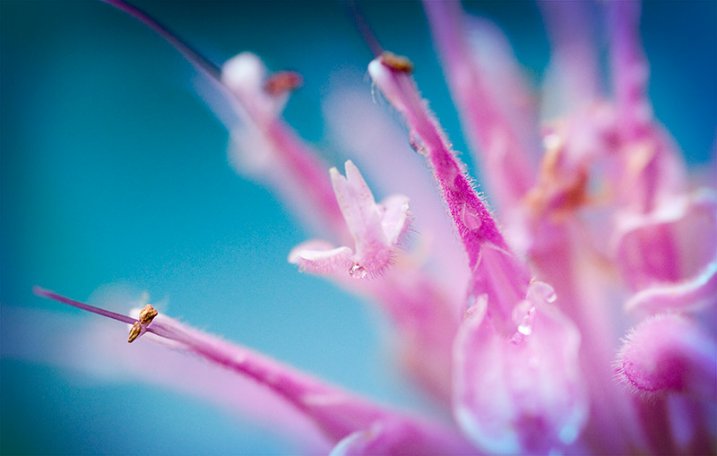
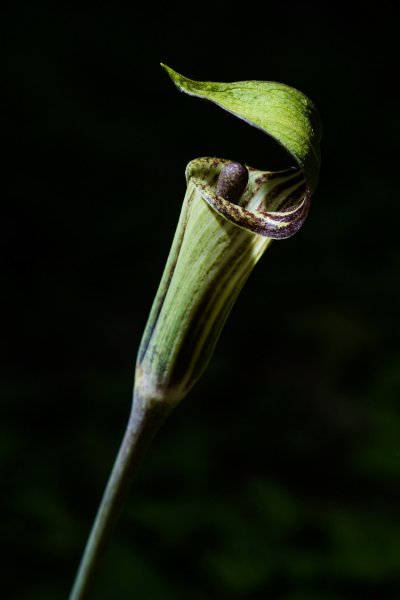
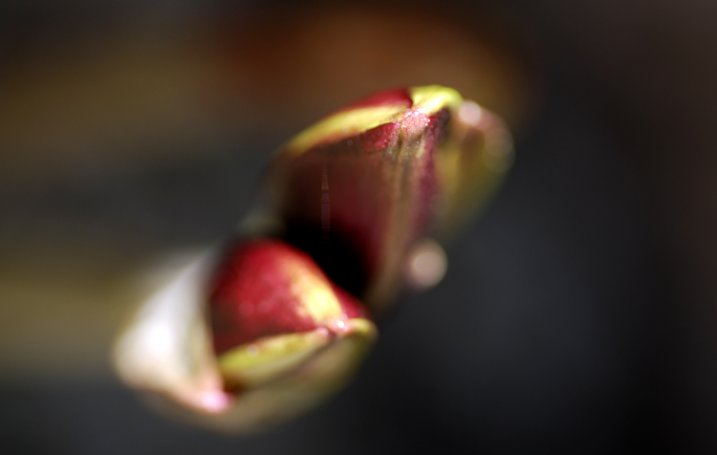
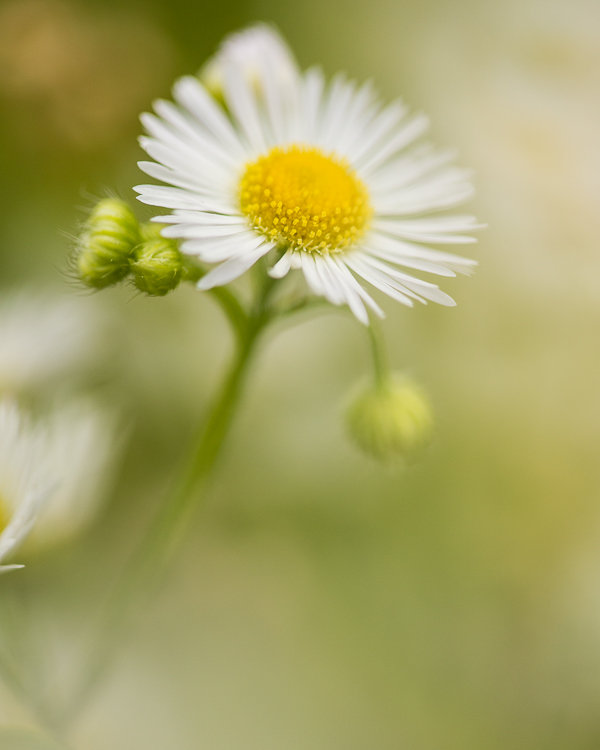
Depth of field is the amount of distance between the nearest and farthest objects that appear in acceptably sharp focus in a photograph, it varies depending on camera type, aperture and focusing distance. If you are into photography you probably already know this and how critical it is when you photograph in macro distances.

01

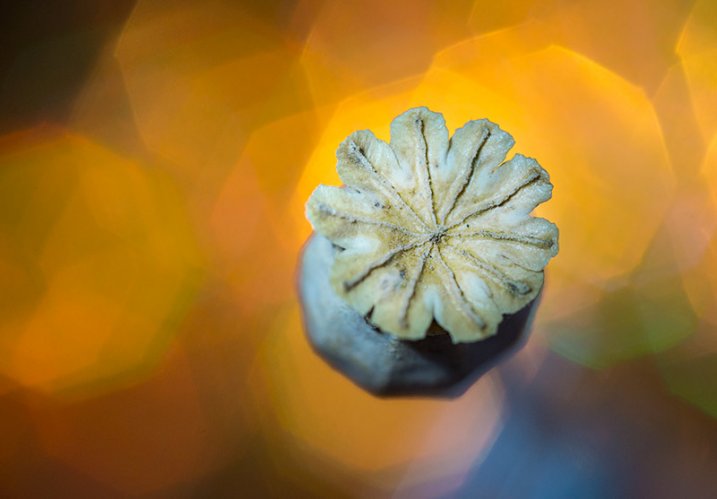
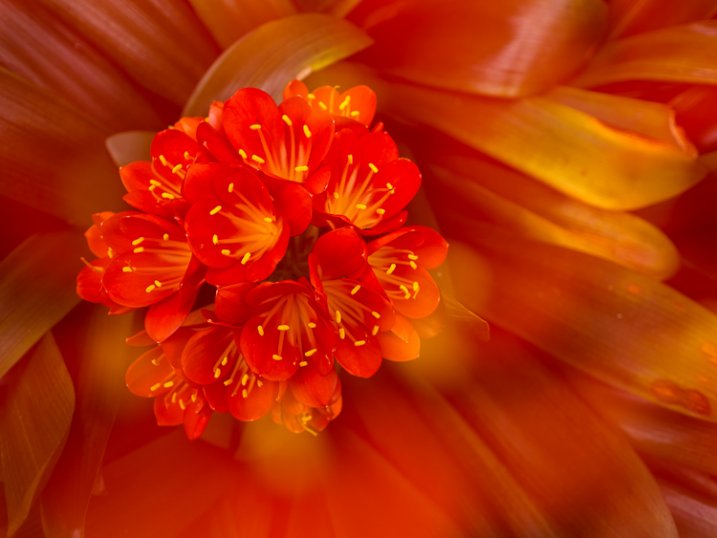
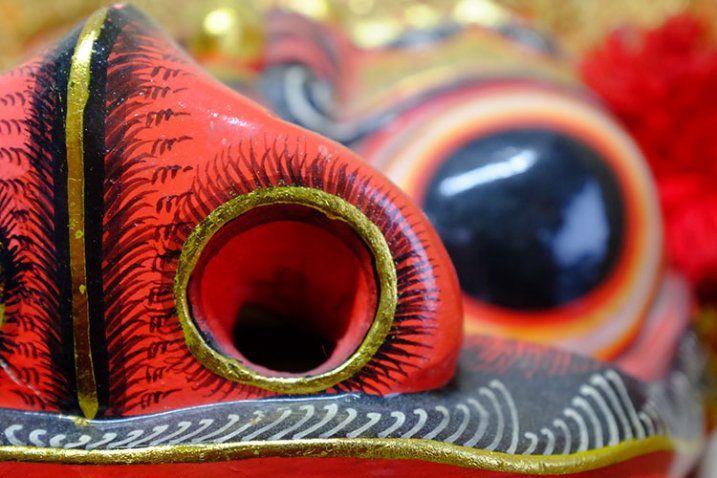
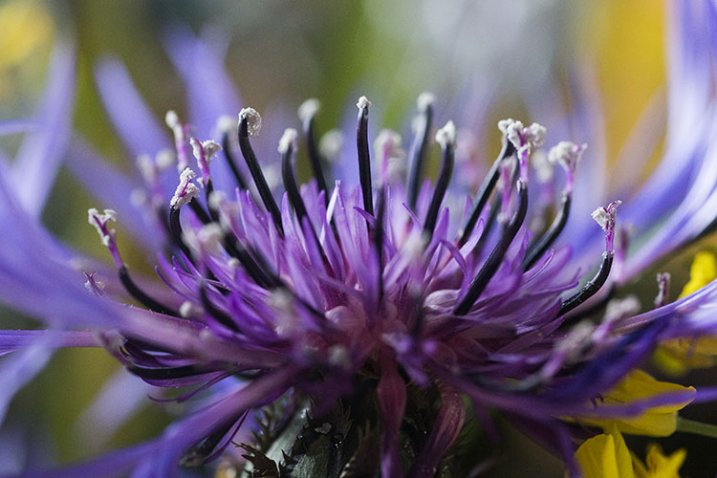
This image was done with a 100mm macro lens with a life-size converter attached, at a distance of 4 inches to the object to achieve this type of magnification. The Depth of Field you see here is impossible to achieve, as there is no way to have the whole ring in focus with this focal length and this distance to the object.

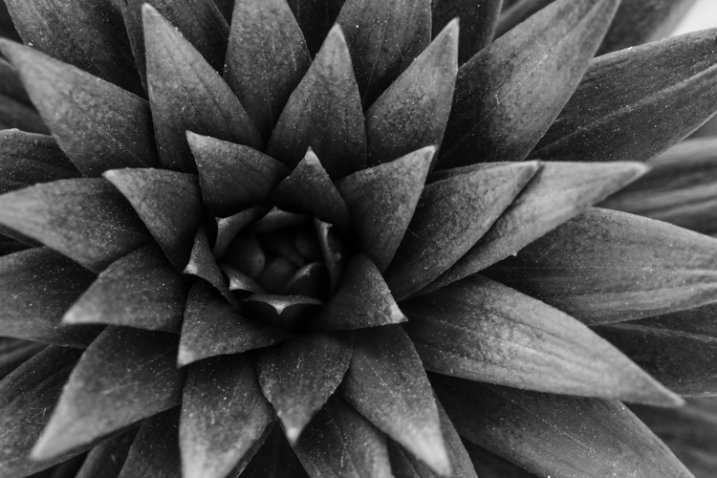
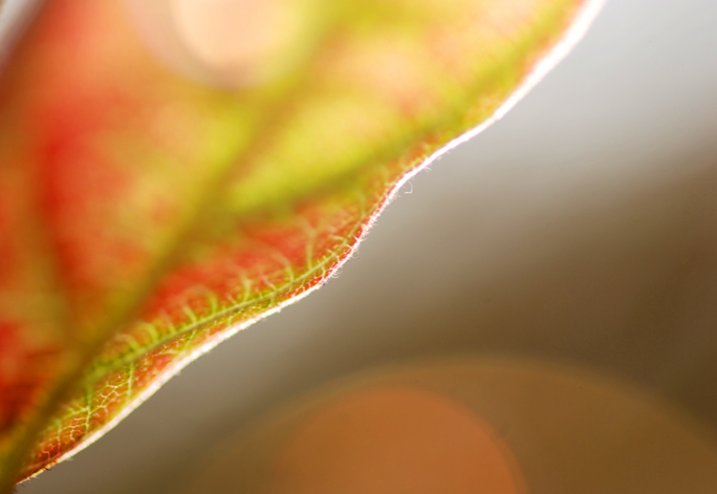
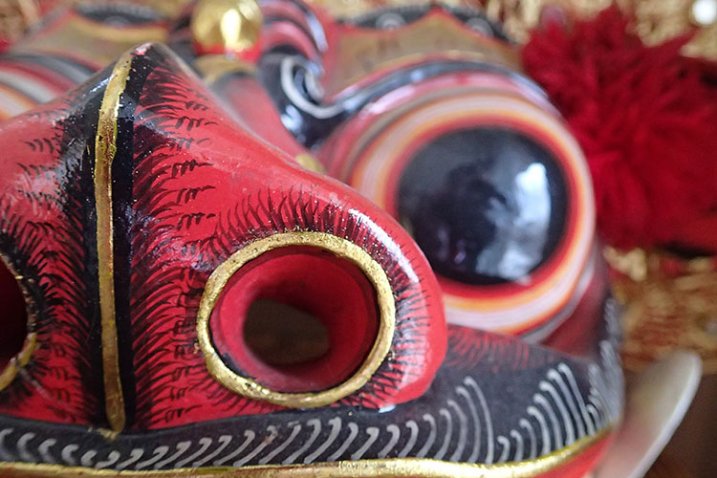
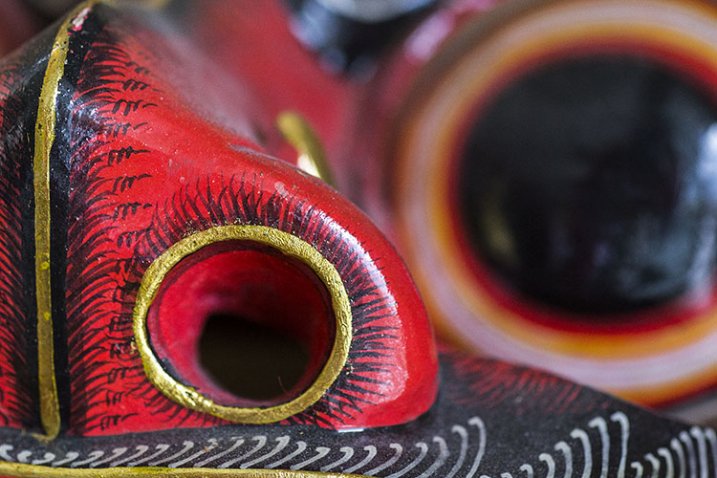
Here are a couple of test shots to show a comparison between an f/8 and an f/32 exposure of this image:

02

In this particular image f/8 would give you a very shallow Depth of Field, so if you would like to have more then f/32 would seem to be a better choice, right? But if you take a closer look, you will realize it is just not that easy.

03

The magnified image shows you that f/8 has shallow Depth of Field but, because it represents the sweet spot of this lens, it gives you great detail in the focused areas. On the other hand f/32 gives you more Depth of Field, but it lacks detail overall.

This lack of detail is due to diffraction, that is the slight bending of light as it passes around the edge of an object giving the photographed image a soft focus effect. So, sharp focus and deep Depth of Field are impossible to achieve in this image due to optical limitations.

A great work-around for these limitations is Focus Stacking (also known as Focal Plane Merging, Z-Stacking or Focus Blending), which combines images photographed with different focus distances into one final image with a greater Depth of Field.

This technique is only possible if the camera, and all the elements on the image are perfectly still, so the use of a steady tripod is really important.

Another important factor is to shoot, and focus without touching the camera. In this particular image the camera was tethered with a computer and a remote shooting app was used to focus the image.

04

The best way to capture these images is to start by focusing on the closest area first, then keep shooting, making sure you cover all the focusing length (move focus farther away from the camera with each successive shot). Just use the controls of your remote trigger and app to fine-tune the focus for each shot.

The final number of shots depends on how detailed you want your image to be, but keep in mind that the more images you have, the harder it will be to process later on. This particular image was made with a merge of 21 images.

05

After the images are captured it’s time to process them. There are a lot of software options on the market for focus stacking; this image was edited with Adobe Photoshop CC. Here are the steps:

  1. Open Photoshop, go on File > Scripts > Load files into a stack
  2. Select all the pictures and turn on “attempt to automatically align layers”
  3. Select all your files in the layer panel on the right side
  4. Go to edit > Auto-Blend Layers and select “stack Images”

You will end up with a stack of layers with associated masks that look something like this:

06

Each layer mask reveals the best of each focused part of the image, and they can also be manually adjusted for more controlled results. The final images are usually very impressive and allow you to achieve effects that would be impossible to reach any other way.

googletag.cmd.push(function() {
tablet_slots.push( googletag.defineSlot( “/1005424/_dPSv4_tab-all-article-bottom_(300×250)”, [300, 250], “pb-ad-78623” ).addService( googletag.pubads() ) ); } );

googletag.cmd.push(function() {
mobile_slots.push( googletag.defineSlot( “/1005424/_dPSv4_mob-all-article-bottom_(300×250)”, [300, 250], “pb-ad-78158” ).addService( googletag.pubads() ) ); } );

The post Tips for Depth of Field Control in Macro Photography by Ivo Guimaraes appeared first on Digital Photography School.


Digital Photography School

 
Comments Off on Tips for Depth of Field Control in Macro Photography

Posted in Photography


The Devil’s in the Details: Macro Photography for Beginners

14 Aug

The world around us, that which we often consider mundane, if we consider it at all, is infinitely detailed. The carpet beneath your feet, the grass in your front yard and along the sidewalk you stroll down each day, the corners of your cupboard behind the cereal boxes, all of these places contain mind-boggling facets and edges and curves, if Continue Reading

The post The Devil’s in the Details: Macro Photography for Beginners appeared first on Photodoto.


Photodoto

 
Comments Off on The Devil’s in the Details: Macro Photography for Beginners

Posted in Photography


Samyang 100mm macro lenses for stills and video photographers

07 Jul

Korean lens manufacturer Samyang has announced two versions of a new 100mm macro lens. The 100mm F2.8 ED UMC Macro is designed for stills photographers, while the 100mm T3.1 VDSLR ED UMC Macro is aimed at those shooting video. The lenses are essentially the same internally, using 15 elements in 12 groups but the VDSLR version is fitted with an uncoupled aperture ring and gears around both aperture and focus controls. Read more

Articles: Digital Photography Review (dpreview.com)

 
Comments Off on Samyang 100mm macro lenses for stills and video photographers

Posted in Uncategorized


Moment announces 10x macro lens for iPhone

03 Jul

Mobile accessory maker Moment has added a new lens to its lineup. The Moment Macro lens offers a 25mm focal length and 10x magnification, using a multi-element design and ED-glass for improved image quality. Read more

Articles: Digital Photography Review (dpreview.com)

 
Comments Off on Moment announces 10x macro lens for iPhone

Posted in Uncategorized


Venus Optics launches Laowa 15mm F4, the world’s widest macro lens

24 Jun

Chinese lens manufacturer Anhui ChangGeng Optical Technology Company Limited has introduced what it describes as the world’s widest 1:1 macro lens. The Venus Optics Laowa 15mm F4 is designed for full frame sensor cameras and can focus down to just 12cm from the front element, and is equipped with a +/-6mm shift function for architectural work at normal focusing distances. Read more

Articles: Digital Photography Review (dpreview.com)

 
Comments Off on Venus Optics launches Laowa 15mm F4, the world’s widest macro lens

Posted in Uncategorized


5 Macro Photography Tricks to Make Your Images Stand Out

27 May

Editor’s Note: This is the first article in a series on macro photography this week. Look for a new one each day for the next 7 days. The next newsletter will have them all if you miss any! 

In the world of macro photography, most of discussions seem to surround the technical aspects of this photographic art form. Amongst my colleagues, lens choice comes up a lot, along with the use of a flash, extension rings, and bellows.

_DSC5144W

Dynamic and creative macro photographs.

I’d like to switch gears away from the technical, and share some of my tricks to help you creatively enhance your macro shots for added impact and emotive value. If you’re a photographic purist, (not that there is anything wrong with that!) you may not want to keep reading. These tricks provide definite enhancements to the natural environment – so if real is what are shooting for, this article may not be for you.

However, if you are looking to inject more creativity into your macro images, you may appreciate these easy, but high-impact, techniques and tricks.

 Creative Backgrounds

1) Macro Blues

Most macro shots seem to be of natural subjects, such as; flowers, plants, insects, webs, etc., that live under the blue sky of planet Earth. To enhance the point of view for these kinds of shots, try a using an old blue J-Cloth (it must have been washed many times to work well) as a background. You can drape it across nearby branches or rocks to provide a soft blue background that will make your flowers and spiderwebs pop.

Use a shallow depth of field (f/2.8 or less, depending on your lens) and keep the background at least 12 inches from your subject for best results. I use a Sigma 105mm for my macro work, and these settings work well for this lens. You may need to experiment a bit with your lens and subject.

_DSC0785_0026

A macro background made from an old well-washed J-Cloth.

_DSC0093Wjpg

Creatively draped J-Cloth background.

I like J-Cloths because I always have one handy at home, to grab and put in my pocket when I go on spontaneous photo walks and drives, and it fits easily in my camera bag or my pocket.  An old well-washed J-Cloth is the perfect shade of blue for my type of macro art. Newer ones that are out of the box, or that haven’t been used, are okay too but I find the blue is a little too dark. But try one for yourself and see which you prefer.

2) Better with Bokeh

If you really want to get really creative, go for big bokeh, those soft round(ish) blurred shapes in the background. I like the following technique because it emulates tiny light sources and adds a bit of mystery to your photos. Using this technique, you can create ethereal micro landscapes that look like they are from another planet!

_DSC2670W

Mysterious Macro

Again this involves using a background material, in this case holiday wrapping paper. Look for plastic foil with a metallic coating. It costs a bit more than paper but it works great for creating macro bokeh, and you’ll have lots left over for actually wrapping gifts (of your amazing macro photos).

wrapping-paper

Crinkled metallic gift wrap.

First crinkle the wrapping paper – scrunch it into a ball. If it’s the plastic type it will instantly “un-ball” itself, and you’ll have a wrinkled many faceted metallic backdrop. With this set up, you may also need a light source to bounce off the reflective metallic wrap, depending on where the sun is when you’re shooting. If I need light I usually use my iPhone flashlight, but if you have any other flashlight in your gadget bag it will work just as well. Just aim your light at about a 45 degree angle to the background, out of view of your subject, compose, use Live View if you have it, and your preview button to check the depth of field and bokeh effect. Adjust as needed. Make sure you have no big hot spots of light. Try using different colors of wrap as well. I always keep this gold colored stuff in my bag because I also use it as a reflector – which brings me to trick number three.

3) Reflectors

Just as in regular photography, there are times when you’ll need some additional brightness to light up parts of your macro subject. Once you’re up close and personal, you’ll often find shadows you didn’t see from your higher vantage point. In macro photography you may find a flash is often too much light, and the close quarters between your camera and the subject make soft lighting tricky. So try using a reflector.

I often use the gold side of the wrapping paper to reflect sunlight into shadows or dark spaces in my subject. I also have (but seem to have misplaced) a 12″ square of copper foil sheeting (you can find this in craft shops or stained glass shops). It’s thicker than aluminum foil so it stands up on its own, and can be bent into angles to suit your needs each time. The copper color gives a nice warm tone to your subject, and again it’s light weight, cheap, and tucks nicely into your bag. I duct taped the edges to avoid getting cut – copper edges are sharp!

Dew Drop In

Nature photographers either love or hate these last two tricks.

_2DS0492

4) The Spray Bottle

There’s nothing more crushing than getting up at 4:30 am in the summer to capture the sunrise and the morning dew, only to arrive at your destination to find things dry as a bone. Fear not Grasshopper. With your handy spray bottle of water, you can create dew drops for spiderwebs, leaves, flowers, and everything else you choose to photograph.

With a good soaking of water from your bottle, colors become more rich and saturated (is this where the term came from?), making for more vibrant and rich-looking photos.

_DSC5428w

Water drops add interest, and a sense of a moment.

5) The Ultimate Droplet

Finally, if you need large drops, drips, or tears, nothing beats glycerine and an eye dropper.

_DSC5095-(2)W

Micro macro landscapes with bokeh and glycerine drops

Glycerine is thick and viscous, and stays on your leaves and petals giving you a longer time to compose and shoot. The drips are syrupy and seem to stretch slower, so again you have more time to shoot. I don’t use glycerine in the natural environment though, only in my indoor macro studio. If you need thick drops for work in nature use white corn syrup, and use it sparingly. It’s super sweet and you don’t want the critters getting addicted.

sprayW

The creative macro photographer’s tool kit.

_DSC0152W

Color contrast with a creative background and a spray of water.

Let’s wrap this up (excuse the pun).

To keep in your bag for your macro photography:

  • J-Cloths
  • Glittery plastic gift wrap
  • A sheet of Copper foil
  • Small spray bottle for water
  • Eye dropper and small container of white corn syrup (for outdoor shots) or glycerine for indoor macro work.

I’d love to know what other creative macro shots you can take using some or all of these tools and techniques. How do you feel about enhancing the environment for your macro shots?


macro-coverWant to learn more about macro photography? Check out Ed Versosky’s Introduction to Close-Up & Macro Photography ebook – just $ 10 (over 30% off) this week with coupon code: DPS. You will need to enter the code to apply the discount.

googletag.cmd.push(function() {
tablet_slots.push( googletag.defineSlot( “/1005424/_dPSv4_tab-all-article-bottom_(300×250)”, [300, 250], “pb-ad-78623” ).addService( googletag.pubads() ) ); } );

googletag.cmd.push(function() {
mobile_slots.push( googletag.defineSlot( “/1005424/_dPSv4_mob-all-article-bottom_(300×250)”, [300, 250], “pb-ad-78158” ).addService( googletag.pubads() ) ); } );

The post 5 Macro Photography Tricks to Make Your Images Stand Out by Alex Morrison appeared first on Digital Photography School.


Digital Photography School

 
Comments Off on 5 Macro Photography Tricks to Make Your Images Stand Out

Posted in Photography


Backyard Macro Photography Safari

26 May

Editor’s Note: This is part a series on macro photography this week. Look for a new one each day. The next newsletter will have them all if you miss any!

As photographers, we often have the opinion that in order to capture a great image we need to head out to an exotic location. But, what if you don’t have the time or opportunity to go to one of those places? Say you have free time some morning, and would like to go outside and capture some stunning images. You might be surprised at what you can find to photograph right in your own backyard!

If you don’t have a backyard, take a trek to a nearby park. Everywhere you look, you will find subjects to photograph in macro. Spring and summer are great seasons to go on a backyard macro photography safari. There are many advantages to such a shoot. For one, you don’t need to be up and at’em before the crack of dawn to travel – though it is beneficial to take full advantage of the early morning light. Also, keep in mind that if you are planning a Backyard Macro Safari for your weekend, you should put off mowing your grass until after your macro adventure, because your mower will likely destroy some potential subject matter in your yard.

New growth on a pine tree creates a unique color burst effect.

New growth on a pine tree creates a unique color burst effect.

Necessary Equipment:

Keep it simple! Start out with your camera and macro lens on a tripod. Other equipment you might find useful includes a mat or knee pads, an off-camera flash, a reflector, and a diffuser. Another great thing about a backyard safari is, if you decide to use another piece of equipment you can just go back in the house and get it!

Tripod

As with almost every type of photography, the tripod is one of your most important pieces of equipment, for a couple of reasons. The most obvious reason is to avoid camera shake, But also, in many cases, your depth of field will be very shallow, and keeping your camera still on a tripod will help keep your subject in sharp focus. Another benefit to using a tripod is that to do so will slow you down, which is very helpful with setting up the composition and lighting of your image.

Mat or knee pads

Not every capture will be found at standing level. A mat or knee pads are great tools for helping you get to ground level conveniently and comfortably in your yard.

Off-camera flash

Sometimes you’ll find some of the most interesting subjects in the deep shadows of your yard. In these cases, using an off-camera flash will add some light to better reveal or enhance your subject.

Light Reflectors

Reflectors come in very handy when you need to add some light into the shadowy areas of your image.

Light Diffusers

If you are dealing with very harsh light, diffusers or light modifiers can soften the light.

Black and white

Converting to black and white can bring out the patterns and textures of your images.

Take time to look around

Yogi Berra once said “You can observe a lot by just looking around.” In macro photography, sometimes less is more, so slow down and seek out even the smallest detail that could create a great macro image. Try to find new angles that make even the simplest object interesting. Don’t be afraid to experiment with new techniques such as multiple exposures.

What to look for, subject-wise

There are many objects right in your own backyard that make great macro photography subjects, such as flowers and insects. But don’t just stop there! Look for repeating patterns, textures and leading lines. Water droplets and spider webs can become beautiful subjects if photographed carefully. Just as in any other form of photography, look for the color red to compose a powerful image.

14844445274_cf84722530_o

Choose your background wisely

The background is one of the most important elements of a good macro. Setup your camera at the level of your subject. This will allow you to move 360 degrees around it, and carefully choose just the right background to enhance the subject. Be aware that if the background is too busy or too light, it will draw the viewer’s eye away from the subject.

DSC_6693-Edit

The muted colors of the background causes the subject to stand out sharply.

Light

Avoid harsh lighting or flat lighting. By looking for side light, or even back-lighting, you can create more dramatic images. Adding an off-camera flash is an effective technique to enhance your subject and separate it from the background. By setting your fastest flash sync-speed, and using a small aperture, you can make your subject pop from an otherwise boring background.

Focusing

Focusing can be the most difficult component of macro photography. Here’s a little trick to help you get the focus result you are looking to achieve: First, set your lens on manual focus. Next, turn the focus ring to the minimum focus length. Now simply move your camera closer to your subject until the part of the image that you want to be sharp is in focus and take the shot.

The wind is not your friend

Windy days make it very difficult to capture sharp macro images, and even harder to compose one if your subject is swaying back and forth in the wind. Try adding a flash to freeze your subject in windy conditions. In some cases the wind can help create interesting effects, but it’s a challenge!

Found this in the under growth in my backyard. Because of very low light I add a off camera flash set to low power on the side. I wanted to add some light to the top so I used my hat to reflect some of the light from the flash to the top of the plant.

An off camera flash was used here to add side light to this Jack-in-the-Pulpit. A light colored hat was used as an impromptu reflector to add light to the top of the wild flower.

Conclusion

Capturing images of nature in your own backyard is rewarding and convenient. One of the best things about a Backyard Macro Safari is that you don’t have to go anywhere for the shooting experience, so if things don’t work out, you don’t have that long disappointing ride home with nothing to show for it. If it was successful, you can kick back and celebrate right away, though you may still have to face mowing the lawn! What macro images can you capture in your backyard safari?


macro-coverWant to learn more about macro photography? Check out Ed Versosky’s Introduction to Close-Up & Macro Photography ebook – just $ 10 (over 30% off) this week with coupon code: DPS. You will need to enter the code to apply the discount.

googletag.cmd.push(function() {
tablet_slots.push( googletag.defineSlot( “/1005424/_dPSv4_tab-all-article-bottom_(300×250)”, [300, 250], “pb-ad-78623” ).addService( googletag.pubads() ) ); } );

googletag.cmd.push(function() {
mobile_slots.push( googletag.defineSlot( “/1005424/_dPSv4_mob-all-article-bottom_(300×250)”, [300, 250], “pb-ad-78158” ).addService( googletag.pubads() ) ); } );

The post Backyard Macro Photography Safari by Bruce Wunderlich appeared first on Digital Photography School.


Digital Photography School

 
Comments Off on Backyard Macro Photography Safari

Posted in Photography


Getting Started with Abstract Macro Photography

26 May

Editor’s Note: This is part a series on macro photography this week. Look for a new one each day. The next newsletter will have them all if you miss any!

Lines and light can emphasise your subject

Lines and light can emphasize your subject

Macro photography truly is a unique genre of photography. In most of the other types of photography (landscape, portrait, sport, etc.) you want to get the context of your scene in the image. In macro photography, you can literally focus in on what’s important and remove any distractions by simply getting closer. One of the best things about macro photography is that you can do it anywhere, all you need is something to photograph. In my previous article: Getting Started Guide to Macro or Close-Up Photography, I went into some details about what you will need to get started in macro photography. Take a look at that article to be sure that you understand more about the genre of macro photography.

In this article we are going to be looking at getting great abstract images using macro photography.

Look for shape and colour

Look for shape and colour

What is abstract macro photography?

Abstract photography in general is about representing a subject in a non-literal way. The focus of abstract photography is more about colour, shape, and texture as opposed to the literal representation of the subject. Abstract macro photography, takes this to the next level by enabling you to get even closer to your subject, and therefore also able to be more abstract in a sense.

The same guidelines around composition apply, you can use the rule of thirds, curves, and lines to draw the viewer into the image. The difference is, the subject may not be immediately recognizable, your centre of interest might be a colour or a curve of a flower. So for abstract macro photography, you will need to think a little differently.

Abstract close up of a lily

Abstract close up of a lily

What will I need?

You will need a macro lens if you want to get in really close. You can use a prime lens like a 50mm, or even an 85mm lens, but for this type of work, a macro lens will work best. The reason is that you want be able to get in close enough to remove all distractions; in other words, you want to fill the frame with your subject. With a macro lens, you can do this. Most macro lenses have the ability to focus on subjects that are really close to the lens. The prime lenses can focus on subjects that are reasonably close, but you may not be able to get in close enough to remove the background.

You will also need to use a tripod. The close focusing ability of the macro lens means that it is very easy for your subject to become out of focus with the slightest movement. Ideally, you will want to have you camera set up with your macro lens mounted, then get that in as close as possible to your subject. Next, you will want to set your aperture to f/8, or higher, and then click onto manual focus to get your subject good and sharp in the frame.

Frayed rope abstract

Frayed rope abstract

What can I photograph?

For abstract macro photography, I find that organic items work best. By organic I mean flowers, wood, fruit, vegetables, and so on. That does not mean you can’t photograph an abstract macro image of a computer keyboard or a coffee cup, but sometimes, these well known shapes are difficult to transform into abstract images. If you are going to photograph a product like a computer or another manufactured product, try shooting it from a different angle or get in very close so that any telltale signs of what it is, will be lost. Ultimately, you can photograph anything that you think will work, but start out with some easy subjects first,  then move on to the trickier ones.

Buds about to bloom

Buds about to bloom

Try this…

Set up your subject and get your camera in position. Look through the viewfinder and start working on your composition. Try some of these pointers to get started and work from there:

  • Work on building your composition – are there any curves, lines, shapes ,or colours that you want to emphasize?
  • Use manual focus to bring even a small part of your image into sharp focus, this will be your centre of interest.
  • Make sure your centre of interest is obvious. In other words it should be in focus, it can be a different colour to the rest of the frame, or it can even be a well defined line or shape in the image
  • Check the exposure to make sure that you are exposing your scene correctly.
  • You can even overexpose slightly. In abstract macro photography, some slight overexposure is okay, as long as it does not distract from the rest of the image
  • Capture the shot
  • Try shooting the same image from a different angle and maybe even a different centre of interest.
  • Take as many images as possible, from different angles, with different focal points.
  • Choose the best three images and edit them in your chosen image editing software.

This is a great indoor project, but you can try this outside too. Shooting macro images outside can be more challenging as the subject may be affected by changes in lighting. If it is a flower or a plant, there may be a slight breeze which can move the flower as you are trying to photograph it. The most important thing is to try this type of photography if you can. It will cause you to think creatively and to look for different things in your image setup. Give it a try and load up your results below – let’s see what you get.

Abstract of a lily leaf

Abstract of a lily leaf


macro-coverWant to learn more about macro photography? Check out Ed Versosky’s Introduction to Close-Up & Macro Photography ebook – just $ 10 (over 30% off) this week with coupon code: DPS. You will need to enter the code to apply the discount.

googletag.cmd.push(function() {
tablet_slots.push( googletag.defineSlot( “/1005424/_dPSv4_tab-all-article-bottom_(300×250)”, [300, 250], “pb-ad-78623” ).addService( googletag.pubads() ) ); } );

googletag.cmd.push(function() {
mobile_slots.push( googletag.defineSlot( “/1005424/_dPSv4_mob-all-article-bottom_(300×250)”, [300, 250], “pb-ad-78158” ).addService( googletag.pubads() ) ); } );

The post Getting Started with Abstract Macro Photography by Barry J Brady appeared first on Digital Photography School.


Digital Photography School

 
Comments Off on Getting Started with Abstract Macro Photography

Posted in Photography


5 Creative Macro Photography Ideas that Really Work

25 May

Editor’s Note: This is part a series on macro photography this week. Look for a new one each day. The next newsletter will have them all if you miss any!

Here are 5 quick creative tips to help you with your macro photography:

1) Use Flash for Tiny Details

While a macro lens with a 1:1 (one to one) ratio is a terrific tool for close-up work, so too is an external flash. Contrary to what some photographers will tell you, it doesn’t necessarily have to be a ring light for successful results. The trick is to reduce the flash output to approximately -1.75 in TTL mode. This will illuminate the finer detail in your macro work such as a butterfly’s antennae. Should you need even less light, cut the flash intensity further to -2 or -3 stops.

1_butterfly_with_flash
There are times when you’ll want more depth of field to keep the entire subject sharp. This can be problematic, however, as more of the scene remains in focus and can be distracting. Rather than opting for a shallow depth of field, consider using flash. With it, you can illuminate the subject, enjoy great depth of field, and render the background really dark, or even black. To do this, position yourself so there is at least six to 12 inches of separation between the subject and the background. Your reduced flash will effectively expose your macro subject without reaching what’s behind it.

2_orchid_flash

2) Shoot Through a Flower Petal

Go beyond the routine snapshot by adding a layer of visual interest to your macro captures. By shooting through a flower petal or leaf, you can create a soft wash of color while keeping the main subject in sharp focus. The technique is simple but yields a sophisticated look that’s reminiscent of an impressionist painting. For this particular method, you may prefer the freedom of shooting without a tripod. By working handheld, it’s easier to position the camera directly into the patch of flowers.

3_shoot_through_petals

Start with your widest aperture, preferably around f/2.8. Locate a flower that’s in front of your subject, and place your lens approximately one inch away from it. Don’t worry if it largely blocks the main subject, as the extremely shallow depth of field will render it nearly transparent. The closer your lens is to the front flower, the more out of focus it will become. Carefully compose so that you can still see your subject in the background. Finally, move your single active autofocus point to the flower you want sharpest.

4_shoot_through_petals

3) Switch to Manual Focus

Autofocus is highly effective for the majority of shooting opportunities. In extreme close-up situations however, it can struggle to find its mark. This is particularly true with ultra fine details such as a delicate spider web. A better alternative is to use manual focus aided by Live View or focus peaking. These options take the guess work out of manual focus, allowing you to view the scene at extreme magnifications. At 5x or 10x magnification, it leaves no doubt that something is sharp. On some camera models you can even couple the enlarged view with focus peaking. This works by outlining the portion of subject that’s in focus. While it’s possible to do this handheld, a stable tripod will improve your accuracy.

5_spiderweb

4) Mind the Background

When shooting macro images, the importance of clean background can not stressed enough. If the area behind your subject is cluttered, it draws attention away from your main point of focus. Rather than taking the first vantage point offered, try composing with your feet. This is a deliberate process that forces you to slow down and explore the subject from all possible angles.

6_butterfly_background

Filling the frame with your subject can be an effective way to eliminate distracting backgrounds. With the close focusing ability of a macro lens, you can carefully arrange the scene to only include the flower. This enables you to work with small apertures such as f/16 for maximum depth of field. With sharp detail throughout the frame, there are no areas of soft focus to detract from the subject. For a more dynamic look, try using the rule of thirds instead of a bulls-eyed composition.

7_fill_frame

5) Experiment

There is something serendipitous about in-camera double exposures that is lost when methodically stacking images in Photoshop. Making exposures this way builds a sense of anticipation that is normally not present in digital photography, with today’s camera’s featuring “instant everything”. Instead, you take the first image, look at it on the LCD and hold that visual in your mind while searching for a second scene to best compliment it. After capturing that, you have to wait a few seconds for the camera to reveal your creation. In that brief pause, suspense builds, and anything seems possible, much like the days of waiting for your film to be processed. Of course with a technique like this, there will be a few misses. Nevertheless, the results can be quite interesting when you get it just right.

OLYMPUS DIGITAL CAMERA

Another creative option is to experiment with slow shutter speeds and intentional camera movement. You don’t even need a macro lens to try it, just a basic zoom. Start by filling the frame with the flower and make sure it’s in focus. For this you can be at the longer end of your focal range. Press the shutter all the way down and start the exposure, then immediately zoom out to a wide-angle perspective. You can also reverse the process, starting with a wide angle and zooming in. The following settings are a baseline to get you started.

  • 1/6th of a second for the shutter speed.
  • f/22 on the aperture.
  • A very low ISO around 100.
  • Based on the existing light you may have to adjust these for the best results.

OLYMPUS DIGITAL CAMERA

Do you have any additional creative tricks to share? Please do so in the comments.


macro-coverWant to learn more about macro photography? Check out Ed Versosky’s Introduction to Close-Up & Macro Photography ebook – just $ 10 (over 30% off) this week with coupon code: DPS. You will need to enter the code to apply the discount.

googletag.cmd.push(function() {
tablet_slots.push( googletag.defineSlot( “/1005424/_dPSv4_tab-all-article-bottom_(300×250)”, [300, 250], “pb-ad-78623” ).addService( googletag.pubads() ) ); } );

googletag.cmd.push(function() {
mobile_slots.push( googletag.defineSlot( “/1005424/_dPSv4_mob-all-article-bottom_(300×250)”, [300, 250], “pb-ad-78158” ).addService( googletag.pubads() ) ); } );

The post 5 Creative Macro Photography Ideas that Really Work by Chris Corradino appeared first on Digital Photography School.


Digital Photography School

 
Comments Off on 5 Creative Macro Photography Ideas that Really Work

Posted in Photography


Mirrorless, DSLR or Point and Shoot: Which Camera is Best for Macro Photography?

23 May

Editor’s Note: This is part a series on macro photography this week. Look for a new one each day. The next newsletter will have them all if you miss any!

Cameras

Macro photographers have a plethora of choices when it comes to selecting a camera with this feature. From DSLRs to even cell phones, the macro function is becoming a standard add-on to most forms of digital photography. But, when put to the test, which type of camera will give you the best macro photography results? This article compares the macro photography functions of a DSLR, mirrorless, and point-and-shoot camera to evaluate the pros and cons of using each to shoot extreme close-ups.

To start, can you tell which of the below images were shot with either a DSLR (Canon 6D with 100mm f/2.8 macro lens), mirrorless (Fujifilm x100s), or point-and-shoot (Olympus Stylus TG-2 Tough)? The answers, listed in sequential order below the image, may surprise you.

Fuj Oly Can

1) Fujifilm x100s

The image on the far left in the above montage was shot using the macro function of the Fujifilm x100s mirrorless camera. The x100s has a macro mode and can shoot images as close-up as 3.9 inches (10 cm). Accessing the macro mode is simple, requiring just a quick dial turn; the results can be seen below.

Fuj Dragon

Pros:

Besides being an attractive camera with its retro body, the x100s has become popular among both professional and amateur photographers, thanks to its high quality features and ability to produce stunning images with its fixed Fujinon 23mm f/2.0 lens. At 15.7oz (445g), this camera is significantly smaller and lighter than a DSLR, yet it is relatively more affordable costing around $ 900. It also offers a unique hybrid viewfinder, meaning shots can be taken using the built-in optical viewfinder, or an electronic one.

Fuj Flowers

Cons:

The fixed lens might bug some photographers since it can’t be swapped out, and the 23mm focal range means you have to get really close to your photo subject. This could produce shadows or block natural lighting, which can’t be overridden without purchasing the optional external flash unit. An additional possible grievance is the 3.9 inch maximum focusing distance. Some of the other cameras mentioned below allow you to get much closer.

These shots were taken at an aperture of f/2.8 using natural lighting, in JPG format (RAW shooting is also available) with no post-processing.

2) Olympus Stylus TG-2 Tough

This little camera shot the middle image in the above photo montage. One of the most sophisticated, prettiest, and most durable point-and-shoots on the market today is the Olympus Tough line. It is your best friend for taking high quality photos while engaging in extreme outdoor adventures, and it has a superb macro mode.

Oly Dragon

Pros:

Waterproof, freeze-proof, crushproof, and shockproof, the TG-2 also has a 12 megapixel BSI CMOS sensor and a high-speed f/2.0 lens. It is pocket-sized, although a little bulkier than most other point-and-shoots, and it only costs around $ 350 (TG-4 is the current model). This camera also has many shooting modes including two macro options: Super Macro and Underwater Macro. Both allow you to get as close as 1 cm to the photo subject, and additional magnification of up to 7x with the optical zoom, and 14x with Super Resolution zoom, which is closer than either the x100s or Canon 100mm f/2.8 macro lens offer. Its unique 5:1 magnification really makes macro photography a joy on this little camera.

Oly Flowers

Cons:

This is the only camera of the bunch that doesn’t offer RAW shooting or an optical viewfinder, but it is the only one that has a built-in flash. While the flash produces a balanced output in most situations, it isn’t helpful when shooting in macro mode since it tends to blow out the image due to being too close to the photo subject. Along those lines, shooting in macro mode on the TG-2 does require the camera to be very physically close to the subject, again making it easy to obstruct lighting.

3) Canon 100mm f/2.8 Macro Lens

The final image on the far right of the montage above was snapped with the Canon 100mm macro lens. A newer version of this lens recently debuted featuring Image Stabilization and extra goodies, but the older model still boasts spectacular, sharp optics at a relatively lower price ($ 549 versus $ 899).

Can Dragon

Pros:

Canon has a small but mighty line of macro lenses, and the 100mm is arguably the best choice. Its longer focal length causes images to be rendered at 1:1 magnification, giving you more working distance so you don’t scare away your living photo subjects, or cast shadows. Since this lens is paired with a DSLR, image resolution can be up to an astounding 50.6 megapixels if it is used with the Canon 5DS. That’s a huge number compared to the 16.3 megapixels on the Fujifilm or 12 megapixels on the Olympus.

Can Flowers

Cons:

At 20.6 oz (584.2 g), the 100mm macro lens is by far the bigger, heavier, option of the three. With a cost of $ 550-899, and the requirement of using it with a Canon DSLR, this is also the most expensive macro photography tool.

Conclusion

So which camera option is the best for macro photography? It truly depends on how you define “best.” In moments when you need a compact option, the Fujifilm x100s or Olympus Tough point and shoot are the better options, the latter being the better deal for budget or extreme sports shooters. However, if high-quality, professional imagery is your goal, a DSLR with a macro lens is your best bet.


macro-coverWant to learn more about macro photography? Check out Ed Versosky’s Introduction to Close-Up & Macro Photography ebook – just $ 10 (over 30% off) this week with coupon code: DPS. You will need to enter the code to apply the discount.

googletag.cmd.push(function() {
tablet_slots.push( googletag.defineSlot( “/1005424/_dPSv4_tab-all-article-bottom_(300×250)”, [300, 250], “pb-ad-78623” ).addService( googletag.pubads() ) ); } );

googletag.cmd.push(function() {
mobile_slots.push( googletag.defineSlot( “/1005424/_dPSv4_mob-all-article-bottom_(300×250)”, [300, 250], “pb-ad-78158” ).addService( googletag.pubads() ) ); } );

The post Mirrorless, DSLR or Point and Shoot: Which Camera is Best for Macro Photography? by Suzi Pratt appeared first on Digital Photography School.


Digital Photography School

 
Comments Off on Mirrorless, DSLR or Point and Shoot: Which Camera is Best for Macro Photography?

Posted in Photography