RSS
 

Posts Tagged ‘lightroom’

10 Shortcuts of the Commonly Used Features in the Library Module of Lightroom 4

02 May

Introduction

This tutorial has been transcribed from the SLR Lounge Lightroom 4 Workshop on DVD, a 14 hour Lightroom 4 A – Z guide with over 130 tutorials for mastering Lightroom from start to finish. The Digital download can be purchased from SLR Lounge while the physical copy is available through Amazon Prime.

Overview

This quick article will go over 10 shortcuts of the commonly used features in the Library Module of Lightroom 4. Knowing these simple shortcuts can greatly speed up your workflow!

(Note:  Apple users, just pretend that “CTRL” is “CMD”.  😉

1. Lightroom 4 Module Shortcuts

There are a total of 7 Modules in Lightroom 4 and each corresponds with numbers 1-7. To switch to a Module, hit “Ctrl + Alt + 1-7.”

“1” is the Library Module, “2” is the Develop Module, “3” is the Map Module, and so forth. For example, if you want to go to the Develop Module, hit “Ctrl + Alt + 2.”

01_lightroom-module-shortcuts

Another quick way to get to the Develop Module is by simply hitting “D.” You can also get to the Library Module through the different Library View Modes, which brings us to our next shortcut.

2. Library View Modes

There are 4 Library View Modes in Lightroom 4: Grid View Mode, Loupe View Mode, Compare View Mode, and Survey View Mode. To access the Grid View, hit “G.” To get to the Loupe View, hit “E.” Hit “C” for Compare View and “N” for Survey View. If you are in a module other than the Library Module, hitting any 4 of these Library View Mode shortcuts will bring you back to the Library Module.

3. Import/Export Shortcuts

To import images into Lightroom, hit “Ctrl + Shift + I.” This will bring up the Import Dialogue Box. Hit “Ctrl + Shift + E” to bring up the Export Dialogue Box to export your images out of Lightroom.

4. Photoshop Shortcut

Sometimes we need to finish editing our images in Photoshop. We can take our images from Lightroom into Photoshop by selecting the image and then hitting “Ctrl + E.” Once you are done with your image in Photoshop, hit “Ctrl + W.” This will bring you back into Lightroom, where you will see both your Photoshop copy and Lightroom copy of your image in your Lightroom catalog.

5. Left/Right Panels Shortcuts

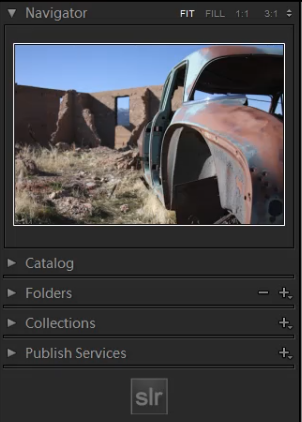
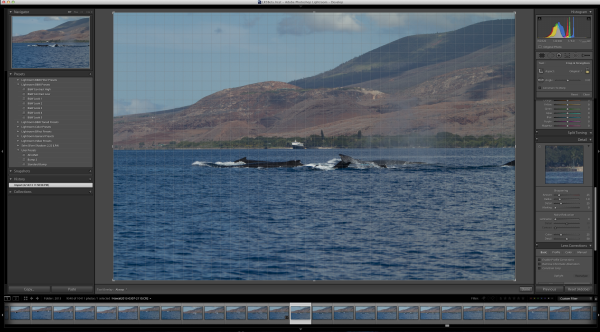
The boxes on the right and left sides of Lightroom 4 are referred to as Panels. Like the Modules, the Panels also correspond to a number. The Left Panels correspond with the numbers “0-4” and include the Navigator Panel, the Catalog Panel, the Folders Panel, the Collections Panel, and the Publish Services Panel.

To expand or collapse a Left Panel, hit “Ctrl + Shift + 0-4.” The Navigator Panel is “0,” the Catalog Panel is “1,” the Folders Panel is “2,” and so on. Below, you can see that only the Navigator Panel is expanded and the remaining Panels are collapsed.

02_lightroom-left-side-panels-shortcuts

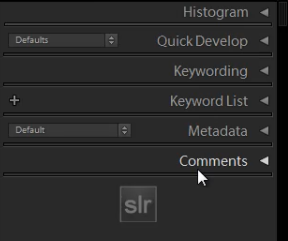
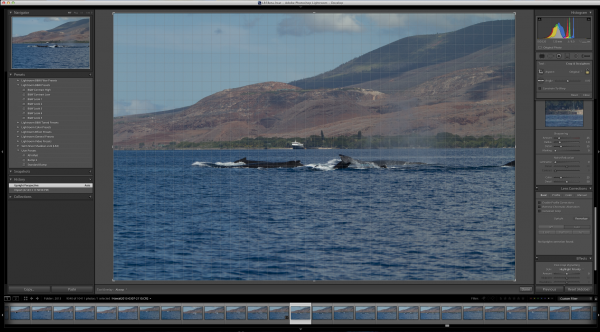
The Right Panels correspond with the numbers “0-5.” To expand or collapse a Right Panel, hit “Ctrl + 0-5.” The Right Panel includes the Histogram Panel, the Quick Develop Panel, the Keywording Panel, the Keyword List Panel, the Metadata Panel, and the Comments Panel. The Histogram Panel is “0,” the Quick Develop Panel is “1,” the Keywording Panel is “2,” and so forth. As you can see below, none of the Panels have been expanded.

03_lightroom-right-side-panels-shortcuts

6. Target Collection Shortcuts

Since we just discussed the Panels shortcuts, we will go over a Target Collection, which can be found in the Collections Panel (“Ctrl + Shift + 3”) in the Left Panel. A Target Collection is a useful tool because it helps us organize our photos quickly by using a hotkey. You can set a previous collection as the Target Collection, or you can create a new collection and set it  as the Target Collection.

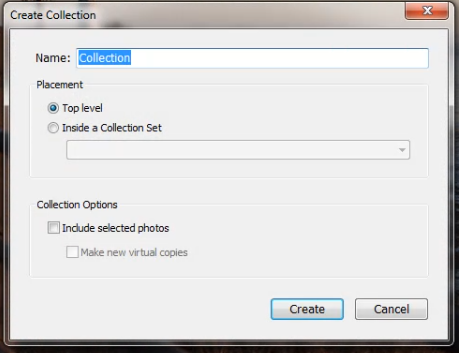
To create a new collection, click on the “+” sign next to Collections in the Left Panel. Select “Create Collection.”

04_create-new-collection

Once you have hit “Create Collection,” the Create Collection Dialogue Box will appear. Once you have named your collection, hit “Create.”

05_create-collection-dialogue-box

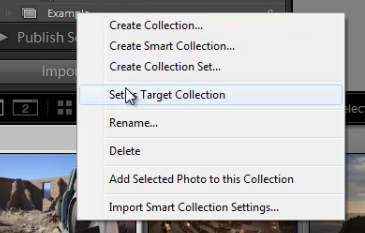
Right-click on a collection and hit “Set as Target Collection” to set the collection as your Target Collection.

06_set-as-target-collection

Once you have selected a collection to be your Target Collection, a “+” sign will appear next to the collection you have selected to remind you which collection is your “target” for the Collection hotkey. Now, simply hit “B” to add any image to your Target Collection!

For example, you might have created a collection for your portfolio images. Set that collection as your Target Collection, and then whenever you are looking through your latest photo shoot and you see one that is portfolio worthy, just hit “B” to add it to your portfolio!

7. Rotate Left/Right Shortcuts

To rotate multiple images at once, go to the Grid View (“G”). Once you are in the Grid View, select your images by holding down “Ctrl” while clicking on your images. To rotate your images to the left, hit “Ctrl + [.” To rotate your images to the right, hit “Ctrl + ].” You can also rotate individual images by using the same shortcuts.

8. Flag Shortcuts

Some people use flags as their culling system. For example, selecting an image as a pick means that we will deliver the image. Rejecting an image means that we will not deliver the image. Simply hit “P” to flag an image as a “pick.” If you want to remove the flag, hit “U.” To reject an image, hit “X.”

Or, to simply increase or decrease the flag status of an image, just hit Ctrl and either the up or down arrow.  This is by far the fastest way to go go from image to image and flag keepers (with just one hand!) by using the left and right arrows to navigate and the Ctrl-up/down key combination to pick or reject your images…

9. Star Rating Shortcuts

The following are the shortcuts for the Star Rating in Lightroom 4.

  • “1” = 1 star
  • “2” = 2 stars
  • “3” = 3 stars
  • “4” = 4 stars
  • “5” = 5 stars

Simply select an image and hit “1-5” to give the image a star rating. To reset Star Ratings on your images, hit “0.”

10. Color Label Shortcuts

The Color Labels in Lightroom 4 correspond with the numbers six thru nine. Red is “6,” Yellow is “7,” Green is “8” and Blue is “9.” There is also a Purple Color Label but to label an image Purple, you need to go into the Edit Menu, as shown below.

07_lightroom-purple-color-label

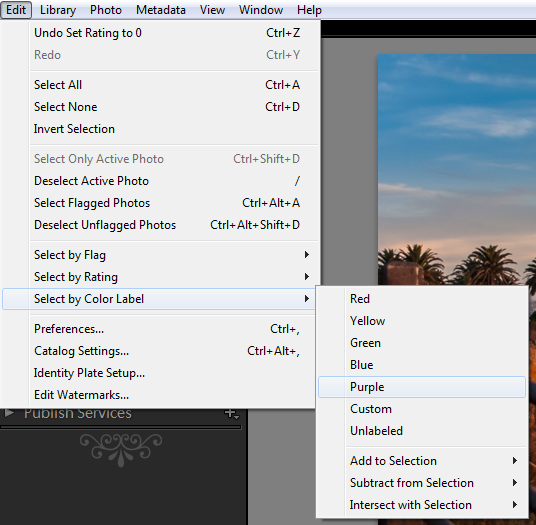
If you want to remove a Color Label, hit the corresponding number again. So for example, if your image is already color labeled Green, hit “8” again to remove this Green Color Label.

Learn More with the Lightroom 4 Workshop Collection!

This was a sample tutorial from the Lightroom 4 A to Z DVD which is one of the DVDs in the Lightroom 4 Workshop Collection. A collection of nearly 30 hours of video education teaching everything from Lightroom basics to advanced raw processing techniques.

The LR4 Workshop Collection also includes the critically acclaimed Lightroom 4 Preset System which is designed to enable users to achieve virtually any look and effect within 3-5 simple clicks. From basic color correction, vintage fades, black & white effects, tilt-shift effects, faux HDR, retouching, detail enhancing, and so much more. Click the links above to learn more.

Post originally from: Digital Photography Tips.

Check out our more Photography Tips at Photography Tips for Beginners, Portrait Photography Tips and Wedding Photography Tips.

10 Shortcuts of the Commonly Used Features in the Library Module of Lightroom 4


Digital Photography School

 
Comments Off on 10 Shortcuts of the Commonly Used Features in the Library Module of Lightroom 4

Posted in Photography


3 Small But Important Lightroom 5 Beta Changes You Might Have Missed

17 Apr

Adobe announced the availability of Lightroom 5 Beta at Adobe Labs today and by all means, go grab a free copy and play. I’ve been using Lightroom since version 1 and have been impressed with every upgrading to the program, gladly plopping down my money for a new version as I have found the enhancements in subsequent revisions well worth the funds. And Lightroom 5 seems to be on the same track, based on my findings while playing with the beta this last week.

Adobe has a number of fine new features in this revision and they are sure not to be missed. They include

  • A Smart Preview feature which mobile photographers will love as it creates a smaller, editable version of their monstrously sized RAW image that is easily portable on a laptop and can be synced when the originals, possibly stored on an external drive or NAS back at home, become available.
  • Radial Gradient which allows for selecting oval or circular shaped areas for specific effects.
  • Upright, which attempts to correct crocked images or fine tune vertical lines. (My experience with this tool has been less than stellar on simple horizon shots at sea. More on this in a minute.)
  • Advanced Healing Brush. This one, I like a lot and it is very helpful. Now your “Spot Removal Tool” can be used as a brush to wipe out items that are not in the shape of a circle. This helps a lot and means I spend even less time in Photoshop CS6.

That’s the obvious stuff that Abode packs into their press kit and you probably have seen those items demonstrated on other sites. What I want to show you are three things I found to be helpful in little, but repetitive ways for how I use Lightroom.

(Click any image for a larger version)

Invert Mask

Shot4Thank you! I’ve been wanting this feature for the longest time to save time. But it’s not quite right.

Invert Mask is currently only available with the new Radial Gradient feature. See it at the right? It works well and I’d like to see if appear in the Gradient Tool (especially when creating a new gradient…it would be great to great one just the opposite of the one I am using at the moment) and in the Adjustment Brush.

Here’s a simple rundown of how the tool works.

Starting with this image of one of my client’s boats, the Un-Cruise Adventures Safari Explorer off the shore of Maui, Hawaii, I want to see which direction works best: highlight the boat and darken the surrounding seas or slightly darken the boat and bring up the seas, in order to add contrast to the main subject.

Shot1

I select the new Radial Gradient tool and draw an oval over the boat (Dear Adobe, please make this tool work like the Ellipse Tool in Photoshop for consistency. Specifically, please allow me to grab a “corner” of the ellipse and drag it down instead of starting with the middle of the ellipse. Consistency would really help. Thanks.).

Shot2

Because I have chosen only to increase the exposure by .39, Lightroom masked the boat and increased the exposure for the rest of the image. But if I want to swap that and mask the entire picture except for the boat, it’s just a simple click of the “Invert Mask” check box.

Shot3

Subtle, but useful to me.

Now please, Adobe, add that ability to the Gradient Tool and to the Adjustment Brush especially.

Visualize Spot Healing

I’d like to think my sensor was perfectly clean before leading a recent tour to Bhutan. As a matter of fact, it was extremely clean before I left. But, as life goes, things don’t stay clean.

Take this image of a masked dancer at the Paro Tsechu.

Viz1

I wanted some blur (obviously) and used a small aperture to achieve a slow shutter speed. In this case, f/25 and 1/6th of a second. Closing down that aperture makes dust on the sensor more obvious, but this image has a lot going on making it hard to find all the dust.

Viz1-2


Viz2


If I click on the “Visualize Spots” check box after clicking the Spot Removal Tool, the slider to the right of it comes alive and I can now more easily see spots. This is a technique used in Photoshop for a while and it works best where edge contrast can be spotted, so in areas without a lot going on.

Viz11

In this image, I found three additional spots, two of which would have been easy to miss without the tool.

Viz4

Remove Chromatic Aberration Check Box

This one is really small, but helpful. With the addition of the “Upright” feature to the Lens Correction panel, Adobe made it easier to get to the Chromatic Aberration removal check box.

Rem1

It’s a small thing, but I often use the check box for “Enable Profile Corrections” for my lens and then want to remove chromatic aberration on only select images, but many. The placement of the box here, as well as on the “Color” tab, helps.

Upright Is Not That Functional For Me

Maybe I’m doing something wrong, but I doubt it. This is one of Adobe’s touted JDI (Just Do It) features and it seems to work well on the demos, but not in real life. If it did, it would be cool. I can get the feature to work part of the time, but no where near even 25% of the time reliably.

The feature is supposed to level a scene and make diverging or converging vertical lines straight. It can be helpful when it works. But something as simple as a horizon, an obvious one, in this example is not being leveled.  Here’s the initial image out of the camera.

Level1

Now to show that the horizon is not level using the Crop Overlay.

Level2

And now using the tool in Auto mode.

Level3

I tried in Level and Full modes to no avail. The program clearly states “No Upright Correction Found”. This is supposed to be a boon for landscape photographers, but even with a clear horizon like this, it failed.

I tried another obvious shot from Bhutan.

Level4

Now how can it say, in all four modes (Auto, Level, Vertical and Full) that no data can be found?

I’m not saying it doesn’t work, I’m saying it’s wonky and not yet reliable.

But this is beta software and that is why they put it out, to find the kinks that mean the most for their users.

Give it a try, Lightroom 5 Beta is quite useful with all the upgrades instituted.


Post originally from: Digital Photography Tips.

Check out our more Photography Tips at Photography Tips for Beginners, Portrait Photography Tips and Wedding Photography Tips.

3 Small But Important Lightroom 5 Beta Changes You Might Have Missed


Digital Photography School

 
Comments Off on 3 Small But Important Lightroom 5 Beta Changes You Might Have Missed

Posted in Photography


Adobe launches Photoshop Lightroom 5 Public Beta

16 Apr

lr5logo.png

Adobe has released a public beta version of its Photoshop Lightroom 5 workflow and image editing software. Available immediately for free download from Adobe Labs, the beta introduces a more advanced healing/cloning tool, automatic image leveling and perspective correction, a new selective editing tool and the ability to edit files that are offline. We’ll have our hands-on preview online very shortly but you can click here to begin exploring this new release on your own.

News: Digital Photography Review (dpreview.com)

 
Comments Off on Adobe launches Photoshop Lightroom 5 Public Beta

Posted in Uncategorized


Batch Crop and Resize in Lightroom

15 Apr

Lightroom batch crop and resize opener

If you’re working on a large shoot and need to output a lot of images at a fixed size then Lightroom can do the work for you. It isn’t obvious how you can crop all your images to a fixed size and output them at a certain set of pixel dimensions but it is easy to do when you know how. Here’s how to do it:

Step 1

Lightroom batch crop and resize 1

First locate the folder with your images in it. I prefer to make virtual copies of my images and put them in a new collection but you can do whatever makes sense to you.

Step 2

Lightroom batch crop and resize 2

Select all the images in Grid view in the Library module in Lightroom.

Open the Quick Develop panel on the right and, from the Crop Ratio dropdown list, select the crop ratio that you want to crop to. For example you can crop to fixed ratios such as 1 by 1 or printing sizes such as 5×7, 4×6 and so on.

Here I’ve selected 5×7 and when I do so all the selected images are automatically cropped to this 5 x 7 ratio.

Lightroom is smart enough to understand that some images are portrait orientation and others are landscape. Portrait images are cropped to 5 x 7 and landscape orientation images to 7 x 5.

Lightroom batch crop and resize 2a

Step 3 (optional)

Lightroom batch crop and resize 3

If desired, you can now move to the Develop module and check the crop for all the images. By default, Lightroom will center the crop rectangle on the image and this may not be exactly what you want for some images. However, it is easy to go to the Develop module, click the first image and click on the Crop Overlay Tool so you see the crop marquee in position on the on the image.

Now from the filmstrip you can click on each image in succession to preview it in the crop window and you can easily identify if any of them need an adjustment to the crop rectangle. If they do simply drag on the crop rectangle to reposition it. When you’re done return to the Library view.

Step 4

Lightroom batch crop and resize 4

As the images are now all cropped to size, press Ctrl + A to select them and then click Export. Choose a folder to export the images into or click New Folder to create a new folder.

You can now set your desired preferences in the Export dialog.

To control the output size – in pixels wide and tall – of the images easily because you already know the crop ratio. To do this, select the Resize to fit checkbox and choose Long Edge from the dropdown list. Then type a pixel dimension for the long edge. So, for example, to prepare 5 by 7 ratio images for printing at 300 dpi the longest edge will need to be 2,100 pixels (7 x 300) so type 2100 and set the resolution to 300.

Step 5

Lightroom batch crop and resize 5

Click Export to export your images and they will be exported to a folder at the chosen size and resolution.

This process allows you to quickly and effectively prepare a batch of images for printing. It manages portrait and landscape images so that you don’t have to separately handle each type. It’s a simple workflow and a fast way to prepare images from a large shoot.

Post originally from: Digital Photography Tips.

Check out our more Photography Tips at Photography Tips for Beginners, Portrait Photography Tips and Wedding Photography Tips.

Batch Crop and Resize in Lightroom


Digital Photography School

 
Comments Off on Batch Crop and Resize in Lightroom

Posted in Photography


Adjusting White Balance in Lightroom

12 Apr

Lightroom white balance opener

Lightroom has a set of tools that you can use to adjust white balance in your images. To see these at work open an image in the Develop module. At the top of your Basic panel are the white balance adjustment tools.

White Balance Options

The dropdown list will show you some options for adjusting white balance – what is shown here will vary depending on how your images are captured. If you capture in raw then the white balance dropdown list will contain the same options as you have on your camera for setting white balance. If you’re capturing jpg images then there are fewer options – As Shot, Auto and Custom.

Lightroom white balance 1

On the left are the options for a raw image and on the right those for a jpeg image.

The Temperature and Tint sliders also have different units of measure depending on whether you’re working with jpgs or raw images. For jpg images both the sliders range from +100 to -100. If you’re working on a raw image then the Temperature slider shows degrees Kelvin from 2000 – 50,000 and the Tint slider ranges between + 150 and – 150.

Kelvin is a measurement of the color of light – daylight is around 5,500 degrees Kelvin. Lights we consider to be warm or pink/orange in color including tungsten globes are around 3,000 degrees Kelvin and cool lights which are blue in color such as overcast daylight are around 7,000 degrees Kelvin and higher.

Adjust White Balance

To adjust the white balance in the selected image you can select an option from the White Balance dropdown list to use to fix the image or you can use it as a starting point and then fine tune the result.

You can also manually adjust the Temp slider to add warmth or remove it from the image. Drag the sider to the left to add a blue tint to the image (to cool it down), or to the right to add a yellow tint to it to warm the image.

Use the Tint slider to balance out any excess magenta or green in the image. Drag towards the right to add magenta to the image cancelling out any green tint and drag to the left to add a green tint cancelling out any unwanted magenta.

White Balance Selector

You can also use the White Balance Selector to adjust white balance. You can select the tool by clicking on it or press W.

Lightroom white balance 2

From the White Balance toolbar under the image you can select options that make the White Balance tool easier to use. I suggest you deselect Auto Dismiss as you can then click on the image in various places to attempt to fix it. If you have Auto Dismiss enabled you’ll only be able to click once before the selector is dismissed so, if that fix isn’t perfect then you’ll need to select the tool again to attempt another fix. This is a cumbersome way to work so I prefer to disable Auto Dismiss and put the tool away only when I am done with it.

If you click the Show Loupe checkbox then you’ll see a 5 by 5 pixel grid beside the mouse cursor. The center point in the grid is the pixel that you are currently targeting and which will be used to adjust the image if you click. This grid makes it easier for you to pick the correct point in the image to adjust to. The scale itself can be increased or decreased using the Scale option on the toolbar.

At the bottom of the loupe itself are the RGB percentage values of the pixel under the cursor. These values tell you if the pixel is neutral or not. If it is neutral then the percentages of R, G and B will all be equal – if they are not equal then there is color in that pixel.

Lightroom white balance 3

To balance the image using the White Balance selector, click on a pixel that should be neutral grey – not white or black. When you do so, Lightroom will adjust the image so that the selected pixel is a neutral grey and, as a result, all the color in the image will change. At the same time Lightroom adds an entry to the image History for that adjustment. This means that you can wind back the history to return to an earlier white balance fix, if desired.

Lightroom white balance 4

You should be aware that adjusting image white balance is to an extent a subjective assessment – so there is no one value that is “correct”. There are, instead, a myriad of different results that can be achieved so look for one that is it pleasing to you. In most cases viewers prefer to see some warmth in photos as they are more pleasing to the eye if they are warmer rather than cool.

I find that a good approach to take is to experiment with the white balance selector to see the effect on the image by selecting different pixels to adjust to. Then choose the most aesthetically pleasing result.

Post originally from: Digital Photography Tips.

Check out our more Photography Tips at Photography Tips for Beginners, Portrait Photography Tips and Wedding Photography Tips.

Adjusting White Balance in Lightroom


Digital Photography School

 
Comments Off on Adjusting White Balance in Lightroom

Posted in Photography


How to Easily Create Selective Color Using Lightroom

11 Apr

This is a guest post by: John Davenport

Selective color photography has been around for ages. It’s something that has been used in the movies – Schindler’s List and Sin City come to mind – and more recently Chase Freedom and Budweiser have used it in their ad campaigns to highlight their products. So even if you dislike selective color, or if haven’t given it much thought, you have to admit it’s a great technique to use when you’re trying to draw attention to a certain subject and is something useful to have in your tool belt.

Today I’m going to show you how to create simple selective color images using only Lightroom as your processing software.

What Makes a Good Selective Color Image?

Double Yellow.jpg

First we need to make sure we know what to look for when we’re out photographing our subjects because selective color photography is not something suited for every situation. Whether you’re a landscape photographer, a portrait photographer, or someone shooting on the city streets it’s important to keep the idea in the back of your head that selective color shouldn’t be forced.

Typically you’ll want to pull a vibrant color out of a rather drab scene so fall foliage can work really well, blue eyes in portraits are a very common theme, bright dresses and clothing work well too.

One final point is that you should make sure that whatever you’re keeping in color adds value to the photograph and isn’t something that will detract from the overall scene.

How to Create Selective Color in Lightroom

One of the limitations of Lightroom is that it does not have the ability to do true layers like Photoshop does. We can get around this for selective color processing by working with the HSL tab and working with the Adjustment Brush tool. In short, what we’re going to be doing today is turning the saturation down on all the colors and areas of the photograph that we don’t want color in. The following is a step by step guide on how I created the image at the top of this post.

Here’s the original image for your reference.

original.jpg

The first step would be to go into the HSL tab in Lightroom and remove the saturation from all the colors you don’t want in your photograph. In my case I wanted to keep yellow so all the other sliders have been pulled to the far left.

Screen Shot 1.png

Next step would be to tune the image to your liking – this is a rough tuning just something to get you close to where the final image will be. Simply go into the Basic editing tab of Lightroom and get the overall image set up how you like. You might notice as you do this, some colors start creeping back into the photograph, that’s okay we’ll fix this in the next step.

Screen Shot 2.png

Cleaning up any colors that have reappeared after your tuning process can be done easily with the Adjustment Brush. Simply create a new adjustment brush layer and turn the saturation to the far left. Paint anywhere you don’t want color. If you accidentally paint over something you want to keep switch to the erase mode and go back over that area until you get it right.

Screen Shot 3.png

After you get to this point it’s up to you to finalize the photograph for your own unique look with final touches and cropping.

I find that this workflow does a good job at creating selective color images without the confusion and time consuming nature that dealing with layers in Photoshop has. Of course it should be noted that with a program like Photoshop you’ll have a lot more control over your selective color processing, but for many of us this Lightroom trick is a great alternative.

Let’s Hear From You

Now that we’ve learned how to perform selective color edits I’d love to hear what your opinions are of this kind of processing do you use it? Do you hate it? Have you ever done this kind of thing in Lightroom before?

John Davenport is an avid amateur photographer who shares daily photos on Facebook. For more tips on Lightroom editing check out John’s weekly series which focuses on how to edit photos in Lightroom.

Post originally from: Digital Photography Tips.

Check out our more Photography Tips at Photography Tips for Beginners, Portrait Photography Tips and Wedding Photography Tips.

How to Easily Create Selective Color Using Lightroom


Digital Photography School

 
Comments Off on How to Easily Create Selective Color Using Lightroom

Posted in Photography


How To Sync Multiple Camera Time Stamps In Lightroom 4

05 Apr

Syncing the time stamp on multiple cameras is best done ahead of time. Every six months or so I take all of my digital SLR camera bodies and sync the clocks in them. This is important because if you use multiple cameras on a photo shoot like a wedding, you want to be able to sort the photos by the time they were taken so you can give the client a set of photos that are organized from start to finish. If your cameras time stamps are off, this can become very annoying in post because you’ll notice images being out of order. This becomes amplified the more your cameras are out of sync.

Well, none of us are perfect and I certainly don’t claim to be! I recently shot a wedding with my good buddy Cliff Baise and I totally forgot to sync our cameras ahead of time. When I got his images on my computer to start editing everything together I was getting frustrated because I wasn’t seeing ANY of my images in Lightroom. Everything was sorted by time like it always is and I double checked everything. Well, it turns out our cameras were a full hour out of sync with my camera being an hour ahead of Cliff’s. So my images weren’t showing up in the timeline until much later in the wedding. This was pretty nerve racking because I hadn’t run into this problem before. I’ve always synced my own cameras (my wife usually shoots with me and uses my other main camera) so I’ve never had to deal with this before. I thought I was out of luck. So I started rummaging through the menu options in Lightroom and eventually figured out a way to sync the two cameras very quickly and very easily. Here’s how to do it:

Find Images You Know Were Taken At The Same Time

Screen Shot 2013-03-29 at 9.05.11 AM

At some point during the day of a wedding or any shoot, it’s likely that the two shooters took a photo at the same exact time (or dang close to it). This doesn’t have to be an exact, down to the mili-second thing…they just need to be close. For this wedding I found a shot that Cliff took of me taking a picture of the bride showing off her boots. Perfect. All I needed to do was find the picture that I took at that moment.

Screen Shot 2013-03-29 at 9.05.24 AM
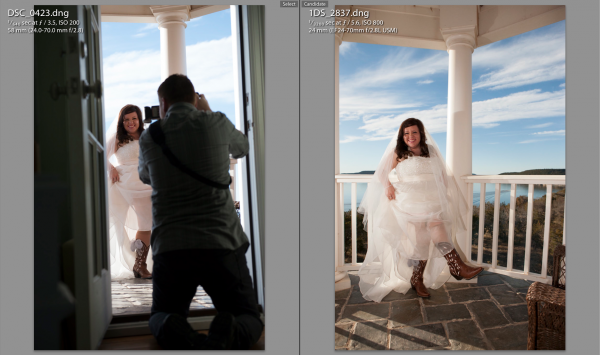
The first thing you need to do is select the first photo you find by clicking on it in Library Mode. Then, scroll down to the other image from the second camera, hold down command on a Mac (control on PC) and click that one as well. This will select both images at the same time. Now hit the ‘C’ key on your keyboard which will bring up the two images in Compare mode side by side. Once in compare mode you can click back and forth between the two images to see all the EXIF information on the right hand side. Again, this all has to be done in Library Mode, not Develop Mode.

On the right hand side in the EXIF data, you will see the Capture Time. This is how you tell if the images are off at all. Just click back and forth between the two images and watch how the time changes. If they are off by more than a few seconds, it’s time for the next step.

Syncing The Times

This part was a little tricky the first time. Go ahead and write down the exact times of each photo on a piece of paper or type it onto your computer somewhere. Note which time correlates with each image.

Now you need to decide which set of images you want to sync. In all honesty, it doesn’t really matter which one you choose. Nobody cares what time the picture was taken, they just need to be in order of when they were taken. So I just chose to make Cliff’s images match the time of my images. I could have gone the other way around and gotten the same result.

Screen Shot 2013-03-29 at 12.14.44 PMTo sync the time stamps, select all the images from the camera you want to correct. If you have them in separate folders this will be easy. If they are all mixed in to the same folder, you can sort by File Name in Library Mode and then the images will be separated. If all the images from the one camera are in their own folder, just hit Command A on a Mac (Control A on PC). This will select all the photos. If the images are mixed with another camera in the same folder, separate them by file name, then select the first image from the camera you want to correct by clicking on it, then scroll down to the last image from that camera, hold down Shift and click the last image.

Now that you have all the images selected that you want to fix, go up to Metadata in the top menu and scroll down to Edit Capture Time. When the window pops up all you need to to is update the time under the ‘New Time’ section. The original time will be on the top so just plug in the time that you wrote down from the correct camera in the ‘Corrected Time’ section.

Screen Shot 2013-03-29 at 12.16.11 PM

Once this is done, it’s important to just double check everything and make sure you have everything correct. It says at the bottom of the window that the operation cannot be undone so don’t make any mistakes! Once you are sure you have everything right just click Change and you’ll be done! You should now be able to select the images from both cameras in library mode, sort by time and see all of the images in chronological order.

Conclusion

Like I said in the beginning, it’s way easier to do this right the first time by synching the cameras before the shoot. But if you ever forget this like I did, being able to do it in Lightroom is a life saver!


Post originally from: Digital Photography Tips.

Check out our more Photography Tips at Photography Tips for Beginners, Portrait Photography Tips and Wedding Photography Tips.

How To Sync Multiple Camera Time Stamps In Lightroom 4


Digital Photography School

 
Comments Off on How To Sync Multiple Camera Time Stamps In Lightroom 4

Posted in Photography


Adobe releases Lightroom 4.4 and Adobe Camera Raw 7.4

03 Apr

shared:AdobeLogo.png

Adobe has released Photoshop Lightroom 4.4 and Adobe Camera Raw 7.4. These are final versions of updates that were originally posted as ‘release candidates’. Both versions add Raw support for 25 additional cameras, including the Nikon D7100, Canon EOS 100D, Fujifilm X100s and Sony SLT-A58. Corrections to the demosaicing algorithms for previously supported Fujifilm X-Trans and EXR sensor cameras are also included along with several new lens profiles. Click through for a full list of supported cameras, lenses and bug fixes.

News: Digital Photography Review (dpreview.com)

 
Comments Off on Adobe releases Lightroom 4.4 and Adobe Camera Raw 7.4

Posted in Uncategorized


Lightroom 4 Virtual Copies 101

25 Mar

Introduction

This tutorial has been transcribed from the SLR Lounge Lightroom 4 Workshop on DVD, a 14 hour Lightroom 4 A – Z guide with over 130 tutorials for mastering Lightroom from start to finish. The Digital download can be purchased from SLR Lounge while the physical copy is available through Amazon Prime.

Overview

The way an image is post-produced can drastically change the mood and feel of that image. We often take pictures that would look great in color, black and white or even with vintage effects. Virtual Copies are great for creating duplicates of an image with different develop settings applied to them. In this tutorial, we will go over the basics of Virtual Copies in Lightroom 4 and how they differ from Snapshots.

What is a Virtual Copy?

Virtual Copies are not copies of the original RAW file (that’s actually what makes them so awesome to begin with). Instead, a virtual copy is only a copy of the develop settings, represented as a new image within the Lightroom catalog. When you export the image, Lightroom will create outputted images based on each virtual copy of a particular image. Virtual Copies are great because they do not take up much space on the hard drive since only the settings of the photo are saved within the catalog. However, once you export these images out from Lightroom, they will take up more space because Lightroom is creating different versions of the original image.

Creating Virtual Copies

There are several ways to create a virtual copy of an image. We can right-click on an image and hit “Create Virtual Copy.”

01_right-click-create-virtual-copy

But, my favorite method is simply to use the shortcut. To create a Virtual Copy at any point hit (Ctrl + ’) on the desired image.

Filtering and Deleting Virtual Copies

At times, it might be beneficial to view all the Virtual Copies within our Lightroom catalog. To aid us, we can actually filter by Virtual Copies in Lightroom. First, you need to bring up your Filter Menu. To do this, you need to be in the Library Module. Once there, hit “\” to bring up the Filter Menu. Click on “Attribute” and on the far right of the panel there are 3 little box icons. To select Virtual Copies, click on the middle box, as shown below. Once you turn this filter on, you can see all the Virtual Copies in your catalog.

02_virtual-copies-filter

Filtering by Virtual Copies is very handy if say you wish to clear out all of your Virtual Copies in your catalog. Often times I also like to filter by Virtual Copies when I want to create a “universal look” with the develop settings for all of my Virtual Copies.

Remember, if you delete a Virtual Copy, the original file with the original settings will still be in your catalog. Deleting a Virtual Copy has no effect over the original image. Delete Virtual Copies the same way you would a regular image, simply right-click on the images, and hit “Delete Photos.”

03_delete-virtual-copies

A dialogue box will then appear, asking if you want to remove the Virtual Copies. Once again, this will not remove your original image from your catalog (so long as the original image isn’t selected for deletion).

04_confirm-remove-virtual-copies

Virtual Copies vs. Snapshots

We are often asked what the difference is between a Snapshot versus a Virtual Copy. Given that both functions are used to create different looks for an image, it can seem similar. However, in reality, these two functions are very different, particularly when it comes to exporting.

When you create different looks via Snapshots, only the “active” or selected Snapshot develop settings will be exported to the final image. Let’s illustrate with an example.

Let’s say we have an image with 3 different looks created with Snapshots, and another image with 3 different looks created with Virtual Copies.

When we export the image with the 3 different Snapshots, Lightroom will create one exported image with the develop settings from the “active” snapshot.

When we export the image with the 3 different Virtual Copies, Lightroom will actually create 3 separate exported images using the develop settings from each Virtual Copy.

To keep it simple. Virtual Copies will create additional exported images while Snapshots will not.

Learn More with the Lightroom 4 Workshop Collection!

This was a sample tutorial from the Lightroom 4 A to Z DVD which is one of the DVDs in the Lightroom 4 Workshop Collection. A collection of nearly 30 hours of video education teaching everything from Lightroom basics to advanced raw processing techniques.

The LR4 Workshop Collection also includes the critically acclaimed Lightroom 4 Preset System which is designed to enable users to achieve virtually any look and effect within 3-5 simple clicks. From basic color correction, vintage fades, black & white effects, tilt-shift effects, faux HDR, retouching, detail enhancing, and so much more. Click the links above to learn more.

Post originally from: Digital Photography Tips.

Check out our more Photography Tips at Photography Tips for Beginners, Portrait Photography Tips and Wedding Photography Tips.

Lightroom 4 Virtual Copies 101


Digital Photography School

 
Comments Off on Lightroom 4 Virtual Copies 101

Posted in Photography


Introduction to Lightroom

22 Mar

Do you have Lightroom but feel like you’re not using it to it’s potential? Have you heard about the power of Lightroom but are not sure if you’ll be able to learn it?

The following video is the introduction from Phil Steele’s ‘Lightroom Made Easy’ video which is currently 30% off at SnapnDeals.

It’ll give you a taste for Phil’s style but also give you a good simple (and free) introduction to what Lightroom is and how it is different from many other types of photo editing software.

Pick up the full Lightroom Made Easy video course for 30% off (just $ 33) via SnapnDeals for the next few days only.

Post originally from: Digital Photography Tips.

Check out our more Photography Tips at Photography Tips for Beginners, Portrait Photography Tips and Wedding Photography Tips.

Introduction to Lightroom


Digital Photography School

 
Comments Off on Introduction to Lightroom

Posted in Photography