RSS
 

Posts Tagged ‘lightroom’

Adobe Lightroom goes mobile, but only for subscribers

09 Apr

adobe3b.jpg

Adobe has released Lightroom mobile for Apple’s iPad as a companion app to the Lightroom desktop application. The app offers many of same image editing and organizing functions found on the desktop version. It also uses cloud technology to synchronize your edits across various devices with the image catalog on your desktop computer. Learn more

News: Digital Photography Review (dpreview.com)

 
Comments Off on Adobe Lightroom goes mobile, but only for subscribers

Posted in Uncategorized


Adobe Camera Raw 8.4 and Lightroom 5.4 now available

09 Apr

shared:AdobeLogo.png

Camera Raw 8.4 is now available as a final release for Photoshop CS6 and Photoshop CC. Lightroom 5.4 is also now on Adobe.com and available through the update mechanism in the application. The updates include bug fixes, new features and support for a number of new cameras such as the Nikon D4s and D3300, Canon PowerShot G1 X Mark II, Olympus OM-D E-M10 and Fujifilm X-T1. Learn more

News: Digital Photography Review (dpreview.com)

 
Comments Off on Adobe Camera Raw 8.4 and Lightroom 5.4 now available

Posted in Uncategorized


Seven Pieces of Advice for New Lightroom Users

08 Apr

Lightroom Develop module

Andrew S. Gibson is the author of Mastering Lightroom: Book 2 – The Develop Module. There’s a special deal on now at Snapndeals, get 40% off for a limited time only.

A Digital Photography School poll held earlier this year revealed that the majority of readers carry out their post-processing in Lightroom. Lightroom is attracting users all the time as it is not just a photo processor – it helps you organize, search and view your photos as well. If you are new to Lightroom then these tips will help you get started.

1. Understand the Lightroom Catalog

The Lightroom Catalog is a database containing all the information that Lightroom holds about your photos. It includes metadata, records of any edits you have made, star ratings, keywords, Collections and the locations where your photos are saved.

***An important note: the Catalog doesn’t contain any photos, just information about them.***

The Catalog is important, and for maximum peace of mind you should set Lightroom to make a backup copy every time you close the program. Do this by going to the General tab in Lightroom > Catalog settings and setting Back up Catalog to Every Time Lightroom Exits:

Lightroom Catalog settings

The next time you exit Lightroom it will give you the choice where to save the backup – it’s a good idea to save it on a separate hard drive to the one containing your Lightroom Catalog (located on the computer’s main hard drive). If the backup and the original Catalog are on the same hard drive, and it fails, you will lose both.

2. Appreciate the advantages that using Lightroom gives you

The main benefit of using Lightroom is that it becomes the heart of your post-processing workflow. You can do most of what you need in Lightroom: including viewing, organizing, searching and key-wording photos, through to post-processing and exporting. If you need to finish a photo in Photoshop or another program you can export it from Lightroom first, then bring it back into Lightroom when it’s done, where the two versions will exist side by side.

This diagram shows the workflow:

Lightroom workflow

Another advantage is that Lightroom saves you hard drive space. Think about what happens if you process a Raw file in Photoshop. You start by converting it in Adobe Camera Raw, then open the file as a 16 bit TIFF in Photoshop itself, before finally saving it. Depending on what format you save it in, you end up with either a Raw file and a JPEG, or a Raw file and an 8 bit or 16 bit TIFF.

In Lightroom, on the other hand, all the edits you carry out on your photos are saved as text commands in your Lightroom Catalog. This takes up a lot less space and you only need to export your files into another format (JPEG, TIFF etc.) when you actually need them for something.

You can save even more hard drive space by converting your Raw files to the DNG format when you import them into Lightroom. This also makes Lightroom run faster. This is covered in more detail in my article Make Lightroom Faster by Using DNG.

3. Learn what you can and can’t do in the Develop module

Lightroom is primarily for processing Raw files, although it can also be used for editing JPEGs and TIFFs. All this is done in the Develop module. Even if you are processing a Raw file with the intention of exporting it to another program (like Photoshop or a plug-in) it is a good idea to do as much editing as you can in Lightroom first.

Why? The main reason is that using Lightroom saves you hard drive space, as mentioned earlier. When you export a photo to use in a plug-in, Lightroom converts it to a 16 bit TIFF (or other format of your choice) first. This negates the benefit of using Lightroom to save hard drive space, so you should avoid it where possible.

Things you can’t do in the Develop module are anything involving layers, creating HDR images by tone mapping, exposure blending, adding textures, creating composite images or adding fancy borders. For these you will need Photoshop or another program.

4. Retouching portraits in Lightroom

There are lots of Lightroom plug-ins available designed to help you retouch portraits. Indeed, there are so many that it’s difficult to know which are any good, especially as some cost more than Lightroom itself.

While you may need a plug-in (or Photoshop) for high-end retouching work, Lightroom has a built in Adjustment Brush preset that will do the job for you. It’s called Soften Skin and is a quick and easy way to retouch a portrait.

This before (left) and after (right) comparison shows what you can achieve in Lightroom:

Lightroom portrait retouching

This is a good example of learning what you can achieve within Lightroom, saving yourself time, hard drive space and the expense of purchasing another plug-in in the process.

For more on retouching portraits in Lightroom see: How to professionally retouch portraits in Lightroom

5. Learn to organize your images in the Library module

If you are new to Lightroom you will be accustomed to organizing your photos into folders on your hard drive. In Lightroom though, things are different. There’s only one module (Library module) that gives you direct access to the folders on your hard drive. The others all use Collections instead.

Lightroom is set up that way because Adobe wants you to organize your photos in Collections. The advantage of working this way is that a Collection can contain images that reside across a multitude of folders and bring them together in a way that makes sense for you. You can organize your images by date, subject matter, people’s names or any other way that is useful. My article Use Lightroom Collections to Improve Your Workflow goes into this in more detail.

6. Decide how to use colour labels, star ratings and keywords from the beginning and stick with it

This is the hardest piece of advice to follow because when you are starting out you’re still figuring how to use these features. As your understanding of Lightroom grows, you will work out how to use these things in a way that suits you. Just be aware that consistency is your friend. If you start out using (for example) colour labels one way, then change your mind after a few months, it has the potential to cause confusion.

Lightroom colour labels and star ratings

For help with keywords, read my article Creative Ways to Use Keywords in Lightroom 5.

7. Put all your Raw files in a single folder on an external hard drive

This makes it easy to back them up. If you need help with deciding on a file structure then my article Organising Photos for Lightroom will help. The main benefit of keeping all Raw files in a single folder is that it is easy to back up. I recommend that you back your Raw files up to at least two different hard drives. Given that hard drive failure is inevitable (it is always a question of when, not if, even if the when is years into the future) it is wise to have multiple copies. That way if the worse happens it is an inconvenience, not a disaster.

Over to you

Now it’s your turn. What advice would you give to new Lightroom users? What do you wish you had known from the start?


Mastering Lightroom: Book Two

Mastering Lightroom: Book Two – The Develop Module ebookMy new ebook Mastering Lightroom: Book Two – The Develop Module teaches you how to process your Raw files in Lightroom for spectacular results. Written for Lightroom 4 & 5 it takes you through every panel in the Develop module and shows you how to creatively edit your photos. It’s now 40% off at Snapndeals for a limited time only.

The post Seven Pieces of Advice for New Lightroom Users by Andrew S. Gibson appeared first on Digital Photography School.


Digital Photography School

 
Comments Off on Seven Pieces of Advice for New Lightroom Users

Posted in Photography


Four Ways to Improve Your Photos With the Clarity Slider in Lightroom

05 Apr

Using the Clarity slider in Lightroom

Andrew S. Gibson is the author of Mastering Lightroom: Book 2 – The Develop Module. There’s a special deal on now at Snapndeals, get 40% off for a limited time only.

The Clarity slider is one of the most useful in Lightroom when it comes to giving your images extra punch and impact. Today I’m going to show you several ways you can use it to improve your photos. But first, let’s take a look at exactly what the Clarity slider does, and how it differs from its cousin the Contrast slider.

This photo is ideal to demonstrate the difference:

Using the Clarity slider in Lightroom

Using the Clarity slider in Lightroom

It was taken on an overcast day and the light was very flat. This is confirmed by the histogram, which has gaps on both the left and right-hand sides (screen capture image to the right).

Now let’s see what happens when we set the Contrast slider, and then the Clarity slider, to their maximum settings of +100:

Using the Clarity slider in Lightroom

The most obvious difference at this scale is that the Contrast slider has a more far reaching effect. It makes both the shadows darker and the highlights brighter, stretching the histogram in the process.

The Clarity slider works differently. It increases contrast, but in the mid-tones only. The highlights aren’t affected, and if anything the photo becomes darker as the Clarity slider has a greater effect on dark tones than the Contrast slider.

Here’s a close-up of both images so you can see the effect in more detail. Look closely and you’ll see that the Clarity slider brings out more texture than increasing Contrast.

Using the Clarity slider in Lightroom

That’s the key to using this slider successfully. Increasing mid-tone contrast brings out texture and detail, increasing the tactility and apparent sharpness of the image. That’s what the Clarity slider is designed to do. Now I’m going to show you some practical applications.

1. Emphasizing texture

The Clarity slider in the Basic panel is a  global adjustment – meaning that, moving this slider affects the entire image. A small but subtle boost to Clarity can lift just about any image. Photos with more texture, such as the one below, may benefit from a larger increase in Clarity to bring out the texture and detail. This technique is especially effective in black and white. Plus, there’s nothing to stop you increasing contrast as well, especially in black and white, which usually benefits from higher contrast than colour images.

Using the Clarity slider in Lightroom

2. Emphasising texture locally

There is a theory in photography called visual mass that states that certain elements pull the viewer’s eye more than others (you read more about it in my article Composition, Balance and Visual Mass). One of these elements is sharpness. The eye goes to sharp parts of the image before it goes to unsharp, or out of focus areas.

You can use this to your advantage by making local adjustments to Clarity rather than global ones. In the example below, I wanted the white stones to be the centre of attention. The principle of tonal contrast ensures that they are, and I emphasixed it here by placing Radial filters over the stones and setting Contrast to +100 in each one.

Using the Clarity slider in Lightroom

Note: The Radial filter is new to Lightroom 5. If you have an older version of Lightroom you can use the Adjustment Brush tool instead.

3. Emphasize the eyes in a portrait

There’s another area where increasing Clarity locally can make a huge difference and that’s in portraiture. Use either the Radial filter or Adjustment Brush to increase the Clarity of your model’s eyes. Again, it’s a subtle, but often effective change. You can also do the same with your model’s mouth to emphasize the lips. Remember that as Clarity tends to make things darker, you’ll probably need to increase Exposure a little as well.

Using the Clarity slider in Lightroom

4. Soften skin

So far we’ve just looked at what happens when you increase Clarity, but you can also go the opposite way and decrease it in order to obscure detail, or soften part of the photo. You do have to be careful with this as the result can look a little false. A light touch is essential.

You can use negative Clarity as a kind soft focus effect in portraits. The most effective way is to increase Sharpness at the same time that you decrease Clarity. This helps retain realistic looking texture in the skin and avoids the false effect I spoke of earlier.

Lightroom has a built-in Adjustment Brush preset called Soften Skin which does exactly that. You can see the effect here. It’s subtle, look at the area under the model’s eyes if you’re not sure what the difference is:

Using the Clarity slider in Lightroom

To use the Soften Skin preset, start by activating the Adjustment Brush and paint in the area you want to apply the preset to (shown in red below). Leave the eyes, eyebrows, mouth and tip of the nose alone as you don’t want to soften those areas.

Using the Clarity slider in Lightroom

Select Soften Skin from the Effects menu. Lightroom sets Clarity to -100 and Sharpness to +25.

Using the Clarity slider in Lightroom

Using the Clarity slider in Lightroom

This is the strongest Soften Skin preset. If it’s too strong, you can reduce it by hovering the mouse over the Adjustment Brush pin until the double arrow icon (left) appears. When you see it, hold the left mouse button down and move the mouse left. Lightroom reduces the Clarity and Sharpness settings proportionally. Moving the mouse left, reduces the settings, moving it right increases them. Let go when it looks good to your eye. (You can also adjust the sliders manually)

Your turn

How do you use the Clarity slider? I’m curious to see what applications you have come up with for it.

Let us know in the comments, and feel free to share your photos so we can see what you have done.


Mastering Lightroom: Book Two

Mastering Lightroom: Book Two – The Develop Module ebookMy new ebook Mastering Lightroom: Book Two – The Develop Module teaches you how to process your Raw files in Lightroom for spectacular results. Written for Lightroom 4 & 5 it takes you through every panel in the Develop module and shows you how to creatively edit your photos. It’s now 40% off at Snapndeals for a limited time only.

The post Four Ways to Improve Your Photos With the Clarity Slider in Lightroom by Andrew S. Gibson appeared first on Digital Photography School.


Digital Photography School

 
Comments Off on Four Ways to Improve Your Photos With the Clarity Slider in Lightroom

Posted in Photography


Using Daminion with Lightroom [for Advanced Users]

04 Apr

daminion-opener

If you have Lightroom you might assume that you have all you need for managing your images. That may not be the case and many professional and keen amateur photographers benefit from combining Lightroom with the image management software Daminion.

Daminion is an image management solution which helps you manage large image libraries. You can think of it as being the rough equivalent of the Lightroom Library module operating on steroids. Daminion’s biggest advantage is that it is true multiuser software so, with Daminion server installed, multiple users can access a single catalog. This is something that Lightroom is notoriously poor at doing and which Adobe has so far failed to address despite multi-user/multi-computer access being one of the top ten feature requests for Lightroom.

You can download a version of Daminion at Daminion.net using the Download link. At the time of writing the current release version is 2.5 and version 3 is still in beta. Daminion comes as both a standalone and a server version. The Daminion standalone Free version handles up to 15,000 images per catalog. The for fee versions are Basic, Standard and Pro which give you 25,000, 75,000 and unlimited images in a catalog respectively. There are also multiple Daminion server versions, one for noncommercial use and others for individual professionals and small teams. Daminion is available for the PC only and not for the Mac.

You can install both the server and client versions on the same computer – the server version will run faster than the client version so it has value when you have a lot of images in a catalog. When you consider that some Daminion users have catalogs of a million or more images, speed of accessing and filtering these images becomes important.

Once you have downloaded and installed Daminion, launch it and you can create a catalog. Like Lightroom you must import the images you want to manage with Daminion into the catalog. If the Add Files dialog doesn’t open automatically you can find it by choosing File > Add Files and then select the folders to import from.

daminion-import

While you can create and manage multiple catalogs in Daminion, like Lightroom, you can’t search across multiple catalogs so you should be careful about how you organize your images in catalogs. What makes sense in terms of catalog organization will depend on how you work with your images and if it makes sense to have them all in one catalog or in separate ones.

Daminion will recognize and manage a wide range of file types including common raster and vector formats as well as camera RAW images, video, music, and PDF formats. This gives it a broader scope as a management tool for digital media collections than Lightroom which is limited to photo and video formats only.

You can copy the images to another location on import or import them from their current locations. You can also group images by folder, date or file type on import. As the images are being imported you can begin to work with those already imported.

daminion-work-while-importing

When you have some images imported into Daminion you can investigate the tools you have for managing and organizing them. The Catalog Tags panel on the left of the screen is pre-populated with tags. Some of these are created from the image metadata, such as Camera lens and Camera Model, and others are those that you may have applied to the images in other programs such as keywords, ratings and color labels.

daminion-catalog-tags

To filter the images by any catalog tag click the tag group and the tag to view and click the circle icon to view images that match that tag. You can perform AND and OR filtering using the Find dialog which you can find by clicking the Advanced link immediately to the right of the search box on the toolbar.

daminion-searches

You can also add tags and keywords to your images using the Catalog Tags panel. These can be written to the image XMP metadata so they will be accessible not only within Daminion but also in other applications such as Lightroom and Bridge.

There are benefits to using Daminion for image management and filtering in preference to Lightroom. Daminion provides multiple ways to categorize your images including Categories, Collections, Events, Places, People and more. It also supports hierarchical tags, with no limitation on nesting levels. So you can configure hierarchical tags for categories, people, places, keywords, events and so on whereas in Lightroom you can create hierarchical keywords only. You can also create your own custom user defined tags in Daminion to categorize images by criteria that are meaningful to you. Daminion can write metadata directly into the RAW images rather than needing to do so to sidecar .xmp files, and it makes it easy for you to filter your image collection by writing complex searches using Boolean (AND/OR) operators.

daminion-boolean

Viewing your images
You can view your filtered images in one of a number of ways. You can sort them using a range of sort options including by shutter speed, file size, file name and so on. You can also view the images as thumbnails, using a compact view, details or filmstrip view.

daminion-compact

In Thumbnail view you can customize the information displayed above and below the image so it is easy to see the image properties that are meaningful to you. At any time you can view an image full screen by pressing Enter or click View.

You can select any image and view and edit its properties using the Properties panel. And while Daminion is not an editor you can use it to rotate your images.

daminion-properties

As you work through your images you can drag images you want to do something with into the Tray. The Tray stores these images until you are ready to work with them such as by sending them to an external editor or using the multiuser checkout feature. The checkout feature helps you manage multiple people working with the same catalog, it maintains an audit history and gives you the ability to undo changes if, for example, a newer version of an image is replaced by an older version.

One handy feature of Daminion is the ability for you to publish images from Daminion direct to Dropbox so they are viewable on your iPad or other device. The Publish panel can be set up to convert and resize images including raw format images and then export them to a Dropbox folder on your computer. When this folder syncs to Dropbox the uploaded images can then be viewed on other devices.

daminion-publish

If you’re looking for a way to allow multi-user access to your image collection then Daminion is a great tool. It can be used along-side Lightroom for managing and organizing images which you then develop in Lightroom. The metadata changes made in either program can be easily viewed in the other program and the two work in tandem very well.

The post Using Daminion with Lightroom [for Advanced Users] by Helen Bradley appeared first on Digital Photography School.


Digital Photography School

 
Comments Off on Using Daminion with Lightroom [for Advanced Users]

Posted in Photography


Useful Lightroom Plug-ins

30 Mar

Lightroom Export to PicasaWeb plug-in

In previous articles you learned: how to create a photo website using the Koken plug-in for Lightroom, how to use The Fader plug-in to add an opacity slider to Develop Presets, and how to upload photos to 500px using their own plug-in (scroll down to read that section).

Today I’d like to look at some other Lightroom plug-ins you may find useful. To clarify, I’m referring to plug-ins that add extra functionality to Lightroom by enabling you to do things with finished photos. Not programs such as those made by Nik or OnOne Software that are also plug-ins, but are used for editing photos.

Jeffrey Friedl plug-ins

Jeffrey Friedl has written lots of plug-ins for Lightroom (there’s a full list here). I’m going to highlight a few interesting ones here, but feel free to go and check the full list at the link above because there’s a lot of useful stuff there.

Jeffrey’s plug-ins work on a donation-ware basis. They are free to download and install, but will stop working properly after six weeks unless you register the plug-in. To register, you need to make a payment using Paypal. The amount you pay is up to you, the minimum is just one cent, making the plug-ins virtually free. You can pay more if you’d like to make a donation to support Jeffrey’s work.

Lightroom Publish Service

Export to Facebook

Lightroom’s Publish Services has built-in support for exporting images to Facebook. However, the photos are published to your personal Facebook page, not a business page. Jeffrey’s Export to Facebook plug-in lets you publish to Facebook pages as well.

For those of you unfamiliar with Lightroom’s Publish Services, these are found in the Library module and let you export photos directly to a location on your hard drive or a photo sharing website such as Flickr without leaving Lightroom. You get from this (photo right) > to this (below), with just the click of a mouse button.

Portrait published on Facebook page

Export to PicasaWeb

Lightroom’s Publish Services don’t support Google+, but you can get around that using the Export to PicasaWeb plug-in. PicasaWeb albums are used by Google+ to store your photos. Once your photo is uploaded to a PicasaWeb album, go to the photo albums in your Google+ account, select the photo and click Share to share it with your circles:

Lightroom Export to PicasaWeb plug-in

Export to Tumblr

The Export to Tumblr plug-in allows you to export images to a Tumblr account. It works a little differently from the previous two in that in doesn’t set up a Publish Service. Instead, go to File > Export and select jf Tumblr from the Export To menu at the top. You will need to authenticate your Tumblr account to get started:

Export to Tumblr plug-in

Adobe Plug-in Exchange

Plug-in exchange

If you click the Plug-in Exchange button in the Lightroom Plug-in Manager the Lightroom Exchange Classic website opens in your browser. This is the official Adobe marketplace for Lightroom Plug-ins and Develop presets. You’ll find a wide range of both, and plug-ins to do all sorts of things including exporting photos to SmugMug, Zenfolio and Dropbox.

Photographer’s Toolbox

The Photographer’s Toolbox website sells plug-ins written by Timothy Arnes, John Beardsworth and Matt Dawson. They are not free, but you can test them out by downloading them and using them (within the trial limitations). Some of them, such as LR/Mogrify 2, a plug-in that exports your images with borders, watermarks or text annotations, are donation-ware, letting you decide how much you would like to pay for the plug-in.

LR/Blog is another useful plug-in that lets you export photos directly to a WordPress, Blogger or TypePad blog, or a NextGEN gallery for WordPress.

Website Creation

I’ve already mentioned Koken, a free CMS (content management system) that lets you build a photo website, but there are a couple more websites that sell more sophisticated plug-ins for creating photo websites. One of those is The Turning Gate, and another is Sean McCormack’s Lightroom-Blog. Take a look at both of these if you want to create your own website from within Lightroom.

Installing Lightroom Plug-ins

The easiest way to install a Lightroom Plug-In is to start by saving the uncompressed file in a folder on your computer’s hard drive. If you use the same folder for all your plug-ins, you will know exactly where to go each time.

In Lightroom, open the Plug-in Manager (File > Plug-in Manager) and click the Add button in the bottom left-hand corner. Go to the folder where the plug-in is saved, select it and click the Add Plug-in button. If you get a message asking you to update your Catalog, then click the Update button. From this point on the process may vary, so check the installation instructions that come with the plug-in you have added to finish the installation and set-up.

Lightroom plug-in manager

More plug-ins

Here are links to the Lightroom plug-ins covered in earlier articles:

Koken Lightroom plug-in
500px Lightroom plug-in
The Fader Lightroom plug-in

Over to you

I’ve touched on a few of the more popular or useful Lightroom plug-ins in this article, but I can’t possibly cover them all. So now it’s your turn. What Lightroom plug-ins have you used? What do you recommend for other readers? Let us know in the comments.


mastering-lightroom-bundle-1

Mastering Lightroom: Book One and Two

My Mastering Lightroom ebooks are a complete guide to using Lightroom’s Library and Develop modules. Written for Lightroom 4 & 5 they take you through every panel in both modules and show you how to import and organise your images, use Collections and creatively edit your photos.

The post Useful Lightroom Plug-ins by Andrew S. Gibson appeared first on Digital Photography School.


Digital Photography School

 
Comments Off on Useful Lightroom Plug-ins

Posted in Photography


How to Apply the Look of Hand Coloring in Lightroom

27 Mar
Give a photo the look of a hand tinted image in Lightroom

Give a photo the look of a hand coloring in Lightroom

Before there were color photos there were black and white photos, colored by hand using paints or dyes. Today, courtesy of any good photo-editing program, you can apply your own hand coloring effect to your photos.

Here’s how to apply the look of hand coloring in Lightroom.

To get started, open the image in the Lightroom Develop module. You will want to make the usual basic edits to the image so it shows a good tonal range and contrast.

Before colorizing the image, make sure to adjust the tonal range and contrast.

Before colorizing the image, make sure to adjust the tonal range and contrast

Then convert the image to a black and white by clicking B&W panel and adjust how the underlying colors in the image are converted to black and white using the sliders. Lighter areas will show the color better and darker areas will show a more subtle tint.

Use B&W to create a black and white image.

Use the B&W panel to create a grayscale or monochromatic image

When you’re ready to add color to the image, click the Adjustment Brush and return all the sliders to zero by double clicking on the word Effect at the top of the panel (circle in red below).

Double click Effect to reset all the Adjustment Brush sliders.

Double click Effect to reset all the Adjustment Brush sliders

Click on the color sampler and choose a color to use.

Select a color to tint the image with from the Color selector

Select a color to tint the image with from the Color selector as shown here

Now click on the area that you want to recolor to set an Edit Point. Paint over the area to apply the color to it. As you paint with the Adjustment Brush a layer of partially opaque color is applied to the image.

Select the Auto Mask checkbox if you are working on an area of the image that has distinct edges. Doing this makes it easier to limit the painting to only the desired area. The roof tops and buildings here are good examples of areas with distinct edges.

Selecting Auto Mask helps paint in areas with defined edges.

Selecting Auto Mask helps paint in areas with defined edges (stay within the “lines”)

When painting an area that is less defined, disable the Auto Mask checkbox. The tree in this image has less defined edges so you should disable Auto Mask when coloring this area.

The buildings have defined edges so use Auto Mask when painting them. The tree does not, so disable Auto Mask when painting it.

The buildings have defined edges so use Auto Mask when painting them. The tree does not, so disable Auto Mask when painting it.

If you mistakenly paint over an area and want to undo the painting click the Erase brush link or hold Alt to select Erase and paint to remove the mistake.

To zoom into the image press Z on the keyboard and click on the image to zoom in or out. To move the image hold the spacebar so the mouse pointer turns into a hand and drag on the image.

Size the brush using the Size slider

Size the brush using the Size slider

To resize the brush either use the [ and ] keys on the keyboard or adjust the size using the Size slider.

When you have finished working with the first color, click New to set a new Edit Point. Select a different Color and paint that onto the image.

Continue creating a new Edit Point for each color until the coloring is complete.

If desired, you can alter a color or adjust a painted area by selecting the Adjustment Brush and then click the Edit Pin for that adjustment. You can then change the color using the color picker.

Give a photo the look of a hand tinted image in Lightroom

Give a photo the look of a hand tinted image in Lightroom

Do you have some other tips:

If you have some other ways of doing this technique in Lightroom please share. Or share your images if you give it a try!

For more Lightroom tips and tutorials try these:

  • Processing an Image in Lightroom 5 – a Video Tutorial
  • 6 of Lightroom’s Hidden Treasures
  • Why Lazy Photographers Should Use Lightroom Smart Collections
  • 3 Uses for the Radial Filter Tool in Lightroom 5
  • Lightroom 5 Tips – Hidden Gems

The post How to Apply the Look of Hand Coloring in Lightroom by Helen Bradley appeared first on Digital Photography School.


Digital Photography School

 
Comments Off on How to Apply the Look of Hand Coloring in Lightroom

Posted in Photography


Are Lightroom Develop Presets Worth the Money?

27 Mar

Delicious Presets review

I was recently approached by a representative of Delicious Presets to review their product. The review is below, but when I looked at the details on their website it occurred to me that there are other questions to answer:

  1. Are Lightroom Develop Presets (the sort you buy from someone) worth the money?
  2. And if they are, how do you know which ones to buy given that most websites won’t refund your money if you are unhappy with the product?

Let’s start with Delicious Presets, then dig into those later. The promise on the website is that their presets will increase the quality of your processing and save you time in Lightroom.

They seem to be aimed primarily at event and wedding photographers. On the surface, their presets seem expensive at $ 40 a set (you can save money by buying in bundles) but from a business perspective that is a relatively small investment for something that saves you time. An example:  I recently spent around $ 150 on a good quality polarizing filter for a new lens, and you can buy all the Delicious Presets in a bundle for less than that.

Here’s what you get in each set:

  • Between 11 and 13 Develop Presets
  • Delicious Controls, which gives you three sets of presets for taking control of sharpness, grain and tone
  • Plus 37 vignettes and frames

All the presets have been updated to work with Lightroom 5. You can go to the Delicious Presets website and view the details for yourselves.

If you want to learn more about Lightroom Develop presets in general, you should read my article A Concise Guide to Lightroom Develop Presets.

Delicious presets website

Delicious Controls:  Sharpness, Grain and Tone

The Sharpness and Grain presets really do nothing that you can’t do on your own, although it might be nice to use presets created by someone else if you don’t have the time or inclination to work out the sharpness and grain settings that suit your photos. Complete beginners to Lightroom may also find them useful as a way of learning by analyzing how the presets work.

The Tone Control presets are a little more useful and give you some colour grading options that you might not have come up with yourself. But again, they are fairly simple in nature and are really just a set of Split Toning presets that can be applied to either colour or black and white images. They do look nice in black and white and you can tweak the saturation if the tone is too strong for you.

Delicious Controls: Vignettes and Frames

While I can see the use of the sharpness, grain and tone controls as part of a workflow aiming to save you time, I don’t understand the point of the vignettes and frames. The vignettes are rendered useless by The Radial Filter tool in Lightroom 5, a tool that is easier to use and more versatile. The frames are just cheesy.

Delicious Presets Collections

Now let’s look at the preset collections themselves. Lightroom Develop Presets tend to fall into one of two broad categories. The first are one shot Presets – they tend to be presets that you use once. These ones are pretty binary, they either work or they don’t, and the effectiveness depends on your photo. If the preset matches your photo you’ll get a good result, and if it doesn’t, it won’t.

The second category are what I think of as genuinely useful presets. These are a bit better thought out and may be presets that the photographer who created them uses in his own workflow. They may work in modular fashion, so that you can build up the effects by layering them on top of each other. Each preset tends to adjust just one or two settings, so that you can pick which adjustments you want to make. The best ones combine flexibility with consistency, allowing you to create a variety of looks while retaining a consistent feel throughout your portfolio.

The Delicious Presets presets fall into the second category, if used with the Delicious Controls presets.

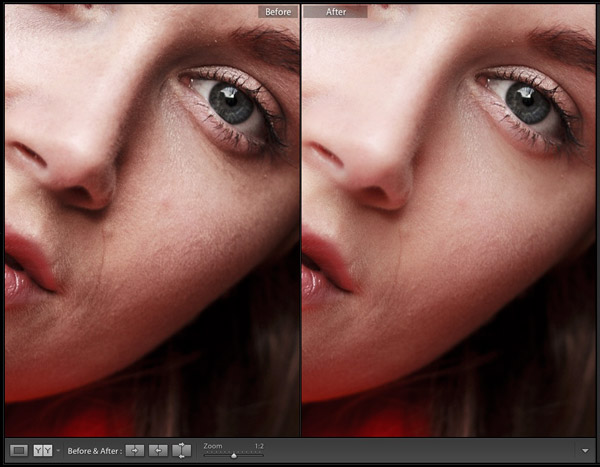
Delicious Colour Presets

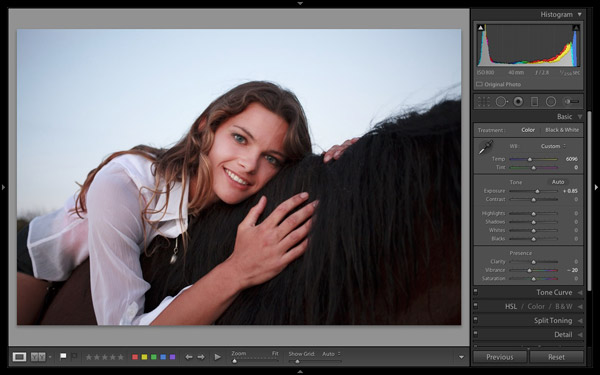
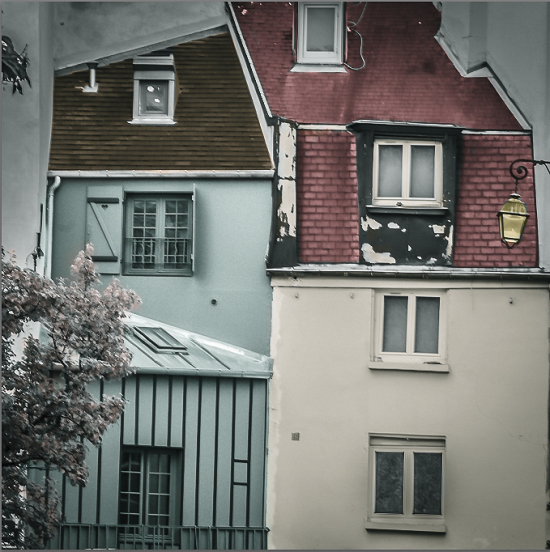
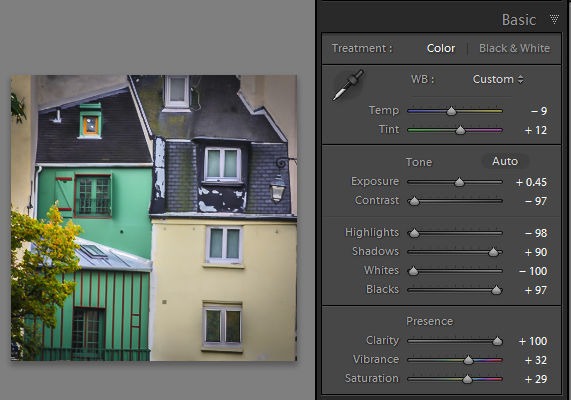
This is a promising set of presets. The key to getting the best out of them is pick one you like and use it as a starting point, tweaking the sliders in the Basic panel until the tonal values are pleasing to the eye. Here’s an example with the Autumn preset:

Delicious Presets review

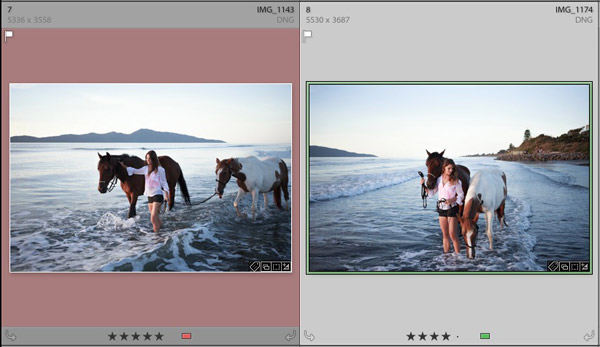
Another with the Blue Love preset:

Delicious Presets review

Yet another with the Vivid Tones preset. For this example I used the presets in a modular fashion, adding a vignette, grain, sharpening and the Brownie tone using the Delicious Controls presets:

Delicious Presets review

The verdict? I like these and think they have a lot of potential for portrait processing.

Delicious Black and White Pepper Presets

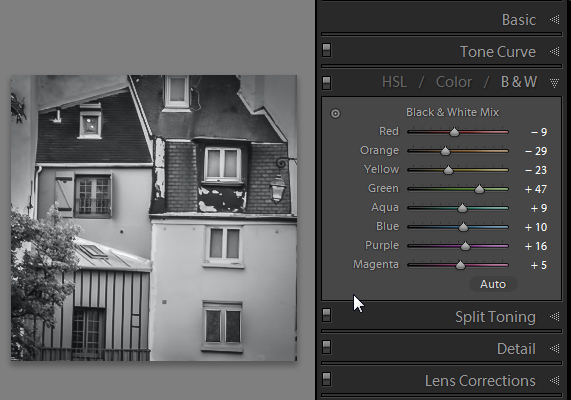
This is another promising set of presets that give you 12 instant black and white conversions. They need a bit of work to get the best out of them, but the potential is certainly there. This example uses the Black Pepper preset:

Delicious Presets review

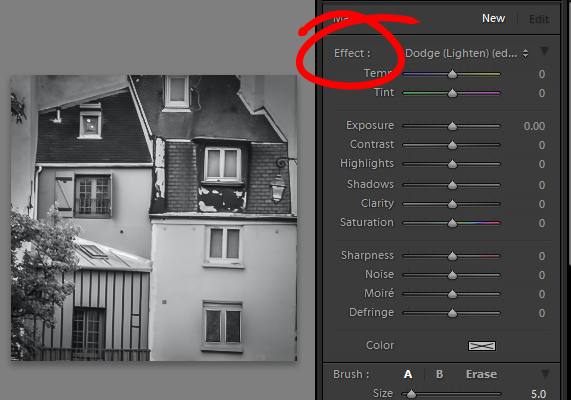
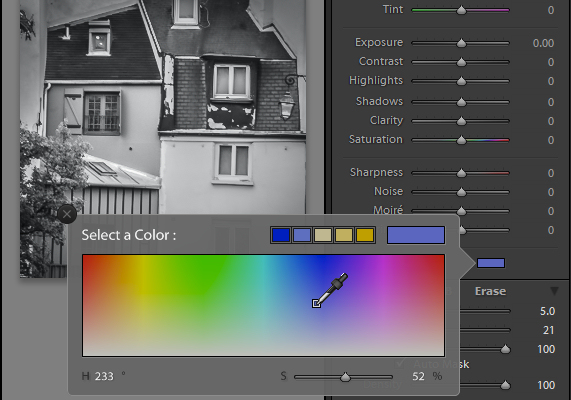
Below is the Black Pepper preset with the Warm Tone from the Delicious Tone Control presets added:

Delicious Presets review

This is an interesting collection and they are certainly helpful for creating black and white conversions rapidly.

Delicious Analog Story Presets

These presets are aimed at photographers who like the look of photos produced with film cameras. There’s no doubt this is a trend in the world of event photography, and these presets aim to bring that look to you with a click of the button. There are some interesting presets here that complement the Delicious Colour presets nicely. This is the Blue Vintage preset:

Delicious Presets review

Distinct Analog Presets

Another set of analog presets, and I have to admit that these didn’t work well. Most of the presets just looked horrible with this particular photo, although you may of course get a better result with different subject matter. The Love Letter preset didn’t look too bad:

Delicious Presets review

The verdict

If you buy the bundle with all four singles collections you end up with 37 colour Develop Presets and 12 black and white ones. You also get the Delicious Controls which may provide a useful shortcut to some people. But essentially you can achieve the same effects by pushing sliders. The Tone Control part of the Delicious Controls gives some nice tones but the others are not really worth bothering with.

That leaves the Develop Presets themselves. Are they useful? The Delicious Colors, Delicious Black & White Pepper and Delicious Analog Story, yes. Especially if you are willing to use them as starting points and adjust them to suit your photos. The Delicious Distinct Analog is an exception – I didn’t like this one, but it may work well with other peoples’ photos.

Are they worth the money?

I don’t think so. They are too expensive for what you get and you will get better value elsewhere. I think the fair price is around $ 10 a set, although I’m sure many people will disagree. It’s hard to name a fair price for Develop Presets but there are plenty of people selling similar sets for around the $ 10 mark and I don’t see anything special about the Delicious Presets collections that sets them apart.

Don’t forget you can go to the Delicious Presets website and check them out for yourself.

A negative review?

Is this review too negative? I’m the sort of person who speaks his mind and I’m not going to tell you that a product is good value for money if I don’t think is. But, I understand that some of you may see things differently. If you have used any Delicious Preset products, then please let us know in the comments to balance out my point of view. Do you like them? Do you think they are good value for money?

You can also check out the Delicious Presets blog, where they give examples of photos processed with Delicious Presets. Take a look and make up your own mind.

Free Develop presets

There’s no question about value for money with free Develop Presets, but are they worth the time? My favourite free presets are the Signature Collections from OnOne Software. But what are your favourites? Let us know in the comments.

Other Develop Presets

There are lots of Develop Presets out there, and I haven’t tried them all. That’s where you come in. Have you purchased any other Develop Presets? Did you find them useful? Were they good value for money? What are your recommendations? Please let us know in the comments, and hopefully we can build a good list of useful Develop Presets.

Some that I have bought and found useful are the ones sold by Craft & Vision and the Black and White Workflow Collection from Pretty Presets.

Tips for buying Develop Presets

You don’t always have to pay full price for Develop Presets. You’ll often see presets offered for heavily discounted prices at websites like Snapndeals, Photo Deal Cafe and Photo Dough.

Another tip is to sign up for the newsletters of websites that sell Develop Presets. If they have a sale, they will let you know.

For more on Lightroom check out these:

  • Processing an Image in Lightroom 5 – a Video Tutorial
  • 6 of Lightroom’s Hidden Treasures
  • Organizing Images in Lightroom 5
  • Lightroom How To – One Tip and One Trick

Mastering Lightroom: Book Two
Mastering Lightroom Book Two Develop ModuleMy new ebook Mastering Lightroom: Book Two – The Develop Module teaches you how to process your Raw files in Lightroom for spectacular results. Written for Lightroom 4 & 5 it takes you through every panel in the Develop module and shows you how to creatively edit your photos.

The post Are Lightroom Develop Presets Worth the Money? by Andrew S. Gibson appeared first on Digital Photography School.


Digital Photography School

 
Comments Off on Are Lightroom Develop Presets Worth the Money?

Posted in Photography


How to Apply the Look of Hand Coloring in Lightroom

23 Mar
Give a photo the look of a hand tinted image in Lightroom

Give a photo the look of a hand coloring in Lightroom

Before there were color photos there were black and white photos, colored by hand using paints or dyes. Today, courtesy of any good photo-editing program, you can apply your own hand coloring effect to your photos.

Here’s how to apply the look of hand coloring in Lightroom.

To get started, open the image in the Lightroom Develop module. You will want to make the usual basic edits to the image so it shows a good tonal range and contrast.

Before colorizing the image, make sure to adjust the tonal range and contrast.

Before colorizing the image, make sure to adjust the tonal range and contrast

Then convert the image to a black and white by clicking B&W panel and adjust how the underlying colors in the image are converted to black and white using the sliders. Lighter areas will show the color better and darker areas will show a more subtle tint.

Use B&W to create a black and white image.

Use the B&W panel to create a grayscale or monochromatic image

When you’re ready to add color to the image, click the Adjustment Brush and return all the sliders to zero by double clicking on the word Effect at the top of the panel (circle in red below).

Double click Effect to reset all the Adjustment Brush sliders.

Double click Effect to reset all the Adjustment Brush sliders

Click on the color sampler and choose a color to use.

Select a color to tint the image with from the Color selector

Select a color to tint the image with from the Color selector as shown here

Now click on the area that you want to recolor to set an Edit Point. Paint over the area to apply the color to it. As you paint with the Adjustment Brush a layer of partially opaque color is applied to the image.

Select the Auto Mask checkbox if you are working on an area of the image that has distinct edges. Doing this makes it easier to limit the painting to only the desired area. The roof tops and buildings here are good examples of areas with distinct edges.

Selecting Auto Mask helps paint in areas with defined edges.

Selecting Auto Mask helps paint in areas with defined edges (stay within the “lines”)

When painting an area that is less defined, disable the Auto Mask checkbox. The tree in this image has less defined edges so you should disable Auto Mask when coloring this area.

The buildings have defined edges so use Auto Mask when painting them. The tree does not, so disable Auto Mask when painting it.

The buildings have defined edges so use Auto Mask when painting them. The tree does not, so disable Auto Mask when painting it.

If you mistakenly paint over an area and want to undo the painting click the Erase brush link or hold Alt to select Erase and paint to remove the mistake.

To zoom into the image press Z on the keyboard and click on the image to zoom in or out. To move the image hold the spacebar so the mouse pointer turns into a hand and drag on the image.

Size the brush using the Size slider

Size the brush using the Size slider

To resize the brush either use the [ and ] keys on the keyboard or adjust the size using the Size slider.

When you have finished working with the first color, click New to set a new Edit Point. Select a different Color and paint that onto the image.

Continue creating a new Edit Point for each color until the coloring is complete.

If desired, you can alter a color or adjust a painted area by selecting the Adjustment Brush and then click the Edit Pin for that adjustment. You can then change the color using the color picker.

Give a photo the look of a hand tinted image in Lightroom

Give a photo the look of a hand tinted image in Lightroom

Do you have some other tips:

If you have some other ways of doing this technique in Lightroom please share. Or share your images if you give it a try!

For more Lightroom tips and tutorials try these:

  • Processing an Image in Lightroom 5 – a Video Tutorial
  • 6 of Lightroom’s Hidden Treasures
  • Why Lazy Photographers Should Use Lightroom Smart Collections
  • 3 Uses for the Radial Filter Tool in Lightroom 5
  • Lightroom 5 Tips – Hidden Gems

The post How to Apply the Look of Hand Coloring in Lightroom by Helen Bradley appeared first on Digital Photography School.


Digital Photography School

 
Comments Off on How to Apply the Look of Hand Coloring in Lightroom

Posted in Photography


Make a Photo Website with Lightroom and Koken

06 Mar

Photography website created with Koken

We’ve already looked at how you can use Lightroom Collections to organize your images and how to upload your photos directly from Lightroom to Flickr and 500px using Lightroom’s Publish Services.

But did you know that there’s a way to upload photos directly to your own photo website from Lightroom? Before I explain precisely how to do that let’s think about the advantages of such a method:

  • You can decide which images to add to your website while in Lightroom. Decision made, it takes only a few seconds to add them to the appropriate Published Collection and publish them to your website.
  • Removing images is just as simple, just remove them from the Published Collection.
  • You can add watermarks to your images in Lightroom. If you change your watermark design, it’s easy to republish all the photos with the new design.
  • You can upload photos to a private album on your website for someone else to view, without having to use the standard Lightroom Web module formatting.

This is where Koken comes in

Interested? The software you need to do this is called Koken (rhymes with spoken). The best way to think of Koken is as WordPress for photographers. Like WordPress, it is a free CMS (content management system) and you need your own domain name and hosting plan to use it. But whereas WordPress can be adapted to all kinds of uses, Koken is designed to do one thing only: build websites for creative individuals with portfolios, such as photographers, artists and graphic designers.

Make a Photo Website with Lightroom and Koken

You can learn more by going to the Koken website, where you will also be able to download the free software and try it out if you have a domain name and hosting plan.

Koken website

But before you do, there are a few things you should know:

  • The main advantage of WordPress over Koken, for the purpose of creating a photography portfolio website, is that there are lots more themes available for WordPress. Koken, at the moment, has eight built-in themes (which you can see here). However, the themes in Koken are easier to modify, although you will need to be familiar with HTML and CSS to do so. You can also create your own Koken themes if you have the know how, and they are starting to appear on some of the websites that sell WordPress themes.
  • The main advantage of Koken over WordPress is that Koken integrates with Lightroom’s Publish Services, enabling you to upload photos directly from Lightroom. This is a huge benefit to Lightroom users.
  • You do not have to own Lightroom to use Koken. You can install the software and upload photos from your computer’s hard drive, just as you can in WordPress.

Koken close-up

Here’s a closer look at the Koken interface. But first, let me show you how it works in Lightroom. As you can see in the screenshot below, you can create Published Collections containing the photos you want to use on your website. Lightroom lets you know if you have added new photos, or made changes to existing ones. Click the Publish button to update your website.

Lightroom interface

Then in the Koken interface (accessed through a web browser) you can view the photos, change title, description and keywords, and rearrange the order in which they are displayed.

Koken interface

You can also create static pages (such as an About page) and blog entries (called Essays) in Koken:

Koken interface

The verdict

I’ve only used Koken for a short while, but I’m impressed by how easy it is to use, especially with Lightroom’s Publish Services. The exciting thing about Koken is that the software is in its early days – I’m sure the system will grow as the developers improve it and more themes become available.

To get an idea of the sort of thing you can do with Koken, you can check out my portfolio pages (created with a modified version of the Boulevard theme) and the Koken demo site to see the built-in themes in action.

For more Lightroom articles try these:

  • Why Lazy Photographers Should Use Lightroom Smart Collections
  • 3 Lightroom History Tips
  • Using Smart Previews in Lightroom 5
  • Make Lightroom Faster by Using DNG

Mastering Lightroom Book One: The Library Module

Mastering Lightroom ebook
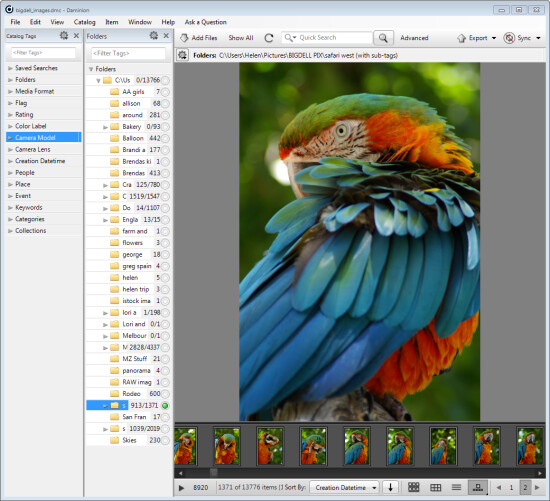
My latest ebook Mastering Lightroom Book One: The Library Module is a complete guide to using Lightroom’s Library module to import, organize and search your photo files. You’ll learn how to tame your growing photo collection using Collections and Collection Sets, and how to save time so you can spend more time in the Develop module processing your photos.


The post Make a Photo Website with Lightroom and Koken by Andrew S. Gibson appeared first on Digital Photography School.


Digital Photography School

 
Comments Off on Make a Photo Website with Lightroom and Koken

Posted in Photography