RSS
 

Posts Tagged ‘lightroom’

The Beginners Guide to Lightroom Presets

20 Jun

Presets this and Presets that. It’s like the world has gone Lightroom Preset mad of late. Some people hate them, others rave about them! So where do you start? Well, the beginning is best really.

When Lightroom was only a beta program (and for Mac only), one of the big features was that you could make changes to an image in the Develop Module, and save those settings to apply them to another image directly! They didn’t even have to be in the same shoot. (Lightroom organized by shoots then, not folders). Unlike Actions in Photoshop, the setting changes were immediate, and easy to undo. These were the first Presets. While they worked pretty much like Presets today, they weren’t as versatile as they are now.

What are Lightroom Presets

Presets are files that allow Lightroom to apply particular Develop settings to an image. They appear in the Left Panel of the Develop Module in the Presets Panel. They’re also available in a drop down menu in the Quick Develop panel in Library.

Presets1

Lightroom ships with a range of Presets, which are stored in folders based on the type of Preset within. This organization suggests a great way to store Presets: organize by what the preset does.

Presets2

With the Preset and Navigator panels open, hover over one of the default Presets (you may need to click on the folder triangle to open it). You should see the Navigator preview change to show what the preset would do to the image if you click and apply it. Now if only you could make the preview bigger!

Presets3

A preview of the preset will appear in the Navigator window top of the left side panel.

Making your own Presets

You can get a handle on Presets by making them, exporting them, sharing them, and even importing Presets from other people. First you need to make changes to your image to be able to save a preset. You could start with a Tone Curve adjustment. First, go to the Tone Curve panel, and click on the Point Curve icon (indicated with the red box).

Presets4

Next, click about one third of the way from the bottom. Finally, click the square point on the bottom right of the box, then drag it up while holding the Shift key. The blacks in your image will fade to give a nice retro, matte-finish look. You can see the difference by pressing the Y key to see a before and after view.

Presets5

To save this look to use again, go over to the Presets panel and click the plus (+) in the panel header. You can also choose New Preset in the Develop menu or use the keyboard shortcut: Shift + Control + N on PC, or Shift + Command + N on Mac. This opens the New Develop Preset dialog box, where you save your settings.

Presets6

This is a good time to talk about what to include when you save your Presets. You can just save everything into the Preset (which is the default). There’s no harm in that, but generally it means the preset will only work on images that look similar to the one you started with. It also means that preset will overwrite all develop settings in the image, so any other work you’ve done to the image will be lost.

Presets7

But, there is a better way. The second option (besides saving all settings) is you exclude Exposure from your preset. This means any changes to the apparent brightness of the image you made remain intact. That’s a win straight away.

Beginners Lightroom Presets8

The third option you have, is to save only the settings that are making the change to the images. You’ve just used the Tone Curve here, so you could press the Check None button, and then tick Tone Curve, followed by Process Version – it’s best to always include that last one so that all the other settings apply correctly.

Beginners Lightroom Presets 9

For organization, you could also create create a new Folder for these Presets. To do that, click the Folder menu and choose New Folder at the top of the menu. Name the Folder Tone Curves. Finally, you can give the Preset a useable name. While flowery names might work for selling your Presets as artsy product, in reality, you’re better off using a name that reminds you what the Presets does. You could use Fade Blacks, or Lighten Blacks, for this one.

Beginners Lightroom Presets 10

Applying the preset to other images

This Preset can now be applied to any other image. You could test with an image that has other settings already applied, like a black and white photo for example. Notice how the image remains black and whie after applying the Preset? If you’d saved everything into the preset, the image would’ve turned back into color, because one of the options selected was the B&W Treatment.

Beginners Lightroom Presets 11

Sharing the preset with others

You can also share this Preset by right clicking on it, and choosing Export. Notice that you can also choose Import from here (as well as Apply on Import) which is how you also get shared, or purchased Presets, into Lightroom. Apply on Import is different, and refers to when images are being Imported into Lightroom, selecting that will change the settings on each photo brought into Lightroom automatically. Also in this menu is, Update with Current Settings. This allows you to make changes to your settings, then save them to an existing preset instead of making a new one.

Beginners Lightroom Presets 12

Back to Export: When you click Export, you get an OS Save window. The suggested filename will be the name you gave the preset, followed by ‘.lrtemplate’, which is the required file extension for Presets. Save them somewhere useful, like a folder called Saved Presets.

Beginners Lightroom Presets 13

Where are your Presets stored?

You might be wondering where the Presets you haven’t exported are stored. Fortunately Lightroom does allow you access to them. You can get to them by opening Lightroom Preferences (which you’ll find in the Edit menu on PC, and the Lightroom menu on Mac). Click the Presets tab (in blue below) when the Preferences box opens. In the middle is a button that says Show Lightroom Presets Folder. If you click that a folder will open, with a subfolder called Lightroom selected. Open that folder to see all of Lightroom’s Presets and Templates folders for Develop, Slideshow, etc. The one you want is called Develop Presets.

If you have a lot of downloaded or purchased Presets to add to Lightroom, it is quicker to open this folder, drag the new Presets into it (preferably in their own folder for organization) and then restart Lightroom to load them. Another way to get to a Preset is to use the Show in Finder/Explorer option from that right click menu earlier.

Beginners Lightroom Presets 14

The last thing worth a mention in this article is the Store presets with this catalog checkbox. This does what is says, but the practical reality is that it means if you then use another catalog, you don’t have access to your Presets. So in general I recommend not using that option.

Hopefully now you know a lot more about Lightroom Presets than when you started. If you have any questions or comments please share them below.

googletag.cmd.push(function() {
tablet_slots.push( googletag.defineSlot( “/1005424/_dPSv4_tab-all-article-bottom_(300×250)”, [300, 250], “pb-ad-78623” ).addService( googletag.pubads() ) ); } );

googletag.cmd.push(function() {
mobile_slots.push( googletag.defineSlot( “/1005424/_dPSv4_mob-all-article-bottom_(300×250)”, [300, 250], “pb-ad-78158” ).addService( googletag.pubads() ) ); } );

The post The Beginners Guide to Lightroom Presets by Sean McCormack appeared first on Digital Photography School.


Digital Photography School

 
Comments Off on The Beginners Guide to Lightroom Presets

Posted in Photography


The Winner of $1000 from our 101 Landscape Lightroom Presets Competition is….

19 Jun

Recently we launched 101 Landscape Lightroom Presets product. As part of the launch we put everyone who purchased a copy into the draw to win $ 1000 in camera gear. Those who purchased the bundle (101 Lightroom Presets and 101 Landscape Lightroom Presets) received 2 entries.

The winner of this competition is Terrence Jones

Congratulations – we’ve just emailed you with details of how we’ll get you your prize and can’t wait to see what you buy!

landscape-lightroom-presets

Thanks everyone else for picking up a copy of the the presets packs – we’ve received some amazing feedback and appreciate you supporting dPS with your purchase.

googletag.cmd.push(function() {
tablet_slots.push( googletag.defineSlot( “/1005424/_dPSv4_tab-all-article-bottom_(300×250)”, [300, 250], “pb-ad-78623” ).addService( googletag.pubads() ) ); } );

googletag.cmd.push(function() {
mobile_slots.push( googletag.defineSlot( “/1005424/_dPSv4_mob-all-article-bottom_(300×250)”, [300, 250], “pb-ad-78158” ).addService( googletag.pubads() ) ); } );

The post The Winner of $ 1000 from our 101 Landscape Lightroom Presets Competition is…. by Darlene Hildebrandt appeared first on Digital Photography School.


Digital Photography School

 
Comments Off on The Winner of $1000 from our 101 Landscape Lightroom Presets Competition is….

Posted in Photography


Total Beginner’s Guide to Lightroom – Step by Step

13 Jun

I had tried Lightroom in the past, but always preferred using Apple’s Aperture photo editing program. But in the spring of 2014, when it was announced that Apple was no longer supporting Aperture, I decided to make the leap to Lightroom. At first I found it difficult to use and not really intuitive, but I soon found my way around and I was a Lightroom convert.

beginners-guide-lightroom-blue-buds

If you are new to Lightroom and don’t know where to start, or have thought about using it but feel overwhelmed, then please know I feel your pain, and know where you’re coming from. I wrote this Beginner’s Guide to Lightroom to help you, and I wish I would have had something like this when I first got started. It’s designed to help you through a few basic steps from opening up Lightroom for the first time, making two basic edits, and exporting (saving) a final version of your picture.

What is Lightroom and what does it do?

In a nutshell, Lightroom is a program that can manage and edit your images. The catch, though, is that it doesn’t really edit your images, or actually manage anything either. Instead, the program works by looking at pictures you have stored on your computer, and allows you to create instructions for how you want to change them.

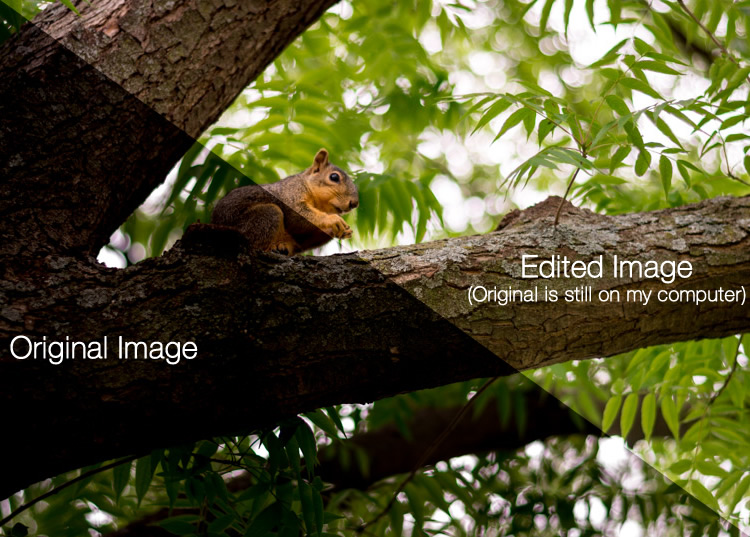
For example, let’s say you have a photo of a squirrel that’s a bit dark so you want to make it brighter. Lightroom doesn’t touch the original image! It doesn’t move it, copy it, rename it, or change it in any way. Instead Lightroom, is a non-destructive editing program, that allows you make changes to a preview or thumbnail version of the picture, which means you can see what the final image will look like after you make it brighter. When you are finished with your editing you export (or save as) a final image from Lightroom (again leaving the original file completely un-touched) and voilá, you now have a second, much brighter photo, to print or share with others.

beginners-guide-lightroom-squirrel-comparison

The Lightroom catalog is like a recipe book

Lightroom stores a record of all the changes you want to make to your images in a separate file called the Catalog, which is stored independent from your pictures. The best analogy I can think of is that of a kitchen: your original pictures are kind of like the raw ingredients in your cupboards, and the Lightroom Catalog is like a recipe book. Lightroom doesn’t do anything to your ingredients (your original files), but instead saves the instructions for transforming your supplies into actual finished products (in this case output edited images), just like recipes for your photos. When you are finished, your original image files still remain, but you have a new creation (i.e. an edited picture) that you can share with others.

The Importance of Adobe Camera Raw

Before we get too deep into the weeds here, it’s important to back up a bit and look at another program called Adobe Camera Raw (ACR), which allows you to perform all sorts of edits and changes to your Raw images – from simply making them brighter or darker, to selectively editing colors, or working with curves. You may already have it on your computer and not even know it, and it’s actually the engine that powers everything Lightroom does in terms of editing your images. Every change, adjustment, and tweak you do to one of your photos in Lightroom, is actually being done by ACR. Understanding how this fits in might seem a bit extraneous to the overall Lightroom discussion, but it’s important to know how all it works together if you want to make sense of Lightroom itself.

beginners-guide-lightroom-brothers

You and Lightroom: best buds for life.

Opening Lightroom for the First Time

When I initially launched my copy of Lightroom four years ago, things started to go south within a matter of seconds. It asked me about making a Catalog, and wanted to know where to store it, and I started channeling my inner Gob Bluth while muttering to myself, “I’ve made a huge mistake.” If this sounds like you, don’t worry – there’s really not much going on here that you need to worry about, and everything will be fine. Remember the kitchen analogy I mentioned earlier? All your computer wants to know right now is where to store the Catalog, or recipe book, that it will use to keep track of the changes you want to make to your pictures. You will need to create a new Catalog, and specify its location on your hard drive. I just keep mine within my Pictures folder.

beginners-guide-lightroom-catalog-dialogue

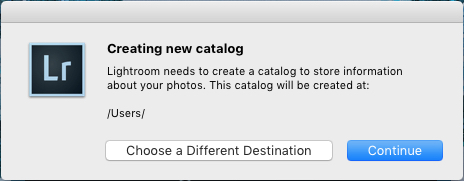
Lightroom wants to know where you would like to store its Catalog, or database of edits you want to make to pictures. If you’re not sure what to do here, just click the “Continue” button.

Some people are very specific about where they want this Catalog to be located, and professional photographers will often have multiple image collections and many catalogs as well. Honestly, if you just want to figure out how to use Lightroom you can just click the “Continue” button and go about your business. For casual photographers the exact location of the Catalog file is not all that important, so don’t sweat it.

Note: do not store your catalog on an external hard drive though, it will not run optimally or may not run at all. Keep it on your computer’s main drive. If in doubt just click Continue as noted above.

In terms of new-user-confusion, the next screen (the Library module) you see is not much better. Upon encountering it for the first time I felt like someone had quashed my photography enthusiasm with a scary dull grey veil. There are a few tutorial hints that pop up in the middle, which aren’t very helpful, and after you dismiss them you’re left staring at an empty dark wasteland, wondering why you didn’t just stick to using Instagram filters like everyone else.

If this screen doesn't make a new user run screaming from Lightroom, I don't know what would.

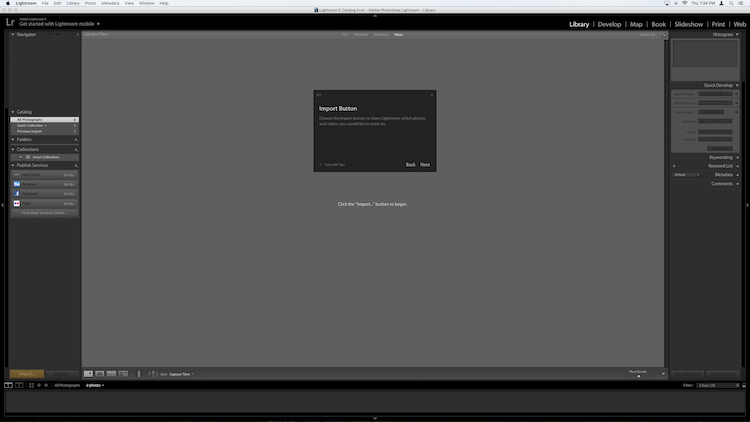
If this screen doesn’t make a new user run screaming from Lightroom, I don’t know what would.

What you’re looking at here is your entire library of photos, but it’s empty because none have actually been imported yet. There’s plenty of other options and buttons here as well – enough to confuse even the most experienced user – so for now just ignore the Catalog/Folders/Collections stuff on the left side, and all those Quick Develop options on the right side. And for heaven’s sake, don’t give a second thought to those strange chessboard-like icons at the bottom. Just take a breath, grab your memory card and your favorite beverage, and get ready to import some photos. Plug your memory card into your computer, then click the “Import” button in the lower-left corner to start transferring your pictures over to your hard drive. You can also import photos that are already sitting on your computer, but for now I want to focus on the kind of workflow you might encounter, as a photographer who just wants to figure out this program.

Importing Photos

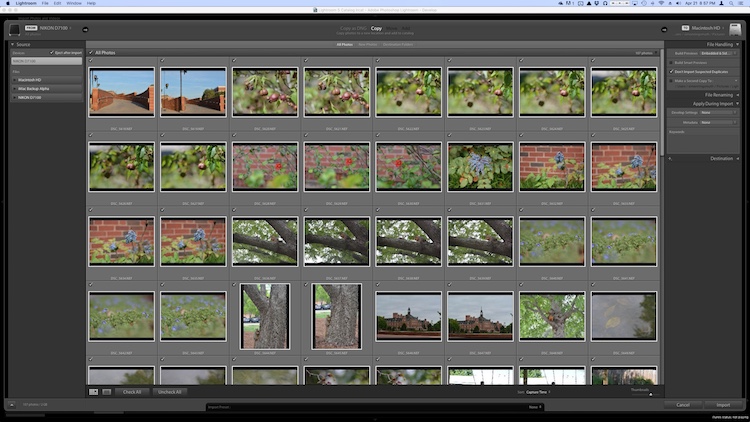
The first thing you see once you have your memory card connected is a grid with tiny thumbnail previews of all the pictures on your memory card.

Note: You can also connect to your camera directly – however, it’s a better idea to use a card reader then plug in your camera directly. If the camera battery dies during import you can crash the card and damage or lose your images.

beginners-guide-lightroom-import

There are all sorts of options on this screen, but if you just want to get the basics down, here’s what you need to look at:

  1. At the top of your screen, select the option that says “Copy.” This will, as you may guess, copy the pictures over to your computer, and add them to the Lightroom catalog so you can make edits to them later.
  2. On the right-hand side you have to choose a Destination so the program knows where to put the original photos on your computer. You can select a specific destination or just let Lightroom figure this out for you. You can also do things like rename your pictures as they are imported, apply specific edits (called “Develop Settings”) to all of them, or give them keywords such as “Wedding” or “Camping.” For now don’t worry about any of this, and I promise everything will be just fine.
  3. Choose which pictures to import by making sure they have checkmarks in the top corner of each thumbnail preview. They should all be checked by default (if they aren’t just click Check All), but if there are any images you don’t want to import, you can just un-check the box next to them.

When you’re all set, click the Import button in the lower-right corner of your screen. Your computer will beep or chime when everything is done, and you’ll be ready to start editing your photos!

Organizing and Developing (Processing)

After your photos are imported things start to get really crazy, but once again just try to ignore all the new things that show up on the side of your screen, and focus on just a few of the essentials. First of all, don’t start making edits or changes to your pictures just yet.

Instead, look at the left side of your screen and find an area called “Collections.” beginners-guide-lightroom-collections
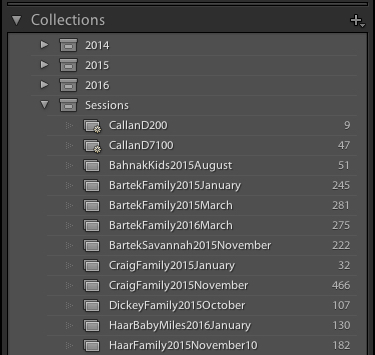
Remember that Lightroom doesn’t actually do anything with the original pictures. When you clicked Import, it copied them over to a folder on your hard drive where they will remain, intact and untouched, until the end of time. What you can do is organize the pictures into Collections within Lightroom itself, in order to keep track of them more easily. Collections function just like playlists in iTunes or Spotify, and allow you to sort photos manually or automatically, based on how you want them to fit together. Click the + button on the right side to make a new Collection (i.e. Playlist), Smart Collection (where sorts your photos automatically based on criteria you specify) or Collection Set (a folder containing multiple Collections). Once you have a Collection created you can populate it by dragging and dropping your photos over to it, just like in iTunes. During this process the original images stay exactly where they are on your hard drive, you are just using Collections to help manage them a little easier.

Read more on collections and organizing here: How to Organize Your Photos in Lightroom

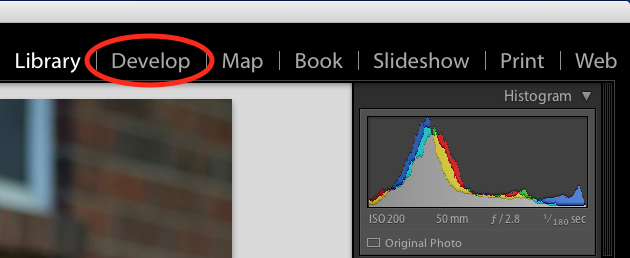
Once you have your images sorted into Collections it’s time to start editing them. (Or you can start editing without doing any sorting at all. It’s up to you.) Click the “Develop” option in the top-right corner of your screen to begin making changes (or click D on your keyboard). At first I was put off and confused by the term Develop, but Adobe used it to hearken back to the days of darkrooms and analog film photography. (which some photographers still use even today). Before digital cameras you had to actually get your film developed before you could see your pictures, and that’s essentially what Lightroom is trying to emulate here in the Develop module. If it doesn’t make sense to you yet, just pretend it says “Edit” instead of “Develop” and you’ll be fine.

beginners-guide-lightroom-develop

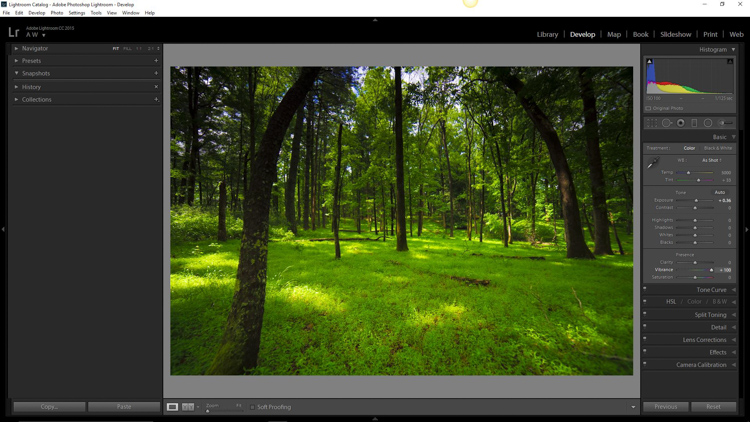
You are now in the Develop module, which is one of seven different working states available inside Lightroom, the rest being: Library (which you started in), Map, Book, Slideshow, Print, and Map. I ignore all the others, and spend about 98% of my time in either Library or Develop, and as a new user I would recommend the same for you.

At first when you click on the Develop module it might not seem like anything is different, but look again and you will see that all the metadata information that was on the right-hand side of your screen has been replaced with a series of panels like Basic, Tone Curve, Lens Corrections, and more. Don’t start hyperventilating! I promise this is easier than it may seem at first. There are a metric ton of tutorials and web pages online devoted to helping you understand the Develop module, but right now I just want you to focus on two simple things: Cropping and Exposure.

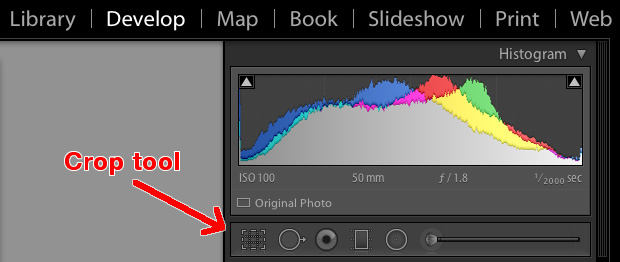
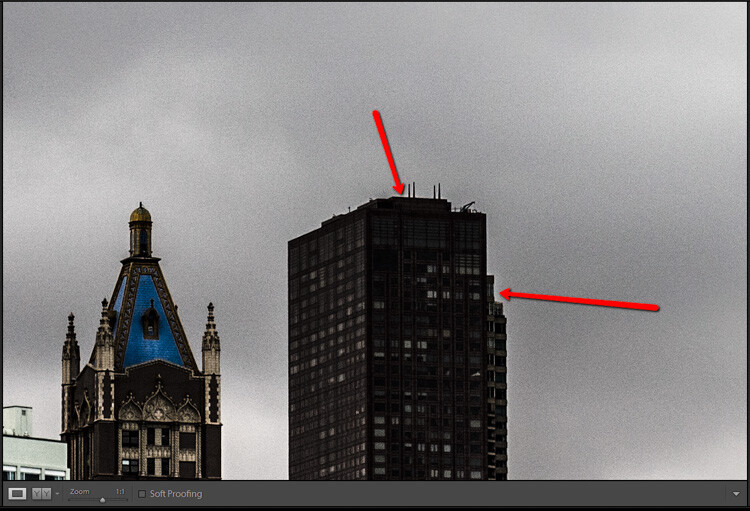
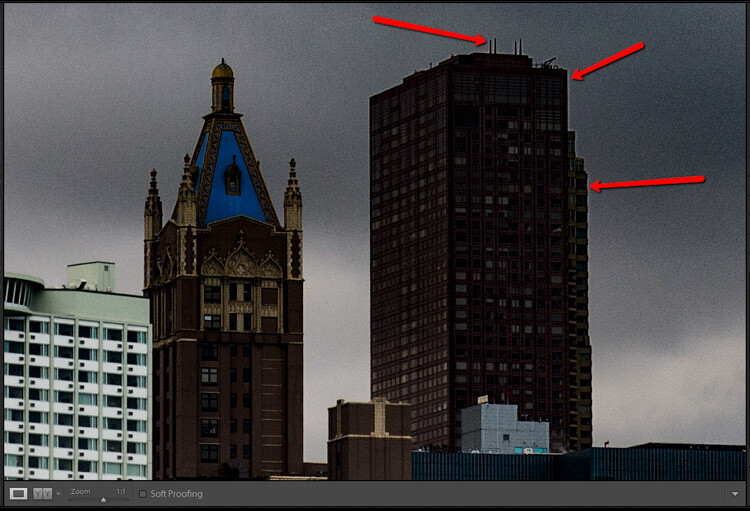
One of the most basic edits many people do, is to trim them down so just the important parts are in the frame, and get rid of things along the edge like trees, trash cans, bystanders, and the like. To do this click the square icon under the colorful graph called the Histogram, (or use the keyboard shortcut R) and you will see a nifty overlay appear on your image that you can use to crop it down how you want. Also read: How Cropping in Post-Production Can Improve Composition

beginners-guide-lightroom-crop-tool

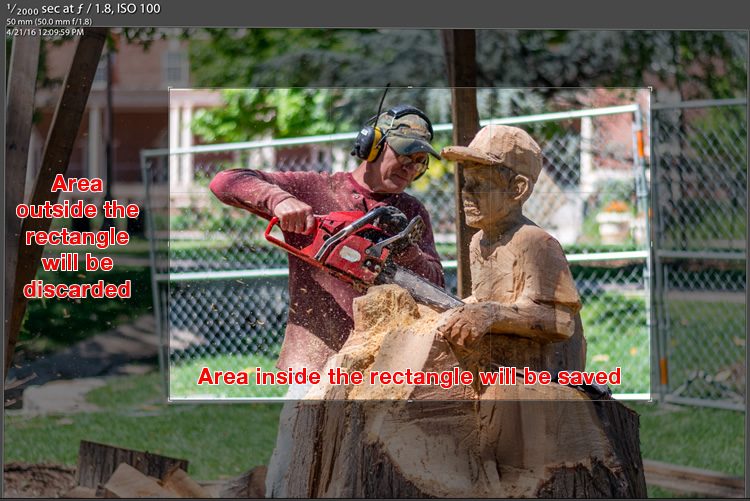
Use the corners of the rectangle overlay to crop your picture down so it contains only what you want, then when you are done press the [enter] or [return] key to see the results. Remember what I said earlier about Lightroom being nondestructive? It might look like you have just removed part of your photo, but the original is entirely untouched, and remains fully intact on your computer. What you are actually editing here is a placeholder – a preview of what the final image will look like – not the actual image itself. None of your edits in Lightroom are permanent, and you can reverse or undo any editing decision you make, so don’t be afraid to play around with it, kick the tires, and just start trying things even if you’re not entirely sure what the result will be.

beginners-guide-lightroom-crop-tool-example

But your original file remains uncropped on your computer – Lightroom only shows how it will look if you apply this setting.

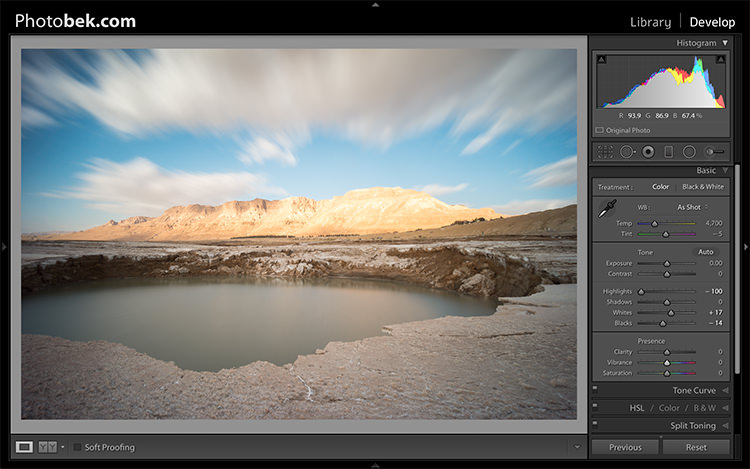
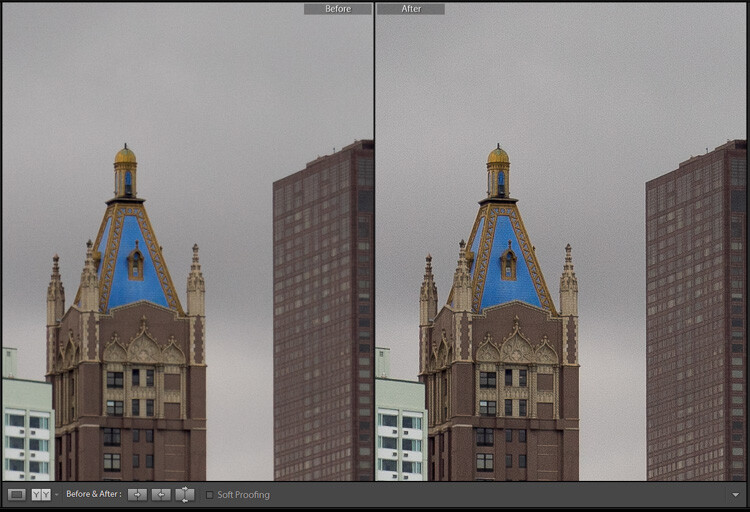
The other common edit that people make to their images is adjusting the brightness, often to fix an image that is too over or under-exposed. This can easily be done with the top panel on the right side of the Develop module, appropriately titled “Basic.” Look for the slider called “Exposure” and move it to the right or left in order to make your picture brighter or darker.

beginners-guide-lightroom-exposure-tool

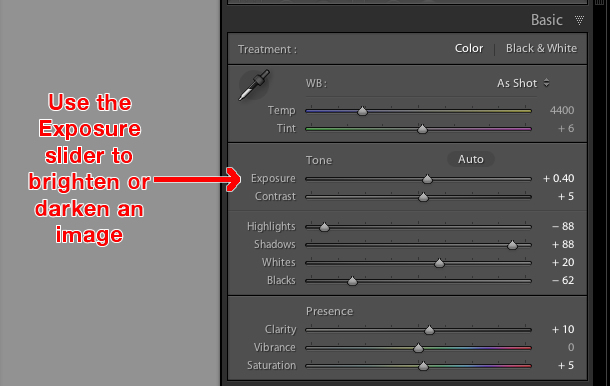
Once again you will notice the changes you make reflected on the picture you see, but keep in mind you are not actually editing the original photo. Your instructions to crop, brighten, or otherwise change the picture are being stored in the Catalog file, while the original remains untouched. At this point you can go ahead and experiment with all the other options, tools, and sliders you see in the Develop module and take note of how they alter your photo. Even if you are not at all sure of what is happening just remember that Lightroom is nondestructive so you may as well play around with things to your heart’s content, since your original pictures will never be altered, and are safe.

Read more on the basic editing tools and sliders here:

  • Master These Five Lightroom Sliders and Your Photos Will Pop
  • Understanding the Basic Sliders in Adobe Camera Raw

Exporting (Save As)

Once you have made all the changes to a picture that you want, it’s time to export the final photo. This is again where the cooking analogy may come in handy, since this step is similar to putting your cake, casserole, or quiche, in the oven so it can bake. You still have the original ingredients on your counter and in your pantry, but once your timer beeps you will have an entirely new creation based on the recipe you used.

In Lightroom you edit photos instead of making pastries or pies, and the Export step is when you put them in your virtual oven to be processed. You may also think of this as opening up a document or spreadsheet, making some changes, and then choosing “Save As” instead of “Save.” This leaves the original document intact while creating a new one with your changes, much like exporting a picture in Lightroom leaves your original image as it was, and gives you a new edited version, complete with all the edits you made.

beginners-guide-lightroom-conversation

When you are ready to export a photo or multiple photos, select the ones you want while in the Library or Develop module and choose “File > Export”, which will bring up yet another confusing dialog box filled with head-spinning options and choices. Hopefully by now you are getting a little more used to this sort of thing when using Lightroom, but if not just focus on a few specific items on this screen.

On the left side you will see a few presets for exporting your photos, depending on whether you want to print them, email them, etc. You can also create your own presets for exporting, but for now don’t worry about that and just focus on a few specific settings.

Once you get the hang of the Export box you can create your own presets for saving pictures with specific parameters that you set.

Once you get the hang of the Export box you can create your own presets for saving pictures with specific parameters that you choose.

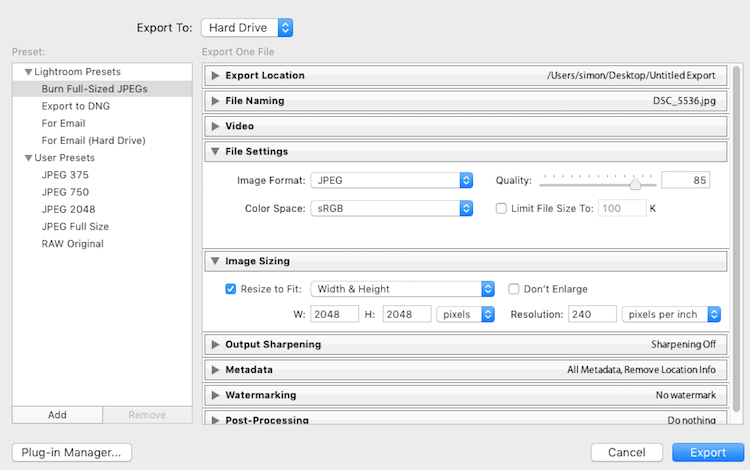
If you’re not sure which option to choose, start with “Full-Sized JPEGs” and then modify things just a bit by tweaking a couple settings (make sure Export To: is set to Hard Drive at the top of the box). Then find and adjust the following:

  • File Settings – Choose “JPEG” as the Image Format, set the quality slider to 85, and Color Space to sRGB.
  • Image Sizing – Tick off “Resize to Fit” then choose “Width & Height” and then enter 2048 in both the W (Width) and H (Height) boxes, (make sure it says “Pixels after Height, not In or Cm.). Leave the rest of the parameters alone.
  • Post-Processing – make sure After Export is set to:  Show in Finder (or Show in Windows Explorer if you use a PC).

These settings will give you pictures that are large enough to print up to about 5×7″ size, or share on social media sites, (for email use a slightly smaller size like 1200 or 800px). When you’re ready, click the “Export” button in the lower right corner and you’re all set. As long as you did the last part, Lightroom will open a Finder (or Windows Explorer) window showing you all your new images, and where they are on your harddrive. Lightroom will probably save the edited copies of your pictures to your Desktop (the default) but you can double check this using the “Export Location” option (at the top of the box) in the Export pop-up box if you want.

Read more here:

  • Organizing Images in Lightroom 5 (still applies in 6 and LR CC)
  • Photography Workflow Tips – From Memory Card to Computer and Beyond
The original photo was OK, but Lightroom helped me coax much more detail, color, and vibrance out of it.

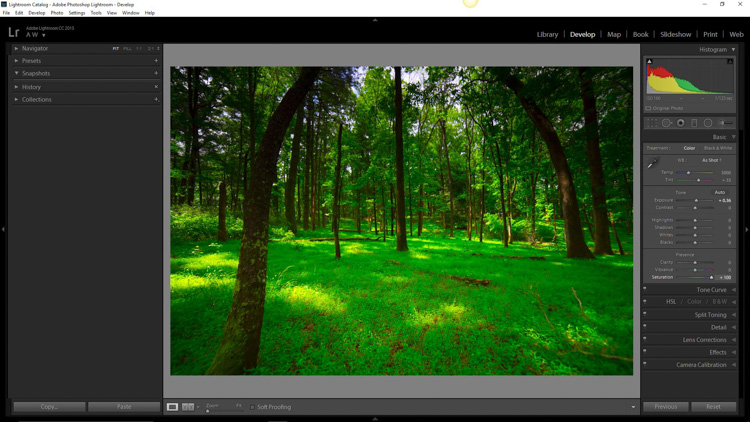
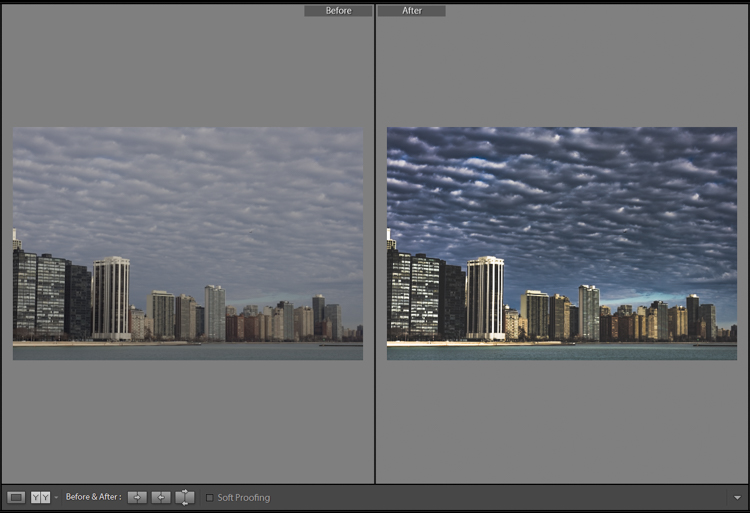
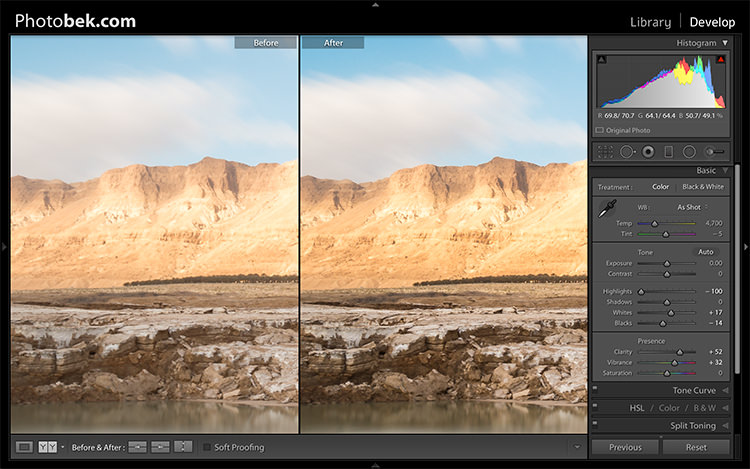
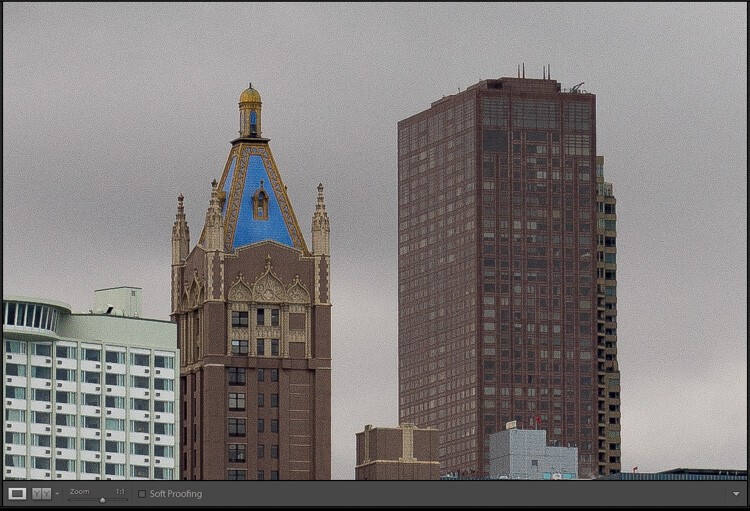
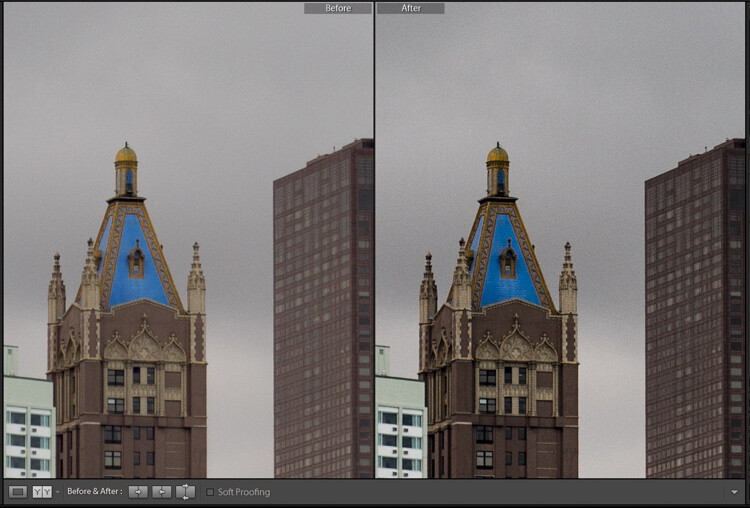
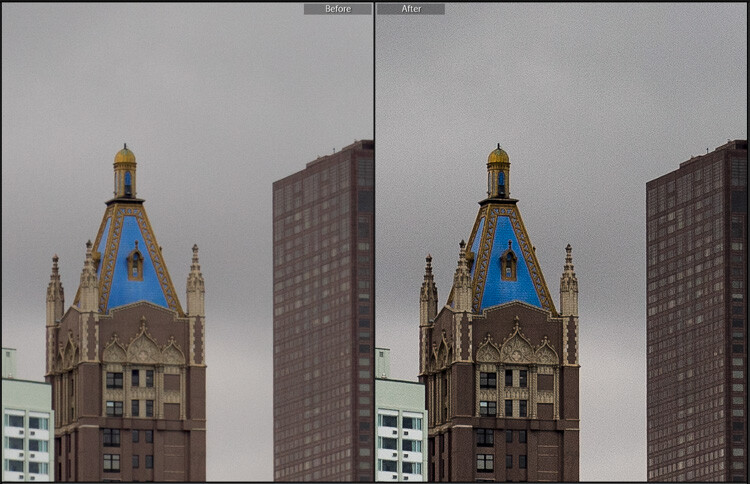
The original photo was okay, but Lightroom helped me coax much more detail, color, and vibrance out of it.

Let’s Review

This all seems like a lot, but hopefully if you have made it this far, you now have a good understanding of a very basic Lightroom workflow. If you take away nothing else from this tutorial, remember these few precious nuggets of wisdom:

  • Lightroom does not edit your original images. They will always remain wherever you put them, and Lightroom does not change them in any way.
  • You are looking at preview versions when you are editing your photos in Lightroom, and not the actual images themselves.
  • A complete record of edits to your photos is kept in a database called the Catalog. Think of this like a recipe book, where you have instructions for how to cook your images, but you are not altering the original ingredients in the kitchen.
  • The editing process is not complete until you Export your images, which saves a new copy of your photos, complete with the changes you made in Lightroom.

I hope this Beginner’s Guide to Lightroom was helpful. Please leave any thoughts or questions in the comments section below. Good luck, and feel free to share some of your favorite images that you have edited in Lightroom too!

googletag.cmd.push(function() {
tablet_slots.push( googletag.defineSlot( “/1005424/_dPSv4_tab-all-article-bottom_(300×250)”, [300, 250], “pb-ad-78623” ).addService( googletag.pubads() ) ); } );

googletag.cmd.push(function() {
mobile_slots.push( googletag.defineSlot( “/1005424/_dPSv4_mob-all-article-bottom_(300×250)”, [300, 250], “pb-ad-78158” ).addService( googletag.pubads() ) ); } );

The post Total Beginner’s Guide to Lightroom – Step by Step by Simon Ringsmuth appeared first on Digital Photography School.


Digital Photography School

 
Comments Off on Total Beginner’s Guide to Lightroom – Step by Step

Posted in Photography


Step by Step How to Make a Moody Desaturated Image in Lightroom

12 Jun

Often times we occupy our processing time with thoughts of what can be added to our images in order to make them more impactful; more sharpness, contrast, or color. But, this may not always the best route to take. The old expression “Less is more” can be applied to many aspects of photography, and it is especially true when it comes to dealing with colors.

Example 1

Desaturated images are becoming more and more popular, especially with nature, landscape, and street photographers. As counterintuitive as it might seem, removing some color saturation can be more effective than adding it in some situations. That being said, there is more to making a strong desaturated photograph than simply working with the saturation and vibrance sliders in Lightroom or ACR.

In this article I will walk you through all the steps needed to process a moody, desaturated image in Lightroom. It’s extremely easy, and will help you add a unique look to your images. But first, a little bit of knowledge that you need to understand before we get started processing our photos.

What is Saturation?

It might seem to be one of those “It goes without saying” type of situations, but have you ever really thought about what saturation means, or how it can impact your images? As it relates to photography, saturation is the overall intensity of a color. Technically, saturation can be viewed as how far a color differs from pure white in the color spectrum.

For our purposes, saturation is the depth of colors present within a photograph. How intense the colors are in an image can be controlled globally (affecting the entire photo) in multiple ways such as: the saturation slider, HSL panel, and tone curve. Also, saturation can be controlled selectively, to only certain areas of the image, by using the filter and brush tools. In the end, saturation adjustments apply themselves to all colors no matter their luminance.

Full saturation applied

Full +100 saturation applied – notice the histogram here.

What is Vibrance?

Vibrance is a somewhat more interesting concept. This is a term Adobe has used to label something that is very similar to saturation. The difference between saturation and vibrance isn’t always black and white (color humor), but there is a distinction.

The saturation slider controls the intensity of all color tones throughout the image, regardless of their luminance. This means any colors whose brightness falls into the highlights, mid-tones, and shadows are all affected. Vibrance is different, in that it only affects the saturation of colors whose luminance falls into the mid-tone range. It has been referred to as smart saturation, and I tend to agree. Vibrance is very useful for enhancing, or in our case desaturation of the colors within a photo, without being as harsh as the saturation slider.

+100 Vibrance applied - notice the difference between this histogram and the saturation one.

+100 Vibrance applied – notice the difference between this histogram and the saturation one.

When Does Desaturation Work Best?

Bright colors lend themselves to photos when the intent is to bring an upbeat or more cheerful feel to the image. Not to say that all less saturated images have to be melancholy or less cheerful, most times it is quite the opposite. The purpose of desaturated, or muted tones, is not to dampen the spirit of a photo, but rather to enhance the mood. Still, more often than not, photographs that benefit the most from desaturation are those which carry an underlying sense of brooding. Images that work well with desaturation include but are definitely not limited to:

  • Moody portraiture
  • Earthy outdoor photographs
  • Urban landscapes and cityscapes
  • Emphasizing dank weather conditions such as rain, mist, or fog

Now that you’ve been patient and endured the why, we will move onto the how.

How to Desaturate Images Effectively

More often than not, the actual desaturation process is accomplished with the vibrance slider more so than the saturation slider itself. They key is the desaturate the image without making it appear flat and completely colorless. There should almost always points of color which are emphasized. As with most aspects of photography less can actually be more. Don’t take away too much color and be sure to work with the colors that enhance the photo. It should be about harmony.
We begin with a RAW file straight from the camera.

RAW Chicago

Here we have the same image after being straightened, and some adjustments in the basic panel of Adobe Lightroom applied. I also used the neutral density filter tool to equalize the exposure of the sky, buildings, and water. Then +45 dehaze was added.

Chicago Basic

Now that we’ve finished with our basic adjustments, the desaturation process can begin. I find it usually works best to save the saturation adjustments for toward the end of the editing process. Please keep in mind that there are an infinite number of directions you can take your saturation effects, so have some fun with this part.

Find the Presence section of the basic Panel in the develop module of Lightroom.

Presence

For this image I took the saturation to -40.

Desat Slider

This brings the entire photo into a considerably desaturated state.

Desaturation Chicago

By itself the desaturation leaves the image a little flat. To counteract this, let’s increase the vibrance to +25.

Vib Slider

Remember that vibrance affects the colors in the mid-tones only. In this case, the blue, orange, and yellow tones are amplified. This makes them stand out more within the image, adding a little more pop.

Increased Vib Chicago

Now, this is where things get interesting. Instead of settling for an image that is merely desaturated, we will now take full control with some advanced options, in order to make the photo stand out.

To do this, we turn to the curves panel. The tone curve is simply a graphic representation of the luminance present within the image. If you’ve ever seen a vintage style photo, most likely some edits have been applied using this technique. What we want to do is to slightly fade the image, in order to add a washed out feel to the scene. Mainly the blacks will be lightened and the highlights enhanced. This forms somewhat of an S-curve and looks something like the following image:

Tone Curve

Which leaves us with a subtly faded effect.

Tone Curve Update

The buildings and the water still look a little drab, so to add a little color intensity we will once more turn to our old friend, the graduated filter tool. This will allow a little more color to be added where it is needed, without affecting the entire image.

Grad Filter Sat

Which leaves us with a photograph much different than the one we began with just a few minutes earlier.

Final Desat Chicago

The difference is quite apparent when compared to the original RAW file.

Before_and_After_Desat_Update

Desaturating a photograph goes much further than merely taking away color. Sure, you can move those sliders to the left and continue on your merry way, but why not go further to the next level, and really make them unique? Remember these key points:

  • Begin with a RAW file in order to give you the most dynamic range possible.
  • Complete all basic adjustments such as exposure, contrast, and clarity first.
  • Don’t go too far with your desaturation.
  • Make use of the tone curve panel to add additional ambiance.
  • Fine-tune your finished product using local adjustments such as graduated filter tool or the adjustment brush.

The important thing to remember is to never underestimate the possibilities for your images. Take the time to experiment with different effects until you discover what you like best. It may be something entirely different that what your expected.

Here are a few more examples of images processed with a desaturated look:

Desat 1

Desat 2

Desat 3

Desat 4

Desat 5

Have you got some photos that you purposely desaturated? Be sure to share them with us in the comments below.


Editor’s Note: Adam also has a Lightroom Preset pack called Desaturated Cinematic that will give you this sort of look. Inspired by motion pictures and tv series, this pack of 25 lightroom presets will achieve great-looking desaturated effects. Perfect to give your images a simulated cinematic look. You can get more info on that by clicking the link.

googletag.cmd.push(function() {
tablet_slots.push( googletag.defineSlot( “/1005424/_dPSv4_tab-all-article-bottom_(300×250)”, [300, 250], “pb-ad-78623” ).addService( googletag.pubads() ) ); } );

googletag.cmd.push(function() {
mobile_slots.push( googletag.defineSlot( “/1005424/_dPSv4_mob-all-article-bottom_(300×250)”, [300, 250], “pb-ad-78158” ).addService( googletag.pubads() ) ); } );

The post Step by Step How to Make a Moody Desaturated Image in Lightroom by Adam Welch appeared first on Digital Photography School.


Digital Photography School

 
Comments Off on Step by Step How to Make a Moody Desaturated Image in Lightroom

Posted in Photography


Adobe Lightroom CC 2015.6, Lightroom 6.6, and Camera Raw 9.6 now available

09 Jun

Adobe has released Lightroom CC 2015.6, Lightroom 6.6, and Camera Raw 9.6, primarily fixing bugs and adding camera profiles as well as Raw support. Lightroom CC and Camera Raw 9.6 users, however, also get a new feature called Guided Upright that reduces/eliminates keystone effects in buildings, straightens images and fixes horizons.

Guided Upright adds a semi-automated function to an existing feature, using guides drawn by the user to apply perspective corrections. It’s found within a new ‘Transform’ panel, which also houses manual perspective correction sliders. Users manually draw 2 to 4 guide lines on the photo, which the software uses to transform the image via Upright. Those manual perspective correction sliders can be used to ‘fine tune’ the resulting image when necessary. 

Lightroom CC 2015.6 / 6.6 and Camera Raw 9.6 have added support for the following cameras:

  • Canon PowerShot G7 X Mark II
  • Leica M-D (Typ 262)
  • Nikon COOLPIX B700
  • Panasonic DMC-GX85/GX80/GX7MK2

The software has also added camera matching color profiles for the Pentax K-3 II, K-1, and 645Z cameras. Both versions of Lightroom also received tethered camera support for the Canon EOS-1D X Mark II, Canon EOS 80D, and Canon EOS 1300D / Canon Rebel T6.

The full list of new lens profile support in Lightroom 2015.6 / 6.6 is available here, and the list for Camera Raw 9.6 lens profile support is available here.

Articles: Digital Photography Review (dpreview.com)

 
Comments Off on Adobe Lightroom CC 2015.6, Lightroom 6.6, and Camera Raw 9.6 now available

Posted in Uncategorized


4 Batch Processing Techniques to Speed Up Your Workflow in Lightroom

09 Jun

0 copy

Lightroom is a fantastic program for keeping your photos organized, but it also provides many tools to speed up your editing workflow. You can even process many photos at once with batch editing. These techniques are by far the biggest time savers Lightroom provides. Once you start using them you’ll wonder how you ever edited each image individually.

Technique 1: Applying presets on import

Presets are hugely popular, and for good reason. They allow you to apply frequently used edits and adjustments to photos, instead of having to manually adjust the settings for each new image. But did you know you can apply your favorite preset during import and cut out a lot of steps?

1 copy

Step 1: Start an import in the library module

2 copy

Step 2: On the right panel in the import dialog you’ll see the “Apply During Import” module.

Step 3: If you have a base preset, or a most commonly used one, select it here and click import to have it automatically applied to all of the photos as they are imported into Lightroom.

This not only skips a lot of clicks for you, but it applies them faster than selecting them individually in the develop module later.

Technique 2: Apply presets in the Library module

Applying presets on import is great if all the photos are similar, but you may need to use different presets on varying scenes, poses, etc. Instead of applying these one image at a time, you can select them in the library module and apply them in a group. This trick is great for weddings, or similar shoots where you may be inside then outside, or have constantly changing light conditions.

3 copy

Step 1: Click the first image in the set, then hold down the Control button and click any others to which you want to apply the same preset.

4 copy

Step 2: At the top of the Quick Develop panel, click the drop down menu under “Saved Preset” and select the new preset. It will update the settings from that preset to all the selected photos.

5 copy

Step 3: Repeat for each changing scene as needed.

Technique 3: Edit in the Library module

The Library module runs much smoother, and processes changes faster than the Develop module. Since you have already applied your presets to the images, you will mostly need to make broad adjustments to your photos now. The Library module can edit the major adjustments like white balance, exposure, contrast, and more. Even better, you can apply these adjustments to multiple photos at once, making them more consistent, and saving you a lot of time.

6 copy

Step 1: Select a group of images as above (CTRL + click to add to your selection) in the Library module.

7 copy

Step 2: In the Quick Develop panel on the right, click the arrows under Exposure, Contrast, and any other applicable options, to apply the changes to all selected photos at once.

Step 3: You can use the + and – key to enlarge or minimize the library view, allowing you to get a better view of the adjustments you are applying.

Technique 4: Sync adjustments across multiple photos in the Develop module

After applying the broad adjustments, you may need to fine-tune a few things in your images. These may include changes like a curve adjustment, add a gradient filter to fine tune a bright sky, etc. These are changes you have to make in the Develop module, but you can still apply them in batches, instead of doing them one photo at a time.

8 copy

Step 1: In the Develop module, apply the adjustments to a single photo.

Step 2: In the Develop filmstrip or Library grid view, select multiple photos (CTRL + click).

Step 3: At the bottom of the right hand panel, select “Sync”, it will be the left button beside “Reset”

9 copy

Step 4: Check the options that you want to sync with all the selected photos. These should include any adjustments you just made in the Develop module.

10 copy

Keep in mind

When batch editing, be careful you don’t sync anything that you don’t want applied to all of the selected images. If you use the adjustment brush on skin in one photo and sync that to another photo, chances are that the subject has moved slightly, and the brush will be applied to the wrong part of the image.

Stick with it!

Do you think these batch editing techniques have a spot in your workflow? For me, learning to batch edit allowed me to cut my wedding editing time down to a fraction of what it was before. You can focus on the big picture and style of each shoot, and not get lost spending 10-15 minutes on every image. Batch editing lets you get more work done in less time, and that is fantastic!

Do you have any additional tips to add? Please do so in the comments below.

googletag.cmd.push(function() {
tablet_slots.push( googletag.defineSlot( “/1005424/_dPSv4_tab-all-article-bottom_(300×250)”, [300, 250], “pb-ad-78623” ).addService( googletag.pubads() ) ); } );

googletag.cmd.push(function() {
mobile_slots.push( googletag.defineSlot( “/1005424/_dPSv4_mob-all-article-bottom_(300×250)”, [300, 250], “pb-ad-78158” ).addService( googletag.pubads() ) ); } );

The post 4 Batch Processing Techniques to Speed Up Your Workflow in Lightroom by David Childers appeared first on Digital Photography School.


Digital Photography School

 
Comments Off on 4 Batch Processing Techniques to Speed Up Your Workflow in Lightroom

Posted in Photography


How to Straighten Crooked Images Fast Using Lightroom

06 Jun

If you’re like me, it’s so easy to get focused on trying to take great shots that you forgot to make sure your images are straight, and not crooked. Not some crazy tilt, mind you – just a slight tilt. So slight that when you notice it in your images, it just looks weird. A more dramatic tilt and we’ll just call it art. But this slight tilt is just enough to drive you crazy and cost us a lot of extra time editing your images.

Well I am here to report that I have found a quick and easy way to fix this tilt fast using Lightroom. So easy, that you can even automate it so that Lightroom fixes it for you.

So if this tip interests you, keep reading to find out how:

Image01

Take a look at the image above. Good shot, right? Photographically I think I did well with the image, but it’s crooked! I can’t give this image to my client like this, it needs to be straightened first.

Lens Corrections Panel

Beginning with Lightroom version 5 the Basic tab was introduced inside of the Lens Corrections panel. This tab gives you the easy to use Upright Mode buttons, which are powerful tools used to fix perspective issues with your images. The perspective issue that I always seem to be dealing with is crooked images.

Image02

There are several Upright Mode buttons, but the one I want to show you in this article is the Level button. When clicked, this button works to straighten your images based on the lines present inside them. Obviously if there are no strong vertical or horizontal lines in the image, this button won’t work. But if there aren’t strong lines, who’s to say it’s crooked in the first place, right?

Images appear crooked to our eyes because of the strong lines within an image, therefore the Level button works great at straightening those images quickly, without much difficulty. Instead of going into the crop tool and manually rotating the image slightly to straighten it, I can go to the Lens Corrections Panel instead and click the level button to straighten this image very quickly.

I also like to have the Enable Profile Corrections check box checked as well as the Constrain Crop check box. These make sure Lightroom is straightening with as much information as possible.

Image03

Automating Your Upright Adjustments

Now here is the trick. When done properly, you can create a Lightroom preset, or sync your Level adjustment across any number of images, and have Lightroom analyze and adjust each image independently based on each image’s needs and requirements.

What this means is you can have Lightroom straighten all of your crooked images with the click of a couple of buttons!

Syncing

In the Sync dialog box under Lens Corrections check box, there are three check boxes you want to be concerned with: Upright Mode, Upright Transforms and Transform.

Image04

These three boxes determine how Lightroom is going to handle your straightening – whether to analyze each image independently or simply copy the same settings from one image to the next.

If all three are checked, Lightroom will simply apply the same setting to all of the images, something you do not want because each image requires specific straightening based on its own lines. You’ll notice that Upright Mode is grayed out, telling you that it isn’t active.

Image05

To do what you want, which is to have Lightroom analyze each image independently and straighten it based in its own needs, you want to ONLY have a check mark in the Upright Mode box. The other two are left blank (see below).

Image06

By doing it this way, Lightroom will fix your crooked images, according to the amount of straightening that each image specifically needs.

How cool is that?

Take a look at the images below. I took many shots in a sequence of the couple walking, and I want to straighten each one individually. Before learning this technique, I had to straighten each image individually – but not anymore.

Image07

Once I fix the first image using the Level button in the Lens Corrections panel, I can then sync the Upright Mode across all of the other crooked images, and each will be analyzed and fixed according to what it needs (even if they are all different amounts).

Image08

Look at that. All of my images were fixed with a few clicks. I don’t want to belabor the point here, but I constantly shoot crooked and this little trick saves me hours of tedious straightening over the course of a year.

Making a LR Preset

You can also automate this process by creating preset. You do this by first straightening an image with the Level button found in the Lens Corrections panel of the Develop Module.

Then, at the top of Presets panel clicking the (+) plus button to create a new LR preset.

Image09

This will bring up the New Develop Preset dialog box where you choose which settings you want in your preset, the folder you want to store it in, and what name you want to give it. Name your preset something that you will remember, put checkmarks in the Upright Mode checkbox and the Lens Profile Corrections checkbox and hit Create.

Image10

Now, when you have crooked images you can hit this preset and almost magically, your images will be straightened compared to the strong lines in the image.

Image11

Give it a shot, I think you will find yourself using this technique quite often to straighten your images quickly.

Image012

Image013

googletag.cmd.push(function() {
tablet_slots.push( googletag.defineSlot( “/1005424/_dPSv4_tab-all-article-bottom_(300×250)”, [300, 250], “pb-ad-78623” ).addService( googletag.pubads() ) ); } );

googletag.cmd.push(function() {
mobile_slots.push( googletag.defineSlot( “/1005424/_dPSv4_mob-all-article-bottom_(300×250)”, [300, 250], “pb-ad-78158” ).addService( googletag.pubads() ) ); } );

The post How to Straighten Crooked Images Fast Using Lightroom by Kelly David Sansom appeared first on Digital Photography School.


Digital Photography School

 
Comments Off on How to Straighten Crooked Images Fast Using Lightroom

Posted in Photography


Transform Your Landscape Photography in a Click with our New Lightroom Presets (60% off Today)

12 May

NewImageDo you take landscape photos? Are you a Lightroom* user? Do you need a little help to lift your landscape shots to the next level?

Today we’re excited to announce the launch of our all new Adobe Lightroom® presets bundle: 101 Landscape Lightroom presets.

With our new presets pack, transforming your landscape shots is a breeze.

And for a limited time, the pack can be yours for the special introductory price of just USD $ 20 (that’s 60% off).

Check them out here.

In this massive pack of 101 presets you’ll get these 6 collections to suit all scenery seasons:

  • Spring / Summer collection
  • Fantastic Fall
  • Wonderous Winter
  • Stunning Black & Whites
  • Creative Horizons
  • Mono Toned
  • Plus you get a bonus Toolbox collection with 29 presets designed to be stackable for making simple adjustments.

Created by professional landscape photographer Sarah Sisson (co author of our best selling eBooks Living Landscapes which is all about how to take great landscapes and Loving Landscapes which is a guide to post processing landscapes), she’s done all the hard work for you so you can get the perfect edit for every photo without the fuss.

Simply apply the effect and adjust as desired… It’s that easy!

You’ll save a whole heap of processing time, while giving your images an instant “pop”. See Sarah demonstrate in the video below.

101 Landscape Lightroom Presets from Digital Photography School on Vimeo.

Transform your photos in just one click. Pick up our 101 Landscape Lightroom Presets today – while we’re still offering it at the introductory price.

*Please note: a copy of Adobe Lightroom is required to use these presets.

Also: Haven’t used presets before? No worries. Full instructions are included in the pack.

googletag.cmd.push(function() {
tablet_slots.push( googletag.defineSlot( “/1005424/_dPSv4_tab-all-article-bottom_(300×250)”, [300, 250], “pb-ad-78623” ).addService( googletag.pubads() ) ); } );

googletag.cmd.push(function() {
mobile_slots.push( googletag.defineSlot( “/1005424/_dPSv4_mob-all-article-bottom_(300×250)”, [300, 250], “pb-ad-78158” ).addService( googletag.pubads() ) ); } );

The post Transform Your Landscape Photography in a Click with our New Lightroom Presets (60% off Today) by Darren Rowse appeared first on Digital Photography School.


Digital Photography School

 
Comments Off on Transform Your Landscape Photography in a Click with our New Lightroom Presets (60% off Today)

Posted in Photography


4 Steps to Make Your Images Pop in Lightroom

03 May

In this article, I share with you the start of my post-processing workflow for pretty much all of the photos I take. I’m mostly using Lightroom for 90% of my post-processing and very rarely do I go into Photoshop for some extra stuff.

Before we begin I must confess that I’m no post-processing master, nor do I know Lightroom inside and out, and I definitely don’t know Photoshop inside and out. But, as I learned, and I hope you will too, it turns out you don’t have to be a master in order to be able to bring your Raw photos to life. It can be done by just about anyone with just a few simple steps as I’m going to show you.

8 Photobek Before
Before we start, here is the image as taken straight out of camera.

The photo I’m going to use (above) for this tutorial is one that I took while on a Dead Sea Night and Sunrise Workshop. I didn’t really plan for this photo ahead of time, but it’s probably the best image I took during that workshop. It’s a photo of one of the biggest sinkholes in the Dead Sea area (one out of more than 5,000 and counting) and it’s an 89 second exposure, done with a 10 stop neutral density filter that allowed me to smooth the water inside the sinkhole, and stretch the clouds moving above.

Now let’s make it POP!

1. Lens Corrections

1 Photobek Lens Corrections

The first thing I do is apply Lens Corrections. This specific photo was taken with a wide angle lens, and if you’re into landscape photography then a wide angle lens would be your go to lens 80% of the time, so fixing the distortion it creates is important.

just go to the Lens Corrections Panel and mark the Enable Profile Corrections. Lightroom has profiles for plenty of lenses, and chances are that it will have one for the lens you are using. If not, make sure you update to the latest version of Lightroom as they keep adding support for new lenses as they are being released to the world.

In some cases I decide to leave the photo as it is without doing the lens correction. It is just a matter of what seems or feels right for each specific photo.

Under the Lens Corrections panel you can also correct perspective in your photo, so I always click on Auto and see how that affects the image. If it’s good, I keep it. If it’s off I undo it and align in manually, or rotate using the crop tool if necessary.

2. White Balance

2 Photobek White Balance

Adjusting the White Balance comes second. Since I’m always shooting Raw (and if you’re not, then please start) I don’t really mess with White Balance while I’m shooting. Again, this is a matter of playing with the options in Lightroom to see what looks the best, and what makes the image as close to how it looked when I was out shooting.

80% of the time I’m using either the Auto or As Shot options, and for this photo I kept it at As Shot.

3. Spot Removal

3 Photobek Spot Removal 01

Spot Removal is a MUST. Not removing the spots from your photos is a really bad habit. It’s hard to avoid having these spots, as the lens or sensor will get some dirt and dust on them, and having them cleaned on a consistent basis is not really something most photographers do. I know I don’t.

Spots can ruin a photo in my opinion, I simply hate them, but I love getting rid of them and Lightroom makes it super easy to do. As you can see in the screenshot above I marked two very obvious spots with arrows but after using the Visualize Spots feature look what happens.

4 Photobek Spot Removal 02

BOOM!

I know I shouldn’t be so happy since my lens (or sensor) is pretty filthy, but thanks to this great feature in Lightroom I can see pretty much all the spots and get rid of them.

You can choose between Clone or Heal in the Spot Removal tool. I usually use Heal as it does a better job of removing the spots and picking the best places to copy over from.

4. Basic Panel

5 Photobek Basic 01

This is where most of the magic happens, and this part makes the biggest impact on the photo. It has nine sliders (besides the two sliders for White Balance which we already took care of in step 2) and the most important thing for you to know, is that every photo needs its own adjustments as each image is different.

The adjustments I’m going to make on this specific photo might not work so good on a different shot, so keep in mind that the overall process is similar and I’ll use all these sliders for every photo, but not necessary move them to the same locations.

Let’s begin:

4.1 Exposure

6 Photobek Histogram

Since the photo was exposed well, and there is no clipping as you can see in the histogram above, I didn’t need to make any adjustments to the Exposure slider, so I left it at 0.

The histogram is a great tool that you should keep your eyes on at all times during your post-processing work on an image. It will provide you with valuable information about the clipped areas in a photo (in case it has any).

Here is what it would like if the highlights were clipped (press J or click/hover on the arrows that are shown at the top of the histogram to activate the clipping indicators).

6 1 Photobek Histogram Clipped Highlights

Here is what it would like if the shadows were clipped.

6 1 Photobek Histogram Clipped Shadows

Keep in mind that some clipping is perfectly acceptable, and might even be desired at some occasions. The trick is to find out where the clipping is occurring, and deciding whether a loss of detail in that area is acceptable or not, and that is entirely up to you to decide.

4.2 Contrast

I usually don’t mess around with the contrast slider much, as making the adjustments to the following sliders also has a big impact on the contrast of the photo, so I don’t find it necessary. I kept Contrast at 0 for this photo.

4.3 Highlights

The highlights slider is designed to bring back detail (moving slider to the left) in the brightest areas of an image, or to brighten (moving slider to the right) highlights while protecting against clipping.

What you should do is drop the highlights slider all the way down to -100 while watching your histogram, and move it back up if needed. In the case of this photo I dropped it to -100 and kept it there, and you can clearly see that it brings back plenty of detail in the clouds and the mountain in the background.

7 Photobek Highlights

4.4 Shadows

The Shadows slider will affect the midtone shadows, to the lower end of the deeper shadows. To brighten up the shadows, simply pull the slider to the right. To darken the shadows, move the slider to the left. For this photo I actually kept it at 0.

4.5 Whites

The Whites slider sets the White Point (brightness) or extreme tonal range of an image, by either lowering or raising this white value. The difference between Highlights and Whites is that the whites slider help you to define the true white in a photo, and the hightlights slider helps you recover lost detail in the highlights of your photo.

While clicking on the option (MAC) or ALT key (PC) move the Whites slider to the right until you just start to see parts being highlighted in the photo (this indicates which parts are being clipped) then drop it back a little and stop there. For this photo I moved it to +17.

4.6 Blacks

The Blacks slider deals with the darkest areas of the image. While clicking on the option (MAC) or ALT key (PC) move the Blacks slider to the left until you see black areas appear (those areas are clipping in the shadows) than move it back a little and stop there. For this photo I moved it to -14.

7.1 - Photobek - Shadows, Whites & Blacks

Shadows, Whites and Blacks adjusted

4.7 Clarity

Clarity is, in effect, a contrast tool. However, rather than boost contrast across the entire range of the image, it affects it only in areas of the image where it finds edge contrast. This makes it a more subtle tool than the contrast slider and it’s excellent for adding punch to your images, without making them look unnatural.

Raise it up until you think it made the impact you want on the photo, but don’t over do it. For this photo I took it up to +52.

4.8 Vibrance

Vibrance is the close cousin of Saturation, and at first they may seem to be almost the same, but Vibrance is different. The Saturation control moves all the colors in the spectrum up or down in saturation, more or less together. Vibrance on the other hand, is a lot more selective about the way it saturates colors as it only saturates colors that need it, which means it doesn’t oversaturate colors that are already very saturated or colors of very low saturation.

Raise it up until you think it made the impact you want on the photo, and again don’t over do it. For this photo I took it up to +32 to add more blue to the sky and more earth colors to the mountain.

Clarity and Vibrance adjusted

Clarity and Vibrance adjusted

Before and After

As you can see, not much was done to the image and this entire process shouldn’t take more than a few minutes (depending on how many spots you have). I think it makes a world of difference to this specific image, and to any image for that matter.

Here is the image as taken straight out of camera:

8 Photobek Before

Here is the image after the adjustments were made:

9 Photobek After

Finally, here are the before and after one next to the other:

10 Photobek Before After

I hope you enjoyed this tutorial, and more importantly, I hope you’ve learned something that you can actually implement on your own photos to make them POP.

googletag.cmd.push(function() {
tablet_slots.push( googletag.defineSlot( “/1005424/_dPSv4_tab-all-article-bottom_(300×250)”, [300, 250], “pb-ad-78623” ).addService( googletag.pubads() ) ); } );

googletag.cmd.push(function() {
mobile_slots.push( googletag.defineSlot( “/1005424/_dPSv4_mob-all-article-bottom_(300×250)”, [300, 250], “pb-ad-78158” ).addService( googletag.pubads() ) ); } );

The post 4 Steps to Make Your Images Pop in Lightroom by Dror Bekerman appeared first on Digital Photography School.


Digital Photography School

 
Comments Off on 4 Steps to Make Your Images Pop in Lightroom

Posted in Photography


How to Make Your Photos Shine Using Clarity, Sharpening, and Dehaze in Lightroom

01 May

The goal of any photographer is to make each and every photo stand out from the crowd. Making an image that pops is something that we all strive to achieve, but it’s not always easy to do. Luckily, there are tools at our disposal in Adobe Lightroom that can go a long way to help us achieve an image that we can be proud of, and that catches the attention of the viewer. What are these tools? They are many and varied, but there are three central processing techniques that can make your images transcend the average, and reach the potential you intended. They are Clarity, Sharpness, and Dehaze.

These three tools are deceptively simple and subtle. When used properly, the enhancements they will make to your photos will be nearly imperceivable. They can take your image from good to great, with just a few simple clicks of the mouse. In this tutorial, I will show you how each one of these processing tools affect your photos, and how they can be put to best use, so that your photographs really stand out from the rest. Let’s get started!

After CSD

Clarity

The clarity slider has been around virtually since the inception of Lightroom. You can find it in the Basic panel of the Develop module. It functions to add definition and well, clarity, to your images. It accomplishes this by darkening the lines surrounding the perimeter of objects within your photo. Think of it as contrast on steroids. The clarity slider can really add a lot of punch to your photos, and add drama.

Clarity

Tips for Using the Clarity Slider

  • Don’t add too much. If you push the clarity slider too far to the right, you can begin to see unattractive halos around objects within the frame, resulting in a fake or unnatural looking photograph. If using it globally (applies to the entire image), do so judiciously. Be careful when applying the clarity slider to an entire image, most areas of your photo probably won’t need to be clarified.
  • It’s best to apply clarity after everything else. Since the clarity tool will add a good amount of contrast to your photo, it’s best to apply it towards the end of your workflow. While this is not always true, it is a good guideline to follow in order to avoid the need to backtrack.
  • Use the Adjustment Brush or Graduated Filter tools to apply it to select areas of your image that need clarity. This will enable you to apply clarity only to foregrounds or backgrounds and to specific points you want to emphasize in the image.

Clarity Adjustment

Clarity applied, viewing at 1:1

Clarity applied at +30, viewing at 1:1

Clarity slider taken too far, viewed at 1:1 (100%)

Clarity slider taken too far, viewed at 1:1 (100%)

Sharpness

The art of sharpening an image can often make or break the composition. Sharpening is one of those awesome features of Lightroom which has been around from the beginning, and it only seems to be getting better with time.

Sharpening

The sharpening tool is located under the Details panel in the Develop module. Basically, sharpening is accomplished by adding contrast between pixels so that the area being sharpened appears to have more definition, compared to its surroundings. There are a few key tweaks that you can perform in order to get the most from the sharpening panel.

Make use of the radius slider. The radius controls how many pixels around the perimeter of objects are affected by the sharpening. Think of this as the halo of sharpness. The greater the radius, the more apparent the sharpening will become. Don’t over do the details. You might think the more details you preserve in your sharpening, the better quality your image will be. This is not true. Usually, the farther you move the detail slider to the right, the more grainy and gaudy the image will be. Find a happy medium here and you will be happy in turn.

Global sharpen at +50

Global sharpen at +50

Over sharpened

Over sharpened – this is what too much sharpening looks like at 1:1

Apply sharpening only to the areas you need to sharpen. It’s easy to simply sharpen an entire image instead of taking the time to selectively apply the edit. Rest assured though, if you apply your sharpening using the Adjustment Brush tool you will have a much more aesthetically pleasing result. Much like clarity, you usually do not need to sharpen the whole photograph.

Use the masking slider with the Alt key (Option key on Mac). The masking slider can be considered the most underrated asset in the sharpening panel. It dictates what areas will be sharpened. However, by itself the masking slider is rather lacklustre. This is where the Alt key comes into play. Hold down the Alt key while you adjust the masking slider.

Sharpening Mask

You will see that the image is transformed into a black and white relief image. The areas in white are where the sharpening will be applied; the areas in black will not be sharpened. This is a great way to fine tune your sharpening when adjusting globally. (Note: to keep people’s skin from becoming overly sharp and showing every pore and bump, move the masking slider until the skin areas are black and therefore unaffected by the sharpening adjustment)

Dehaze

This is a feature that was introduced very recently in Lightroom CC. It is a magical little function that people seem to either hate or love.

Dehaze Slider

I for one love this little guy. It’s located under the Effects panel. The explanation of how exactly it works is somewhat cryptic. Here is an answer pulled directly from Adobe Blog:

The Dehaze technology is based on a physical model of how light is transmitted, and it tries to estimate light that is lost due to absorption and scattering through the atmosphere.

Simply put, the dehaze slider can reduce haze within your images. It can also add a mystical fogginess as well if you choose (just slide it the other way).

Dehaze

Basically, it will make an otherwise hazy photo more clear. This comes in handy for photographs of the night sky when your want to make the stars more pronounced, or when you have to deal with physically dense atmospheric conditions.

Tips for Using the Dehaze Slider

  • Keep an eye on your black points within the image. The dehaze slider can cause loss of shadow detail if you push it too far. Use the J key to show highlight and shadow clipping in order to preserve details.
  • Perform your white balance adjustments BEFORE you apply dehaze. The dehaze tool can do some incredible things for your photo, but it can also cause some funky color distortions if you adjust white balance after the fact. As always, strive to obtain optimal white balance before you ever begin to post-process an image.
  • Sometimes an image will benefit from added haze instead of dehazing. Experiment with adding a small amount of haze by moving the dehaze slider to the left. This can add an ethereal glow to some landscapes and even portraits.
Dehaze +20 at 1:10 view

Dehaze +20 at 1:10 view

Dehaze pulled too far

Dehaze pulled too far

As with all post-processing, the less you have to adjust after the image has been made, the better off you will be. The tools in Lightroom are a fantastic way to bring out the true power of your photographs, if you use them deliberately, and with good judgment.

Before clarity, sharpening and dehaze

Before clarity, sharpening and dehaze

After

After

After clarity, sharpening and dehaze were applied

After clarity, sharpening and dehaze were applied

Any adjustments you make to the clarity and sharpness of your photo should never make them appear unrealistic (with exceptions) or detract from your original vision. Even the dehaze tool should be used sparingly and only when required. Just as the saying goes that one brush stroke can ruin a painting, so too can one more click of the slider. The goal of post-processing is to enhance a photograph to the point of meeting your pre-visualzation. No more and no less. Experiment with the tips you’ve learned here and witness the hidden potential within your own photographs!

googletag.cmd.push(function() {
tablet_slots.push( googletag.defineSlot( “/1005424/_dPSv4_tab-all-article-bottom_(300×250)”, [300, 250], “pb-ad-78623” ).addService( googletag.pubads() ) ); } );

googletag.cmd.push(function() {
mobile_slots.push( googletag.defineSlot( “/1005424/_dPSv4_mob-all-article-bottom_(300×250)”, [300, 250], “pb-ad-78158” ).addService( googletag.pubads() ) ); } );

The post How to Make Your Photos Shine Using Clarity, Sharpening, and Dehaze in Lightroom by Adam Welch appeared first on Digital Photography School.


Digital Photography School

 
Comments Off on How to Make Your Photos Shine Using Clarity, Sharpening, and Dehaze in Lightroom

Posted in Photography