RSS
 

Posts Tagged ‘lightroom’

How to Use DNG Files on Your iPhone With Lightroom Mobile, RAW or ProCam 4

16 Nov

The recent release of iOS 10 saw an important update to the iPhone’s operating system for photographers. If you own an iPhone with a 12-megapixel camera (that is an iPhone 6S/Plus, iPhone 7/Plus, iPhone SE or even an iPad Pro 9.7) the operating system now allows third party camera apps to save photos in the DNG format. That’s excellent news for iPhone photographers as it means that you can now realize the potential of your phone’s camera.

iPhone DNG file

Image quality improvements

The advantage of using DNG (rather than JPEG) as the file format is that you can process the DNG files in Lightroom (or your software of choice). This gives you much greater control over noise reduction and sharpening, as well as color and tonal adjustments. Photos processed by the iPhone and saved in JPEG format often suffer from smearing caused by noise reduction, especially if taken in low light. Using DNG lets you avoid that.

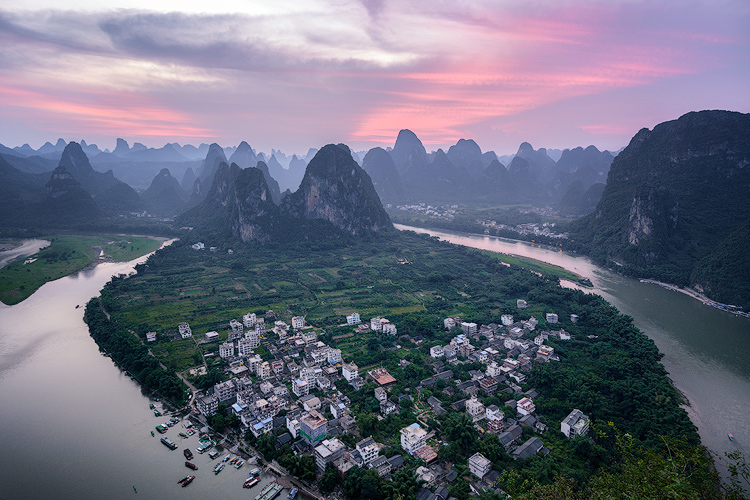
This photo was taken at ISO 125 (fairly high for an iPhone, whose lowest ISO setting is 25) using the JPEG format (all other photos in this article are from DNG files).

iPhone DNG file

This 100% magnification from part of the image shows the smearing caused by the iPhone’s processing. To me, it looks like someone has applied a filter in Photoshop that is meant to make the photo look like a painting.

iPhone DNG file

This photo was taken at ISO 250 using the DNG format. A smartphone camera is not the best tool for shooting in low light, but I wanted to test the camera under these conditions.

iPhone DNG file

This is a 100% magnification. I processed the photo using Lightroom’s default noise reduction settings. There is plenty of noise (exaggerated by the increased Clarity needed to get the best out of iPhone files) but no smearing.

iPhone DNG file

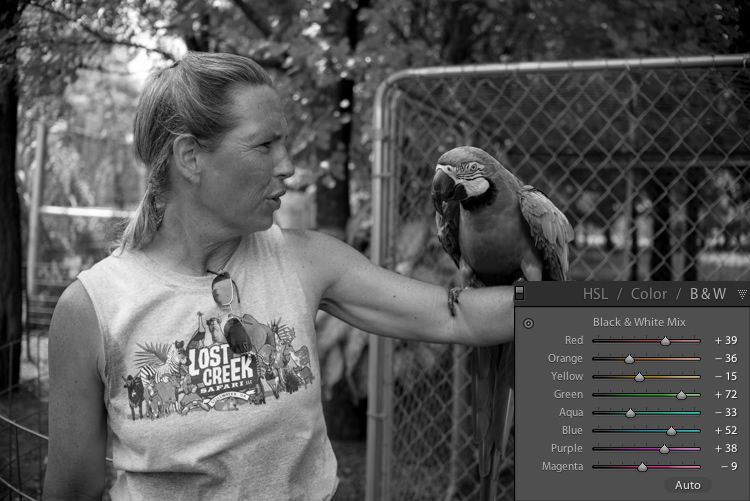
DNG files are also much better for converting to black and white than JPEG files. Black and white shooters will appreciate the ability to process their own Raw files and not rely on the camera’s software to do it.

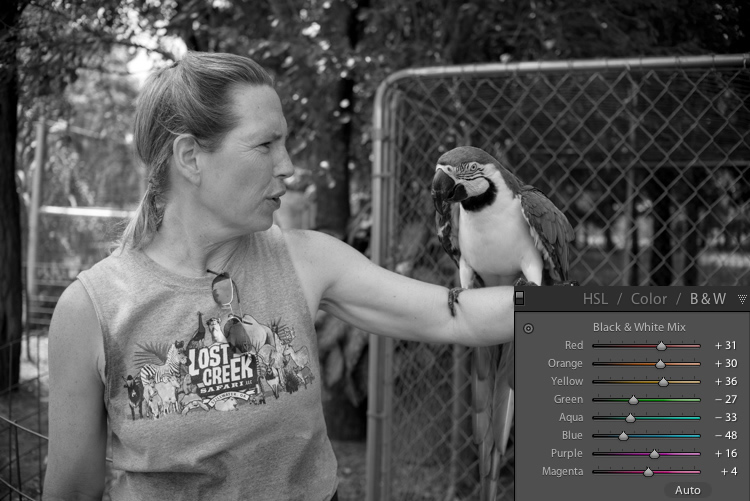
Here’s a black and white version of the opening photo that I made using Lightroom for conversion.

iPhone DNG file

What you need to know

The important thing you need to know is that, at the time of writing, the iPhone’s native Camera app doesn’t have the ability to save your photos in the Raw format. You need a third-party one. Let’s take a look at some of the choices available.

Lightroom mobile

Lightroom mobile lets you take, save, and process DNG files on your iPhone. This is brilliant if you’re a Lightroom CC subscriber as it lets you take full advantage of all of Lightroom mobile’s features.

The only disadvantage of using Lightroom mobile is that the photos you take are stored within the Lightroom mobile app and not in the Camera Roll. That means you can’t download your DNG files by connecting your iPhone to your computer using the lightning cable.

Please note: If you’re not a Lightroom CC subscriber, you can still download Lightroom mobile for your iPhone and use it to take Raw photos. However – and this is very important – there is no way to save the Raw files to your Camera Roll or get at them without a CC subscription. I understand that Adobe software engineers are working on a solution to this, and hopefully, it will be implemented in a future version of Lightroom mobile.

iPhone DNG file

How it works

Lightroom mobile uploads photos taken with the camera, to Adobe’s servers. These are then downloaded by Lightroom desktop or Lightroom mobile on another device such as a tablet. You can set Lightroom mobile to sync only over wi-fi networks, so you don’t have to worry about using up data. But, given that DNG files are larger than JPEG files, it does mean that if you take photos in any volume it’s going to take a while for them to synchronize across devices.

Lightroom mobile’s camera app is a little more sophisticated than the iPhone’s camera app and lets you set white balance and exposure compensation.

As we’ve seen, Lightroom mobile works well under the right circumstances. But if you’re not a CC subscriber or you don’t have fast wi-fi, then you may want to look elsewhere for an app that lets you save photo files in the DNG format.

iPhone DNG file

RAW

500px have released a free camera app called RAW that lets you capture DNG files and edit them on your phone. The RAW app lets you create model releases, upload and license your photos on the 500px website, and use filters created by other RAW app users to process your photos.

The app also lets you save DNG files to the Camera Roll. So that you can download them by connecting your iPhone to your computer without having to rely on a wi-fi connection. You can only do this one at a time, though. So it’s a time-consuming process if you shoot a lot of photos. The camera in the app itself is also quite limited – you can tap on the screen to select the focus point but that’s the only control you have over the camera.

iPhone DNG file

VSCO Cam

The VSCO Cam app (also free, AND available for Android users too!) doesn’t support DNG yet but according to a recent press release DNG support is coming in a future update (date unspecified).

I’m looking forward to this, because the VSCO Cam camera app is quite clever and lets you adjust the exposure, white balance, and flash settings, as well as display a grid and a spirit level on the screen. You can download free presets to process your images (or buy others). But the big advantage is that it saves photos automatically to the Camera Roll, so you can download your DNG files directly from your iPhone if you want, without having to rely on a wi-fi connection.

iPhone DNG file

ProCam 4

If you’re looking for a sophisticated iPhone camera app that supports Raw, saves your DNG files to the Camera Roll, and gives you full manual control over the camera, then I recommend the ProCam 4 app.

It costs a few dollars to buy ($ 4.99) but is well worth the expenditure. This app lets you adjust ISO, shutter speed and white balance. It also lets you save the same photo in both JPEG and DNG formats in the Camera Roll.

If you take photos in any volume, then the ProCam 4 app is the best one that I’ve used for the iPhone. All you have to do to transfer your DNG files to your computer is connect the iPhone with the lightning cable and import the files using Lightroom (or the computer’s own software). It’s much quicker and easier than waiting for Lightroom mobile to synchronize files, or using the RAW app and saving your photos to the Camera Roll one by one.

iphone-dng-8

Disadvantages of DNG

Are there any disadvantages to using Raw on an iPhone? The only one that I can think of is that DNG files are larger than JPEGs and require more storage space. If you have an iPhone with 64GB or more storage space I don’t think this will be a problem. But if you have 32GB or less, then space management may become an issue if you have lots of DNGs.

More to come in the future

Before we finish I think that it’s important to note that the ability to save DNG files on an iPhone is such a new feature that developers are still rushing to take advantage of it. Expect the apps mentioned in this article to be updated and improved, and for more apps to take advantage of this new feature in the future.

All photos in this article were taken with an iPhone SE and processed in Lightroom.

Do you have an iPhone that lets you use the DNG format? Which apps do you use to take DNG photos? Let us know in the comments.

Editor’s note: There are several Android phones which can shoot RAW files in the DNG format as well. If you have an Android do a google search to find options for your brand and model.


If you’d like to learn more about processing photos in Lightroom then please check out my Mastering Lightroom ebooks.

googletag.cmd.push(function() {
tablet_slots.push( googletag.defineSlot( “/1005424/_dPSv4_tab-all-article-bottom_(300×250)”, [300, 250], “pb-ad-78623” ).addService( googletag.pubads() ) ); } );

googletag.cmd.push(function() {
mobile_slots.push( googletag.defineSlot( “/1005424/_dPSv4_mob-all-article-bottom_(300×250)”, [300, 250], “pb-ad-78158” ).addService( googletag.pubads() ) ); } );

The post How to Use DNG Files on Your iPhone With Lightroom Mobile, RAW or ProCam 4 by Andrew S. Gibson appeared first on Digital Photography School.


Digital Photography School

 
Comments Off on How to Use DNG Files on Your iPhone With Lightroom Mobile, RAW or ProCam 4

Posted in Photography


Adobe updates Lightroom for Android and web, Photoshop Express for iOS

12 Nov

Adobe today dropped a fresh round of updates to its mobile and web photo app offerings.

A new version of Lightroom for Android features a Raw Technology Preview for the mobile app — like the one introduced for iOS in July — that lets you import Raw images directly from the camera into your device. With this update, you can now capture, edit, share and access full resolution Raw photos with your Android app, now at version 2.2. In addition to Raw image-processing advantages, the Android app also syncs files with Lightroom on your other devices, including the desktop app and web, complete with edits, ratings and flags.

As explained in a new Adobe blog post to pull this off, you’ll need a special USB adapter — an on-the-go or OTG cable — to connect your camera to your mobile device, and transfer images via PTP mode. OTG cables are inexpensive and come in different configurations, so you’ll want to search for one that matches the ports built into both your camera and your device.

As with the iOS app, Lightroom for Android supports the same Raw files as the desktop app and Adobe Camera Raw. Check to see whether your camera is supported.

Lightroom for web updates include enhancements to the app’s share feature, now letting you add a header graphic, sections and text to promote better engagement and storytelling. That hooks into updates to Adobe Portfolio, the company’s utility that lets you create professional online portfolios: You can now send images from Lightroom on the web to Portfolio. Just create a new project in Portfolio from within Lightroom’s Web app and copy photos into the project. You can also now download original images (if they are available in the cloud) from within Lightroom on the web.

In separate news, Adobe has also announced a major update to Photoshop Express app for iOS. New features include Adobe Photoshop Express Collages, which create high-quality collages with intelligent layout and style transfer automation choices. The update also features Google photo integration, letting you select and import images from a Google Photos account, edit them in Photoshop Express, and share or export them.

All new Lightroom and Photoshop Express features are available now.

Articles: Digital Photography Review (dpreview.com)

 
Comments Off on Adobe updates Lightroom for Android and web, Photoshop Express for iOS

Posted in Uncategorized


5 Steps to Achieve the Look of Black and White Film Using Lightroom

10 Nov

As a hobbyist, amateur, or professional photographer, you may be interested in achieving the look and feel of black and white film without the hassle and investment in equipment and gear. You can edit a digital image using Lightroom with this goal without having your hands smell like rotten eggs (developing chemicals). If you shoot black and white film often, as I do, then you might actually love that smell. If not, then you might want to read on.

Look feel black white film Lightroom01

The feel of black and white film – research first

The objective here is to provide you with a few basic steps to get you started on the path to edit your digital images to look like they were shot on black and white film, without the mess. If you are not familiar with the qualities of film images or have not examined them closely, it would be a good idea to do so. Try to pick up and look closely at some actual prints on photographic paper. You might find these in your grandmother’s attic or your local museum. Photography books or online searches will yield many reprinted or scanned examples as well.

First, consider the subject of style as it relates to film photography. Film photographs generally have a certain nostalgic or vintage look and quality to them that distinguish them from the clarity and realistic look of a well-composed digital image. Film tends to render subjects and scenes in a more abstract manner. Although you can make tack sharp and very realistic looking images using today’s film and gear, that’s not really the role of film photography.

Look feel black white film Lightroom02

If you want clean, shoot digital. Film should look old, slightly out of focus, and definitely grainy. All film has some or a lot of grain and it is basically the equivalent of digital noise. While you may prefer some of your images to look super sharp and smooth, you may also find it pleasing to add a little (or a lot) of grain from time to time.

Film adds an air of mystery

You might want to experiment with this more abstract style or look of film that comes with a distinctive aesthetic. One advantage of presenting this style of image is that the viewer is given the task of filling in the blanks, so to speak. Subjects in your image that are not entirely in focus or even blurry can be representative of anything or anyone. Your image can be more open to interpretation by the viewer as compared to an image that was sharply composed with a subject that is obvious. In other words, you might want to leave some room for mystery in your images. Film photography, or working towards the look and feel of film, can do that for your images.

Look feel black white film Lightroom03

Like digital, film is really just another medium in which we can express ourselves as artists and photographers. I love many things about both film and digital and each has a place in my professional and personal photography life.

5 steps to getting the look and feel of film using Lightroom

If you shoot digital and are looking to achieve the look and feel of film, below are five easy steps using Lightroom.

1. Set your ISO high

ISO should be set to somewhere between 1600 and 6400. Digital noise is the modern day equivalent of the grain in film. The grain or digital noise creates atmosphere and the look or aesthetic that you are trying to emulate.

2. Make an image of something interesting

Look feel black white film Lightroom04

Choose a subject. Framing and composition should be pleasing, and be careful to avoid too many distractions. Emotion is usually a good idea to include if there are people or animals in your photo. Any additional compositional techniques can be applied to the image. The subject could be in focus or blurry. This is completely up to you and your vision.

3. Convert the image to black and white

To convert your image to black and white, press V or use another method for black and white conversion in Lightroom. You can stay in color, but the look and feel of color film is more difficult to achieve and will require some additional steps.

4. Open the Develop module in Lightroom

Look feel black white film Lightroom11
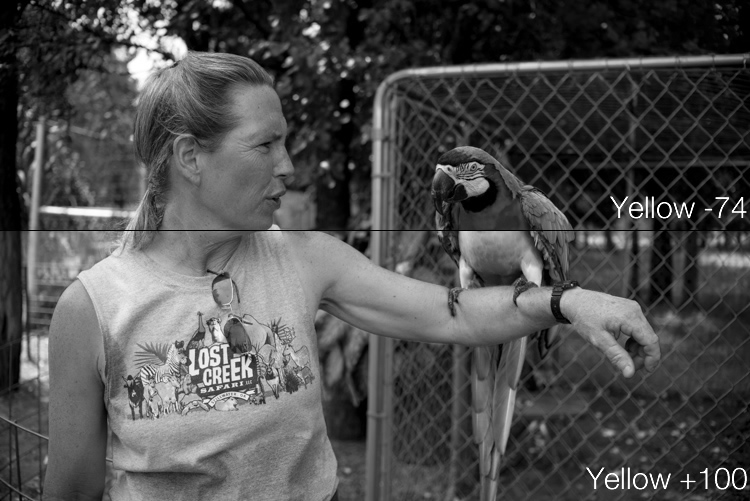
In the bottom panel of the Develop module called Effects, make the following adjustments:

  • Using the sliders, set the Post-Crop Vignetting to -10. Older camera lenses tended to impart some vignetting onto the image. This will give the image an authentic older film quality to it. Ansel Adams famously burned (darkened) the edges to all of his prints.
  • Set the Grain Amount slider to 50.
  • Adjust the Grain Size to 50.
  • Set the Grain Roughness to 25.

5. Review your image and make the finishing touches

Adjust the sliders to increase or decrease the three Grain options to achieve your vision for the given image. You can also dial in or out the vignette as well. All images are different and all digital image files will respond differently to these adjustments based on the sharpness and ISO settings.

Look feel black white film Lightroom05

You may want to consider the following questions to evaluate your adjustments at this point. Do these edits help the image? Does it assist in the presentation of the image as more abstract so that it might connect better with the viewer? Did the adjustments achieve the look at feel of film that you were gong for? You can decide on the answers to these questions and make editing decisions as you see fit or recruit a friend to provide a critique.

If you like your results and would like to explore this topic further, there are free online software programs such as Analog Efex Pro that are part of Google’s Nik Collection. Presets are also available that will aid you in this process and even help you to achieve the look and feel of color film. You might want to consider making your own presets and applying them en masse to a given photo shoot or batch of images as well.

Look feel black white film Lightroom06

Below are a few images representing multiple genres that I made with a digital camera then edited to achieve the look I was going for using the settings in the Effects panel above.

Look feel black white film Lightroom07

Look feel black white film Lightroom08

Look feel black white film Lightroom09

Look feel black white film Lightroom10

Do you enjoy shooting film or reproducing the look of it using digital methods? Do you have a favorite way to achieve it? Please share in the comments below.

googletag.cmd.push(function() {
tablet_slots.push( googletag.defineSlot( “/1005424/_dPSv4_tab-all-article-bottom_(300×250)”, [300, 250], “pb-ad-78623” ).addService( googletag.pubads() ) ); } );

googletag.cmd.push(function() {
mobile_slots.push( googletag.defineSlot( “/1005424/_dPSv4_mob-all-article-bottom_(300×250)”, [300, 250], “pb-ad-78158” ).addService( googletag.pubads() ) ); } );

The post 5 Steps to Achieve the Look of Black and White Film Using Lightroom by Jeremy H. Greenberg appeared first on Digital Photography School.


Digital Photography School

 
Comments Off on 5 Steps to Achieve the Look of Black and White Film Using Lightroom

Posted in Photography


Fujifilm launches ‘Pro’ tethered shooting plug-in for Lightroom with live view and remote control

03 Nov

Fujifilm X-T2 owners will soon be able to shoot tethered to Adobe’s Lightroom image manipulation software application using a new plug-in that will be sold through the Adobe Add-ons website. Tether Shooting Plug-in Pro is an upgrade from the existing version of the company’s Tether Shooting plug-in that is now compatible with the X-T2 as well as the X-T1. The new version brings a Control Panel display that allows users to check their imported images more quickly and to preview the image in live view mode while at the same time being able to control the camera’s settings.

The plug-in features two shooting modes that allow the user to control settings at the camera or via the computer screen, with both modes allowing the captured images to be transferred directly to the computer by USB connection.

The X-T1 and X-T2 cameras both need the relevant firmware to be able to operate with the plug-in, and Fujifilm has announced that v1.10 for the X-T2 will be available on 8th November. This firmware also makes the camera compatible with the standard version of Tether Shooting Plug-in and Tethered Shooting Software HS-V5.

The camera firmware will be free to download, but the Tether Shooting Plug-in Pro will cost $ 79.

For more information visit the Fujifilm website.

Press release:

Tether Shooting Plug-in PRO for Adobe® Photoshop® Lightroom®

PC tethered shooting support for FUJIFILM X-T1/X-T2

FUJIFILM Corporation (President: Kenji Sukeno) is pleased to announce the launch of “Tether Shooting Plug-in PRO for Adobe® Photoshop® Lightroom®” to enable tethered shooting of FUJIFILM X-T1(hereafter X-T1) and FUJIFILM X-T2(hereafter X-T2)* to a compatible computer.

“Tether Shooting Plug-in PRO for Adobe® Photoshop® Lightroom®” is a tethering software plug-in that allows Lightroom users to connect X-T1 / X-T2 to a computer via USB cable for direct saving of captured images onto computer, and controlling the camera from the computer**.

“Tether Shooting Plug-in PRO for Adobe® Photoshop® Lightroom®” will be available from Adobe Add-ons website*** for US$ 79. The launch of the Mac OS X / macOS Sierra version*4 is scheduled for release around the beginning of November 2016, and the Windows version*5 is scheduled for release around the beginning of December 2016. The detail launch schedule will be informed on this page.

(1) Featuring the “Camera Mode” and “PC Mode” to control shooting on camera or from computer
In Camera Mode, the camera is held in hand or set up on a stand. The images taken will be transferred directly and saved onto computer for use in Lightroom. Adjustment of exposure and other shooting settings as well as the shutter release is carried out on the camera. In PC Mode, users can check the viewfinder image of a remotely-setup camera in the LIVE VIEW window, operate the camera and adjust its settings on the computer screen. The user can also take images and have them transferred directly and saved onto a computer for use in Lightroom. Adjustment of exposure and other shooting settings and the shutter releases are carried out from the connected computer.

(2) Featuring the “Control Panel” to check captured image and to control camera
In addition to the features of “Tether Shooting Plug-in for Adobe® Photoshop® Lightroom®” (standard version)*6, “Tether Shooting Plug-in PRO for Adobe® Photoshop® Lightroom®” has Control Panel which can check captured images and to control the camera. The Control Panel PREVIEW window allows users to check transferred images in quicker than before.

The Control Panel also allows users to check shooting angles with LIVE VIEW, to set shooting conditions from computer, to operate interval/bracketing shootings and to backup/restore all the camera settings*7.

* * X-T1 and X-T2 must be upgraded to the tethering-compatible firmware (X-T1: Ver. 3.10 or later, X-T2: Ver.1.10 or later). Internet connection is required for downloading compatible firmware.
* ** Adobe® Photoshop® Lightroom® 6 or CC is required.
* *** https://creative.adobe.com/addons/
* *4 The compatible OS is same as that of Lightroom. To use on macOS Sierra, Lightroom should be upgraded to 6.7 or later / CC 2015.7 or later.
* *5 The compatible OS is same as that of Lightroom.
* *6 The current version (Ver.1.2) of “Tether Shooting Plug-in for Adobe® Photoshop® Lightroom®” (standard version) is compatible only with X-T1. X-T2 will be supported with upgraded version (Ver.1.3) or later.
* *7 Backup/restore is only compatible with X-T2.

Articles: Digital Photography Review (dpreview.com)

 
Comments Off on Fujifilm launches ‘Pro’ tethered shooting plug-in for Lightroom with live view and remote control

Posted in Uncategorized


How to Sharpen Your Photos using Lightroom and Nik Efex

02 Nov

Do you want to take razor sharp photos? One of the best methods for creating tack sharp images is what I call The 20/20 Technique. It’s a process that combines the editing power of Adobe Lightroom and Nik Efex to sharpen your images.

sharpen, photos, tips, photography, Lightroom, Nik Efex

Lotus Temple, Delhi: Bringing out sharpness in architectural photos can really make them pop. © Pete DeMarco

Is sharpness overrated?

The godfather of street photography, Henri Cartier-Bresson, once quipped, “Sharpness is a bourgeois concept.” It’s true that sharpness does not turn a bad photo into a good one. In fact, some of the greatest photographs of our time aren’t that sharp. A picture that evokes emotion will always win over an image that is technically great but lacks feeling.

In the digital age, however, sharpness is another tool in the photographer’s kit that can transform an image from good to great. Have you ever seen a photo so clear that it makes you feel as if you could reach through the screen? It’s almost as if it’s not even a photograph at all but a window into another world.

sharpen, sharper photos, tips, photography, Lightroom, Nik Efex

Bundi, India: Be careful not to sharpen people too much. © Pete DeMarco

Popular advice about getting sharp images usually centers around buying expensive lenses or having the proper settings in camera, as is explained in this article; How to Take Sharp Images. Although those two factors have a major impact on the overall sharpness of the image, today’s top photographers take an additional step. They enhance the sharpness in post-processing.

Sharpen Using The 20/20 Technique

In the modern digital darkroom, there are a number of ways you can add a superior amount of sharpness to your images. I’m going to explain one of the most simple and effective methods you can use to get incredible results. Here is my 20/20 Technique workflow:

sharpen, photos, tips, photography, Lightroom, Nik Efex

Burj Khalifa Reflection, Dubai: Nik Efex is a powerful photo editing suite you can download for free. © Pete DeMarco

Step 1. Open your image in LR

Import your image into Adobe Lightroom (or the editing software of your choice). Open the Develop Module and go to the Detail Panel, then to Sharpening. Increase the sliders up to somewhere between 40 – 50. This is just a general number to start. You’ll have to decide what works best for your image (make sure to view it full size or 1:1). Then finish editing your photo (correcting the white balance, exposure, etc.).

Step 2. Open the image in Nik Efex

For the next step, you will need a piece of software called NIK Efex. You can download NIK Efex for free here. Look for the blue download button in the top-right corner.

NIK Software is a company that develops image editing tools for others like Adobe and Google. In fact, Google bought the company in 2012. Then they copied the best editing algorithms from NIK Efex and created the photo editing app Snapseed. Sadly, NIK Efex has not been updated since then. Most assume it will die a slow death, especially after Google announced the software is now free.

sharpen, photos, tips, photography, Lightroom, Nik Efex

Busan, South Korea: Adding a slight tilt-shift blur effect to the edges of your photo can accentuate the sharpened areas. © Pete DeMarco

Anyways, once you install Nik Efex, right click on your photo in the Lightroom Develop Module > Edit in Nik Output Sharpener, and choose; Edit a copy with Lightroom Adjustments. Your photo will then open in a new Nik Output Sharpener window.

Step 3. Adjust using the Nik filters

From the Nik Output Sharpener window, move the sliders until you get the look and sharpness you are after. For me, I usually leave the “Adaptive Sharpening” at 50%. Then I increase the “Local Contrast” and “Focus” sliders up to around 15-20%.

Google, Nik Efex, sharpen, photograph, output

The Nik Efex Output Sharpener interface.

Step 4. Save and head back to Lightroom

Click on “Save” and the final version of your image will import as a new file back in Lightroom. That’s it!

Here is a video from Nik showing how to use this filter:

Words of warning

Don’t sharpen too much. Know when to pump it up or turn it down. For instance, clouds are soft so you usually don’t want to apply a lot of sharpening to them. Nature scenes usually call for less sharpening. With architecture, some extra sharpening really makes it pop (try adding a little “Structure” sharpening to those). Sharpening people can be hit or miss. It all depends on what you’re trying to achieve.

sharp, photos, tips, photography, Lightroom, Nik Efex

Xingping, China: Selectively sharpening parts of your image, like the houses in the foreground of this photo, helps to lead the viewer’s eye. © Pete DeMarco

Watch out for noise. The more digital sharpening you apply, the greater the noise in your photo. Just zoom in on your photo to see it more clearly. You can apply some Noise Reduction in Lightroom if need be. I don’t like to use it much though because it softens the image. Some noise really doesn’t matter anyways, especially if you are sharing your photo as a smaller size online.

Make sure you’re using a good monitor. If you are viewing or editing your photos on an old monitor, it’s possible that you will not see much difference in sharpness. You can get the best results on a retina display or by printing your photos.

sharpen, photos, tips, photography, Lightroom, Nik Efex

Sipisopiso Waterfall, Indonesia: Transform your images by combining the 20/20 Technique with split toning. © Pete DeMarco

Share your work

Try the 20/20 Technique and share your photo in the comments below. I’d love to see what you do with it. And if you enjoyed this article, you might also like my previous article: How To Use Split Toning to Make Your Photos Stand Out.

googletag.cmd.push(function() {
tablet_slots.push( googletag.defineSlot( “/1005424/_dPSv4_tab-all-article-bottom_(300×250)”, [300, 250], “pb-ad-78623” ).addService( googletag.pubads() ) ); } );

googletag.cmd.push(function() {
mobile_slots.push( googletag.defineSlot( “/1005424/_dPSv4_mob-all-article-bottom_(300×250)”, [300, 250], “pb-ad-78158” ).addService( googletag.pubads() ) ); } );

The post How to Sharpen Your Photos using Lightroom and Nik Efex by Pete DeMarco appeared first on Digital Photography School.


Digital Photography School

 
Comments Off on How to Sharpen Your Photos using Lightroom and Nik Efex

Posted in Photography


4 of the Most Important Elements of the Lightroom Library Module

11 Oct

When I read through photography forums or talk to other photographers the topic of image editors often comes up. People give various opinions and thoughts about which one they prefer. Photoshop, Lightroom, Apple Photos, Capture One, GIMP, and a host of other options from companies like ON1 and MacPhun are all capable of doing various types of small and large edits to your images.

However, one advantage Lightroom has over some other programs is that it not only lets you edit your pictures but categorize them, sort them, tag them, even compare different pictures to see which one you prefer. All this happens in the Library module which is a key part of Lightroom’s workflow. It is essential to understand the Lightroom Library module if you want to get the most out of this program.

The Library module. No late fees here, just lots of ways to manage your images.

The Library module. No late fees here (library pun), just lots of ways to manage your images.

While the Library module does many different things, to get an understanding of the basics it’s good to narrow your focus down a bit. There are a few key areas of the photographer’s workflow that are served by this part of Lightroom; organizing, sorting and viewing…with a dash of editing thrown in just for fun. Let’s look at each one by one.

Organization of images in Lightroom

One aspect of Lightroom that is often misunderstood is how it handles your actual picture files, whether JPG, RAW, DNG, or any other format. Contrary to what some people think, it doesn’t actually do anything with your files whether you are categorizing them, sorting them, or editing them. Wherever your pictures are stored on your computer, that is precisely where they will remain when you import them into Lightroom. What you can do, however, is use the Library module to organize and manage your pictures within the program itself. The best way to do this is to put your pictures into what’s known as Collections, or virtual folders that contain sets of images.

Collections are a powerful and efficient method of sorting and organizing your pictures in Lightroom, while leaving them fully intact and untouched on your hard drive.

Collections are a powerful and efficient method of sorting and organizing your pictures in Lightroom while leaving them fully intact and untouched on your hard drive.

How Lightroom sees your pictures

When you import your pictures into Lightroom you are essentially just telling Lightroom where to look for the images that are sitting on your hard drive. Remember back in the days of using the card catalog in a public library? The books weren’t stored in the massive grids of tiny filing cabinet drawers. But those thousands of little cards did tell you where to locate each book as well as a bit of information about each one. That’s sort of how the Collections feature works in the Library module. You can use it to create virtual filing cabinets to organize the images on your hard drive without actually moving, renaming, or otherwise altering your original images.

For example, let’s say you shoot a wedding for your friends Jim and Pam Halpert and come back to your computer with over a thousand images to edit. You can copy all their images to your computer into one folder, and then use Collections in Lightroom to organize them in a way that makes sense to you. Then you can create a Collection Set called “Halpert Wedding” and then within that create additional collections such as “Ceremony,” “Reception,” and “Candids.” Because you are not actually moving the images into different folders on your computer or duplicating the actual picture files, you can put the same picture into multiple collections. You could have the same shot of Jim’s buddy Dwight in both the Reception and Candids folder.

This picture of a periwinkle flower could go into a collection called "Flowers," another one called "Nature," and another one with only pictures of periwinkles. All at the same time.

This picture of a periwinkle flower could go into a collection called “Flowers,” another one called “Nature,” and another one with only pictures of periwinkles. All at the same time.

Smart Collections

While Collections themselves are quite flexible, you can go a step further by utilizing Smart Collections which is a way of automatically putting pictures in various collections based on criteria that you specify. There are a staggering number of criteria at your disposal, and you can choose whether the Smart Collection should meet any, all, or none of them. These collections are updated dynamically so as soon as a picture in your Library meets the specifications for a given Smart Collection it is automatically inserted into that Collection.

lightroom-library-module-smart-collection


Collections remain one of the hallmark features of the Library module and serve to make Lightroom far more versatile than other programs that simply let you edit your pictures. They work hand-in-hand with the many sorting options as well to give you even greater control over your images.

Sorting images in Lightroom

Have you ever gone through your closet and wished that you could snap your fingers and instantly see all your red shirts, tan pants, or gym shorts that still fit? Better yet, what about immediately seeing only the red shirts you actually like? The Library module allows you to do just that. With the click of a button or press of a keystroke, you can hone and filter your images to see precisely the ones you want, then easily reset everything back the way it was. Pressing the “\” key (while in the Library module), or going to “View > Show Filter Bar” brings up a bar at the top of your screen that allows you to dynamically sort your images based on criteria you specify at will.

lightroom-library-module-filter-bar

Using the filter bar tools

The Filter Bar lets you sort by criteria such as whether photos are marked as Picks or Rejects, have a color or star rating, or are associated with specific keywords. Click any of the icons in the Filter Bar to see the results in real-time, and your images will be immediately pared down to reflect the criteria you want.

To remove any of the filtering criteria just click the button again and Lightroom turns it off. You can also change the type of filtering by clicking the “Text/Attribute/Metadata” options in the middle of the top of your screen which will give you additional parameters. If you don’t want to constantly turn the Filter Bar on and off there is also a persistent mini Filter Bar at the bottom of your screen with many of the options as the full-featured one. I use these filters constantly to sort through my images and find the ones I need for any given project.

Using Keywords to sort your images

lightroom-library-module-keywords

Keywords are a handy way to add sorting criteria to your photos.

The Keywords feature is another aspect of Lightroom that allows you to sort through your images. On the right side of the Library module is a panel that you can use to assign keywords to images such as “Birthday,” “Nature”, “Summer”, “Uncle Mike”, or any other words you want. To assign a keyword, or multiple keywords, to a picture, just start typing them in the Keyword box or select them from the Keyword Suggestions or Keyword Bank frames. To assign keywords to multiple images at the same time, select them first and then enter your keywords in the box.

Whether you have dozens, hundreds, or thousands of pictures to sort, the options in the Library module can help.

Whether you have dozens, hundreds, or thousands of pictures to sort, the options in the Library module can help.

Viewing images in the Library module

As your photo collection grows larger it’s essential that you have a way to actually view and manage all of the images. Thankfully Lightroom has a robust system in place to let you do exactly that. Of course, you can use collections and sorting criteria, but you also have some useful tools at your disposal to actually view the pictures too. The icons at the bottom-left of your screen let you change between four different views; Grid, Loupe, Compare, and Survey.

View modes

Click Grid to see a bird’s-eye view of all the pictures in the Collection you are currently viewing. Use the Thumbnail slider in the bottom-right (if it’s not visible tap the T key to hide/show the tools bar) to change the size of the thumbnails depending on your preference.

Grid, Loupe, Compare, and Survey let you view your pictures in useful and creative ways.

Grid, Loupe, Compare, and Survey let you view your pictures in useful and creative ways.

Loupe is a term borrowed from the days of developing pictures in a darkroom. It refers to the small glass viewer, sort of like a magnifying glass without a handle, that a technician would use to see a given image in greater detail. Click the Loupe view to see one image at a time and then click anywhere on the image with your cursor (which has now turned into a magnifying glass with a + inside) to zoom in closer. Hold [alt] or [option] on a Mac to click and zoom out, and use the zoom level options in the top-left corner of your screen to change the magnification level. This is particularly useful if you want to check if a given picture is sharp and in focus.

Compare and Survey view modes are related in that they let you see two or more pictures at a time in order to choose the one you prefer. These modes are especially handy if you have multiple similar images, such as after a portrait session, and are trying to pick the best one out of a bunch.

I had about two dozen nearly identical shots, but Lightroom's view and sorting options helped me find just the photographic needle in the memory card haystack.

I had about two dozen nearly identical shots, but Lightroom’s view and sorting options helped me find just the photographic needle in the memory card haystack.

Quick Develop in the Library module

I like to think of the Library’s Quick Develop options as extra credit for a class assignment. They are an added touch that lets you do a bit of editing with your pictures without going to the full-fledged Develop module, and will often give you just the right amount of editing that a picture needs. Nestled on the right-hand side of the Library module is a little toolbar called Quick Develop which does exactly what you might think. It allows you to quickly and easily adjust a few essential parameters such as White Balance, Exposure, Highlights, Shadows, and a few other settings.

lightroom-library-module-quick-develop

Clicking on the single arrow for any given parameter adjusts things just a little bit. While clicking the double arrow adjusts things a lot. For example, the single right-facing arrow for Exposure will increase the value by 1/3 stop, whereas the double arrows will increase the value by a full stop. You don’t get anywhere near the fine-grain control that you do in the actual Develop module, but if you need to quickly make some basic edits to an image you might find Quick Develop to be quite handy.

lightroom-library-module-rainbow

Conclusion

These four elements aren’t all that the Library module has to offer, but learning them will give you plenty to work with as you begin to expand your knowledge of this powerful program. Do you have any favorite tips you’d like to share? Are there features you think I missed that others should know about? Please leave your thoughts in the comments below.

googletag.cmd.push(function() {
tablet_slots.push( googletag.defineSlot( “/1005424/_dPSv4_tab-all-article-bottom_(300×250)”, [300, 250], “pb-ad-78623” ).addService( googletag.pubads() ) ); } );

googletag.cmd.push(function() {
mobile_slots.push( googletag.defineSlot( “/1005424/_dPSv4_mob-all-article-bottom_(300×250)”, [300, 250], “pb-ad-78158” ).addService( googletag.pubads() ) ); } );

The post 4 of the Most Important Elements of the Lightroom Library Module by Simon Ringsmuth appeared first on Digital Photography School.


Digital Photography School

 
Comments Off on 4 of the Most Important Elements of the Lightroom Library Module

Posted in Photography


How to Save and Use Stackable Lightroom Presets

02 Oct

Lightroom presets are basically post-processing shortcuts that can save you tons of time and really speed up your editing workflow. They allow you to save a particular set of edits and apply them later with a single click. Presets can either be a final solution or a great starting point from where you can further tweak and perfect your images.

Processed Image featured

Making development presets is incredibly easy and effective working in Adobe Lightroom CC. It even gives you the option to import presets made by others into your own library. Chances are, if you’re a seasoned photographer, you have used presets at some point.

But are you really getting the most from the huge range of editing control that presets can give you? In this article, you will learn just how versatile your Lightroom preset options can be and how you can essentially stack multiple presets to achieve the exact result you want.

The Basics

Just as a refresher, let’s go over the steps for creating and saving presets in Lightroom. Here is a original RAW file of a mountain meadow in the early morning mist.

RAW Image

I applied some basic edits to the RAW file which consist of contrast, clarity, whites and shadows, warming, and then finally sharpening to get the following result:

Processed Image

How to save a Preset

It’s looking decent. Hmmm, if you feel these edits might work for some similar images later, why not make a preset to save some clicking next time? To do this, you must first create a folder to house your presets. Click the Develop dropdown at top left or use the keyboard shortcut Ctrl+Alt+N (Command+Option+N for Mac).

Preset Folder

Then name your freshly minted folder so you can easily locate it later.

Preset Folder Naming

Now you will see your brand new folder appear under the Presets drop down menu.

Preset Folder Location

Since you now have a destination for your preset you can go about actually saving the preset itself. To do this, simply go back to the Develop drop down and select New Preset. You can also use the keyboard shortcut Ctrl+Shift+N (Command+Option+N for Mac) or just click the + symbol next to the Presets menu on the left panel (see below). A fairly large dialog box will appear bring along with it a host of options for saving your preset. First things first, come up with a name for your preset and then select the folder you made earlier as the destination.

Save preset

If you leave the Check All option selected, all the edits you made with any of the sliders and filter tools will be saved. Click on Create at the bottom right of the dialog box and viola! You will see your newly created preset appear in the folder to the left.

Preset Location

Preset conflicts

In most Lightroom preset tutorials that would be all you would do. But this isn’t most tutorials. In order to have full control over your presets you have to go a little deeper and that hinges on just how far you are willing to venture down the post-processing rabbit hole.

Here is the final image from which I saved the Morning Landscape 1 preset with the Check All settings applied.

morning_landscape_preset


If I attempt to apply another preset, all of the current settings will be changed to whatever values the new preset dictates. Here is the same image after clicking another preset from my preset library.

Preset Conflict

The problem that arises when you try to combine multiple presets is that you can’t do it without the processing values conflicting and overriding one another. Or can you? Well, yes and no.

Remember, that dialog box asking which edits you wanted to save that appeared earlier while you were making the preset? That dialog box is the key to being able to stack multiple editing presets so you can apply different adjustments without them overriding one another. Let me show you how.

Stacking Lightroom Presets

It comes down to which edits you choose to save when creating your preset. Instead of selecting to save each and every adjustment, you can select only the ones you want. This way, you can avoid conflicting edits when you apply multiple presets. That means you can have a preset folder for various Clarity edits, a folder for Contrast and Exposure, a folder for Vignettes, or virtually any combination of any adjustment in Lightroom. Here’s how it’s done.

How to do it

I’ve created a folder called Clarity and Sharpness. This will be where I keep the Sharpness and Clarity (and even Dehaze) adjustments. I then created a folder for Exposure and Contrast and another for warming and cooling effects aptly titled Warming and Cooling.

Each one of these folders contains presets related to their respective edits to varying degrees of intensity. When saving for the Clarity and Sharpness folder click the uncheck all box and then select ONLY the Clarity, Sharpness, and Dehaze boxes. This way, any other edits will be left as they are and only these settings will change once you apply your presets.

Do this with the presets you save for the Exposure and Contrast and Warming and Cooling folders except only check the respective edit boxes to save for each.

Exposure and Contrast Selection

For Exposure and Contrast, select only the relevant boxes as seen here.

Calrity and Sharpness Selection

Do the same for the Clarity and Sharpness folder.

Saving separate presets which only affect certain aspects of your processing will allow a huge range of preset adjustments to be applied without affecting all the other unrelated edits from another preset. Essentially letting you stack one preset on top of another.

Applying the new presets

Let’s look at an example. Here is the RAW image again to which we will now apply our selective presets one by one.

RAW Image

RAW image.

First I will apply the Exposure and Contrast + preset.

Exposure and Contrast +

Next, I will add the Warming 2 preset.

Warming 2

And lastly, I will Sharpen and Clarify the photo with my Clarity and Sharpness Dehaze ++ preset.

Clarity and Sharpness Dehaze 2

Conclusion

By saving your presets in a way which targets only specific edits, you essentially enable yourself to allow the presets to work together. This way, quickly editing your photos becomes much more controllable and streamlined because you can apply different presets in tandem without disrupting the edits applied by each.

This advanced knowledge of creating, saving, and applying Lightroom presets can remove a lot of the headache from your post-processing conundrums. It can give you, for lack of a better word, limitless combinations of adjustment possibilities. What might have taken you an hour’s worth of post-processing can now be reduced to only three or four clicks of your mouse.

While presets might not be a one and done method for editing your photos they can still give you a wonderful starting point to base your more in-depth editing. By being able to apply multiple presets to one image you will have even more of a head start in your processing workflow. Work smarter – not harder.

How do you use Lightroom presets? Please share in the comments below.

googletag.cmd.push(function() {
tablet_slots.push( googletag.defineSlot( “/1005424/_dPSv4_tab-all-article-bottom_(300×250)”, [300, 250], “pb-ad-78623” ).addService( googletag.pubads() ) ); } );

googletag.cmd.push(function() {
mobile_slots.push( googletag.defineSlot( “/1005424/_dPSv4_mob-all-article-bottom_(300×250)”, [300, 250], “pb-ad-78158” ).addService( googletag.pubads() ) ); } );

The post How to Save and Use Stackable Lightroom Presets by Adam Welch appeared first on Digital Photography School.


Digital Photography School

 
Comments Off on How to Save and Use Stackable Lightroom Presets

Posted in Photography


Adobe Lightroom for iOS updated with iPhone 7 camera profiles

01 Oct

With iOS 10.1, currently available in beta, the new iPhone 7 and 7 Plus are capable of recording Raw image files. Adobe has now updated its Lightroom app for iOS to take advantage of this new feature. The capability to shoot Raw images with all Apple devices with 12MP camera had already been implemented in version 2.5 of the app, but the latest version  v2.5.2 now also comes with lens and sensor profiles for both new iPhones, including specific optimizations for the dual-camera of the 7 Plus. 

These should ensure color, noise reduction, lens corrections and other parameters are set at the right levels when opening DNG Raw-files that have been captured with one of the new iPhones. In addition, the new version of Lightroom for iOS supports the DCI-P3 wide color gamut display that is also a new feature of the iPhone 7 series. It offers 25 percent more color than the sRGB color space. The latest version of Adobe Photoshop Lightroom can now be downloaded for free from the Apple App Store.

Articles: Digital Photography Review (dpreview.com)

 
Comments Off on Adobe Lightroom for iOS updated with iPhone 7 camera profiles

Posted in Uncategorized


Tips for Understanding the Lightroom Adjustments Panel

28 Sep

Lightroom can be an intimidating program. Even longtime users sometimes find themselves confused at all the options or unsure of exactly what to do to achieve a specific type of look for their pictures. Fortunately much of this can be mitigated by learning new things slowly and carefully, and taking the time to master just one new tool, option, or set of sliders at a time. The first thing I usually recommend to beginners is the Basic panel because, as its name implies, those sliders can go a long way towards improving your pictures. However another set of sliders in the Develop module, called the Adjustments panel, can take your images to a whole new level if you learn to use it properly.

lightroom-adjustments-panel-squirrel

What is the Adjustments panel?

While the Basic panel allows you to adjust global settings on an image related to things like white balance, overall tint, and highlights/shadows, the Adjustments panel lets you get much more specific with selective color editing. To access this panel click on the Develop module and then look on the right-hand side of your screen. If you do not see it (it’s the third one down), right-click (ctrl-click on a Mac) on any of the Develop panels and make sure the Adjustments option in the pop-up menu is checked.

lightroom-adjustments-panel

Right away you might be a little confused because the options have odd-sounding acronyms with no explanation. But once you understand how they are related it should get a little easier. For starters, here’s a brief explanation of the three main categories of HSL / Color / B&W.

  • HSL: Allows you to control the Hue, Saturation, and Luminance of all the main colors that make up a picture (Red, Orange, Yellow, Green, Aqua, Blue, Purple, and Magenta)
  • Color: This is essentially the same thing as the HSL panel, as you will see shortly, but the options are organized in order to help you focus on specific colors, and then specific types of adjustments within those colors.
  • B&W: This panel is often the most misunderstood, but one of the most powerful tools available in Lightroom when it comes to converting your images to black and white.

lightroom-adjustments-panel-apple

The HSL tab

This abbreviation stands for Hue, Saturation, and Luminance and allows you to control these parameters all at once for the various colors in your image. When you click the HSL option in the Adjustments panel you can then choose each of these three options to control, or you can click the “All” option and have access to all of the parameters at a glance.

lightroom-adjustments-panel-hsl

Hue sliders

Click the Hue option and you will be able to change the look of specific colors such as Red, Green, Yellow, etc. for the entire image. For example, you could make your greens have more of a yellow tint to them, or make them look almost fluorescent just by changing the Green slider. You can give your skies a deep, rich blue or tone it down to make them look a bit pale. Your purples can be anywhere from reddish to deep violet, all with the click of a mouse button.

Simply adjusting the green hue can give your nature photos an entirely different look and feel.

Simply adjusting the green hue can give your nature photos an entirely different look and feel.

Adjusting the hue, as is the case with many editing decisions, can be most effective when used subtly and in combination with other options such as the tone curve or white balance. Too much editing can come across as obvious and give your images a look that seems overly processed, especially when it comes to portraits. Still, it’s a powerful and valuable adjustment that can greatly affect your pictures.

If you are not sure exactly which color option to select from the ones that are available to you, you can click the target button in the top-left corner of the Hue panel (circled in red below) then click and drag on a specific point in your image. This will adjust the hue that matches the target area, and all similar colors for your entire photo.

lightroom-adjustments-panel-hue-click-drag

One tip I like to use when adjusting the values is to click on the 0 and enter numerical values using my keyboard. I’ll start with something small like 5 and then press the up and down arrows on my keyboard to raise the value in increments of 1. Or you can hold down the shift key while tapping the arrows to raise and lower values in increments of 10. It’s a good way of making more precise adjustments rather than moving the slider with your mouse.

Saturation and Luminance

The Saturation and Luminance tabs function in much the same way. You use sliders or enter numerical values in order to adjust how much of each color is present (Saturation) or the brightness of each color (Luminance). Finally, clicking “All” will let you edit all three parameters at once. I find that a bit overwhelming but others can think is quite useful. See what works best for you.

Subtly editing the HSL values on this picture helped me bring out more vibrant colors and produce the final image I was really going for.

Subtly editing the HSL values on this picture helped me bring out more vibrant colors and produce the final image I was really going for.

The Color tab

At first when you click on the Color tab of the Adjustments panel you might be hit with a feeling of déjà vu. The options look remarkably similar to what you might have already seen in the HSL tab, in that you can once again change the Hue, Saturation, and Luminance. The difference here has to do with how things are organized, and it’s why I find myself working more often in the Color tab than the HSL tab.

Here all three adjustments are available to you at the same time for each individual color, which makes it very easy to work with your image on a per-color basis as opposed to a per-adjustment basis. If I’m shooting portraits and want to tweak the color of my subject’s purple shirt I will probably want to adjust all three parameters at once, but just for the color purple. This tab gives me the option to do exactly that, and once again you can click on the All option to see all the colors, along with all their corresponding adjustment options, at the same time.

Working in the Color tab of the Adjustments panel let me tweak various parameters of the greens and yellows to get the final image I was going for.

Working in the Color tab of the Adjustments panel let me tweak various parameters of the greens and yellows to get the final image I was going for.

The B&W tab

lightroom-adjustments-panel-bw
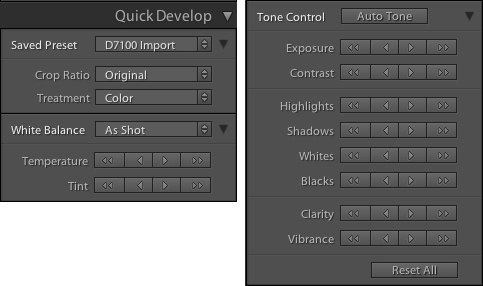
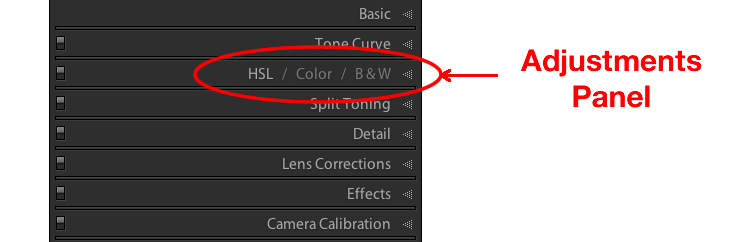
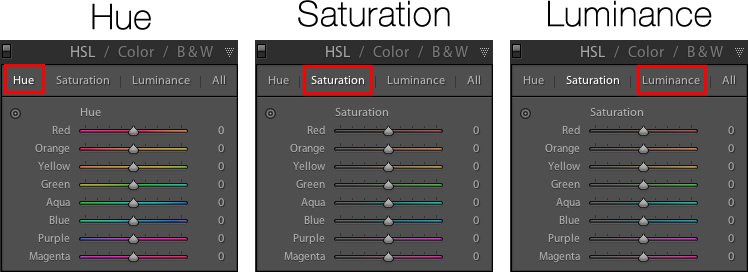
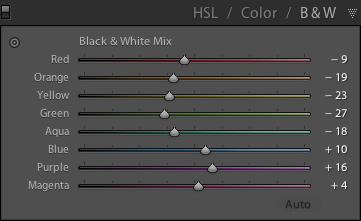
This part of the Adjustments panel is often the most confusing because as soon as you click on it, your image turns grey, and yet you still have all the same color sliders as on the other tabs. What’s going on here?
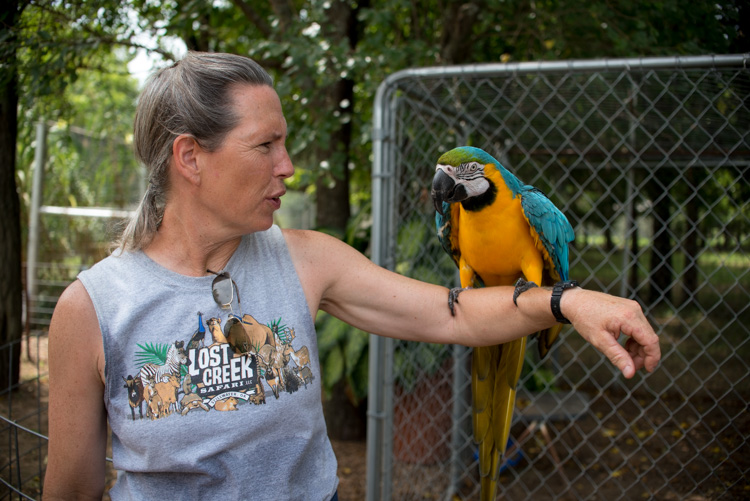
The answer lies in how Lightroom essentially tries to mimic the effect of black and white filters on color pictures. What you are doing with this panel is turning your image into a grayscale version of its colorized counterpart, then adjusting the tone of each of the individual colors as the image is processed. Incidentally, if you open this panel and then click on one of the Black and White filter presets in Lightroom (in the presets panel on the left side of LR) you will see the sliders move around because they are really just specific values for the sliders you see here.

An example B&W conversion to see how the sliders work

To demonstrate how these Adjustment options work, here’s an image of a woman who owns a wildlife refuge in Oklahoma holding a macaw.

lightroom-adjustments-panel-macaw-color

There are several distinct colors in this image such as yellow, aqua, and green, which makes it an ideal candidate for understanding how the B&W adjustments work. In this first example I have clicked the B&W filter and left all sliders at their default values, but changed the yellow option for two different results.

lightroom-adjustments-panel-macaw-bw-yellow

Most of the image remains unaffected except for the bird’s bright yellow chest, which is starkly different depending on the values I have selected for the Yellow slider. Increasing the numerical value of yellow has made the corresponding areas much lighter, and decreasing it has made them appear significantly darker. Once again you will likely find that in this B&W panel the best edits are the most subtle, and you can use the sliders to creatively adjust the look and feel of a monochromatic image. To further illustrate the effects of these sliders, compare the following images. The first one has higher values of colors that correspond to the skin tones of the woman and the chest plumage of the bird, and darker greens for the foliage in the background.

lightroom-adjustments-panel-macaw-bw-all-1

Be careful not to go too far

In the next example, the colors of the bird’s chest have been significantly darkened while the background is much lighter, and the woman’s skin tone has been toned down quite a bit as well. I find the top image much more natural and pleasing, whereas the bottom one significantly alters the appearance of the bird and makes the woman look almost as though her face has been burned, particularly if you look where her jawline meets her neck.

lightroom-adjustments-panel-macaw-bw-all-2

As you play around and experiment with the B&W sliders you will start to get a feel for how you might prefer various adjustments in your images. If you are the type of person who likes to try black and white photography this panel is significantly more useful than just clicking on a preset or using built-in filters in a program like Instagram.

Conclusions

I hope this article has helped you understand a bit more about some of Lightroom’s useful editing options. If you have never used the Adjustments panel before go ahead and try it out! Lightroom is non-destructive which means your edits are not permanent and can be undone at any time, so it never hurts to try something and see what happens.

If you find the Adjustments panel to be useful, or have your own tips to share, please leave your thoughts in the comments below. I’m sure other readers would enjoy hearing them.

googletag.cmd.push(function() {
tablet_slots.push( googletag.defineSlot( “/1005424/_dPSv4_tab-all-article-bottom_(300×250)”, [300, 250], “pb-ad-78623” ).addService( googletag.pubads() ) ); } );

googletag.cmd.push(function() {
mobile_slots.push( googletag.defineSlot( “/1005424/_dPSv4_mob-all-article-bottom_(300×250)”, [300, 250], “pb-ad-78158” ).addService( googletag.pubads() ) ); } );

The post Tips for Understanding the Lightroom Adjustments Panel by Simon Ringsmuth appeared first on Digital Photography School.


Digital Photography School

 
Comments Off on Tips for Understanding the Lightroom Adjustments Panel

Posted in Photography


Adobe Lightroom CC 2015.7 and Lightroom 6.7 available now

21 Sep

Adobe has launched Lightroom CC 2015.7 and Lightroom 6.7, saying the new versions bring bug fixes including compatibility solutions for newly released macOS Sierra, as well as additional lens profile and Raw support. MacOS users are encouraged to update to the latest version of Lightroom before updating to version 10.12 Sierra.

In addition to the new camera support listed below, Lightroom CC now allows users to submit their photos to Adobe Stock Contributor via Adobe Stock Publish Service, more easily sync content between devices using drag-and-drop into ‘All Synced Photographs,’ and to always use Smart Previews in the Develop Module (regardless of whether the original files are available).

New camera support:

  • Apple iPad Pro 9.7? (wifi and cellular)
  • Apple iPhone 6s Plus
  • Apple iPhone 6s
  • Apple iPhone 7
  • Apple iPhone 7 Plus
  • Apple iPhone SE
  • Canon EOS 5D Mark IV*
  • Casio EX-ZR4000 (EX-ZR5000)
  • GoPro HERO5 Black
  • Hasselblad H6D-100c
  • Nikon D3400
  • Panasonic DMC-G8 (DMC-G80, DMC-G81, DMC-G85)
  • Panasonic DMC-LX9 (DMC-LX10, DMC-LX15)

*Please note that we support the import and editing of jpegs, raw files and dual pixel raw files from this camera model. We do not support any specific dual pixel raw functionality. If you are planning to use Dual Pixel raw files, please read Limitations with Canon Dual Pixel raw files in Camera Raw and Lightroom.

**We added new versions of Adobe Standard color profiles for the Canon EOS 5DS and Canon EOS 5DS R cameras. These versions are denoted as V2, and the v2 profiles have lower contrast than the original Adobe Standard (v1) camera profiles.

The list of new camera lens profile support can be found at Adobe’s Lightroom blog.

Articles: Digital Photography Review (dpreview.com)

 
Comments Off on Adobe Lightroom CC 2015.7 and Lightroom 6.7 available now

Posted in Uncategorized