RSS
 

Posts Tagged ‘lightroom’

Adobe’s Lightroom Downloader lets you rescue your image library from the cloud

17 Nov

Adobe has released Lightroom Downloader app, an application that pulls original image and video files from the cloud and stores them locally in a folder.

The Lightroom Downloader app is available for both Windows 10 and macOS High Sierra, and requires users to log in with their Lightroom account. Once the login is complete, users are prompted to choose a hard drive location to which the cloud content will be downloaded.

As Adobe explains on its help site, Lightroom Downloader pulls all of the cloud video and image files and parks them in a date-based folder in a user-specific hard drive location. Any edits made to these original, raw files will be written into XMP sidecar files alongside the raw files.

In instances where only a Smart Preview is cloud synced, Adobe says its app will download the DNG Smart Previews for those photos.

Articles: Digital Photography Review (dpreview.com)

 
Comments Off on Adobe’s Lightroom Downloader lets you rescue your image library from the cloud

Posted in Uncategorized


How to Stylize Your Images Using Complementary Colors in Lightroom

17 Nov

In this tutorial, I’m going to show you a process that uses complementary colors to stylize your images and create a consistent theme in your collections.

I recently embarked on an 1,800-mile road trip through the dusty outback of Western Australia. After two days on the road, I arrived at Karijini – a national park famous for its iron-rich earth, icy-cold gorges and sheer remoteness from absolutely anything.

Complementary colors Lightroom 01

The Middle of Nowhere – Karijini National Park, Western Australia

Karijini is awash with complementary characteristics; hot deserts, icy-cold gorges, warm days and freezing nights. Nothing quite compares, however, to the daily occurrence of Karijini’s natural complementary colors. Each night, my eyes were treated to a beautiful blend of golden earthy tones and cool shadows. And each night, they couldn’t get enough.

You may find yourself getting a little trigger happy when you’re on a holiday. Perhaps you are trying out a new lens, maybe practicing new techniques or just getting carried away with the shutter button – we’ve all been there! If so, you’re likely to return home with a mixed bag of great shots and perhaps some images that aren’t particularly strong enough in their own right to add to your portfolio, blog, or Instagram feed.

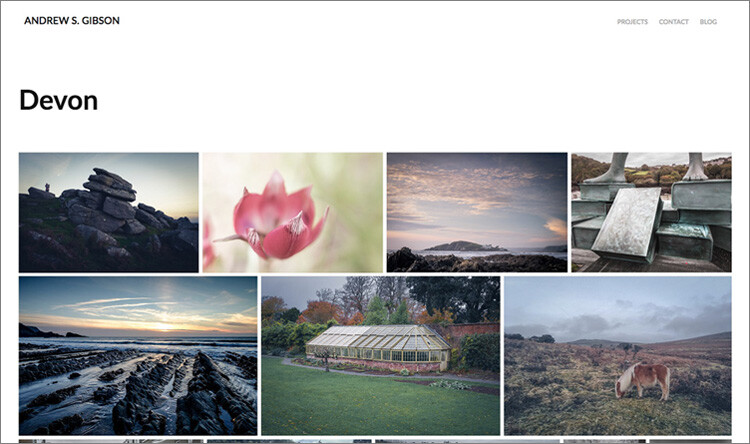
Here’s a collection of images from my trip to Karijini that don’t combine very well as a collection in their current form. They each have a different color palette, there are multiple different techniques going on, and they don’t really share the same style. There’s no cohesiveness, no harmony.

Complementary colors Lightroom 02

Individually, these images are not particularly strong. However, as a collection, they have potential to pull together to form a great storyboard.

To help this image set convey that story, I’m going to show you a coloring process to stylize this collection. By using complementary colors I will create a consistent look, feel, and style that will run through the entire collection. This process is something that you can adapt to your own collections, time and time again.

Complementary Colors

If you’re thinking, “What on earth is a complementary color?” don’t worry, it’s quite easy to understand. Put simply, they are colors that are opposite each other on the color wheel. Here’s a screenshot with some examples:

Complementary colors Lightroom 03

Complementary color examples.

Complementary colors appear everywhere, particularly in nature. Think of a beautiful sunset, the beach, or even Finding Nemo – each of them is jammed packed with complementary colors. They are called complementary because they do exactly what they say on the tin – complement each other.

You can use complementary colors in your photography to create a consistent look, feel, and style to a collection of images. This can be achieved while capturing your shots (i.e. by asking your subjects to wear a particular color) or by applying subtle adjustments to colors in post-processing. I am going to show you precisely how to achieve the latter using Adobe Lightroom.

Step #1: Create a Color Palette

Before you jump into Lightroom and begin to adjust your colors, you need to be clear about which colors you want your images to include.

A great way to do this is to create a simple color palette that you can refer to while editing your images. This color palette could be a collection of images you have cut out of magazines, perhaps some color swatches from a paint store or even a bunch of squares on your computer filled with your desired colors.

Here I opted for the bunch of squares, filling the color palette with complementary warm earthy tones and cool murky shadows that capture the landscape of Karijini.

Complementary colors Lightroom 04

Step #2: Align and Subtract using Hue, Saturation, and Luminance (HSL)

When you sit down to edit a photograph, you typically approach it with the mindset of adding something. For example, you tend to add contrast, sharpness, or perhaps you add a gradient.

When you are working with color, particularly when you have a color palette in mind, you need to alter your approach and instead think about subtracting. You need to subtract the colors from your images that don’t align with your color palette, because working with color is as much about the colors you can’t see as it is about the ones you can see.

Once you are happy with your colors, and they sit within the boundaries of your color palette, you can then go forth and add, enhance, and beautify.

In this step, I will show you how to use the HSL (Hue, Saturation and Luminance) panel in Lightroom to subtract and align the colors of an image to reflect those of your color palette.

Align with Hue

Start off inside the Hue section of the HSL tab. The Hue sliders allow you to replace your existing colors with neighboring colors on the color wheel.

For example, you are able to replace all red tones in your image with magenta by adjusting the Red Hue slider to -100. Moving this slider to +100 will replace all the Reds with Oranges. This is because magenta and orange sit on either side of red on the color wheel.

At this point, it’s worth taking a moment to study the color in your image and start to think about what colors you can push and pull to align your image with your color palette.

Let’s do this with an example image. At the moment, this image is a bit off from the desired color palette. It appears to have an aqua/green color cast, particularly in the sky.

Complementary colors Lightroom 05

Original image.

To remove the aqua/green color cast, you can push the aqua tones up to replace them with blue. In this example, a value of +81 works well. In addition, you can push the Blue slider up a little, to around +36. This will deepen the blue tones and remove what was left of the aqua/green color cast.

Finally, to align the orange/yellow tones to the color palette, you can pull the Orange and Yellow sliders to -26 and -15 respectively. This subtle adjustment pushes the orange tones towards red and the yellow tones towards orange – essentially warming up those earthy tones.

While editing, it’s always a good idea to view your image alongside your color palette, to ensure you are working along the same lines for each photo. This will help you pull the collection together at the end.

Complementary colors Lightroom 06

Hue adjustments in the HSL panel of Lightroom.

Here, you can already see that the Hue adjustments have aligned the color of the sky and earth to the desired color palette. However, there are still plenty of green tones roaming around in the shrubbery and navigation system that are wreaking havoc with the color palette. You can remove the green tones with the Saturation sliders.

Subtract with Saturation

The Saturation sliders within the HSL tab allow you to control the intensity of your colors. By increasing the saturation, your colors will become stronger and more vibrant. Decreasing the saturation sliders will make your colors less intense.

Have another look at your image and take note of any distracting colors that do not align with your color palette. Adjust the corresponding sliders to desaturate those colors. This will leave you with only the colors that align with your color palette. Once you have these base colors in place, you can then give them a little saturation boost to strengthen the image.

Let’s jump back to the example image to demonstrate.

While the example image is a lot closer to the desired palette, it still contains distracting colors that don’t align – notably, the green tones and strong yellows. You can subtract these colors from the image by desaturating the Green and Yellow sliders. In this case, values of -100 (Green) and -78 (Yellow) worked nicely.

To finish up with the Saturation sliders, you can increase the saturation of the colors that align to your complementary color scheme. In the example image, boosting the red, orange, aqua and blue colors worked a charm.

Time for another review of the example image against the color palette.

Complementary colors Lightroom 07

Saturation adjustments.

Lighten with Luminance

The Luminance sliders in the HSL tab allow you to control how bright or dark you want a particular color to look. Increasing the Luminance adds brightness to your colors, whereas decreasing the Luminance darkens your colors.

Compare your image to your color palette. How does it look? Are the colors a little too dark or too light? If so, adjust the corresponding Luminance slider to lighten or darken your colors.

In the example image, the oranges are appearing a little too dark and perhaps the blues could do with a little brightening as well. To achieve this, you can increase the luminance of the Orange, Yellow and Blue sliders until you are happy with the brightness. In this case, moving the Orange slider to +28, Yellow to +21 and Blue to +11 did the trick.

Complementary colors Lightroom 08

Luminance adjustments.

Try to get into the habit of regularly comparing your image to your color palette, particularly after you have made any adjustments to the HSL sliders. At this point, if you think that your colors need a little more work, run through each of the HSL sliders again and tweak them accordingly.

Step #3: Adding Character with Curves

Creating a consistent style and applying this to every image in your collection can be the difference between a good collection and a great one.

If you have a particular editing style, now is the perfect time to apply it to your images. If you’re at a stage where you’re perhaps trying to create or establish your own style and you’re not sure what to do, it’s a great idea to use your subject or environment as a style guide. Let’s take a look at doing precisely that with an example.

Karijini is awash with complementary colors, iron-rich earth, warm dusty air, and murky shadows. To help inject some of these characteristics into the image you can use the Tone Curve.

The Tone Curve is essentially a square graph that consists of a Histogram and a linear line running from the bottom left to the top right. Much like the Histogram, the left side of the Tone Curve represents the shadows, the middle represents mid-tones and the right side represents the image highlights.

Complementary colors Lightroom 09

Tone Curve – Basic

By clicking on the “Point Curve” Icon (in the lower-right corner of the Tone Curve window) you’re now able to click on the Tone Curve graph to create control points. You can then drag these control points up or down to alter the value of the corresponding tones.

Complementary colors Lightroom 10

Point Curve icon for adding adjustment points.

Your Tone Curve works in four distinct channels – RGB, Red, Green, and Blue. For now, ensure the channel of your Tone Curve is set to RGB. This allows you to control the overall tone of your image by manipulating the Red, Green and Blue tones simultaneously. You’ll get to know the other channels shortly.

Creating Atmospheric Shadows

Before incorporating atmospheric shadows into your image, you want to ensure that any adjustments you make only apply to the shadows. So, to safeguard your mid-tones, you can place a control point in the middle of your Tone Curve (as seen below).

Complementary colors Lightroom 11

Now you can add some control points on the left side of your Tone Curve. These will allow you to manipulate your shadows.

Complementary colors Lightroom 12

Dragging these control points downwards will darken your shadows. However, to create flat, murky looking shadows, you can drag these control points upwards – essentially lightening your shadows. While doing so, pay close attention to the darker areas of your image to ensure you don’t overdo it.

To complete this murky atmospheric look, you can darken the highlights by dragging the control point on the extreme right of your Tone Curve down a little.

In the example, you can see that this subtle adjustment has lightened the shadows, darkened the highlights, reduced the contrast, and introduced that murky atmospheric style to the image.

Complementary colors Lightroom 13

Tone Curve applied.

Color Stylizing

Every pixel in your photo is made up of a mix of Reds, Greens, and Blues. The Tone Curve isolates these individual color channels so you can adjust how much or how little of that color channel is present in your shadows, mid-tones, and highlights.

Studying the example image, the base colors of the image are looking good. It’s full of complementary colors, and it aligns nicely with the color palette. So then, why bother with these individual tone curve channels?

It goes back to infusing your photos with a style reminiscent of your subject or the environment. Perhaps there was a particular feeling or emotion during the shoot. Was it lively? Happy? Bright? Melancholic? Hot? Cold? Is there a color tone within your color palette that you feel best represents these?

Perhaps there was a lot of earthy red dust and cool shadows floating around? If so, you could add a subtle warm tone to your image and cool down those shadows to help enhance the look, feel and style of your images. Let’s take a look at how to achieve precisely that by using the Tone Curve with the example image.

Start off by selecting the Red Channel inside your Tone Curve. If you can’t see the “Channel” option, be sure to click on the “Points Curve” icon.

Complementary colors Lightroom 14

Working on the Red Channel of the Tone Curve.

Any adjustments you make to this Tone Curve will only affect the Reds in your image. If you create a control point in the shadows and drag this upwards, it will increase the Reds in your shadows. If you were to do the opposite and drag this control point downwards, it will remove the Reds from your shadows.

It’s worth noting here that when you remove a primary color using the Tone Curve, you will introduce its opposite color. Here’s a list of the primary colors and their corresponding opposite colors.

  • The opposite color to Red is Cyan.
  • The opposite color to Blue is Yellow.
  • The opposite color to Green is Magenta.

To add a subtle warm underlying tone to an image, simply click and drag the control point on the extreme left of the Red channel upwards slightly. You’ll notice that it doesn’t take a lot of adjusting to achieve the desired look.

Complementary colors Lightroom 15

Red Tone Curve adjustments.

To cool down your shadows, switch your Tone Curve channel over to Blue. This will enable you to increase the amount of Blue in the darker areas of your image. To do this, click and drag the control point on the extreme left of the Blue channel upwards. Pay attention to the darker areas of your image to ensure you don’t overdo it.

Complementary colors Lightroom 16

Working on the Blue Channel of the Tone Curve.

You may find that while this adjustment cools down the shadows, it also cools down the mid-tones and highlights. To counter this, you can click and drag the control point on the extreme right of the Blue Channel downwards. This will remove the blue tones from your highlights and introduce a little of Blue’s opposing color (Yellow) to warm your highlights back up.

Complementary colors Lightroom 17

Blue Tone Curve adjustments.

Step #4: Split toning (Optional)

The final step in the complementary color stylizing process is to apply a subtle split toning adjustment using Lightroom’s Split Toning tab.

By now, you may feel that your image is already perfectly aligned to your color palette and perhaps there is nothing more that needs to be adjusted. If so, congratulations! I encourage you to go forth, infuse your collections with your style and inspire others to do the same.

If you are looking at your images thinking “there’s something not quite right” or “they still need a little work”, head to the Split Toning tab. This is a very simple tool that can add a final layer of polish to your images.

Split Toning enables you to apply a specific color tone to your highlights and shadows. It’s a good idea to refer to your color palette and select the exact Hue that you want to be present in the highlights and likewise for the shadows. You can then dial back the intensity of this look using the saturation sliders until you are happy with the result.

For the example image, selecting complementary warm hues of 45 for the highlights and 240 for the shadows aligned perfectly with the color palette. Adjusting the Saturation of each to 10 and 6 respectively, applies just the right amount of toning and completes the stylizing process.

Complementary colors Lightroom 18

Split Toning adjustments added.

Recap

Let’s take a few seconds to do a recap of the coloring and stylizing process before taking a peek at the before and after.

  1. Start off by creating a complementary color palette.
  2. Using your complementary color palette as a guide, align the existing colors in your image and subtract those that don’t quite fit. Use the HSL panel for this step.
  3. Gently boost the saturation and luminance of your complementary colors, again using the HSL panel
  4. Use the Tone Curve to stylise your image and incorporate atmospheric shadows and subtle underlying tones.
  5. Pull all of your adjustments together with a subtle Split Toning adjustment, by adding complementary warm and cool tones to your highlights and shadows.

Before and After

Complementary colors Lightroom 05

Before

Complementary colors Lightroom 20

After

Below, you can see an example of what this process looks like when I applied it to the remaining images in my collection.

This collection now has a great level of consistency. It has a beautiful complementary color palette and a similar style running throughout the collection. As a result, there is a togetherness about the collection that wasn’t present before. It shares the same message and comes together to tell a lovely little story.

Complementary colors Lightroom 02

Collection – before.

Complementary colors Lightroom 19

Collection – after.

Conclusion

Working with color is a process, it’s not an exact science. While the exact values of the sliders and curve adjustments used for the example image will not necessarily work on every image, this overarching process will.

I hope this tutorial gets you thinking about how you apply color in your photography. It’s a great skill to develop, so try not to rely on presets and instead get thinking about defining a color palette of your own that you can use to stylize your collections. It’s much more fun that way!

PS. Do you have a color palette that you stylize your images with? If so please share in the comments below, I’d love to see your collections.

The post How to Stylize Your Images Using Complementary Colors in Lightroom by William Palfrey appeared first on Digital Photography School.


Digital Photography School

 
Comments Off on How to Stylize Your Images Using Complementary Colors in Lightroom

Posted in Photography


ON1 Photo RAW 2018 takes on Lightroom with more features and improved Raw processing

10 Nov

After releasing it in beta last month, ON1 has officially announced the latest version of its image editing and organization software: ON1 Photo RAW 2018. With this newest version, ON1 wants to establish its application as a viable alternative to Adobe’s Lightroom, and says most of the improvements to the new version are a direct result of community input.

The new app comes with an updated raw processing engine and a new HDR function that merges a bracket of photos for increased dynamic range. Pano Stitching combines multiple photos into a single panoramic image and a host of new masking tools allow for precise selection of image areas and background masking.

ON1 has also updated the UI for a cleaner and more modern look, and has added support for the Nikon D850, Olympus EM-10 III, Panasonic DMC-G85, preliminary support for Sony a7R III, and a range of new lenses.

Other features include: re-editable adjustments for exposure, contrast, color, shadows, highlights, lens correction, and transform tools, as well as hundreds of customizable photo effects.

ON1 Photo RAW 2018 for Mac and Windows is available now for download as a free 30-day trial from the ON1 website. Previous owners of any ON1 app (or ON1 plug-in) can upgrade to the new version for $ 100, while new users will have to pay $ 120. However, a single license can be activated on up to five computers.

For more information and a full list of updates, check out the video below and read the full press release below that.

Press Release

Portland, OR – November 9, 2017 ­– Today, ON1, Inc. announced ON1 Photo RAW 2018 is officially available. Along with the essential tools and features needed in a photography workflow, ON1 Photo RAW 2018 includes key updates to the fast, non-destructive raw processing engine. Photographers now have an integrated tool with accelerated photo management, precise photo development, hundreds of customizable photo effects, fast and beautiful HDR, pano stitching, masking and blending adjustments, layers, and much more – in one app.

From the beginning the ON1 community has driven the development of ON1 Photo RAW based on what’s most important to them. Almost every feature and improvement made to the app in version 2018 is a direct result of community input through the ON1 Photo RAW Project.

This type of transparency is what customers can continue to expect from the ON1 team. This process has solidified ON1 Photo RAW as the app designed by photographers for photographers and a great alternative to Adobe® Lightroom®.

ON1 Photo RAW 2018 includes major updates and enhancements in many areas. Key new features include the following.

  • ON1 HDR – Create stunning HDR photos that merge all tonality from a bracket of photos in a fraction of the time (test results have shown up to seven times faster than other HDR apps). Automatically aligns photos and removes ghosting from motion between exposures. Includes full non-destructive editing with natural results and can be turned up to 11 for a surreal look.
  • Pano Stitching – Combine multiple photos into a single panoramic or matrix photo. Automatically aligns photos, even if they are not shot on a tripod, and blends them together seamlessly. An option to embed panoramic metadata for Facebook panning is also available.
  • Global Mask Editing Tools – These include new mask Density and Feather sliders to allow for changing the density or opacity of masks as well as blur masks for softening.
  • Luminosity Mask Updates – Adjust the levels of a mask to increase the contrast or brightness as well as set a tonal window to only affect a certain zone. These updates allow users to target just the area they want, based on the photo.
  • Color Range Masks – Create a mask from a color range selection.
  • Blur and Chisel Mask Tools – In ON1 Effects, the Blur and Chisel mask tools are now included. The blur tool is perfect for softening or feathering a mask selectively. The Chisel tool lets the user push or pull the edge selectively, to remove halos. All of these new masking options are re-editable and non-destructive.
  • Versions — Versions are virtual copies of the same photo. Each version created can include non-destructive settings, including crop, retouching and adjustments. Versions work just like any other photo without taking up more space on your computer.
  • Updated UI — Clean and modern UI where your photo is the center of attention. Custom name filters and layers to easier keep track of work. Also select your own UI accent color.
  • Paint with Color Brush — Painting with color can be a solid color, perfect for skin smoothing and making annotation layers, or paint with just the color and leave the underlying luminosity in place to change the color of objects like eyes.
  • Selectively Add or Remove Noise — Brush away noise in areas like skies or add noise for an artistic effect.
  • Improved Highlight Recovery –– The algorithms for highlight recovery have been improved.
  • ON1 Photo for Mobile — Take the best shots with you on the go with the free ON1 Photo for Mobile app. It’s a great way to share portfolios. It can also sync new photos taken on phones back to the desktop so those photos are ready for editing.
  • Additional Camera & Lens Support — Added support for the Nikon D850, Olympus EM-10 III, Panasonic DMC-G85, preliminary support for Sony a7R III, plus a ton of new lenses.

ON1 Photo RAW 2018 differentiates itself from other apps by allowing photographers to both browse and catalog their photos from the very beginning of their workflow. This hybrid system provides one of the fastest digital asset management tools available today. The ultra fast photo browser is perfect for quickly viewing and culling through photos without having to wait on an import process. Once the culling process is complete, the ability to create and catalog those photos is the next step in common workflows.

There is plenty more available within the app’s non-destructive photo development. These features include re-editable adjustments such as exposure, contrast, color, shadows, highlights, lens correction, and transform tools. The hundreds of unique photo effects are also perfect for finishing off your photos to add that extra punch. Photographers have complete control of how each effect is applied using masking brushes, gradients masks, and local adjustments. Each effect is also completely customizable to save any look as a custom preset.

Photo editing technologies such as live blending options, apply to, smart layers, smart photos, and mask refinement tools also make ON1 Photo RAW 2018 a more advanced pixel editor without having to launch a separate app. The ability to combine photos together with layers, masks, and selectively apply filters and effects to raw photos gives users a big advantage.

ON1 Photo RAW 2018 isn’t just for raw files. Supported file formats include JPEG, TIF, PSD, PSB, PNG, and DNG are supported and benefit from the speed, performance, and abundance of editing tools in the app. Photo RAW 2018 also continues to work seamlessly within current photography workflows. The app integrates as a plug-in for Adobe® Lightroom® Classic CC and Photoshop® and further builds its case as a complete standalone photo editor or alternative to the Adobe Photography Plan. Version 2018 also integrates with the major cloud services to allow for uploading, managing and editing photos across multiple computers. This also allows users to sync photos and their edits across multiple computers or in a studio setting.

Price and Availability

ON1 Photo RAW 2018 is available for download as a free 30-day trial from the ON1 website. Previous owners of any ON1 app (or ON1 plug-in) can upgrade for $ 99.99. Those who don’t own an ON1 app can order for $ 119.99. ON1 Photo RAW 2018 is also bundled with some excellent bonus materials which include: Three ON1 Photo RAW 2018 Courses by Product Director Dan Harlacher, and all of their 2017 and 2018 Loyalty Rewards. ON1 Photo RAW 2018 works with both Mac and Windows and includes activation on up to five computers.

Articles: Digital Photography Review (dpreview.com)

 
Comments Off on ON1 Photo RAW 2018 takes on Lightroom with more features and improved Raw processing

Posted in Uncategorized


New Lightroom CC or Lightroom Classic: Which Version is Right for You?

10 Nov

You may have heard that Adobe recently unveiled some pretty significant changes to Lightroom. When you consider using Lightroom, you will now have two different versions to choose from; both are aimed at different audiences. In this article we will take a look at both the new Lightroom CC and Lightroom Classic, so you can choose the one that best meets your needs.

New Lightroom CC or Lightroom Classic: Which is Right for You?

How we got here

There are a lot of letters and numbers associated with Lightroom, so it might be helpful to walk through a quick timeline of how we got here.

In the beginning, way back in 2007, there was Lightroom. At first, Adobe was content to come out with periodic new releases and number them. So we had Lightroom 1.0, 2.0, 3.0, 4.0, 5.0, and 6.0, with each version they added some new features. If nothing else, the system was easy to understand.

After that, however, Adobe moved to a subscription model. They simply called it Lightroom CC, which stood for Creative Cloud. With the change to the subscription model, there wouldn’t be big periodic launches. Instead, new features would be rolled out periodically. That’s the world we lived in until recently.

Now, however, Adobe has essentially split Lightroom into two different applications. They are Lightroom CC and Lightroom Classic. Let’s take a closer look at each of them.

Lightroom Classic

Let’s start with the simple one, Lightroom Classic. If you are already familiar with Lightroom, then this is the easy one to understand. Lightroom Classic is basically the same Lightroom you have been using but it’s just updated a little bit. There are really only two changes.

The first is that it is faster. It uploads (imports) image faster, it moves through pictures faster, it edits faster – it seems to do everything faster. There have been a lot of complaints about speed in recent versions of Lightroom. As Adobe added more and more features, it gummed up the works so it was moving slower and slower. Adobe clearly made fixing this a priority.

So Lightroom Classic is faster – a lot faster – than previous versions of Lightroom. How much faster? I haven’t seen any numbers, but the increase in speed will be noticeable to you immediately. It is much faster.

Beyond the speed, is there anything actually different between Lightroom Classic and the prior version? Yes, but not that much. In fact, when it comes to making global changes to your pictures, there is nothing different. The features and controls are all exactly the same. There is one change that is small but is really handy if you make local adjustments to your pictures (i.e. changes to discrete portions of your pictures rather than the whole thing).

New Lightroom CC or Lightroom Classic: Which is Right for You?

Adobe added new masking controls to the local adjustment tools – those being the Adjustment Brush, Graduated Filter, and Radial Filter. It is called the Range Mask feature, and it allows you to limit the selection you make by either the Luminance or the Color. In other words, if you make a selection with the Adjustment Brush or one of the filters, but there are things you don’t want to be included in your selection, you can remove them using these tools. This promises to make local adjustments much more doable in Lightroom.

Lightroom CC

Now comes the new part, and the one everyone is talking about (for good or for bad), Lightroom CC. This is a whole new Lightroom. It really comes down to three principles.

  1. Lightroom CC is simpler to use
  2. It is designed for mobile devices
  3. It relies largely on cloud storage

Let’s take a look at each of these.

#1 Lightroom CC is simpler

Lightroom CC has a simpler interface. It is streamlined and more intuitive. Those new to Lightroom will find it easier to navigate and use.

New Lightroom CC or Lightroom Classic: Which is Right for You?

Simplified Lightroom CC editing controls.

This comes at a cost though. Experienced Lightroom users will find the experience a little like switching from Photoshop to Photoshop Elements. There are entire modules of Lightroom that are missing from Lightroom CC.

There are no Print, Maps, or Books modules. There are some editing functions that are missing as well (the Tone Curve and Camera Calibration). There is no Photo Merge or HDR. In fairness, however, over 90% of the editing functions in traditional Lightroom are present in Lightroom CC.

New Lightroom CC or Lightroom Classic: Which is Right for You?

Expanded Lightroom CC editing controls.

#2 Lightroom CC is for mobile

Lightroom CC is designed for mobile platforms. It will look and work exactly the same whether you use it on your phone, your tablet, or your desktop. You’ll be editing full resolution versions of your photos, and they will be synced to all your devices. What’s more, Lightroom CC makes it easy to share your photos to various social media channels. Because of this, however, you can only export to JPEG (no PSDs or TIFFs) and only in sRGB, which is the color space that is used for all online photos.

#3 Cloud storage

All your edits in Lightroom CC are backed up to cloud storage. Of course, this will cost you extra. More about the plans below, but the first TB of data will cost you $ 10 a month, and it goes up from there. There is also an additional element of organization added in; Lightroom CC uses Adobe’s Sensei to automatically add keywords to your photos.

The Plans

Here’s the deal, though, you don’t necessarily have to choose between the different versions of Lightroom. If you subscribe to the Photography Plan (in my opinion, most readers of this website should be doing that) you already get Lightroom CC. It has just been added to your subscription, along with a token 20 GB of cloud storage. If you aren’t already familiar with the Photography Plan, it is where you get Photoshop and Lightroom for $ 10 a month.

If you want additional cloud storage, it will cost you more. 1 TB of cloud storage costs another $ 10 a month, taking the Photography Plan plus the 1 TB of cloud storage up to $ 20 a month.

Finally, if you only want the new Lightroom CC, you can get it along with 1 TB of cloud storage for $ 10 a month. That might be a good option for those that are very mobile, store everything to the cloud, and/or are just getting started with Lightroom.

Here is a chart from Adobe showing the options:

Purchased outright version is going away

There is one more thing you need to know. If you want to purchase Lightroom outright and avoid the monthly charge, you can still do so, but Lightroom 6 is your last chance. Adobe will also stop updating that fairly soon (meaning if you buy a new camera and LR 6 can’t open the raw files there will be no update for that – you’d have to convert them all to DNG before importing). The days of being able to purchase Lightroom (as opposed to renting it) appear to be just about over.

Which version of Lightroom is right for you?

So, which one is right for you? If you are just starting out with Lightroom and your photography is based on mobile platforms, then Lightroom CC might be for you. But if you are already using Lightroom, I think Classic is the way to go.

If you are used to Lightroom, then switching to CC will probably seem like a step backward. Further, if you tend to use desktops and laptops for your editing, then Classic is clearly the way to go. For those instances when you need to do something on your phone, there is always Lightroom Mobile (not ideal, but it works in a pinch).

Of course, all this assumes that Adobe keeps updating Lightroom Classic (the use of the term “Classic” has a lot of people scared since that is often the kiss of death in the tech world).  For the moment at least, Adobe is promising continued updates to it.

Poll

Fill in this quick poll and tell us what you’ll be choosing in regards to Lightroom.
Note: There is a poll embedded within this post, please visit the site to participate in this post’s poll.

The post New Lightroom CC or Lightroom Classic: Which Version is Right for You? by Jim Hamel appeared first on Digital Photography School.


Digital Photography School

 
Comments Off on New Lightroom CC or Lightroom Classic: Which Version is Right for You?

Posted in Photography


How to Create a Beautiful Online Gallery with Lightroom Classic CC and Adobe Portfolio in 15 Minutes

04 Nov

One of the common questions I hear from photographers is regarding a way to link Lightroom to a photography portfolio website. It usually comes from photographers who don’t like the design options in the LR Web module. The perfect solution doesn’t exist, perhaps the closest (until recently) is Koken, a free plugin that I wrote about some time ago that uses Lightroom’s Publish Collections to update your online portfolio.

But, the good news is that Adobe has just made creating a portfolio website a whole lot easier with its latest update to Adobe Portfolio.

Adobe Portfolio Lightroom

What is Adobe Portfolio?

Adobe Portfolio is exactly what it sounds like – an online gallery of photos. The benefit of using Adobe Portfolio is that it’s very easy (no web design or coding skills required). It also integrates with your Lightroom Collections (this is the update I just referenced).

That means all you have to do is set up some Collections containing the photos you want to include in your gallery and synchronize them with Adobe Portfolio. Then it’s just a matter of choosing a layout, tweaking the design, and making the website live. You can do all of this in less than 15 minutes.

The only caveat is that you need to be an Adobe Creative Cloud Photography Plan subscriber. Just like Lightroom mobile and Lightroom web, it isn’t available to photographers who use a standalone (purchased) version of Lightroom.

Curious? You can check out a portfolio website I created for myself using Adobe Portfolio here to see what it’s capable of.

Adobe Portfolio Lightroom

Step-by-Step Guide to Adobe Portfolio

The first step – and probably the hardest – is to decide what photos you want to include in your portfolio. Once you’ve made your mind up about that, the rest is easy.

  1. Create a Collection Set in the Library module called Portfolio.
  2. Create several Collections inside this Collection Set, one for each gallery you want to include on your portfolio website.
  3. Add photos to the Collections.
  4. Arrange the photos in the order in which they are to be displayed online.
  5. Synchronize the photos in the Collections by ticking the boxes to the left of the Collection name (marked below).

My portfolio website (link above) has four galleries; Black & White, Portraits, Spain, and Devon. Each gallery corresponds to a Collection in Lightroom with the same name (seen below).

Adobe Portfolio Lightroom

Register

Go to www.myportfolio.com and sign in with your Adobe ID. If you haven’t created a portfolio yet click the button that says Get Started Free. Otherwise, click the button that says Edit Your Portfolio.

Adobe Portfolio Lightroom

Choose a design for your gallery

Now it’s time to choose a layout. Start by clicking the Switch layouts icon (marked below).

Adobe Portfolio Lightroom

Adobe Portfolio gives you eight layouts from which to choose. All the layouts are fully mobile responsive, which means they work and look professional on mobile phones and tablets as well as desktop computers. Decide which one you want to use and click the Use this layout button.

Adobe Portfolio Lightroom

It may be difficult to visualize which one works best when populated with your photos. Don’t worry about that at this stage – you can change the layout afterward if you want to.

Settings

Next, click the Edit your settings icon (marked below).

Adobe Portfolio Lightroom

Go to Site Options and click the Lightbox for Images tab. Tick the “Enable lightbox for images on my pages” box and click Done (see below). This is important as it lets people view the photos on your portfolio website. If you don’t tick it all they will be able to see are thumbnails.

Adobe Portfolio Lightroom

Add images to your gallery

Click the Manage content icon (marked below).

Adobe Portfolio Lightroom

Go to the Integrations tab and Click the Add Collections button. The website opens a window that displays all your synchronized Lightroom Collections. Pick the ones you want to include in your portfolio and click the Import Selected button (see button below lower-right).

Adobe Portfolio Lightroom

Go to Adobe Portfolio, click on the Manage content icon again and go to the Website Pages tab. Make sure the switch is set to the On position for each Collection you want to display on your portfolio website.

Adobe Portfolio Lightroom

Choose cover photos

Now it’s time to tidy up the gallery cover photos. You’ll need to do this once for each gallery. Start by clicking the pencil icon next to the gallery cover photo (see below).

Adobe Portfolio Lightroom

Pick Edit Cover Image from the menu to edit the cover photo. At the moment this feature is a little limited – the website automatically picks the photo that appears on the cover and it’s not easy to change it.

The only way currently is to click Upload a new image and upload a photo you’ve exported from Lightroom – there’s no way to select another photo from the Collection. But you can zoom the photo and adjust the crop. Click Done when you’re finished and repeat for the other gallery cover photos.

Adobe Portfolio Lightroom

Setup the domain name

Click the Edit your settings icon again and click Domain Name. You can select a URL for your portfolio in the form yourname.portfolio.com. This is the easiest option. Alternatively, if you have a domain or a subdomain you can follow the instructions to use that.

Adobe Portfolio Lightroom

Preview your portfolio gallery

Click the gray Preview button to see a preview of your portfolio website. Happy with what you see? Click Update Live Site to publish your portfolio to your chosen URL. Congratulations – your brand new portfolio website is now live!

Adobe Portfolio Lightroom

Customizing the design

So far I’ve shown you how to get your portfolio website online as quickly as possible. The hardest part, as I said, is deciding which photos to include in your gallery. That can take hours, days, or even weeks. But, once the decision is made, you can get your portfolio online in under 15 minutes. It really is that quick.

If you’re happy with the default settings of your layout you can stop there, your job is done. But it’s worth spending some time looking at both the page and global settings. You can customize things such as fonts, colors and the number of columns on your front page. There is an option to add pages (for instance an About page) and links to other websites. You have a lot of options and it’s worth exploring them to see how you can individualize your portfolio website.

You can even change the layout by clicking on the Switch layouts icon. Adobe portfolio remembers your customizations, which gives you peace of mind as it means you won’t lose your customizations when you switch from one layout to another.

When you are finished, remember to click the green Update Live Site button. None of your customizations are published until you click that button.

How to update the photos

Portfolios are fluid and as time goes by you will add and remove photos from the Collections you created. You may also add more Collections as your photo collection grows. There are two steps to updating your portfolio website.

1. Update your Lightroom Collections and make sure Lightroom has had time to synchronize the changes.

2. Go to Adobe Portfolio, click on the Manage content icon and go to the Website Pages tab. Click on the Cog icon next to the Collection that you want to update and select Reset from Lightroom to update your portfolio gallery.

Adobe Portfolio Lightroom

3. Finish by clicking the green Update Live Site button to publish the updates to your portfolio website.

Next steps

With the recent update that lets you integrate Lightroom Collections, Adobe Portfolio has become the easiest way to create a portfolio website using Lightroom Collections. The only downside, as mentioned earlier, is that you need to be a Creative Photography Plan subscriber to use this feature.

If you are not, then look at Koken as an alternative. Don’t dismiss the Web module out of hand either, it has some very useful features and doesn’t require a CC subscription to use.


You can learn more about all aspects of Lightroom with my bestselling Mastering Lightroom ebooks.

The post How to Create a Beautiful Online Gallery with Lightroom Classic CC and Adobe Portfolio in 15 Minutes by Andrew S. Gibson appeared first on Digital Photography School.


Digital Photography School

 
Comments Off on How to Create a Beautiful Online Gallery with Lightroom Classic CC and Adobe Portfolio in 15 Minutes

Posted in Photography


Macphun unveils Luminar 2018, takes on Adobe Lightroom CC

02 Nov

Macphun—the photo editing software company that will rename itself ‘Skylum’ at the end of the year—has just unveiled the latest version of its full-featured photo editing suite Luminar. Meet Luminar 2018: a photo editor and (eventually) digital asset manager that seeks to compete with Adobe’s Lightroom at a time when many Lightroom users are looking for an out.

Available for pre-order starting today, Luminar 2018 features speed improvements, a dedicated RAW develop module, LUT support, AI-powered filters that can do some strange/interesting things like create intelligent light rays, and a digital asset management system (coming soon) that will allow you to organize your photo library sans subscription.

Macphun is very much hoping disgruntled Lightroom users will give Luminar 2018 a go:

Luminar 2018 has been re-built from the ground up for dramatic performance boosts.

[…]

Instead of stuffing menus with boring effects and old technology, Luminar only puts in filters that photographers want and need. Luminar offers more than 40 filters to correct color, sharpen details, and release creativity. New filters include the ability to enhance color with Brilliance, selectively lighten or darken specific areas of an image with Dodge & Burn, as well as the ability to change the lighting in a photo with Sun Rays.

Want a whole new way to stylize images? Try the new Lookup Table adjustments, known as LUTs . Creative color, perfect black and white conversions, and even digital films stocks are just a click away. Lightroom users who rely on custom presets created for Lightroom can also easily convert those presets into LUTs (with a free 3rd party tool) and use them inside of Luminar 2018.

Here’s a closer look at the interface:

$ (document).ready(function() { SampleGalleryV2({“containerId”:”embeddedSampleGallery_3300296879″,”galleryId”:”3300296879″,”isEmbeddedWidget”:true,”standalone”:false,”selectedImageIndex”:0,”startInCommentsView”:false,”isMobile”:false}) });

And a few before and after images to show what Luminar 2018 can do when you put it to work on your images:

$ (document).ready(function() { SampleGalleryV2({“containerId”:”embeddedSampleGallery_6390293885″,”galleryId”:”6390293885″,”isEmbeddedWidget”:true,”standalone”:false,”selectedImageIndex”:0,”startInCommentsView”:false,”isMobile”:false}) });

Most of the features discussed will launch with Luminar 2018 later this month, with the exception of the DAM, which is scheduled to ship “in 2018.” Pre-orders start today at a special discount price of $ 60 for new users (usually $ 70) and $ 40 for users of the current Luminar (usually $ 50).

To learn more about Luminar 2018, head over to the Macphun (soon Skylum) website by clicking here.

Press Release

The new Luminar 2018 takes on Adobe Lightroom

New Luminar 2018 delivers a breakthrough photo editing experience for photographers on Mac & Windows with new filters, tools, non-destructive editing, major speed boosts, and a digital asset management platform that will arrive in 2018.

San Diego, CA – November 1, 2017 — Macphun, the California-based software developer today announced Luminar 2018. New users will be able to purchase Luminar 2018 for $ 59, and current users of Luminar may upgrade at a special price of $ 39. Preorders start November 1 at www.macphun.com/luminar.

Luminar 2018 offers everything a modern photographer needs for photo editing, including new filters powered by artificial intelligence, major speed improvements, a dedicated RAW develop module and a forthcoming in 2018 digital asset management platform. Users will also benefit from the new intelligent Sun Rays filter, LUT support, and real-time noise removal. With adaptive workspaces that match styles of shooting, Luminar adapts to deliver a complete experience that avoids clutter and complexity.

Luminar 2018 has been re-built from the ground up for dramatic performance boosts. Existing filters deliver richer colors and depth in less time. A brand new streamlined user interface speeds up working with presets, filters, and masks. With full support of pro options like layers, masks, and blending modes, complex repairs and photo composites can be easily accomplished.

And, importantly, Luminar works on both Mac- and Windows-based desktop computers*.

“We’ve taken the time to listen to photographers, and what they want is performance and quality. The less time photographers have to spend in front of computers, the more time they have for taking pictures,” said Alex Tsepko, CEO of Macphun. “Our mission is to get Luminar streamlined with just the tools and controls photographers need. The goal is simple: enable the best-looking images with the least amount of effort.”

Luminar offers a new RAW Engine that can handle high-quality images faster. Plus, it’s easy to solve image problems caused by camera lenses with Lens Correction features that resolve vignette, distortion, and color aberrations. If the photo has unwanted perspective problems, a new Transform tool can quickly solve them.

Instead of stuffing menus with boring effects and old technology, Luminar only puts in filters that photographers want and need. Luminar offers more than 40 filters to correct color, sharpen details, and release creativity. New filters include the ability to enhance color with Brilliance, selectively lighten or darken specific areas of an image with Dodge & Burn, as well as the ability to change the lighting in a photo with Sun Rays.

Want a whole new way to stylize images? Try the new Lookup Table adjustments, known as LUTs**. Creative color, perfect black and white conversions, and even digital films stocks are just a click away. Lightroom users who rely on custom presets created for Lightroom can also easily convert those presets into LUTs (with a free 3rd party tool) and use them inside of Luminar 2018.

Luminar 2018 will become available in November 2017, and in 2018 a free update will provide a new image browser/digital asset manager to help photographers manage their image libraries.

Photographers will be able to sort, rate, organize, and backup their photos at great speed. The new digital asset management platform in Luminar will work without subscription and will work with any storage (cloud or local). It will also bring a number of unique features, that the current Lightroom library can’t boast.


* Workspaces, Clone & Stamp, blend modes for layers, luminosity masking, flip and rotate, as well as some other tools and features will be available in the Mac version at launch, and arrive in the PC version with free updates by the end of the year.

** Look-Up Table (LUT) – is mathematically precise way of taking specific RGB image values form a source image – and modifying them to new RGB values by changing the hue, saturation and brightness values of that source image. LUTs are used creatively to impose a specific ‘Look’ on a source image.

Availability

Pre-order for Luminar 2018 will run from November 1 until November 16.

Pre-order customers will receive a special price and value-add bonuses such as:

  • A pack of signature presets & textures from a Pro photographer Nicolesy.
  • An exclusive pack of LUTs.
  • 1-year Power plan from SmugMug ($ 72 value). For new accounts only

Pricing

Mixed-computer households can share the same product key for Mac and PC which can be activated on five devices.

Current users of Luminar may upgrade at a special pre­-order price of $ 39

New users can purchase Luminar at a special pre­order price of $ 59

The retail price for Luminar 2018 after November 16 will be:

$ 49 upgrade for current Luminar HDR users

$ 69 for new users

The digital asset management platform will arrive in 2018 as the free update for all the users of Luminar 2018.

Articles: Digital Photography Review (dpreview.com)

 
Comments Off on Macphun unveils Luminar 2018, takes on Adobe Lightroom CC

Posted in Uncategorized


Adobe will release the last update to Lightroom 6 ‘towards the end of the year’

27 Oct

The countdown to the end of Lightroom as a standalone product is officially ticking, and the deadline is drawing near. Earlier today, Adobe released a fresh compatibility update for Lightroom 6, but in addition to adding support for cameras like the Nikon D850 and Fuji X-E3, Adobe also answered a burning question in the release notes: Is this the last upgrade of Lightroom perpetual product?

The answer, it seems, is no… but that last upgrade will arrive “towards the end of the year.” Here is Adobe’s answer in full:

As we align our investments in the direction of supporting our subscription-based products, the last version of Lightroom 6 will be coming out towards the end of the year. If there is a camera not supported in Lightroom 6, you can use the DNG converter before importing your images into Lightroom 6.

Once that final upgrade goes live, Lightroom 6 will become an ‘unsupported’ product, and if you intend to keep using Adobe Photoshop Lightroom you’ll either have to subscribe to CC or deal with the less-than-ideal workflow described above… while you can. It might not take too many operating system upgrades before unsupported LR6 breaks entirely.

Not everybody is happy about this state of affairs… as Senior Reviewer Richard Butler pointed out last week:

RIP Lightroom 6: Death by Subscription Model

Articles: Digital Photography Review (dpreview.com)

 
Comments Off on Adobe will release the last update to Lightroom 6 ‘towards the end of the year’

Posted in Uncategorized


Interview: Adobe will ‘absolutely continue investing’ in Lightroom Classic

24 Oct

The release of Lightroom CC and Lightroom Classic CC—and the untimely death of Lightroom as a stand-alone product that is available sans subscription—has inspired some very strong reactions within the photo community. But even those of us who aren’t itching to yell profanities at the folks at Adobe are left with some questions about the future of this software.

Enter Dan Watson of Learning Cameras, who recently sat down with Adobe director of product management Tom Hogarty and Lightroom product manager Sharad Mangalick for a deep dive on this major release, how it would impact current Lightroom users who don’t want to switch to a cloud-based workflow, and, most importantly, what the future looks like for Lightroom Classic CC.

In other words: is Lightroom Classic an afterthought that is going to be phased out in a couple of years?

You can check out the full interview at the top of this post—they cover everything from the reason for the name change, to moving images between the two versions, to potential future features, video integration, custom preset, and a lot more—but since everyone has been wondering, here’s the answer to the question above.

No, Lightroom Classic CC isn’t going anywhere.

In fact, Adobe has two separate teams working to build out Lightroom CC and Lightroom Classic CC, so this isn’t some side-project that will quickly be relegated to the back burner.

Some photographers want to work on a hard disk-based desktop workflow, and Adobe has no interest in deserting those users, at least according to Hogarty. Speaking of Lightroom CC, he said:

We don’t want [the name change] to be perceived as a lack of investment, or a lack of effort with that product. It is very good at what it was designed to do, which is manage files and folders on disk. All of those desktop-local workflows that photographers told us about during our first Lightroom Public Beta back in 2006, we are absolutely going to continue investing in. It’s a different team.

To hear more about Lightroom CC and Lightroom Classic CC from the product managers who actually decide where these products go in the future, click play up top. And if you want to hear our thoughts on the product-line split, read two opposing opinions by senior editors here at DPReview below:

RIP Lightroom 6: Death by subscription model

Hello Lightroom CC: Embracing the future

Articles: Digital Photography Review (dpreview.com)

 
Comments Off on Interview: Adobe will ‘absolutely continue investing’ in Lightroom Classic

Posted in Uncategorized


Macphun responds to Lightroom CC release, teases its own photo manager

20 Oct
Macphun’s own Digital Asset Manager (DAM) is coming to Luminar in 2018… and it’ll be a free upgrade. Photo: Macphun

It’s no surprise that not everyone is exactly thrilled by Adobe’s Lightroom announcement. The end of standalone Lightroom, and the birth of Lightroom in the cloud, has a lot of legacy users looking for a new way to organize their photos into a perpetual library they don’t have to ‘subscribe’ to. There are already tons of options out there, but if you’re a fan of Macphun’s editing applications, take heart: the software company has their own solution in the works.

Earlier today, we heard from Macphun that they’re working on their own Digital Asset Manager (DAM), which will work with both hard drives and cloud storage platforms.

The Luminar photo manager’s single image view. Photo: Macphun

“It’s going to be a perfect tool for organizing and managing images,” says Macphun. “Moreover, users will be able to run it along with LR library to compare both DAMs side by side and choose which fits them better.”

Here’s a quick video ‘preview’ (read: teaser):

The DAM will be added to Luminar in 2018, and the best part of it all is that it will be completely and totally free for current Luminar users.

For now, those are all of the details we have, but if you’re unhappy with the latest update to Lightroom and you’re looking for an alternative DAM and photo editor combo, check out the preview above and keep an eye on Macphun in 2018.

Articles: Digital Photography Review (dpreview.com)

 
Comments Off on Macphun responds to Lightroom CC release, teases its own photo manager

Posted in Uncategorized


Hello Lightroom CC: Embracing the future

19 Oct

Disclaimer: I’m an avid Lightroom user who uses a NAS with 12 TB of local storage. Yet I agree with Adobe’s decisions. Am I crazy? Read on…

It’s an inevitable truth that Adobe, like any other company, can’t please everyone. Today’s news of a new, all-cloud Lightroom CC has definitely ruffled some feathers among loyal users. But it might just be time to embrace the future – consider some important points here:

  • The current version of Lightroom is not going away. It’s just going from CC to Classic CC. Oh, and it got much faster.
  • The standalone version of Lightroom is entering sunset. That doesn’t mean you won’t be able to keep using it for new cameras in the future: you’ll just have to use DNG Converter to first convert your files to DNG format.*
  • To continue to benefit from updates to Lightroom, though, you’ll have to go CC (Classic or not).
  • To benefit from consistent access of your entire library from every device, as well as AI features to help you manage, search, curate and more (a la Google/Apple Photos), you’ll want to go with Lightroom CC.

Whether or not you like the subscription based model, either way you pay for software updates, whether it’s when you buy a new version (upgrading from 5 to 6) or continually via a subscription method. Some would even argue the latter is a better user experience, as you don’t have to worry about ‘versions’.

Who is Lightroom CC for?

Good question. If you’re a staunch NAS user or have a hard drive for each of your shoots, it’s not for you. But there’s a reason that Director of Product Management is calling this new release a bigger deal than even the inception of Lightroom. According to TechCrunch’s conversation with Hogarty, “The new reality of photography [is one] where users tend to take a lot of their photos on their phones – and take a lot more images in general. [Many of them want] a powerful tool that allows them to communicate but doesn’t require them to spend a lot of time to learn.”

In other words, Adobe is trying to find a way to be Google or Apple Photos for the both the masses, and the enthusiasts/pros. Time will tell if it’ll succeed, but it’s an approach that is certainly future-focused.

In fact, we expect the cloud-based version will quickly improve and gain features beyond what Classic CC will offer. The AI features will help you organize, search, curate, and maybe even edit faster by learning your tastes. With storage getting progressively cheaper, internet (upload) speeds increasing, and the decreased sales of PC/laptop and the increased expectation to be able to access your files from anywhere, this is Adobe looking to the future, while still offering the present for the foreseeable future.

This is Adobe looking to the future, while still offering the present for the foreseeable future.

Inevitably, there will be some teething pains, for which Adobe is still offering Classic CC. But we expect that in the not-too-distant future, even pros will appreciate the instant access and AI features that will ease workflows. And I, for one, will be happy to say goodbye to my hard drives (though I won’t be forced to).

Understandably though, many of you have questions…

We’re a studio and need multiple licenses across many computers

That’s what CC business is meant for. You can have 10+ licenses with the same account across all your computers (each license serves up to 2 computers, and you can dynamically switch which two computers whenever you want). And if you’re installing a standalone on more than 2 computers today, you’re breaking the law. Multiple licenses are simply not an issue with CC.

I need multiple libraries, though

Do you really? Back in the days of physically limited hard-drives, many would assign one drive or another to one shoot. You can still work that way with Classic CC.

But in the future, with increased cloud storage at lower prices, and hopefully decreased internet service provider (ISP) bandwidths, that segmentation won’t be necessary.** Everything will live on the cloud, and you can still organize by albums if you wish. Better yet, you’ll have access to increasingly intelligent AI that will allow you to find the photos you’re looking for simply by searching for the content in it (in text form). Segment as you wish, or just search.

In that world – you may not find multiple libraries as useful anymore. It’s already a headache – I’ve gone to work on days where I needed the library on one drive that was, you guessed it, at home.

What if Adobe pulls the plug on Classic CC?

Certainly a valid suspicion. But one you may not have to be so worried about. First, we’ll likely see CC rapidly catch up to Classic CC. That raises the concern if Classic CC is itself at risk of being pulled.

Maybe. But likely not for quite some time. More importantly, if Classic CC were to run off into the sunset, do you really think Adobe would only offer a cloud-based version of Lightroom?

I don’t think so.

Much more likely – and this is just my opinion (and suggestion to Adobe) – would be CC simply offering an option to ‘Disable cloud storage. I don’t need access to my files on any device.’ Done. Problem solved. Remember that CC already has an option to keep all files locally (as well as in the cloud), so retiring Classic CC would almost undoubtedly see CC gain an option to not work in the cloud. Until ISP limits are definitively not an issue and privacy concerns are completely addressed, I can’t see Adobe offering no option to only work with files locally.

You can’t always get what you want… but you might get what you need

This is Adobe modernizing and considering the future. And the current masses of Google and Apple Photos users that are surprised and delighted daily at the auto search and curation functionalities, or the auto-generation of collages, video clips, and sharing of shots of your kid with your immediate family. This all depends on cloud-storage and AI. It’s the future, and whether or not you like it this future has a lot of potential benefits that you loathe the idea of today, but might come to rely on, nigh even need, in the future. Imagine AI learning your editing tastes and doing them for you as a starting point so you have less work to do. It’s not that unreasonable to imagine, and is something even pros would appreciate.

And as long as privacy issues are considered, sharing – both with family or with clients or collaborators – becomes far easier in a cloud-only approach.

Accessing your library on multiple devices has been clunky up until now – with manual selection of images that are synced, and a different user experience of LR based on what device you’re on. Lightroom CC’s promise is a consistent experience across all devices, and the removal of the headache of selecting images you wish access to. Not to mention the issues with editing ‘Smart Previews’.

And you might even find the perks of AI on top of this irresistible one day. But until that day, you still have options that allow you to continue working exactly as you did yesterday.


Footnotes:

* That’s actually probably a good thing. DNG can take a 96MB Nikon D850 NEF and make it into a 49MB Raw with no visual loss in quality (LZW and gamma curve compression done right provide visually lossless compression). DNG Converter is even scriptable if you want to automate the process. And if you need to save the original Raw (say because you want to access Dual Pixel Raw for some Canon files in the future), you can always embed, then later export, the original Raw. The only concern I see here is if future OS versions don’t support the final version of LR.

** ISP bandwidths are a valid concern. My current Comcast bandwidth per month is capped at 1TB/month, with a two months grace period if I run over in one year (I’ll pay on the third month I run over). That will likely still serve most users and even enthusiasts but may be an issue for pros shooting enormous amounts of images monthly. We’ll be following up with Adobe about their views on this issue, but for now we do expect the growth of cloud-based services to force ISPs to offer solutions.

Articles: Digital Photography Review (dpreview.com)

 
Comments Off on Hello Lightroom CC: Embracing the future

Posted in Uncategorized